General Principles for Approaches to the Facial Skeleton - part 3 pdf
Bạn đang xem bản rút gọn của tài liệu. Xem và tải ngay bản đầy đủ của tài liệu tại đây (692.11 KB, 18 trang )
36
ALTERNATIVE TECHNIQUE: EXTENDED LOWER EYELID APPROACH
The extended lower eyelid approach provides access to the entire lateral orbital rim to a point
approximately 10 to 12 mm superior to the frontozygomatic suture. For this added exposure,
however, amore generous incision and wide undermining are necessary. Additionally, the lateral
canthal tendon must be stripped from its insertions and carefully repositioned. In spite of these
concerns, the approach is useful when one requires access to the entire lateral orbit, lateral orbital
rim, orbital floor, and inferior orbital rim.
The incision for the "extended" subciliary approach is exactly as described for the standard
subciliary incision, but the incision must be extended laterally approximately 1 to 1,5 cm in a
natural crease (see Fig. 2-13). If no natural skin crease extends laterally from the lateral palpebral
fissure, the extension can usually be made straight laterally, or slightly inferolaterally.
Supraperiosteal dissection of the entire lateral orbital rim is performed with scissor
dissection to a point above the frontozygomatic suture (Fig. 2-29). The orbicularis oculi
musculature and superficial portion of the lateral canthal tendon are retracted as the dissection
proceeds.
Figure 2-29 Technique used to obtain increased exposure of the lateral orbital rim. The initial incision is
extended laterall
y
1 to 1
,
5 cm
,
and su
p
ra
p
eriosteal dissection alon
g
the lateral orbital rim
p
roceeds
37
With retraction, an incision through the periosteum 2 to 3 mm lateral to the lateral orbital
rim is made from the highest point obtained with supraperiosteal dissection (Fig. 2-30). The
periosteal incision is connected to the one described from the standard approach to the orbital floor
and infraorbital rim (see previous text). Subperiosteal dissection must strip all of the tissue from the
orbital floor and lateral orbital wall. This includes stripping the insertions of the deep portion of the
lateral canthal tendon, Lockwood's suspensory ligament, and the lateral check ligament, from the
orbital (Whitnall's) tubercle of the zygoma. Generous subperiosteal dissection deep into the lateral
orbit allows retraction of these tissues to expose the frontozygomatic suture.
No lateral canthopexy is necessary if careful repositioning and suturing of
periosteum along the lateral orbital rim are performed. This maneuver brings the
superficial portion of the lateral canthal tendon into proper position, giving the
lateral palpebral fissure satisfactory appearance.
REFERENCES
1. Zide BM, Jelks Gw : Surgical Anatomy of the Orbit. New York, Raven Press, 1985
2. Anderson RC: The medial canthal tendon branches out, Arch Ophthalmol 95:2051, 1977
3. Zide BM, McCarthy JG : The medial canthus revised. An anatomical basis for canthopexy, Ann Plast Surg
11:1, 1983
4. Rodriguez RL, Zide BM : Reconstruction of the medial canthus. Clin Plast Surg 15:255, 1988.
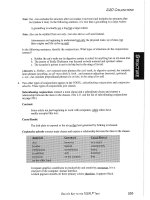
Figure 2 30 Dissection to the level of the frontozygomatic suture. The tissues superficial to the
periosteum are retracted superiorly with a small retractor and an incision through periosteum is made 3 to
4 mm lateral to the lateral orbital rim. Subperiosteal dissection exposes the entire lateral orbital rim.
Dissection into the lateral orbit frees the tissues and allows retraction su
p
eriorl
y
.
38
3
Transconjunctival
Approach
he transconjuntival incision, also called the inferior fornix incision, is a popular approach for
exposure of the orbital floor and infraorbital rim. Two basic transconjuntival approaches, the
preseptal and retroseptal, have been described. These approaches vary in the relationship of the
orbital septum to the path of dissection (Fig. 3-1). The retroseptal approach is more direct than the
preseptal approach and easier to perform. The periorbital fat may be encountered during the
retroseptal approach, but this is of little concern and causes no ill effects. A lateral canthotomy is
frequently used with transconjunctival incisions for improved lateral exposure. The approach that
will be demonstrated here is the retroseptal transconjunctival approach with a lateral canthotomy.
The main advantage of tranconjunctival approaches is that they produce excellent cosmetic
results because the scar is hidden in the conjunctiva. If a canthotomy is performed in conjunction
with the approach, the only visible scar is the lateral extension, which heals with an inconspicuous
scar. Another advantage is that these techniques are rapid, and no skin or muscle dissection is
necessary.
One disadvantage of the transconjunctival approach is that the medial extent of the incision
is limited by the lacrimal drainage system. If access to the medial third of the orbital rim is needed,
cutaneous approaches through the lower eyelid should be considered because they allow extension
of the incision as far medially as necessary.
T
Figure 3 1 Sagital section through orbit showing preseptal and retroseptal placement of
incision.
39
SURGICAL ANATOMY
Lower Eyelid
In addition to an understanding of the anatomy described in Chapter 2 for the lower eyelid
approach, the transconjunctival approach requires understanding of a few additional matters.
Lower Lid Retractors.
During full downward gaze, the lower lid descends approximately 2 mm in
conjunction with movement of the globe itself. The inferior rectus muscle, which rotates the globe
downward, simultaneously uses its fascial extension to retract the lower eyelid. This extension,
which arises from the inferior rectus, contains sympathetic-innervated muscle fibers and is
commonly called the capsulopalpebral fascia (Fig. 3-2). This fascia is incised during the
transconjunctival approach to the orbit, but seems to be inconsequential from a clinical standpoint.
Figure 3 2 Sagital section through orbit and globe. C=palpebral conjunctiva;
IO=inferior oblique muscle; IR=inferior rectus muscle; LLR=lower lid retractors;
OO=orbicularis oculi muscle; OS=orbital septum; P=periosteum/periorbita;
TP=tarsal plate.
40
TECHNIQUE
Step 1. Protection of the Globe
Protection of the cornea during operative procedures around the orbit is beneficial. Because
tarsorrhphy is precluded with this approach, a corneal shield may be placed to protect the globe
(Fig. 3-3).
Figure 3 3 Placement of a corneal protector (shield). Two or three traction sutures placed through the
lower lid assist in the placement of the shield and in subsequent surgery.
41
Step 2. Vasoconstriction
A vasoconstrictor can be injected under the conjunctiva to aid in hemostasis. A minimal amount is
necessary. Additional solution is infiltrated in the area of the lateral canthotomy.
Step 3. Traction Sutures in Lower Eyelid
The lower eyelid is everted with fine forceps and two or three traction sutures are placed through
the eyelid (see Fig. 3-3). These should be placed stright through the eyelid, from palpebral
conjunctiva to skin, approximately 4 to 5 mm below the lid margin to ensure that the tarsal plate is
included in the suture.
Step 4. Lateral Canthotomy and Inferior Cantholysis
If a lateral canthotomy is used, the approach begins with it. One tip of pointed scissors is placed
inside the palpebral fissure, extending laterally to the depth of the underlying lateral orbital rim
(approximately 7 to 10 mm). The scissors are used to cut horizontally through the lateral palpebral
fissure (Fig. 3-4). The structure cut in the horizontal plane are skin, orbicularis muscle, orbital
septum, lateral canthal tendon, and conjunctiva.
Figure 3 4 Initial incision for lateral canthotomy.
42
The traction sutures are used to evert the lower lid. Note that the lower lid is still tethered to
the lateral orbital rim by the inferior limb of the lateral canthal tendon (Fig. 3-5). This is isolated by
retraction and incised with scissors. To perform the contholysis, the scissors will need to be
positioned with a vertical orientation (Fig. 3-6). Once the cantholysis is complete, an immediate
release of the lower lid from the lateral orbital rim is noted (Fig. 3-7). The surgeon will be able to
evert the lower lid more effectivelly.
Figure 3 5 Anatomic dissection shoing result after initial canthopexy illustrated in
Figure 3-3. Note that the inferior limb of the lateral canthal tendon (*) is still
attached to the lower tarsus, preventing mobilization.
43
Figure 3 6 Technique of
inferior cantholysis.
Figure 3 7 Anatomic dissection
shoing rsult after cantholysis
illustrated in Figure 3-5. Note
that the inferior limb of the
lateral canthal tendon (*) has
been severed, allowing the lower
lid great mobility.
44
Step 5. Transconjunctival Incision
Once the lower lid is everted, note the position of the lower tarsal plate through the conjunctiva.
Blunt-tipped pointed scissors are used to dissect through the small incision through the conjunctiva
made during the lateral canthotomy, inferiorly toward the infraorbital rim. The traction sutures are
used to evert the lower eyelid during the dissection. Spread the scissors to clear a pocket just
posterior to the orbital septum, ending just posterior to the orbital rim (Fig. 3-8).
Figure 3 8 Scissors placed into the initial canthopexy incision to dissect in the subconjunctival plane. The
dissection should be just below the tarsal plate and extend no farther medially than the lacrimal punctum.
Note how the traction sutures through the lower lid assist in this dissection.
45
Scissors are used to icise the conjunctiva and lower lid retractors midway between the
inferior margin of the tarsal plate and the inferior conjunctival fornix (Figs. 3-9 and 3-10). The
incision should not extend farther medially than the lacrimal punctum. A traction suture through the
cut edge of the bulbar conjunctiva can be placed to assist in retraction and to hold the corneal shield
in place (Fig. 3-11).
Figure 3 9 Incision of the conjunctiva below the tarsal plate.
46
Figure 3 10 Sagital plane through the orbit and globe demonstrating level and plane of incision. The
con
j
unctiva and lower lid retractors are incised with scissors.
47
Step 6. Periosteal Incision
With retraction of the orbital contents and the lower lid, using suitable retractors, a scalpel is used to
icise the periorbita, taking care to stay lateral to the lacrimal sac (Fig. 3-11). The incision through
the periorbita is just posterior to the orbital rim when the retroseptal approach is used.
Figure 3 11 Incision through periosteum. To facilitate this maneuver, a traction suture is placed through
the cut end of the conjunctiva to retract the tissue and maintain the position of the corneal shield. Small
retractors are placed so that the lower lid is retracted to the level of the anterior surface of the infraorbital
rim. A broad retractor is placed just posterior to the infraorbital rim, confinig the orbital fat. The
intervening tissue along the infraorbital rim is the periosteum. The incision is made through the
periosteum just posterior to the infraorbital rim.
48
Step 7. Subperiosteal Orbital Dissection
Periosteal elevators are used to strip the periosteum over the orbital rim and anterior surface of the
maxilla and zygoma, and orbital floor (Fig. 3-12). A broad malleable retractor should be placed as
soon as feasible to protect the orbit and to confine any herniating periorbital fat.
Figure 3 12 Subperiosteal dissection of the orbital floor. Note the traction suture placed through the
cut end of the conjunctiva, which assists in retracting the conjunctiva and maintains the corneal
shield in place.
49
Step 8. Closure
Periosteal sutures are not absolutely necessary, but if exposure permits, the can be placed, The
conjunctiva is closed with a running 6-0 chromic gut suture. The ends of the suture may be buried.
No attempt is made to reapproximate the lower lid retractors because they are intimately in contact
with the conjunctiva and will be adequately repositioned with closure of that layer. Once the
conjunctiva is closed, an inferior canthopexy is performed (Fig. 3-13).
Figure 3 13 Closure of transconjunctival incision and inferior canthopexy. A running 6-0 gut suture is
initially placed through the conjunctiva (and lower lid retractors). The inferior canthopexy suture is placed
next
,
followed b
y
skin sutures alon
g
the dermal canthotom
y
incision.
50
A 4-0 polyglactin or other long lasting suture is used to reattach the lateral portion of the
inferior tarsal plate to the superior portion of the canthal tendon and surrounding tissues. It is
important that this suture be securely placed in the appropriate location or the lateral canthal area
will never appear normal. When the inferior limb of the canthal tendon is severed during the
approach, only a minute amount of canthal tendon remains attached to the lower tarsus. Therefore
the canthopexy suture can be placed through the lateral border of the tarsus if the tendon attached is
insufficient to hold a suture. It is easier to pass the suture through the lateral border of the lower
tarsus and/or cut portion of the lateral canthal tendon if the skin is dissected slightly from them.
This is very easily performed by taking a #15 scalpel and incising between the tarsus and the skin.
A cleavage plane exists in this location, and the tissue readily separates. The tarsus is grasped with
forceps and a suture is passed through either the cut tendon or the lateral border of the tarsus in such
a fashion that a firm bit of tissue is engaged. Once a goode bite of lower tarsus has been taken with
the suture, the suture needle should be placed through the superior limb of the lateral canthal
tendon.
The bulk of the lateral canthal tendon attaches to the orbital tubercle, 3 to 4 mm
posterior
to
the orbital margin. Following canthotomy, the superior limb of the canthal tendon is still attached to
the orbital tubercle. It is important to place the suture as deep behind the orbital rim as possible to
adapt the lower eyelid to the globe. If the suture is not properly placed, the eyelid will not contact
the globe laterally, giving an unnatural appearance. Therefore, the suture needle should pass very
far posteriorly and superiorly to ensure that it grasps the superior limb of the tendon. An effective
method to pass this suture is to identify the superior limb of the canthal tendon first with small,
toothed forceps placed into the incision. The forceps are passe along the medial side of the lateral
orbital rim for a few mm until the dense fibers of the superior limb are located. While the tendon is
held, the suture needle is passed through the tendon. The surgeon should pull on the two ends of the
suture to enclosure that the suture is firmly attached to ligamentous tissue. The suture is then tied,
with the lower lid drawn into position.
Finally, subcutaneous sutures and 6-0 skin suture are placed along the horizontal lateral
canthotomy.
51
4
Supraorbital Eyebrow
Approach
SURGICAL ANATOMY
A previously popular incision used to gain access to the superolateral orbital rim is the eyebrow
incision. No important neurovascular structures are involved in this approach, and it gives simple
and rapid access to the frontozygomatic area. If the incision is made almost entirely within the
confines of the eyebrow, the scar is usually imperceptible. Occasionally, however, some hair loss
occurs, making the scar perceptible. Unfortunately, in individual who has no eyebrows extending
laterally and inferiorly along the orbital margin, this approach is undesirable. Incisions made along
the lateral orbital rim outside of the eyebrow are very conspicuous in such individuals, and another
type of incision may be indicated. The main disadvantage of the approach is extremely limited
access.
TECHNIQUE
Step 1. Vasoconstriction
A local anesthetic with a vasoconstrictor is injected into the subcutaneous tissues over the lateral
orbital rim to aid in hemostasis.
Step 2. Skin Incision
The eyebrow is not shaved. The skin is straddled over the orbital rim using two fingers and a 2 cm
incision is made. The incision should be parallel to the hair of the eyebrow to avoid cutting hair
shafts. Which might retard growth of the eyebrow hair. The incision may be made to the depth of
the periosteum in one stroke (Fig. 4-1). The skin is freely movable in this plane.
Access can be improved by extending the incision more anteriorly within the confines of
the eyebrow. Extending the incision inferiorly along the orbital rim should be avoided because the
incision crosses the lines of resting skin tension, making the scar very conspicuous. If more inferior
exposure is required, the incision should extend laterally into a crow's foot wrinkle at least 6 mm
above the level of the lateral canthus.
52
Figure 4 1 Placement of incision within confines of eyebrow hair. The incision is made through skin and
subcutaneous tissue to the level of the
p
eriosteum in one stroke.
53
Step 3. Periosteal Incision
After undermining in the supraperiosteal plane, the skin is retracted until it is over the area of
interest. Another incision through the periosteum completes the sharp dissection (Fig. 4-2).
Figure 4 2 Incision through periosteum along lateral orbital rim and subperiosteal dissection into lacrimal
fossa. Because of the concavity just behind the orbital rim in this area, the periosteal elevator is oriented
laterall
y
as dissection
p
roceeds
p
osteriorl
y
.