General Principles for Approaches to the Facial Skeleton - part 4 doc
Bạn đang xem bản rút gọn của tài liệu. Xem và tải ngay bản đầy đủ của tài liệu tại đây (857.88 KB, 18 trang )
54
Step 4. Subperiosteal Dissection of Lateral Orbital Rim and Lateral Orbit
Two sharp periosteal elevators are used to expose the lateral orbital rim on the lateral, medial
(intraorbital), and, if necessary, posterior (temporal) surfaces (Fig. 4-2). Wide undermining of the
skin and periosteum allows the tissues to be retracted inferiorly, providing better access to the lower
portions of the lateral orbital rim. If one stays in the subperiosteal space, there is virtually no chance
of damaging structures.
Step 5. Closure
The incision is closed in two layers, the periosteum and the skin.
55
5
Upper Eyelid Approach
The upper eyelid approach to the superolateral orbital rim is also called upper blepharoplasty, upper
eyelid crease, and supratarsal fold approach. In this approach, a natural skin crease in the upper
eyelid is used to make the incision. The advantage of this approach is the inconspicuous scar it
creates, which makes it one of the best approaches to the region of the superolateral orbital
complex.
SURGICAL ANATOMY
Upper Eyelid
In sagital section, the upper eyelid consists of at least five distinct layers: the skin, the orbicularis
oculi muscle, the orbital septum above or levator palpebrae superioris aponeurosis below, Müller's
muscle/tarsus complex, and the conjunctiva (Fig. 5-1). The skin, orbicularis oculi muscle, and
conjunctiva of the upper eyelid are similar to those of the lower eyelid (see previous text). The
upper eyelid differs from the lower eyelid, however, by the presence of the levator palpebral
superioris aponeurosis and Müller's muscle.
Orbital Septum/Levator Aponeurosis Complex. Deep to the orbicularis oculi muscle lies the orbital
septum/levator aponeurosis complex. Unlike the situation in the lower eyelid, where the orbital
septum inserts into the tarsal plate, in the upper eyelid the orbital septum extends inferiorly and
blends with the levator aponeurosis approximately 10 to 15 mm above the upper eyelid margin. The
levator muscle usually becomes aponeurotic at the equator of the globe in the superior orbit. The
aponeurosis courses anteriorly to insert onto the anterior surface of the lower two thirds of the tarsal
plate. Extensions of the levator aponeurosis also extend anteriorly into the skin of the lower portion
of the upper eyelid. The aponeurotic portion of the levator behind the orbital septum is much wider
than the muscle from which it is derived, and its medial and lateral extensions are known as horns
or cornua. The lateral horn is prominent and deeply indents the anterior portion of the lacrimal
gland to divide it into thin palpebral and thick orbital portions; its lateral extension attaches to the
orbital wall at the orbital (Whitnall's) tubercle. The weaker medial horn of the levator aponeurosis
blends with the orbital septum and the medial check ligament.
56
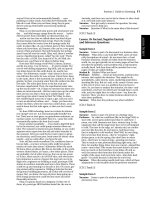
Figure 5 1 Sagittal section through orbit and globe. C=Palpebral conjunctiva; LA=levator palpebral
su
p
erioris a
p
oneurosis
;
MM=Müller's muscle
;
OO=orbicularis oculi muscle
;
OS=orbital se
p
tum
;
57
Müller's Muscle/Tarsus Complex. Deep to the levator aponeurosis is Müller's muscle superiorly
and the tarsus along the lid margin. Müller's muscle is a nonstriated, sympathetically innervated
elevator of the upper eyelid. It takes its origin from the inner surface of the levator aponeurosis and
inserts onto the superior surface of the upper tarsal plate. The tarsal plate of the upper eyelid is a
thin, pliable fibrocartilaginous structure that gives form and support the upper eyelid. Embedded
within the tarsal plate are large sebaceous glands, the tarsal or Meibomian glands. The edge of the
tarsus adjacent to the free border of the lid parallels this, while the deeper (superior) border is
curved so that the tarsus is somewhat semilunar in shape. It is also, of course, curved to conform the
outer surface of the eyeball. The superior tarsus is considerably larger than the inferior one, the
greatest height of the superior being about 10 mm and that of the inferior about 4 to 5 mm (see Figs.
2-5 and 2-6). The tarsal glands sandwiched between the layer of fibrocartilage in the upper eyelid
exit on the lid margin near the lash follicles. The lashes are supported by their roots, attached to
fibrous tissue on the tarsal plate, not in the orbicularis oculi muscle anterior to the tarsal plate.
Laterally, the tarsal plate becomes a fibrous band that adjoins the structural counterpart from the
lower lid, forming the lateral canthal tendon. Medially, the tarsal plate also becomes fibrous and
shelters the superior lacrimal canaliculus behind as it becomes the medial canthal tendon.
TECHNIQUE
Step 1. Protection of Globe
Protection of the cornea during operative procedures around the orbit is an excellent precautionary
measure. If one is operating on the skin side of the eyelids to approach the orbital rim and/or orbital
floor, a temporary tarsorrhaphy or scleral shell may be used after apllication of a bland eye
ointment. These are simply removed at the completion of the operation.
Step 2. Identification of and marking Incision Line
Carefully evaluate the skin creases around the orbit. If tissues are edematous, the skin surrounding
the opposite orbit can be used to obtain an appreciation for the direction of creases. If a lid crease is
not readily detectable, a curvilinear incision along the area of the supratarsal fold that tails off
laterally over the lateral orbital rim works well. The incision should be similar in location and shape
to the superior incision in a blepharoplasty (Fig. 5-2). The incision, however, may be extended
farther laterally as necessary for surgical access. The incision should begin at least 10 mm superior
to the upper lid margin and be 6 mm above the lateral canthus as it extends laterally. The incision
line is marked before infiltration of a vasoconstrictor. The tissues distort following infiltration, and
therefore a perceptible crease may disappear after injection.
Step 3. Vasoconstricton
Local anesthesia with a vasoconstrictor is injected under the eyelid skin and orbicularis oculi
muscle along the incision line. Additional vasoconstrictor solution is injected supraperiosteally in
the area to be surgically exposed.
58
Step 4. Skin Incision
The incision is through both skin and orbicularis oculi muscle (Fig. 5-2). The vaculature of the
muscle maintains the viability of the skin when they are elevated together, and this leads to
excellent healing.
Figure 5 2 Position of incision. The incision may be extended farther laterally if necessary. The initial
incision is made throu
g
h skin and muscle.
59
Step 5. Underminig of Skin-Muscle Flap
A skin-muscle flap is developed superiorly, laterally, and if necessary, medially, using scissor
dissection in a plane deep to the orbicularis oculi muscle (Fig. 5-3). The dissection is carried over
the orbital rim, exposing the periosteum.
Figure 5 3 Sagittal section through orbit and globe showing dissection between orbicularis oculi
muscle and the levator a
p
oneurosis below and orbital se
p
tum above.
60
Step 6. Periosteal Incision
The skin-muscle flap is retracted until the area of interest is exposed. The periosteum is divided 2 to
3 mm posterior to the orbital rim with a scalpel (Fig. 5-4).
Figure 5 4 Incision through periosteum along lateral orbital rim and subperiosteal dissection into lacrimal
fossa. To facilitate retraction of the skin/muscle flap, it can be widely undermined laterally and retracted
with small retractors. Because of the concavity just behind the orbital rim in this area, the periosteal
elevator is oriented laterally as dissection proceeds posteriorly.
61
Step 7. Subperiosteal Dissection of Lateral Orbital Rim and Lateral Orbit
Periosteal elevators are used to perform subperiosteal dissection of the orbit and orbital rims (Fig. 5-
4). One must be cognizant of the lacrimal fossa, a deep concavity in the superolateral orbit. When
reflecting periosteum from the lateral orbital rim into the orbit, one must turn the periosteal elevator
so that it extends almost directly laterally inside the orbital rim. If the periostem is violated, the
lacrimal gland will herniate through the periosteum into the surgical field.
Step 8. Closure
The wound is closed in two layers, periosteum and skin/muscle.
S E C T I O N
III
CORONAL APPROACH
65
6
Coronal Approach
The coronal or bi-temporal incision is a versatile surgical approach to the upper and middle regions
of the facial skeleton, including the zygomatic arch. It provides excellent access to these areas with
minimal complications (1). A major advantage is that most of the surgical scar is hidden within the
hairline. When the incision is extended into the preauricular area, the surgical scar is inconspicuous.
SURGICAL ANATOMY
Layers if the Scalp
The basic mnemonic for the layers of the scalp (Fig. 6-1) is :
S = skin
C = subcutaneous tissue
A = aponeurosis and muscle
L = loose areolar tissue
P = pericranium (periosteum)
The skin and subcutaneous tissue of the scalp are surgically inseparable, unlike these same
structures elsewhere in the body. Many hair follicles and sweat glands are found in the fat just
beneath the dermis. Also, no easy plane of cleavage exists between the fat and the
musculoaponeurotic layer.
The musculoaponeurotic layer, also inappropriately called the galea (which refers to
aponeurosis
only
), consists of the paired frontalis (epicranius) and occipitalis muscle, the auricular
muscles, plus a broad aponeurosis. The aponeurosis is the true galea and has two portions, an
extensive intermediate aponeurosis between the frontalis and occipitalis muscles and a lateral
extension into the temporoparietal region known as the temporoparietal fascia. Farther inferiorly,
the temporoparietal fascia is continuous with the superficial musculoaponeurotic layer of the face
(SMAS). The paired frontalis muscles originate from the galeal aponeurosis and insert into the
dermis at the level of the eyebrows. An extension of the galea separates the two quadrilateral
frontalis muscle in the middle of the forehead.
The galea is a dense, glistening sheet of fibrous tissue, approximately 0,5 mm thick,
stretching between the occipitalis and frontalis muscles. When the galea moves, the skin and fat
move with it because of their close attachment. Laterally, the galea (or temporoparietal fascia as it is
usually called) becomes less dense, but is still readily dissectable. The superficial temporal artery
lies on or in this layer.
The subgaleal fascia is the layer usually referred to as the "loose areolar layer" or the
"subaponeurotic plane". This layer cleaves readily, allowing the skin, subcutaneous tissue
Figure 6 1 Layers of the scalp above the superior temporal line (top insert) and below the superior
temporal line (right inset). Top inset : Skin, subcutaneous tissue, the musculoaponeurotic layer
(galea in this illustration), the subgaleal layer of loose tissue, periosteum (pericranium), and bone
of the skull. Right inset : Skin, subcutaneous tissues, the temporoparietal fascia (note temporal
branch of VII N), the superficial layer of the temporalis fascia, a superficial pad of fat, the deep
layer of temporalis fascia, the temporalis muscle above, the buccal fat pad below, skull.
66
musculoaponeurotic layers to be stripped from the pericranium.It is in this fascial plane that
cleavage occurs during traumatic avulsion of the scalp. The loose tissue of the subgaleal fascia
allows free movement of the skin over the periosteum when the frontalis muscle is contracted.
Anatomic dissection have also revealed that the subgaleal frontalis muscle is contracted. Anatomic
dissections have also revealed that the subgaleal fascia can be mobilized as an independent fascial
layer. For the routine coronal approach to the fascial skeleton, however, this fascial layer is used
only for its ease of cleavage.
Anteriorly, the subgaleal fascia is continuous with the loose areolar layer deep to the
orbicularis oculi muscles. Laterally, it is attached to the frontal process of the zygoma. This
attachment continues along the superior surface of the zygomatic arch, above the external auditory
meatus, and over the mastoid process. It terminates by fusing with the periosteum along the superior
nuchal line.
The pericranium is the periosteum of the skull. The pericranium can be elevated from the
skull, although it is more firmly attached along cranial sutures. When released by subperiosteal
dissection, the pericranium retracts owing to its elasticity.
Layers of the Temporoparietal Region (see Fig. 6-1)
The temporoparietal fascia is the most superficial layer beneath the subcutaneous fat. Frequently
called the superficial temporal fascia or the zygomatic SMAS, this fascia layer is the lateral
extension of the galea and is continuous with the SMAS of the face (Fig. 6-2). Because this fascia is
just beneath the skin, it may go unrecognized after incision. The blood vessels of the scalp, such as
the superficial temporal vessels, run along its outer aspect, adjacent to the subcutaneous fat. The
motor nerves, such as the temporal branch of the facial nerve, run on its deep surface.
Figure 6 2 Anatomic dissection of the temporal region showing temporoparietal fascia (lower forceps) and
subgaleal fascia (upper forceps). Skin and subcutaneous tissues have been removed. Just deep to the subgaleal
fascia is the temporalis fascia.
67
68
The subgaleal fascia in the temporoparietal region is well developed and can be dissected as
a discrete fascial layer, although it is used only as a cleavage plane in the standard coronal approach
(see Fig. 6-2).
The temporalis fascia is the fascia of the temporalis muscle. This thick layer arises from the
superior temporal line, where it fuses with the pericranium (see Fig. 6-1). The temporalis muscle
arises from the deep surface of the temporalis fascia and the whole of the temporal fossa. At the
level of the superior orbital rim, the temporalis fascia splints into the superficial layer attaching to
the lateral border and the deep layer attaching to the medial border of the zygomatic arch. A small
quantity of fat, sometimes called the superficial temporal fat pad, separates the two layers.
Dissection through the medial layer of the temporalis fascia reveals another layer of fat, the
temporal portion of the buccal fat pad, which is continuous with the other portion of the buccal fat
pad of the cheek below the zygomatic arch. This fat pad separates the temporalis muscle from the
zygomatic arch and from the other muscles of mastigation, allowing a smooth gliding motion
during function.
Temporal Branch of Facial Nerve
The temporal branches of the facial nerve are often called the frontal branches when they reach the
supraciliary region. The nerves provide motor innervation to the frontalis, the corrugator, the
procerus, and, occasionally, a portion of the orbicularis oculi muscles. Nerve injury is revealed by
inability to raise the eyebrow or wrinkle the forehead.
The temporal branch or branches of the facial nerve leave the parotid gland immediately
inferior to the zygomatic arch (Fig. 6-3). The general course is from a point 0,5 cm below the tragus
to a point 1,5 cm above the lateral eyebrow (2). It crosses superficial to the zygomatic arch an
average of 2 cm anterior to the anterior concavity of the external auditory canal, but in some cases,
it is as near as 0,8 cm and as far as 3.5 cm anterior to the external auditory canal (Fig. 6-4) (3). As it
crosses the lateral surface of the arch, the temporal branch courses along the undersurface of the
temporoparietal fascia, and subgaleal fascia (see Fig. 6-1). As the nerve courses anterosuperiorly
toward the frontalis muscle, it lies on the undersurface of the temporoparietal fascia (Fig. 6-5), and
Figure 6- 3 Anatomic dissection showing branches of the facial nerve. Note the relationship
of the temporal branch to the zygomatic arch (*). In this specimen, the branch crosses just
anterior to the articular eminence of the temporomandibular joint.
69
Figure 6-4 Branches
of the facial nerve.
The distance from
the anterior
concavity of the
external auditory
canal to the crossing
of the zygomatic
arch (arrow) by the
temporal branch
varies from 8 to 35
mm.
Figure 6- 5 Anatomic dissection showing position of the temporal branch of the
facial nerve in relation to the temporoparietal fascia and zygomatic arch. The
temporoparietal fascia is retracted inferiorly. The temporal branch of the facial
nerve courses on its deep surface (or within the layer of fascia) anteriorly and
superiorly (dashed lines), between the temporoparietal fascia and the fusion of the
su
p
erficial la
y
er of the tem
p
oralis fascia with the
p
eriosteum of the z
yg
omatic arch.
70
enters the frontalis muscle no more inferiorly than 2 cm above the level of the superior orbital rim.
It commonly branches into three or four rami long its course. The anterior branches supply the
superior portion of the orbicularis oculi muscle and the frontalis muscle. The posterior branch
innervates the anterior auricular muscles.
The medial Orbit
The medial orbital wall is composed of several bones: the frontal process of the maxilla, the
lacrimal bone, the lamina papyracea of the ethmoid, and part of the lesser wing of the sphenoid. In
terms of function, the medial orbit can be divided into anterior, middle, and posterior thirds.
Anterior One Third of the Medial Orbital Wall.
The medial orbital rim and the anterior one third
of the medial orbit comprise the frontal process of the maxilla, the maxillary process of the frontal
bone, and the lacrimal bone. The lacrimal fossa for the lacrimal sac lies between the anterior and
posterior lacrimal crest. The anterior crest is a continuation of the frontal process of the maxilla.
The posterior lacrimal crest is an extension of the lacrimal bone. The bone of the lateral nasal wall
contains the nasolacrimal duct, which enters the nasal cavity through the inferior meatus located
beneath the inferior turbinate.
Middle One Third of the Medial Orbital Wall
This part of the medial orbital wall, largely made of
the lamina papyracea of the ethmoid bone, is thin, but is reinforced by the buttress effect of the
ethmoid air cells. The only vascular structures of any significance are the anterior and the posterior
ethmoidal arteries. The foramina for the anterior and posterior ethmoid arteries and nerves are
found in, or just above, the frontoethmoid suture line at the level of the cribriform plate. The
anterior ethmoid foramen is located approximately 24 mm posterior to the anterior lacrimal crest (4)
(Fig. 6-6). The posterior ethmoid foramen or foramina (25% are multiple) are located
approximately 36 mm posterior to the anterior lacrimal crest (4). The optic canal is located
approximately 42 mm posterior to the anterior lacrimal crest. The distance between the posterior
ethmoidal artery and the optic nerve is variable, but it is never less than 3 mm (4).
Figure 6- 6 Medial orbital wall of the skull. Note the position of the
anterior and posterior ethmoidal foramina (arrows). They are not located
at the most superior portion of the orbit but at the level of the cribriform
plate.
71
Posterior One Third of the Medial Orbital Wall.
The posterior part of the orbit is made of thick
bone surrounding the optic foramen and superior orbital fissure.
TECHNIQUE
The coronal approach can be used to expose different areas of the upper and middle face, The layer
of dissection and the amount of exposure depend on the particular surgical procedure for which the
coronal approach is used. In some instances, it may be prudent to perform a subperiosteal elevation
of the flap from the point of incision. The periosteum is freed with a scalpel along the superior
temporal lines as one proceeds anteriorly with the dissection, leaving the temporalis muscle
attached to the skull. In most cases, however, dissection and elevation of the flap are in the easily
cleaved subgaleal plane. For illustrative purposes, the following description is that of complete
exposure of the upper and middle face, including the zygomatic arch, using a subgaleal dissection
for most of the flap elevation.
Step 1. Locating the Incision Line and Preparation
Two factors are considered when designing the line of incision. The first is the hairline of the
patient. In males, expected recession at the widow's peak as well as male pattern baldness should be
contemplated. The incision for balding males might be placed along a line extending from one
preauricular area to the other, several centimeters behind the hairline (Fig. 6-7), or even more
posteriorly. Incision made farther posteriorly need not reduce access to the operative field, because
Figure 6- 7 Incision placement for patients with male pattern hair recession. The incision is stepped
posteriorly just above the attachment of the helix of the ear. The incision can be moved posteriorly as
necessar
y
.
72
the amount of skeletal exposure depends on the inferior extent of the incision, not on the
anteroposterior position. In most females and nonbalding males, the incision may be curved
anteriorly at the vertex, paralleling but remaining 4 to 5 cm within the hairline (Fig. 6-8). In
children, the incision is preferably placed well behind the hairline to allow for migration of the scar
with growth. If a hemicoronal incision is planned, the incision curves forward at the midline, ending
just posterior to the hairline. Curving the hemicoronal incision anteriorly provides the relaxation
necessary for retraction of the flap.
Figure 6- 8 Incision placement for most female patients and males with no signs or family history of
b
aldness. The incision is ke
p
t a
pp
roximatel
y
4 cm behind the hairline.
73
The second factor considered in designing the location of the incision is the amount of
inferior access required for the procedure. When exposure of the zygomatic arch is unnecessary,
extension of the coronal incision inferiorly to the level of the helix may be all that is necessary. The
coronal incision can extended inferiorly, however, to the level of the lobe of the ear as a
preauricular incision. This maneuver allows exposure of the zygomatic arch, temporomandibular
joint (TMJ), and/or infraorbital rims.
Extensive shaving of the head before incision is not medically necessary. In fact, direction
of the hair shafts may be used as a guide for incision bevel to minimize damage to the follicles. The
presence of hair makes closure more difficult, but does not seem to cause an increase in the rate of
infection. A comb can be used to separate the hair along the proposed incision line. Long hair can
be held in clumps with elastics placed either before or after sterile preparation. This measure
minimizes the annoyance of loose hair in the operative field (Fig. 6-9). If shaving the hair is desired,
it need not to be extensive - a small strip, approximately 12 to 15 ,,. Is adequate. The drapes can be
sutured or stapled to the scalp approximately 1,5 cm posterior to the planned incision site, covering
the posterior scalp and confining this hair.
Figure 6- 9 Technique of gathering hair into clumps and securing the clumps with small elastics bands.
Small bundles of the hair are twisted with the fingers and each is grasped in the middle with a hemostat
loaded with an elastic band. The elastic band is rolled off the hemostat onto the hair bundle below the tips
of the hemostat, which can be removed.