General Principles for Approaches to the Facial Skeleton - part 8 ppsx
Bạn đang xem bản rút gọn của tài liệu. Xem và tải ngay bản đầy đủ của tài liệu tại đây (851.87 KB, 18 trang )
131
Step 6. Division of the Pterygomasseteric Sling and Submasseteric Dissection
With retraction of the dissected tissue superiorly and placement of a broad ribbon retractor just
below the inferior border of the mandible to retract the submandibular tissues medially, the inferior
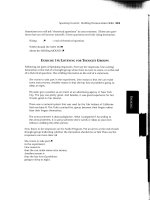
border of the mandible is visualized. The pterygomasseteric sling is sharply incised with a scalpel
along the inferior border, the most avascular portion of the sling (Fig. 9-8). Incisions on the lateral
surface of the mandible into the masseter muscle often produce bothersome hemorrhage. Increased
exposure of the mandible is made possible by sequentially retracting the overlying tissues anteriorly
and posteriorly, permitting more exposure of the inferior border for incision.
Figure 9- 8 Incision through the petygomasseteric sling after retraction of vital structures. the incision
should be at the inferior border of the mandible because it is the most avascular area in which the masseter
and medial pterygoid muscles join.
132
The sharp end of a periosteal elevator is drawn along the length of the periosteal incision to
begin stripping the masseter muscle from the lateral ramus. Care is taken to keep the elevator in
intimate contact with the bone or shredding of the masseter results, causing bleeding and making
retraction of the shredded tissue difficult. The entire lateral surface of the mandibular ramus
(including the coronoid process) and the body can be exposed to the level of the TMJ capsule (Fig.
9-9), being sure to avoid perforating into the oral cavity along the retromolar area if this is not
desired. The only tissue separating the oral cavity from the dissection once the buccinator muscle
has been stripped from the retromolar area is the oral mucosa. Retraction of the masseter muscle is
facilitated by inserting a suitable retractor into the sigmoid notch (channel retractor, sigmoid notch
retractor)(Fig.9-10).
More anterior in the mandibular body, care is needed to avoid damage to the mental
neurovascular bundle, which exits the mental foramen, close to the apices of the bicuspid teeth.
Figure 9- 9 Amount of exposure obtained with the submandibular approach. The channel retractor is
placed into the sigmoid notch, elevating the masseter, parotid, and superficial tissues. Exposure more
anteriorl
y
is accom
p
lished b
y
retraction in that direction.
133
Figure 9- 10 Sigmoid retractor. The curved flange inserts into the
sigmoid notch, retracting the masseter muscle.
134
Step 7. Closure
The masseter and medial pterygoid muscle are sutured together with interrupted resorbable sutures
(Fig. 9-11). It is often difficult to pass the suture needle through the medial pterygoid muscle
because it is thin an the inferior border of the mandible. To facilitate closure, it is possible to strip
the edge of the muscle for easier passage of the needle.
The superficial layer of deep cervical fascia does not require definitive suturing. The
platysma muscle may be closed with a running resorbable suture (Fig. 9-11). Subcutaneous
resorbable sutures are placed, followed by skin sutures.
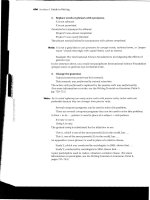
Figure 9- 11 Closure of the pterygomasseteric sling (insert) and platysma. The pterygomasseteric sling is
closed with resorbable interrupted suture. The platysma can be closed with a running resorbable suture,
taking care to avoid damaging the underlying blood vessels and the seventh nerve.
135
EXTENDED SUBMANDIBULAR APPROACHES TO THE INFERIOR BORDER OF THE
MANDIBLE
Should more exposure of the mandible become necessary, the surgeon has several choices. For
increased ipsilateral exposure, the submandibular incision can be extended posteriorly toward the
mastoid region, and anteriorly in an arcing manner toward the submental region (Fig. 9-12). Once
the incision leaves the direction of the resting skin tension lines, however, the resultant scar will be
more obvious.
To eliminate some of the undesirable scarring that may accompany the change in direction
of the incision toward the submental area, one can step the anterior portion of the incision (Fig. 9-
13) (3).
Surgical splitting of the lower lip is another maneuver occasionally used in combination
with incisions in the submandibular area to increase exposure to one side of the mandible. It is
possible to divide the lower lip in several ways. Each method uses the principle of breaking up the
incision line to minimize scar contracture during healing (Figs. 9-14 and 9-15).
For complete bilateral exposure of the mandible, one can use an "apron" flap with or
without lip splitting. Bilateral submandibular incisions are extended into the neck and then are
connected. The incision may course somewhat toward the submental region or be kept low in the
neck, depending on the surgical requirements (Fig. 9-16).
Figure 9- 12 Extension of the
submandibular incision
posteriorly toward the mastoid
region and anteriorly toward
the submental region. Note that
the incision leaves the resting
skin tension lines anteriorly.
136
Figure 9- 14 Extension of the
submandibular incision posteriorly
toward the mastoid region and
anteriorly toward the submental region
in a "stepped" manner. The longer arms
of the step should be kept close or
parallel to the resting skin tension
lines.
Figure 9- 13 One technique
of splitting the lower lip in
the midline. This incision
can be connected to
submandibular incisions on
either side.
137
Figure 9- 15 A technique of splitting
the lip following the mentolabial
crease. This technique is used in
conjunction with a contralateral
submandibular incision to increase
exposure of that side of the
mandible.
Figure 9- 16 Bilateral
submandibular incisions connected
in the midline for complete bilateral
exposure of mandible.
138
10 Retromandibular
Approach
he retromandibular approach exposes the entire ramus from behind the posterior border. It may
therefore be useful for procedures involving the area on or near the condylar neck/head, or
ramus itself. The distance from the skin incision to the area of interest is reduced in comparison to
that of the submandibular approach.
T
SURGICAL ANATOMY
Facial Nerve
The main trunk of the facial nerve emerges from the skull base at the stylomastoid foramen. It lies
medial, deep, and slightly anterior to the middle of the mastoid process at the lower end of the
tympanomastoid fissure. After giving off the posterior auricular and branches to the posterior
digastric and stylomastoid muscles, it passes obliquely inferiorly and laterally into the substance of
the parotid gland. The length of the facial nerve trunk that is visible to the surgeon is about 1,3 cm.
It divides into the temporofacial and cervicofacial divisions at a point inferior to the lowest part of
the bony external auditory meatus (Fig. 10-1). The average distance from the lowest point on the
external bony auditory meatus to the bifurcation of the facial nerve is 2,3 cm (S.D. 0,28 cm) (1).
Posterior to the parotid gland, the nerve trunk is at least 2 cm deep to the surface of the skin. The
two divisions proceeds forward in the substance of the parotid gland and divide into their terminal
branches (Fig. 10-2).
The marginal mandibular branch courses obliquely downward and anteriorly. It frequently
arises from the main trunk well behind the posterior border of the mandible and crosses the
posterior border in the lower one third of the ramus. This positioning leaves a void between the
buccal branches and the marginal mandibular branch or branches through which the mandible can
be approached safely (Fig. 10-3).
Retromandibular Vein
The retromandibular vein (posterior facial vein) is formed in the upper portion of the parotid gland,
deep to the neck of the mandible, by the confluence of the superficial temporal vein and the
maxillary vein. Descending just posterior to the ramus of the mandible through the parotid gland, or
folded into its deep aspect, the vein is lateral to the external carotid artery (see Fig. 10-3). Both
vessels are crossed by the facial nerve. Near the apex of the parotid gland, the retromandibular vein
gives off an anteriorly descending communication that joins the facial vein just below the angle of
the mandible. The retromandibular vein then inclines backward and unites with the posterior
auricular vein to form the external jugular vein.
139
Figure 10- 1 Branching of the extracranial portion of the facial nerve. Only the
main branches are shown. Many smaller branches occur in most individuals (see
Figure 10-2).
140
Figure 10-2. Anatomic dissection reveals an extensive branching pattern of the facial nerve (the parotid gland
was removed)
141
Figure10-3 Anatomic
dissection showing the
relationship of the
retromandibular vein
(RV) , and inferior (+)
and superior divisions
(*) of the VII to the
mandible. Note the
space between the
inferior and superior
divisions of VII, through
which the posterior
border of the mandible
can be approached
TECHNIQUE
The retromandibular approach to the mandible varies with surgeons in the position of the skin
incision – which also dictates the underlying dissection. Some surgeons advocate placing an
incision approximately 2 cm posterior to the ramus. The parotid gland is approached from behind
and sharply dissected from the sternocleidomastoid muscle, allowing retraction of the gland
superiorly and anteriorly to gain access to the ramus. The theoretic advantage to this approach is
that it avoids the branching facial nerve, which is contained within the parotid gland. Unfortunately,
the primary advantage of the retromandibular approach, the direct proximity of the skin incision to
the mandible, is then lost. An alternate approach, presented here, was described by Hinds (2). The
incision is placed at the posterior ramus, just below the earlobe. Dissection to the posterior border of
the mandible is direct, traversing the parotid gland and exposing some branches of the facial nerve.
Step 1. Preparation and Draping
Pertinent landmarks should be exposed throughout the procedure, keeping the corner of the mouth
and lower lip within the surgical field anteriorly and the entire ear posteriorly. These landmarks
orient the surgeon to the course of the facial nerve and allow observation of lip motor function.
142
Step 2. Marking the Incision and Vasoconstriction
The skin is marked before injection of a vasoconstrictor. The incision for the retromandibular
approach begins 0,5 cm below the lobe of the ear and continues inferiorly 3 to 3,5 cm (Fig. 10-4). It
is placed just behind the posterior border of the mandible and may or may not extend below the
level of the mandibular angle, depending on the amount of exposure needed.
Epinephrine (1:200.000) without a local anesthetic is useful, although routine local
anesthetic with a vasoconstrictor may be injected subcutaneously to aid hemostasis at the time of
incision. One should not inject local anesthetics deep to the platysma muscle because of the risk of
rendering the facial nerve branches nonconductive, making electrical testing impossible.
Figure 10-4 Vertical incision just posterior to the mandible through skin and
subcutaneous tissue to the depth of the platysma muscle.
143
Step 3. Skin Incision
The initial incision is carried through skin and subcutaneous tissues to the level of the scant
platysma muscle present in this area (see Fig. 10-4). Undermining the skin with scissor dissection in
all directions allows ease of the retraction and facilitates closure. Hemostasis is then achieved with
electro coagulation of bleeding subdermal vessels.
Step 4. Dissection to the Pterogomasseteric Muscular Sling
After retraction of the skin edges, the scant platysma muscle is sharply incised in the same plane as
the skin incision (Fig. 10-5). At this point, the superficial musculoaponeurotic layer (SMAS) and
parotid capsule are incised and blunt dissection begins within the gland in an anteromedial direction
toward the posterior border of the mandible. A homostat is repeatedly inserted and spread open –
parallel to the anticipated direction of the facial nerve branches (Fig. 10-6). The marginal
mandibular branch of the facial nerve is often, but not always, encountered during this dissection
and may intentionally sought with a nerve stimulator. The cervical branch of the facial nerve may
Figure 10-5 Sharp dissection through the thin platysma muscle, SMAS, and parotid capsule after
undermining with a hemostat.
144
Figure 10-6 Blunt hemostat dissection throungh the parotid gland, spreading in the direction of the fibers of
VII.
Also be encountered, but it is of little consequence as it runs vertically, out of the field. In many
instances, the marginal mandibular branch interferes with exposures and may be retracted
superiorly depending on its location. A useful adjunct in retracting the marginal mandibular branch
involves dissecting it free from surrounding tissues proximally for 1 cm and distally for 1,5 to 2 cm.
This simple maneuver determines whether the nerve is better retracted superiorly or inferiorly.
Dissection then continues until the only tissue remaining on the posterior border of the mandible is
the periosteum of the pterygomasseteric sling (Fig. 10-7). One should also be cognizant of the
retromandibular vein, which runs vertically in the same plane of dissection and is commonly
exposed along its entire retromandibular course. This vein rarely requires ligation unless it has been
inadvertently transected.
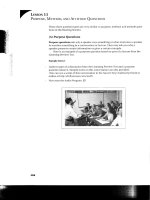
Step 5. Division of the Pterygomasseteric Sling and Submasseteric Dissection
After retraction of the dissected tissues anteriorly (the marginal mandibular branch of the facial
nerve perhaps under the retractor), a broad retractor such as a ribbon is placed behind the posterior
border of the mandible to retract the mandibular tissues medially. The posterior border of the
145
mandible with the overlying pterygomasseteric sling is visualized (Fig. 10-7). The
pterygomasseteric sling is sharply incised with a scalpel (Fig. 10-8). The incision begins as far
superiorly as is reachable and extends as far inferiorly around the gonial angle as possible. An
incision in the posterior portion of the sling bleeds less than an incision placed more laterally
through the belly of the masseter muscle.
Figure 10-7 The surgical window to the posterior mandible is revealed by retraction
of tissues between inferior (*) and posterior divisions of VII. The retractor is on the
neck of the condyle (*). Note the path of the retromandibular vein (RV). The inferior
division of VII can be retracted farther inferiorly to allow access to the gonial angle.
146
Figure 10-8 Incision through the pterygomasseteric sling along the posterior border of the mandible. The
inferior division of VII is being retracted superiorly.
147
The sharp end of a periosteal elevator is draw along the length of the incision to begin stripping the
tissues from the posterior border of the ramus. The masseter is stripped from the lateral surface of
the mandible using periosteal elevators. Clean dissection is facilitated by stripping the muscle from
top to bottom (Fig 10-9). Keeping the elevator in intimate contact with the bone reduces shredding
and bleeding of the masseter. The entire lateral surface of the mandibular ramus to the level of the
temporomandibular joint capsule as well as the coronoid process can be exposed. Retraction of the
masseter muscle is facilitated by inserting a suitable retractor into the sigmoid notch (channel
retractor, sigmoid notch retractor)(Figs. 10-10 to 10-12).
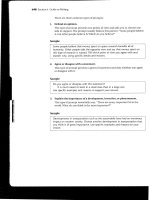
Figure 1 2 10-9 Subperiosteal dissection of the masseter muscle. The periosteal elevator is used to strip the
muscle fibers from the top to the bottom of the ramus.
148