Fundamentals of Clinical Ophthalmology - part 5 ppsx
Bạn đang xem bản rút gọn của tài liệu. Xem và tải ngay bản đầy đủ của tài liệu tại đây (270.95 KB, 20 trang )
The technique is as follows:
• Estimate the required weight of the implant
with test weights stuck to the upper lid skin
close to the lashes. The correct weight
allows complete closure of the upper and
lower lids but no more than a slight ptosis
when the eyes are open. Order the gold
implant of the correct weight.
• Make a skin crease incision, deepen it to
the tarsal plate and dissect inferiorly deep
to the orbicularis muscle on the surface of
the tarsal plate, almost to the lid margin.
• Suture the gold weight to the tarsal plate
close to the lid margin (Figure 7.6a).
• Close the orbicularis muscle of the inferior
wound edge to the tarsal plate with
continuous 6/0 or 7/0 absorbable suture.
This covers the gold weight implant
(Figure 7.6b).
• Close the skin with continuous 6/0 or
7/0 suture. Prescribe prophylactic systemic
antibiotics for five days.
Complications – migration or extrusion may
occur over several months. Resite the implant
if necessary.
Direct brow lift (Figure 7.7)
The principle is to raise the brow by the
excision of an ellipse of skin and frontalis
muscle, fixing it to the periosium of the
forehead.
The technique is as follows:
• Mark the ellipse of tissue to be excised:
mark first the superior border of the brow
across its full width. Now manually lift the
brow to the intended position, note the
position, and allow the brow to fall again.
Mark on the forehead skin the intended
position of the superior border of the brow.
Aim to over-correct slightly. Complete the
marking of the ellipse with curved lines
which join at the medial and lateral ends of
the brow.
• Identify and mark the supraorbital notch
through which the supraorbital nerve and
vessels pass.
PLASTIC and ORBITAL SURGERY
72
Tarsal plate
Orbicularis muscle
Tarsal plate
Orbicularis muscle
sutured to
tarsal plate
Figure 7.6 (a) Gold weight placed between the tarsal plate and orbicularis muscle, (b) orbicularis muscle
sutured to tarsal plate over the gold weight.
Suture closing
deep layers
up to dermis
Good skin apposition
with single subcutaneous suture
Figure 7.7 Deep sutures inserted in direct brow lift.
(a)
(b)
• Incise the ellipse of skin to the level of the
frontalis muscle on the deep surface of the
subcutaneous fat. Excise the ellipse of
tissue. Special care is needed in the region
of the supraorbital nerve and vessels.
• Close the deep layers with 4/0
nonabsorbable or long-acting absorbable
sutures which include a deep bite through
the periostium at the level of the superior
wound edge. Omit the deep bite in the
region of the supraorbital nerve and
vessels. An extra row of more superficial
subcutaneous sutures may be needed.
• Close the skin with a 4/0 monofilament
subcuticular suture. Remove this at one
week.
Complications – altered sensation in the
forehead may occur due to damage to the
supraorbital nerve.This may recover gradually
over several months but it may be permanent.
The position of the brow commonly droops
again slightly in the weeks following surgery.
Corneal exposure
The risk factors for corneal exposure are
well known: lid lag (inadequate eyelid
closure), poor Bell’s phenomenon, insensitive
cornea and dry eye. Apart from release of a
tight inferior rectus muscle to improve Bell’s
phenomenon and reduce upper lid retraction
indirectly, the only surgical option in corneal
exposure is to improve eyelid closure with or
without overall reduction in the palpebral
aperture. The latter may be achieved in either
a vertical direction by lowering the upper lid
and stabilising the lower lid or in a horizontal
direction by approximating the lids at the
inner or outer canthi.
Causes of inadequate eyelid closure
Select the surgical technique to improve
corneal protection after analysing the causes
of the inadequate eyelid closure. These can be
conveniently classified as: orbicularis muscle
functioning normally but normal lid closure
prevented; orbicularis muscle not functioning
normally; or eyelid defects.
Orbicularis muscle functioning normally
Tight skin, tight upper or lower lid
retractors or tight conjunctiva prevent normal
upper or lower lid movement and closure.
Common causes are scarring and proptosis.
Tight skin – is due to scarring (or
occasionally skin loss). Diffuse scarring is
treated with a skin graft; linear scarring is
treated with a z-plasty.
Tight upper or lower lid retractors – may be
due to overcorrected ptosis or scarring. The
retractors are recessed with either excision of
Müller’s muscle (simple recession is usually
ineffective), or recession of the retractors
themselves (levator aponeurosis or lower lid
retractors). This is done through the anterior
(skin) or the posterior (conjunctiva) approach.
A spacer (e.g. sclera) is optional in the upper lid
but is essential in the lower lid. Alternately, in
the upper lid adjustable sutures may be used.
Tight conjunctiva – must be released and a
graft of oral mucosa or hard palate inserted.
Proptosis – if severe (lid surgery alone is
not effective) is treated with decompression of
the medial wall and floor, and the lateral wall
if necessary. A lateral tarsorrhaphy may be
necessary in severe cases.
Orbicularis muscle not functioning
normally
The commonest cause is facial palsy but
patients who blink less than normal may have
an added risk factor e.g. mental deficiency;
comatose patients, especially those on
ventilators; premature babies; etc.
SEVENTH NERVE PALSY and CORNEAL EXPOSURE
73
Lid defects
For example, after tumour excision or
trauma.
Surgical techniques in corneal
protection
Skin grafting and z-plasty are described on
p. 13, hard palate grafts on p. 30 and orbital
decompression on p. 116. Surgical procedures
in facial palsy are described above.
Upper lid retractor recession
The anterior approach is suitable for larger
amounts of retraction; the posterior approach is
better for smaller amounts. Since the posterior
approach also results in a raised skin crease, it
is preferable to restrict its use to bilateral cases.
The principle is that the levator aponeurosis
and Müller’s muscle are separated from the
tarsal plate and recessed. Their position may
be maintained with a spacer or with sutures,
or left free.
The technique for the anterior approach is
as follows (Figure 7.8a and b).
• Make an incision in the upper lid skin
crease at the desired level. Deepen it
through the orbicularis muscle to expose
the full width of the tarsal plate.
• Dissect the skin and orbicularis muscle
upwards for about 10–15mm to expose the
anterior surface of the orbital septum. To
confirm that it is the septum, press on the
lower eyelid and look for the forward
movement of the pre-aponeurotic fat pad
behind it. Incise the septum horizontally to
expose the pre-aponeurotic fat pad. Sweep
the fat superiorly to expose the underlying
levator aponeurosis and muscle.
• Dissect the levator aponeurosis and
Müller’s muscle from the superior border
of the tarsal plate and continue the
dissection between Müller’s muscle and
the conjunctiva as far as the superior
conjunctival fornix. The upper lid
retractors are now free of their inferior
attachments and the tarsal plate can
descend freely. If there is persistent
retraction laterally, cut the lateral horn of
the levator aponeurosis. If it still persists
cut the lateral third of Whitnall’s ligament
and continue to free the tissues laterally
until the retraction is overcome and there is
a smooth curve to the lid. Decide whether
a spacer is to be inserted to maintain the
corrected lid position.
• If a spacer is to be inserted (Figure 7.8a), cut
the spacer to the size required to allow
adequate correction of the lid retraction. It
is usually necessary to overcorrect the
retraction by 2–3mm. Using 6/0 absorbable
sutures, suture the edges of the spacer to the
upper lid retractors (levator aponeurosis
PLASTIC and ORBITAL SURGERY
74
Levator aponeurosis
Donor
sclera
Tarsal plate
Central and medial
Hang-back sutures
Figure 7.8 (a) Spacer of donor sclera placed between tarsal plate and levator aponeurosis, (b) upper lid
retractors recessed and fixed with central and medical hang-back sutures.
(a)
(b)
and Müller’s muscle) superiorly and to the
superior tarsal plate border inferiorly.
• If no spacer is to be used (Figure 7.8b),
estimate how much recession of the upper
lid retractors is required and insert three 6/0
long-acting absorbable or nonabsorbable
hang-back sutures.The lateral suture can be
omitted if there was difficulty achieving
satisfactory correction laterally.
• Close the lid with deep bites to create a
skin crease. Insert a traction suture into the
upper lid and tape it to the cheek until the
first dressing.
The technique for the posterior approach
is as follows (Figure 7.9a and b).
• Place a 4/0 stay suture into the centre of the
tarsal plate close to the lid margin. Evert the
lid over a Desmarres retractor. Make a
short incision through the tarsal plate close
to the superior border. An obvious surgical
space – the post-aponeurotic space – is
entered. Extend the incision medially and
laterally, staying close to the superior
border of the tarsal plate. The levator
aponeurosis is the structure in the depths of
the wound (see Figure 7.4).
• Pull down the lower wound edge which
includes a strip of the superior tarsal plate
and dissect between Müller’s muscle
posteriorly and the levator aponeurosis
anteriorly. Downward traction on Müller’s
muscle will expose a “white line” (Figure
7.9a) which is the edge of the levator
aponeurosis folded on itself. Incise and
turn down the levator aponeurosis for the
full width of the tarsal incision to expose,
but taking care not to damage the
underlying orbicularis muscle (Figure
7.9b). Turn the lid back into its correct
anatomical position and assess the
correction of the retraction. An over-
correction of 2–3mm is usually required. If
it is inadequate, dissect superiorly between
the levator aponeurosis and the orbicularis
muscle for a few millimetres and reassess
the lid position. Repeat this until adequate
correction is achieved.
• Excise the narrow strip of superior tarsal
plate – which is attached to the Müller’s
muscle. The retractors may be left free.
Alternatively, suture them to the orbicularis
muscle to fix their position.
• The conjunctiva does not need to be closed.
Place a traction suture in the upper lid and
tape it to the cheek until the first dressing.
Complications – the lid level, or the curve of
the lid margin, may be incorrect. If there is no
obvious cause, such as swelling, adjust the
level early, within a week or so. If there
SEVENTH NERVE PALSY and CORNEAL EXPOSURE
75
Figure 7.9 (a) Everted upper lid showing the ‘white line’ of the folded aponeurosis, (b) aponeurosis and septum
exposed.
Cut edge of
everted tarsal plate
White line
Muller's muscle
overlying conjunctiva
Everted tarsal
plate
Cut edge of
tarsal plate
Orbicularis
Septum
Levator
aponeurosis
Muller's muscle
overlying conjunctiva
(a)
(b)
• If donor sclera is to be used as the spacer
suture the lower border of the sclera to the
recessed lower lid retractor layer with
6/0 absorbable sutures (Figure 7.10b).
Draw up the conjunctiva to cover the sclera
and suture the superior border of the sclera,
together with the edge of the conjunctiva,
appears to be a probable cause, for example
haematoma or swelling, and you think the lid
may settle, wait then readjust the level, if
necessary, at six months.
An inevitable side effect of an upper lid
retractor recession by the posterior approach is
that the skin crease is raised. Further surgery
may be needed to restore symmetry of the upper
lid skin creases and lid folds – either lowering the
skin crease in the operated upper lid or raising
the skin crease in the opposite upper lid.
Lower lid retractor recession
(Figure 7.10)
The principle here is that the lower lid
retractors are separated from the lower border
of the tarsal plate and recessed. Their position
is maintained with a spacer.
The technique is as follows:
• Place a stay suture through the lower tarsal
plate close to the lid margin. Evert the lid
over a Desmarres retractor.
• Make an incision through the conjunctiva
close to the lower border of the tarsal plate.
Carefully dissect the conjunctiva from the
underlying, white, lower lid retractor layer,
as far as the inferior fornix.
• Make an incision in the lower lid retractor
layer to separate it from the lower border of
the tarsal plate. Carefully dissect this layer
from the underlying orbicularis muscle as
far as the fornix, or until the retractors will
recess inferiorly freely (Figure 7.10a). Cut
an appropriate size of spacer to achieve
slight overcorrection of the retraction –
usually 2–3mm larger than the amount of
retraction.
If hard palate is to be used as the spacer,
rather than donor sclera, the conjunctiva and
lower lid retractor layers can be dissected as
one layer, and recessed together, because no
conjunctival covering is needed. If sclera is to
be used the layers must be dissected separately
because a scleral spacer must be covered with
conjunctiva.
PLASTIC and ORBITAL SURGERY
Palpebral conjunctiva
reflected up
Lower lid retractors
Orbicularis muscle
Lower border
of tarsal plate
Conjuctiva
Sclera sutured to
lower lid retractor
Donor sclera
Conjunctiva
Tarsal plate
Sclera
Figure 7.10 Lower lid conjunctiva reflected and
lower lid retractors detached from tarsal plate, (b)
spacer of donor sclera sutured to the lower lid
retractors, (c) spacer covered with conjunctiva. All
layers sutured to the lower border of the tarsal plate.
76
(b)
(a)
(c)
to the inferior border of the tarsal plate
with a continuous 6/0 absorbable suture
(Figure 7.10c).
• If a hard palate graft is to be used as the
spacer recess the lower lid retractors and
the conjunctiva together as one layer.
Suture the lower edge of the graft to the
recessed tissues and the superior edge to
the inferior border of the tarsal plate using
6/0 absorbable sutures.
• Place three double-armed 4/0 sutures from
the posterior aspect of the lid, through the
graft to the skin and tie over small cotton
wool bolsters.These sutures hold the layers
together and are removed after a week.
Place a traction suture in the lower lid
and tape it to the forehead until the first
dressing.
Complications – mild discomfort is common
in the first few lays. The lid level will drop
1–2mm during the first few weeks.
Acknowledgement
Figures are modified from illustrations in
Tyers AG, Collin JRO. Colour Atlas of
Ophthalmic Plastic Surgery, 2nd edn. Oxford:
Butterworth Heinemann, 2001.
Further reading
Adour KK, Diagnosis and management of facial palsy.
N Engl J Med 1982; 307:348–51.
Armstrong MWJ, Mountain RE, Murray JAM.Treatment of
facial synkinesis and facial asymmetry with botulinum
toxin type A following facial nerve palsy. Clin Otolaryngol
1996; 21:15–20.
Cataland PJ, Bergstein MJ, Biller HF. Comprehensive
management of the eye in facial paralysis. Arch Otolaryngol –
Head Neck Surg 1995;121:81–6.
Crawford GJ, Collin, JRO, Moriarty PAJ. The correction of
paralytic medial ectropion. Br J Ophthalmol 1984 68:639.
Kartush JM et al., Early gold weight implantation for facial
paralysis Otolaryngol Head Neck Surg 1990; 103:1016–23.
Kirkness CM, Adams GG, Dilly PN, Lee JP. Botulinum
toxin A-induced protective ptosis in corneal disease
Ophthalmology 1988; 95:473–80.
Lee OS. Operalion for correction of everted lacrimal puncta.
Am J Ophthalmol 1951; 34:575.
May M. Facial paralysis: differential diagnosis and
indications for surgical therapy. Clin Plast Surg 1979;
6:275–92.
May M. Croxson GR, Klein SR. Bell’s palsy: management of
sequelae using EMG, rehabilitation, botulinum toxin and
surgery. Am J Otol 1989; 10:220–9.
McCoy FJ, Goodman RC. The Crocodile Tear Syndrome.
Plast Reconstr Surg 1979; 63:58–62.
Olver JM, Fells P. Henderson’s relief of eyelid retraction. Eye
1995; 9:467–71.
Seiff SR, Chang J. The staged management of ophthalmic
complications of facial nerve palsy. Ophthal Plast Reconstr
Surg 1990; 9:241–9.
Small RG. Surgery for upper eyelid retraction, three
techniques. Trans Am Ophthalmol Soc 1995; 93:353–69.
Tucker SM, Collin JRO. Repair of upper eyelid retraction: a
comparison between adjustable and non-adjustable
sutures. Br J Ophthalmol 1995; 79:658–60.
Tyers AG, Collin JRO. Colour Atlas of Ophthalmic Plastic
Surgery, 2nd edn. Oxford: Butterworth Heinemann,
2001.
SEVENTH NERVE PALSY and CORNEAL EXPOSURE
77
78
Cosmetic surgery occupies an important part
of the oculoplastic surgeon’s workload.
Increasingly patients request elective surgery
to alter or improve their appearance. Patient
selection, assessment, and surgical techniques
differ in certain ways from non-aesthetic
practice and appreciation of these differences
is central to surgical success. Cosmetic
surgery is both challenging and rewarding.
The challenge posed is to effect the realistic
expectations of the patient; it is with this goal
in mind that the chapter has been written.
Patient evaluation
Patient selection and evaluation is of
paramount importance in all branches of
surgery; cosmetic surgery is no exception.
A detailed history is essential. The patients’
concerns and their expectations of surgery
need to be established at the outset. Relevant
past ophthalmic history should be taken
including previous surgery, dry eyes or contact
lens intolerance and general health problems,
such as bleeding disorders, hypertension or
diabetes. Similarly a past history of psychiatric
or psychological disorders may prove
important. Drug history is important with
particular reference to anti-coagulants and
aspirin, in addition to topical medication, and
social and family history. Relevant factors
such as outstanding or past litigation should
also be noted.
8 Cosmetic surgery
Richard N Downes
Examination
Ask the patient to demonstrate what he/she
is unhappy with and/or would like changed
either in a mirror or with photographs. It is
essential to note whether these concerns are
appropriate and more importantly whether the
expectations with regard to surgery realistic.
Examine the whole face for asymmetry,
scarring etc. before examining specific areas of
the face. It is important to remember that
there are certain differences in facial structure
between the female and male, such as brow
and upper eyelid configuration, as well as
racial variations. Surgery must always be
planned with these variations in mind.
Examine the eyebrow configuration,
position and symmetry. The male brow has a
“T” shape configuration whilst that in the
female is “Y” shaped. Assess the eyebrows for
ptosis and symmetry, remembering that a
patient may initially complain of eyelid ptosis
when in fact the underlying problem is one
of brow ptosis. The correct operation in
this situation is a brow lift rather than
blepharoplasty since the latter will if anything
further accentuate the patient’s problem.
Brow ptosis and excess upper eyelid skin often
co-exist; surgery should correct each of these
components (Figures 8.1 and 8.2).
Examine the eyelids paying particular
attention to the upper lid skin crease, lid
contour and position, levator function,
presence or absence of lagophthalmos and
Bell’s phenomenon. Assess the eyelids for
symmetry, excess lid tissue, i.e. is the problem
one of dermatochalasis or blepharochalasis,
and fat prolapse. Specifically examine for
lower lid eyelid laxity. If this is present to any
significant degree and lower lid blepharoplasty
is contemplated then a lower lid tightening
procedure may well be necessary. The lower
lid skin is assessed for excess tissue, skin
wrinkles and altered skin texture. If the latter
is the case then periocular laser resurfacing
may provide a better result with less risk of
complications than skin excision. Is the
patient suffering from festoons of excess lower
lid skin? If so a variation in the surgical
approach from conventional blepharoplasty
may be needed.
Examine the rest of the face with particular
attention to any scars, wrinkles and skin folds
and generalised skin texture changes. It is
important to document the patient’s skin
colouring and type which is best assessed
using Fitzpatrick’s classification. (Fitzpatrick
described six skin types with types 1 and
2 representing a fair skin complexion,
susceptible to sunburn, types 3 and 4 dark
Mediterranean/Asian type of complexion,
whilst 5 and 6 are deeply pigmented Afro-
Caribbean skin types.)
Detailed ophthalmic examination must be
undertaken. General ophthalmic examination
should include best corrected visual acuity,
assessment of ocular motility and slit lamp
examination, the latter paying particular
attention to the cornea and any evidence of
dry eye syndrome, such as punctate corneal
staining, a reduced tear film or break up time
or an abnormal Schirmer’s tear test.
Visual fields and any further specific tests
are undertaken as necessary. Pre- and post
operative photography is essential.
Patient discussion
The clinical findings and treatment options
are explained in detail with the patient.
Remember to be honest and realistic with
regard to surgical outcomes as well as
treatment limitations and complications.
Ensure as much as you are able that the patient
fully understands what treatment entails, that
his/her expectations are realistic and that he/
she is “psychologically fit” for any procedure.
Always document what has been discussed.
Anaesthetic considerations
The anaesthetic options available for
cosmetic surgery are local anaesthesia with
or without sedation or general anaesthesia.
Remember that surgery is elective and has
been requested by the patient; it is incumbent
upon the surgeon to ensure that any surgical
treatment is as comfortable as possible.
Most procedures can be undertaken
with local anaesthesia but supplementary
intravenous anaesthesia provided by a trained
anaesthetist should be considered in all cases,
especially if the procedure is likely to be
prolonged or the patient is apprehensive or
nervous. Allow adequate time for the
anaesthetic to take effect and ensure skin
marking is undertaken before local infiltration.
General anaesthesia should be considered if a
79
COSMETIC SURGERY
Figure 8.1 A patient with brow ptosis, excess upper
eyelid skin and mid-face ptosis – pre-operatively.
Figure 8.2 Post operative appearance of the same
patient after face and brow lift, blepharoplasty and
periocular laser resurfacing.
number of areas of the face are operated on at
the same time, the surgery is likely to be
prolonged or at the patient’s specific request.
Supplementary local infiltrative anaesthesia is
useful for haemostatic purposes as well as post
operative analgesia even when general
anaesthesia is the anaesthesia of choice.
Brow surgery
Brow ptosis generally results from ageing
changes of the skin and soft tissues but may be
secondary to other causes such as trauma or
seventh nerve palsy. It is essential to examine
for these and treat, as appropriate. Eyebrow
ptosis which is characterised by inferior
displacement of the brow, often below the
orbital rim, is usually greatest laterally. If
unilateral, the position is measured in relation
to the opposite brow. If bilateral then the
extent of ptosis is measured by comparing the
difference in positions of marked fixed points
on the brow medially, centrally and laterally
when the brow is manually elevated to the
desired position.
There are a number of approaches to
surgical correction of brow ptosis.
Internal brow fixation (browpexy)
This is useful for the treatment of mild
unilateral or bilateral, predominantly lateral,
brow ptosis. It is often undertaken in
conjunction with blepharoplasty.
The amount of brow lift is determined as
outlined above. After a standard blepharoplasty
upper lid skin crease incision, dissection is
continued superiorly and laterally in the
submuscular fascia plane over the orbital rim.
Deep to the plane of dissection the brow fat
pad is identified overlying the lateral orbital
rim.This is excised on to periosteum. Between
one and three 4/0 Prolene sutures are then
used to fixate or plicate the brow to the
periosteum in the desired position. The
number of sutures used depends upon the
amount and extent of the brow lift required.
The sutures are positioned 1cm apart and
passed transcutaneously through the lower
brow on to periosteum and horizontally
through periosteum 1–1·5cm above the orbital
rim. The suture is then passed back, again
horizontally, through the brow muscle at the
level of the transcutaneous suture avoiding
superficial placement; the transcutaneous end
of the suture is pulled through the brow tissue
(but not the periosteum) and tied (Figure 8.3).
This manoeuvre is a straightforward way of
accurately positioning the suture with regard
to both the periosteal and brow tissues.
Additional sutures are used as required; if
more than one suture is necessary then tying of
the suture is best delayed until all sutures have
been positioned. The height and curvature
of the brow are assessed and adjusted as
necessary. The skin incision is closed in
the conventional way as for upper lid
blepharoplasty.
PLASTIC and ORBITAL SURGERYPLASTIC and ORBITAL SURGERY
80
Figure 8.3 This demonstrates the horizontal
periosteal suture, and return suture pass, before the
transcutaneous suture is drawn through flap tissues
only and tied.
Transcutaneous
suture
Reflected flap
Periosteum
Orbital rim
Lateral lid
Medial lid
Complications including skin dimpling,
skin erosion and cheese-wiring of the sutures
can occur with superficial placement. Contour
and brow height abnormalities are seen with
inappropriate suture placement. Recurrent
brow ptosis may occur particularly if
absorbable sutures have been used. Reduced
eyelid elevation on upgaze is described which
is an unavoidable limitation of the technique.
Direct brow lift (browplasty)
This procedure is particularly suitable for
male patients with thick bushy eyebrows and
receding hairlines (thereby masking brow
scarring and avoiding coronal scarring),
patients requiring a less extensive procedure
and those with unilateral brow ptosis
secondary to facial nerve palsy.
The extent of tissue excision is marked with
the patient sitting upright aiming to position the
scar within the upper row of brow hairs. The
lower skin incision is made with the scalpel
blade bevelled such that the incision is parallel
to the hair shafts. This obviates transverse
sectioning of the hair follicles thus minimising
brow hair loss. Skin and subcutaneous tissue,
with underlying orbicularis muscle as necessary,
are excised taking care to identify and therefore
avoid damage to the supraorbital neurovascular
bundle. If surgery is undertaken for seventh
nerve palsy then tissue excision down to the
periosteum with deep fixation of brow tissue
to periosteum using interrupted 4/0 Prolene
sutures is necessary. The deeper tissues are
closed with 4/0 or 5/0 Vicryl taking care to evert
the skin edges prior to skin closure using a
subcuticular 5/0 Prolene suture which is
removed after five to seven days. This layered
skin closure approach facilitates a thin flat scar.
Complications including loss of brow hair
and/or an unsightly scar may result from poor
surgical technique. An unacceptable brow
position or contour is usually due to
inappropriate marking. Permanent forehead
parasthesia may occur with supraorbital nerve
damage.
Mid forehead brow lift
This procedure is suitable for males with
deep forehead furrows and excess forehead skin.
The forehead creases lying above the lateral
brow are chosen as incision sites. Ideally the
creases are at different levels over either brow.
Following skin marking, skin, subcutaneous
tissues and hypertrophic muscle are all excised
as appropriate with layered wound closure as
described in a direct brow lift.
The complications mainly relate to scarring
and are minimised by careful surgical technique.
Temporal brow lift
This procedure is useful in patients with
predominantly lateral brow ptosis. The
incision site needs to be within the hairline
and is therefore more appropriate for the
female patient.
A 10–12cm vertical incision above the ear is
made in the hair bearing scalp down to
temporalis fascia. Blunt dissection towards the
eyebrow initially at the plane of temporalis
fascia then becoming more superficial over
the scalp hairline (to minimise damage to
superficial seventh branches) is undertaken.
The flap is undermined onto the brow with
excision of redundant scalp tissue followed by
layered skin closure.
Complications include unacceptable elevation
of the temporal hairline and local seventh
nerve weakness if the facial nerve branches are
damaged.
Coronal brow lift
This procedure is ideally suited to patients
with a combination of brow ptosis, excessive
forehead skin and soft tissue and a low non-
receding hairline.
A bevelled high coronal incision is made
within the hairline following the shape of
the latter far enough posterior to position
the subsequent scar 3–4cm posterior to the
anterior hairline. The incision is angled to run
parallel with the axis of the hair follicles down
81
COSMETIC SURGERY
to periosteum. A forehead scalp flap is elevated
using predominantly blunt dissection in the
loose sub-galeal plane above the periosteum to
within 2cm of the supraorbital rim centrally.
Careful lateral dissection is undertaken
avoiding seventh nerve branch damage.This is
continued along the supraorbital rim with
selective weakening surgery to the corrugator
procerus and frontalis muscles avoiding
damage to the supraorbital neurovascular
bundles. A supraorbital periosteal incision may
further enhance the procedure. Meticulous
haemostasis throughout is essential before
excision of excess flap tissue within the
hairline.The wound is carefully closed in layers
using deep 3/0 Vicryl and surgical staples or
4/0 Prolene, after placement of a supraorbital
drain.The staples or sutures are removed seven
to ten days post operatively.
Post operative haematoma leading to flap
necrosis, localised sensory and motor nerve
damage, hair loss and unacceptable scarring
are all recognised complications, the majority
of which can be avoided with careful surgical
technique.
Endoscopic forehead and brow lift
This small incision technique is an
alternative to the more extensive coronal brow
lift. It facilitates brow elevation with
coincident reduction of forehead creases
whilst minimising scarring.
Two small vertical frontal incisions are
made within the hairline on each side of the
head down to bone followed by localised
subperiosteal dissection, without endoscopic
visualisation, backwards over the occiput,
laterally over the parietal bone and towards the
brow. Transverse temporal incisions, one on
each side within the hairline, are then made
on to deep temporalis fascia. These incisions
are connected to the previously created
subperiosteal dissection pockets, using blunt
scissors, dissecting from the temporal incision
centrally. The frontal and temporal spaces are
joined to create an “optical cavity” thus
facilitating further dissection using endoscopic
control. This proceeds inferolaterally along the
temporal line with subsequent fascial incision,
facilitating adequate release of the lateral brow.
Dissection with release of the periosteum, galea
and depressor muscles is then undertaken.
The brows are now free for fixation which
may be effected in a number of ways. The
most common method is screw fixation
whereby a screw is placed in each lateral
frontal incision site at a predetermined
distance from the anterior margin of the
incision. A skin hook then pulls the
periosteum margin posteriorly; the incision
site is closed with staples or suture so that the
screw is now at the anterior part of the wound
and the forehead lifted and fixated by the
predetermined amount. Additional fascial
fixation may then be undertaken prior to skin
closure using 4/0 Prolene or staples.
Complications are as for those described
with bi-coronal brow lift technique, although
with the exception of nerve damage, they
occur less commonly.
Eyelid surgery
Upper eyelid blepharoplasty
Excess upper eyelid tissue and/or herniated
orbital fat can be excised for functional or
aesthetic reasons. In the former the excess
tissues abut or overhang the lash margin, thus
interfering with visual function. Significant
coincidental brow ptosis must be repaired or it
will be worsened by blepharoplasty.
The incision is marked with the patient
sitting up. A line is drawn along the skin
crease starting above the superior punctum
extending to the lateral canthus and then
sloping upwards 1–1·5cm from the lateral
canthus in a natural skin crease (Figure 8.4).
The skin above this area is pinched vertically
using fine tooth forceps, the lower jaw of
which is positioned on the marked line such
that excess skin is eliminated and the lids
PLASTIC and ORBITAL SURGERY
82
COSMETIC SURGERY
just touch with passive lid closure. The
position of the superior jaw of the forceps is
marked. This method of marking is repeated
nasally and temporally and the marks joined
with similar preparation of the other eyelid
remembering to aim for a symmetric post
operative appearance. If local infiltrative
anaesthesia is used it is injected at this stage.
The skin is incised with a scalpel along the
marked line and excised from the underlying
orbicularis. A strip of orbicularis may be
removed if the muscle is felt to be bulky or
significant skin excision has been undertaken.
Orbital fat excision is undertaken if appropriate.
Excess upper lid fat is usually confined to the
central and medial areas of the eyelid. An
apparent lateral protrusion is invariably a
prolapsed lacrimal gland which should not be
excised but rather repositioned using plicating
sutures between the anterior gland capsule and
supraorbital rim. Fat prolapse is facilitated by
incision through the orbicularis and underlying
fat capsule; gentle pressure on the globe via the
lower lid enhances fat prolapse. It is essential
that the fat is handled carefully and gently to
avoid unnecessary traction on posterior orbital
fat and associated blood vessels. The excess fat
to be removed is clamped and excised with
cautery to the excision stump. Meticulous care
is necessary throughout with particular regard
to haemostasis.
If excess medial canthal skin is present then
this is excised by extension of the medial
incision superiorly with excision of redundant
overlying skin. It is not necessary to close
either orbital septum or the deeper layers of
the eyelid. The skin is sutured with an over
and over 6/0 Prolene centrally reinforced with
individual sutures at the medial and lateral
angulation, which are removed four to five
days post operatively.
To minimise post operative bruising and
facilitate healing, ice-packs are applied for 24
hours post operatively. The vision is checked
hourly for the first four hours post operatively.
The patient is advised to report sudden orbital
pain or loss of vision immediately.
Lower eyelid blepharoplasty
Lower eyelid blepharoplasty is generally
undertaken for cosmetic purposes. Three
different approaches are described.
Anterior approach blepharoplasty
Anterior approach blepharoplasty is indicated
in patients with excess lower eyelid skin and fat
prolapse.
Technique – a subciliary incision is marked
1–2mm below the lash line starting inferior to
the punctum, running across the lid to the
lateral canthus and extending straight laterally
for up to 1cm in the line of a natural skin
crease (Figure 8.5). The skin is incised with a
scalpel and deepened centrally on to the
tarsus. A skin muscle flap is initially fashioned
and elevated off the tarsus and septum, then
extended laterally and medially using scissors.
A 4/0 traction suture through the tarsus
superior to the incision site allows controlled
eyelid traction upwards which facilitates flap
dissection. Dissection is continued inferiorly
in the suborbicularis plane to the orbital rim,
thereby exposing orbital septum throughout
the lower eyelid. Orbital fat lies deep to the
orbital septum and is prolapsed when the
83
Skin marking
Brow
Eyelid
Upper
punctum
Lateral Medial
Figure 8.4 Skin marking for upper eyelid
blepharoplasty.
septum is opened across the horizontal length
of the eyelid. The fat is localised in three fat
pads temporally, centrally and nasally and
careful graded excision of the fat starting
temporally and proceeding medially is
undertaken with meticulous haemostasis,
again avoiding unnecessary posterior traction.
The skin muscle flap is swept superiorly on
maximal stretch (with the patient looking up
and the mouth open), excess flap tissue is
marked and redundant skin and muscle then
excised. The wound is closed with a single
over and over 6/0 Prolene suture along the lid
incision and interrupted 6/0 sutures laterally.
In cases with co-existent lid laxity a
horizontal lid shortening procedure, in the
form of either a lateral full thickness pentagon
lid excision or lateral canthal sling, is
undertaken before skin and muscle excision.
Similarly if co-existent mid-face ptosis is
present then a mid-facelift may be necessary.
Surgery to correct this should immediately
precede any lid shortening procedure if this
surgical combination is undertaken. The skin
muscle flap is retracted downwards to expose
the inferior orbital rim. Various techniques
have been described to undermine and elevate
the cheek, or mid-face, tissues. In the SOOF
(suborbital orbicularis oculi fat) lift a cheek
flap is raised at the periosteal level;
alternatively a subperiosteal flap may be
fashioned. With either approach, dissection is
continued inferiorly to the level where the
cheek bone ends and nasally towards the
nasolabial fold, taking care to avoid infraorbital
nerve damage.With the subperiosteal approach
the periosteum is incised 2–3mm below the
orbital rim with inferior dissection and periosteal
release such that the cheek flap is freely elevated.
The latter is attached superiorly to the
periosteum of the lateral orbital wall and orbital
rim with interrupted 4/0 Prolene such that the
ptotic cheek is lifted upwards and laterally.
Excess skin and muscle are excised and the skin
closed as for conventional blepharoplasty.
Ice packs are applied in the immediate post
operative period with regular assessment of
the vision as with upper lid blepharoplasty.
Transconjunctival blepharoplasty
Transconjunctival blepharoplasty is
indicated in patients with fat prolapse but
without excess skin.
The lower eyelid is infiltrated with local
anaesthesia subcutaneously and trans-
conjunctivally down to the orbital rim. A
marginal traction suture is placed and the lid
everted over a Desmarres retractor. The
conjunctiva is incised 4mm below the inferior
tarsal margin, extending the width of the
eyelid, using scissors, cutting cautery or laser.
The incision is carried through the deeper
tissues until fat is exposed.The incision is held
open with outward and downward traction
which facilitates fat exposure. The fat capsule
is incised with judicious fat excision from the
three fat pads as appropriate and meticulous
haemostasis, again avoiding unnecessary
posterior fat traction. The conjunctival
incision can either be left unsutured or closed
with interrupted 6/0 absorbable sutures.
Post operatively ice packs are applied with
regular visual assessment as for conventional
blepharoplasty.
External direct lower eyelid
blepharoplasty
This procedure is reserved for excision of
significant lower eyelid tissue in the form of
festoons.
PLASTIC and ORBITAL SURGERY
84
Medial
Lateral
Skin marking
Lower punctum
Figure 8.5 Skin marking for lower eyelid
blepharoplasty.
COSMETIC SURGERY
The skin and excess underlying tissues to be
excised are outlined taking care to position the
excision symmetrically and, if possible, in a
co-existent lid crease in the area overlying the
inferior orbital rim. The skin and deeper
tissues are incised followed by excision of
all excess tissue using scissors. Haemostasis
is secured. Layered closure with careful
skin margin approximation using a 6/0
subcuticular Prolene suture is undertaken
which is removed five to seven days post
operatively.
Blepharoplasty complications
Blindness is described as occurring in
between 1:10 000 and 1 : 40 000 cases. It only
occurs when the orbital compartment is
entered with fat excision and is thought to be
related to traction on the posterior orbital
vessels with subsequent orbital haemorrhage.
Diplopia is an uncommon complication of
blepharoplasty usually related to damage to
the inferior oblique muscle.
Ptosis may occur transiently or
permanently. It is caused by either direct
damage or significant stretching of the levator
muscle.
Inadequate or excessive skin excision may
result in a number of complications. If excess
upper lid skin is excised lagophthalmos
results which may or may not be a
permanent feature. More marked excess
upper lid skin excision may result in frank lid
margin rotation and ectropion. Excess skin
removal from the lower lid can result in
rounding of the lateral canthal region with
enhancement of scleral show and frank lid
margin ectropion or lid retraction. Excess
skin removal is the commonest significant
complication following blepharoplasty. The
abnormal lid position may respond to
vigorous regular lid massage but often
recourse to revisionary lid surgery is
necessary. Inadequate skin removal requires
further skin excision.
Fat excision may be inadequate or
excessive. Significant excess fat excision will
result in a hollowed out appearance
particularly apparent in the lower lid. Surgery
in the form of suborbicularis oculi fat
transposition may be necessary to rectify this
asymmetry. If fat excision has been limited
then further fat removal may be necessary.
Lid asymmetry as a consequence of
improperly positioned incisions is described.
The most noticeable asymmetry relates to
asymmetric skin crease positions which if
unacceptable will require revisionary surgery.
Lasers in oculoplastic surgery
The use of lasers in oculoplastic surgery has
become increasingly widespread of late. Two
lasers are at present pre-eminent in the field;
the carbon dioxide and more recently erbium
YAG lasers. The basic principle for all these
lasers is that of delivering high laser energy in
short pulses or bursts, thus maximising tissue
ablation whilst minimising adjacent thermal
damage and hence scarring.The current lasers
produce these short burst effects either by the
provision of a super or ultra pulse pattern such
as the Coherent CO
2
laser or Erbium YAG or
a continuous wave laser which is interrupted
by a rapidly moving mechanical system such
as the Sharplan laser.
A number of carbon dioxide laser systems
are currently available for oculoplastic
surgery. Carbon dioxide lasers have both
tissue ablative and haemostatic properties
which make them ideally suited for both
incisional and resurfacing surgery.
The Erbium YAG laser delivers increased
tissue ablation with co-incidental reduction of
adjacent thermal damage when compared to
the carbon dioxide laser. This results in
reduced tissue damage, erythema and post
operative inflammation. The major
disadvantages of the erbium YAG are lack of
coagulation, so that it is not suitable for
incisional surgery, and lack of contractile
85
effect when used for resurfacing which may be
important in the maintenance of medium to
long term effects.
Skin resurfacing
Laser skin resurfacing is used to smooth facial
skin and reduce wrinkles or rhytides. Dynamic
rhytides resulting from underlying muscle
activity, i.e. glabellar folds do not respond as
well as static rhytides, i.e. periocular folds
caused by ageing and ultraviolet exposure. The
technique of laser skin resurfacing results in
vaporisation of the epidermis and upper dermal
layers with subsequent repair resulting in an
improved cosmetic appearance. This relatively
precise skin ablation with reduced thermal
damage results in a more reproducible and
superior result than alternative techniques such
as dermabrasion or chemical peels.
Patients for laser resurfacing should be
carefully selected and understand the aims and
limitations of laser treatment.A thorough history
with particular emphasis upon the use of topical
skin preparations, allergies and sensitivities and
previous herpetic infections is taken. Fair
skinned patients (Fitzpatrick grades 1 and 2) are
ideal for resurfacing whereas darker skinned
individuals (Fitzpatrick grades 3 and 4) run a
risk of post laser hyperpigmentation and should
be approached cautiously. Laser resurfacing is
contra-indicated in patients with deeply
pigmented skin (Fitzpatrick grades 5 and 6).
Pre-operative photographs with detailed
diagrams and sketches are mandatory.
Technique of carbon dioxide laser
resurfacing
Pre-operative skin preparation may be
necessary in certain patients. Prophylactic
anti-virals, i.e. Zovirax and oral antibiotics
are frequently used and started 24 hours
pre-operatively. If limited areas are being
resurfaced, i.e. periocular or perioral regions
only, then local anaesthesia, either infiltrative
or regional nerve blocks, with or without
intravenous sedation is used. Full face
resurfacing is best undertaken using local
anaesthesia and sedation or general
anaesthesia.
Laser safety precautions must always be
observed which include protection of areas
not being treated with wet swabs and/or
protective eye shields. Anaesthetic equipment
if used, must be protected using silver foil
around the exposed endotracheal tube and
connection and all theatre staff, including the
surgeon, must wear protective goggles.
Techniques for resurfacing vary greatly
from one surgeon to the next but all adhere to
certain basic tenets. The skin thickness varies
considerably over different parts of the face
with the periocular skin being the thinnest and
skin over the cheek and chin the thickest. In
order to achieve a similar improvement in
each area more laser treatment or resculpting
is necessary with the thickest tissues.
The skin is thoroughly cleansed with saline
and dried. The area of treatment is outlined
and any deep wrinkles individually marked.
The laser pattern and power are set, the laser
tested and treatment commenced. The initial
treatment centres on the individual wrinkles or
scars outlined, with treatment to the shoulders
or elevated areas adjacent to the deeper
wrinkle or scar. The ablated debris is removed
with saline soaked gauze swabs. Confluent
laser passes are then made over the entire
region or regions to be treated, taking care to
avoid significant overlap of the laser pattern.
The number of passes with the laser is
dependent on the region of skin treated and
the laser characteristics. Usually 1–2 passes are
all that is required when treating periocular
skin whilst 2–4 passes may be necessary in
areas of thicker skin such as the forehead,
cheeks or chin. All desiccated tissue must be
carefully wiped away with saline swabs after
each pass (Figure 8.6). Assessment of the
depth of treatment is facilitated by recognised
colour changes occurring in the tissues.
PLASTIC and ORBITAL SURGERY
86
COSMETIC SURGERY
Complete epithelial removal results in a
pinkish appearance; treatment to the papillary
dermal layer correlates with a yellow/orange
coloration whilst deeper reticular dermal
ablation is characterised by a chamois leather
or white appearance. Treatment should stop at
this latter stage as deeper laser treatment may
well lead to hypertrophic scarring.
It is important to avoid a frank demarcation
line between areas of treated and untreated
facial skin. This is facilitated by feathering or
blending of the adjacent areas whereby laser
treatment using reduced power and wider
spacing is undertaken.
Post operatively it is essential to keep the
treated area moist or covered at all times until
re-epithelialisation has occurred which is
usually complete within five to seven days.
Many techniques have been described ranging
from regular applications of aqueous cream
and cleansing through to custom designed
dressings.
After re-epithelialisation it is again
important to keep the treated area moist. Most
patients elect to use a combined moisturising
concealer preparation until the erythematous
phase of the treatment (lasting anything up to
three months from the time of laser treatment)
has settled. It is essential that the patient treats
the newly resurfaced skin very carefully, rather
like a baby’s skin. Direct sunlight must be
avoided and a sunblock preparation always
used when outdoors, ideally long term.
Most post operative problems, assuming
that laser treatment has been appropriately
undertaken, result from poor skin care.
Redness or erythema is to be expected and
may take up to three months or more to settle.
Hyper- or rarely hypo-pigmentation can
occasionally occur. The former can be
managed with topical skin bleaching agents or
steroid preparations but there is relatively little
that can be offered for hypo-pigmentation.
Incisional surgery
The carbon dioxide laser can be used for
tissue cutting as in blepharoplasty. The
improved haemostasis allows for better
visualisation during surgery, more rapid surgery
and less post operative bruising and discomfort.
Incisional laser surgery is particularly useful in
transconjunctival blepharoplasties. Fat excision
can be more carefully controlled with regard to
both the amount of tissue excised and
haemostasis at excision, without requirement
for clamping of the fat to be excised. The
possibility of undue posterior traction on the fat
is therefore virtually abolished; the latter may
well prove to be an important advantage of
laser over conventional techniques. When
transconjunctival blepharoplasty is combined
with periocular resurfacing, very acceptable
results can be achieved in patients with general
wrinkling and skin laxity, and associated fat
prolapse, without the complications normally
associated with conventional subciliary
blepharoplasty and skin excision.
Erbium YAG laser
The principles of resurfacing with the erbium
YAG laser are broadly similar to those outlined
using the carbon dioxide laser.The skin change
colours characteristic of carbon dioxide laser
resurfacing, are not seen with the erbium YAG.
Break through punctate bleeding occurs as a
consequence of lack of coagulation which,
87
Figure 8.6 Periocular laser resurfacing with CO
2
laser.
although useful in assessing the depth of
treatment, is a limiting factor when undertaking
deeper resurfacing. The recovery, in particular
the duration of post operative erythema,
with erbium YAG resurfacing is significantly
reduced compared to the carbon dioxide laser
and this appears to be its major advantage.
At the present time the carbon dioxide and
erbium YAG lasers should be considered as
complementary. As such the oculoplastic
surgeon should be familiar with and have
access to both systems.
PLASTIC and ORBITAL SURGERY
88
Further reading
Alster TS, Apfelberg DB. Cosmetic Laser Surgery (1st ed.)
New York:Wiley-Liss Inc, 1996.
Collin JRO. A Manual of Systematic Eyelid Surgery (2nd ed.)
Oxford: Butterworth-Heinemann, 1989.
De Mere M, Wood T, Austin W. Eye Complications with
Blepharoplasty or Other Eyelid Surgery. A National
Survey. Plast Reconstr Surg 1974; 53:634–7.
McCord Jr CD, Tanenbaum M, Nunery WR. Oculoplastic
Surgery (3rd ed.) New York: Raven Press, 1995.
Putterman AM. Cosmetic Oculoplastic Surgery (3rd ed.)
Philadelphia: WB Saunders Company, 1999.
89
The absence or loss of an eye is of enormous
psychological significance to any patient.
Socket surgery is directed at enabling the
patient to wear a comfortable cosmetic ocular
prosthesis which is stable and free from
discharge. Removal of the eye and or orbital
tissues may be necessary as a result of trauma,
infection, tumour, the consequence of a
painful eye or to remove a cosmetically
unattractive globe. Depending upon the
nature of the pathology the globe should be
removed by evisceration, enucleation or
exenteration.
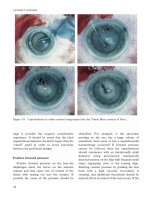
Evisceration
The procedure involves the removal of
ocular contents, retaining the scleral coat
(Figure 9.1). There is no involvement of the
meninges or optic nerves so little risk of
backward spread of infection.The operation is
less traumatic than enucleation and normally
results in minimal bleeding; this may be of
particular significance in the presence of
orbital inflammation. The ocular remnant is
fully mobile and there is less late orbital fat
atrophy.
A contra-indication to evisceration is the
theoretical risk of subsequent sympathetic
uveitis although if uveal tissue is carefully
removed the incidence of this condition
appears extremely low. This surgery should
not be performed when there is a risk of local
tumour recurrence or when an intraocular
9 Socket surgery
Carole A Jones
tumour cannot be excluded. Furthermore,
histological assessment of the specimens
obtained at the time of evisceration are
difficult to interpret.
Evisceration can be performed with or
without keratectomy. The ocular contents are
evacuated with an evisceration spoon
introduced into the supra-choroidal space.
Haemostasis is achieved by packing, and all
remnants of uveal tissue should be carefully
removed. The scleral cavity can be swabbed
with dressed orange sticks moistened with
absolute alcohol.
In the presence of suppuration the scleral
envelope may be packed open and allowed to
heal by secondary intention. In primary
closure, if keratectomy has been performed,
two triangles of sclera are excised at 9 and 3
o’clock allowing secure closure over an
implant. The evisceration is completed by a
three layered closure, sclera, Tenon’s capsule
and finally conjunctiva, using 5/0 Vicryl
(Figure 9.1).
Enucleation
This procedure (Figure 9.2) involves the
removal of the entire globe by severing the
attachments of the extra-ocular muscles and
optic nerves.This is the technique of choice in
the presence of an intra-ocular tumour as
histological specimens are easily obtained.
There is no associated risk of sympathetic
ophthalmitis. The surgery requires care to
PLASTIC and ORBITAL SURGERY
90
prevent socket contracture or late post
operative fat atrophy.
A 360° peritomy is made in the conjunctiva
and Tenon’s capsule is carefully separated
from the globe. The four rectus muscles are
identified and tagged with double ended 5/0
Vicryl sutures. The two oblique muscles are
cut or the inferior oblique may be tagged and
sutured to the inferior border of the lateral
rectus, 10mm posterior to its free edge. The
optic nerve is sectioned with scissors or a
snare. The globe is removed and the socket
packed, using gauze soaked in iced saline to
achieve haemostasis.
An ocular implant is generally inserted,
either within Tenon’s capsule or posterior to
the posterior part of Tenon’s capsule. Deep
(a)
(b)
(c)
Figure 9.1 Evisceration. (a) 360° peritomy, anterior
chamber opened, cornea removed, two triangles of
sclera excised at 3 and 9 o’clock; (b) evisceration
spoon used to remove contents of globe, scleral shell
cleaned; (c) scleral shell closed with 5/0 Vicryl.
(a)
(b)
(c)
(d)
(e)
Figure 9.2 Enucleation. (a) 360° peritomy; (b) four
rectus muscles disinserted, oblique muscles cut, optic
nerve divided, globe removed; (c) wrapped spherical
orbital implant inserted, rectus muscles saturated to
implant; (d) tenons capsule closed, muscle sutures
brought out through conjunctiva; (e) conjunctiva
closed.
91
SOCKET SURGERY
placement of the orbital implant in this site
posterior to Tenon’s capsule allows a larger
volume to be implanted and reduces the
incidence of implant migration or extrusion.
The orbital implant may be of inert material, for
example silicone ball or one that allows
fibrovascular ingrowth, for example Medpor
and Hydroxyapatite. Implants are wrapped in a
synthetic mesh or donor sclera.The four rectus
muscles are attached to the implant. The
superior rectus should not be placed too
anteriorly to minimise the incidence of upper lid
retraction or ptosis.When using Hydoxyapatite,
holes should be made in the wrap to allow the
attachment of the extra ocular muscles and
to facilitate fibro-vascular ingrowth. Muscle
sutures are then placed through the conjunctival
fornices to improve prosthesis mobility.Tenon’s
capsule and conjunctiva are closed carefully in
two layers. A conformer, with a large central
drainage hole should be inserted post
operatively and left in place until a prosthesis is
fitted at approximately six weeks.
Enucleation is not appropriate in the
presence of endophthalmitis nor where a
malignant tumour may have spread to extra-
ocular structures. In this case an exenteration
should be performed. An orbital implant is
normally inserted at the time of primary
enucleation but may be avoided in the
presence of intraocular malignancy or in a
very inflamed orbit where the incidence of
post operative extrusion is high.
Exenteration
This involves the total excision of the orbital
contents, with or without the removal of the
eyelids. Indications for this surgery are
advanced malignancy, either of the eyelid, the
globe or surrounding adnexal structures. The
extent of the procedure depends upon the size
and extent of the tumour. If the tumour of the
globe does not involve the eyelid skin the lids
may be retained but they must be sacrificed in
the presence of an extensive skin tumour.
An elliptical incision is made through the
skin and deep tissues to the bone of the orbital
rim. The periosteum is separated from the
bony orbit; the trochlea, medial and lateral
canthal tendons are detached. The apical
structures, including the optic nerve, are cut
and the orbital contents are removed within
the periosteum. The orbit may be allowed to
heal by granulation or a split skin graft used to
line the bony cavity.
If the eyelid skin is to be preserved the
periorbital skin is undermined, the lid margins
are sacrificed and the resultant skin edges
sutured together. The dead space behind the
skin is gradually obliterated as the skin
adheres to the bony orbit. Any attempt to
replace the volume within the orbit using a
thick skin flap or temporalis muscle may make
the detection of local recurrences more
difficult.
Orbital implants
When the globe is removed its volume
cannot be replaced solely with an ocular
prosthesis. By replacing orbital volume in the
form of a orbital implant a light artificial eye
can be fitted.
Box 9.1 Calculation of implant
volume
Globe volume ϭ 8ml
Implant volume ϭ globe volume –
prosthesis volume
ϭ 8ml – 2ml
Ideal implant volume ϭ 6ml
Many shapes have been suggested but a
sphere is routinely used as it has the
maximum volume for a given surface area. An
18mm sphere has a volume of 3ml and when
wrapped this increases to 4ml. Studies have