ASP.NET at Work: Building 10 Enterprise Projects PHẦN 7 potx
Bạn đang xem bản rút gọn của tài liệu. Xem và tải ngay bản đầy đủ của tài liệu tại đây (562.28 KB, 64 trang )
Creating _SmallCart.ascx
The _SmallCart user control displays the product name, quantity, and total price of the
products that the user has decided to purchase. In the _ProductsList user control that
you created earlier, I highlighted the code in bold that passes the ProductID and the
AddToCart action in the query string. The code-behind for the _SmallCart user control
checks the query string, and if the AddToCart action exists, it calls a method to update
the ShoppingCart table in the database, return a new SQLDataReader object contain-
ing this user’s cart data, and binds that data to the DataList control. This user control
uses the FooterTemplate item to display a Check Out image. Once the online store is
completed, the _SmallCart user control is displayed on each page the user views up
until the point of checking out. When the user decides he or she is done shopping, he
or she can click the Check Out image, which passes the CheckOut action in the query
string and redirects to the CheckOut.aspx page. Listing 6.26 is the complete HTML
code for the _SmallCart user control.
<%@ Control Language=”vb” AutoEventWireup=”false” _
Codebehind=”_SmallCart.ascx.vb” _
Inherits=”project06.C_SmallCart” _
TargetSchema=” /><asp:DataList id=”DataList1”
runat=”server”
BackColor=”LemonChiffon”
BorderColor=”DarkGreen”
BorderWidth=”1px”
BorderStyle=”Groove”>
<HeaderTemplate>
<IMG src=”images/carttop.gif”>
</HeaderTemplate>
<FooterTemplate>
<a href=”checkout.aspx?Action=CheckOut”>
<IMG src=”images/cartbottom.gif”>
</a>
</FooterTemplate>
<ItemTemplate>
<TABLE border=”0”>
<TR>
<TD class=”SmallCart” width=”5”>
<%# DataBinder.Eval(Container.DataItem, “Quantity”)%>
</TD>
<TD class=”SmallCart” align=”left” width=”120”>
<%# DataBinder.Eval(Container.DataItem, “ProductName”)%>
</TD>
<TD class=”SmallCart” align=”right” width=”45”>
<%# DataBinder.Eval(Container.DataItem, “TotalDue”, “{0:c}”) %>
</TD>
</TR>
</TABLE>
</ItemTemplate>
</asp:DataList>
Listing 6.26 Code for _SmallCart.ascx user control
Building the Online Store Application 367
The code that updates the ShoppingCart table in the database is encapsulated in the
Page_Load event. When a user clicks an item in the _ProductsList user control, three
items are passed in the query string: Action, CategoryID, and ProductID. When a user
clicks the Add To Cart image, the query string will look something like this:
ProductList.aspx?productID=55&CategoryID=6&selection=3&Action=AddToCart
The Page_Load event reads the Action parameter in the query string, and if the
Action parameter is AddToCart, then the UpdateCartQuantity method is called from a
new instance of the ShoppingCart class. Once the item is added to the cart, the GetCart
method is called, and the DataSource property of the DataList control is set to the SQL-
DataReader object that the method returns. Then the DataBind method is called, and
the shopping cart display is updated. Listing 6.27 is the code-behind for the _SmallCart
user control.
Private Sub Page_Load(ByVal sender As System.Object, _
ByVal e As System.EventArgs) Handles MyBase.Load
‘ Declare a new instance of the ShoppingCart class
Dim s As Proj06Web.ShoppingCart = _
New Proj06Web.ShoppingCart()
‘
‘ No matter what, we need a shopping cartID
Dim cartID As String = s.GetCartID()
If Request.Params(“Action”) = “AddToCart” Then
‘
‘ Need to get the query string and add the
‘ items to the page
Dim strCat = Request.Params(“CategoryID”)
Dim strProd = Request.Params(“ProductID”)
‘
‘ When the page loads on the small cart,
‘ the quantity
‘ is always 1, since this only gets called from the AddToCart
‘ image on the ProductsList page
s.UpdateCartQuantity(CInt(strProd), 1, cartID, False)
End If
‘
‘ Load Products list into the DataList control
‘ Calls stored proc sp_Shopping_Cart
If cartID <> “” Then
With DataList1
.DataSource = s.GetCart(cartID)
.DataBind()
End With
End If
End Sub
Listing 6.27 _SmallCart.ascx.vb code
368 Project 6
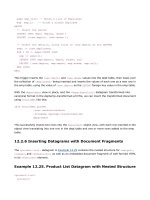
Figure 6.7 _SmallCart user control.
Figure 6.7 displays an example of the _SmallCart user control once a few items are
added to it.
Creating _BigCart.ascx
The _BigCart.ascx user control is displayed to the shopper during the checkout
process. This user control is a little more complicated than the previous user controls
you have created, mainly because it includes a Checkbox control that the user can click
to indicate the removal of an item from the shopping cart and a Textbox control that the
user can use to change the quantity of the items being purchased. The design of the
user control is not the hard part; it is the actual code-behind that is a little more com-
plex than the data-binding process that occurs during the Page_Load event in the pre-
vious controls that we created.
Listing 6.28 is the partial HTML code for the _BigCart user control. The listing is
quite long, so I thought it better to just display the data-binding code, which is really
the important part. To give you an idea of what the grid looks like at design time, Fig-
ure 6.8 shows you the complete grid in the IDE. When we explore the code-behind, you
will see the code that handles the events for the buttons on the user control. There is
also a Label control on the form that will output any error information back to the user
if an error occurs during the update process the cart goes through when an item is
deleted or a quantity is changed.
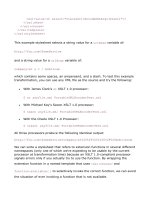
Figure 6.8 _BigCart.ascx at design time.
Building the Online Store Application 369
<asp:datagrid id=”DataGrid1” Height=”118px”
AutoGenerateColumns=”False” runat=”server”
CssClass=”checkout” Width=”615px”
DataKeyField=”Quantity”>
<Columns>
<asp:TemplateColumn HeaderText=”Remove”>
<ItemTemplate>
<asp:CheckBox id=”Delete” runat=”server” />
</ItemTemplate>
</asp:TemplateColumn>
<asp:TemplateColumn HeaderText=”Quantity”>
<ItemTemplate>
<asp:TextBox id=Quantity runat=”server”
Text=’<%# DataBinder.Eval(Container.DataItem, “Quantity”)%>’
width=”40px” Columns=”4”>
</asp:TextBox>
</ItemTemplate>
</asp:TemplateColumn>
<asp:TemplateColumn>
<ItemTemplate>
<asp:Label id=ProductID runat=”server”
Text=’<%# DataBinder.Eval(Container.DataItem, “ProductID”)%>’
Visible=”False” Width=”298px”>
</asp:Label>
</ItemTemplate>
</asp:TemplateColumn>
<asp:BoundColumn
DataField=”ProductName”
HeaderText=”Product Name”>
</asp:BoundColumn>
<asp:BoundColumn
DataField=”QuantityPerUnit”
HeaderText=”Qty Per Unit”>
</asp:BoundColumn>
<asp:BoundColumn
DataField=”UnitPrice”
HeaderText=”Unit Price” DataFormatString=”{0:c}”>
</asp:BoundColumn>
<asp:BoundColumn
DataField=”TotalDue”
HeaderText=”Total Due” DataFormatString=”{0:c}”>
</asp:BoundColumn>
</Columns>
</asp:datagrid></TD>
Listing 6.28 _BigCart.ascx code
370 Project 6
The code-behind for the _BigCart user control is a little more complicated due to the
fact that we are allowing the user to modify each row in the grid. Once the user chooses
to either delete an item or modify the quantity, he or she clicks the Update Cart button,
and the ShoppingCart table in the database is updated. If you were to write this code
in ASP, it could be a little more complicated, but since the DataGrid control has some
additional functionality to make processes like this possible, the code you need to
write is simple. We will break down the code-behind for this user control by each event
that occurs, since the code is quite lengthy and deserves proper explaining.
Listing 6.29 is the code for the Page_Load event. Like each Page_Load event up until
now, this is straightforward data binding. A new instance of the ShoppingCart class is
created, and if there is data in the ShoppingCart table, then the SQLDataReader that is
returned is bound to the DataGrid grid control by setting the DataSource property and
calling the DataBind method.
Private Sub Page_Load(ByVal sender As System.Object, _
ByVal e As System.EventArgs) Handles MyBase.Load
If Not IsPostBack Then
Dim CartID As String = _
Request.Cookies(“CartID”).Value.ToString()
‘
‘ If the CartID is not empty, then fill the DataGrid with
‘ the current cart data in the database
If CartID <> “” Then
Dim s As Proj06Web.ShoppingCart = _
New Proj06Web.ShoppingCart()
‘ Call the GetCart method and bind the
‘ results to the DataGrid
DataGrid1.DataSource = _
s.GetCart(CartID)
DataGrid1.DataBind()
‘ Display the Total Order Amount in the label
Label1.Text = “Total Order Amount: “ _
& FormatNumber(s.GetCartSum(CartID), 2)
End If
End If
End Sub
Listing 6.29 Page_Load event for the _BigCart.ascx
The UpdateButton control on the form handles updating the ShoppingCart table
with any changes that the user makes to the items displayed in the grid. There are three
items for each row in the grid that are important to this method: the ProductID field,
the Delete check box, and the Quantity text box. In order to determine if the user has
either selected the Delete check box or modified the value in the Quantity text box, you
need to iterate through the collection of rows in the grid and use the FindControl
method of Items collection in the grid. Using the FindControl method for each row,
Building the Online Store Application 371
compare the value of the original quantity in the textbox to the current quantity. This is
accomplished by setting the DataKeyField property equal to the item in the grid that
you want to key on. In Listing 6.28, you defined the DataKeyField for the DataGrid
control with the following code:
<asp:datagrid id=”DataGrid1” Height=”118px”
AutoGenerateColumns=”False” runat=”server”
CssClass=”checkout” Width=”615px”
DataKeyField=”Quantity”>
Because the DataGrid control has a DataKeyField property, you are saved the addi-
tional work of creating hidden fields or otherwise figuring out how to keep track of
values that have changed. This means that the actual data-access code that updates or
deletes items from the cart only occurs if the user is requesting it.
To determine if the user is requesting to remove a product from the shopping cart,
the checked property of the Checkbox control is examined. If the property is True, then
the RemoveFromCart method is called, the ProductID for that row is passed, and the
item is removed.
Listing 6.30 is the complete code for the UpdateButton_Click event.
Private Sub UpdateButton_Click(ByVal sender As System.Object, _
ByVal e As System.EventArgs) Handles UpdateButton.Click
‘
‘ Make sure the ErrorMessage label is not visible
ErrorMessage.Visible = False
‘
Dim CartID As String = _
Request.Cookies(“CartID”).Value.ToString
Dim s As Proj06Web.ShoppingCart = _
New Proj06Web.ShoppingCart()
Dim Looper As Long
Dim strMsg As String
Try
‘ Loop thru the collection of items in the DataGrid
‘
For Looper = 0 To DataGrid1.Items.Count - 1
‘ Declare a variable for each type of control
‘ that you need to evaluate
‘
Dim DeletedCheckbox As CheckBox
Dim UpdatedQty As TextBox
Dim ProductID As Label
‘ Set the controls that need to be evaluated to each type that
‘ is in the DataGrid using the FindControl method
ProductID = DataGrid1.Items(Looper).FindControl(“ProductID”)
DeletedCheckbox = DataGrid1.Items(Looper).FindControl(“Delete”)
UpdatedQty = DataGrid1.Items(Looper).FindControl(“Quantity”)
‘
Listing 6.30 UpdateButton_Click event handler
372 Project 6
TEAMFLY
Team-Fly
®
‘ Make sure the value in the textbox is a number
‘ before updating the qty
If IsNumeric(UpdatedQty.Text) And CInt(UpdatedQty.Text) > 0 Then
If Convert.ToInt32(UpdatedQty.Text) <> _
Convert.ToInt32(DataGrid1.DataKeys(Looper)) Then
‘ Call the UpdateCartQuantity method if the number in the
‘ Quantity Texbox control is different than the original value
s.UpdateCartQuantity(CInt(ProductID.Text), _
CInt(UpdatedQty.Text), CartID, True)
End If
End If
‘ If the user put a 0 in the Qty box, then make it a Delete
If DeletedCheckbox.Checked = True _
Or CInt(UpdatedQty.Text) = 0 Then
‘ Call the RemoveFromCart method to delete the Cart Item
s.RemoveFromCart(CInt(ProductID.Text), CartID)
End If
Next
Catch ex1 As Exception
‘ If an error occurs, make the ErrorMessage label visible
‘ and fill it with the error string
With ErrorMessage
.Visible = True
.Text = ex1.Message.ToString
End With
Finally
‘ No matter what, the cart needs to be filled with the current cart
‘ data, even if an error occured
With DataGrid1
.DataSource = s.GetCart(Request.Cookies(“CartID”).Value.ToString)
.DataBind()
End With
‘ Display the Total Order Amount in the Label control
Label1.Text = “Total Order Amount: “ & _
FormatNumber(s.GetCartSum(CartID), 2)
End Try
End Sub
Listing 6.30 UpdateButton_Click event handler (continued)
Creating _CustomerDetailsAdd.ascx
The _CustomerDetails user control is a basic data entry form that enables users to add
or update their personal information. This user control introduces validation controls
that notify users if they have not entered the correct data in the data entry fields.
Building the Online Store Application 373
Listing 6.31 is a partial listing of the _CustomerDetails user control demonstrating the
different types of validation controls in use.
The RequiredFieldValidator control is straightforward. Once you add this control to
your form, you specify a control to validate and an error message.
The RegularExpressionValidator control is more complex and gives you complete
control over the type of data that is entered into the control you want to validate. Like
the RequiredFieldValidator control, you must set the ControlToValidate property to a
valid control on your form. The difference is in how you validate the expression. The
.NET Framework has an extensive regular-expression syntax that can be used in many
different scenarios, one of them being data validation. By using the regular-expression
syntax, you can define how data should look in the control. We are using regular-
expression syntax to define an email address that validates the EmailTextBox control.
When you add a RegularExpressionValidator control to a form, the properties dialog
box gives you several options for predefined expressions, such as phone numbers for
different locales, email addresses, and URLs. Most of the bases are covered with the
predefined offerings, but if something does not match your needs, you can customize
the property as you see fit.
The third type of validation control on the user control is the CompareValidator con-
trol. This control is perfectly suited for the password data entry fields. In order to make
sure that the user re-enters the password in the Password2 text box, add the Com-
pareValidator to the form, and set the ControlToValidate property to Password2 and
the ControlToCompare property to the Password1 text box. The control will automati-
cally check that both fields are the same before the data is submitted to the server for
processing.
<TD>Company Name:</TD>
<TD><asp:textbox id=”Company” Width=”208px” runat=”server”>
</asp:textbox></TD>
<TD><asp:requiredfieldvalidator id=”RequiredFieldValidator1”
runat=”server” ControlToValidate=”Company”
ErrorMessage=”Company name required”>
</asp:requiredfieldvalidator></TD>
<TD>Email Address:</TD>
<TD><asp:textbox id=”Email” Width=”208px” runat=”server”>
</asp:textbox></TD>
<TD>
<asp:RegularExpressionValidator id=”RegularExpressionValidator1”
runat=”server” ErrorMessage=”Invalid email address”
ControlToValidate=”Email”
ValidationExpression=”\w+([-+.]\w+)*@\w+([ ]\w+)*\.\w+([ ]\w+)*”>
</asp:RegularExpressionValidator></TD>
<TD>Re-Enter Password:</TD>
<TD><asp:textbox id=”Password2” Width=”208px” runat=”server”>
</asp:textbox></TD>
Listing 6.31 Partial _CustomerDetailsAdd.ascx HTML
374 Project 6
Building the Online Store Application 375
<TD><asp:comparevalidator id=”CompareValidator1”
runat=”server” ControlToValidate=”Password2”
ErrorMessage=”Passwords do not match”
ControlToCompare=”Password1”>
</asp:comparevalidator></TD>
Listing 6.31 Partial _CustomerDetailsAdd.ascx HTML (continued)
The code-behind for the _CustomerDetailsAdd user control is contained in two
events: the Page_Load event and the SaveButton_Click event. The SaveButton_Click
event does the basic reading of the data in the text box controls and passes them to the
AddEditCustomer method in the Customers class. This either adds new customer
information or updates an existing customer’s profile. If a cookie containing the Cus-
tomerID exists on the computer, then the method assumes that the user has already
logged in and is attempting to update his or her profile information. If this is the case,
then the AddNew Boolean value that tells the method in the class to call the Update
stored procedure is set to False, ensuring that the existing data is updated and a new
record is not added. If the CustomerID cookie does not exist, then the AddNew
Boolean value is set to True, and the AddEditCustomer method uses the appropriate
stored procedure to add a new record to the Customers table.
The Page_Load event only runs if the CustomerID cookie exists on the computer.
The event checks for the cookie, and if a CustomerID exists, then the user has either
already logged in on this session or in a previous session. If this is the case, then the
GetCustomerInfo method in the Customers class is called, and the SQLDataReader
object that is returned is used to populate the controls on the page with the customer’s
data. The only way the user can get to this screen is after a login attempt, so no matter
what, you are guaranteed that a cookie containing the CustomerID will either exist or
not exist—there is no way an order can get lost in the process of the user attempting a
login or updating profile information. Listing 6.32 is the complete listing for the _Cus-
tomerDetailsAdd.ascx.vb class.
Private Sub SaveButton_Click(ByVal sender As System.Object, _
ByVal e As System.EventArgs) Handles SaveButton.Click
‘ make sure the page is valid and
‘ save the data to the database
Dim c As Proj06Web.Customers = _
New Proj06Web.Customers()
‘ Set a true/false switch to determine if this
‘ is an update or an add new
Dim CustID As String = _
Request.Cookies(“CustomerID”).Value.ToString
‘
Dim AddNew As Boolean
If CustID = “” Then
Listing 6.32 _CustomerDetailsAdd.ascx.vb
AddNew = True
Else
AddNew = False
End If
‘
If c.AddEditCustomer(Email.Text.ToString.Trim, _
Password1.Text.ToString.Trim, Company.Text.ToString.Trim, _
Contact.Text.ToString.Trim, Title.Text.ToString.Trim, _
Address.Text.ToString.Trim, City.Text.ToString.Trim, _
State.Text.ToString.Trim, PostalCode.Text.ToString.Trim, _
Country.Text.ToString.Trim, Phone.Text.ToString.Trim, _
Fax.Text.ToString.Trim, AddNew) Then
‘
‘ Save the CustomerID as the cookie
context.Response.Cookies(“CustomerID”).Value = _
Email.Text.ToString
‘
‘ Go to the page that allows the user to verify their details
Response.Redirect(“verify.aspx?CustomerID=” & _
Email.Text.ToString)
End If
End Sub
Private Sub Page_Load(ByVal sender As System.Object, _
ByVal e As System.EventArgs) Handles MyBase.Load
Dim CustID As String = _
Request.Cookies(“CustomerID”).Value.ToString
If CustID <> “” Then
‘ a customerID value exisits as a cookie, so the user needs
‘ to update their existing profile, and not add a new profile.
Dim c As Proj06Web.Customers = _
New Proj06Web.Customers()
‘ Get the customer details, and fill the textboxes
Dim rdr As SqlDataReader = _
c.GetCustomerInfo(CustID)
‘ call the Read method of the SQLDataReader object
‘ to retrieve the fields
While rdr.Read
Company.Text = Convert.ToString(rdr(“CompanyName”))
Contact.Text = Convert.ToString(rdr(“ContactName”))
Address.Text = Convert.ToString(rdr(“Address”))
City.Text = Convert.ToString(rdr(“City”))
State.Text = Convert.ToString(rdr(“Region”))
PostalCode.Text = Convert.ToString(rdr(“PostalCode”))
Country.Text = Convert.ToString(rdr(“Country”))
Phone.Text = Convert.ToString(rdr(“Phone”))
Fax.Text = Convert.ToString(rdr(“Fax”))
Listing 6.32 _CustomerDetailsAdd.ascx.vb (continued)
376 Project 6
Email.Text = Convert.ToString(rdr(“Email”))
‘ set the email to read only, since this is
‘ the customer ID
Email.ReadOnly = True
End While
End If
End Sub
Listing 6.32 _CustomerDetailsAdd.ascx.vb (continued)
A cool feature to add at this juncture would be the ability for a customer to have
multiple addresses. In Commerce Server 2000, a single customer can have more than
one shipping address. You can customize this feature even further by allowing a cus-
tomer to break out a single order into multiple addresses. If you add an Address table
to the database, you can add an Add New Address button on this user control and link
the user to a new screen where a new address can be added. During the checkout
process, you could list the available addresses in a DataList control and using an
OptionButton control, let users choose the address they want shipments to go to and
update the Orders table with that address.
Creating _VerifyDetails.ascx
The _VerifyDetails user control is the last step in the checkout process. Once the user
logs in, he or she verifies their address and billing information and is presented with
the option of modifying this information or completing the order. This user control
consists of read-only label controls that display the user information from the Cus-
tomers table in the database. Listing 6.33 is the _VerifyDetails.ascx code.
<%@ Control Language=”vb” AutoEventWireup=”false”
Codebehind=”_VerifyDetails.ascx.vb”
Inherits=”project06.C_VerifyDetails”
TargetSchema=” %>
<TABLE id=”Table1” cellSpacing=”1” cellPadding=”1”
width=”417” border=”0” height=”456”>
<TR>
<TD class=”siteheader” colSpan=”2”>
Verify Customer Information</TD>
</TR>
<TR>
<TD style=”WIDTH: 379px”></TD>
</TR>
<TR>
<TD style=”WIDTH: 379px; HEIGHT: 20px”>
<HR style=”COLOR: #669999” width=”100%” SIZE=”1”></TD>
Listing 6.33 _VerifyDetails.ascx code
Building the Online Store Application 377
</TR>
<TR>
<TD>
<TABLE id=”Table2”>
<TR>
<TD class=”ProductNormal”>Company: </TD>
<TD><asp:Label CssClass=”MediumRed14” id=”Company”
Width=”216px” runat=”server”>
</asp:Label></TD></TR>
<TR>
<TD class=”ProductNormal”>Contact Name: </TD>
<TD><asp:Label CssClass=”MediumRed14” id=”Contact”
Width=”216px” runat=”server”>
</asp:Label></TD></TR>
<TR>
<TD class=”ProductNormal”>Address:</TD>
<TD><asp:Label CssClass=”MediumRed14” id=”Address”
Width=”216px” runat=”server”>
</asp:Label></TD></TR>
<TR>
<TD class=”ProductNormal”>City:</TD>
<TD><asp:Label CssClass=”MediumRed14” id=”City”
Width=”216px” runat=”server”>
</asp:Label></TD></TR>
<TR>
<TD class=”ProductNormal”>Region:</TD>
<TD><asp:Label CssClass=”MediumRed14” id=”RegionName”
Width=”216px” runat=”server”>
</asp:Label></TD></TR>
<TR>
<TD class=”ProductNormal”>Postal Code:</TD>
<TD><asp:Label CssClass=”MediumRed14” id=”PostalCode”
Width=”216px” runat=”server”>
</asp:Label></TD></TR>
<TR>
<TD class=”ProductNormal”>Country:</TD>
<TD><asp:Label CssClass=”MediumRed14” id=”Country”
Width=”216px” runat=”server”>
</asp:Label></TD></TR>
<TR>
<TD class=”ProductNormal”>Phone:</TD>
<TD><asp:Label CssClass=”MediumRed14” id=”Phone”
Width=”216px” runat=”server”>
</asp:Label></TD></TR>
<TR>
<TD class=”ProductNormal”>Fax:</TD>
<TD><asp:Label CssClass=”MediumRed14” id=”Fax”
Width=”216px” runat=”server”>
</asp:Label></TD></TR>
Listing 6.33 _VerifyDetails.ascx code (continued)
378 Project 6
<TR>
<TD class=”ProductNormal”>Email:</TD>
<TD><asp:Label CssClass=”MediumRed14” id=”Email”
Width=”216px” runat=”server”>
</asp:Label></TD></TR>
</TABLE>
</TD>
</TR>
<TR>
<TD style=”WIDTH: 379px”>
<HR style=”COLOR: #009999” width=”100%” SIZE=”1”>
</TD>
</TR>
<TR><TD style=”WIDTH: 379px”>
<asp:Button id=”CheckOutButton” runat=”server”
Width=”133px” Text=”Submit Order>
</asp:Button> </TD></TR>
<TR><TD style=”WIDTH: 379px”></TD>
</TR>
<TR>
<TD style=”WIDTH: 379px”>
<asp:Button id=”ChangeProfile”
runat=”server” Text=”Change Information”>
</asp:Button></TD>
</TR>
</TABLE>
Listing 6.33 _VerifyDetails.ascx code (continued)
The code-behind for the _VerifyDetails user control consists of the Page_Load event,
which loads the user information from the Customers table, and the
ChangeProfile_Click event, which redirects the shopper to the profile data-entry form
if personal information needs to be modified. The Page_Load event creates an instance
of the Customers class and calls the GetCustomerInfo method to return a SQL-
DataReader object, which binds the results to the label controls. The DataField prop-
erty for each label control is set to the appropriate field from the table. Listing 6.34 is
the complete listing for the _VerifyDetails.ascx.vb class.
Private Sub Page_Load(ByVal sender As System.Object, _
ByVal e As System.EventArgs) Handles MyBase.Load
‘ Load the information from the customers database to let the user
‘ verify address information
Dim c As Proj06Web.Customers = _
New Proj06Web.Customers()
Listing 6.34 _VerifyDetails.ascx.vb code
Building the Online Store Application 379
Dim rdr As SqlDataReader = _
c.GetCustomerInfo(Request.Cookies(“CustomerID”).Value.ToString)
While rdr.Read
Company.Text = Convert.ToString(rdr(“CompanyName”))
Contact.Text = Convert.ToString(rdr(“ContactName”))
Address.Text = Convert.ToString(rdr(“Address”))
City.Text = Convert.ToString(rdr(“City”))
RegionName.Text = Convert.ToString(rdr(“Region”))
PostalCode.Text = Convert.ToString(rdr(“PostalCode”))
Country.Text = Convert.ToString(rdr(“Country”))
Phone.Text = Convert.ToString(rdr(“Phone”))
Fax.Text = Convert.ToString(rdr(“Fax”))
Email.Text = Convert.ToString(rdr(“Email”))
End While
End Sub
Private Sub ChangeProfile_Click(ByVal sender As System.Object, _
ByVal e As System.EventArgs) Handles ChangeProfile.Click
‘ The user has determined that they need to modify their information,
‘ so redirect them to the profile page
Response.Redirect(“userprofile.aspx”)
End Sub
Listing 6.34 _VerifyDetails.ascx.vb code (continued)
When you create an actual online store, you will need to include some type of credit
card verification. This user control would most likely encapsulate that functionality.
You might want to include the type of credit card and the credit card number so users
can view this information one last time and modify it if need be before completing the
order.
Creating _Login.ascx
The _Login user control is your basic login screen. Once the user decides that the infor-
mation in the shopping cart is what he or she wants, he or she proceeds to the login
screen. If the user has already shopped at the online store, the username and password
can be entered and the login attempted. If a user has not shopped here before, clicking
the Register button displays the user profile data entry screen you created earlier. This
user control uses RequiredFieldValidator controls to force the user to enter a username
and password, but since the Register button would cause the validation events to
occur, you need to set the CausesValidation property of the Register button to False so
the click event can occur. If you are a Visual Basic 6 developer, the CausesValidation
property behaves the same in ASP.NET as it did in VB6. Listing 6.35 is the _Login user
control code listing.
380 Project 6
<%@ Control Language=”vb” AutoEventWireup=”false”
Codebehind=”_Login.ascx.vb”
Inherits=”project06.C_Login”
TargetSchema=” %>
<TABLE class=”ProductNormal” id=”Table1”>
<TR>
<TD style=”WIDTH: 96px”></TD>
<TD style=”WIDTH: 236px”>
Returning customers, please log in.
</TD>
</TR>
<TR>
<TD>User Name:</TD>
<TD style=”WIDTH: 236px”>
<asp:TextBox id=”Username” runat=”server”>
</asp:TextBox>
</TD>
<TD>
<asp:RequiredFieldValidator id=”RequiredFieldValidator1”
runat=”server” ErrorMessage=”RequiredFieldValidator”
Width=”198px” ControlToValidate=”Username”>
Please enter a User Name</asp:RequiredFieldValidator>
</TD>
</TR>
<TR>
<TD>Password:</TD>
<TD style=”WIDTH: 236px”>
<asp:TextBox id=”Password” runat=”server”>
</asp:TextBox>
</TD>
<TD>
<asp:RequiredFieldValidator id=”RequiredFieldValidator2”
runat=”server” ErrorMessage=”RequiredFieldValidator”
ControlToValidate=”Password”>
Please enter a Password</asp:RequiredFieldValidator>
</TD>
</TR>
<TR>
<TD>
<asp:Button id=”LoginButton” runat=”server”
Width=”115px” Text=”Log In”>
</asp:Button>
</TD>
</TR>
<TR>
<TD>
<asp:Label id=”LoginError” runat=”server”
Width=”181px” ForeColor=”Red”>
</asp:Label>
</TD>
Listing 6.35 _Login.ascx code listing
Building the Online Store Application 381
</TR>
<TR>
<TD style=”WIDTH: 236px”>
If you are a new customer, click here to register.
</TD>
</TR>
<TR>
<TD style=”WIDTH: 236px”>
<asp:Button id=”RegisterButton” runat=”server”
CausesValidation=”False”>
</asp:Button>
</TD>
</TR>
</TABLE>
Listing 6.35 _Login.ascx code listing (continued)
The code-behind for the _Login user control is simple. Once the user clicks the Login
button, the Authenticate method in the Customers class is called, using the username
and password entered as the parameters. If the user exists in the database, he or she is
redirected to the Verify.aspx page to complete the checkout process. If this user does
not exist in the database, the LoginError label control notifies him or her that the login
attempt was unsuccessful. From this point, the user can either try to log in again or
click the Register button and get redirected to the Userprofile.aspx page and enter new
customer information. The Action parameter with the Add value lets the Userpro-
file.aspx page know that this is a new user and not an existing user attempting to
update his or her profile information. The _CustomerDetailsAdd.ascx user control also
performs an additional check for the CustomerID cookie to verify that the user is
adding a new record and not updating previous information. Listing 6.36 is the com-
plete listing for the _Login.ascx.vb code.
Private Sub LoginButton_Click(ByVal sender As System.Object, _
ByVal e As System.EventArgs) Handles LoginButton.Click
Dim c As Proj06Web.Customers = _
New Proj06Web.Customers()
Dim CustomerID As String = _
c.Authenticate(Username.Text, Password.Text)
If CustomerID <> “” Then
context.Response.Cookies(“CustomerID”).Value = _
CustomerID.ToString
Response.Redirect(“verify.aspx?CustomerID=” & CustomerID)
Else
Listing 6.36 _Login.ascx.vb code
382 Project 6
TEAMFLY
Team-Fly
®
LoginError.Text = “You are not in the database”
End If
End Sub
Private Sub RegisterButton_Click(ByVal sender As System.Object, _
ByVal e As System.EventArgs) Handles RegisterButton.Click
Response.Redirect(“userprofile.aspx?Action=Add”)
End Sub
Listing 6.36 _Login.ascx.vb code (continued)
Creating _NoMenuHeader.ascx
The final user control that needs to be created is the _NoMenuHeader user control.
This user control is used on the Verify.aspx and Checkout.aspx pages to replace the
Categories menu that would normally be across the top of the page. When users are in
the checkout process, they should not have the ability to continue shopping. To ensure
that they do not, we remove the Categories menu and give them no way to return back
to shopping. Listing 6.37 is the code for the _NoMenuHeader user control. There is no
code-behind for this control; it is simply for display purposes.
<TABLE id=”Table1” style=”WIDTH: 100%; HEIGHT: 51px” cellSpacing=”1”
cellPadding=”1” width=”100%” border=”0”>
<TR>
<TD bgColor=”#336600”> </TD>
</TR>
<TR>
<TD bgColor=”#cccc66”> </TD>
</TR>
</TABLE>
Listing 6.37 _NoMenuHeader.ascx code
Creating the Style Sheet
The style sheet that covers the whole application is presented in Listing 6.38. Up until
now, each HTML element and ASP.NET Web control had either the class or CssClass
property set with a style class. Each of the Web forms will need the relative link to this
style sheet to unify the look and feel of the Web site. To change the colors and fonts, you
can just change this style sheet and the site will be updated. There are several areas in
Building the Online Store Application 383
the user controls where the colors of the controls are hard-coded, but that can also be
included in the style sheet, along with border style settings for tables and any other
visual features you want to add to improve the look and feel of your online store.
body
{
font-size: 11px;
font-weight:bolder;
color: navy;
font-family: Verdana;
}
.checkout
{
font-size: 11px;
font-weight:normal ;
color:Black ;
font-family: Verdana;
}
.selected
{
font-size: 11px;
font-weight:bolder;
color: white;
font-family: Verdana;
background-color: #006666;
}
.notselected
{
font-size: 10px;
font-weight:normal;
color: maroon;
font-family: Verdana;
background-color: LemonChiffon;
}
.ProductName
{
font-weight: bold;
font-size: 18px;
color: maroon;
font-family: Verdana, Tahoma;
}
.ProductDescription
{
font-size: 10px;
color: black;
font-family: Verdana, Tahoma;
}
Listing 6.38 Main.css style sheet code
384 Project 6
.ProductPrice
{
font-size: 12px;
color: maroon;
font-family: Verdana, Tahoma;
}
.ProductNormal
{
font-size: 10px;
color: black;
font-family: Verdana, Tahoma;
}
.SiteHeader
{
font-family: Franklin Gothic Medium;
color: #999933;
font-size: 36;
font-weight:bold
}
.SmallCart
{
font-size: 10px;
color: maroon;
font-weight:bold;
font-family: Verdana, Tahoma;
}
.MediumRed14
{
font-size: 14px;
color: maroon;
font-family: Verdana, Tahoma;
}
.UserProfile
{
font-size: 10px;
color: Navy;
font-family: Verdana, Tahoma;
}
Listing 6.38 Main.css style sheet code (continued)
Creating the Web Forms
Earlier, I mentioned that once the user controls were created, it would simply be a mat-
ter of dragging and dropping the controls on to the Web forms in the correct location.
Each of the Web forms that you added to the project will have almost the exact same
layout. The basic idea here is that you want the design to be in the user controls and not
the Web forms, so the less work in the Web forms, the better.
Building the Online Store Application 385
Figure 6.9 Default.aspx at design time.
Instead of going right into the HTML code that makes up each page, take a look at
Figure 6.9. This figure displays the basic structure of the page. The image represents
the Default.aspx page, but the HTML table that controls the positioning of the user
controls is the same for each Web form.
The process of adding user controls to the Web forms is the same as adding any
other control. Drag and drop the control to the desired location on the page. If you add
a table to each of the Web forms, then it is just a matter of setting the correct width of
the rows and columns. Listing 6.39 is the HTML output for the Default.aspx page rep-
resented in Figure 6.9. The code in bold indicates the code that is added to the ASP.NET
form once the user controls are added.
<%@ Register TagPrefix=”uc1” TagName=”_productlist”
Src=”_productlist.ascx” %>
<%@ Register TagPrefix=”uc1” TagName=”_SiteHeader”
Src=”_SiteHeader.ascx” %>
<%@ Register TagPrefix=”uc1” TagName=”_SmallCart” Src=”_SmallCart.ascx”
%>
<%@ Page Language=”vb” AutoEventWireup=”false”
Codebehind=”default.aspx.vb”
Inherits=”project06._default” %>
<%@ Register TagPrefix=”uc1” TagName=”_CategoriesMenu”
Src=”_CategoriesMenu.ascx” %>
<!DOCTYPE HTML PUBLIC “-//W3C//DTD HTML 4.0 Transitional//EN”>
<HTML>
<HEAD>
<title>Project06 - Online Store Home</title>
<meta name=”GENERATOR” content=”Microsoft Visual Studio.NET 7.0”>
Listing 6.39 HTML code for default.aspx
386 Project 6
<meta name=”CODE_LANGUAGE” content=”Visual Basic 7.0”>
<meta name=”vs_defaultClientScript” content=”JavaScript”>
<meta name=”vs_targetSchema”
content=” /><LINK rel=”stylesheet” type=”text/css” href=”main.css”>
</HEAD>
<body MS_POSITIONING=”GridLayout”>
<form id=”Form1” method=”post” runat=”server”>
<TABLE id=”Table1”>
<TR>
<TD class=”siteheader” style=”HEIGHT: 40px” colSpan=”3”>
<uc1:_SiteHeader id=_SiteHeader1 runat=”server”></uc1:_SiteHeader>
</TD>
</TR>
<TR>
<TD style=”HEIGHT: 1px” colSpan=”3”>
<uc1:_CategoriesMenu id=_CategoriesMenu1
runat=”server”></uc1:_CategoriesMenu>
</TD>
<TR>
<TD style=”WIDTH: 435px” vAlign=top align=left></TD>
<TD vAlign=top align=left>
<uc1:_SmallCart id=_SmallCart1 runat=”server”></uc1:_SmallCart>
</TD>
<TD vAlign=top align=top></TD>
</TR>
</TABLE>
</form>
</body>
</HTML>
Listing 6.39 HTML code for default.aspx (continued)
First, when you add a user control to a Web form, the Register directive is added to
the top of the Web form. The Register directive notifies the page that there are user con-
trols on the page. It specifies the TagPrefix for the user control and sets the location of
the actual control in the Web directory. The ID property for each user control added is
incremented by one for each instance of the same control, so if you added the _Small-
Cart user control more than once on the same page, you would have _SmallCart1,
Building the Online Store Application 387
_SmallCart2, and so on. The second item to notice is the style sheet link. Each Web form
needs the style sheet to correctly set the fonts and colors for the elements in each user
control.
To complete the user interface, Table 6.6 lists the remaining Web forms and the user
controls that need to be added to each form. If you refer to Figure 6.4 earlier in this proj-
ect, you can get a refresher on the goal for the page setup. The Location column in the
table refers to either Top, Middle, Left, or Right, which specifies the location in the
HTML table where the user control is to be added.
Now that you have added the user controls to their respective Web forms, you can
work on positioning and any other formatting issues you might have. The final step in
creating the online store is doing a final build to make sure all the assemblies are up-to-
date. Once the solution is built, you can run the store and then start thinking of what
you can do next to improve on the design to meet your specific needs.
Table 6.6 Web Forms and User Control Location
WEB FORM USER CONTROL LOCATION
ProductsList.aspx _SiteHeader.ascx Top
_CategoriesMenu.ascx Middle
_ProductsList.ascx Left
_SmallCart.ascx Right
Checkout.aspx _SiteHeader.ascx Top
_CategoriesMenu.ascx Middle
_BigCart.ascx Left
UserLogin.aspx _SiteHeader.ascx Top
_NoMenuHeader.ascx Middle
_Login,ascx Left
UserProfile.aspcx _SiteHeader.ascx Top
_NoMenuHeader.ascx Middle
_CustomerDetailsAdd.ascx Left
Verify.aspx _SiteHeader.ascx Top
_NoMenuHeader.ascx Middle
_VerifyDetails.ascx Left
388 Project 6
Wrap Up
In this project, you went through all of the steps necessary to create an online
e-commerce application. Using the thousands of e-commerce applications across the
Internet as an example, you now have the base functionalities that all e-commerce
applications must have:
■■ Browsing items for sale
■■ Adding items to a shopping cart
■■ Performing a checkout process
To enhance this version of the online store, you can add features such as a Wish List,
which is becoming more popular on the larger e-commerce sites, banner advertising,
and targeted marketing features, like an Also Bought user control that could check
what other people have purchased when the user adds an item to the shopping cart.
There is no limit when it comes to features you can add, so by examining what exists
on the Internet and what your requirements are, the architecture of the site makes it
easy to implement new features without major redesign or modification to existing
code.
In Project 7, you’ll begin building the Team Network system, an application that will
provide project tracking, file sharing, and discussion forums.
Building the Online Store Application 389
One of the more interesting aspects of the Internet is how it has made virtual corpora-
tions a reality. Instead of hiring people to do jobs, you add people as needed to perform
certain tasks. This is especially true among independent contractors like myself. I work
with a client on a project, and then we all go our separate ways. If I need help doing
something, I bring people in to do those tasks. The problem with all this collaboration,
however, is the sheer number of places information can get lost. You might have some
information in your email program, some printed on paper on your desk, some files
stored on various computers, and lots of phone calls, for which there is really no record.
In this project, you’ll start building the Teamwork Network system. This application
provides three major features: project tracking, file sharing, and discussion forums.
These three subsystems are integrated in a complex infrastructure, which you’ll
build in this project. While there aren’t a lot of heavy concepts, there are quite a few files
to build and a number of features to implement. Besides the three major subsystems,
you’ll also be implementing a user login system, a team manager, and a messaging
component that allows for system- and user-generated messages to be kept in the sys-
tem outside of regular email. A customized home page will consolidate information
from the three subsystems onto a single page for the user, and a search utility will
enable the user to search for content in all the subsystems. You’ll also see how to expand
the system to add on other features later.
If you want to see the system operational, be sure to visit the Web site at www.
teamworknetwork.com. I intend to keep this site running as a public-development
project that you can discuss at the book’s Web site: www.10projectswithasp.net. We’ll
add new features as time goes on to make this site useful for everyone.
Teamwork Network:
The Infrastructure
PROJECT
7