assembly language step by step programming with dos and linux PHẦN 6 pptx
Bạn đang xem bản rút gọn của tài liệu. Xem và tải ngay bản đầy đủ của tài liệu tại đây (747.33 KB, 47 trang )
file:///D|/Agent%20Folders/Chapter%207%20Our%20Object%20All%20Sublime.htm
character (ASCII 3FH) into every byte of the buffer.
The DUP directive can also be used to store repeated patterns into larger variables and
buffers. This can make the buffers and variables easy to spot when you perform a hex
dump from DEBUG
:
Marked DB 10 DUP ('Zorro!!!') Table1 DB 5 DUP
(02H,04H.06H,08H) DB 64 DUP ('STACK!!!')
The last example allocates space for the stack segment in EAT.ASM. Although this
statement illustrates the fact that you don't have to name a buffer that simply exists to take
up space (as in allocating space for the stack segment), I recommend that you name all
variables and buffers.
Setting Up the Code Segment
Like any segment, the code segment must have a name, and the name must be given at the
start and end of the segment definition, before the SEGMENT and ENDS directives.
Although the name is unimportant and probably won't be referenced anywhere in the
code, it must be there, or you will receive an assembler error.
An ASSUME directive must be included in the program. Its purpose is to tell the
assembler which of the segments you have defined is to be used for the code segment, and
which segment is to be used for the data segment. Unlike the stack segment, which has
the directive STACK to tell the assembler what sort of segment it is, nothing in the code
or data segments specifies which sort of segment they are. It isn't enough that there are
variables defined in the data segment or machine instructions in the code segment. The
assembler will allow you put variable definitions in the code segment and machine
instructions in the data segment, regardless of whether that makes sense or not. (It may, in
certain extremely advanced techniques.)
In EAT.ASM, the ASSUME directive tells the assembler that the code segment will be
the segment named MyCode, and that the data segment will be named MyData.
EAT.ASM has its machine instructions grouped together in a procedure named Main
with the PROC directive. This is not strictly necessary unless you have broken down
your program into procedures or modules, and EAT.ASM will assemble and run
correctly without the Main PROC and Main ENDP statements. I would advise you to
get in the habit of placing the main program portion of any assembly-language program
into a procedure called Main to help make the program more readable.
What is essential, however, is to provide a label that marks the place where program
file:///D|/Agent%20Folders/Chapter%207%20Our%20Object%20All%20Sublime.htm (35 of 38) [9/25/2002 8:07:31 PM]
file:///D|/Agent%20Folders/Chapter%207%20Our%20Object%20All%20Sublime.htm
execution is to begin. I recommend the label Start: as a convention, but the label can be
any legal identifier. Whatever label you choose, mark the main program's starting point
with the label and a colon. Then, place the same label minus the colon after the END
directive, which marks the end of the source-code file. Placing the "start" label after the
END directive tells the assembler that there is no more source code, and that the label is
the point at which execution is to begin.
What EAT.ASM's Machine Instructions Do
; From the top:
mov AX,MyData ; Set up our own data segment address in DS
mov DS,AX ; Can't load seg-reg. directly from memory
Before your program can access any of its variables in the data segment, it must have the
segment address of the data segment in the DS register. The ASSUME directive tells the
assembler to assemble any instruction referencing an identifier in the MyData segment
under the assumption (hence the name of the directive) that MyData is to be a data
segment. ASSUME, however, does not load the data segment address into DS!
You must do that yourself, which is the purpose of the two instructions shown above.
This seemingly simple operation takes two instructions rather than one because MOV
cannot move memory data directly into a segment register like DS. To load the address of
memory data into a segment register, you must first load the address into one of the
general-purpose registers and then load the general-purpose register into the segment
register:
lea DX , Eat1 ; Load offset of Eat1 message string into DX
mov AH,09H ; Select DOS service 09H: Print String
int 21H ; Call DOS
Here's where the first real work of EAT.ASM gets done. The load effective address
instruction (LEA) puts the offset address of variable Eat1 into the DX register. Keep in
mind that the segment address of Eat1 is already in DS— loaded by the first two
instructions in the program. MOV AH, 09H loads the number of DOS service O9H
(Print String) into register half AH. The term "Print String" is a misnomer inherited from
file:///D|/Agent%20Folders/Chapter%207%20Our%20Object%20All%20Sublime.htm (36 of 38) [9/25/2002 8:07:31 PM]
file:///D|/Agent%20Folders/Chapter%207%20Our%20Object%20All%20Sublime.htm
an ancient age when video terminals were considered exotic, and strings could only be
printed—on (kerchunk-kerchunkity-chunk) Teletype terminals!
Finally, INT 21H transfers control to the DOS services dispatcher by way of software
interrupt 21H. The dispatcher looks in DS:DX for the address of the string variable to be
displayed, and then hands control over to the Print String service routine somewhere deep
within DOS. When the string is displayed, execution returns to the instruction following
the INT 21H instruction, which is possible because the INT 21H instruction pushed the
address of the next instruction onto the stack before it passed execution to the DOS
services dispatcher. The dispatcher simply popped that return address of the stack and
resumed execution at that address. Again, here is an explanation of how interrupts work:
the previous block of instructions were enough to display the string "Eat at Joe's!" on your
video display. DOS leaves the hardware cursor on the character following the last
character of the string, however, and any subsequent display output would follow "Eat at
Joe's!" immediately. You may want this, and you may not—and if you don't, it would be
a good idea to return the cursor to the left margin and bump it down to the next screen
line. This is what's going on here:
lea DX , CRLF ; Load offset of CRLF string into DX
mov AH, 09H ; Select DOS service 09H: Print String
int 21H ; Call DOS
The CRLF variable contains the EOL marker, which includes the ASCII carriage return
characters. EAT.ASM passes the string containing these two "invisible" characters to
DOS in exactly the same way it passed the string "Eat at Joe's!", by loading CRLF's
address into DS:DX and selecting DOS service O9H before handing control to the DOS
services dispatcher through software interrupt 21H.
Finally, the job is done. Joe's has been properly advertised, and it's time to let DOS have
the machine back:
mov AH,4CH ; Terminate process DOS service
mov AL,0 ; Pass this value back to ERRORLEVEL
int 21H ; Control returns to DOS
Another DOS service, 4CH (Terminate Process) handles the mechanics of courteously
disentangling the machine from EAT.ASM's clutches. The Terminate Process service
doesn't need the address of anything, but it will take whatever value it finds in the AL
register and place it in the DOS ERRORLEVEL variable. DOS batch programs can test
the value of the ERRORLEVEL variable and branch on it, as I'll demonstrate in the next
file:///D|/Agent%20Folders/Chapter%207%20Our%20Object%20All%20Sublime.htm (37 of 38) [9/25/2002 8:07:31 PM]
file:///D|/Agent%20Folders/Chapter%207%20Our%20Object%20All%20Sublime.htm
chapter.
EAT.ASM doesn't do anything worth testing in a batch program, but if ERRORLEVEL
will be set anyway, it's a good idea to provide some reliable and harmless value for
ERRORLEVEL to take. This is why 0 is loaded into AL prior to ending it all by the
final INT 21 instruction. If you were to test ERRORLEVEL after running EAT.EXE,
you would find it set to 0 in every case.
file:///D|/Agent%20Folders/Chapter%207%20Our%20Object%20All%20Sublime.htm (38 of 38) [9/25/2002 8:07:31 PM]
file:///D|/Agent%20Folders/Chapter%208%20Dividing%20and%20Conquering.htm
Dividing and Conquering
Using Procedures and Macros to Battle
Complexity
8.1 Programming in Martian >• 216
8.2 Boxes Within Boxes >• 216
8.3 Using BIOS Services >• 224
8.4 Building External Libraries of Procedures >• 235
8.5 Creating and Using Macros >• 248
8.1 Programming in Martian
There is a computer language called APL (an acronym for "A Programming Language,"
how clever) that has more than a little Martian in it. APL was the first computer language
I learned, (on a major IBM mainframe) and when I learned it I learned a little more than
just APL.
APL uses a very compact notation, with dozens of odd little symbols, each of which is
capable of some astonishing power like matrix inversion. You can do more in one line of
APL than you can in one line of anything else I have learned since. The combination of
the strange symbol set and the compact notation make it very hard to read and remember
what a line of code in APL actually does.
So it was in 1977. Having mastered (or so I thought) the whole library of symbols, I set
out to write a text formatter program. The program would justify right and left, center
headers, and do a few other things that we take for granted today, but which were very
file:///D|/Agent%20Folders/Chapter%208%20Dividing%20and%20Conquering.htm (1 of 50) [9/26/2002 12:42:58 PM]
file:///D|/Agent%20Folders/Chapter%208%20Dividing%20and%20Conquering.htm
exotic in the Seventies.
The program grew over a period of a week to about 600 lines of squirmy little APL
symbols. I got it to work, and it worked fine—as long as I didn't try to format a column
that was more than 64 characters wide. Then everything came out scrambled.
Whoops. I printed the whole thing out and sat down to do some serious debugging. Then I
realized with a feeling of sinking horror that, having finished the last part of the program,
I had no idea how the first part worked.
The APL symbol set was only part of the problem. I soon came to realize that the most
important mistake I had made was writing the whole thing as one 600-line monolithic
block of code lines. There were no functional divisions, nothing to indicate what any 10-
line portion of the code was trying to accomplish.
The Martians had won. I did the only thing possible: I scrapped it. And I settled for
ragged margins in my text.
8.2 Boxes Within Boxes
This sounds like Eastern mysticism, but it's just an observation from life: Within any
action is a host of smaller actions. Look inside your common activities. When you "brush
your teeth," what you're actually doing is:
• Picking up your toothpaste tube
• Unscrewing the cap
• Placing the cap on the sink counter
• Picking up your toothbrush
• Squeezing toothpaste onto the brush from the middle of the tube
• Putting your toothbrush into your mouth
• Working the brush back and forth vigorously
and so on. The original list went the entire page. When you brush your teeth, you perform
every one of those actions. However, when you think about brushing your teeth, you don't
consciously run through each action on the list. You bring to mind the simple concept
"brushing teeth."
Furthermore, when you think about what's behind the action we call "getting up in the
morning," you might assemble a list of activities like this:
• Shut off the clock radio
• Climb out of bed
• Put on your robe
• Let the dogs out
file:///D|/Agent%20Folders/Chapter%208%20Dividing%20and%20Conquering.htm (2 of 50) [9/26/2002 12:42:58 PM]
file:///D|/Agent%20Folders/Chapter%208%20Dividing%20and%20Conquering.htm
• Make breakfast
• Brush your teeth
• Shave
• Get dressed
Brushing your teeth is on the list, but within the "brushing your teeth" activity a whole list
of smaller actions exist. The same can be said for most of the activities collectively called
"getting up in the morning." How many individual actions, for example, does it take to
put a reasonable breakfast together? And yet in one small, if sweeping, phrase, "getting
up in the morning," you embrace that whole host of small and even smaller actions
without having to laboriously trace through each one.
What I'm describing is the "Chinese boxes" method of fighting complexity. Getting up in
the morning involves hundreds of little actions, so we divide the mass up into coherent
chunks and set the chunks into little conceptual boxes. "Making breakfast" is in one box,
"brushing teeth" is in another, and so on. Closer inspection of any box shows that its
contents can also be divided into numerous boxes, and those smaller boxes into even
smaller boxes.
This process doesn't (and can't) go on forever, but it should go on as long as it needs to in
order to satisfy this criterion: the contents of any one box should be understandable with
only a little scrutiny. No single box should contain anything so subtle or large and
involved that it takes hours of hair pulling to figure it out.
Procedures as Boxes for Code
The mistake I made in writing my APL text formatter is that I threw the whole collection
of 600 lines of APL code into one huge box marked "text formatter." While I was writing
it, I should have been keeping my eyes open for sequences of code statements that
worked together at some identifiable task. When I spotted such sequences, I should have
set them off as procedures. Each sequence would then have a name that would provide a
memory-tag for the sequence's function. If it took ten statements to justify a line of text,
those ten statements should have been named JustifyLine, and so on.
Xerox's legendary APL programmer, Jim Dunn, later told me that I shouldn't ever write a
procedure that wouldn't fit on a single 25-line terminal screen "More than 25 lines and
you're doing too much in one procedure. Split it up, " he said. Whenever I worked in APL
after that, I adhered to that rather sage rule of thumb. The Martians still struck from time
to time, but when they did, it was no longer a total loss.
All computer languages have procedures of one sort or another, and assembly language
file:///D|/Agent%20Folders/Chapter%208%20Dividing%20and%20Conquering.htm (3 of 50) [9/26/2002 12:42:58 PM]
file:///D|/Agent%20Folders/Chapter%208%20Dividing%20and%20Conquering.htm
is no exception. You may recall from the previous chapter that the main program is in fact
a procedure, and the only thing setting it apart as the main program is the fact that its
name is specified after the END directive.
Your assembly-language program may have numerous procedures. There's no limit to the
number of procedures, as long as the total number of bytes of code does not exceed
65,536 (one segment). Other complications arise at that point, but nothing that can't be
worked around.
But that's a lot of code. You needn't worry for awhile, and certainly not while you're just
learning assembly language. (I won't be treating the creation of multiple code segments in
this book.) In the meantime, let's take a look at the "Eat at Joe's" program, expanded a
little to include a couple of procedures:
file:///D|/Agent%20Folders/Chapter%208%20Dividing%20and%20Conquering.htm (4 of 50) [9/26/2002 12:42:58 PM]
file:///D|/Agent%20Folders/Chapter%208%20Dividing%20and%20Conquering.htm
file:///D|/Agent%20Folders/Chapter%208%20Dividing%20and%20Conquering.htm (5 of 50) [9/26/2002 12:42:58 PM]
file:///D|/Agent%20Folders/Chapter%208%20Dividing%20and%20Conquering.htm
EAT2.ASM does about the same thing as EAT.ASM. It prints a two-line slogan, and
that's all. The way the two lines of the slogan are displayed, however, bears examination:
lea DX , Eat1
call Writeln
Here's a new instruction: CALL. The label Writeln refers to a procedure. As you might
have gathered, (especially if you've programmed in an older language like BASIC or
FORTRAN) CALL Writeln simply tells the CPU to go off and execute a procedure
named Writeln.
The means by which CALL operates may sound familiar: CALL first pushes the address
of the next instruction after itself onto the stack. Then CALL transfers execution to the
address represented by the name of the procedure. The instructions contained in the
procedure execute. Finally, the procedure is terminated by CALL'S alter ego: RET (for
RETurn.) The RET instruction pops the address off the top of the stack and transfers
execution to that address. Since the address pushed was the address of the first instruction
after the CALL instruction, execution continues as though CALL had not changed the
flow of instruction execution at all.
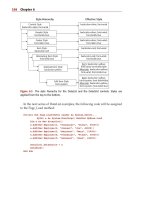
See Figure 8.1.
This should remind you strongly of how software interrupts work. The main difference is
that the caller does know the exact address of the routine it wishes to call. Apart from
that, it's very close to being the same process. (Also note that RET and IRET are not
interchangeable. CALL works with RET just as INT works with IRET. Don't get those
return instructions confused!)
file:///D|/Agent%20Folders/Chapter%208%20Dividing%20and%20Conquering.htm (6 of 50) [9/26/2002 12:42:58 PM]
file:///D|/Agent%20Folders/Chapter%208%20Dividing%20and%20Conquering.htm
The structure of a procedure is simple and easy to understand. Look at the Write
procedure from EAT2.ASM:
Write PROC
mov AH, 09H ; Select DOS service 9: Print String
int 21H ; Call DOS
ret ; Return to the caller
Write ENDP
The important points are these: a procedure must be bracketed by the PROC/ ENDP
directives, preceded in both cases by the name of the procedure. Also, somewhere within
the procedure, and certainly as the last instruction in the procedure, there must be at least
one RET instruction.
The RET instruction is the only way that execution can get back to the caller of the
procedure. As I mentioned above, there can be more than one RET instruction in a
procedure, although your procedures will be easier to read and understand if there is only
one. Using more than one RET instruction requires the use of JMP (JuMP) instructions,
which I haven't covered yet but will shortly in Chapter 9.
file:///D|/Agent%20Folders/Chapter%208%20Dividing%20and%20Conquering.htm (7 of 50) [9/26/2002 12:42:58 PM]
file:///D|/Agent%20Folders/Chapter%208%20Dividing%20and%20Conquering.htm
Calls Within Calls
file:///D|/Agent%20Folders/Chapter%208%20Dividing%20and%20Conquering.htm (8 of 50) [9/26/2002 12:42:58 PM]
file:///D|/Agent%20Folders/Chapter%208%20Dividing%20and%20Conquering.htm
Within a procedure you can do anything that you can do within the main program. This
includes calling other procedures from within a procedure. Even something as simple as
EAT2.ASM does that. Look at the Writeln procedure:
Writeln PROC
call Write ; Display the string proper through Write
lea DX , CRLF ; Load address of newline string to DS:DX
call Write ; Display the newline string through Write
ret ; Return to the caller
Writeln ENDP
The Writeln procedure displays a string on your screen, and then returns the cursor to the
left margin of the following screen line. This procedure is actually two distinct activities,
and Writeln very economically uses a mechanism that already exists: the Write
procedure. The first thing that Writeln does is call Write to display the string on the
screen. Remember that the caller loaded the address of the string to be displayed into DX
before calling Writeln. Nothing has disturbed DX, so Writeln can immediately call
Write, which will fetch the address from DX and display the string on the screen.
Returning the cursor is done by displaying the newline sequence, which is stored in a
string named CRLF. Writeln again uses Write to display CRLF. Once that is done, the
work is finished, and Writeln executes a RET instruction to return execution to the caller.
Calling procedures from within procedures requires you to pay attention to one thing:
stack space. Remember that each procedure call pushes a return address onto the stack.
This return address is not removed from the stack until the RET instruction for that
procedure executes. If you execute another CALL instruction before returning from a
procedure, the second CALL instruction pushes another return address onto the stack. If
you keep calling procedures from within procedures, one return address will pile up on
the stack for each CALL until you start returning from all those nested procedures.
If you run out of stack space, your program will crash and return to DOS, possibly taking
DOS and the machine with it. This is why you should take care to allocate considerably
more stack space than you think you might ever conceivably need. EAT2.ASM at most
uses four bytes of stack space, because it nests procedure calls two deep—Writeln within
itself calls Write. Nonetheless, I allocated 512 bytes of stack to get you in the habit of not
being stingy with stack space. Obviously you won't always be able to keep a 128-to-l ratio
of "need to have," but consider 512 bytes a minimum for stack space allocation. If you
need more, allocate it. Don't forget that there is only one stack in the system, and while
your program is running, DOS and the BIOS and any active TSRs may well be using the
same stack. If they fill it, you'll go down with the system—so leave room!
file:///D|/Agent%20Folders/Chapter%208%20Dividing%20and%20Conquering.htm (9 of 50) [9/26/2002 12:42:58 PM]
file:///D|/Agent%20Folders/Chapter%208%20Dividing%20and%20Conquering.htm
When to Make Something a Procedure
The single most important purpose of procedures is to manage complexity in your
programs by replacing a sequence of machine instructions with a descrip-tive name.
While this might seem to be overkill in the case of the Write procedure, which contains
only two instructions apart from the structurally-necessary RET instruction.
True. But—the Writeln procedure hides two separate calls to Write behind itself: one to
display the string, and another to return the cursor to the left margin of the next line.
If you look back to EAT.ASM, you'll see that it took six instructions to display both the
slogan string and the newline string. What took six instructions now takes two, thanks to
Writeln. Furthermore, the name Writeln is more readable and descriptive of what the
sequence of six instructions do than the sequence of six instructions themselves.
Extremely simple procedures like Write don't themselves hide a great deal of complexity.
They do give certain actions descriptive names, which is valuable in itself. They also
provide basic building blocks for the creation of larger and more powerful procedures, as
we'll see later on.
In general, when looking for some action to turn into a procedure, see what actions tend
to happen a lot in a program. Most programs spend a lot of time displaying things on the
screen. Procedures like Write and Writeln become general-purpose tools that may be
used all over your programs. Fur-thermore, once you've written and tested them, they may
be reused in future programs as well.
Try to look ahead to your future programming tasks and create procedures of general
usefulness. (Tool-building is a very good way to hone your assembly language skills.) I'll
be showing you more of this type of procedure by way of examples as we continue.
On the other hand, a short sequence (five to ten instructions) that is only called once or
perhaps twice within a middling program (i.e., over hundreds of machine instructions) is a
poor candidate for a procedure.
You may find it useful to define large procedures that are called only once when your
program becomes big enough to require breaking it down into functional chunks. A
thousand-line assembly-language program might split well into a sequence of nine or ten
largish procedures. Each is only called once from the main program, but this allows your
main program to be very indicative of what the program is doing:
Start: call Initialize
call OpenFile
Input: call GetRec
file:///D|/Agent%20Folders/Chapter%208%20Dividing%20and%20Conquering.htm (10 of 50) [9/26/2002 12:42:58 PM]
file:///D|/Agent%20Folders/Chapter%208%20Dividing%20and%20Conquering.htm
call VerifyRec
call WriteRec
loop Input
call CloseFile
call Cleanup
call ReturnToDOS
This is clean and readable, and provides a necessary "view from a height" when you
begin to approach a thousand-line assembly-language program. Remember that the
Martians are always hiding somewhere close by, anxious to turn your program into
unreadable hieroglyphics.
There's no weapon against them with half the power of procedures.
8.3 Using BIOS Services
In the last chapter we looked closely at DOS services, which are accessed through the
DOS services dispatcher. The DOS dispatcher lives at the other end of software interrupt
21H, and offers a tremendous list of services at the disposal of your programs. There's
another provider of services in your machine that lives even deeper than DOS: the ROM
BIOS. ROM (Read-Only Memory), indicates memory chips whose contents are burned
into their silicon and do not vanish when power is turned off. BIOS (Basic Input/Output
System) is a collection of fundamental routines for dealing with your computers input and
output peripherals. These peripherals include disk drives, displays, print-ers, and the like.
DOS uses BIOS services as part of some of the services that it provides.
Like DOS, BIOS services are accessed through software interrupts. Unlike DOS, which
channels nearly all requests for its services through the single interrupt 21H, BIOS uses
numerous interrupts (about 10) and groups similar categories of services beneath the
control of different interrupts. For example, video display services are accessed through
interrupt 10H, keyboard services are accessed through interrupt 16H, printer services are
accessed through interrupt 17H, and so on.
The overall method for using BIOS services, however, is very similar to that of DOS.
You load a service number and sometimes other initial values into the registers and then
execute an INT <n> instruction, where the n depends on the category of services you're
requesting.
Nothing difficult about that at all. Let's start building some tools.
file:///D|/Agent%20Folders/Chapter%208%20Dividing%20and%20Conquering.htm (11 of 50) [9/26/2002 12:42:58 PM]
file:///D|/Agent%20Folders/Chapter%208%20Dividing%20and%20Conquering.htm
Positioning the Hardware Cursor
So far, in writing to the screen, we've simply let the text fall where it may. In general, this
means one line of text following another, and when the screen fills DOS scrolls the screen
upward to make room on the bottom line for more text. This makes for dull programs,
very similar to programming in the bad old days when everything was done on clunky
mechanical printers called Teletypes. (Indeed, this kind of screen I/O is called glass
teletype I/O, due to its similarity to a printer scrolling paper up one line at a time.)
Let's leave the glass teletypes behind, and take control of the cursor. BIOS service 10H
(often nicknamed VIDEO, in uppercase, for reasons that are obscure) offers a simple
service to position the hardware cursor on the text screen. The service number is loaded
into AH, a common thread through all BIOS services. The value 0 must be placed in BH
unless you intend to tinker with multiple display pages. That's a story for another time;
while you're learning, assume BH should be set to 0 for cursor positioning.
The new position of the cursor must be loaded into the two halves of the DX register.
Cursor positions are given as XY coordinate pairs. The X component of the cursor
position is the number of character columns to the right of the left margin where you want
the cursor to be positioned. The Y component is the number of lines down from the top of
the screen where you want the cursor to be positioned. The X component is loaded into
DL, and the Y component is loaded into DH. The routine itself is nothing more than this:
GotoXY PROC
mov AH ,02H ; Select VIDEO service 2: Position cursor
mov BH ,0 : Stay with display page 0
int 10H ; Call VIDEO
ret : Return to the caller
GotoXY ENDP
Don't forget that the X and Y value must be loaded into DX by the caller. Using GotoXY
is done this way:
mov DL,35 ; Pass 35 as X coordinate
mov DH,9 ; Pass 9 as Y coordinate call
GotoXY ; Position the cursor
EAT3.ASM uses GotoXY to position the cursor, but it does something else as well: it
clears the display. If you're going to be moving the cursor at will around the screen with
GotoXY, it makes sense to start with a completely clear screen so the remains of earlier
file:///D|/Agent%20Folders/Chapter%208%20Dividing%20and%20Conquering.htm (12 of 50) [9/26/2002 12:42:58 PM]
file:///D|/Agent%20Folders/Chapter%208%20Dividing%20and%20Conquering.htm
programs and DOS commands don't clutter up the view.
There's another VIDEO service that can do the job. VIDEO Service 6 is an interesting
and powerful one: not only does it clear the screen, it can scroll the screen as well, by any
specified number of lines. Furthermore, it can clear or scroll the entire screen, or only a
rectangular portion of the screen, leaving the rest of the screen undisturbed.
If scrolling is unfamiliar to you, just press Enter repeatedly at the DOS prompt and watch
what happens when you reach the bottom line of the screen. The displayed text on the
screen jumps up by one line, and an empty line appears at the bottom of the screen. The
DOS prompt is then redisplayed in the empty line. Scrolling is the process of making the
screen jump up by one or more lines, and inserting one or more blank lines at the bottom
as appropriate.
Using VIDEO Service 6
Understanding VIDEO service 6 involves learning a fair number of values that need to be
passed to the service in registers. The one unchanging item is the service number itself,
passed as 6 in register AH (as with all BIOS services).
Service 6 acts upon a rectangular region of the display. This may be the full screen, or it
may be only part of the screen. You must pass the coordinates of the upper-left and lower-
right corners of the region in registers CX and DX. Because screen coordinates are
always smaller than 255 (which is the largest value that can be expressed in 8 bits) the
register halves of CX and DX are used independently to carry the X and Y values.
The upper-left corner's X coordinate is passed in CL, and the upper-left corner's Y
coordinate is passed in CH. These are 0-based coordinates, meaning that they count from
0 rather than 1. Confusion is possible here, because most high-level languages like Turbo
Pascal number coordinates on the screen from 1. In other words, the upper-left corner of
the screen in Turbo Pascal is given by the coordinates 1,1. To the BIOS, however, that
same corner of the screen is 0,0. The width and height of a typical screen to Turbo Pascal
would be 80 x 25; the BIOS would use 79 x 24.
Similarly, the lower-right corner's X coordinate is passed in DL, and the lower-right
corner's Y coordinate is passed in DH. (Again, counting from 0.)
Service 6 either scrolls or clears the region. It can scroll the screen upward by any
arbitrary number of lines. This number is passed to service 6 in register AL. Clearing the
region is a special case of scrolling it: when you specify that zero lines be scrolled, the
entire region is cleared.
The full screen is actually a special case of a rectangular region.
By passing the coordinates of the upper-left and lower-right corners of the screen (0,0 and
79,24) the full screen is cleared.
file:///D|/Agent%20Folders/Chapter%208%20Dividing%20and%20Conquering.htm (13 of 50) [9/26/2002 12:42:58 PM]
file:///D|/Agent%20Folders/Chapter%208%20Dividing%20and%20Conquering.htm
Procedures with Multiple Entry Points
This is a lot of versatility for one service to handle, and it brings up a couple of questions.
First of all, how versatile should a single procedure be? Should there be one procedure to
clear the whole screen, another procedure to clear part of a screen, and a third procedure
to scroll part of the screen?
The answer is that one procedure can do all three, and not duplicate any code at all. The
method involves writing a single procedure that has four different entry points. Each entry
point is a label that is called with a CALL instruction. When a given entry point's label is
called, execution begins at the instruction specified by that label. There is only one RET
instruction, so the procedure is in fact one procedure. It's like a house with three front
doors but only one back door; having three front doors does not make it three separate
houses.
Here's what such a creature might look like:
ClrScr PROC
mov CX,0 ; Upper-left corner of full screen
mov DX.LRXY ; Load lower-right XY coordinates into DX
ClrWin: mov AL,0 ; 0 specifies clear entire region
ScrlWin: mov BH,07H ; Specify "normal" attribute for blanked
line(s)
VIDEO6: mov AH,06H ; Select VIDEO service 6: Initialize/Scroll
int 10H ; Call VIDEO
ret ; Return to the caller
ClrScr ENDP
There's nothing much to this. What we have here is a collection of MOV instructions
setting up values in registers before calling VIDEO through interrupt 10H. Note that all
of the entry points, except the one (ClrScr) doing double duty as the procedure name,
must be given with colons. The colon, as I pointed out earlier, is necessary after any label
used to mark an address within a code segment.
The multiple entry points exist only to allow you to skip certain portions of the procedure
that set up values that you don't want set. All the registers used by service 6 must be set
up somewhere. However, they can either be set within the procedure or in the caller's
code just before the procedure is called. If the procedure sets them, the # registers have to
be set to some generally useful configuration (say, clearing the entire screen); if the caller
file:///D|/Agent%20Folders/Chapter%208%20Dividing%20and%20Conquering.htm (14 of 50) [9/26/2002 12:42:58 PM]
file:///D|/Agent%20Folders/Chapter%208%20Dividing%20and%20Conquering.htm
sets them, the registers can be set to serve the caller's needs, making service 6 perform
any of its varied combinations.
So it is with the ClrScr procedure. If you enter ClrScr through its main or top entry
point, all of its internal code will be executed: CX and DX will be set to the upper-left
and lower-right corner coordinates of the full screen; AL will be set to 0 to clear the full
screen rather than scroll it, and BH will be loaded with the "normal," (blank, for white
text on a black background) text display attribute. Then service 6 is called.
If you wish to clear only a rectangular area of the screen (a window), you would use the
ClrWin entry point. This entry point starts executing the code after CX and DX are set to
the corners of the full screen. This means that the caller must load CX and DX with the
upper-left and lower-right corners of the screen region to be cleared. Calling ClrWin
without setting CX and DX at all will execute service 6 with whatever leftover garbage
values happen to be in CX and DX. Something will happen, for certain. Whether it's what
you want to happen or not is far less certain.
Keeping in mind that for proper operation, all of service 6's required registers must be set,
calling ClrWin would be done this way:
mov CX,0422H ; Set upper-left corner to X=22H; Y=04H
mov DX,093AH ; Set lower-right corner to X=3AH; Y=09H
call ClrWin ; Call the window-clear procedure
The two MOV instructions are worth a closer look. Rather than use a separate instruction
to load each half of DX and CX, the two halves are loaded together by loading a 16-bit
immediate data value into the full 16-bit register. Thus two MOV instructions can do the
work that a first glance might think would take four MOV instructions. This is a good
example of writing tight, efficient assembler code. The trick is to document it (as I've
done above) to make sure you understand six weeks from now what the magic number
093AH means!
The first instruction at the label ClrWin sets AL to 0, indicating that the region is to be
cleared, not scrolled. If in fact you do want to scroll the region, you need to skip the
MOV instruction that loads 0 into AL. This is the purpose of the entry point labeled
ScrlWin: it gets you into the procedure below the point where you select clearing over
scrolling. This means that you not only have to set the corners of the region to be scrolled,
but also the number of lines to scroll as well.
mov CX , 0422H ; Set upper-left corner to X-22H; Y-04H
mov DX , 093AH ; Set lower-right corner to X-3AH; Y-09H
file:///D|/Agent%20Folders/Chapter%208%20Dividing%20and%20Conquering.htm (15 of 50) [9/26/2002 12:42:58 PM]
file:///D|/Agent%20Folders/Chapter%208%20Dividing%20and%20Conquering.htm
mov AL , 1 ; Set to scroll by one line
call ScrlWin ; Call the window-scroll procedure
As you can see, more and more of the work is being done by caller and less and less
within the procedure. How you arrange the entry points to the procedure depends on what
operations get done most frequently. In my programs, I tend to clear the whole screen a
lot, clear windows less frequently, and scroll windows less frequently still, and this is
what I had in mind while arranging the code within ClrScr.
Note that there is no entry point to scroll the full screen. To scroll the full screen, you
need to load the coordinates of the corners of the full screen into CX and DX, and then
call ClrWin as though you were clearing just a portion of the screen. If you do a lot of
screen-scrolling, you might define a separate routine for scrolling the full screen. As an
interesting exercise, write such a routine and a program to test it.
As one more entry point, I included a label VIDEO6. This label short-circuits all of the
register setups apart from loading the service number into AH. This allows you to do
something odd and infrequently, like scrolling the entire screen by three lines
.
Memory Data or Immediate Data?
You may have been wondering what the variable identifier LRXY is for and where it is
defined. LRXY is simply used to hold the current X,Y coordinates for the lower-right
corner of the screen. Where LRXY is defined is in the program's data segment, in the
usual way variables are defined, as you'll see if you look ahead to the full listing of
EAT3.ASM.
The more interesting question is why. Most of the time I've been showing you values
loaded into registers from immediate data, which is often useful. The coordinates of the
upper-left corner of the full screen, for example, are always going to be 0,0, and nothing
will change that. The lower-right corner, however, is not necessarily always 79,24.
The original 1981-vintage IBM MDA and CGA graphics adapters are indeed capable of
displaying only an 80 by 25 text screen and no more. However, with an EGA it is
possible to have an 80 by either 25 or 43 text screen, and the VGA, introduced in 1987
with the PS/2 line, can display 25, 43, or 50 line screens, all 80 characters wide. The
newer super VGA video boards are capable even more different text modes, some of them
with more than 80 characters in a visible line. If your program can determine what size
screen is in force when it is invoked, it can modify its displays accordingly.
Avoid dropping immediate values into code (we call this hard-coding) whenever you
can. A better strategy, which I'll be following from now on, uses variables in the data
file:///D|/Agent%20Folders/Chapter%208%20Dividing%20and%20Conquering.htm (16 of 50) [9/26/2002 12:42:58 PM]
file:///D|/Agent%20Folders/Chapter%208%20Dividing%20and%20Conquering.htm
segment initialized with currently correct values when the program begins running.
Use Comment Headers!
As time goes on, you'll find yourself creating dozens or even hundreds of procedures as a
means of not reinventing the same old wheel. The libraries of available procedures that
most high-level language vendors supply with their compilers just don't exist with
assembly language. By and large, you create your own.
Keeping such a list of routines straight is no easy task, when you've written them all
yourself. You must document the essential facts about each individual procedure or you'll
forget them, or, worse yet, remember them incorrectly and act on bad information. (The
resultant bugs are often very hard to find, because you're sure you remember everything
there is to know about that proc! After all, you wrote it!)
I recommend adding a comment header to every procedure you write, no matter how
simple. Such a header should contain the following information:
• The name of the procedure
• The date it was last modified
• What it does
• What data items the caller must pass it to make it work correctly
• What data is returned by the procedure, if any, and where it is re-turned. (For
example, in register CX.)
• What other procedures, if any, are called by the procedure
• Any "gotchas" that need to be kept in mind while writing code that uses the
procedure
file:///D|/Agent%20Folders/Chapter%208%20Dividing%20and%20Conquering.htm (17 of 50) [9/26/2002 12:42:58 PM]
file:///D|/Agent%20Folders/Chapter%208%20Dividing%20and%20Conquering.htm
;DX: The offset of the string to be displayed
; String must be terminated by "$"
;Action: Displays the string at DS:DX up to the "$"
; marker, then issues a newline. Hardware cursor
; will move to the left margin of the following
; line. If the display is to the bottom screen line,
; the screen will scroll.
;Calls: Write
file:///D|/Agent%20Folders/Chapter%208%20Dividing%20and%20Conquering.htm (18 of 50) [9/26/2002 12:42:58 PM]
file:///D|/Agent%20Folders/Chapter%208%20Dividing%20and%20Conquering.htm
file:///D|/Agent%20Folders/Chapter%208%20Dividing%20and%20Conquering.htm (19 of 50) [9/26/2002 12:42:58 PM]
file:///D|/Agent%20Folders/Chapter%208%20Dividing%20and%20Conquering.htm
file:///D|/Agent%20Folders/Chapter%208%20Dividing%20and%20Conquering.htm (20 of 50) [9/26/2002 12:42:58 PM]
file:///D|/Agent%20Folders/Chapter%208%20Dividing%20and%20Conquering.htm
file:///D|/Agent%20Folders/Chapter%208%20Dividing%20and%20Conquering.htm (21 of 50) [9/26/2002 12:42:58 PM]