Beginning VB 2008 Databases From Novice to Professional phần 4 potx
Bạn đang xem bản rút gọn của tài liệu. Xem và tải ngay bản đầy đủ của tài liệu tại đây (1.31 MB, 44 trang )
Try It Out: Executing a Stored Procedure with Parameters
In this example, you’ll call the sp_Orders_By_EmployeeId2 stored procedure, supplying the
employee ID as an input parameter and displaying the result set, the output parameter, and
t
he return value.
1. Add a new VB .NET Console Application project named CallSp2 to your Chapter6 solu-
tion. Rename
Module1.vb to CallSp2.vb.
2. Replace the code in CallSp2.vb with the code in Listing 6-2.
Listing 6-2. CallSp2.vb
Imports System
Imports System.Data
Imports System.Data.SqlClient
Namespace Chapter6
Class CallSp2
Shared Sub Main()
' create connection
Dim conn As New SqlConnection
conn.ConnectionString = "Data Source=.\sqlexpress;Initial
Catalog=Northwind;Integrated Security=True"
Try
' open connection
conn.Open()
' create command
Dim cmd As SqlCommand = conn.CreateCommand()
' specify stored procedure to execute
cmd.CommandType = CommandType.StoredProcedure
cmd.CommandText = "sp_orders_by_employeeid2"
' create input parameter
Dim inparm As SqlParameter = cmd.Parameters.Add( _
"@employeeid", SqlDbType.Int)
inparm.Direction = ParameterDirection.Input
inparm.Value = 2
' create output parameter
Dim ouparm As SqlParameter = cmd.Parameters.Add( _
"@ordercount", SqlDbType.Int)
ouparm.Direction = ParameterDirection.Output
CHAPTER 6 ■ USING STORED PROCEDURES 103
9470ch06final.qxd 2/21/08 3:02 PM Page 103
Simpo PDF Merge and Split Unregistered Version -
' create return value parameter
Dim retval As SqlParameter = cmd.Parameters.Add( _
"return_value", SqlDbType.Int)
retval.Direction = ParameterDirection.ReturnValue
' execute command
Dim rdr As SqlDataReader = cmd.ExecuteReader()
' Process the result set
While rdr.Read()
Console.WriteLine("{0} {1}",
rdr(0).ToString().PadRight(5), rdr(1).ToString())
End While
rdr.Close()
' display output parameter value
Console.WriteLine("The output parameter value is {0}" _
, cmd.Parameters("@ordercount").Value)
' display return value
Console.WriteLine( _
"The return value is {0}" _
, cmd.Parameters("return_value").Value)
Catch ex As SqlException
Console.WriteLine(ex.ToString())
Finally
conn.Close()
End Try
End Sub
End Class
End Namespace
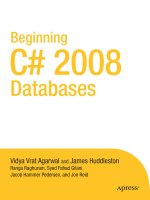
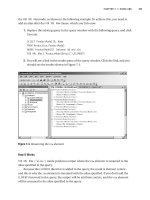
3. Make this the startup project and run it by pressing Ctrl+F5. You should see the results
shown in F
igure 6-10.
CHAPTER 6 ■ USING STORED PROCEDURES104
9470ch06final.qxd 2/21/08 3:02 PM Page 104
Simpo PDF Merge and Split Unregistered Version -
Figure 6-10. Using parameters and the return value with VB .NET
How It Works
This is very much like the previous example. The main difference is that you add three com-
mand parameters, specifying the kind of parameter with the
Direction property:
' create input parameter
Dim inparm As SqlParameter = cmd.Parameters.Add( _
"@employeeid", SqlDbType.Int)
inparm.Direction = ParameterDirection.Input
inparm.Value = 2
' create output parameter
Dim ouparm As SqlParameter = cmd.Parameters.Add( _
"@ordercount", SqlDbType.Int)
ouparm.Direction = ParameterDirection.Output
' create return value parameter
Dim retval As SqlParameter = cmd.Parameters.Add( _
"return_value", SqlDbType.Int)
retval.Direction = ParameterDirection.ReturnValue
Y
ou set the input parameter value to
2 before the call:
inparm.Value = 2
and retrieve the values for the output parameter and return value by indexing into the com-
mand’s parameters collection after the stored procedure is returned:
CHAPTER 6 ■ USING STORED PROCEDURES 105
9470ch06final.qxd 2/21/08 3:02 PM Page 105
Simpo PDF Merge and Split Unregistered Version -
' display output parameter value
Console.WriteLine("The output parameter value is {0}" _
, cmd.Parameters("@ordercount").Value)
' display return value
Console.WriteLine( _
"The return value is {0}" _
, cmd.Parameters("return_value").Value)
You can create as many input and output parameters as you need. You must provide
command parameters for all input parameters that don’t have default values. You don’t have
to provide command parameters for any output parameters you don’t need to use. Input and
output parameter names must agree with the parameter names in the stored procedure,
except for case (remember that T-SQL is not case sensitive).
Though it’s handled in ADO.NET as a command parameter, there is always only one
return value. Like output parameters, you don’t need to create a command parameter for the
return value unless you intend to use it. But unlike input and output parameters, you can give
it whatever parameter name you choose.
Deleting Stored Procedures
Once a stored procedure is created, it can also be deleted if its functionality is not required.
Try It Out: Deleting a Stored Procedure
You’ll delete your first stored procedure (sp_Select_All_Employees), which you renamed to
sp_Select_Employees_Details.
1. Replace the query with the following statement in the query window and click Execute.
Drop procedure sp_Select_Employees_Details
You will see the following message: “Command(s) completed successfully.”
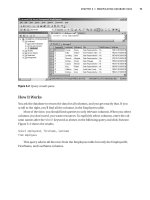
2. Navigate to Object Explorer, expand the Northwind database node, and then expand
the Pr
ogrammability node
. Select the Stored Procedures node, right-click, and select
Refresh. Notice that the procedure
sp_Select_Employees_Details has been deleted, as
it is no longer listed in Object Explorer (see Figure 6-11).
CHAPTER 6 ■ USING STORED PROCEDURES106
9470ch06final.qxd 2/21/08 3:02 PM Page 106
Simpo PDF Merge and Split Unregistered Version -
Figure 6-11. Deleting a stored procedure
How It Works
SQL Server offers the DROP statement to remove objects. To remove the stored procedure,
you use
drop procedure sp_Select_Employees_Details
In this statement, DROP takes the procedure sp_Select_Employees_Details as its value and
will thus remove it.
Summary
In this chapter, you created stored procedures; you developed an understanding of what’s
involved in calling stored procedures from VB .NET. You saw that calling stored procedures
isn’t inherently different from executing queries and statements; you simply create appropri-
ate command parameters for the stored procedure parameters you need to use. You also
learned about modifying a stored procedure, retrieving metadata information, and renaming
and deleting a stor
ed pr
ocedur
e
, as well as calling a stored procedure from VB .NET applica-
tions using ADO .NET.
In the next chapter, you will see how to work with XML.
CHAPTER 6 ■ USING STORED PROCEDURES 107
9470ch06final.qxd 2/21/08 3:02 PM Page 107
Simpo PDF Merge and Split Unregistered Version -
9470ch06final.qxd 2/21/08 3:02 PM Page 108
Simpo PDF Merge and Split Unregistered Version -
Using XML
XML has been around for many years; with the release of Microsoft .NET technology, XML
has become even more popular. Microsoft’s development tools and technologies have built-in
features to support XML. The advantages of using XML and its related technologies are major
foundations of both the Internet and .NET.
Our goal in this chapter is to introduce you to the most essential XML concepts and ter-
minology and the most basic techniques for using XML with SQL Server 2005. This will enable
you to handle some common programming tasks while writing a software application.
In this chapter, we’ll cover the following:
• Defining XML
• Why XML?
• Benefits of storing data as XML
• Understanding XML documents
• Understanding the XML declaration
• Converting relational data to XML
• How to store and retrieve XML documents using the
xml data type
Defining XML
XML stands
for eXtensible Markup Language. XML, which is derived from SGML (Standard
Generalized Markup Language), is a metalanguage. A
metalanguage isn’t used for program-
ming but rather for defining other languages, and the languages XML defines are known as
mar
kup languages
. M
arkup is exactly what it implies: a means of
“
marking up” something.
The XML document is in the form of a text document, and it can be read by both humans
and computers.
109
CHAPTER 7
9470ch07final.qxd 2/21/08 3:01 PM Page 109
Simpo PDF Merge and Split Unregistered Version -
■Note In essence, each XML document is an instance of a language defined by the XML elements used in
the document. The specific language may or may not have been explicitly defined, but professional use of
XML demands carefully planning one’s XML
vocabulary and specifying its definition in a schema that can be
used to validate that documents adhere to both the syntax and semantics of a vocabulary. The XML Schema
Definition language (usually referred to as XSD) is the language for defining XML vocabularies.
The World Wide Web Consortium (W3C) developed XML in 1996. Intended to support a
wide variety of applications, XML was used by the W3C to create eXtensible HTML (XHTML),
an XML vocabulary. Since 1996, the W3C has developed a variety of other XML-oriented tech-
nologies, including eXtensible Stylesheet Language (XSL), which provides the same kind of
facility for XHTML that Cascading Style Sheets (CSS) does for HTML, and XSL Transformations
(XSLT), which is a language for transforming XML documents into other XML documents.
Why XML?
XML is multipurpose, extensible data representation technology. XML increases the possibili-
ties for applications to consume and manipulate data. XML data is different from relational
data in that it can be structured, semistructured, or unstructured. XML support in SQL Server
2005 is fully integrated with the relational engine and query optimizer, allowing the retrieval
and modification of XML data and even the conversion between XML and relational data
representations.
Benefits of Storing Data As XML
XML is a platform-independent, data-representation format that offers certain benefits over
a relational format for specific data representation requirements.
Storing data as XML offers many benefits, such as the following:
• Since XML is self-describing, applications can consume XML data without knowing
the schema or str
uctur
e
. XML data is always arranged hierarchically in a tree structure
form. XML tree structure must always have a root, or parent node, which is known as
an
XML document.
• XML maintains document ordering. Because XML is arranged in tree structure, main-
taining node order becomes easy.
• XML Schema is used to define valid XML document structure.
• Because of XML’s hierarchical structure, you can search inside the tree structures.
X
Query and XPath are the query languages designed to search XML data.
• Data stored as XML is extensible. It is easy to manipulate XML data by inserting, modi-
fying, and deleting nodes
.
CHAPTER 7 ■ USING XML110
9470ch07final.qxd 2/21/08 3:01 PM Page 110
Simpo PDF Merge and Split Unregistered Version -
■Note Well-formed XML is an XML document that meets a set of constraints specified by the W3C
recommendation for XML 1.0. For example, well-formed XML must contain a root-level element, and any
other nested elements must open and close properly without intermixing.
SQL Server 2005 validates some of the constraints of well-formed XML. Some rules such as the
requirement for a root-level element are not enforced. For a complete list of requirements for well-formed
XML, refer to the W3C recommendations for XML 1.0 at />Understanding XML Documents
An XML document could be a physical file on a computer, a data stream over a network (in
theory, formatted so a human could read it, but in practice, often in compressed binary form),
or just a string in memory. It has to be complete in itself, however, and even without a schema,
it must obey certain rules.
The most fundamental rule is that XML documents must be
well formed. At its simplest,
this means that overlapping elements aren’t allowed, so you must close all
child elements
before the end tag of their
parent element. For example, this XML document is well formed:
<states>
<state>
<name>Delaware</name>
<city>Dover</city>
<city>Wilmington</city>
</state>
</states>
It has a root (or document) element, states, delimited by a start tag, <states>, and an end
tag,
</states>. The root element is the parent of the state element, which is in turn the parent
of a
name element and two city elements. An XML document can have only one root element.
Elements may have
attributes. In the following example, name is used as an attribute with
the
state element:
<states>
<state name="Delaware">
<city>Dover</city>
<city>Wilmington</city>
</state>
</states>
This r
etains the same infor
mation as the earlier example
, r
eplacing the
name element,
which occurs only once, with a
name attribute and changing the content of the original element
(
Delaware) into the v
alue
of the attr
ibute (
"Delaware"). An element may hav
e any number of
attributes
, but it may not hav
e duplicate attr
ibutes
, so the
city elements w
er
en
’
t candidates
for replacement.
CHAPTER 7 ■ USING XML 111
9470ch07final.qxd 2/21/08 3:01 PM Page 111
Simpo PDF Merge and Split Unregistered Version -
Elements may have content (text data or other elements), or they may be empty. For
e
xample, just for the sake of argument, if you want to keep track of how many states are in
the document, you could use an empty element to do it:
<states>
<controlinfo count="1"/>
<state name="Delaware">
<city>Dover</city>
<city>Wilmington</city>
</state>
</states>
The empty element, controlinfo, has one attribute, count, but no content. Note that it
isn’t delimited by start and end tags, but exists within an
empty element tag (that starts with
< and ends with />).
An alternative syntax for empty elements, using start and end tags, is also valid:
<controlinfo count="1"></controlinfo>
Many programs that generate XML use this form.
■Note Though it’s easy to design XML documents, designing them well is as much a challenge as
designing a database. Many experienced XML designers disagree over the best use of attributes and
even whether attributes should be used at all (and without attributes, empty elements have virtually no
use). While elements may in some ways map more ideally to relational data, this doesn’t mean that
attributes have no place in XML design. After all, XML isn’t intended to (and in principle can’t) conform
to the relational model of data. In fact, you’ll see that a “pure” element-only design can be more diffi-
cult to work with in T-SQL.
Understanding the XML Declaration
In addition to elements and attributes, XML documents can have other parts, but most of
them are important only if you need to delve deeply into XML. Though it is optional, the
XML declaration is one part that should be included in an XML document to precisely con-
form to the W3C recommendation. If used, it must occur before the root element in an
XML document.
The XML declaration is similar in format to an element, but it has question marks
immediately next to the angle br
ackets. It always has an attribute named
version; curr
ently,
this has two possible values:
"1.0" and "1.1". (A couple other attributes are defined but
aren’t required.) So, the simplest form of an XML declaration is
<?xml version="1.0" ?>
CHAPTER 7 ■ USING XML112
9470ch07final.qxd 2/21/08 3:01 PM Page 112
Simpo PDF Merge and Split Unregistered Version -
XML has other aspects, but this is all you need to get started. In fact, this may be all you’ll
e
ver need to be quite effective. As you’ll see, we don’t use any XML declarations (or even more
important things such as XML schemas and namespaces) for our XML documents, yet our
small examples work well, are representative of fundamental XML processing, and could be
scaled up to much larger XML documents.
Converting Relational Data to XML
A SELECT query returns results as a row set. You can optionally retrieve results of a SQL query
as XML by specifying the
FOR XML clause in the query. SQL Server 2005 enables you to extract
relational data into XML form, by using the
FOR XML clause in the SELECT statement. SQL Server
2005 extends the
FOR XML capabilities, making it easier to represent complex hierarchical
structures and add new keywords to modify the resulting XML structure.
■Note In Chapter 13, we’ll show how to extract data from a dataset, convert it into XML, and write it to
a file with the dataset’s WriteXml method.
The FOR XML clause converts result sets from a query into an XML structure, and it pro-
vides four modes of formatting:
•
FOR XML RAW
• FOR XML AUTO
• FOR XML PATH
• FOR XML EXPLICIT
We’ll use the first two in examples to show how to generate XML with a query.
Using FOR XML RAW
The FOR XML RAW mode transforms each row in the query result set into an XML element
identified as
row for each row displayed in the result set. Each column name in the SELECT
statement is added as an attribute to the row element while displaying the result set.
By default, each column value in the row set that is not null is mapped to an attribute of
the
row element.
Try It Out: Using FOR XML RAW (Attribute Centric)
T
o use
FOR XML RAW to
tr
ansfor
m returned rows into XML elements, follow these steps:
CHAPTER 7 ■ USING XML 113
9470ch07final.qxd 2/21/08 3:01 PM Page 113
Simpo PDF Merge and Split Unregistered Version -
1. Open SQL Server Management Studio Express (SSMSE), and in the Connect to Server
d
ialog box select
<
ServerName>
\
SQLEXPRESS as the server name and click Connect.
2. In Object Explorer, expand the Databases node, select the AdventureWorks database,
and click the New Query button. Enter the following query and click Execute:
SELECT ProductModelID, Name
FROM Production.ProductModel
WHERE ProductModelID between 98 and 101
FOR XML RAW
3. You will see a link in the results pane of the query window. Click the link, and you
should see the results shown in Figure 7-1.
Figure 7-1. Using FOR XML RAW
How It Works
FOR XML RAW mode produces very “raw” XML. It turns each row in the result set into an
XML
row empty element and uses an attribute for each of the column values, using the
alias names you specify in the query as the attribute names. It produces a string composed
of all the elements.
FOR XML RAW mode doesn’t produce an XML document, since it has as many root ele-
ments (
raw) as there are rows in the result set, and an XML document can have only one
root element.
CHAPTER 7 ■ USING XML114
9470ch07final.qxd 2/21/08 3:01 PM Page 114
Simpo PDF Merge and Split Unregistered Version -
Try It Out: Using FOR XML RAW (Element Centric)
To change the formatting from attribute centric (as shown in the previous example) to ele-
m
ent centric, which means that a new element will be created for each column, you need to
add the
ELEMENTS keyword after the FOR XML RAW clause as shown in the following example:
1. Replace the existing query in the query window with the following query and click
Execute:
SELECT ProductModelID, Name
FROM Production.ProductModel
WHERE ProductModelID between 98 and 101
FOR XML RAW,ELEMENTS
2. You will see a link in the results pane of the query window. Click the link, and you
should see the results shown in Figure 7-2.
Figure 7-2. Using FOR XML RAW ELEMENTS
How It Works
FOR XML RAW ELEMENTS mode pr
oduces v
er
y
“
element-centric” XML. It turns each row in the
result set where each column is converted into an attribute.
FOR XML RAW ELEMENTS mode also doesn’t produce an XML document, since it has as many
r
oot elements (
raw) as ther
e are r
o
ws in the r
esult set, and an XML document can have only
one root element.
CHAPTER 7 ■ USING XML 115
9470ch07final.qxd 2/21/08 3:01 PM Page 115
Simpo PDF Merge and Split Unregistered Version -
Try It Out: Renaming the row Element
For each row in the result set, the FOR XML RAW mode generates a row element. You can option-
a
lly specify another name for this element by including an optional argument in the
F
OR XML
RAW
mode, as shown in the following example. To achieve this, you need to add an alias after
the
FOR XML RAW clause, which you’ll do now.
1. Replace the existing query in the query window with the following query, and click
Execute:
SELECT ProductModelID, Name
FROM Production.ProductModel
WHERE ProductModelID between 98 and 101
FOR XML RAW ('ProductModelDetail'),ELEMENTS
2. You will see a link in the results pane of the query window. Click the link, and you
should see the results shown in Figure 7-3.
Figure 7-3. Renaming the row element
How It Works
FOR XML RAW ('alias') mode produces output where the row element is renamed to the alias
specified in the query.
Because the
ELEMENTS directive is added in the query, the result is element centric, and
this is why the
row element is renamed with the alias specified. If you don’t add the ELEMENTS
keyword in the query, the output will be attribute centric, and the row element will be
renamed to the alias specified in the query.
CHAPTER 7 ■ USING XML116
9470ch07final.qxd 2/21/08 3:01 PM Page 116
Simpo PDF Merge and Split Unregistered Version -
Observations About FOR XML RAW Formatting
FOR XML RAW does not provide a root node, and this is why the XML structure is not a well-
f
ormed XML document.
FOR XML RAW supports attribute- and element-centric formatting, which means that all
the columns must be formatted in the same way. Hence it is not possible to have the XML
structure returned with both the XML attributes and XML elements.
FOR XML RAW generates a hierarchy in which all the elements in the XML structure are at
the same level.
Using FOR XML AUTO
FOR XML AUTO mode returns query results as nested XML elements. This does not provide
much control over the shape of the XML generated from a query result.
FOR XML AUTO mode
queries are useful if you want to generate simple hierarchies.
Each table in the
FROM clause, from which at least one column is listed in the SELECT
clause, is represented as an XML element. The columns listed in the SELECT clause are mapped
to attributes or subelements.
Try It Out: Using FOR XML AUTO
To see how to use FOR XML AUTO to format query results as nested XML elements, follow these
steps:
1. Replace the existing query in the query window with the following query and click
Execute:
SELECT Cust.CustomerID,
OrderHeader.CustomerID,
OrderHeader.SalesOrderID,
OrderHeader.Status,
Cust.CustomerType
FROM Sales.Customer Cust, Sales.SalesOrderHeader
OrderHeader
WHERE Cust.CustomerID = OrderHeader.CustomerID
ORDER BY Cust.CustomerID
FOR XML AUTO
2. You will see a link in the results pane of the query window. Click the link, and you
should see the results shown in Figure 7-4.
CHAPTER 7 ■ USING XML 117
9470ch07final.qxd 2/21/08 3:01 PM Page 117
Simpo PDF Merge and Split Unregistered Version -
Figure 7-4. Using FOR XML AUTO
How It Works
The CustomerID references the Cust table. Therefore, a Cust element is created and
CustomerID is added as its attribute.
Next, three columns, OrderHeader.CustomerID, OrderHeader.SaleOrderID, and Order-
Header.Status, reference the OrderHeader table. Therefore, an
OrderHeader element is
added as a subelement of the
Cust element, and the three columns are added as attributes
of
OrderHeader.
Next, the Cust.CustomerType column again references the Cust table that was already
identified by the Cust.CustomerID column. Therefore, no new element is created. Instead,
the
CustomerType attribute is added to the Cust element that was previously created.
The query specifies aliases for the table names. These aliases appear as corresponding
element names.
ORDER BY is required to group all children under one parent.
Observations About FOR XML AUTO Formatting
FOR XML AUTO does not provide a root node, and this is why the XML structure is not a well-
formed XML document.
FOR XML AUTO suppor
ts attribute- and element-centric formatting, which means that all
the columns must be formatted in the same way. Hence it is not possible to have the XML
structure returned with both the XML attributes and XML elements.
FOR XML AUTO does not provide a renaming mechanism the way FOR XML RAW does. How-
ever,
FOR XML AUTO uses table and column names and aliases if present.
CHAPTER 7 ■ USING XML118
9470ch07final.qxd 2/21/08 3:01 PM Page 118
Simpo PDF Merge and Split Unregistered Version -
Using the xml Data Type
S
QL Server 2005 has a new data type,
x
ml
,
that is designed not only for holding XML docu-
ments (which are essentially character strings and can be stored in any character column big
enough to hold them), but also for processing XML documents. When we discussed parsing an
X
ML document into a DOM tree, we didn’t mention that once it’s parsed, the XML document
can be updated. You can change element contents and attribute values, and you can add and
remove element occurrences to and from the hierarchy.
We won’t update XML documents here, but the
xml data type provides methods to do it.
It is a very different kind of SQL Server data type, and describing how to exploit it would take
a book of its own—maybe more than one. Our focus here will be on what every database pro-
grammer needs to know: how to use the xml type to store and retrieve XML documents.
■Note There are so many ways to process XML documents (even in ADO.NET and with SQLXML, a sup-
port package for SQL Server 2000) that only time will tell if incorporating such features into a SQL Server
data type was worth the effort. Because XML is such an important technology, being able to process XML
documents purely in T-SQL does offer many possibilities, but right now it’s unclear how much more about
the
xml data type you’ll ever need to know. At any rate, this chapter will give you what you need to know
to start experimenting with it.
Try It Out: Creating a Table to Store XML
To create a table to hold XML documents, replace the existing query in the query window with
the following query and click Execute:
create table xmltest
(
xid int not null primary key,
xdoc xml not null
)
How It Works
This works in the same way as a CREATE TABLE statement is expected to work. Though we’ve
said the
xml data type is different from other SQL Server data types, columns of xml type are
defined just like any other columns
.
■Note The xml data type cannot be used in primary keys.
N
o
w
, y
ou
’
ll inser
t your XML documents into
xmltest and quer
y it to see that they w
er
e
stored.
CHAPTER 7 ■ USING XML 119
9470ch07final.qxd 2/21/08 3:01 PM Page 119
Simpo PDF Merge and Split Unregistered Version -
Try It Out: Storing and Retrieving XML Documents
To insert your XML documents, follow these steps:
1. Replace the code in the SQL query window with the following two INSERT statements:
insert into xmltest
values(
1,
'
<states>
<state>
<abbr>CA</abbr>
<name>California</name>
<city>Berkeley</city>
<city>Los Angeles</city>
<city>Wilmington</city>
</state>
<state>
<abbr>DE</abbr>
<name>Delaware</name>
<city>Newark</city>
<city>Wilmington</city>
</state>
</states>
'
)
insert into xmltest
values(
2,
'
<states>
<state abbr="CA" name="California">
<city name="Berkeley"/>
<city name="Los Angeles"/>
<city name="Wilmington"/>
</state>
<state abbr="DE" name="Delaware">
<city name="Newark"/>
<city name="Wilmington"/>
</state>
</states>
'
)
2. Run the two INSERT statements by clicking Execute, and then display the table with
select * from xmltest. You see the two rows displayed. Click the xdoc column in the
first row, and you should see the XML shown in Figure 7-5.
CHAPTER 7 ■ USING XML120
9470ch07final.qxd 2/21/08 3:01 PM Page 120
Simpo PDF Merge and Split Unregistered Version -
Figure 7-5. Viewing an XML document
How It Works
This works the same way all INSERTs work. You simply provide the primary keys as integers
and the XML documents as strings. The query works just as expected, too.
Summary
This chapter covered the fundamentals of XML that every Visual Basic .NET programmer
needs to know. It also showed you how to use the most frequently used T-SQL features for
extracting XML from tables and querying XML documents like tables. Finally, we discussed
the xml data type and gave you some practice using it.
H
o
w much mor
e you need to know about XML or T-SQL and ADO.NET facilities for using
XML documents depends on what you need to do. As for many developers, this chapter may
be all you ever need to know and understand. If you do more sophisticated XML processing,
you now have a strong foundation for experimenting on your own.
In the next chapter, you will learn about database transactions.
CHAPTER 7 ■ USING XML 121
9470ch07final.qxd 2/21/08 3:01 PM Page 121
Simpo PDF Merge and Split Unregistered Version -
9470ch07final.qxd 2/21/08 3:01 PM Page 122
Simpo PDF Merge and Split Unregistered Version -
Understanding Transactions
For any business, transactions, which may comprise many individual operations and
even other transactions, play a key role. Transactions are essential for maintaining data
integrity, both for multiple related operations and when multiple users update the data-
base concurrently.
This chapter will discuss the concepts related to transactions and how transactions can
be used in SQL Server 2005 and VB.NET.
In this chapter, we’ll cover the following:
• What is a transaction?
• When to use transactions
• Understanding ACID properties
• Transaction design
• Transaction state
• Specifying transaction boundaries
• T-SQL statements allowed in a transaction
• Local transactions in SQL Server 2005
• Distributed transactions in SQL Server 2005
• Guidelines to code efficient transactions
•
H
o
w to code transactions
What Is a Transaction?
A tr
ansaction
is
a set of operations performed so all operations are guaranteed to succeed or
fail as one unit.
A common example of a transaction is the process of transferring money from a checking
account to a savings account. This involves two operations: deducting money from the check-
ing account and adding it to the savings account. Both must succeed together and be
committed to the accounts, or both must fail together and be rolled back so that the accounts
are maintained in a consistent state. Under no circumstances should money be deducted
123
CHAPTER 8
9470ch08final.qxd 3/3/08 5:16 PM Page 123
Simpo PDF Merge and Split Unregistered Version -
from the checking account but not added to the savings account (or vice versa)—at least you
w
ould not want this to happen with the transactions occurring with your bank accounts. By
using a transaction, both the operations, namely debit and credit, can be guaranteed to suc-
ceed or fail together. So both accounts remain in a consistent state all the times.
When to Use Transactions
You should use transactions when several operations must succeed or fail as a unit. The fol-
lowing are some frequent scenarios where use of transactions is recommended:
• In batch processing, where multiple rows must be inserted, updated, or deleted as a
single unit
• Whenever a change to one table requires that other tables be kept consistent
• When modifying data in two or more databases concurrently
• In distributed transactions, where data is manipulated in databases on different servers
When you use transactions, you place locks on data pending permanent change to the
database. No other operations can take place on locked data until the lock is released. You
could lock anything from a single row up to the whole database. This is called
concurrency,
which means how the database handles multiple updates at one time.
In the bank example, locks ensure that two separate transactions don’t access the same
accounts at the same time. If they did, either deposits or withdrawals could be lost.
■Note It’s important to keep transactions pending for the shortest period of time. A lock stops others from
accessing the locked database resource. Too many locks, or locks on frequently accessed resources, can
seriously degrade performance.
Understanding ACID Properties
A transaction is characterized by four properties, often referred to as the ACID properties:
atomicity
, consistency, isolation, and dur
ability.
■Note The term ACID was coined by Andreas Reuter in 1983.
CHAPTER 8 ■ UNDERSTANDING TRANSACTIONS124
9470ch08final.qxd 3/3/08 5:16 PM Page 124
Simpo PDF Merge and Split Unregistered Version -
Atomicity: A transaction is atomic if it’s regarded as a single action rather than a collection
o
f separate operations. So, only when all the separate operations succeed does a trans-
action succeed and is committed to the database. On the other hand, if a single operation
fails during the transaction, everything is considered to have failed and must be undone
(rolled back) if it has already taken place. In the case of the order-entry system of the
Northwind database, when you enter an order into the Orders and Order Details tables,
data will be saved together in both tables, or it won’t be saved at all.
Consistency: The transaction should leave the database in a consistent state—whether or
not it completed successfully. The data modified by the transaction must comply with all
the constraints placed on the columns in order to maintain data integrity. In the case of
Northwind, you can’t have rows in the Order Details table without a corresponding row in
the Orders table, as this would leave the data in an inconsistent state.
Isolation: Every transaction has a well-defined boundary—that is, it is isolated from
another transaction. One transaction shouldn’t affect other transactions running at the
same time. Data modifications made by one transaction must be isolated from the data
modifications made by all other transactions. A transaction sees data in the state it was in
before another concurrent transaction modified it, or it sees the data after the second
transaction has completed, but it doesn’t see an intermediate state.
Durability: Data modifications that occur within a successful transaction are kept perma-
nently within the system regardless of what else occurs. Transaction logs are maintained
so that should a failure occur the database can be restored to its original state before the
failure. As each transaction is completed, a row is entered in the database transaction log.
If you have a major system failure that requires the database to be restored from a
backup, you could then use this transaction log to insert (roll forward) any successful
transactions that have taken place.
Every database server that offers support for transactions enforces these four ACID prop-
erties automatically.
Transaction Design
Transactions represent real-world events such as bank transactions, airline reservations,
remittance of funds, and so forth.
The purpose of transaction design is to define and document the high-lev
el character
is
-
tics of transactions required on the database system, including the following:
• Data to be used by the transaction
• Functional characteristics of the transaction
•
O
utput of the transaction
• Importance to users
• Expected rate of usage
CHAPTER 8 ■ UNDERSTANDING TRANSACTIONS 125
9470ch08final.qxd 3/3/08 5:16 PM Page 125
Simpo PDF Merge and Split Unregistered Version -
There are three main types of transactions:
•
Retrieval transactions: Retrieves data from display on the screen
•
U
pdate transactions
:
Inserts new records, deletes old records, or modifies existing
records in the database
•
Mixed transactions: Involves both retrieval and updating of data
Transaction State
In the absence of failures, all transactions complete successfully. However, a transaction may
not always complete its execution successfully. Such a transaction is termed
aborted.
A transaction that completes its execution successfully is said to be
committed. Figure 8-1
shows that if a transaction has been partially committed, it will be committed but only if it has
not failed; and if the transaction has failed, it will be aborted.
Figure 8-1. States of a transaction
Specifying Transaction Boundaries
SQL Server transaction boundaries help you to identify when SQL Server transactions start
and end by using API functions and methods:
•
Transact-SQL statements: Use the BEGIN TRANSACTION, COMMIT TRANSACTION, COMMIT
WORK
, ROLLBACK TRANSACTION, ROLLBACK WORK, and SET IMPLICIT_TRANSACTIONS state-
ments to delineate transactions. These are primarily used in DB-Library applications
and in T-SQL scripts, such as the scripts that are run using the
osql command-prompt
utility.
•
AP
I functions
and methods
: D
atabase AP
I
s such as ODBC, OLE DB
, ADO
, and the .NET
Framework
SQLClient namespace contain functions or methods used to delineate
transactions. These are the primary mechanisms used to control transactions in a
database engine application.
CHAPTER 8 ■ UNDERSTANDING TRANSACTIONS126
9470ch08final.qxd 3/3/08 5:16 PM Page 126
Simpo PDF Merge and Split Unregistered Version -
Each transaction must be managed by only one of these methods. Using both methods on
t
he same transaction can lead to undefined results. For example, you should not start a trans-
action using the ODBC API functions, and then use the T-SQL
COMMIT statement to complete
the transaction. This would not notify the SQL Server ODBC driver that the transaction was
committed. In this case, use the ODBC
SQLEndTran function to end the transaction.
T-SQL Statements Allowed in a Transaction
You can use all T-SQL statements in a transaction, except for the following statements:
ALTER DATABASE, RECONFIGURE, BACKUP, RESTORE, CREATE DATABASE, UPDATE STATISTICS, and
DROP DATABASE.
Also, you cannot use
sp_dboption to set database options or use any system procedures
that modify the master database inside explicit or implicit transactions.
Local Transactions in SQL Server 2005
All database engines are supposed to provide built-in support for transactions. Transactions
that are restricted to only a single resource or database are known as
local transactions. Local
transactions can be in one of the following four transaction modes:
Autocommit Transactions Autocommit mode is the default transaction management mode of
SQL Server. Every T-SQL statement is committed or rolled back when it is completed. If a
statement completes successfully, it is committed; if it encounters any errors, it is bound to
roll back. A SQL Server connection operates in autocommit mode whenever this default mode
has not been overridden by any type transactions.
Explicit Transactions Explicit transactions are those in which you explicitly control when the
transaction begins and when it ends. Prior to SQL Server 2000, explicit transactions were also
called
user-defined or user-specified transactions.
T-SQL scripts for this mode use the
BEGIN TRANSACTION, COMMIT TRANSACTION, and ROLLBACK
TRANSACTION
statements. Explicit transaction mode lasts only for the duration of the trans-
action. When the transaction ends, the connection returns to the transaction mode it was in
befor
e the explicit transaction was started.
Implicit Transactions When you
connect to a database using SQL Ser
v
er Management Studio
Express and execute a DML query, the changes are automatically saved. This occurs because,
b
y default, the connection is in autocommit transaction mode. If you want no changes to be
committed unless you explicitly indicate so
, y
ou need to set the connection to implicit tr
ans
-
action mode.
Y
ou can set the database connection to implicit transaction mode by using
SET IMPLICIT
_TRANSACTIONS ON
|OFF.
After implicit transaction mode has been set to
ON for a connection, SQL Server automati-
cally star
ts a tr
ansaction when it first executes any of the following statements:
ALTER TABLE,
CREATE, DELETE, DROP, FETCH, GRANT, INSERT, OPEN, REVOKE, SELECT, TRUNCATE TABLE, and UPDATE.
CHAPTER 8 ■ UNDERSTANDING TRANSACTIONS 127
9470ch08final.qxd 3/3/08 5:16 PM Page 127
Simpo PDF Merge and Split Unregistered Version -