Beginning VB 2008 Databases From Novice to Professional phần 10 docx
Bạn đang xem bản rút gọn của tài liệu. Xem và tải ngay bản đầy đủ của tài liệu tại đây (2.18 MB, 43 trang )
Architecture of LINQ
L
INQ consists of three major components:
• LINQ to Objects
• LINQ to ADO.NET, which includes
• LINQ to SQL (formerly called DLinq)
• LINQ to DataSets (formerly called LINQ over DataSets)
• LINQ to Entities
• LINQ to XML (formerly called XLinq)
Figure 19-1 depicts the LINQ architecture, which clearly shows the various components of
LINQ and their related data stores.
Figure 19-1. LINQ architecture
LINQ to Objects deals with in-memor
y data. Any class that implements the
IEnumerable(Of T) interface (in the System.Collections.Generic namespace) can be queried
with S
tandar
d Query Operators (SQOs).
■Note SQOs are a collection of methods that form the LINQ pattern. SQO methods operate on sequences,
where a
sequence represents an object whose type implements the interface IEnumerable(Of T) or the
interface
IQueryable(Of T). The SQO provides query capabilities including filtering, projection, aggrega-
tion, sorting,
and so forth.
CHAPTER 19 ■ USING LINQ 367
9470ch19final.qxd 3/3/08 5:26 PM Page 367
Simpo PDF Merge and Split Unregistered Version -
LINQ to ADO.NET (also known as LINQ-enabled ADO .NET) deals with data from
e
xternal sources, basically anything ADO.NET can connect to. Any class that implements
IEnumerable(Of T) or IQueryable(Of T) (in the System.Linq namespace) can be queried
with SQOs. The LINQ to ADO.NET functionality can be achieved by using the
System.Data.Linq
namespace.
LINQ to XML is a comprehensive API for in-memory XML programming. Like the rest of
LINQ, it includes SQOs, and it can also be used in concert with LINQ to ADO.NET, but its pri-
mary purpose is to unify and simplify the kinds of things that disparate XML tools, such as
XQuery, XPath, and XSLT, are typically used to do. The LINQ to XML functionality can be
achieved by using the
System.Xml.Linq namespace.
■Note LINQ on the .NET Compact Framework includes a subset of the desktop LINQ features. One of the
differences between LINQ on the .NET Framework and LINQ on the .NET Compact Framework is that on
the .NET Compact Framework, only SQOs are supported. LINQ to DataSets and LINQ to DataTables are sup-
ported, and LINQ to XML is also supported except for XPath extensions.
In this chapter, we’ll work with the three techniques LINQ to Objects, LINQ to SQL, and
LINQ to DataSets, since they’re most closely related to the Visual Basic 2008 database pro-
gramming we’ve covered in this book.
LINQ Project Structure
Visual Studio 2008 allows you to use LINQ queries, and to create a LINQ project, follow these
steps:
1. Open Visual Studio 2008 and select File ➤ New ➤ Project.
2. In the New Project dialog box that appears, by default .NET Framework 3.5 is chosen in
the list of available .NET Framework versions supported by Visual Studio 2008. Select
the type of project you would like the LINQ feature to be part of. For example, we will
be using a Console Application project (see Figure 19-2).
3. Type the name Chapter19 for the chosen project and click OK. The new Console Appli-
cation project named Chapter19 will appear. In a Visual Basic Console Application, the
LINQ namespaces ar
e added under the
References folder in S
olution Explor
er, as
shown in Figure 19-3.
Now you are ready to work with a LINQ project, and all you need to do is add the code
functionality and required namespaces to the project and test the application. Let’s begin
using LINQ.
CHAPTER 19 ■ USING LINQ368
9470ch19final.qxd 3/3/08 5:26 PM Page 368
Simpo PDF Merge and Split Unregistered Version -
Figure 19-2. Choosing a LINQ-enabled Console Application project
Figure 19-3. LINQ references
Using LINQ to Objects
The term LINQ to Objects refers to the use of LINQ queries to access in-memory data struc-
tures. You can query any type that supports
IEnumerable(Of T). This means that you can use
LINQ queries not only with user-defined lists, arrays, dictionaries, and so on, but also in con-
junction with .NET Framework APIs that return collections. For example, you can use the
CHAPTER 19 ■ USING LINQ 369
9470ch19final.qxd 3/3/08 5:26 PM Page 369
Simpo PDF Merge and Split Unregistered Version -
System.Reflection classes to return information about types stored in a specified assembly,
and then filter those results by using LINQ. Or you can import text files into enumerable data
structures and compare the contents to other files, extract lines or parts of lines, group match-
ing lines from several files into a new collection, and so on.
LINQ queries offer three main advantages over traditional
For Each loops:
• They are more concise and readable, especially when filtering multiple conditions.
• They provide powerful filtering, ordering, and grouping capabilities with a minimum
of application code.
• They can be ported to other data sources with little or no modification.
In general, the more complex the operation you want to perform on the data, the greater
the benefit you will realize by using LINQ as opposed to traditional iteration techniques.
Try It Out: Coding a Simple LINQ to Objects Query
In this exercise, you’ll use LINQ to Objects to retrieve some names from an array of strings.
1. Right-click the Chapter19 project in the Chapter19 solution, select the Rename option,
and rename the project to LinqToObjects. Rename
Module1.vb to LinqToObjects.vb.
Replace the code in
LinqToObjects.vb with the code in Listing 19-1.
Listing 19-1. LinqToObjects.vb
Imports System
Imports System.Text
Imports System.Linq
Imports System.Collections.Generic
Namespace Chapter19
Class LinqToObjects
Shared Sub Main(ByVal args As String())
Dim names As String() = {"James Huddleston", "Pearly", _
"Rupali Agarwal", "Fabio Claudio", "Vamika Agarwal", _
"Sofia Merchant", "Vidya Vrat Agarwal"}
'Dim name As String
Dim namesOfPeople As IEnumerable(Of String) = _
From name In names _
Where (name.Length <= 16) _
Select name
CHAPTER 19 ■ USING LINQ370
9470ch19final.qxd 3/3/08 5:26 PM Page 370
Simpo PDF Merge and Split Unregistered Version -
For Each name In namesOfPeople
Console.WriteLine(name)
Next
End Sub
End Class
End Namespace
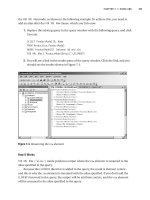
2. Run the program by pressing Ctrl+F5, and you should see the results shown in Fig-
ure 19-4.
Figure 19-4. Retrieving names from a string array using LINQ to Objects
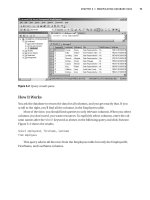
How It Works
You declare a string array called names:
Dim names As String() = {"James Huddleston", "Pearly", _
"Rupali Agarwal", "Fabio Claudio", "Vamika Agarwal", _
"Sofia Merchant", "Vidya Vrat Agarwal"}
In order to retrieve names from the string array, you query the string array using IEnumer-
able(Of String)
and also loop through the names array with the help of For Each using the
LINQ to Objects query syntax:
Dim namesOfPeople As IEnumerable(Of String) = _
From name In names _
Where (name.Length <= 16) _
Select name
For Each name In namesOfPeople
Console.WriteLine(name)
Next
CHAPTER 19 ■ USING LINQ 371
9470ch19final.qxd 3/3/08 5:26 PM Page 371
Simpo PDF Merge and Split Unregistered Version -
Using LINQ to SQL
L
INQ to SQL is a facility for managing and accessing relational data as objects. It’s logically
similar to ADO.NET in some ways, but it views data from a more abstract perspective that
simplifies many operations. It connects to a database, converts LINQ constructs into SQL,
s
ubmits the SQL, transforms results into objects, and even tracks changes and automatically
requests database updates.
A simple LINQ query requires three things:
• Entity classes
• A data context
• A LINQ query
Try It Out: Coding a Simple LINQ to SQL Query
In this exercise, you’ll use LINQ to SQL to retrieve all customers from the Northwind Cus-
tomers table.
1. Navigate to Solution Explorer, right-click the Chapter19 solution, and select Add ➤
New Project. From the provided list of Visual Studio installed templates, choose
Console Application and name the newly added project
LinqToSql. Click OK.
2. Rename Module1.vb to LinqToSql.vb. Replace the code in LinqToSql.vb with the code
in Listing 19-2.
Listing 19-2. LinqToSql.vb
Imports System
Imports System.Linq
Imports System.Data.Linq
Imports System.Data.Linq.Mapping
Imports System.Data.Linq.DataContext
Namespace Chapter19
Class LinqToSql
<Table(Name:="Customers")> _
Public Class Customer
<Column()> _
Public customerId As String
<Column()> _
Public companyName As String
<Column()> _
Public city As String
<Column()> _
Public counTry As String
End Class
CHAPTER 19 ■ USING LINQ372
9470ch19final.qxd 3/3/08 5:26 PM Page 372
Simpo PDF Merge and Split Unregistered Version -
Shared Sub Main(ByVal args() As String)
' connection string
Dim connString As String = "server = .\sqlexpress;" & _
"Integrated security = True;database = northwind"
'create data context
Dim db As DataContext = New DataContext(connString)
'create typed table
Dim Customers As Table(Of Customer) = _
db.GetTable(Of Customer)()
'query database
Dim custs = From c In Customers _
Select c
'display customers
For Each c In custs
Console.WriteLine("{0}, {1}, {2}, {3}", _
c.customerId, c.companyName, c.city, c.counTry)
Next
End Sub
End Class
End Namespace
3. Right-click the LinqToSql project and select the Set as StartUp Project option.
4. Run the program by pressing Ctrl+F5, and you should see the results shown in
Figure 19-5.
Figure 19-5. Retrieving customer data with LINQ to SQL
CHAPTER 19 ■ USING LINQ 373
9470ch19final.qxd 3/3/08 5:26 PM Page 373
Simpo PDF Merge and Split Unregistered Version -
How It Works
You define an entity class, Customer:
<Table(Name:="Customers")> _
Public Class Customer
<Column()> _
Public customerId As String
<Column()> _
Public companyName As String
<Column()> _
Public city As String
<Column()> _
Public counTry As String
Entity classes provide objects in which LINQ stores data from data sources. They’re like
any other Visual Basic class, but LINQ defines attributes that tell it how to use the class.
The
<Table> attribute marks the class as an entity class and has an optional Name property
that can be used to give the name of a table, which defaults to the class name. That’s why you
name the class
Customers rather than Customer. A more typical approach would be
<Table(Name:="Customers")> _
Public Class Customer
and then you’d have to change the typed table definition to
Dim Customers As Table(Of Customer) = _
db.GetTable(Of Customer)()
to be consistent.
The
<Column()> attribute marks a field as one that will hold data from a table. You can
declare fields in an entity class that don’t map to table columns, and LINQ will just ignore
them, but those decorated with the
<Column()> attribute must be of types compatible with
the table columns they map to. (Note that since SQL Server table and column names aren’t
case sensitive, the default names do not have to be identical in case to the names used in
the database.)
You create a
data context:
'create data context
Dim db As DataContext = New DataContext(connString
A data context does what an ADO.NET connection does, but it also does things that a
data provider handles. It not only manages the connection to a data source, but also trans-
lates LINQ r
equests (expressed in SQO) into SQL, passes the SQL to the database server, and
cr
eates objects from the r
esult set.
You create a
typed table:
'create typed table
Dim Customers As Table(Of Customer) = _
db.GetTable(Of Customer)()
CHAPTER 19 ■ USING LINQ374
9470ch19final.qxd 3/3/08 5:26 PM Page 374
Simpo PDF Merge and Split Unregistered Version -
A typed table is a collection (of type System.Data.Linq.Table(Of T) whose elements are of
a specific type. The
GetTable method of the DataContext class tells the data context to access
the results and indicates where to put them. Here, you get all the rows (but only four columns)
from the Customers table, and the data context creates an object for each row in the cus-
tomers typed table.
You initialize the local variable with a
query expression:
From c In Customers _
Select c
A query expression is composed of a From clause and a query body. You use the simplest
form of the
From clause and query body here. This From clause declares an iteration variable, c,
to be used to iterate over the result of the expression,
customers—that is, over the typed table
you earlier created and loaded. A query body must include a
select or groupby clause that
may be preceded by
where or orderby clauses.
Your
select clause is the most primitive possible:
Select c
and, like a SQL SELECT *, gets all columns, so the variable custs is implicitly typed to handle
a collection of objects that contain all the fields in the
Customers class.
Finally, you loop through the
custs collection and display each customer. Except for the
use of the
var type, which is a new data type in Visual Basic 2008, in the For Each statement,
this was just Visual Basic 2005.
'display customers
For Each c In custs
Console.WriteLine("{0}, {1}, {2}, {3}", _
c.customerId, c.companyName, c.city, c.counTry)
Next
Despite the new Visual Basic 2008 features and terminology, this should feel familiar.
Once you get the hang of it, it’s an appealing alternative for coding queries. You basically code
a query expression instead of SQL to populate a collection that you can iterate through with a
For Each statement. However, you provide a connection string, but don’t explicitly open or
close a connection. Further, no command, data reader, or indexer is required. You don’t even
need the
System.Data or System.Data.SqlClient namespaces to access SQL Server.
Pretty cool, isn’t it?
Try It Out: Using the where Clause
Here, you’ll modify LinqToSql to retrieve only customers in the United States.
1. A
dd the follo
wing two bold lines to
LinqToSql.vb:
'query database
Dim custs = From c In Customers _
where c.country = "USA"
select c
;
CHAPTER 19 ■ USING LINQ 375
9470ch19final.qxd 3/3/08 5:26 PM Page 375
Simpo PDF Merge and Split Unregistered Version -
2. Rerun the program by pressing Ctrl+F5, and you should see the results shown in
F
igure 19-6.
Figure 19-6. Retrieving only U.S. customers with a where clause
How It Works
You simply use a Visual Basic 2008 Where clause to limit the rows selected:
Where c.country = "USA"
It is just like a SQL WHERE clause, except for using "USA" instead of 'USA', since you code
using Visual Basic 2008 here, not T-SQL.
Using LINQ to XML
LINQ to XML provides an in-memory XML programming API that integrates XML querying
capabilities into Visual Basic 2008 to take advantage of the LINQ framework and add query
extensions specific to XML. LINQ to XML provides the query and transformation power of
XQuery and XPath integrated into .NET.
From another perspective, you can also think of LINQ to XML as a full-featured XML API
compar
able to a modernized, redesigned
System.Xml AP
I plus a few key features from XPath
and XSLT. LINQ to XML provides facilities to edit XML documents and element trees in mem-
ory, as well as streaming facilities.
Try It Out: Coding a Simple LINQ to XML Query
In this exercise, you’ll use LINQ to XML to retrieve element values from an XML document.
1. N
avigate to Solution Explorer, right-click the Chapter19 solution, and select Add
➤
N
ew Pr
oject. Fr
om the provided list of Visual Studio installed templates, choose Con-
sole Application and name the newly added pr
oject
LinqToXml. Click OK.
2. Rename Module1.vb to LinqToXml.vb. Replace the code in LinqToXml.vb with the code
in Listing 19-3.
CHAPTER 19 ■ USING LINQ376
9470ch19final.qxd 3/3/08 5:26 PM Page 376
Simpo PDF Merge and Split Unregistered Version -
Listing 19-3. LinqToXml.vb
I
mports System
Imports System.Linq
Imports System.Xml.Linq
Namespace Chapter19
Class LinqToXml
Shared Sub Main(ByVal args() As String)
'load the productstable.xml in memory
Dim doc As XElement = XElement.Load _
("C:\Documents and Settings" & _
"\Toshiba User\My Documents\Visual Studio 2008" & _
"\Projects\Chapter19\productstable.xml")
'Dim prodname As VariantType
'query xml doc
Dim products = From prodname In _
doc.Descendants ("products") _
Select prodname.Value
'display details
For Each prodname In products
Console.WriteLine("Product's Detail = {0}", prodname)
Next
End Sub
End Class
End Namespace
■Note We have specified the productstable.xml file, which is located in a specific location on my
machine; you can use another XML file path based on your machine and XML file availability. The
product-
stable.xml is also available with the source code for this chapter.
3. Right-click the LinqT
oXml project and select the Set as StartUp Project option.
4. Run the program by pressing Ctrl+F5, and you should see the results shown in Fig-
ure 19-7.
CHAPTER 19 ■ USING LINQ 377
9470ch19final.qxd 3/3/08 5:26 PM Page 377
Simpo PDF Merge and Split Unregistered Version -
Figure 19-7. Retrieving product details with LINQ to XML
How It Works
You specify the following statement using the XElement of System.Linq.Xml to load the XML
doc in memory:
Dim doc As XElement = XElement.Load _
("C:\Documents and Settings" & _
"\Toshiba User\My Documents\Visual Studio 2008" & _
"\Projects\Chapter19\productstable.xml")
You also write the following statement to query the XML doc, where the Descendants
method will return the values of the descendant elements for the specified element of the
XML document.
Dim products = From prodname In _
doc.Descendants ("products") _
Select prodname.Value
Summary
I
n this chapter
, w
e co
v
ered the essentials of using LINQ for simple queries. We introduced
you to the three flavors of LINQ, mainly LINQ to Objects, LINQ to SQL, and LINQ to XML.
W
e discussed several new features of Visual Basic 2008 that support using LINQ queries.
I
n the next chapter
, w
e will look at LINQ featur
es for
ADO.NET 3.5.
CHAPTER 19 ■ USING LINQ378
9470ch19final.qxd 3/3/08 5:26 PM Page 378
Simpo PDF Merge and Split Unregistered Version -
Using ADO.NET 3.5
The world thought that the database APIs were mature enough with the release of ADO.NET
2.0, but data access API–related innovations are still taking place and still growing. They are
reasonably straightforward to use and let you simulate the same kinds of data structures and
relationships that exist in relational databases.
However, you don’t interact with data in datasets or data tables in the same way you do
with data in database tables. The difference between the relational model of data and the
object-oriented model of programming is considerable, and ADO.NET 2.0 does relatively little
to reduce impedance between the two models.
With the release of .NET Framework 3.5 and the addition of Language Integrated Query
(LINQ) to Visual Studio 2008, a new version of ADO.NET has also been introduced: ADO.NET
3.5. To work with ADO.NET 3.5 features, you need to have ADO.NET 3.5 Entity Framework
(ADO.NET 3.5 EF) and ADO.NET 3.5 Entity Framework Tools. This chapter will introduce you
to the ADO.NET 3.5 Entity Data Model (EDM).
In this chapter, we’ll cover the following:
• Understanding ADO.NET 3.5 Entity Framework
• Understanding the Entity Data Model
• Working with the Entity Data Model
Understanding ADO.NET 3.5 Entity Framework
The vision behind ADO.NET 3.5, the latest version of ADO.NET, is to extend the level of
abstraction for database programming, which completely removes the impedance mismatch
between data models and development languages that programmers use to write software
applications.
Two revolutionary innovations have made this entire mission successful: LINQ and
ADO.NET 3.5 EF. ADO.NET 3.5 EF exists as a new part of the ADO.NET family of technologies.
With ADO.NET 3.5 EF, developers can focus on data through an object model instead
of through the traditional logical/relational data model, helping to abstract the logical
data schema into a conceptual model to allow interaction with that model through a
new data provider called EntityClient. It abstracts the logical database structure using
a conceptual layer, a mapping layer, and a logical layer. In this chapter, we review the pur-
pose of each of these layers.
379
CHAPTER 20
9470ch20final.qxd 3/15/08 2:50 PM Page 379
Simpo PDF Merge and Split Unregistered Version -
ADO.NET 3.5 EF allows developers to write less data access code, reduces maintenance,
a
nd abstracts the structure of the data into a more business-friendly manner. It can also help
to reduce the number of compile-time errors since it generates strongly typed classes from the
conceptual model.
ADO.NET 3.5 EF generates a conceptual model that developers can write code against
using a new data provider called
EntityClient, as mentioned previously. EntityClient follows
a model similar to familiar ADO.NET objects, using
EntityConnection and EntityCommand
objects to return an EntityDataReader.
■Note You can download ADO.NET 3.5 EF and ADO.NET 3.5 Entity Framework Tools from http://
www.microsoft.com/downloads.
Understanding the Entity Data Model
The core of ADO.NET 3.5 EF is in its Entity Data Model. ADO.NET 3.5 EF supports a logical
store model that represents the relational schema from a database. A relational database often
stores data in a different format from what the application can use. This typically forces devel-
opers to retrieve the data in the same structure as that contained in the database. Developers
then often feed the data into business entities that are more suited for handling business
rules. ADO.NET 3.5 EF bridges this gap between data models using mapping layers. There are
three layers active in ADO.NET 3.5 EF’s model:
• Conceptual layer
• Mapping layer
• Logical layer
These three layers allow data to be mapped from a relational database to a more object-
oriented business model. ADO.NET 3.5 EF defines these layers using XML files. These XML
files provide a level of abstraction so developers can program against the OO conceptual
model instead of the traditional relational data model.
The conceptual model is defined in an XML file using C
onceptual Schema Definition
Language (CSDL). CSDL defines the entities and the relationships as the application’s busi-
ness lay
er knows them. The logical model, which represents the database schema, is defined
in an XML file using S
tor
e Schema D
efinition Language (SSDL).
The mapping layer, which is
defined using Mapping Schema Language (MSL), maps the other two layers. This mapping is
what allo
ws developers to code against the conceptual model and have those instructions
mapped into the logical model.
Working with the Entity Data Model
M
ost applications
r
unning today cannot exist without having a database at the back end.
The application and the database are highly dependent on each other—that is, they are
CHAPTER 20 ■ USING ADO.NET 3.5380
9470ch20final.qxd 3/15/08 2:50 PM Page 380
Simpo PDF Merge and Split Unregistered Version -
tightly coupled—and so it becomes so obvious that any change made either in the applica-
t
ion or in the database will have a huge impact on the other end; tight coupling is always
two-way, and altering one side will require changes to be in sync with the other side. If
changes are not reflected properly, the application will not function in the desired manner,
and the system will break down.
Let’s have look at tight coupling by considering the following code segment, which we
used in Chapter 11 as part of Listing 11-3:
'create connection
Dim conn As SqlConnection = New SqlConnection _
("Data Source=.\sqlexpress;" & _
"Integrated Security=True;" & _
"database=northwind")
'create command (with both text and connection)
Dim sql As String = "select firstname,lastname from employees"
Dim cmd As SqlCommand = New SqlCommand(sql, conn)
Console.WriteLine("Command created and connected.")
Try
'Open connection
conn.Open()
'execute query
Dim rdr As SqlDataReader = cmd.ExecuteReader
Assume you have deployed the preceding code into production along with the data-
base, which has the column names as specified in the select query. Later, the database
administrator (DBA) decides to change the column names in all the tables to implement
new database policies: he modifies the employees table and changes the firstname column
to EmployeeFirstName and the lastname column to EmployeeLastName.
After these database changes are made, the only way to prevent the application from
breaking is by modifying all the code segments in source code that refers to the firstname
and lastname columns, rebuild, retest, and deploy the whole application again. The modi-
fied code segment in the preceding code will appear as follo
ws:
'create command
Dim sql As String = "select EmployeeFirstName,EmployeeLastName from employees"
Though on the surface it doesn’t seem difficult to make such changes, if you factor in
the possibility that there might be many database-related code segments that require modi-
fication of the column names accor
ding to the new column naming scheme, this can end up
being a tedious approach to upgrade an application so that it can work with the modified
database.
With ADO.NET 3.5 EF’s Entity Data Model, Microsoft has made entity-relationship model-
ing executable. Microsoft achieved this by a combination of XML schema files and ADO.NET
3.5 EF APIs. The schema files are used to define a conceptual layer to expose the data store’s
CHAPTER 20 ■ USING ADO.NET 3.5 381
9470ch20final.qxd 3/15/08 2:50 PM Page 381
Simpo PDF Merge and Split Unregistered Version -
schema (for example, the schema for a SQL Server database) and to create a map between the
t
wo. ADO.NET 3.5 EF allows you to write your programs against classes that are generated
from the conceptual schema. The EDM then takes care of all of the translations as you extract
data from the database by allowing you to interact with that relational database in an object-
oriented way.
The EDM makes it possible for the client application and the database schema to evolve
independently in a loosely coupled fashion without affecting and breaking each other.
The EDM of ADO.NET 3.5 EF provides a conceptual view of the database schema that is
used by the application. This conceptual view is described as an XML mapping file in the
application. The XML mapping file maps the entity properties and associated relationships
to the database tables.
This mapping is the magic wand that abstracts the application from the changes made to
the relational database schema. So rather than modifying all the database-oriented code seg-
ments in an application to accommodate changes made in the database schema, you just
need to modify the XML mapping file in such a way that it reflects all the changes made to the
database schema. In other words, the solution offered by ADO.NET 3.5 EDM is to modify the
XML mapping file to reflect the schema change without changing any source code.
Try It Out: Creating an Entity Data Model
In this exercise, you will see how to create an EDM.
1. Create a Windows Forms Application project named EntityDataModel.
2. Right-click the solution, choose the Rename option, and then name the solution
Chapter20.
3. Right-click the project and select Add ➤ New Item. From the provided Visual Studio
templates choose ADO.NET Entity Data Model and name it
NorthwindModel; your
screen should look like the one in Figure 20-1. Click Add.
4. The Entity Data Model Wizard will start, with the Choose Model Contents screen
appearing first. Select the Generate From Database option, as shown in Figure 20-2.
Click Next.
CHAPTER 20 ■ USING ADO.NET 3.5382
9470ch20final.qxd 3/15/08 2:50 PM Page 382
Simpo PDF Merge and Split Unregistered Version -
Figure 20-1. Adding an ADO.NET Entity Data Model
Figure 20-2. E
ntity Data Model Wizard—Choose Model Contents screen
CHAPTER 20 ■ USING ADO.NET 3.5 383
9470ch20final.qxd 3/15/08 2:50 PM Page 383
Simpo PDF Merge and Split Unregistered Version -
5. The Choose Your Data Connection screen appears next, as shown in Figure 20-3. Click
N
ew Connection.
Figure 20-3. Entity Data Model Wizard—Choose Your Data Connection screen
6. Next, the Connection Properties dialog box appears. Enter .\sqlexpress in the Server
name list box and ensure that the Use Windows Authentication radio button option is
selected. From the list box provided below the Select or Enter a Database Name radio
button, select Northwind. Your dialog box should appear as shown in Figure 20-4.
Click Test Connection.
7. A message box should flash showing the message “Test connection succeeded.”
Click OK. Now click OK in the Connection Properties dialog box.
8. The Choose Your Data Connection window appears again, displaying all the settings
you’ve made so far. Ensure the check box option Save Entity Connection Settings in
A
pp.Config As is checked and has NorthwindEntities as a value entered in it. Change
the value to
N
or
thwindEntitiesC
onnectionS
tring
, as shown in F
igure 20-5. Click N
ext.
CHAPTER 20 ■ USING ADO.NET 3.5384
9470ch20final.qxd 3/15/08 2:50 PM Page 384
Simpo PDF Merge and Split Unregistered Version -
Figure 20-4. Entity Data Model Wizard—Connection Properties dialog box
Figure 20-5. Entity Data Model Wizard—Choose Your Data Connection screen with
settings displayed
CHAPTER 20 ■ USING ADO.NET 3.5 385
9470ch20final.qxd 3/15/08 2:50 PM Page 385
Simpo PDF Merge and Split Unregistered Version -
9. The Choose Your Database Objects screen now appears. Expand the Tables node. By
d
efault, all the tables in the selected Northwind database will have a check box with a
check mark in it. Remove all the check marks from all the check boxes except for the
ones beside the Employees and EmployeeTerritories tables. Also remove the check
marks from the check boxes next to the Views and Stored Procedures node. You will
see the screen shown in Figure 20-6. Click Finish.
Figure 20-6. Entity Data Model Wizard—Choose Your Database Objects screen
10. Navigate to Solution Explorer, and you will see that a new NorthwindModel.edmx object
has been added to the project, as shown in Figure 20-7.
Figure 20-7. Solution Explorer displaying the generated Entity Data Model
CHAPTER 20 ■ USING ADO.NET 3.5386
9470ch20final.qxd 3/15/08 2:50 PM Page 386
Simpo PDF Merge and Split Unregistered Version -
11. Double-click NorthwindModel.edmx to view the generated Entity Data Model in Design
view. It should appear as shown in Figure 20-8.
Figure 20-8. Entity Data Model in Design view
12. The generated Entity Data Model also has an XML mapping associated with it.
To view the XML mapping, navigate to Solution Explorer, right-click
NorthwindModel.edmx, and choose the Open With option. From the dialog box
that appears, select XML Editor and click OK. You should see the XML mapping as
shown in Figure 20-9.
13. Switch to the Design view of Form1. For the Name property of the form, type
Employees, and for the Text property, type Employees Detail.
14. Drag a Button control onto the form For the Name property, type btnEmployees,
and for the Text property, type
Get Employees.
15. Drag a ListBox control onto the form below the Button control, and for its Name
property type
lstEmployees. The form should appear as shown in Figure 20-10.
CHAPTER 20 ■ USING ADO.NET 3.5 387
9470ch20final.qxd 3/15/08 2:50 PM Page 387
Simpo PDF Merge and Split Unregistered Version -
Figure 20-9. XML mapping associated with the Entity Data Model
Figure 20-10. D
esign view of the form
16. Double-click the Button control to go to Code view. Before proceeding with adding the
code for the button’s click event, add the following namespace to the project:
Imports System.Data.EntityClient
CHAPTER 20 ■ USING ADO.NET 3.5388
9470ch20final.qxd 3/15/08 2:50 PM Page 388
Simpo PDF Merge and Split Unregistered Version -
17. Switch back to the click event of the button and add the code shown in Listing 20-1.
Listing 20-1. Creating a Connection Using the Entity Data Model
Dim connection As EntityConnection = New EntityConnection _
"name=NorthwindEntitiesConnectionString")
connection.Open()
Dim command As EntityCommand = connection.CreateCommand()
command.CommandText = "select E.FirstName,E.LastName " & _
"from NorthwindEntitiesConnectionString.Employees as E"
Dim reader As EntityDataReader = _
command.ExecuteReader(CommandBehavior.SequentialAccess)
lstEmployees.Items.Clear()
While reader.Read()
lstEmployees.Items.Add(reader("FirstName") + _
" " + reader("LastName"))
End While
18. Build the solution and run the project. When the Employees Detail form appears, click
the Get Employees button. The screen shown in Figure 20-11 should display.
Figure 20-11. D
isplaying the E
mployees Detail form
How It Works
B
ecause y
ou are working with an Entity Data Model, you don’t have to deal with
SqlConnection, SqlCommand, and so forth. Here you create a connection object referencing
the
EntityConnection, pass the entire connection string that is stored with the name
NorthwindEntitiesConnectionString in the App.config file, and then open the connection:
Dim connection As EntityConnection = New EntityConnection _
"name=NorthwindEntitiesConnectionString")
connection.Open()
CHAPTER 20 ■ USING ADO.NET 3.5 389
9470ch20final.qxd 3/15/08 2:50 PM Page 389
Simpo PDF Merge and Split Unregistered Version -
After specifying opening the connection, it’s time to create the Command object using
EntityCommand, and then specify the query to the CommandText property. Notice that the From
clause of the query is composed of EntityContainer.EntitySet, thus including the name of
the connection string, which represents the
EntityContainer, suffixed with the table name,
which is actually an
EntitySet:
Dim command As EntityCommand = connection.CreateCommand()
command.CommandText = "select E.FirstName,E.LastName " & _
"from NorthwindEntitiesConnectionString.Employees as E"
■Note The EntityContainer element is named after the database schema, and all “Entity sets” that
should be logically grouped together are contained within an
EntityContainer element. An EntitySet
represents the corresponding table in the database.
Now you have to specify the reader object, which will read the data stream from the
database and populate the ListBox control. You do so by using the
EntityDataReader object,
and then you also specify the
ExecuteReader method to return the results. The ExecuteReader
method also requires an enumeration value to be specified; for this example, you use the
CommandBehavior.SequentialAccess enumeration value to tell the ADO.NET 3.5 runtime to
retrieve and load the data sequentially and receive it in the form of a stream:
Dim reader As EntityDataReader = _
command.ExecuteReader(CommandBehavior.SequentialAccess)
Next, you specify the code to tell the reader that it has to add the data values in the
ListBox until the reader is able to read the data:
lstEmployees.Items.Clear()
While reader.Read()
lstEmployees.Items.Add(reader("FirstName") + _
" " + reader("LastName"))
End While
Try It Out: Schema Abstraction Using an Entity Data Model
I
n the
pr
evious exer
cise, you created an Entity Data Model named NorthwindModel; in
this exercise, you will see how this Entity Data Model will help developers achieve schema
abstraction and modify the database without touching the data access code throughout
the project or in the
D
ata Access Layer (DAL).
1. S
tart SQL Server Management Studio Express, expand the Database node, expand the
Northwind database node, and then expand the Tables node. In the list of tables,
expand the dbo.Employees node and then expand the
Columns folder.
2. S
elect the LastN
ame column, r
ight-click, and select the R
ename option. R
ename the
LastN
ame column to E
mplo
y
eesLastN
ame
.
CHAPTER 20 ■ USING ADO.NET 3.5390
9470ch20final.qxd 3/15/08 2:50 PM Page 390
Simpo PDF Merge and Split Unregistered Version -
3. Select the FirstName column, right-click, and select the Rename option. Rename the
F
irstName column to EmployeesFirstName.
4. Now exit from SQL Server Management Studio Express by selecting File ➤ Exit.
5. Switch to the Chapter20 solution and then run the EntityModel project. The Employ-
ees Detail form should load. Click the Get Employees button; this raises an exception
window with the message “CommandExecutionException was unhandled.” Click View
Detail located under Actions.
6. The View Detail dialog box opens. Expand the exception to see the exception details.
If you look at InnerException, you will see a message that indicates the cause of this
exception, and that is because you have just renamed the FirstName and LastName
database columns. The exception details should appear as shown in Figure 20-12.
Figure 20-12. Exception details
7. Click OK to close the exception’s View Detail window, and choose Debug ➤ Stop
Debugging.
8. To fix this application, you have to modify the XML mapping file created by the
Entity Data Model, the
NorthwindModel.edmx file you created earlier in the chapter
and shown previously in Figures 20-7 and 20-8. To view the XML mapping, navigate
to Solution Explorer, right-click
NorthwindModel.edmx, and choose the Open With
option. From the provided dialog box, select XML Editor and click OK. You will see
the XML mapping as shown previously in Figure 20-9.
9. In the opened XML mapping file, navigate to the <! SSDL content > section
and modify
LastName in the <Property Name="LastName" Type="nvarchar"
Nullable="false" MaxLength="20" />
XML tag to EmployeesLastName; the tag should
appear as
<Property Name="EmployeesLastName" Type="nvarchar" Nullable="false"
MaxLength="20" />
after the modification.
■Note The logical model, which represents the database schema, is defined in an XML file using SSDL.
This is why you need to modify the column names to ma
p with the da
tabase schema.
CHAPTER 20 ■ USING ADO.NET 3.5 391
9470ch20final.qxd 3/15/08 2:50 PM Page 391
Simpo PDF Merge and Split Unregistered Version -