C#Your visual blueprint for building .NET applications phần 3 pptx
Bạn đang xem bản rút gọn của tài liệu. Xem và tải ngay bản đầy đủ của tài liệu tại đây (1 MB, 32 trang )
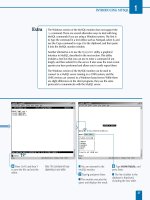
Solution Explorer
Class1.cs
Solution Explorer
Classes
■ The default Class1
appears in your code in
the parent window and the
Solution Explorer window
also highlights Class1 in
the tree.
Á Right-click the Classes
entry in the Solution Explorer
window.
‡ Click Add.
° Click Add Class.
WORKING WITH VISUAL C# BASICS
3
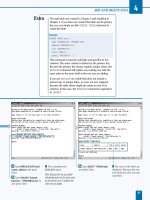
The Add Class Wizard converts your summary comments
into XML documentation, but you can also add summary
comments directly into your program code.
51
TYPE THIS:
using System; /// <summary>
/// The summary declaration for this class.
/// </summary>
class Class1
RESULT:
The summary does not display on your screen, but when
you or someone else displays the code for the program,
the comments appear within the code.
CONTINUED
043601-X Ch03.F 10/18/01 11:58 AM Page 51
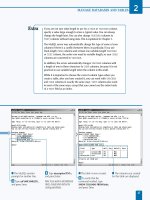
Class View - Classes
■ The Add New Item -
Classes window appears.
· Type the name for your
new class in the Name field.
‚ Click Open.
■ Your new class code
appears in the parent
window.
— Click the Class View tab.
± Right-click the Classes
entry in the Class View
window.
¡ Click Add.
™ Click Add Class.
A
fter you add your class name and its associated
filename, you must create a namespace. A namespace
organizes your Visual C# program so that it can
present your program elements to external programs
properly. A namespace is something like a box that you use
to contain your entire program elements in.
When you create a Visual C# program that is something
different than an empty project (such as a Windows
application), Visual C# creates the namespace for you
automatically and the namespace has the name of your
program. The namespace is the first thing that appears in
your program.
After you enter the namespace information, you can define
both the accessibility level for the class and the class
modifiers. The accessibility level lets you determine
whether your class can be accessed by all elements in your
program, and others, or accessed by certain components.
The class modifiers let you determine whether your class
will be a base class or a class that cannot be inherited by
another class.
After you add any comments and finish with the wizard, the
class code appears in the parent window already created so
you can concentrate on writing the rest of your program.
ENTER CLASSES
C#
52
ENTER CLASSES (CONTINUED)
043601-X Ch03.F 10/18/01 11:58 AM Page 52
■ The C# Class Wizard
window appears.
£ Type a name for your
class in the Class name field.
¢ Click Finish.
■ The C# Class Wizard
window closes and your new
class code appears in the
parent window.
∞ Save the program as the
filename.
WORKING WITH VISUAL C# BASICS
3
When you determine the class accessibility level, you can
determine whether the class will have elements that can only
be accessed by files in the same assembly. An assembly is like
a box that holds boxes containing your program components;
these components come in the form of files, such as a class
being stored in a .CS file. You restrict access to the same
assembly by using the internal keyword.
53
TYPE THIS:
internal class IntClass
{
public int x = 5;
}
RESULT:
When you tell your class that it has
internal access, only the program
components within the assembly
box can access that class;
components in other assemblies
cannot.
043601-X Ch03.F 10/18/01 11:58 AM Page 53
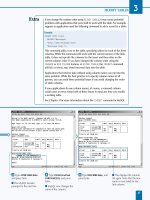
Console
Applicatio
⁄ Click Start ➪ Programs ➪
Microsoft Visual Studio .NET
7.0 ➪ Microsoft Visual
Studio .NET 7.0.
¤ Click New Project in the
Start page.
■ The New Project window
appears.
‹ Click the Console
Application icon in the
Templates pane.
› Type a name for your file.
ˇ Click OK.
C
# lets you add comments to your code so you can
remind yourself and tell others who view your code
what you have done. If you update your code,
comments can tell you what you did when you wrote that
string of code. Comments also tell others what you did to
the code in case someone else has to review or change
your code. In sum, comments show that you are a polite
programmer.
Like Java and C++, Visual C# indicates comments with two
forward slash marks (//). Visual C# also marks comments in
green and automatically adds comments to your code if you
create a new Visual C# project that is something other than
an empty project (such as a form or console application).
These comments provide information about what certain
code does and also include “to do” information about what
code you should add to the program skeleton.
If you have only a few words in your comments, you can
add the comments to the right of the code line. If you want
to say more, you can add multiple lines, although it is
usually a good idea to break multi-line comments out onto
their own lines so people can read your comments more
easily.
ADD COMMENTS TO CODE
C#
54
ADD COMMENTS TO CODE
043601-X Ch03.F 10/18/01 11:58 AM Page 54
Comments
■ The Class1.cs code
appears in the parent
window.
Á Delete the comments
within the Main method.
‡ Type a decimal value
with a two-slash comment
immediately afterward.
■ The comment code color
turns green to differentiate
your comment from other
code.
° Type an integer value and
a comment by placing
/* at
the beginning and an
*/ at the
end of the comment.
■ The comment code turns
green to differentiate your
comment from other code.
Note: When you finish typing in an
asterisk and slash, your comment
appears in boldface; this signifies
that you have a complete comment.
· Save the program as the
filename.
WORKING WITH VISUAL C# BASICS
3
Like Java and C++, Visual C# begins its comments
with the slash-and-asterisk combination (/*) and
ends comments with the asterisk-and-slash
combination (*/). However, there are some minor
variations. Java and C# have the same comment
structure, but C++ is slightly different. In case you
want to copy comments from your Java and/or C++
program over to your Visual C# program. Here are
examples of comments in Visual C#, Java, and C++.
55
VISUAL C# JAVA C++
// // //
/* comment */ /* comment */ /* comment */
043601-X Ch03.F 10/18/01 11:58 AM Page 55
Console
Applicatio
⁄ Click Start ➪ Programs ➪
Microsoft Visual Studio .NET
7.0 ➪ Microsoft Visual
Studio .NET 7.0.
¤ Click New Project in the
Start page.
■ The New Project window
appears.
‹ Click the Console
Application icon in the
Templates pane.
› Type a name for your file.
ˇ Click OK.
Y
our first program lets you become acquainted with
programming in the MDE window, gives you
confidence in programming with C#, and provides the
enjoyment of seeing your first program compile. The Hello,
world! program is the ubiquitous first program that people
write no matter what programming language you write the
program in. Visual C# is brand new, so this task shows you
how to write a Hello, world! program so you can announce
your program, and Visual C#, to the rest of the world.
You can program your Hello, world! program in several
different ways, though this task shows you only one of
them. You can view all sample Hello, world! programs in the
Visual Studio .NET online help available in the MDE
window. See page 18 for more information about using
Visual Studio .NET online help.
You can also download the Hello, world! samples directly
from the Hello World Tutorial page in Visual Studio .NET if
you want to open and run them without having to type in
all of the variants yourself. After you compile the program,
the result appears in a hello.exe file that you can run
from Visual C# or by opening the file in Windows and
viewing the output in an MS-DOS, for Windows 9x and ME,
or console, for Windows NT or 2000, window.
WRITE YOUR FIRST PROGRAM
C#
56
WRITE YOUR FIRST PROGRAM
043601-X Ch03.F 10/18/01 11:58 AM Page 56
■ The Class1 class appears
in the parent window.
Á Rename Class1 as
Hello.
‡ Delete the comments
from the Main method.
° Type the
Console.WriteLine
statement that announces
your program to the world.
· Run the program by
pressing the F5 key.
■ The Hello, world! text
appears.
‚ Save the program as the
filename.
WORKING WITH VISUAL C# BASICS
3
If you are used to programming in C or C++, you will
notice some changes in the Visual C# code, including
the following:
• The program does not use a global Main method.
• The program does not support methods and
variables at the global level, instead containing
those elements within type declarations such as
class and struct.
• The program does not use :: or -> operators. The
former operator does not exist in Visual C# and the
latter has limited use.
• The program uses a period (.) in compound names,
the most common of which is Console.WriteLine.
• Because the declaration order is not significant in a
Visual C# program, forward declarations do not
exist.
• The program does not import text by using
#include.
• Visual C# eliminates some inter-language barriers;
for example, the Console class can be written in
another language such as Visual Basic.
57
043601-X Ch03.F 10/18/01 11:58 AM Page 57
Console
Applicatio
⁄ Click Start ➪ Programs ➪
Microsoft Visual Studio .NET
7.0 ➪ Microsoft Visual
Studio .NET 7.0.
¤ Click New Project in the
Start page.
■ The New Project window
appears.
‹ Click the Console
Application icon in the
Templates pane.
› Type a name for your file.
ˇ Click OK.
A
fter you document your code and compile it, C#
automatically changes that code into Extensible
Markup Language, XML, format. XML comments
let you pass those comments easily if you want to share
them with others, such as on a corporate Intranet, for
feedback.
XML is a cross between HTML, Hypertext Markup Language,
and the more powerful SGML, Standard Generalized
Markup Language. XML contains greater flexibility than
HTML but XML is not as hard to learn and use as SGML is.
XML is the default documentation language for Visual
Studio .NET. You can compile the XML comments in your
program into an XML file that can then be shared on the
Internet or on your company intranet using your Internet
browser, provided that your browser is XML-capable.
However, the job of processing the XML file so that it can
create XML documentation is up to your site Webmaster.
XML documentation in your program starts with three slash
marks, ///. Visual C# also includes 14 built-in XML tags for
user documentation such as the <summary> tag. Visual C#
processes the XML tags on types and type members such as
classes, and that is why you will see some XML
documentation when you view the code in a Visual C#
project, other than an empty project, that is.
ENTER XML DOCUMENTATION
C#
58
ENTER XML DOCUMENTATION
043601-X Ch03.F 10/18/01 11:58 AM Page 58
Á Replace the summary
comments with your own
text.
‡ Type three slashes (///)
before the Main method in
your text.
■ The summary XML tags
and the ancillary param tag
appear automatically.
° Add the <c> XML tag for
denoting code.
■ The closing </c> code
appears automatically.
· Type your comment text
with your code text between
the <c> and </c> codes.
‚ Save the program as the
filename.
WORKING WITH VISUAL C# BASICS
3
You can also use the slash-and-asterisk
combination — /* and */ — just as you do
with Java and C++ if you prefer doing so.
59
TYPE THIS:
using System;
/* This is a comment about the following class. */
public class Class1;
RESULT:
As with Java and C++, remember that the
asterisk always appears immediately before
and after the comment text.
043601-X Ch03.F 10/18/01 11:58 AM Page 59
Visual C#
⁄ Click Start ➪ Programs ➪
Microsoft Visual Studio .NET
7.0 ➪ Microsoft Visual
Studio .NET 7.0.
¤ Click the Headlines link
in the Start page.
Note: If you have a dial-up Internet
connection, your dial-up connection
window will appear so you can dial
your Internet service provider. If you
cannot connect to the Internet, the
parent window displays an action
cancelled message stating that
Internet Explorer was unable to
connect.
■ The Headlines screen
appears in the Start menu
with the Features tab
selected.
‹ Click to the right of the
Filter field.
› Filter the headline articles
to show Visual C# articles
only by clicking Visual C#.
T
he MDE window gives you access to many different
sources of help so you can get the answers you need
quickly and get back to programming.
These sources include online text files that provide help and
online resources from the Microsoft Web site. The online
help files and Web pages appear directly within the MDE
window so you do not have to close the MDE window and
open a new one.
Visual Studio .NET installs online help as part of its
installation process. You can access these files directly from
the MDE window menu bar. Visual Studio .NET groups
these files by topic so you can find what you want easily. If
you need more powerful search features, you can search by
keywords and other criteria such as limiting results to Visual
C# topics. When you view a help page, it appears in the
parent window as another tab so you can switch between
your help page and C# program.
When you view the online help features, those Web pages
appear in the parent window as well. You can navigate
these pages just as you would in a Web browser so you can
find the information you want. The MDE window also
includes a built-in online search feature so you can find
what you need online more effectively.
ACCESS DOCUMENTATION
C#
60
ACCESS DOCUMENTATION
043601-X Ch03.F 10/18/01 11:58 AM Page 60
ˇ Click the Technical
Articles tab.
■ The latest technical articles
about C# appear.
Á Click the Knowledge
Base tab.
■ Knowledge Base articles
appear that contain the latest
C# support issues.
WORKING WITH VISUAL C# BASICS
3
If you decide to view a Webcast in MSDN Online
that requires Windows Media Player and you do
not have the Player, you can download the Player
from the Webcast’s opening HTML screen that
contains an overview of the Webcast and links to
download the Player.
You can send feedback directly from the MSDN
Online site by clicking the Send Us Your
Feedback link at the lower left-hand corner of
the MSDN Online window. After you click the
link, you can enter feedback on the MSDN
articles or features or submit a bug report about
the MSDN Web site, but not about Visual Studio
.NET.
You can search for specific articles within MSDN
Online by entering a search phrase in the Enter
Search Phrase text box in the upper–left of the
MSDN Online window and then click the Search
button. The results will then appear in the MSDN
Online window. If you need to conduct a more
refined search, you can click the Advanced link
below the Search button.
61
043601-X Ch03.F 10/18/01 11:58 AM Page 61
⁄ Click Start ➪ Programs ➪
Microsoft Visual Studio .NET
7.0 ➪ Microsoft Visual
Studio .NET 7.0.
■ The Start page appears in
the parent window.
¤ Click the Report a Visual
Studio .NET issue link.
■ The Login page appears in
the parent window.
Note: If you have a dial-up Internet
connection, your dial-up connection
window will appear so you can dial
your Internet service provider. If you
cannot connect to the Internet, the
parent window displays an action
cancelled message stating that
Internet Explorer was unable to
connect.
‹ Enter your login ID and
password.
Note: If you do not have a login ID
or password, sign up by clicking
the Register Now link.
› Click Submit.
Report a Visual Studio .NET issue
I
t is inevitable that a product as sophisticated as Visual
Studio .NET will have a few bugs in it. Microsoft wants
your help in identifying bugs you have run into so the
Visual Studio .NET team at Microsoft can fix your reported
problem as quickly as possible. Microsoft makes it easy for
you to send issues to Microsoft directly in the Microsoft
Development Environment, MDE, window.
You log into the Visual Studio .NET Web site with your
username and password. If you do not have a username or
password, you can create one from the Web site. When you
create a username and password, you will also have to enter
your contact information that includes your name, mailing
address, e-mail address, and telephone number.
After you log on successfully, you can read up on Visual
Studio .NET news and information from the Visual Studio
.NET site, and from here you can also log bug reports. After
you enter a bug report, the Web site forwards the report to
the appropriate personnel on the Visual Studio .NET team.
If the Visual Studio .NET team needs more information from
you to replicate or fix the problem, they will contact you by
e-mail using the contact information you entered when you
created your username and password.
LOG A BUG REPORT
C#
62
LOG A BUG REPORT
043601-X Ch03.F 10/18/01 11:58 AM Page 62
your product feedback
340056
■ The Visual Studio .NET
welcome page appears.
Note: Before you see the Welcome
page, you may see a Security Alert
dialog box informing you that you
will be directed to a non-secure
page. Click the Yes button in the
box if it appears.
ˇ Enter a bug report by
clicking the your product
feedback link.
■ The bug report screen
appears so you can give
technical support detailed
information about your
problem.
WORKING WITH VISUAL C# BASICS
3
It is easy to forget passwords, because you can
have different passwords for each service,
program, or operating system that requires a
password. You should keep your passwords in a
safe place, never on a network, so you can refer
to them in case you forget them.
If you forget your password into the Visual
Studio .NET site, you can click the I forgot my
password link in the Login page. You will have to
enter your user ID name and your e-mail address
so Microsoft can e-mail you your password. If
you forget your user ID name then you will have
to open a new account with a different username
so you can log on.
You can submit feedback directly to the Visual
Studio .NET team at Microsoft without entering the
Visual Studio .NET site. The Login page has a
Feedback link at the upper right-hand corner of the
site. When you click this link, a blank e-mail
message to the Visual Studio .NET team e-mail
address will appear so you can send the team an
e-mail with your comments, suggestions, and/or
problems.
63
043601-X Ch03.F 10/18/01 11:58 AM Page 63
C
# contains three different types of building blocks
that define variables and functionality. You combine
these building blocks — methods, classes, and
structures — together to form a functioning program.
A class is the smallest building block, and it acts like a box
for you to keep certain classes of elements such as the ages
of your cats. You can also declare classes as base classes
where a class can inherit characteristics from a base class.
For example, you can have a base class of cats’ names and
have inheritor classes that contain more specific
information such as fur color.
A structure is a value type. Unlike a class, which contains
references to data in your program, a structure contains the
data to which the classes refer. You can create structures
using the struct keyword that you will learn about later in
this chapter.
A module, the largest building block, is a portable
executable file that can contain structures and classes.
Modules have .exe (executable) or .dll (Dynamic Link
Library) extensions; you can use modules to test various
portions of your program before you integrate them and to
integrate with other Windows programs that will reference
the same DLL file.
VIEW INFORMATION ABOUT
C# BUILDING BLOCKS
64
VIEW INFORMATION ABOUT C# BUILDING BLOCKS
C#
⁄ Click Start ➪ Programs ➪
Microsoft Visual Studio .NET
7.0 ➪ Microsoft Visual Studio
.NET 7.0.
■ The Start page appears.
¤ Click Help.
‹ Click Index.
■ The Index menu appears.
Note: Close the Properties window by
clicking to the right of the
Properties title bar.
› Type modules in the Look
for field.
ˇ Click to select Visual
C# from the Filtered by
drop-down list.
Index Ctrl+Alt+F2
Visual C#
053601-X Ch04.F 10/18/01 11:58 AM Page 64
You can create a module with the class name
Module so your program knows the module will
integrate with other parts of a program with a
namespace such as a class. This ensures that your
module and a class in your program work
together.
If you want to create modules as separate
programs, you can give each one a separate
namespace name, or if you want to have the
modules integrated, you can give several
modules the same namespace name.
Classes help your program run more quickly. A class
has the extra advantage of being a reference type —
you can pass along a class that contains data instead
of passing the data itself. Structs have the advantage
of requiring less memory because moving a struct
means that the program does not have to keep
referencing data and using memory for that
purpose.
PROGRAMMING C# BUILDING BLOCKS
4
65
Á Click compared to classes
in the topics list.
■ The Ways to Implement
Component Functionality
page appears in the parent
window.
‡ Scroll down the page until
you reach the comparison
table.
■ The comparison table
compares the different
components.
053601-X Ch04.F 10/18/01 11:58 AM Page 65
⁄ Click Start ➪ Programs ➪
Microsoft Visual Studio .NET
7.0 ➪ Microsoft Visual Studio
.NET 7.0.
¤ Click New Project in the
Start Page.
■ The New Project window
appears.
‹ Click the Console
Application icon in the
Templates pane.
› Type a name for the file.
ˇ Click OK.
Console
O
bject-oriented programming languages use classes
that act as containers for data elements in your
program. Classes let other elements in your
program, such as methods, process that data and perform
functions such as displaying a calculation result as output.
Object-oriented programming languages make use of
classes, which are reference types that act as containers for
data elements in your program. Classes include class
member characteristics such as the method the member
performs, the events the member performs, or the
properties of the member.
A class usually includes definition of the object and the
implementation of that object. However, a class can have no
implementation information, and C# refers to the members
of such a class as abstract members, and the class is called
an abstract class. You can use an abstract class when you
want its instances to only have basic functionality that you
can override or augment with information from other
classes.
C# refers to the members of a class as an object. When your
program invokes the object, the program refers to the class
and receives the object properties as well as any
implementation methods, such as whether the program
uses the object as an event.
You can determine how your program accesses objects in
your class. For example, one object within a class can only
access another object within that class. However, any class
can access objects in any other class.
PROGRAM CLASSES
C#
66
PROGRAM CLASSES
053601-X Ch04.F 10/18/01 11:58 AM Page 66
■ The Class1.cs code
appears in the parent
window.
Note: You can make more room for
your Start page by clicking and
dragging the right edge of the Start
page until you reach the maximum size
for the Start page.
Á Delete the Class1 code
from the program.
‡ Type the MyClass code.
° Run the program by
pressing the F5 key.
■ The output string appears
on the screen.
· Save the program as the
filename.
PROGRAMMING C# BUILDING BLOCKS
4
When you add a class in the Add Class Wizard, one of the
first things you must do is identify a namespace. C#
automatically adds a new namespace when you create a new
class, but if you add a class within a class, you can specify a
new namespace.
67
TYPE THIS:
using System;
namespace NewSpace
{
class NewClass
{
public static void Main(string[] args)
{
Console.WriteLine("This class has the namespace
NewSpace.");
}
}
RESULT:
This class has the
namespace NewSpace.
053601-X Ch04.F 10/18/01 11:58 AM Page 67
⁄ Click Start ➪ Programs ➪
Microsoft Visual Studio .NET
7.0 ➪ Microsoft Visual Studio
.NET 7.0.
¤ Click New Project in the
Start page.
■ The New Project window
appears.
‹ Click the Console
Application icon in the
Templates pane.
› Type a name for the file.
ˇ Click OK.
Console
Applicatio
A
fter you open a new C# project, the MDE window
automatically creates a new class so you can save
time and enter the class code immediately. If you
need to add more classes you can do so in one of two ways:
programming the class in code or accessing the Add Class
Wizard from the Solution Explorer or Class View windows.
The Class View window lets you create a class using the Add
Class Wizard. The Add Class Wizard also lets you determine
if the class you are creating will inherit information from
another class. If you want your class to inherit data from
another, you must determine whether your class inherits
from a base class or another class.
A base class is a single class from which all other classes will
inherit. For example, if you set up class B to inherit from the
base class A, you can set up class C to inherit from class B,
and that way, class C will inherit all of the properties from
class B as well as the base class A.
ADD A CLASS
ADD A CLASS
C#
68
053601-X Ch04.F 10/18/01 11:58 AM Page 68
Class View - Ad
Á Click the Class View tab at
the bottom of the Solution
Explorer window.
‡ Right-click AddClass in
the Class View window.
° Click Add.
· Click Add Class.
■ The C# Class Wizard
appears.
Add Class
Black Text
Add
AddClass
PROGRAMMING C# BUILDING BLOCKS
4
If you have programmed in C++ or Java before, you should
be aware of changes in C# so you are not surprised. Because
C# is closely related to C++ and Java, here are examples of
the differences between several class-related keywords.
69
REFER TO A BASE CLASS
Java super
C++ __super
C# base
DERIVE A CLASS FROM A BASE CLASS
Java class A extends B
C++ class A public B
C# class A B
SPECIFY THAT A CLASS CAN BE INHERITED
Java abstract
C++ abstract
C# abstract
SPECIFY THAT A CLASS CANNOT BE INHERITED
Java final
C# sealed
CONTINUED
053601-X Ch04.F 10/18/01 11:58 AM Page 69
‚ Type the name of the class
in the Class name field.
■ The class name
automatically appears in the
File name field.
— Click to select the
access level from the
drop-down list.
± Click to select a class
modifier in the Class
modifiers area.
¡ Type a class comment in
the Comment field.
™ Click Finish.
public
I
f you decide to add a class using the Solution Explorer,
the procedure is different than adding a class from the
Class View window. The most obvious difference is that
you do not use the Add Class Wizard. Instead, you tell C#
that you want to create a new class object. After you create
the class object, the class appears with the class skeleton
already written for you so you can edit the class.
You can add as many classes to your program as you want.
The class structure contains the namespace information,
sample XML commentary, the class constructor, and
comments telling you to add the constructor logic in place
of the comments. The class structure appears no matter
what project you have created — even an empty Web
project. You can edit the class to your content in the MDE
parent window.
You can change the properties of the added class by using
the Properties window below the Solution Explorer
window. If you want to change the name of your class you
can do that in the Solution Explorer as well. When you
finish editing your class, it remains as part of your project
unless you click the Exclude From Project option when you
right-click the class name.
ADD A CLASS
C#
70
ADD A CLASS (CONTINUED)
053601-X Ch04.F 10/18/01 11:58 AM Page 70
■ The NewClass class
appears in its own tab within
the parent window.
£ Click AddClass in the
Class View window.
¢ Click {} AddClass.
■ The NewClass entry
appears in the tree.
∞ Click NewClass.
■ The NewClass properties
appear in the Properties
window.
§ Save the program as the
filename.
AddClass
PROGRAMMING C# BUILDING BLOCKS
4
You can specify that your class is a base class by
adding the abstract keyword to it.
71
TYPE THIS:
using System;
// This is an abstract class as denoted by the
abstract keyword.
abstract class AbClass
{
static void Main(static[] args)
{
int string a = “An abstract class.”;
Console.WriteLine(a);
}
}
RESULT:
An abstract class.
053601-X Ch04.F 10/18/01 11:58 AM Page 71
⁄ Click Start ➪ Programs ➪
Microsoft Visual Studio .NET
7.0 ➪ Microsoft Visual Studio
.NET 7.0.
¤ Click New Project in the
Start page.
■ The New Project window
appears.
‹ Click the Console
Application icon in the
Templates pane.
› Type a name for the file.
ˇ Click OK.
■ The Class1.cs code
appears in the parent
window.
Á Delete all code after the
namespace Inherit code.
‡ Type the code that
establishes the variables and
constructors.
Console
Applicatio
Y
ou can create classes with objects that more than one
class can refer to. Class inheritance lets you define
objects in a class once and then have other classes in
your program refer to those objects.
Class inheritance speeds up the programming process by
reusing code from a base class in other inheriting classes
without adding extra code. You can also change objects in
your base class that apply to all the inheriting classes.
Inheritance is not the best solution for all programming
circumstances — interfaces can provide a better solution.
See page 110 for more information on class inheritance and
interfaces.
C# only gives you the ability to inherit classes from one
base class. The base class is the very first class that all other
classes inherit from. Like C++, you can have nested classes.
Nested classes let you create classes within the class that
you are programming in the MDE parent window. A nested
class directly inherits from its parent class. Having nested
classes makes it faster for you to create inheriting classes
than if you created new classes one at a time.
You can override some base class information such as
methods in your inheriting class, but for the most part
inheriting classes observe the base class rules.
EMPLOY CLASS INHERITANCE
C#
72
EMPLOY CLASS INHERITANCE
053601-X Ch04.F 10/18/01 11:58 AM Page 72
° Type the code that outputs
the information
and the inheriting class that
processes the information
for output.
· Run the program by
pressing the F5 key.
■ The output strings appear
on the screen.
‚ Save the program as the
filename.
Note: You may want to change the
summary comment in the class to
note to others that NewClass inherits
from Class1.
PROGRAMMING C# BUILDING BLOCKS
4
The rule in C# is that there is only one
base class. If you try to create classes with
the same name that inherit from different
base classes, C# will not let you do so.
73
Example:
abstract class A // Base class A
{
}
class B : A // Inherits from class A
{
}
class C: B // C inherits from B that inherits from A
{
}
abstract class D // new base class
{
}
class C: D // Error; you cannot inherit from two base classes at once
{
}
053601-X Ch04.F 10/18/01 11:58 AM Page 73
⁄ Click Start ➪ Programs ➪
Microsoft Visual Studio .NET
7.0 ➪ Microsoft Visual Studio
.NET 7.0.
¤ Click New Project in the
Start page.
■ The New Project window
appears.
‹ Click the Console
Application icon in the
Templates pane.
› Type a name for the file.
ˇ Click OK.
Console
Applicatio
A
class has two key parts: constructors and destructors.
A constructor is a declaration that tells the compiler
what type of class you have created, the features of
your class, and how you will treat every instance of your
class.
An instance is a variable of an object in the class. For
example, two separate instances in the Cat class can be
Mewsette and Tigger. Every member that belongs to your
class has a status associated with it: static or instance.
A static member of a class belongs to the class itself, not
any specific instance, and maintains a current value. This is
useful if you want to have a class of passwords with
information that does not change. An instance lets you
input different variables for your class. For example, if you
have a Cat class, you can include various types of
information such as name, weight, breed, and so on.
The instance constructor initializer is a piece of code that
implements initialization of an instance of a class — in
short, the piece of code that makes your class work. If you
do not have a constructor in your class, C# adds one
automatically — constructor initializers are that important.
When you add a new class, C# adds the constructor
initializer automatically.
PROGRAM INSTANCE CONSTRUCTORS
C#
74
PROGRAM INSTANCE CONSTRUCTORS
053601-X Ch04.F 10/18/01 11:58 AM Page 74
■ The Class1.cs code
appears in the parent
window.
Á Delete all code after the
namespace Construct
code.
‡ Type the code that
establishes the integer.
° Type the Amount
constructor that sets the
initial value.
PROGRAMMING C# BUILDING BLOCKS
4
You can add the this keyword so a class or struct can overload
existing constructors and call one of its own constructors instead.
75
TYPE THIS:
using System;
class Class1 {
public int a;
public Class1() : this (2) //gives a the value of 2 { }
public Class1(int b) {
a = b //overloads the existing constructor }
static void Main(string[] args) {
Class1 x1 = new Class1();
Class1 x2 = new Class1(4); // 4 is the new value per
the overloaded constructor
Console.WriteLine(x1.a);
Console.WriteLine(x2.a);
}
}
RESULT:
2
4
CONTINUED
053601-X Ch04.F 10/18/01 11:58 AM Page 75