C#Your visual blueprint for building .NET applications phần 6 pps
Bạn đang xem bản rút gọn của tài liệu. Xem và tải ngay bản đầy đủ của tài liệu tại đây (805.87 KB, 32 trang )
Á Type the code that creates
an instance of your array, the
elements in your array, the
sort method, and outputs
the results.
‡ Type the Output method
that outputs the information
to the screen.
° Run the program by
pressing the F5 key.
■ The sorted array elements
with their associated array
locations appear on the
screen.
· Save the program as the
filename.
USING ARRAYS
When you sort arrays that have strings that contain capital
letters, C# considers those strings to be lower on the
alphabetization list than strings with lowercase letters.
147
7
TYPE THIS:
using System;
class SortArray;
{
public static void Main()
{
string[] names = {"too", "two", "To", "Too"};
Array.Sort(names);
foreach (string value in names)
{
Console.WriteLine("The word is {0}", value);
}
}
}
RESULT:
The word is too
The word is two
The word is To
The word is Too
083601-X Ch07.F 10/18/01 12:00 PM Page 147
Properties
⁄ Click Start ➪ Programs ➪
Microsoft Visual Studio .NET
7.0 ➪ Microsoft Visual
Studio .NET 7.0.
■ The Start page appears.
¤ Click New Project.
■ The New Project window
appears.
‹ Click the Console
Application icon in the
Templates pane.
› Type a name for the file.
ˇ Click OK.
C
# lets you search for the first instance of an element
in an array in case you need to pass a particular
element in your array to another part of your
program or if you need to get some specific information
such as finding the number of times an element appears in
an array.
You can search within an array using the Array.IndexOf
method. This built-in method returns the index number of
the first array element that you want to search for. For
example, if you search for the third element in an array,
then the Array.IndexOf method returns the index
number 2 because the default first index number in an array
is 0. If you set the first index number yourself, then the
index number returned for your found element will vary.
The Array.IndexOf method also lets you search for an
array element within certain index positions. For example,
you can search for an array element that is the string and
that appears between index number 2 and 10. You can also
search for an array element from an index position through
the last element in the array.
The drawback to using the Array.IndexOf method is that
you can only search within a single-dimensional array.
SEARCH ARRAYS
C#
148
SEARCH ARRAYS
083601-X Ch07.F 10/18/01 12:00 PM Page 148
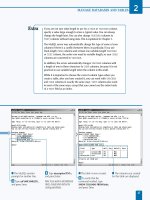
Á Type the code that creates
an instance of your array, the
elements in your array, the
Array.IndexOf search
method, and outputs the
results.
‡ Type the Output method
that outputs the information
to the screen.
° Run the program by
pressing the F5 key.
■ The element and its
associated number appear
on the screen.
· Save the program as the
filename.
USING ARRAYS
7
You can use the Array.LastIndexOf method
to find the last occurrence in an array.
149
TYPE THIS:
using System;
public class Sample
{
public static void Main()
{
array Sample=Array.CreateInstance( typeof (String), 3);
Sample.SetValue( "Five", 0 );
Sample.SetValue( "by", 1 );
Sample.SetValue( "Five", 2 );
string String1 = "Five";
int Index1 = Array.LastIndexOf( Index1, String1 );
Console.WriteLine("The last occurrence of \"{0}\" is at index {1}.", String1, Index1);
}
}
RESULT:
The last occurrence of “Five” is at index 2.
083601-X Ch07.F 10/18/01 12:00 PM Page 149
⁄ Click Start ➪ Programs ➪
Microsoft Visual Studio .NET
7.0 ➪ Microsoft Visual
Studio .NET 7.0.
■ The Start page appears.
¤ Click New Project.
■ The New Project window
appears.
‹ Click the Console
Application icon in the
Templates pane.
› Type a name for the file.
ˇ Click OK.
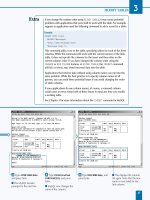
Á Delete all code after the
left brace directly below the
namespace Implement
code.
‡ Type the code that
establishes the array,
establishes the
GetEnumerator definition,
and defines part of the
Enumerator class.
A
collections class collects a number of elements that
have a specific type, such as a set of numbers that
represent the months of the year. C# provides two
methods for declaring collections classes: programming
arrays and programming the built-in IEnumerator and
IEnumerable interfaces.
An array is built from the System.Array base class that is
built into C#. C# identifies this base class as a collections
class. You can also define a class as a collections class
provided that you declare the System.Collections
namespace in your program and include the IEnumerator
and IEnumerable interfaces within the class.
The IEnumerator and IEnumerable interfaces let you
enumerate elements in your collections class. Enumerations
are discussed on page 156, but as a sneak preview,
enumerations assign numbers to elements in your
collections class so you and your program can keep track of
your elements more easily.
Like an array, you can retrieve information from a collections
class using the foreach statement. The foreach statement
works on a collections class the same way it works in an
array — the foreach statement iterates through each
element in the collections class and can return that
information to another statement or method in your program
such as the Console.WriteLine statement for output.
IMPLEMENT A COLLECTIONS CLASS
C#
150
IMPLEMENT A COLLECTIONS CLASS
083601-X Ch07.F 10/18/01 12:00 PM Page 150
° Type the remainder of the
Enumerator class code.
· Type the MainClass
code that iterates through the
collections class and outputs
its elements.
‚ Run the program by
pressing the F5 key.
■ The collections class
elements appear on the
screen.
— Save the program as the
filename.
USING ARRAYS
7
Like an array, you can use the foreach statement for iterating
through a collections class. The following example acquires a
collection in a hashtable, a predefined collection class.
151
TYPE THIS:
using System;
using System.Collections;
public class Class1
{
public static void Main(string[] args)
{
Hashtable areacode = new Hashtable();
areacode.Add("209", "Stockton");
areacode Add("559", "Fresno");
areacode Add("916", "Sacramento");
foreach (string code in areacode.Keys)
{
Console.WriteLine(code + " " + areacode[code]);
}
}
}
RESULT:
209 Stockton
559 Fresno
916 Sacramento
083601-X Ch07.F 10/18/01 12:00 PM Page 151
⁄ Click Start ➪ Programs ➪
Microsoft Visual Studio .NET
7.0 ➪ Microsoft Visual
Studio .NET 7.0.
■ The Start page appears.
¤ Click New Project.
■ The New Project window
appears.
‹ Click the Console
Application icon in the
Templates pane.
› Type a name for the file.
ˇ Click OK.
Á Delete all code after the
left brace directly below the
namespace Struct code.
‡ Type the struct property
values.
T
he struct is a close relative of the class. A struct can
have the same members of a class and can also
implement interfaces. However, a struct is a value type
so it will simply process information, such as integers
passed through an array, as any other value type instead of
instantiating objects for each element in the array as a class
would. Using structs can save memory and help your
program run faster.
You create an object in the struct by using the new
operator. After you create the object, C# will create the
object and call the value for the object. For example, you
can create an integer object that gets its value from a
method contained in a class.
Because a struct is a value type, you cannot inherit from
other structs and you cannot use a struct as a base class. A
struct can inherit from an object in a base class but not
from any inheriting classes.
When you create and run a program with a struct, C#
creates the struct on the memory stack instead of the heap.
Structs use attributes for specifying the memory areas the
struct accesses. C# contains several different built-in struct
attributes that you can use for certain tasks.
PROGRAM STRUCTS
C#
152
PROGRAM STRUCTS
083601-X Ch07.F 10/18/01 12:00 PM Page 152
° Type the output code
and the Main method that
contains the struct value.
· Run the program by
pressing the F5 key.
■ The struct value appears
on the screen.
‚ Save the program as the
filename.
USING ARRAYS
7
The struct attributes mentioned in this task are
different from the value type attribute modifiers
that determine the accessibility of your struct. You
enter the attribute information immediately before
you enter the struct declaration, and the attribute
appears within closed square brackets ([]).
153
TYPE THIS:
Using System;
[StructLayout(LayoutKind.Union)]
struct Union
{z
// Add struct information here.
}
RESULT:
This code establishes a
struct that contains the
StructLayout
(LayoutKind.Union)
attribute.
083601-X Ch07.F 10/18/01 12:00 PM Page 153
Class View - Ind
⁄ Click Start ➪ Programs ➪
Microsoft Visual Studio .NET
7.0 ➪ Microsoft Visual
Studio .NET 7.0.
■ The Start page appears.
¤ Click New Project.
■ The New Project window
appears.
‹ Click the Console
Application icon in the
Templates pane.
› Type a name for the file.
ˇ Click OK.
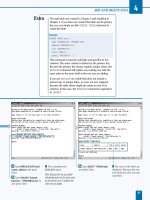
Á Click the Class View tab.
‡ Click the plus sign ( )
next to the method name.
° Click the plus sign ( )
next to the {} method name.
· Right-click the class name
to open the pop-up menu.
‚ Click Add.
— Click Add Indexer.
A
n indexer gives your class the ability to behave as
an array. If you have a class with many elements,
then an indexer lets you sort that information so
your program can get the element it needs from your class.
C# gives you two methods for adding an indexer to a class
or an interface. You can add the indexer directly into your
program or, if you add a class to your interface, you can add
it using the Add C# Interface Indexer Wizard.
Class and interface index accessors come in two forms: get
and set. The get accessor returns the type of the indexer.
The set accessor sets the value of the accessor type. The
get and set accessors use the same access modifiers as
the indexer declaration itself; the access modifiers for get
and set must be as accessible as the indexer itself.
You can add an indexer to an interface through the Add C#
Interface Indexer Wizard in the Class View window. The
Add C# Interface Indexer Wizard contains fields so you can
enter the indexer type, the parameter type, the parameter
name, and any comments. After you finish entering data
into the wizard, C# will create the skeleton of the indexer
for you so you can add the indexer accessors.
ADD AN INDEXER
C#
154
ADD AN INDEXER
083601-X Ch07.F 10/18/01 12:00 PM Page 154
int Parameter1
int
■ The C# Indexer Wizard
window appears.
± Type the indexer
parameter name in the
Parameter name field.
¡ Click Add.
■ The parameter appears in
the parameter list field.
™ Add an indexer comment
in the Comment field.
£ Click Finish.
■ The indexer skeleton code
appears in the parent
window.
¢ Save the program as the
filename.
USING ARRAYS
7
If you declare more than one indexer in the same class or
interface, then the signature for each index must be unique.
155
TYPE THIS:
using System;
class Indexer
{
private int [] Array1 = new int[20];
public int this [int Index]
{
get
{
if (index < 0 | | index >= 20)
return 0;
}
set
{
if (!(index < 0 | | index >= 20))
Array1[index] = amount;
}
}
public int [] Array2 = new int[50];
public int this [int Index]
RESULT:
You will get an error and
your program will not
run because you cannot
have the same index
signature (Index).
083601-X Ch07.F 10/18/01 12:00 PM Page 155
Properties
⁄ Click Start ➪ Programs ➪
Microsoft Visual Studio .NET
7.0 ➪ Microsoft Visual
Studio .NET 7.0.
■ The Start page appears.
¤ Click New Project.
■ The New Project window
appears.
‹ Click the Console
Application icon in the
Templates pane.
› Type a name for the file.
ˇ Click OK.
E
numerations are value types that assign numerical
values to elements in an array. By assigning numerical
values to elements, enumerations let you acquire those
elements quickly for further processing.
C# assigns the first element in the array the number zero (0)
and each successive element in the array receives a
successive number. For example, if you enumerate an array
with the 12 months of the year, January will receive the
number 0 and C# will continue until the end of the array
when December gets the number 11.
An enumeration is a special type of array that you declare
using the enum keyword. Like an array, you can set
accessibility attributes and access modifiers. The enum
elements appear within curly brackets ({}) separated by
commas just as array elements do. The key difference
between an enumeration and an array is that an
enumeration can only be of an integral type, and the
default integral type is int. Because enumerations only
assign integers to their elements, the only integral type that
you cannot include is the char type.
You can change the enumeration value by assigning a
number to the first value in the element list, and all
successive elements in the list will receive successive
numbers. For example, if you give January the number 1,
then C# assigns December the number 12.
INCLUDE ENUMERATIONS
C#
156
INCLUDE ENUMERATIONS
083601-X Ch07.F 10/18/01 12:00 PM Page 156
Á Type the code that
establishes the enumeration,
sets the value, and outputs
the value to the screen.
‡ Run the program by
pressing the F5 key.
■ The enumeration number
appears with its proper
season.
° Save the program as the
filename.
USING ARRAYS
7
You can convert the enumeration type to an integral
type — for example, to equate a string in the
enumeration with an integer for tracking purposes.
157
TYPE THIS:
using System;
public class Convert;
{
enum SpringMonths {Mar=1, Apr, May, Jun};
public static void Main()
{
int a = (int) SpringMonths.Mar //converts the Mar
value (1) to an integer
Console.WriteLine(“March = {0}”, a);
}
}
RESULT:
March = 1
083601-X Ch07.F 10/18/01 12:00 PM Page 157
C
reating and manipulating strings is a big part of any
programming language. Without programmatic
storage of string variables, you cannot create a user
interface to your application without difficulty. For example,
you need strings for describing entities such as a Client,
where a Client has Company Name, Address, City, State,
and ZIP Code fields. You cannot represent all these fields by
a numeric value. These attributes are instead recognized
through a series of characters.
When assigning values to a string variable, you can choose
to use a verbatim string literal or a regular string literal. A
verbatim string literal consists of an @ character followed by
zero or more characters inside of double-quote characters;
for example, consider @"C:\temp\" a verbatim string
literal. This type of assignment interprets the string
verbatim. If you leave out the @ character, you are assigning
a regular string literal. This assignment will not interpret
verbatim, but will evaluate the string for escape sequences
as it stores the string. The escape sequences are a backslash
followed by a reserved set of single characters. These
escape sequences will have an impact on the string that is
formatted in the user interface. For example, in the string
"First Name\tLast Name" the \t will put a tab
between the second and third word in the string.
CREATE STRING LITERALS AND VARIABLES
158
CREATE STRING LITERALS AND VARIABLES
C#
⁄ Create a new console
application and open the
Class1.cs file.
¤ Rename the namespace to
StringSample.
‹ Rename the class name to
LiteralsAndVariables.
› Save the file.
ˇ Add an entry point to the
class by adding the Main
function.
Á Create a regular string to
hold the Web site name and
motto using \n to specify a
new line.
‡ Create a verbatim string to
hold the Web site location by
adding the @ symbol before
the string value.
° Write a message about the
regular string.
093601-X Ch08.F 10/18/01 12:01 PM Page 158
If any other character follows a
backslash in a regular string, a
compile-time error occurs. For
example, \z in a regular string (like
"Brian\zErwin") creates a compile-
time error because z is not a valid
character for an escape sequence.
WORKING WITH STRINGS
8
159
· Use the WriteLine
method to output the regular
string.
‚ Use the WriteLine
method to output an extra
line.
— Use the WriteLine
method to output a message
about the verbatim string.
± Use the WriteLine
method to output the regular
string.
¡ Set a debug stop at the
end of the class.
™ Press F5 to save, build,
and run the console
application.
■ The regular string appears.
■ The verbatim string
appears.
You can use verbatim strings to avoid having
characters interpreted as escape sequences. This is
especially important for strings that hold file paths,
for example, string sFilePath = @"c:\temp\
myfile.txt". The following escape sequences are
the only ones allowed:
ESCAPE SEQUENCE APPLIED FORMATTING
\' Single quote
\" Double-quote
\\ Backslash
\0 Null
\a Alert
\b Backspace
\f Form feed
\n New line
\r Carriage return
\t Horizontal tab
\u and \U Unicode-escape-sequence *
\x Hexadecimal-escape-sequence
* (For example, \u005C is “\”)
093601-X Ch08.F 10/18/01 12:01 PM Page 159
⁄ Create a new console
application and open the
Class1.cs file.
¤ Rename the namespace to
StringSample.
‹ Rename the class to
AssignmentAndLength.
› Save the file.
ˇ Add the Main function.
Á Create a string variable for
the greeting and initialize the
greeting.
‡ Create an integer variable
and initialize it using the
Length property of the
string created.
Y
ou can assign and reassign literals to string variables,
but you can benefit from knowing what goes on
behind the scenes.
The String class in the .NET Framework is an immutable,
fixed-length string of Unicode characters. Immutable means
that the string cannot change. The String is a class and it
is not only storage, but it also has capabilities (properties,
methods, and fields) that allow manipulation of strings. In
the case of changing an existing String, when a new value
is assigned to an existing String you are not updating the
object. The updated value is returned in a new instance of a
String object.
This String class implements the IComparable,
ICloneable, IConvertible, and IEnumerable
interfaces. These interfaces, along with the specific
implementation in the String Class, give String objects
the ability to do things like: convert String objects to
other data types, evaluate parts of a string, format a string,
and iterate through collections of String objects.
Assigning values to a String variable is similar to any other
type of variable assignment. You can take two approaches,
which are allocating a String variable and then assigning
the value. This requires two separate lines of code. To
shorthand this two-step process, you can assign a value to
the String on the same line.
ASSIGN VALUES TO STRINGS
C#
160
ASSIGN VALUES TO STRINGS
093601-X Ch08.F 10/18/01 12:01 PM Page 160
° Use the WriteLine
method to output the greeting
and the length of the
greeting.
· Set a debug stop
‚ Press F5 to save, build,
and run the console
application.
■ A message about the
length of the string appears.
WORKING WITH STRINGS
8
Spaces do count when assigning strings.
161
TYPE THIS:
using System;
namespace StringSample
{
class AssignmentAndLength
{
static void Main()
{
String sSpacesCount = " 6789";
int iSpacesCount = sSpacesCount.Length;
Console.WriteLine (
"The greeting: \n{0}\nis {1} characters long.",
sSpacesCount, iSpacesCount);
}
}
}
RESULT:
C:\>csc AssignStrings_ai.cs
C:\> AssignStrings_ai.exe
The greeting:
6789
is 9 characters long.
C:\>
093601-X Ch08.F 10/18/01 12:01 PM Page 161
⁄ Create a new console
application and open the
Class1.cs file.
¤ Rename the namespace to
StringSample.
‹ Change the class name to
Concatenate.
› Save the file.
ˇ Add the Main function.
Á Create a string variable
and initialize the string with a
name.
‡ Create another string
variable and initialize the
string with a greeting.
C
oncatenating, or joining, strings is a common task for
building useful strings. Most of the time, you build
strings from more than one source. Values for strings
can come from a combination of sources (database calls,
constants, integer counters, and so on).
To build out a string from multiple sources, you concatenate
these strings in a specified sequence. You can accomplish
the concatenate of two or more string sources in several
ways. You can use the arithmetic operator (+) or the (+=)
assignment operator. Use the arithmetic operator (+) to
combine strings in the order that they appear in the
expression, or use the assignment operator (+=) to append
a string to an existing string. As you append your strings,
you have to include the spacing inside the double-quotes of
your string.
You can also use the Concat method on the String class
to perform concatenation. With this method, you can
concatenate one or more String classes together and get
a new String returned to you. Another overloaded
implementation of the String Class allows you to pass a
string array, which is handy if you have many strings to
concatenate into one representative string.
CONCATENATE STRINGS
C#
162
CONCATENATE STRINGS
093601-X Ch08.F 10/18/01 12:01 PM Page 162
° Create a new string
variable and initialize the
variable by using the
String.Concat function
and the two strings previously
created.
· Write the resulting string
to the console.
‚ Set a debug stop.
— Press F5 to save, build,
and run the console
application.
■ A message appears
showing the concatenated
string.
WORKING WITH STRINGS
8
Knowing that the String object is immutable and that it returns a
new instance of a String object, you may want to explore the
System.Text.StringBuilder framework class. The
StringBuilder class lets you concatenate strings without having
to create a new object each time you modify the string. The
StringBuilder class also gives you more flexibility with
concatenating, like appending versus inserting.
163
TYPE THIS:
using System;
using System.Text;
namespace StringSample
{
class Concatenate
{
static void Main()
{
StringBuilder sbPersonalGreeting =
new StringBuilder("Hello, how are you today");
sbPersonalGreeting.Insert(0,"Danny - ");
sbPersonalGreeting.Append("?");
Console.WriteLine(sbPersonalGreeting);
}
}
}
RESULT:
C:\> csc ConcatenateStrings_ai.cs
C:\> ConcatenateStrings_ai.exe
Danny – Hello, how are you today?
C:\>
093601-X Ch08.F 10/18/01 12:01 PM Page 163
⁄ Create a new console
application and open the
Class1.cs file.
¤ Rename the namespace to
StringSample.
‹ Rename the class name to
Compare.
› Save the file.
ˇ Add the Main function.
Á Use the WriteLine
method to prompt the user
for the password.
‡ Create a string variable
that is initialized with the
value that is read from the
console.
° Create a string variable for
the password and set the
password.
C
omparing strings in code is useful when performing
logical operations. String comparisons are useful in
expressions that are used for an if or switch
statement. For example, you can use a string comparison
when someone is logging onto your Web site. You can
compare the password that the user entered to the
password in the database.
There are several comparison methods for a string, the
simplest being two equals signs (==), which is the equality
operator. This operator checks to see if the two strings hold
the same value (length, characters, and sequence of
characters).
The String class contains some very useful comparison
methods — Compare, CompareOrdinal, CompareTo,
StartsWith, EndsWith, Equals, IndexOf, and
LastIndexOf. The method you choose depends on if you
are looking for a binary response (for example, getting a
true or false for the presence of a substring, or if both
strings match based on the method’s criteria) or position of
where a substring exists.
With the Compare method, the comparison is done in the
expression of the if statement. Note that it returns an
integer, which is used in a comparison to zero. If zero is
returned, then a match is found.
COMPARE STRINGS
C#
164
COMPARE STRINGS
093601-X Ch08.F 10/18/01 12:01 PM Page 164
· Check the password using
an if statement and write a
message to the console if the
password matches.
‚ Use an else statement if
the password does not match
and write another message to
the console.
— Set a debug stop.
± Press F5 to save, build,
and run the console
application.
■ A message prompting for
the password appears.
¡ Type in the password of
opensaysme.
■ A message about being
able to view the photos
appears.
WORKING WITH STRINGS
8
Another way to approach string comparisons is to run the
CompareTo method on the first string variable and give it
the second string variable as the parameter to that method.
165
TYPE THIS:
using System;
namespace StringSample
{
class Compare
{
static void Main()
{
Console.WriteLine("Please enter your password " +
"to enter the specified Photo Gallery:");
string sPassword = Console.ReadLine();
string sDatabasedPassword = "opensaysme";
if (sDatabasedPassword.CompareTo(sPassword)==0)
Console.WriteLine("You can view the photos");
else
Console.WriteLine("You do not have permission"
+ " to view the photos");
}
}
}
RESULT:
C:\>csc CompareStrings.cs
C:\> CompareStrings.exe
Please enter your password to
enter the specified Photo
Gallery.
Opensaysme
You can view the photos.
c:\>
093601-X Ch08.F 10/18/01 12:01 PM Page 165
⁄ Create a new console
application and open the
Class1.cs file.
¤ Rename the namespace to
StringSample.
‹ Rename the class name to
Search.
› Save the file.
ˇ Add the Main function. Á Create a string array of
size 3 and initialize the first
element in the array with a
filename and the second two
elements with image
filenames.
W
hen working with filenames that are embedded in
a fully qualified file path, it is helpful to have
substring searching capabilities. Different parts of
that fully qualified path can be useful to your program. For
example, you may want to check for the file extension or
maybe for a certain directory path. The String class
provides several methods that assist you in this process.
One way to search for substrings is to use comparision
methods. Comparison methods that work with substrings
are StartsWith and EndsWith, which essentially do what
the method name indicates (that is, find substrings that start
a string and finish off a string). These methods yield a
Boolean response that indicates if the substring was found.
If you are just looking for a specific character, you can use
the IndexOf and LastIndexOf method of the String
class to see what index position contains that character.
Another useful way to find substrings is to use regular
expressions. This is a more sophisticated way to determine
if a substring exists. With regular expressions, you can go
further than substrings and look for patterns that exist in
the string.
Another handy string-comparison method is the EndsWith
method. You can use EndsWith to identify the extension of
a file and determine if code should run or not.
SEARCH FOR SUBSTRINGS
C#
166
SEARCH FOR SUBSTRINGS
093601-X Ch08.F 10/18/01 12:01 PM Page 166
‡ Use a foreach statement
to loop through all the
elements in the array.
° In the foreach loop, use
the EndsWith function to
check the element for a .jpg
extension and write the
filename to the console if it is
a JPEG file.
· Set a debug stop.
‚ Press F5 to save, build,
and run the console
application.
■ A message appears
displaying the two JPEG
filenames.
WORKING WITH STRINGS
8
Regular expressions are a very powerful way to find substrings or patterns in a string.
If you are trying to accomplish a complicated search of a string, use regular
expressions.
167
TYPE THIS:
using System;
using System.Text.RegularExpressions;
namespace StringSample
{
class Search
{
static void Main()
{
string[] sFileNames = new string[3] {
"allphotos.aspx",
"lri_familyreunion_jan2001_001.jpg",
"hri_familyreunion_jan2001_001.jpg"};
Regex rePictureFile = new Regex(".jpg");
foreach (string sFileName in sFileNames)
{
if (rePictureFile.Match(sFileName).Success)
Console.WriteLine("{0} is a photo file.",
sFileName);
}
}
}
}
RESULT:
C:\>csc SearchSubStrings_ai.cs
C:\> SearchSubStrings_ai.exe
lri_familyreunion_jan2001_001.jpg
is a photo file.
hri_familyreunion_jan2001_001.jpg
is a photo file.
C:\>
093601-X Ch08.F 10/18/01 12:01 PM Page 167
⁄ Create a new console
application and open the
Class1.cs file.
¤ Rename the namespace to
StringSample.
‹ Rename the class name to
Replace.
› Save the file.
ˇ Add the Main function. Á Create a string and
initialize the string with three
image filenames separated by
commas.
I
f you need to create a string from replacing characters in
an existing string, you can use either the String or
StringBuilder classes to perform this operation. For
example, you may want to take a comma-separated file and
turn it into a tab-separated file.
On the String class, the Replace method lets you replace
a character in one string with another character. When you
use the String.Replace method, it will search for all
instances of the character in the affected string and replace
it with the character you specify. If you do not intend to
remove more than one of the same character from your
string, your best course of action is to replace your original
string using the StringBuilder class discussed earlier in
this chapter.
The StringBuilder.Replace method is much more
flexible with replacing characters within a string. The
StringBuilder.Replace method gives you four
methods for replacing characters: replacing a character
string with a new one, replacing all instances of a specified
character with another one (just like the String.Replace
method), replacing all instances of a string within a
specified range, and replacing all instances of a character in
a specified range with a new character.
REPLACE CHARACTERS
C#
168
REPLACE CHARACTERS
093601-X Ch08.F 10/18/01 12:01 PM Page 168
‡ Use the Replace
function to replace the
commas with tabs and write
the result to the console.
° Set a debug stop.
· Press F5 to save, build,
and run the console
application.
■ A message appears with
tabs separating the image
filenames.
WORKING WITH STRINGS
8
The String.Replace method is rather
straightforward, but it is also quite limited just
like the String class it references. If you have a
StringBuilder class, then you can use the
StringBuilder.Replace method for
changing your original String class.
The String.Replace and StringBuilder. Replace
methods are both case sensitive, so if you try to
replace a character with the lowercase letter t,
then Replace function will leave all uppercase T
characters alone. If you want to search for all
uppercase T characters, then you have to include
another String.Replace or String.Builder.Replace
method that searches for an uppercase T.
Visual C# returns an ArgumentNullException
exception if the character that you are trying to
replace is a null value — the character you are
trying to find does not exist or if the string has no
characters in it at all.
169
093601-X Ch08.F 10/18/01 12:01 PM Page 169
⁄ Create a new console
application and open the
Class1.cs file.
¤ Rename the namespace to
StringSample.
‹ Rename the class name to
Extract.
› Add the Main function.
ˇ Save the file.
Á Create a string array of
size 4 and initialize the array.
‡ Declare and initialize an
integer and a string for
outputting the images.
° Prompt the user for the
format of the photos to view.
· Use a foreach statement
to loop and display each of
the photo names.
‚ Write a question mark to
format the prompt message to
the user.
S
tring extractions are a very common task in your
programs. For example, a source string may contain
blank spaces at the beginning or end of a string, and
you only want the contents between those blank spaces.
Or, you may know the format of the string and want to
obtain only a section of that string.
.NET Framework provides methods for extracting substrings
that exist as individual characters or as a range of characters
in a string. You have a few framework classes that allow
string extractions. These classes are String,
StringBuilder, and RegularExpressions. The class
that you use depends on how sophisticated your extraction
needs to be.
The String class holds an immutable string of characters.
Each of these characters has an index, which is the position
within the array of characters. The positions are tracked
from left to right with the zero index being the first position
(zero-based). If you know the starting index and
(optionally) the length, you can pull out the desired
substring.
If you desire to extract a single character, you can reference
by the index in the String or StringBuilder object (for
example, char cThirdChar = sMyString[2]; would
extract the third character in the string sMyString).
EXTRACT SUBSTRINGS
C#
170
EXTRACT SUBSTRINGS
093601-X Ch08.F 10/18/01 12:01 PM Page 170
— Create an integer variable
and initialize the variable.
± Use a switch statement
and the SubString function
to read the prefix for the
filename.
¡ For the case of hri, lri,
and default, set the string
variable.
™ Write the message to the
console.
£ Set a debug stop at the
end of the class.
¢ Press F5 to save, build,
and run the console
application.
■ A message appears
prompting for image number.
∞ Type a number from 0 to 3
and press Enter.
■ A message appears about
the image resolution.
WORKING WITH STRINGS
8
You can use part of one string to build another string.
171
TYPE THIS:
using System;
namespace StringSample
{ class Extract
{ static void Main(string[] args)
{ string sPhoto = "src_fmlyreunion_jan2001_001.jpg";
string sFilePrefix;
string sBasePhoto =sPhoto.Substring(4);
Console.WriteLine(sBasePhoto);
Console.WriteLine("Please choose format to view?");
Console.WriteLine("[0]Low Resolution");
Console.WriteLine("[1]High Resolution");
Console.Write("?: ");
string sSelection = Console.ReadLine();
switch (sSelection)
{ case "0" :
sFilePrefix = "lri_"; break;
case "1" :
sFilePrefix = "hri_"; break;
default :
sFilePrefix = "src_"; break;}
string sFullFile = sFilePrefix + sBasePhoto;
Console.WriteLine("You will view {0}", sFullFile);
}}}
RESULT:
C:\>csc ExtractSubstrings_ai.cs
C:\> ExtractSubstrings_ai.exe
fmlyreunion_jan2001_001.jpg
Please choose format to view?
[0]Low Resolution
[1]High Resolution
?: 1
You will view hri_fmlyreunion_
jan2001_001.jpg
C:\>
093601-X Ch08.F 10/18/01 12:01 PM Page 171