Effective GUI Test Automation Developing an Automated GUI Testing Tool phần 8 doc
Bạn đang xem bản rút gọn của tài liệu. Xem và tải ngay bản đầy đủ của tài liệu tại đây (1006.67 KB, 46 trang )
305
Enhancing the AutomatedGUITest Tool
AutomatedGUITest class. You can refer to the full listing by downloading the sample source code
from this book’s web pages at www.sybex.com.
The next section will guide you through entering the last batch of code into the GUITestScript
class.
Updating the GUITestScript Class
Since verifications happen after the execution of the test, the modification of the AutomateGUITest
class and the GUITestDataCollector class prepares basic information for verification. The
final verification occurs within the GUITestScript class. In this section, you will add code to
obtain a fully functional test script and complete the project with many of the advanced testing
functions.
The modifications in this chapter often involve the addition of some new fields. The
GUITestScript class also needs new fields, as shown here:
private TypeVerification testResult;
private int MaxLen = 10000;
The first field is in the place of the private ArrayList resultList as coded in Chapter 7.
Thus, after the addition of the new field, you can remove the declaration of the resultList
object. The second field initializes an integer variable as the definition of the maximum length
of a string this test script can extract from a GUI control. The value 10,000 is an arbitrary
number that represents the maximum length of a text string the tool can hold.
Next, you need to modify the four Timer tick events. The tmrAutomatedTest_Tick() event
code after the modification should be similar to the code in Listing 8.24 (the newly added lines
are in bold and an obsolete line is commented and in bold).
➲
Listing 8.24 The Modified Code for the tmrAutomatedTest_Tick() Event
private void tmrAutomatedTest_Tick(object sender, System.EventArgs e)
{
StartAUT();
tmrAutomatedTest.Enabled = false;
tmrRunScript.Enabled = true;
//resultList = new ArrayList();
testResult = new TypeVerification();
testResult.AUTPath = seqGUIUT.AUTPath;
testResult.TypeName = seqGUIUT.AUTStartupForm;
}
4351Book.fm Page 305 Tuesday, September 28, 2004 11:21 AM
306
Chapter 8 • Methods of GUI Test Verification
The new lines of code simply initialize the newly added field, a testResult object of the
TypeVerification class. The initialization includes tagging this object with the pathname of
the AUT and its startup form. It will be used to store the verification results step-by-step dur-
ing the test execution and make the result persistent.
The tmrStopScript_Tick() event is another easy update, as shown in Listing 8.25 (the newly
added line is in bold and the obsolete line is commented and in bold).
➲
Listing 8.25 One-Line Addition to the tmrStopScript_Tick() Event
private void tmrStopScript_Tick(object sender, System.EventArgs e)
{
AddTestVerification();
//GUITestUtility.GUIInfo guiUnit =
➥(GUITestUtility.GUIInfo)seqGUIUT.GUIList[clickNum - 1];
//Control ctrlTested;
//ctrlTested = (Control)GUITestUtility.VerifyField(AUT, "txtSelected");
//resultList.Add(ctrlTested.Text);
if (clickNum >= seqGUIUT.GUIList.Count)
{
tmrRunScript.Enabled = false;
tmrStopScript.Enabled = false;
tmrVerifyTest.Enabled = true;
AUT.Dispose();
}
else
{
tmrRunScript.Enabled = true;
tmrStopScript.Enabled = false;
}
}
The addition simply invokes an AddTestVerification() helper method. The code for this
method is in Listing 8.26.
➲
Listing 8.26 A new AddTestVerification() Helper Method to Update the GUITestScript Class
private void AddTestVerification()
{
if (AUT == null)
return;
string VerifyDataStore = guiTestDataStore.Replace(".xml", "_verify.xml");
TypeVerificationSerializable verifyTypes = new TypeVerificationSerializable();
4351Book.fm Page 306 Tuesday, September 28, 2004 11:21 AM
307
Enhancing the AutomatedGUITest Tool
object obj = (object)verifyTypes;
GUITestUtility.DeSerializeInfo(VerifyDataStore, ref obj);
verifyTypes = (TypeVerificationSerializable)obj;
TypeVerification oneType =
➥(TypeVerification)verifyTypes.TypeList[clickNum - 1];
object resulted = null;
foreach (TestExpectation fieldName in oneType.MemberList)
{
TestExpectation tested = fieldName;
try
{
resulted = GUITestUtility.VerifyField(AUT, tested.VerifyingMember);
tested.isField = true;
}
catch(Exception ex4)
{
resulted = GUITestUtility.VerifyProperty(AUT, tested.VerifyingMember);
tested.isProperty = true;
}
VerifyAlphanumericResult(ref tested, resulted);
VerifyClipboard(ref tested, resulted);
}
}
The first line of the AddTestVerification() helper method obtains the filename of the ver-
ification data store by recognizing the suffix, _verify.xml. This suffix was introduced to the
testing tool when you modified the AutomatedGUITest class.
Then it initializes a new TypeVerificationSerializable instance, verifyTypes. The box-
ing method converts the verifyTypes instance into an object instance in order to call the
DeSerializeInfo() method from the GUI test library. After the deserialization reconstructs
the object, an unboxing method converts this object back to a verifyTypes instance that
includes all the members in need of verification.
This tool regards each GUI action as a step in the execution of the GUI test. The step is counted
by the clickNum variable. Using the value of the clickNum, each step of the test initializes a
TypeVerification object, oneType, by retrieving the content from the verifyTypes.TypeList.
Then a foreach loop is used to find how many members are specified for verification. Since this
helper method needs to assign verification results into the oneType.MemberList, it assigns each
fieldName object to a new TestExpectation object, tested. A try-catch clause is used to get the
current status of the member in need of verification. Because the member is either a field or a
property, the try statement invokes the VerifyField() from the GUI test library. If the try
invocation fails, the catch statement invokes the VerifyProperty() method to complete the
4351Book.fm Page 307 Tuesday, September 28, 2004 11:21 AM
308
Chapter 8 • Methods of GUI Test Verification
task. The try-catch clause easily tells the verification whether the current member is a field or
a property.
Finally, it invokes the other two helper methods, VerifyAlphanumericResult() and
VerifyClipboard(), to determine whether this verification matches the expected alpha-
numeric and the clipboard results at this step of the test.
The code for the VerifyAlphanumericResult() method is in Listing 8.27.
➲
Listing 8.27 Code for the VerifyAlphanumericResult() Method
private void VerifyAlphanumericResult(ref TestExpectation fieldName,
➥object resulted)
{
try
{
Control cntl = (Control)resulted;
fieldName.isGUI = true;
fieldName.ActualResult = cntl.Text;
StringBuilder sb = new StringBuilder(MaxLen);
GUITestActions.GetWindowText((int)cntl.Handle, sb, MaxLen);
fieldName.ScreenSnapshot = sb.ToString();
}
catch (InvalidCastException ex1)
{
fieldName.ActualResult = resulted.ToString()+ "\n" + ex1.Message;
}
catch (Exception ex2)
{
fieldName.ActualResult =
➥fieldName.VerifyingMember + " is not found as a member.\n" + ex2.Message;
}
fieldName.AssertAlphanumericTest(fieldName.ExpectAlphaNumericEqual);
testResult.MemberList.Add(fieldName);
}
This method takes two parameters. The first parameter holds the verification information and
the second holds the object of field or a property. Then it uses a compound try-catch clause. A
majority of the verification activities occur inside the try statement. If the member currently
being verified is a GUI component, it retrieves the values of the GUI properties and assigns it to
the related fields of the first parameter, which is passed by reference. The catch statements are
used to report the reason when one line of the code in the try statement encounters an error.
After the invocation of the
try-catch clause, the AssertAlphanumericTest() method of the
GUITestVerification class is called and determines whether to let this test step pass or fail.
The verification result is added to the testResult.MemberList and will be serialized at the
end of the test.
4351Book.fm Page 308 Tuesday, September 28, 2004 11:21 AM
309
Enhancing the AutomatedGUITest Tool
Listing 8.28 shows the code for the VerifyClipboard() method.
➲
Listing 8.28 Code for the VerifyClipboard() Method
private void VerifyClipboard(ref TestExpectation fieldName, object resulted)
{
fieldName.ActualClpbrdObj =
➥Clipboard.GetDataObject().GetData(DataFormats.Text);
try
{
Control cntl = (Control)resulted;
fieldName.ExpectedClpbrdObj = cntl.Text;
fieldName.AssertClipboardTest(fieldName.ExpectClipBrdEqual);
}
catch (Exception ex)
{
Console.WriteLine(ex.Message);
}
}
The VerifyClipboard() method takes the same set of parameters as the VerifyAlphanumeric-
Result()
method does. It goes directly to the clipboard and gets the actual clipboard content.
Then, inside the try statement it retrieves the value of the Text property of the current
member if this is a GUI control. The last line of code inside the try statement invokes the
AssertClipboardTest() method and determines whether the clipboard content is consistent
with the expected result of the GUI control.
We discussed a few types of verification at the beginning of this chapter. However, this test
script class implements only two examples to verify the alphanumeric results and clipboard
results. In order to meet the specific testing requirements of your organization, this kind of
implementation leaves enough room for you to enhance the testing capabilities of the tool in
the future. In Chapters 9 and 11, for example, you will learn how to add methods to verify the
test of Label, CheckBox and RadionButton controls.
Now, you have only one more modification for the tmrVerifyTest_Tick() event. Listing 8.29
displays the new code of this event in bold with the obsolete code commented and in bold.
➲
Listing 8.29 Code for the tmrVerifyTest_Tick() Event
private void tmrVerifyTest_Tick(object sender, System.EventArgs e)
{
tmrVerifyTest.Enabled = false;
string resultDataStore = guiTestDataStore.Replace(".xml", "_result.xml");
//GUITestUtility.SerilizeInfo(resultDataStore, resultList);
4351Book.fm Page 309 Tuesday, September 28, 2004 11:21 AM
310
Chapter 8 • Methods of GUI Test Verification
GUITestUtility.SerilizeInfo(resultDataStore, testResult);
//Display the test result
try
{
XmlTreeViewer.Form1 xmlTV = new XmlTreeViewer.Form1();
xmlTV.OpenXmlDoc(resultDataStore);
xmlTV.Show();
}
catch{}
//Test completed
this.Dispose();
}
When the tmrVerifyTest_Tick() event is ready to be triggered, the test and verification
activities have already completed. But the verification result is still not saved and can not be
viewed. Without confirmation from a human tester reading the saved test results, the verifica-
tion can never be completed. The tmrVerifyTest_Tick() event invokes methods to save the
results and displays the results.
The test results are saved to a file with a name with a _result.xml suffix, which was intro-
duced since Chapter 7. The invocation of the SerilizeInfo() of the GUI test library saves the
test and verification results immediately at the end of the test. In fact, this invocation occurred
in Chapter 7 for the obsolete resultList object. Then the rest of the new code initializes an
XML document viewer object, XmlTreeViewer.Form1, to open the saved XML result docu-
ment. At this point, the tester can scrutinize the results and reports the defects found by the
testing tool. The developers can view this report to fix the defects.
The coding task for the GUITestScript class is completed. If you build the project,
you will observe compiling errors. The reason is that there is no implementation of an
XmlTreeViewer.Form1 class in the AutomatedGUITest project. In the next section, you will
enable this class with a few configuration steps by reusing the XmlTreeViewer project devel-
oped in Chapter 5.
NOTE
For a full code listing of the updated GUITestScript class, you can download the source
code from www.sybex.com.
Adding the XML Document Viewer for Result Presentation
Up to now, there is no implementation of any XML document viewer for the AutomatedGUITest
tool. But, you may remember that you developed an XmlTreeViewer project earlier in the book.
The XmlTreeViewer project displays XML documents, but editing the XML document is not
4351Book.fm Page 310 Tuesday, September 28, 2004 11:21 AM
311
Enhancing the AutomatedGUITest Tool
allowed, which fits the purpose of displaying test results perfectly. You don’t need to add any code
to the XmlTreeViewer project to reuse it. You can follow these steps to incorporate it into the
AutomatedGUITest project and perform some configuration steps:
1. Copy the XmlTreeViewer project folder with all the files from C:\GUISourceCode\Chapter05\
to the C:\GUISourceCode\Chapter08\ folder. This enables you to organize all the needed
project files in the same folder for the AutomatedGUITest project.
2. When the AutomatedGUITest is still open, choose File Add Project Existing Project
from the main window of the IDE.
3. When the Add Existing Project dialog box appears, navigate to the C:\GUISourceCode\
Chapter08\XmlTreeViewer
folder and select the XmlTreeViewer.csproj project. Click the
Open button to finish the addition.
4. In the Solution Explorer of the IDE, select the XmlTreeViewer project and right-click on
it. A pop-up menu appears.
5. Choose Properties from the pop-up menu. The XmlTreeViewer Property Pages dialog
box appears.
6. In the right pane of the dialog box, use your mouse to locate the Output Type field under
the Application category. If the Application category is collapsed, showing a + sign, click
the + sign to expand it. The XmlTreeViewer project was originally created as a Windows
Application as shown in the Output Type field. In order for it to be used by the Auto-
matedGUITest tool as a class library, on the right edge of the Output Type field, click the
arrow (similar to the arrow on a combo box) and select Class Library. Finally, click the OK
button to close the Property Pages dialog box.
7. From the main window of the IDE, choose Project
Add Reference to bring the Add Ref-
erence dialog box up.
8. Activate the Projects tab by clicking it. At this point, you have added two projects, GUITest-
Library and XmlTreeViewer, into the AutomatedGUITest solution. The GUITestLibrary
project has already been referenced in Chapter 7. Select the XmlTreeViewer project and
click the OK button to add the reference and close the dialog box.
Now, you can build and run the AutomatedGUITest tool by pressing F5 and start to feed it
with an application in need of testing. If compiling errors are observed, you can correct the
errors by comparing your code with source code downloadable from www.sybex.com. After the
AutomatedGUITest project is successfully built, you can go on to the next section, which will
demonstrate the new capabilities of the updated GUI testing tool by testing the C# API Text
Viewer again.
4351Book.fm Page 311 Tuesday, September 28, 2004 11:21 AM
312
Chapter 8 • Methods of GUI Test Verification
Conducting a Fully Automated GUI Test
After you press F5 in the Microsoft Visual Studio .NET IDE, the AutomatedGUITest tool is
successfully built and runs on your desktop. The use of this tool has been illustrated in the pre-
vious chapters. The steps of testing the C# API Text Viewer in this section will be similar to
those in Chapter 7:
1. Click the Start GUI Test button. An open file dialog box appears. From this dialog box,
navigate to the
C:\GUISourceCode\Chapter03\CSharpAPITextViewer\bin\Debug folder,
select the
CSharpAPITextViewer.exe file, and click the Open button. The Types under
Test form shows up with names of the classes implemented for the CSharpAPITextViewer
project. One of them is the Form1 class. Select it and click the OK button.
2. The C# API Text Viewer starts on the desktop. If it covers the AutomatedGUITest application,
you can rearrange the applications on your screen and make the AutomatedGUITest tool vis-
ible. But make sure there is only one copy of the C# API Text Viewer running on your system.
3. Click the GUI Survey button on the AutomatedGUITest tool. The tool minimizes itself to
expose the application under test. It takes a few seconds for the tool to complete the survey
and reappear on the screen. The survey results are shown in the DataGrid control of the
GUI interface. Now you can double-click the gray or blue area on the left edge or on the
top to specify the selected GUI component for an invocation by the
GUITesctScript class.
4. Your first GUI action is to manipulate the ListBox. As explained, the value of the GUI text
for this ListBox is empty in the first column. You recognize it by reading its class name,
WindowsForms10.LISTBOX.app3, in the third column to locate the row index. Double-click
beside the row on the left edge. The GUI Test Data Collector form appears on the screen
with the GUI controls populated with possible GUI testing and verification information
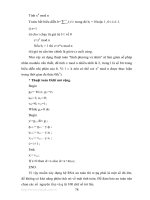
(Figure 8.2).
5. At this point, you can decide which verification method to use for this testing step. For the
purpose of simplicity and setting up a testing example, this test will use the specific verifica-
tion method. First, make sure the Specific radio button is not checked. In the CheckedList-
Box control at the lower-left, check the box beside CSharpAPITextViewer.Form1. Then click
the vertical scroll bar downward to locate the txtSelected member and check the box beside
it. Now select the Specific radio button. You may see that the selected txtSelected member
is entered into the rich text box in the left. The GUI Test Data Collector at this point looks
like Figure 8.2. Click the OK button.
6. After the GUI Test Data Collector closes, you are ready to specify the second GUI invoca-
tion. From the DataGrid of the Automated GUI Test form, locate the Add button control.
Double-click on the left edge of the Add button. The GUI Test Data Collector appears
again. All the radio buttons are unchecked. Because the first step specified to verify the
txtSelected field, select the Specific radio button again and click the OK button.
4351Book.fm Page 312 Tuesday, September 28, 2004 11:21 AM
313
Enhancing the AutomatedGUITest Tool
➲
FIGURE 8.2
The GUI testing and
verification data shown
on the GUI Test Data
Collector
7. Repeat step 6 four more times by selecting the Copy, RichTextBox, Remove, and Clear
controls from the DataGrid. You have specified a total of six steps for this testing case.
8. Next, you need to terminate the C# API Text Viewer. When you click the Run Test button
to execute the test, the test script will start up another copy of the application under test,
and two copies of the application running on the same system will confuse the tool.
9. Click the Run Test button from the AutomatedGUITest tool. When the save file
dialog box appears, type in a filename with an XML extension, such as C:\Temp
\TestC#APITextViewer.xml
. Then click the Save button. A copy of the verification
data is saved as C:\Temp\TestC#APITextViewer_verify.xml at the same time (Listing 8.30).
The designated testing starts and the C# API Text Viewer shows up again. The GUI actions
of the mouse clicking occur in sequence, and the application closes by itself after the auto-
matic testing and verification.
Listing 8.30 Members in Need of Verifiation Saved with the C:\Temp
\TestC#APITextViewer_verify.xml in Step 9
<?xml version="1.0" encoding="utf-8"?>
<TypeVerificationSerializable xmlns:xsd="
➥xmlns:xsi=" /> <AUTPath>C:\GUISourceCode\Chapter03\CSharpAPITextViewer\
➥bin\Debug\CSharpAPITextViewer.exe</AUTPath>
<AUTStartupForm>CSharpAPITextViewer.Form1</AUTStartupForm>
<TypeVerificationSerializable>
<FormUnderTest>
<TypeName>CSharpAPITextViewer.Form1</TypeName>
<GUIEvent>lstAvailableFuncs</GUIEvent>
4351Book.fm Page 313 Tuesday, September 28, 2004 11:21 AM
314
Chapter 8 • Methods of GUI Test Verification
<TestEvents>
<TestAndVerify>
<EventMember>lstAvailableFuncs</EventMember>
<VerifyingMember>txtSelected</VerifyingMember>
<GUIActionSequence>1</GUIActionSequence>
<isGUI>false</isGUI>
<isField>false</isField>
<isProperty>false</isProperty>
<ExpectingResult />
<ActualResult />
<ScreenSnapshot />
<ExpectAlphaNumericEqual>true</ExpectAlphaNumericEqual>
<AlphanumericPass>true</AlphanumericPass>
<ExpectClipBrdEqual>true</ExpectClipBrdEqual>
<ClipboardPass>true</ClipboardPass>
<FileTestPass>true</FileTestPass>
<OjectTestPass>true</OjectTestPass>
<ImageTestPass xsi:type="xsd:boolean">true</ImageTestPass>
</TestAndVerify>
</TestEvents>
</FormUnderTest>
<FormUnderTest>
<TypeName>CSharpAPITextViewer.Form1</TypeName>
<GUIEvent>btnAdd</GUIEvent>
<TestEvents>
<TestAndVerify>
<EventMember>btnAdd</EventMember>
<VerifyingMember>txtSelected</VerifyingMember>
<GUIActionSequence>2</GUIActionSequence>
<isGUI>false</isGUI>
<isField>false</isField>
<isProperty>false</isProperty>
<ExpectingResult />
<ActualResult />
<ScreenSnapshot />
<ExpectAlphaNumericEqual>true</ExpectAlphaNumericEqual>
<AlphanumericPass>true</AlphanumericPass>
<ExpectClipBrdEqual>true</ExpectClipBrdEqual>
<ClipboardPass>true</ClipboardPass>
<FileTestPass>true</FileTestPass>
<OjectTestPass>true</OjectTestPass>
<ImageTestPass xsi:type="xsd:boolean">true</ImageTestPass>
</TestAndVerify>
</TestEvents>
</FormUnderTest>
<FormUnderTest>
<TypeName>CSharpAPITextViewer.Form1</TypeName>
<GUIEvent>btnCopy</GUIEvent>
<TestEvents>
<TestAndVerify>
<EventMember>btnCopy</EventMember>
<VerifyingMember>txtSelected</VerifyingMember>
4351Book.fm Page 314 Tuesday, September 28, 2004 11:21 AM
315
Enhancing the AutomatedGUITest Tool
<GUIActionSequence>3</GUIActionSequence>
<isGUI>false</isGUI>
<isField>false</isField>
<isProperty>false</isProperty>
<ExpectingResult />
<ActualResult />
<ScreenSnapshot />
<ExpectAlphaNumericEqual>true</ExpectAlphaNumericEqual>
<AlphanumericPass>true</AlphanumericPass>
<ExpectClipBrdEqual>true</ExpectClipBrdEqual>
<ClipboardPass>true</ClipboardPass>
<FileTestPass>true</FileTestPass>
<OjectTestPass>true</OjectTestPass>
<ImageTestPass xsi:type="xsd:boolean">true</ImageTestPass>
</TestAndVerify>
</TestEvents>
</FormUnderTest>
<FormUnderTest>
<TypeName>CSharpAPITextViewer.Form1</TypeName>
<GUIEvent>txtSelected</GUIEvent>
<TestEvents>
<TestAndVerify>
<EventMember>txtSelected</EventMember>
<VerifyingMember>txtSelected</VerifyingMember>
<GUIActionSequence>4</GUIActionSequence>
<isGUI>false</isGUI>
<isField>false</isField>
<isProperty>false</isProperty>
<ExpectingResult />
<ActualResult />
<ScreenSnapshot />
<ExpectAlphaNumericEqual>true</ExpectAlphaNumericEqual>
<AlphanumericPass>true</AlphanumericPass>
<ExpectClipBrdEqual>true</ExpectClipBrdEqual>
<ClipboardPass>true</ClipboardPass>
<FileTestPass>true</FileTestPass>
<OjectTestPass>true</OjectTestPass>
<ImageTestPass xsi:type="xsd:boolean">true</ImageTestPass>
</TestAndVerify>
</TestEvents>
</FormUnderTest>
<FormUnderTest>
<TypeName>CSharpAPITextViewer.Form1</TypeName>
<GUIEvent>btnRemove</GUIEvent>
<TestEvents>
<TestAndVerify>
<EventMember>btnRemove</EventMember>
<VerifyingMember>txtSelected</VerifyingMember>
<GUIActionSequence>5</GUIActionSequence>
<isGUI>false</isGUI>
<isField>false</isField>
<isProperty>false</isProperty>
4351Book.fm Page 315 Tuesday, September 28, 2004 11:21 AM
316
Chapter 8 • Methods of GUI Test Verification
<ExpectingResult />
<ActualResult />
<ScreenSnapshot />
<ExpectAlphaNumericEqual>true</ExpectAlphaNumericEqual>
<AlphanumericPass>true</AlphanumericPass>
<ExpectClipBrdEqual>true</ExpectClipBrdEqual>
<ClipboardPass>true</ClipboardPass>
<FileTestPass>true</FileTestPass>
<OjectTestPass>true</OjectTestPass>
<ImageTestPass xsi:type="xsd:boolean">true</ImageTestPass>
</TestAndVerify>
</TestEvents>
</FormUnderTest>
<FormUnderTest>
<TypeName>CSharpAPITextViewer.Form1</TypeName>
<GUIEvent>btnClear</GUIEvent>
<TestEvents>
<TestAndVerify>
<EventMember>btnClear</EventMember>
<VerifyingMember>txtSelected</VerifyingMember>
<GUIActionSequence>6</GUIActionSequence>
<isGUI>false</isGUI>
<isField>false</isField>
<isProperty>false</isProperty>
<ExpectingResult />
<ActualResult />
<ScreenSnapshot />
<ExpectAlphaNumericEqual>true</ExpectAlphaNumericEqual>
<AlphanumericPass>true</AlphanumericPass>
<ExpectClipBrdEqual>true</ExpectClipBrdEqual>
<ClipboardPass>true</ClipboardPass>
<FileTestPass>true</FileTestPass>
<OjectTestPass>true</OjectTestPass>
<ImageTestPass xsi:type="xsd:boolean">true</ImageTestPass>
</TestAndVerify>
</TestEvents>
</FormUnderTest>
</TypeVerificationSerializable>
</TypeVerificationSerializable>
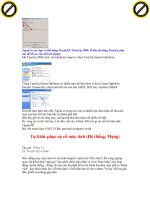
10. The XmlTreeViewer appears on the screen with the verification results as shown in
Figure 8.3. This document is saved with a name C:\Temp\TestC#APITextViewer_result.xml.
You see some nodes highlighted with red characters. If you are testing a project with bugs,
you can report the bugs found by this tool and ask the developers to fix them. Thus, a tester
has only three XML documents to be concerned about: the testing data, verification data, and
result data stores. The test can duplicate and edit the testing data and verification data store
at any time. The result data store need not be modified and tells the causes of the software
defects.
4351Book.fm Page 316 Tuesday, September 28, 2004 11:21 AM
317
Enhancing the AutomatedGUITest Tool
FIGURE 8.3
The final test report
in the XMLTreeViever
application
NOTE
If you scroll the XML tree viewer for this testing case, you’ll spot at steps 2 and 3 that the alpha-
numeric test reports a false value by matching the text read from the object and the text cap-
tured from the screen. This is because the C# API Text Viewer adds escape characters, such
as \n, when marshalling the custom functions. When a set of \n escape characters is added
to the rich text box, it becomes a set of \r\n escape characters. \r and \n represent carriage
return and new line, respectively. However, the clipboard test yields a true value because the
texts read from the field object of the application and the clipboard match. There are other false
alarms in the report, which need to be clarified by updating the tool in the future.
11. After the bugs are fixed you don’t need to repeat the previous steps to recollect the testing and
verification data. You simply start this testing tool, click the Rerun Test button, and navigate
to the saved testing data store. A regression testing can be completed with the minimum efforts.
12. If you want to modify the testing steps and the verification scope, you can modify the test-
ing data store and the verification data store instead of rerunning the testing tool. For this
demonstration, the testing data store is the TestC#APITextViewer.xml document and the
verification data store is the TestC#APITextViewer_verify.xml document. Remember,
adding more testing steps and more verification members into the data stores will increase
the efficiency of finding bugs.
4351Book.fm Page 317 Tuesday, September 28, 2004 11:21 AM
318
Chapter 8 • Methods of GUI Test Verification
Summary
Throughout the course of this book, you have turned a soulless test monkey into an automatic
GUI testing tool. This tool has the capabilities of seeing and manipulating the GUI compo-
nents. GUI testing can be conducted by reusing these capabilities in a desired order with simple
to complex verifications.
At this point, the GUI test library has accumulated a few GUI handling methods for com-
mand buttons, text boxes, and list boxes. The available software development environments
usually have a lot more types of GUI controls than these. Although we will not add code for an
exhaustive testing of all the prefabricated GUI controls, in the rest of the book we will imple-
ment some typical GUI handling methods, such as those for labels, menus, and check boxes.
The testing capability of your tool is not limited to the GUI controls covered next. They are
designed to set up examples so that you can meet all of your future testing requirements.
4351Book.fm Page 318 Tuesday, September 28, 2004 11:21 AM
Chapter 9
Testing Label and
Cosmetic GUI Controls
4351Book.fm Page 319 Tuesday, September 28, 2004 11:21 AM
320
Chapter 9 • Testing Label and Cosmetic GUI Controls
I
n Chapters 7 and 8, we implemented the AutomatedGUITest tool with a test script, a GUI
testing data collector, and methods for GUI test verification. The data is collected into XML
documents. GUI testing input data and verification data are stored separately. Such a separation
makes it easy for the testers to create more testing cases or scenarios later by copying, pasting, and
editing. This data drives the execution of the test script. Thus, the AutomatedGUITest tool
forms the backbone for a high degree of GUI test automation. Based on this backbone, other
testing functions can be added when there are new testing tasks.
Modern software development platforms are rich in prefabricated GUI controls. The GUI
controls are in the front end of an application. They don’t perform any business tasks themselves
but provide an interface for end users. Some controls undertake different tasks by collaborating
with components in the business and data layers of the architecture. In general, GUI compo-
nents have the following responsibilities:
●
Dispatching modules of other layers to accomplish business functions
●
Performing decorative or cosmetic, and nonbusiness functions
●
Providing feedback and intuitive instructions for end users to complete jobs
●
Making applications easy and friendly to end users with respect to usability
So far, the AutomatedGUITest tool has been enabled to test rich text boxes, list boxes, and
command buttons, which invoke functions in business and data layers. This chapter uses the
Label control as an example and shows how to add code to the tool project for testing GUI
controls for cosmetic or nonbusiness functions.
How to Test Label and Other Cosmetic Controls
GUI components need to be labeled so that the end users understand what they are. Some GUI
components, such as radio buttons and checkboxes, use the values of their Text properties to
label themselves. The others have to be labeled by some cosmetic controls. Among the cosmetic
controls, the Label control is the most widely used to label the others, such as text boxes, combo
boxes, and list boxes.
Normally, Label controls only put labels onto the other controls and perform no business
tasks. When a Label control is tested, the focus is more on its decoration purpose than the
other functionality. The decorative effects of a label for another control and the entire appli-
cation are affected by the values of the following properties:
Size
The Size property has values for two dimensions, width and height. The values of the
width and height must be less than the parent control but must be big enough to show the full
caption text and not to overlap with other controls. The testers also take into consideration
that the size and caption of a Label control may change as the status of the application changes.
4351Book.fm Page 320 Tuesday, September 28, 2004 11:21 AM
321
Upgrading the AutomatedGUITest Tool
Text
The value of the Text property is usually fixed at coding time. It is directly visible as
the caption of the Label control. One function of a testing tool will be spell-checking the text.
Font
The Font property usually involves in the style, the size, and the color of the charac-
ters. These values require different sizes of a Label control to display the full length of the text.
Color
For a usable and pleasing interface, Label controls have different foreground and
background colors.
Location
The Location property affects the usability of most of the GUI controls. For
example, the location and the size of GUI controls should be tested to verify that they don’t
overlap one another. The location of a Label control should also be checked to ensure that
the control labels a designated GUI object without ambiguity.
Enabled
The value of the Enabled property could change as the application status
changes. Conventionally, a label appears gray when it isn’t enabled.
Visible
Some functionality of an application may not be available at certain stages, and a label
may not be visible to the end users. However, it will appear when the functionality is available.
There are other GUI controls that perform more decorative tasks for an application than
invoking business functions, such as PictureBox, GroupBox, and Panel. These controls can be
self-labeled. A Panel control usually contains other GUI components. A GroupBox control
also serves as a container for other controls, especially for a group of radio buttons. Thus, only
one of the radio buttons can be checked within a GroupBox control.
The values of the properties affecting the appearance of a Label control affect its decorative
effects. In general, each control has a
hasChildren
property. The value of the
hasChildren
property of a Label usually is false. But, GroupBox and Panel controls usually have a true
value for the
hasChildren
property and will have children. A PictureBox control has an image
property, which is usually a picture filename, such as files with extensions of
.bmp
,
.jpg
,
and
.ico
.
To test these nonbusiness functional controls, testers first are interested in inspecting their
existences. Then they will check the values of the properties affecting their appearance. Even-
tually, the appearances of these controls affects usability and attracts end users.
Upgrading the AutomatedGUITest Tool
The AutomatedGUITest tool uses one test script to test different applications. To increase
the efficiency of finding more bugs, such a tool allows testers to input a lot of testing data and
save time by avoiding recording, handwriting, editing, and debugging test scripts. The exe-
cution of this test script is driven by different GUI controls in an application. Figure 9.1 shows
4351Book.fm Page 321 Tuesday, September 28, 2004 11:21 AM
322
Chapter 9 • Testing Label and Cosmetic GUI Controls
the data-driven GUI testing process, which involves five components of the Automated-
GUITest tool and four major interactions:
1.
After the GUI testing inputs are loaded, the test script starts the application under test.
2.
The test script looks for a GUI handling method from the GUI test library and invokes the
business functions dynamically.
3.
Upon the invocation of the business functions, the test script determines the status of each
of the members in need of verification.
4.
Finally, the test script saves and displays the test results.
Among the involved five components, the GUI testing and verification information needs to
be collected at the time when an application is specified for testing. Updating this tool for test-
ing more GUI controls requires adding code to the
GUITestVerification
,
GUITestScript
, and
GUITestActions
classes.
FIGURE 9.1
Dynamic data-driven
execution and interac-
tions between the test
script and the data
stores
GUI Test Script
GUI Test
Input Data
Conducts testing
and verification
interactively
GUI Handling
Methods from
the GUI Test
Library
GUI Test
Verification
Data
Result Store
Gets GUIs in need of testing
Requests for a GUI handling method
Invokes the GUI event
Requests for verification information
Gets the status of the application after a GUI event
Saves the test results
Displays the test results
4351Book.fm Page 322 Tuesday, September 28, 2004 11:21 AM
323
Upgrading the AutomatedGUITest Tool
➲
Adding a Method to the
GUITestVerification
Class
By the end of Chapter 8, the development of the AutomatedGUITest tool included three
projects, all of which reused the code from Chapters 4, 5 and 7, respectively. We have made a
new directory at the beginning of each chapter for these projects. Now you need to make a
C:\GUISourceCode\Chapter09\
folder, and copy the folders of the three projects, Automated-
GUITest, GUITestLibrary, and XmlTreeViewer, from
C:\GUISourceCode\Chapter08\
to
C:\GUISourceCode\Chapter09\
.
Start the Microsoft Visual Studio .NET IDE and open the AutomatedGUITest solution
from the new folder. Locate the
GUITestVerification
class. You coded this class with an
ActualCosmeticStr
and an
ExpectedCosmeticStr
field in Chapter 8. These two fields are
prepared to test the nonbusiness functional controls. In this chapter, only one method,
AssertCosmeticGUITest()
, is needed for the
GUITestVerification
class to assert that the
values of these two fields match for testing a specified GUI control. The code of the
AssertCosmeticGUITest()
method is in Listing 9.1.
Listing 9.1 Adding Code for the
AssertCosmeticGUITest(
) Method to the
GUITestVerification
Class
public void AssertCosmeticGUITest()
{
if (ActualCosmeticStr.Equals(ExpectedCosmeticStr))
{
CosmeticTestPass = true;
}else
{
CosmeticTestPass = false;
}
}
The
AssertCosmeticGUITest()
method simply checks the actual and the expected values of
the properties of a GUI component, which affects the appearance of the application. After cod-
ing, choose Build
Build Solution to build the project. Thus, the
GUITestVerification
class
is updated.
Expanding the Testing Capability of the
GUITestScript
Class
Software development IDEs have been manufactured with various kinds of GUI controls. The
nonbusiness functional controls are responsible for decorating the application and providing
feedback and instruction to the users. Testers are more interested in testing their appearance
4351Book.fm Page 323 Tuesday, September 28, 2004 11:21 AM
324
Chapter 9 • Testing Label and Cosmetic GUI Controls
than their business functions. For the development of the AutomatedGUITest tool, testing the
Label and other cosmetic GUI controls shares a
VerifyCosmeticGUIs()
method. This method
is coded in Listing 9.2.
➲
Listing 9.2 Code for the
VerifyCosmeticGUIs()
Method of the
GUITestScript
Class
private void VerifyCosmeticGUIs(ref TestExpectation fieldName, object resulted)
{
try
{
Control cntl = (Control)resulted;
fieldName.ActualCosmeticStr =
"Caption: " + cntl.Text + "\n Size: " + cntl.Size +
"\n Child GUIs: " + cntl.Controls.Count + "\n Font: " + cntl.Font +
"\n Location: " + cntl.Location + "\n Back Color: " + cntl.BackColor +
"\n Fore Color: " + cntl.ForeColor + "\n Enabled: " + cntl.Enabled +
"\n Visible: " + cntl.Visible + "\n hasChildren: " + cntl.HasChildren;
PictureBox pb;
fieldName. AssertCosmeticGUITest();
}
catch (Exception ex)
{
fieldName.ActualCosmeticStr = ex.Message;
}
}
The verification method for the cosmetic controls requires the same kinds of parameters the
business functional controls require. Within a
try-catch
clause, this method first converts
the GUI object under test into a Control object by unboxing. Then it assigns the values of the
cosmetic properties of this GUI control to the
ActualCosmeticStr
field. The availability of
the GUI properties in Listing 9.2 is based on the Microsoft Visual Studio .NET IDE 2003.
If your testing projects involves GUI controls from other development environments, the
names of the properties may need to be adjusted.
Finally, it invokes the
AssertCosmeticGUITest()
to check whether the actual cosmetic values
meet the expected values for verification. If any error occurs within the
try
statement, the
catch
statement will assign the error message to the
ActualCosmeticStr
field to report the
reason for the error.
After you add this code segment into the
GUITestScript
class, the
VerifyCosmeticGUIs()
method can be reused to verify any cosmetic GUI testing. Listings 9.3 and 9.4 use a similar
code pattern to verify the Label and GroupBox controls, respectively.
4351Book.fm Page 324 Tuesday, September 28, 2004 11:21 AM
325
Upgrading the AutomatedGUITest Tool
➲
Listing 9.3 Code for the
VerifyLabel()
Method
private void VerifyLabel(ref TestExpectation fieldName, object resulted)
{
try
{
Label lbl = (Label)resulted;
VerifyCosmeticGUIs(ref fieldName, lbl);
}
catch(Exception ex)
{
Console.WriteLine(ex.Message);
}
}
To verify a Label control, the
VerifyLabel()
method tries to convert the GUI object under
test into a Label object. If the conversion succeeds, the
VerifyCosmeticGUIs()
will be invoked
and the verification results will be collected. Otherwise, the GUI object under test is not a
Label and the execution proceeds to the next step.
Listing 9.4 is the code to verify a GroupBox control.
➲
Listing 9.4 Code for the
VerifyGroupBox()
Method
private void VerifyGroupBox(ref TestExpectation fieldName, object resulted)
{
try
{
GroupBox grp = (GroupBox)resulted;
VerifyCosmeticGUIs(ref fieldName, grp);
}
catch(Exception ex)
{
Console.WriteLine(ex.Message);
}
}
Inspecting the code in Listings 9.3 and 9.4, you find that the
VerifyGroupBox()
method also
uses a
try
statement to ensure that the GUI object under test is
GroupBox
object. The rest of
the code in these two methods is identical.
The last step is to add code to the
AddTestVerification()
method of the
GUITestScript
class to call the
VerifyLabel()
and
VerifyGroupBox()
methods. After the addition of the new
code, the code for the
AddTestVerification()
method becomes similar to Listing 9.5 (some
of the existing code is omitted and the new code is in bold).
4351Book.fm Page 325 Tuesday, September 28, 2004 11:21 AM
326
Chapter 9 • Testing Label and Cosmetic GUI Controls
➲
Listing 9.5 The Modified Code for the AddTestVerification() Method
private void AddTestVerification()
{
foreach (TestExpectation fieldName in oneType.MemberList)
{
try
{
}
catch(Exception ex4)
{
}
VerifyAlphanumericResult(ref tested, resulted);
VerifyClipboard(ref tested, resulted);
//chapter 9
VerifyLabel(ref tested, resulted);
VerifyGroupBox(ref tested, resulted);
}
}
At this point, you should have added three methods and updated the AddTestVerification()
method for the GUITestScript class. You can now choose Build Build Solution to compile
the new code. If there are compiling errors, you can inspect and correct the errors by compar-
ing your code with the preceding code listings.
In this chapter, I coded the verification methods for the Label and GroupBox controls for
example purposes. You can add more methods for testing other cosmetic GUI components
using the same coding pattern.
Updating the GUITestActions class
In the previous chapters, you developed two classes for the GUI test library. The GUITestUtility
contains methods to check the application status resulting from the business function invoca-
tions. The methods in the GUITestActions class directly trigger the GUI events from the pre-
sentation layer of the application. A GUI control is usually triggered by turning the mouse wheel,
clicking or double-clicking a mouse button or hovering the pointer over the control. However,
a cosmetic GUI control usually doesn’t need to be triggered as a business functional GUI control
does. In order for the automated testing tool to bring the cosmetic control under test, the mouse
4351Book.fm Page 326 Tuesday, September 28, 2004 11:21 AM
327
Upgrading the AutomatedGUITest Tool
➲
➲
pointer needs to hover over the GUI object. To conduct such a mouse movement, the GUITest-
Actions
class in the GUITestLibrary project needs to be updated with a HandleCosmeticGUIs()
method. The code of the HandleCosmeticGUIs() method is in Listing 9.6. This method simply
moves the mouse pointer to the center of the GUI control under verification so testers can visu-
alize the testing steps of the execution.
Listing 9.6 Code for the HandleCosmeticGUIs() Method for the GUITestActions Class of the
GUITestLibrary Project
public static void HandleCosmeticGUIs(ref int hwnd, ref string winText,
➥ref string clsName, ref string pText)
{
int r = FindGUILike(ref hwnd, 0, ref winText, ref clsName, ref pText);
CenterMouseOn(hwnd);
}
After you add the code segment of Listing 9.5 to the GUITestActions class, you can press F5 to
build and run the AutomatedGUITest tool. But in order for the tool to know the cosmetic GUI
handling method, you need to add the new GUI handling method to the GUITestActionLib.xml
document, which is currently saved in the C:\GUISourceCode\Chapter09\AutomatedGUITest\
bin\Debug
folder based on the discussion in this book. You can use any text editor (such as Note-
pad, for example) for this modification. The modified GUITestActionLib.xml document is shown
in Listing 9.7 with the new lines in bold.
Listing 9.7 The Modified GUITestActionLib.xml Document with the New GUI Handling
Methods in Bold
<GUIActions>
<System.Windows.Forms.Label>HandleCosmeticGUIs</System.Windows.Forms.Label>
<System.Windows.Forms.GroupBox>HandleCosmeticGUIs
➥</System.Windows.Forms.GroupBox>
<System.Windows.Forms.ListBox>HandleListBox</System.Windows.Forms.ListBox>
<System.Windows.Forms.RichTextBox>HandleTextBox
➥</System.Windows.Forms.RichTextBox>
<System.Windows.Forms.TextBox>HandleTextBox
➥</System.Windows.Forms.TextBox>
<System.Windows.Forms.Button>HandleCommandButton</System.Windows.Forms.Button>
<Field>VerifyField</Field>
<Property>VerifyProperty</Property>
<Synchronization>SynchronizeWindow</Synchronization>
</GUIActions>
4351Book.fm Page 327 Tuesday, September 28, 2004 11:21 AM
328
Chapter 9 • Testing Label and Cosmetic GUI Controls
Now, the testing capabilities of the AutomatedGUITest project are expanded to test Label
and GroupBox controls. The next section conducts a demonstration of these testing tasks.
Testing Cosmetic GUI Properties
In order to validate the newly added methods, we use the AutomatedGUITest tool to test the C#
API Text Viewer at the end of each chapter. Now, press F5 to build and run the tool. Complete
the following sections with the new GUI testing data collection and execution.
Collecting Testing Data
While the AutomatedGUITest tool is running, proceed to the following steps:
1. Click the Start GUI Test button.
2. When the file dialog box appears, navigate to the C:\GUISourceCode\Chapter03\CSharp-
APITextViewer\bin\Debug
folder and select CSharpAPITextViewer.exe.
3. After you click the Open button, the form with all the available classes of the C# API Text
Viewer appears. Among them, the
CSharpAPITextViewer.Form1 is the startup class. Select
the check box beside this class and click the OK button.
4. The C# API Text Viewer application is running. Make sure it is visible on the screen and
only one copy of it is running. Then click the GUI Survey button on the AutomatedGUI-
Test application. You can see that the AutomatedGUITest user interface becomes mini-
mized and the mouse pointer traverses all over the GUI controls inside the C# API Text
Viewer. After the entire area of the application is visited, the AutomatedGUITest tool
reappears with the collected GUI information of the application under test, including GUI
handles, window text, class names, and parent window text.
5. From the available GUIs, double-click on the left edge beside the Label control with the
caption text API Type:. (This section focuses on testing the cosmetic GUI controls; only the
Label and GroupBox controls will be specified for testing.)
6. When the GUI Test Data Collector appears, select the Simple radio button under Verifi-
cation Method. Then click OK.
7. Repeat steps 5 and 6 for the Label controls and a GroupBox control with caption text Type
the first few letters of the function name you look for:, Available functions:, Selected functions:, and
Scope, respectively.
8. Close the C# API Text Viewer application.
9. From the AutomatedGUITest user interface, click the Run Test button. A save file dialog
box appears. Type in a filename such as C:\Temp\TestCosmeticGUIs.xml and click the
4351Book.fm Page 328 Tuesday, September 28, 2004 11:21 AM
329
Testing Cosmetic GUI Properties
➲
Save button. The GUI testing data is saved and the test execution is completed within one
second or two.
10. The verification results are displayed by the XML Document Viewer. When you specified
GUI controls for testing, you also specified the simple verification method. But no expected
cosmetic values were defined. The test execution fails the verification at this point. In order
to make the test more effective, you can edit the data store and re-execute the test.
Editing and Rerunning the Data Store
The first execution against the data store completed a test without the tester entering any
expected results. But it yielded the actual caption text for each of the GUI controls tested.
Testers can check these results against the specifications and use them as the expected baselines
for regression testing.
As it has been mentioned, any text editor or XML utility can be used to edit the saved XML
data store. In this section, the Microsoft Visual Studio .NET IDE is used to open and edit the
C:\Temp\TestCosmeticGUIs_verify.xml document, which is saved separately from the C:\Temp\
TestCosmeticGUIs.xml
file specified in step 9 of the preceding section.
You can open an XML document from an active Microsoft Visual Studio .NET IDE session
by choosing File Open. From the open file dialog box, navigate to the C:\Temp\TestCosmetic-
GUIs_verify.xml
document. When the file is open, you can select to view the raw XML docu-
ment or a tabulated data format from the lower-bottom portion of the IDE. The default view is
the raw XML text, and you can locate the five <FormUnderTest> child nodes. The first child node
is an event to test the Label control with a name of lblAPITypes. You can now open the C:\Temp\
TestCosmeticGUIs_result.xml
document and locate the respective test event and copy the text
value of the <ActualCosmeticStr> node. Then insert into the TestCosmeticGUIs_verify.xml
document an <ExpectedCosmeticStr> child element to the <TestAndVerify> node and paste the
content as the text value of the new child. After the modification, the first <FormUnderTest> child
node looks similar to Listing 9.8 with the added node in bold.
Listing 9.8 Value of the <ExpectedCosmeticStr> Element Inserted into the
C:\Temp\TestCosmeticGUIs_verify.xml
<FormUnderTest>
<TypeName>CSharpAPITextViewer.Form1</TypeName>
<GUIEvent>lblAPITypes</GUIEvent>
<TestEvents>
<TestAndVerify>
<EventMember>lblAPITypes</EventMember>
<VerifyingMember>lblAPITypes</VerifyingMember>
<GUIActionSequence>1</GUIActionSequence>
4351Book.fm Page 329 Tuesday, September 28, 2004 11:21 AM