Giáo trình hướng dẫn phân tích các lớp trong hệ điều hành Android bằng hàm phần 4 docx
Bạn đang xem bản rút gọn của tài liệu. Xem và tải ngay bản đầy đủ của tài liệu tại đây (726.98 KB, 9 trang )
-Intent không tường minh thực thi Activity
• Trong trường hợp này intent không chỉ định một lớp cụ thể mà thay vào đó dùng
các dữ liệu khác (action, data, type, etc.) và để hệ thống tự quyết định xem lớp nào
(app nào) sẽ thích hợp để đáp ứng intent đó.
• Thông tin action và category của activity trong một app đáp ứng intent đó phải
được khai báo trong Manifest của app (AndroidManifest.xml) dưới dạng Intent-
filter (tất nhiên nếu chúng ta muốn gọi một built-in action thì ta không cần quan
tâm đến vấn đề này). VD:
PHP Code:
<activity class=".NotesList" android:label="@strin
g/title_notes_list">
<intent-filter>
<action android:name="android.intent.action.GE
T_CONTENT" />
<category android:name="android.intent.categor
y.DEFAULT" />
<data android:mimeType="vnd.android.cursor.ite
m/vnd.google.note" />
</intent-filter>
</activity>
IV-Truyền nhận thông tin giữa các Activity sử dụng intent
-Giả sử ta xây dựng một app có hai activites A và B như hình vẽ trên. Khi đó bên
phái Activity A ta sẽ gọi hàm:
PHP Code:
startActivity(intentA,request_code)
-Bên phía Activity B ta sẽ gọi hàm:
PHP Code:
setResult(return_code, intentB);
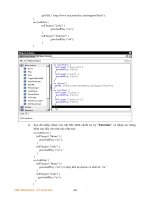
Trong phần 1, mình đã trình bày những kiến thức cơ bản về Intent. Tiếp theo mình
sẽ hướng dẫn các bạn làm một Tutorial đơn giản để hiểu rõ hơn những vấn đề nêu
trong lý thuyết.
-Giả sử bạn cần viết một app để tính các phần tử của một dãy số được cho
theo quy luật:
PHP Code:
a0,b0 nhập từ bàn phím
a(n+1)=a(n)+b(n)
b(n+1)=a(n)*b(n)
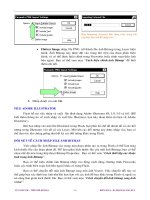
Để thực hiện, chúng ta xây dựng hai Activities 1 và 2. Activity 1 sẽ làm nhiệm vụ
lấy dữ liệu nhập vào sau đó gọi Activity 2 tính toán kết quả và lấy dữ liệu trả về.
Người dùng sẽ quyết định tiếp tục tính toán hay reset lại từ đầu. Toàn bộ quá trình
này được minh họa như hình vẽ dưới đây:
-Đầu tiên bạn tạo một New Project như sau:
PHP Code:
Project Name: IntentBasic
Target: bất kỳ (vd 1.5)
Package name: com.vietanddev.intent
Application name: Intent Basic
-Tiếp theo bạn tạo layout cho hai Activities như hình vẽ dưới
input.xml
PHP Code:
<RelativeLayout xmlns:android="roid.c
om/apk/res/android"
android:id="@+id/RelativeLayout01"
android:layout_width="fill_parent"
android:layout_height="fill_parent">
<TextView android:id="@+id/TextView01"
android:layout_width="wrap_content"
android:text="A = "
android:layout_margin="20dip"
android:layout_height="wrap_content"></TextView>
<EditText android:id="@+id/txtNum1"
android:text="0"
android:layout_width="fill_parent"
android:layout_height="wrap_content"
android:layout_alignBottom="@id/TextView01"
android:background="@android:drawable/editbox_backg
round"
android:layout_marginRight="10dip"
android:layout_toRightOf="@id/TextView01"></EditTex
t>
<TextView android:id="@+id/TextView02"
android:layout_width="wrap_content"
android:layout_below="@id/txtNum1"
android:text="B = "
android:layout_margin="20dip"
android:layout_height="wrap_content"></TextView>
<EditText android:id="@+id/txtNum2"
android:text="0"
android:layout_width="fill_parent"
android:layout_height="wrap_content"
android:background="@android:drawable/editbox_backg
round"
android:layout_marginRight="10dip"
android:layout_toRightOf="@id/TextView02"
android:layout_alignBottom="@id/TextView02"></EditT
ext>
<Button android:id="@+id/btnGo"
android:text="Calculate"
android:layout_margin="10dip"
android:layout_width="wrap_content"
android:layout_below="@id/txtNum2"
android:layout_height="wrap_content"></Button>
</RelativeLayout>
result.xml
PHP Code:
<RelativeLayout xmlns:android="roid.c
om/apk/res/android"
android:id="@+id/RelativeLayout01"
android:layout_width="fill_parent"
android:layout_height="fill_parent">
<TextView android:id="@+id/TextView01"
android:layout_width="wrap_content"
android:text="A + B = "
android:layout_margin="10dip"
android:layout_height="wrap_content"></TextView>
<EditText android:id="@+id/txtSum"
android:text=""
android:layout_marginRight="10dip"
android:layout_marginTop="5dip"
android:layout_width="fill_parent"
android:layout_height="wrap_content"
android:background="@android:drawable/editbox_backg
round"
android:layout_toRightOf="@id/TextView01"></EditTex
t>
<TextView android:id="@+id/TextView02"
android:layout_width="wrap_content"
android:layout_below="@id/TextView01"
android:text="A * B = "
android:layout_margin="10dip"
android:layout_height="wrap_content"></TextView>
<EditText android:id="@+id/txtMul"
android:text=""
android:layout_marginRight="10dip"
android:layout_marginTop="10dip"
android:layout_width="fill_parent"
android:layout_height="wrap_content"
android:layout_below="@id/txtSum"
android:background="@android:drawable/editbox_backg
round"
android:layout_toRightOf="@id/TextView02"></EditTex
t>
<Button android:id="@+id/btnContinue"
android:text="Continue"
android:layout_margin="10dip"
android:layout_width="wrap_content"
android:layout_below="@id/txtMul"
android:layout_height="wrap_content"></Button>
<Button android:id="@+id/btnReset"
android:text="Reset"
android:layout_marginTop="10dip"
android:layout_width="wrap_content"
android:layout_height="wrap_content"
android:layout_below="@id/txtMul"
android:layout_toRightOf="@id/btnContinue"></Button
>
</RelativeLayout>
Ví dụ 6. Trình xử lý SAX
import static
org.developerworks.android.BaseFeedParser.*;
public class RssHandler extends DefaultHandler{
private List<Message> messages;
private Message currentMessage;
private StringBuilder builder;
public List<Message> getMessages(){
return this.messages;
}
@Override
public void characters(char[] ch, int start, int
length)
throws SAXException {
super.characters(ch, start, length);
builder.append(ch, start, length);
}
@Override
public void endElement(String uri, String
localName, String name)
throws SAXException {
super.endElement(uri, localName, name);
if (this.currentMessage != null){
if (localName.equalsIgnoreCase(TITLE)){
currentMessage.setTitle(builder.toString());
} else if
(localName.equalsIgnoreCase(LINK)){
currentMessage.setLink(builder.toString());
} else if
(localName.equalsIgnoreCase(DESCRIPTION)){
currentMessage.setDescription(builder.toString());
} else if
(localName.equalsIgnoreCase(PUB_DATE)){
currentMessage.setDate(builder.toString());
} else if
(localName.equalsIgnoreCase(ITEM)){
messages.add(currentMessage);
}
builder.setLength(0);
}
}
@Override
public void startDocument() throws SAXException {
super.startDocument();
messages = new ArrayList<Message>();
builder = new StringBuilder();
}
@Override
public void startElement(String uri, String
localName, String name,
Attributes attributes) throws SAXException
{
super.startElement(uri, localName, name,
attributes);
if (localName.equalsIgnoreCase(ITEM)){
this.currentMessage = new Message();
}
}
}
Lớp RssHandler mở rộng lớp
org.xml.sax.helpers.DefaultHandler. Lớp này cung cấp các thực thi
mặc định, không thao tác cho tất cả các phương thức tương tự các sự kiện được tạo
ra bởi trình phân tích SAX. Điều này cho phép các lớp con chỉ ghi chèn lên các
phương thức khi cần thiết. RssHandler có một API bổ sung, getMessages.
Cái này trả về danh sách các đối tượng Message mà trình xử lý thu thập được khi
nó nhận các sự kiện từ trình phân tích SAX. Nó có hai biến trong khác, một là
currentMessage cho thể hiện Message đang được phân tích, và một là biến
StringBuilder gọi là builder lưu trữ dữ liệu ký tự từ các nút văn bản. Các
biến này đều được bắt đầu khi phương thức startDocument được dẫn ra khi
trình phân tích gửi sự kiện tương ứng cho trình xử lý.
Hãy xem phương thức startElement trong Ví dụ 6. Phương thức này được gọi
mỗi khi bắt gặp thẻ mở trong tài liệu XML. Bạn chỉ cần quan tâm khi nào thẻ đó là
thẻ ITEM. Trong trường hợp đó, bạn tạo ra một Message mới. Bây giờ hãy nhìn
vào phương thức characters. Phương thức này được gọi ra khi bắt gặp dữ liệu
ký tự từ các nút văn bản. Dữ liệu dễ dàng được thêm vào biến builder. Cuối
cùng hãy xem phương thức endElement. Phương thức này được gọi ra khi bắt
gặp thẻ kết thúc. Đối với các thẻ tương ứng với các đặc tính của một Message,
giống như TITLE và LINK, đặc tính thích hợp được thiết đặt trên
currentMessage sử dụng dữ liệu từ biến builder. Nếu thẻ kết thúc là một
ITEM, thì currentMessage thêm vào danh sách Messages. Đây là sự phân tích
SAX rất điển hình; ở đây không có gì là duy nhất đối với Android. Vì thế nếu bạn
biết cách viết một trình phân tích SAX Java, thì bạn biết cách viết một trình phân
tích SAX Android. Tuy nhiên, Android SDK có bổ sung thêm một số tính năng
thuận tiện vào SAX.
Phân tích SAX dễ dàng hơn
Android SDK có chứa một lớp tiện ích được gọi là android.util.Xml. Ví dụ
7 trình bày cách cài đặt một trình phân tích SAX với cùng lớp tiện ích như thế.
Ví dụ 7. Trình phân tích SAX Android
public class AndroidSaxFeedParser extends
BaseFeedParser {
public AndroidSaxFeedParser(String feedUrl) {
super(feedUrl);
}
public List<Message> parse() {
RssHandler handler = new RssHandler();
try {
Xml.parse(this.getInputStream(),
Xml.Encoding.UTF_8, handler);
} catch (Exception e) {
throw new RuntimeException(e);
}
return handler.getMessages();
}
}
Lưu ý là lớp này vẫn sử dụng trình xử lý SAX chuẩn, vì đơn giản bạn đã sử dụng
lại RssHandler như trong Ví dụ 7 ở trên. Việc có thể sử dụng lại trình xử lý
SAX rất tốt, nhưng nó vẫn có đôi chút phức tạp về mã trình. Bạn có tưởng tượng,
nếu bạn phải phân tích một tài liệu XML phức tạp hơn rất nhiều, trình phân tích có
thể trở thành mảnh đất màu mỡ cho các lỗi. Ví dụ, hãy xem lại phương thức
endElement trong Ví dụ 6. Lưu ý cách phương thức này kiểm tra như thế nào
nếu currentMessage có giá trị không trước khi nó cố cài đặt các thuộc tính?
Bây giờ hãy nhìn vào XML mẫu trong Ví dụ 4. Lưu ý rằng có các thẻ TITLE và
LINK nằm ngoài các thẻ ITEM. Đó là lý do tại sao kiểm tra giá trị không được đưa
vào. Nếu không thì thẻ TITLE đầu tiên có thể gây ra một
NullPointerException. Android bao gồm cả biến thể SAX API của chính
nó (xem Ví dụ 8) loại bỏ yêu cầu bạn phải viết trình xử lý SAX của chính bạn.
Ví dụ 8. Trình phân tích SAX Android đơn giản
public class AndroidSaxFeedParser extends
BaseFeedParser {
public AndroidSaxFeedParser(String feedUrl) {
super(feedUrl);
}
public List<Message> parse() {
final Message currentMessage = new Message();