J2ME in a Nutshell phần 4 pot
Bạn đang xem bản rút gọn của tài liệu. Xem và tải ngay bản đầy đủ của tài liệu tại đây (615.74 KB, 52 trang )
J2ME in a Nutshell
151
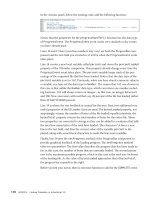
Figure 5-7. Outline differences between drawn and filled rectangles
The rectangle at the top of Figure 5-7 was drawn using this code:
g.drawRect(0, 0, 4, 2)
Because an outline touches the pixels at each end, this rectangle includes the points (0, 0), (4,
0), (0, 2), and (4, 2). By contrast, a filled rectangle created using the same arguments uses the
width and height values to describe the exact area to be filled: 4 pixels wide and 2 pixels
down, as shown at the bottom in Figure 5-7. You can see that a drawn rectangle occupies one
more pixel each to the right and at the bottom than a filled rectangle.
You can see this for yourself by selecting the RectangleFills example from GraphicsMIDlet.
This creates a rectangle drawn with a dotted outline and a filled rectangle, using identical
arguments for each. Magnified versions of the top left and bottom right corners of these
rectangles are shown in Figure 5-8. The figure clearly shows that the color fill does not reach
the right side or the bottom of the drawn rectangle, but it does cover the top and left of it.
Figure 5-8. Drawn and filled rectangles
5.4.2 Arcs
Elliptical or circular arcs, including complete circles and ellipses, can be drawn either in
outline or filled using the following methods:
public void drawArc(int x, int y, int width, int height, int startAngle,
int arcAngle)
J2ME in a Nutshell
152
public void fillArc(int x, int y, int width, int height, int startAngle,
int arcAngle)
The overall shape of the arc is determined by its bounding rectangle, specified by the x, y,
width, and height arguments; if the width and height values are the same, the arc is a circle
or part of a circle. The portion of the ellipse or circle to be drawn is controlled by the
startAngle and arcAngle arguments, both of which are measured in degrees. The
startAngle argument specifies where the arc begins; it is measured relative to the the three
o'clock position on the bounding rectangle. The angle through which the arc turns from its
starting position is given by the arcAngle argument. For both parameters, a positive value
indicates a clockwise turn; a negative value indicates a counterclockwise turn. The Arcs
example in the GraphicsMIDlet draws three arcs with different start and turning angles, as
shown in Figures Figure 5-9 and Figure 5-10.
Figure 5-9. Drawing arcs
The arc in the top left corner is a counterclockwise rotation of 90° from the default starting
point at the three o'clock position on the bounding box. For the sake of clarity, the bounding
boxes for all the arcs are drawn also so that you can see how the arcs are positioned within
them. The code that creates this arc looks like this:
g.drawArc(0, 0, width/2, height/2, 0, 90);
Since the width and height of the bounding box are equal, this arc is part of a circle. The
second arc is similar, but it has a negative
arcAngle so that it turns through 90° in a
clockwise direction:
g.drawArc(width/2, 0, width/2, height/2, 0, -90);
The line drawing on the top left of Figure 5-10 shows how this arc is drawn.
Finally, the larger arc at the bottom of Figure 5-9 starts 90° clockwise from the 3 o'clock
position (so that
startAngle is -90) and sweeps through a complete clockwise half-turn:
g.drawArc(0, height/2, width, height/2, -90, -180)
In this case, the bounding box is twice as wide as it is high, so this is an elliptical arc. The
angles used in this example are shown at the bottom of Figure 5-10.
J2ME in a Nutshell
153
Figure 5-10. Drawing arcs
A filled arc is described in the same way as an arc outline. The pie-shaped region extending
from the center of the arc to the start and end points is filled with the current Graphics color.
Figure 5-11 shows the result of selecting the FilledArcs example from the GraphicsMIDlet,
which fills the same arcs as those drawn in the previous example.
Figure 5-11. Filled arcs
5.5 Translating the Graphics Origin
The origin of the Graphics object that you get in the paint( ) method is initially placed at
the top left of the Canvas. However, you can move it to any location you choose using the
translate( ) method:
public void translate(int x, int y)
This method relocates the origin to the point (x, y) as measured in the coordinates that apply
before this call is made. If the
paint( ) method begins with the following statements:
g.drawLine(0, 0, 20, 0);
g.translate(10, 10);
g.drawLine(0, 0, 20, 0);
a line is first drawn along the top of the Canvas from (0, 0) to (20, 0), the origin is shifted so
that (0, 0) is at the point (10, 10) relative to the top left corner of the Canvas, and finally
another line is drawn. This line stretches from (0, 0) to (20, 0) in the new coordinate system,
which is the same as (10, 10) to (30, 10) relative to the the Canvas itself. Figure 5-12
illustrates the effect of moving the origin.
J2ME in a Nutshell
154
Figure 5-12. Translating the Graphics origin
Once you have moved the origin, the effect of another
translate( ) call is cumulative with
respect to the first. This means that, for example, the following code results in the origin being
moved to (10, 10) and then back to its initial location:
g.translate(10, 10);
g.translater(-10, -10);
The following code moves to the origin to (15, 15) relative to the top left-hand corner of the
Canvas:
g.translate(10, 10);
g.translate(5, 5);
The origin can be moved outside the bounds of the Canvas, if necessary. For example:
g.translate(-10, -10);
g.drawLine(10, 10, 30, 10);
The previous code moves the origin to a point that is above and to the left of the corner of the
Canvas and then draws the same straight line along the top of the Canvas as the original
example in this section.
Translating the origin is commonly used for the following reasons:
• To give the appearance of scrolling the screen over an image that is too large to be
displayed all at once. To implement scrolling, you catch key presses or pointer actions,
respond by moving the origin in the paint( ) method in the opposite direction from
the motion requested by the user, and then paint the Canvas again. Moving the origin
causes everything on the Canvas to be drawn in a different location.
• As a way to use the same code to draw a shape in different locations on the Canvas.
This allows you to have a method that draws a complex shape using coordinates based
at (0, 0) and then call it to draw one copy at (10, 10) and another copy at (50, 40). You
do this by translating the origin first to (10, 10) and then by a further amount of (40,
30):
g.translate(10, 10);
drawMyShape(g); // Draw at (10, 10)
g.translate(40, 30);
drawMyShape(g); // Draw at (50, 40)
You can get the position of the origin relative to the Canvas using the following methods:
J2ME in a Nutshell
155
public int getTranslateX( )
public int getTranslateY( )
These methods let you move the origin to a specific location without needing to keep track of
where it is. For example, no matter where the origin has been translated to, the following
operation always moves it back to the top left corner of the Canvas:
g.translate(-g.getTranslateX(), -g.getTranslateY( ));
Similarly, this operation moves it to absolute coordinates (x, y) relative to the Canvas:
g.translate(x-g.getTranslateX(), y-g.getTranslateY( ));
5.6 A Simple Animation MIDlet
So far, all the Canvas examples have involved drawing shapes onto the screen when the
platform calls the paint( ) method. If the content of the Canvas is static, it is sufficient to
draw it only when the platform detects that the screen content has been partly or completely
overwritten by an Alert, or when a different MIDlet screen is shown and then removed. If
you want to display dynamic content, however, you can't wait for the platform to call paint(
)
, because you need to repaint the Canvas whenever the dynamic content changes.
For example, suppose you wanted to create a simple animation that involves moving small
blocks around the screen. In order to do this, you might create a class to represent each block
by recording its x and y coordinates and its speeds along the x and y axes:
class Block {
int x; // X position
int y; // Y position
int xSpeed; // Speed in the X direction
int ySpeed; // Speed in the Y direction
}
The Canvas paint( ) method then fills its background with an appropriate color and loops
over the set of blocks, drawing a filled rectangle for each, using its current coordinates to
determine the location of its corresponding rectangle. Example 5-2 shows how you might
implement this for a set of square blocks represented by an array of
Block objects in an array
called blocks.
Example 5-2. Painting Blocks onto a Canvas
protected void paint(Graphics g) {
// Paint with the background color
g.setColor(background);
g.fillRect(0, 0, width, height);
// Draw all of the blocks
g.setColor(foreground);
synchronized (this) {
for (int i = 0, count = blocks.length; i < count; i++) {
g.fillRect(blocks[i].x, blocks[i].y, SIZE, SIZE);
}
}
}
J2ME in a Nutshell
156
Each time this method is called, it paints all the blocks at their current locations. In order to
create movement, you need to start a timer that periodically calls a method that updates the
coordinates of each block and then causes the Canvas to be painted again. The problem with
this is that you cannot call the Canvas paint( ) method directly, because there is no way to
get a Graphics object that would allow you to draw on the screen. Fortunately, the Canvas
class provides a method that you can call at any time to request a repaint operation:
public final void repaint( )
Invoking this method does not result in an immediate call to paint( ). Instead, the platform
arranges for paint( ) to be invoked sometime in the near future. Using this method, you can
arrange for each block to be moved to its new location and redrawn using code like that
shown in Example 5-3.
Example 5-3. Moving and Redrawing Blocks
public synchronized void moveAllBlocks( ) {
// Update the positions and speeds
// of all of the blocks
for (int i = 0, count = blocks.length; i < count; i++) {
blocks[i].move( );
// Request a repaint of the screen
repaint( );
}
}
This code updates the x and y coordinates of each Block by calling its move( ) method
(which we don't show here because it is of little interest); it then invokes the Canvas
repaint( ) method. Even though this code involves an invocation of repaint( ) for each
block, this does not result in the same number of paint( ) calls, because the platform merges
multiple repaint( ) requests into a single call to paint( ) to mimimize the amount of
drawing required. The code shown above is scheduled as a
TimerTask, which, as described in
Chapter 3, is executed in a thread associated with a
Timer. Painting, on the other hand, is
performed in a system thread that also handles keyboard and pointer input events; these are
discussed later in this chapter. Because both the moveAllBlocks( ) and paint( ) methods
need to access the Block objects that hold the current locations of the blocks to be drawn,
they are both synchronized to ensure thread safety.
You can see how this code works in practice by selecting the AnimationMIDlet from the
Chapter5 project in the Wireless Toolkit. When this MIDlet starts, it displays two Gauges
that let you select the number of frame updates per second (from 1 to 10) and the number of
blocks to display (in the range 1 to 4), as shown on the left side of Figure 5-13. Once you
have set the parameters, select the Run command to start the animation.
J2ME in a Nutshell
157
Figure 5-13. A MIDlet that performs simple animation
5.6.1 The Canvas showNotify( ) and hideNotify( ) Methods
The animation in this example is driven by a timer. When should this timer be started and
stopped? The simplest possible approach is to start it when the
startApp( ) method is called
for the first time and stop it in destroyApp( ). This might be appropriate if the Canvas were
always visible, but that is not the case here, because the Canvas has a Setup command that
allows the user to switch back to the configuration screen to change the frame update rate or
the number of blocks to be drawn. While the configuration screen is displayed, it would be a
waste of time to continue to move the blocks on the Canvas because it is not visible. The most
efficient approach in cases like this is to start the timer when the Canvas becomes visible and
stop it when it is hidden. You can easily implement this policy by overriding the following
Canvas methods:
protected void showNotify( )
protected void hideNotify( )
The platform makes the following guarantees with respect to these methods:
• The showNotify( ) method is called just before the Canvas is made visible. Before
this method is called, no invocations of paint( ) occur.
• The hideNotify( ) method is called after the Canvas has been removed from the
screen. The paint( ) method is not called between a call to hideNotify( ) and the
next invocation of showNotify( ).
As an example of how these methods are typically used, Example 5-4 shows the code that
controls the animation in this example. Note that showNotify( ) starts the Timer for the
TimerTask that moves the blocks, and hideNotify( ) stops it, so no time is wasted moving
the blocks when the
Canvas is not visible. Since the Canvas implementations of showNotify(
)
and hideNotify( ) are empty, there is no need to include calls to super.showNotify( )
and super.hideNotify( ) when overriding them.
Example 5-4. Using showNotify( ) and hideNotify( ) to Control Animation
// Notification that the canvas has been made visible
protected void showNotify( ) {
// Start the frame timer running
startFrameTimer( );
}
J2ME in a Nutshell
158
// Notification that the canvas is no longer visible
protected void hideNotify( ) {
// Stop the frame timer
stopFrameTimer( );
}
// Starts the frame redraw timer
private void startFrameTimer( ) {
timer = new Timer( );
updateTask = new TimerTask( ) {
public void run( ) {
moveAllBlocks( );
}
};
long interval = 1000/frameRate;
timer.schedule(updateTask, interval, interval);
}
// Stops the frame redraw timer
private void stopFrameTimer( ) {
timer.cancel( );
}
5.7 The Graphics Clip
Although the previous animation example works, it is rather inefficient. The main problem
lies with the way the paint( ) method interacts with the moveAllBlocks( ) method. When
the frame timer expires, moveAllBlocks( ) updates the coordinates of all the blocks and then
arranges for paint( ) to be called, which then redraws the whole screen. Redrawing the
entire screen is, of course, highly inefficient, because most of it has not changed. In fact, when
a block moves, all that you really need to do is use the background color to paint the area that
it used to occupy and then redraw the block in its new location. Because you can't get hold of
a Graphics object to do this directly within moveAllBlocks( ), you need some way to
communicate to the
paint( ) method that it doesn't need to repaint everything. Fortunately,
there is a simple way to do this that requires small modifications to both
moveAllBlocks( )
and the paint( ) method.
In Example 5-3,
moveAllBlocks( ) signals that a repaint is required by calling the Canvas
repaint( ) method. The variant of repaint( ) that it uses signals to paint( ) that the
whole screen needs to be redrawn, but there is a second version that can be used to pass more
information:
public void repaint(int x, int y, int width, int height)
This method defines a rectangle that needs to be repainted, instead of the whole screen. Using
this method, moveAllBlocks( ) can be rewritten as shown in Example 5-5 to indicate that
only the old and new positions of each block need to be redrawn.
J2ME in a Nutshell
159
Example 5-5. Using repaint( ) to Restrict the Areas to be Redrawn
public synchronized void moveAllBlocks( ) {
// Update the positions and speeds of all of the blocks and repaint
// only the part of the screen that they occupy
for (int i = 0, count = blocks.length; i < count; i++) {
// Request a repaint of the current location
Block block = blocks[i];
repaint(block.x, block.y, SIZE, SIZE);
blocks[i].move( );
// Request a repaint of the new location
repaint(block.x, block.y, SIZE, SIZE);
}
}
Notice that repaint( ) is called once before the block moves, to arrange for the original
location to be redrawn, and once afterwards.
The next step is to change the
paint( ) method to take into account the information supplied
to repaint( ). But paint( ) doesn't have any parameters that describe the area to be
repainted, so how is this information passed to it? The answer to this question is an attribute
of the Graphics object called the clip. In MIDP, the clip is a rectangular subset of the
drawing surface (the Canvas in this case), outside of which drawing operations are ignored.
3
The effect of the clip can be seen in Figure 5-14, which shows a Canvas 40 pixels wide and
60 pixels tall, with a clip indicated by the dotted rectangle covering a subset of its surface.
Figure 5-14. The Graphics clip
If the following line of code were to be executed in the paint( ) method:
g.drawLine(0, 30, 40, 30);
only the part of the line that lies within the clip is actually drawn that is, the segment from
(10, 30) to (30, 30). The parts of the line from (0, 30) to (10, 30) and from (30, 30) to (40, 30),
which are dotted in Figure 5-14, are not drawn at all.
3
In J2SE, the clip doesn't have to be rectangular, but that is a Java 2D feature that is not supported by MIDP.
J2ME in a Nutshell
160
When repaint( ) is called with no arguments, or when the platform first displays a Canvas,
the Graphics clip is set to cover the entire surface of the Canvas. However, when the other
repaint( ) method is called, the clip is set according to its arguments. To set the clip shown
in Figure 5-14, for example, the following call is made:
repaint(10, 15, 20, 35);
Now suppose that the moveAllBlocks( ) method moves a single square block of size 4
pixels from (0, 0) to (4, 4). In performing this operation, it executes the following pair of
repaint( ) calls:
repaint(0, 0, 4, 4); // Repaint the old location of the block
repaint(4, 4, 4, 4); // Repaint the new location of the block
When several repaint( ) calls are made, the clip is set to the smallest rectangle that covers
all the areas to be redrawn. In this case, the clip covers the area from (0, 0) to (8, 8). So what
effect does this have on the paint( ) method? Recall from Example 5-2 that the first
operation performed by the paint( ) method is to fill the entire surface of the Canvas with
its background color:
g.setColor(background);
g.fillRect(0, 0, width, height);
In the case of a device with a screen measuring 96 pixels by 100 pixels (i.e., the default color
phone), this involves setting the color of 9,600 individual pixels. However, when the
repaint( ) method sets a clipping rectangle that covers only the area occupied by the block
in its old and new locations, the same fillRect( ) call operates only within the clip that
is, it fills only the rectangle from (0, 0) to (8, 8), a total of 64 pixels even though its
arguments still specify that all 9600 pixels should be painted. Setting the clip, then, gives a
benefit even if no changes are made to the paint( ) method.
You can sometimes improve matters even more by taking account of the clip when
implementing the
paint( ) method. If, for example, your Canvas contains an image or a
sequence of drawing operations that takes a relatively long time to draw, you don't need to do
anything to keep them from being drawn when the clip is set to exclude them: all
Graphics
operations automatically restrict themselves to the area covered by the clip. However, making
this check costs a small amount of time. If you can inspect the clip yourself and determine
that an operation does not need to be performed, you may improve the performance of your
MIDlet. You can get the bounds of the clip using the following methods:
public int getClipX( )
public int getClipY( )
public int getClipWidth( )
public int getClipHeight( )
Using this information, you may be able to save a small amount of time in the paint( )
method by explicitly restricting the
fillRect( ) operation to the clip, as follows:
J2ME in a Nutshell
161
// Get the clipping rectange
int clipX = g.getClipX( );
int clipY = g.getClipY( );
int clipWidth = g.getClipWidth( );
int clipHeight = g.getClipHeight( );
// Paint with the background color - only
// the area within the clipping rectangle
g.setColor(background);
g.fillRect(clipX, clipY, clipWidth, clipHeight);
As a general rule, when implementing a Canvas paint( ) method, consider taking account of
the clip to skip time-consuming operations or those that involve nontrivial calculations.
5.8 Rendering Text
The Graphics class has four methods that you can use to draw text on a Canvas:
public void drawChar(char c, int x, int y, int anchor)
Renders the single character given as the first argument. The position of the character
is determined by the x, y, and anchor arguments, as described below.
public void drawChars(char[ ] chars, int offset, int length,
int x, int y, int anchor)
Draws characters chars[offset] through chars[offset + length - 1] using the
positioning information given by the last three arguments.
public void drawString(String str, int x, int y, int anchor)
Renders the string str at the given location. This is the method most commonly used
to draw text.
public void drawSubstring(String str, int offset, int length,
int x, int y, int anchor)
Draws the part of the string given by the first argument that occupies the character
positions offset to (offset + length - 1).
The text is drawn in the color set by the last setColor( ) or setGrayScale( ) call. Its
position and style are affected by the font property of the Graphics object and the location
parameters passed to the drawing method. These parameters are described in the following
sections.
5.8.1 Fonts
The font determines the shape and size of the text it is used to render. The font attribute can
be set or read using the following Graphics methods:
public void setFont(Font font)
public Font getFont( )
J2ME in a Nutshell
162
In contrast to desktop systems, MIDP devices generally support only a very limited set of
fonts, one of which is considered to be the system default font. The default font is installed
automatically in the Graphics object passed to the paint( ) method. You can also obtain a
reference to it using the following static method of the Font class:
public static Font getDefaultFont( )
A font has three independent attributes that determine the appearance of rendered text:
Face
The font face describes the overall appearance of the characters it renders. The MIDP
specification defines three different font faces, each with an associated constant
defined by the Font class that can be used to select it:
Font.FACE_MONOSPACE
A constant-width font.
Font.FACE_PROPORTIONAL
A proportional font.
Font.FACE_SYSTEM
The "system" font face. The MIDP specification does not define what is meant by the
system font. In the case of the default color phone emulator in the Wireless Toolkit, it
is the same as the proportional font.
Style
The style property determines whether text is rendered in bold, italics, or underlined.
The Font class defines four values to specify the font style:
Font.STYLE_PLAIN
Font.STYLE_BOLD
Font.STYLE_ITALIC
Font.STYLE_UNDERLINE
Styles may be combined using the logical OR operator so that, for example,
STYLE_BOLD | STYLE_ITALIC represents a bold italic font, and STYLE_UNDERLINED
gives underlined plain text. Combining STYLE_PLAIN with any of the other style
constants is allowed but has no effect, because STYLE_PLAIN has the value 0.
Size
The size argument can have one of the following values:
SIZE_SMALL
SIZE_MEDIUM
SIZE_LARGE
J2ME in a Nutshell
163
Unlike J2SE, MIDP does not allow a MIDlet to request a particular font size; instead,
it restricts it to this narrow set of unspecific values that the platform can interpret as it
chooses. This argument is not a bitmask, so combining size values is not allowed.
Font objects can be obtained by calling the following static Font method:
public static Font getFont(int face, int style, int size)
This method returns a font chosen by the platform based on the arguments supplied. The
device may not have fonts that satisfy all possible combinations of these arguments, however,
so the platform is permitted to substitute one that does not have all the required characteristics
when it cannot provide an exact match.
Since Fonts can be obtained only from the getFont( ) or getDefaultFont( ) methods and
cannot be directly instantiated, the platform can minimize the number of active Font objects
(and therefore reduce memory usage and garbage collection) by returning a single instance in
response to getFont( ) calls that specify identical attributes. As a consequence, it is possible
to determine whether two fonts are the same by comparing references instead of using the
equals( ) operator.
4
Fonts have several characteristic measurements, shown in Figure 5-15, that are affected by the
face, style, and size attributes. MIDP provides methods that return these measurements in the
Font class, rather than having separate classes such as the J2SE FontMetrics and
LineMetrics classes.
Figure 5-15. Font measurements
The font height is the distance that should be left between between the top of one line of text
and the top of the line immediately below it to ensure no vertical overlap and satisfactory
readability. The font height includes a certain amount of space, known as leading
(pronounced ledding), that appears below the text itself. There is no way to get the leading
value, but the font height itself can be obtained by calling the following method:
public int getHeight( );
The getBaselinePosition( ) method returns the distance from the top pixel line of
characters from this Font to the baseline. As shown in Figure 5-15, the baseline is the
horizontal line along which text characters are placed. If you were writing longhand on a
ruled page, the ruled lines would coincide with the baseline.
4
Note, however, that fonts that are considered equal need not have been created with the same set of attributes.
J2ME in a Nutshell
164
The following methods let you measure the advance (i.e., the width) of one or more text
characters as rendered by a font:
public int charWidth(char c)
public int charsWidth(char[] c, int offset, int length)
public int stringWidth(String str)
public int substringWidth(String str, int offset, int length)
In a proportional font, characters have varying widths. The charWidth( ) method returns the
width of the single character passed as its argument, while the other three return the total
width of a string or a character array. Note that the width of a set of characters is not
necessarily the same as the sum of the widths of its individual characters, because the
platform may perform kerning (i.e., placing some characters closer together than their
individual widths). Also, in some languages (such as Arabic), a single font character may be
used to represent several characters from the string being rendered. The widths returned by all
these methods include the intercharacter spacing required for readability, which appears on
the right side of each character.
5.8.2 Text Positioning
In J2SE, you place text by supplying the coordinates of the point on the baseline at which you
want rendering to start. MIDP has a more flexible scheme that lets you specify the location of
one of several different anchor points on the bounding box of the text instead of restricting
you to using the position of the baseline. Each text drawing method has an anchor argument
that is constructed by combining a vertical position constant with a horizontal position
constant to describe the point whose coordinates are given by the x and y method arguments.
Figure 5-16 shows the vertical and horizontal text positioning values that can be used when
rendering text. These values are constants defined by the Graphics class.
Figure 5-16. Text anchor points
The following line of code draws the string "Hello, world" with the top left corner of its
bounding box at coordinates (0, 0), in the top left corner of the Canvas:
g.drawString("Hello, world", 0, 0, Graphics.TOP | Graphics.LEFT);
To right-justify the same string at the top of the Canvas, you instead write:
g.drawString("Hello, world", canvas.getWidth( ), 0,
Graphics.TOP | Graphics.RIGHT);
Because the anchor argument allows you to specify which part of the bounding box the
coordinates refer to, you don't need to calculate for yourself how wide the text is in order to
right-justify it, as would be necessary in J2SE. The same feature also makes it easy to center
J2ME in a Nutshell
165
text horizontally on the screen. The following line of code achieves this by placing the center
point of the top of the bounding box halfway across the top line of the Canvas:
g.drawString("Hello, world", canvas.getWidth( )/2, 0,
Graphics.TOP | Graphics.HCENTER);
Although the Graphics class defines a constant called VCENTER, you
cannot use it to vertically center text, because this operation is not
supported by any of the text drawing methods. The VCENTER constraint
can, however, be used when positioning an Image, as you'll see later in
this chapter.
Bear in mind when positioning text that the anchor argument identifies a point on the
bounding box, and the x and y coordinates specify where that point should be placed on the
Canvas.
5
If you insist on using J2SE conventions, you could write code like the following:
g.drawString("Hello, world", 0, font.getBaselinePosition( ),
Graphics.BASELINE | Graphics.LEFT);
This has the same effect as:
g.drawString("Hello, world", 0, 0, Graphics.TOP | Graphics.LEFT);
You can see more examples of text positioning by running the GraphicsMIDlet that we used
earlier in this chapter and selecting Text from the example list. Running this example on the
default color phone and the PalmOS platform produces the results shown in Figure 5-17.
Figure 5-17. Text drawing and positioning
The two lines of text at the top left of the screen were drawn as follows:
// Top left of canvas
g.setColor(0xffffff);
g.drawString("Top left", 0, 0, Graphics.TOP | Graphics.LEFT);
// Draw another string one line below
Font font = g.getFont( );
g.drawString("Below top left", 0, font.getHeight( ),
Graphics.TOP | Graphics.LEFT);
5
The x and y coordinates are, of course, relative to the origin of the Graphics object. For the sake of brevity, we are equating the origin with the
top left corner of a Canvas, but this need not be the case, because the Graphics origin could have been moved by calling the translate( )
method. As you'll see later in this chapter, a Graphics object can also be used to draw text onto a mutable Image, using the same concept of anchor
points
J2ME in a Nutshell
166
The first string is placed at the top left corner of the Canvas by placing the top left corner
(Graphics.TOP | Graphics.LEFT) of its bounding box at coordinates (0, 0). The second
line of text is intended to be drawn immediately below it. To do this, you use the same anchor
point and x coordinate, but you increase the y coordinate by the height of the font. Refer to
Figure 5-15 if necessary to see why this is the correct thing to do.
The text at the bottom right is positioned as follows:
// Bottom right of canvas
g.drawString("Bottom right", width, height, Graphics.BOTTOM |
Graphics.RIGHT);
width
and height are, respectively, the width and height of the Canvas in pixels.
The remainder of this example, which produces the text in the middle of the Canvas,
illustrates how to mix different fonts and colors in the same text line. Since each drawing
operation uses the current font and color attributes of the Graphics object, you need to
perform a separate operation for each font and color change. The first part of the string is
drawn by the following code:
String str = "Multi-font ";
font = Font.getFont(Font.FACE_PROPORTIONAL, Font.STYLE_UNDERLINED,
Font.SIZE_LARGE);
g.setFont(font);
g.drawString(str, 0, height/2, Graphics.LEFT | Graphics.BASELINE);
This code selects a large proportional font with underlining enabled and draws the text with
its baseline at the middle point of the Canvas, starting on its left side. To draw the rest of the
text, you need to use the same anchor constraint, but you have to adjust the x coordinate by
the amount of horizontal space taken up by the first string, which you can get using the Font
stringWidth( ) method. Let's select a different font (bold and italic with no underlines) and
change the drawing color:
int x = font.stringWidth(str);
g.setColor(0x00ff00);
g.setFont(Font.getFont(Font.FACE_PROPORTIONAL, Font.STYLE_BOLD |
Font.STYLE_ITALIC,
Font.SIZE_MEDIUM));
g.drawString("and multi-color", x, height/2, Graphics.LEFT |
Graphics.BASELINE);
As you can see in Figure 5-17, if the text being rendered is too wide to fit on the screen, it is
simply clipped. The low-level API does not provide automatic line wrapping; if you need this
capability, you have to provide it for yourself.
5.9 Images
You have already seen that some of the components provided by the high-level user interface
API allow you to display images. You can create a suitable Image object by loading it from a
resource in a MIDlet suite's JAR file encoded in PNG format. This section looks at other ways
to create Image objects and discuss how you can use Images with the low-level API.
J2ME in a Nutshell
167
5.9.1 Creating Images
The Image class has four static methods that can be used to create an Image:
public static Image createImage(String name);
public static Image createImage(byte[] data, int offset, int length);
public static Image createImage(int width, int height);
public static Image createImage(Image source);
The first and second methods build an Image from data stored either in a named resource
within the MIDlet's JAR file (as described in Section 4.2.11) or as part of a byte array in
memory. The image data must be in an encoding format that is both self-identifying (typically
because it begins with a well-known sequence of bytes, such as "GIF" or "PNG") and
supported by the platform. At the present time, the only encoding format that MIDP devices
are required to support is Portable Network Graphics (PNG), which is a public domain
replacement for the popular GIF format.
The first of these methods is normally used to load images that are included as part of the
MIDlet installed on the device. The second is useful for creating an Image from data read into
a byte array from the network or data stored in and retrieved from the device's permanent
storage.
6
In both cases, the image created is immutable, that is, you cannot make any changes
to it. Immutable images are required by high-level API components such as ImageItem, since
they don't need to be concerned about having to redraw the image on the screen in the event
of changes being made.
The third method creates a mutable image of the given width and height, in which every pixel
is initialized to white. This method is used to create a buffer that you can use to create an
image programmatically, using the same Graphics drawing methods that you would use to
draw on a Canvas. Having created a mutable image in this way, you can use the fourth
method to create an immutable copy of it so that it can be used in connection with the high-
level API.
5.9.2 Drawing Images
Once you have an image (either mutable or immutable), you can draw it onto a Canvas in its
paint( ) method using the following Graphics method:
public void drawImage(Image image, int x, int y, int anchor);
The x, y, and anchor arguments are used in the same way here as they are when drawing text:
the anchor argument defines an anchor point on the bounding box of the image, and the x and
y arguments specify the location relative to the origin of the Graphics object at which the
anchor point should be placed. The legal values for the anchor argument are the same as
those described earlier for text, except that BASELINE cannot be used (since images do not
have the concept of a baseline), but VCENTER (which is not valid for text) can be used instead,
to vertically center the image relative to the given location. If an image is too wide or too tall
to fit on the screen when drawn at the specified location, it is clipped at boundaries of the
Canvas. Images are never scaled to fit them into a smaller space, and there is no API that
would allow a MIDlet to request that an image be scaled.
6
Both networking and local storage are described in Chapter 6.
J2ME in a Nutshell
168
An example that illustrates image drawing can be seen by running the Chapter5 project in the
Wireless Toolkit, launching ImageMIDlet, and selecting DrawImage. This example displays a
Canvas with a paint( ) method that loads an image from the MIDlet JAR file and draws it
in one of three positions, as shown in Figure 5-18.
7
Figure 5-18. Drawing images using drawImage( )
The implementation of the Canvas and its paint( ) method is shown in Example 5-6.
If you examine the paint( ) method, you'll see that there are three drawImage( ) calls that
determine where the image will be drawn. The choice of which to use depends on a counter
that is incremented each time the method is executed. To force the Canvas to repaint, use the
Back command to return to the selection list on the previous screen and then reselect
DrawImage.
Example 5-6. Canvas That Paints an Image in Three Different Locations
class DrawImageCanvas extends Canvas {
static Image image;
int count;
public void paint(Graphics g) {
int width = getWidth( );
int height = getHeight( );
// Fill the background using black
g.setColor(0);
g.fillRect(0, 0, width, height);
// Load an image from the MIDlet resources
if (image == null) {
try {
image = Image.createImage("/ora/ch5/resources/earth.png");
} catch (IOException ex) {
g.setColor(0xffffff);
g.drawString("Failed to load image!", 0, 0, Graphics.TOP |
Graphics.LEFT);
return;
}
}
7
This image of the earth was taken by the astronaut crew of Apollo 8 on Christmas, 1969, and was obtained from the historical image archive of
the National Aeronautical and Space Administration.
J2ME in a Nutshell
169
switch (count % 3) {
case 0:
// Draw the image at the top left of the screen
g.drawImage(image, 0, 0, Graphics.TOP | Graphics.LEFT);
break;
case 1:
// Draw it in the bottom right corner
g.drawImage(image, width, height, Graphics.BOTTOM |
Graphics.RIGHT);
break;
case 2:
// Draw it in the center
g.drawImage(image, width/2, height/2, Graphics.VCENTER |
Graphics.HCENTER);
}
count++;
}
}
When the MIDlet first appears, the image is drawn by this method call:
g.drawImage(image, 0, 0, Graphics.TOP | Graphics.LEFT);
which places the top left of the image at coordinate location (0, 0), as can be seen on the left
of Figure 5-18. The second time, this drawImage( ) call is executed:
g.drawImage(image, width, height, Graphics.BOTTOM | Graphics.RIGHT);
Now the image appears at the bottom right of the screen. The last call is more interesting:
g.drawImage(image, width/2, height/2, Graphics.VCENTER |
Graphics.HCENTER);
Here the anchor argument is VCENTER | HCENTER, which refers to the center of the image
itself, and the
drawImage( ) call places this point halfway across and halfway down the
Canvas in other words, the image is centered on the Canvas. Note that none of these
examples require you to know the size of the image in order to place it properly. If you need
this information, you can get it from the
Image getWidth( ) and getHeight( ) methods.
5.9.3 Creating an Image Programmatically
If you create a mutable Image, you can use Graphics methods to draw onto it and then copy
the result to the screen. This technique can be used to improve performance by drawing
complex shapes that do not change or change rarely offline so that they can be quickly copied
to the screen when required in the paint( ) method of the Canvas class. This same
technique, when taken to its extreme, can also be used to implement double buffering for
those devices that do not directly support it (i.e., those for which the Canvas
isDoubleBuffered( ) method returns false).
To draw on a mutable Image, you first need to get a Graphics object using the following
method:
public Graphics getGraphics( );
J2ME in a Nutshell
170
This method throws an IllegalStateException if it is invoked on an immutable Image. The
returned Graphics object has its coordinate origin at the top left corner of the Image, and a
clip covers its surface. The object is initialized with the default font, the current color is black,
and its stroke style is set to draw solid lines. These attributes are the same as those installed in
the Graphics object passed to the paint( ) method. An important difference between these
two, however, is that you can retain a reference to the object returned by getGraphics( )
indefinitely, and it remains valid, whereas the Graphics object used in the paint( ) method
should not be used once paint( ) returns.
An example that uses the technique of drawing onto a mutable image can be seen by selecting
the ImageGraphics example from the list offered by the ImageMIDlet. The example creates a
pattern using colored lines as shown in Figure 5-19. The code that creates this pattern is
shown in Example 5-7.
Figure 5-19. Drawing onto a mutable Image
Example 5-7. Drawing on a Mutable Image
public void paint(Graphics g) {
int width = getWidth( );
int height = getHeight( );
// Create an Image the same size as the Canvas.
Image image = Image.createImage(width, height);
Graphics imageGraphics = image.getGraphics( );
// Fill the background of the image black
imageGraphics.fillRect(0, 0, width, height);
// Draw a pattern of lines
int count = 10;
int yIncrement = height/count;
int xIncrement = width/count;
for (int i = 0, x = xIncrement, y = 0; i < count; i++) {
imageGraphics.setColor(0xC0 + ((128 + 10 * i) << 8) +
((128 + 10 * i) << 16));
imageGraphics.drawLine(0, y, x, height);
y += yIncrement;
x += xIncrement;
}
// Add some text
imageGraphics.setFont(Font.getFont(Font.FACE_PROPORTIONAL,
Font.STYLE_UNDERLINED, Font.SIZE_SMALL));
imageGraphics.setColor(0xffff00);
imageGraphics.drawString("Image Graphics", width/2, 0, Graphics.TOP |
Graphics.HCENTER);
J2ME in a Nutshell
171
// Copy the Image to the screen
g.drawImage(image, 0, 0, Graphics.TOP | Graphics.LEFT);
}
The paint( ) method creates a blank image that is exactly the same size as the Canvas and
uses getGraphics( ) to get a Graphics object that can be used to draw on it. The process of
drawing the line pattern and the text that appears at the top of the image is exactly the same as
would be used if they were being drawn directly onto the Canvas itself. Finally, the content of
the image is copied to the Canvas itself and therefore to the screen, using the drawImage( )
method of the Canvas Graphics and supplying the Image object as the source:
g.drawImage(image, 0, 0, Graphics.TOP | Graphics.LEFT);
This example is a demonstration of double buffering, because the graphics are first drawn in
an off-screen buffer (the Image) and then copied onto the screen. For devices that do not
implement automatic double buffering, this technique can improve the appearance of a
MIDlet by hiding screen updates from the user until they are complete. A possible
disadvantage of this technique is that it requires more memory than direct screen updates.
5.10 Event Handling
So far, you have seen how to use the Canvas, Image, and Graphics classes to draw lines,
shapes, and images onto the screen. The low-level API also provides the ability for a MIDlet
to detect and respond to user input from the keypad and a pointing device, if the device has
one.
5.10.1 Key Handling
High-level API user interface components like TextBox and TextField automatically handle
interaction with the user via the keypad (or its equivalent), so that the MIDlet just has to wait
for the user to indicate that input is complete and read the content of the control as a String
or an array of characters. If you are using the low-level API, however, the only way to
respond to keyboard input is by overriding the following methods of the Canvas class:
protected void keyPressed(int keyCode)
protected void keyReleased(int keyCode)
protected void keyRepeated(int keyCode)
The keyPressed( ) and keyReleased( ) methods are, fairly obviously, called when the
user presses and releases a key. If the user holds a key down for a device-dependent time,
some platforms periodically call the keyRepeated( ) method, passing it the same argument
as that supplied to the previous keyPressed( ) call. Since not all devices have a repeating
keyboard, a MIDlet can determine whether to expect these events by calling the Canvas
hasRepeatEvents( ) method and adjusting its behavior appropriately.
Unlike PC keyboards, which are more or less standardized, the wide range of different
devices supported by MIDP brings with it a similar range of keypads, many of which have
only a very small number of keys. Examples of typical keypads can be seen in Figures
Figure 3-2 and Figure 3-3. The low-level API assumes only that the device has the minimal
set of keys required by the MIDP specification:
J2ME in a Nutshell
172
•
The digits 0 through 9
• The star or asterisk character (*)
• The pound or hash character (#)
The Canvas class defines constants that represent these keys, listed in Table 5-2. The MIDP
platform vendor is required to ensure that these constant values are passed as the keyCode
argument when keyPressed( ), keyRepeated( ), and keyReleased( ) are called
whenever the keys that correspond to them are pressed or released. The actual values are, in
fact, the Unicode values for the corresponding characters so that, for example, the following
expression has the value true:
Canvas.KEY_NUM0 == '0'
Table 5-2. Standard Key Codes and Game Actions
Key Code/Action Meaning Key Code/Action Meaning
KEY_NUM0
Number key 0
KEY_POUND
The pound key (#)
KEY_NUM1
Number key 1
UP
Game action UP
KEY_NUM2
Number key 2
DOWN
Game action DOWN
KEY_NUM3
Number key 3
LEFT
Game action LEFT
KEY_NUM4
Number key 4
RIGHT
Game action RIGHT
KEY_NUM5
Number key 5
FIRE
Game action FIRE
KEY_NUM6
Number key 6
GAME_A
Custom game action A
KEY_NUM7
Number key 7
GAME_B
Custom game action B
KEY_NUM8
Number key 8
GAME_C
Custom game action C
KEY_NUM9
Number key 9
GAME_D
Custom game action D
KEY_STAR
The star key (*)
The example source code for this book contains a MIDlet that displays the key codes
generated by the keys of a MIDP device. In the Wireless Toolkit, run the Chapter5 project
and select EventsMIDlet. As you press and hold down a key, the screen displays both the
numeric value of the keyCode argument passed to the keyPressed( ) method and the name
of the Canvas constant that corresponds to it, if there is one. The screen shot on the left side of
Figure 5-20 shows the result of pressing the 1 key on the keypad of the default color phone.
As you can see, the key code itself has value 49, which is the Unicode value for the character
1, and it has been identified as Canvas.KEY_NUM1.
Figure 5-20. Key codes and game actions on cell phones
Portable MIDlets must rely only on the key codes (that is, the constants whose names begin
with "KEY_") listed in Table 5-2. Devices with larger keyboards might be capable of
returning additional key codes when other keys are pressed. For example, the RIM wireless
handheld keyboard, shown in Figure 3-2, includes keys that represent alphabetic characters as
well as the standard number keys. If you run the EventsMIDlet on this emulated device, you
J2ME in a Nutshell
173
will find that the alphabetic keys also generate key codes (which also happen to be the
Unicode characters that correspond to the characters on the key faces), but making use of
them (or relying on their values) would introduce device-dependent assumptions into the
MIDlet.
Games (and even some more serious applications) usually require movement keys and a FIRE
button, and many MIDP devices have keys that are obvious candidates to be used for these
functions. On the default color phone, for example, the cluster of arrow keys could be used to
indicate which way to move, and the circular SELECT button at their center could be the
FIRE button. On other devices, such as the RIM wireless handheld, there aren't any keys that
immediately seem ideal for these functions. The Canvas class defines nine constants, shown
in the "Key Code/Action" columns of Table 5-2, that can be used to identify a set of game
actions in a platform-independent way, so that MIDlets do not need to be concerned about
how they are mapped to keys on the keypad. Five of these values (
UP, LEFT, DOWN, RIGHT, and
FIRE) have obvious meanings and should be available on all MIDP devices. The remaining
four (
GAME_A, GAME_B, GAME_C, and GAME_D) can be used for game-specific functions. Because
not all devices will necessarily be able to map keys to these functions (and those that map
some of them may not provide all four), they should be used only to provide a quick and
convenient way for the user to access functionality that is also accessible by more portable
means, such as
Commands attached to the Canvas.
Because the mapping of game actions to key codes is platform-dependent, MIDlets do not
detect them by examining the keyCode argument of the keyPressed( ) method. In other
words, the following code is incorrect:
if (keyCode == Canvas.FIRE) {
// NOT CORRECT!!!
}
Instead, there are two Canvas methods that can be used to test whether a given key code
represents a game action:
public int getGameAction(int keyCode)
public int getKeyCode(int gameAction)
The getGameAction( ) method converts a key code to the corresponding game action and
returns 0 if the key is not mapped to an action:
protected void keyPressed(int keyCode) {
if (getGameAction(keyCode) == Canvas.FIRE) {
// FIRE action
}
}
The getKeyCode( ) method does just the opposite: given a game action, it returns the key
code for the key that is mapped to that action. This method would normally be used during
initialization to get the mappings for the game actions that a MIDlet uses; this avoids method
calls in the
keyPressed( ) method. For example:
J2ME in a Nutshell
174
int fireKey = getKeyCode(Canvas.FIRE);
int upKey = getKeyCode(Canvas.UP);
int downKey = getKeyCode(Canvas.DOWN);
.
.
protected void keyPressed(int keyCode) {
if (keyCode == fireKey) {
// FIRE action
} else if (keyCode == upKey) {
// UP actions
}
}
The advantage of using getKeyCode( ) in this way is that the code in the keyPressed( )
method will run slightly faster than if it called getGameAction( ) each time a key is pressed.
The downside is that if the platform allows the user to change the mapping between game
actions and keys, the MIDlet will no longer work as expected if any of the game actions that it
uses are remapped.
The EventsMIDlet uses the getGameAction( ) method to check each key code passed to its
keyPressed( ) method to determine whether it is a game action; it displays the action name
if it is. By experimenting with this MIDlet on the different emulated devices in the Wireless
Toolkit, you can see how device-dependent the mapping between game actions and keys is.
You can see an example of this in Figure 5-20. The middle screenshot demonstrates that on
the default color phone, the UP arrow key, which is mapped to the UP game action, has key
code -1, whereas on the Motorola cell phone, shown on the right, the same game action is
mapped from the key with key code -10.
The low-level key handling API is much more primitive than the facilities available from
TextBox and TextField. In particular, the small number of standard key codes makes it
impossible to provide alphabetic input in a platform-independent way. In fact, in the MIDP
reference implementation, the keyboard input features used by the high-level components are
actually built on the same key handling described in this section. In order to provide
alphabetic and other characters, the high-level API implementation maintains internal shift
state information and maps the key presses to the appropriate Unicode character values. For
example, on the default color phone, the star key can be used to shift input modes. Pressing
this key causes the internal state information to be changed, and a different lookup table is
used to convert keycodes to characters. Furthermore, because each key has more than one
legend engraved on it, more complex logic is needed to determine whether pressing the key
labeled 2 should generate the code for 2 or for one of the letters A, B, or C. This process, is,
of course, device-dependent since it requires knowledge of the keyboard layout, which is
customized by device vendors.
If you have developed GUI applications using J2SE, you have almost certainly at some time
had to develop or purchase custom components to provide functionality that isn't provided by
Swing and/or AWT. Writing nontrivial custom components on the MIDP platform, however,
is almost impossible. As far as the high-level API is concerned, the methods that you need to
access or override to change the behavior of an existing component are all either private or
package private, making them inaccessible to third-party code. There is, therefore, no base
class like Component or JComponent from which you can start constructing a custom
component. You can use the low-level API to develop more sophisticated user interfaces, but,
as just noted, providing fully featured key input is very complex. Even if you take the trouble
J2ME in a Nutshell
175
to implement it properly, you can't take something built for the low-level API and use it with
a Form, so the component could not be used in the high-level API. Furthermore, there is no
concept of Container or layout manager in MIDP, so it is not practical to build small
components that you can plug into a Canvas without having first to reinvent much of the
infrastructure provided by the high-level API. Some device vendors have solved this problem
by creating their own custom components or offering toolkits that make it possible to write
your own. Using these facilities will, of course, make your MIDlet nonportable to other
devices.
5.10.2 Using the Pointer
MIDlets running on devices that have a pointing device can detect pointer state changes by
overriding the following Canvas methods:
protected void pointerPressed(int x, int y)
protected void pointerDragged(int x, int y)
protected void pointerReleased(int x, int y)
In all cases, the x and y arguments give the position of the pointer relative to the top left
corner of the Canvas. A MIDlet can determine whether the pointerPressed( ) and
pointerReleased( ) methods will be called by using the Canvas hasPointerEvents( )
method; hasPointerMotionEvents( ) indicates whether pointerDragged( ) will be
called.
The EventsMIDlet reports pointer events on devices that support them by displaying the x
and y values passed to the three previous methods on the Canvas. If you run this MIDlet
under the Wireless Toolkit and select the PalmOS device, you can click and drag the mouse
on the emulator's screen to generate pointer events. If you click on the screen and drag the
mouse around, you will notice the following:
• A continuous stream of events is generated as the pointer moves around, but the
stream does not necessarily report every point that the pointer traverses. The faster you
move the pointer, the further apart successive pairs of (x, y) values will be.
• If you drag the pointer from the top of the screen to the bottom, the y value stops
increasing when you move out of the drawing area of the
Canvas, which excludes the
area allocated to
Command buttons.
• If you drag the pointer outside the screen and even outside the emulator window, you
will still get pointer events, provided that one of the coordinates is within the range of
valid values for the
Canvas. If, for example, you start from the center of the Canvas
and drag the pointer out to the right, you will continue to receive events in which the y
coordinate changes, but the x coordinate remains at its maximum value. If you then
drag the pointer up, the y coordinate decreases to zero, but negative values are not
returned. Starting from the center and dragging up, down, or left gives similar results.
If you release the mouse (i.e., lift the pointer) when it is outside the screen area, the
pointerReleased( ) method is still called, as evidenced by the fact that coordinates
are no longer displayed on the screen.