mcts 70-562 Microsoft .NET Framework 3.5, ASP.NET Application Development phần 4 pdf
Bạn đang xem bản rút gọn của tài liệu. Xem và tải ngay bản đầy đủ của tài liệu tại đây (982.51 KB, 108 trang )
Take a Practice Test CHAPTER 5 295
Customize a Web Page by Using Themes and User Profi les
For this task, you should complete at least Practices 1 and 2. If you want in-depth knowledge
of how themes affect controls, complete Practice 3 as well.
n
Practice 1 Using a copy of the last Web application you created, add a theme to
confi gure all controls with consistent colors.
n
Practice 2 Add authenticated user profi les to the last Web application you created.
For example, you might use the user profi le to track recent database queries and en-
able the user to select from a list of recent requests.
n
Practice 3 Create a custom control and experiment with setting the attributes using
themes.
Implement Web Parts in a Web Application
For this task, you should complete all three practices to gain experience using Web Parts.
n
Practice 1 Using the Web Parts page you created in the Lesson 3 exercises, open the
Web page using a non-Microsoft browser. Notice how ASP.NET renders the Web Part
controls differently.
n
Practice 2 Using the Web Parts page you created in Lesson 3, Exercise 3, expand the
connected control capabilities so that the user’s name is stored persistently.
n
Practice 3 Using the Web Parts page you created in Lesson 3, Exercise 3, remove the
static connections from Default.aspx. Then add a ConnectionsZone control to the page.
View the page and use the ConnectionsZone control to manually establish the connec-
tions among the GetName, GreetUser, and ShowNameBackwards controls.
Take a Practice Test
The practice tests on this book’s companion CD offer many options. For example, you can test
yourself on just the content covered in this chapter, or you can test yourself on all the 70-562
certifi cation exam content. You can set up the test so it closely simulates the experience of
taking a certifi cation exam, or you can set it up in study mode so you can look at the correct
answers and explanations after you answer each question.
MORE INFO PRACTICE TESTS
For details about all the practice test options available, see the “How to Use the Practice
Tests” section in this book’s Introduction.
MORE INFO
PRACTICE TESTS
For details about all the practice test options available, see the “How to Use the Practice
Tests” section in this book’s Introduction.
CHAPTER 6 297
CHAPTER 6
Working with ASP.NET AJAX
and Client-Side Scripting
W
eb applications are becoming more and more interactive and dynamic as the tech-
nology used to create them evolves. The latest generation of Web applications, often
loosely referred to as Web 2.0, involve user interface (UI) enhancements that include func-
tionality that was previously reserved for applications running on the desktop. This includes
things like modal dialog boxes and pop-ups, partial screen (or page) updates, dynamically
collapsing or sizing controls on a page, indicating application progress, and more. As these
paradigms are adopted by some major Web applications, users are now demanding this
same level of functionality on many more sites. This means the tools need to catch up with
the demand.
The latest version of ASP.NET includes tools for building Web applications that provide
this level of support. This includes controls for handling client-based interactivity, a rich
library for working with client-side JavaScript, and a programming model for creating your
own JavaScript-enabled controls. This chapter covers these scenarios and shows how you
can enhance users’ experiences with your Web applications.
Exam objectives in this chapter:
n
Working with ASP.NET AJAX and Client-Side Scripting
n
Implement Web Forms by using ASP.NET AJAX.
n
Interact with the ASP.NET AJAX client-side library.
n
Create and register client script.
Lessons in this chapter:
n
Creating AJAX-Enabled Web Forms 299
n
Creating Client Scripts with the AJAX Client-Side Library 316
2 9 8 CHAPTER 6 Working with ASP.NET AJAX and Client-Side Scripting
Before You Begin
To complete the lessons in the chapter, you should be familiar with developing applications
with Microsoft Visual Studio using Microsoft Visual Basic or C#. In addition, you should be
comfortable with all of the following:
n
The Visual Studio 2008 Integrated Development Environment (IDE).
n
The basics of the JavaScript programming language and Dynamic HTML (DHTML).
n
A basic understanding of Hypertext Markup Language (HTML) and client-side scripting
with the JavaScript language.
n
How to create a new Web site.
n
Building a Web form by adding Web server controls to a Web page and programming
against them on the server.
REAL WORLD
Mike Snell
I am fortunate enough to have been around when building Web applications fi rst
came into vogue. The early applications we built were nothing more than hyper-
linked HTML and images. We quickly added server-side script and database connec-
tivity to enable more meaningful scenarios.
The power of having a server-based, near-zero deployment, ubiquitous, cross-
platform application environment has been (and still is) the driving force that
pushes us to build Web applications. There has always been, however, a major gap
with respect to the richness of the UI between a fat and a thin client. We’ve seen
many attempts at closing this gap including Java, ActiveX, ActiveX Documents,
DHTML, and others.
It remains to be seen if this gap will ever really be closed. However, AJAX does pro-
vide a nice compromise between a rich client and a Web-only application. It extends
what is capable on the client without breaking the paradigm of a Web application.
AJAX is rooted in the Web and, like its counterparts such as HTML and DHTML, it is
standards-driven, cross-platform, and ubiquitous. This makes it a great choice for
adding client interactivity to applications that must remain true to the concept of a
Web site.
Lesson 1: Creating AJAX-Enabled Web Forms CHAPTER 6 299
Lesson 1: Creating AJAX-Enabled Web Forms
Much of the increased client interactivity of Web 2.0 applications is provided by Asynchro-
nous JavaScript and XML (AJAX). AJAX is a platform-independent technology that works with
Web applications running inside Microsoft Internet Explorer, Firefox, Safari, and more. It is an
ECMAScript-compliant technology. Therefore, it makes a logical choice for providing a richer
UI for browser-based, cross-platform Web applications.
You can add AJAX to any Web application. Like other Web standards such as HTML, it is
not specifi c to ASP.NET. However, ASP.NET does provide a number of items that make build-
ing AJAX-enabled Web forms easier. This includes controls to manage partial-page updates,
a code library that enables object-oriented development on the client with JavaScript, the
ability to call Web services from client code, the ability to create your own AJAX-enabled
controls, and more.
This lesson covers building interactive Web forms using the AJAX controls built into ASP.
NET. The JavaScript object library and building AJAX-enabled controls are covered in Lesson 2
of this chapter.
After this lesson, you will be able to:
n
Understand and use the AJAX Extension controls built into ASP.NET.
n
Create a Web form that performs partial-page updates to the server (without a
full-page refresh).
n
Display the progress of a request processing on the server.
n
Periodically update portions of a Web form based on a time interval.
Estimated lesson time: 45 minutes
Introducing ASP.NET AJAX
There are many pieces that are part of (or related to) ASP.NET that are meant to enable AJAX
features for developers. These items center on a common goal: improving user experiences
by providing capabilities to create a more responsive Web application. These capabilities are
many. Choosing the appropriate approach is dependent on your specifi c need. The following
are the ASP.NET components related to AJAX capabilities:
n
Microsoft AJAX Library The Microsoft AJAX Library is a set of JavaScript fi les that
make programming client-side JavaScript easier. It provides an object-oriented model
to the AJAX scripting language. This includes support for classes, namespaces, event
handling, data types, and more. The library also has support for error handling, debug-
ging, and globalization.
After this lesson, you will be able to:
n
Understand and use the AJAX Extension controls built into ASP.NET.
n
Create a Web form that performs partial-page updates to the server (without a
full-page refresh).
n
Display the progress of a request processing on the server.
n
Periodically update portions of a Web form based on a time interval.
Estimated lesson time: 45 minutes
Estimated lesson time: 45 minutes
3 0 0 CHAPTER 6 Working with ASP.NET AJAX and Client-Side Scripting
The library combines JavaScript features and DHTML. Like JavaScript, it works across
browsers and across platforms. This library is used by ASP.NET and the AJAX Control
Toolkit. However, you can also leverage this library to extend your own controls with
AJAX behaviors.
n
ASP.NET AJAX server controls ASP.NET ships with a set of AJAX server controls that
can be embedded in your Web pages to enable partial-page updates, communicate
with a server process to indicate progress, and periodically update portions of a page.
n
AJAX Control Toolkit The AJAX Control Toolkit is a set of community-created and
supported controls that show off the power of AJAX. These controls can be used in
your Web pages to enable many client-side features typically reserved for applications
running on the desktop, such as masked edit boxes, slider controls, fi ltered text boxes,
modal pop-ups, and much more.
NOTE AJAX CONTROL TOOLKIT
The AJAX Control Toolkit is an extension to Visual Studio and ASP.NET. It is therefore
not covered in this book or on the exam. You can learn more by visiting
.net/ajax/.
n
Client-side web service support ASP.NET provides support for calling Web services
asynchronously from the client using JavaScript Object Notation (JSON) serialization
and XML.
NOTE USING AJAX TO CALL A WEB SERVICE
AJAX can be used to call a Web service from a client. This functionality is covered in
Chapter 9, “Writing and Working with Services.”
Uses and Benefi ts of ASP.NET AJAX
The features built into ASP.NET AJAX provide a richer user experience than that of a standard,
all server-side Web application. In addition, these features make programming AJAX a much
easier task. As with any new technology, these benefi ts might not be readily apparent at fi rst
glance. The following lists some of the key usage scenarios and related benefi ts of building
Web applications with ASP.NET AJAX.
n
Partial-page updates This feature allows you to defi ne an area of a page that should
PostBack and update by itself. The rest of the page does get refreshed when the re-
quest fi nishes. This ensures the user stays in the context of the page and provides the
user with the feeling he or she never left the application.
n
Client-side processing This interactivity provides immediate feedback and respon-
siveness to users. With client script you can enable things like collapsible areas of a
page, tabs on a Web page, sorting of data on the client, and much more.
NOTE
AJAX CONTROL TOOLKIT
The AJAX Control Toolkit is an extension to Visual Studio and ASP.NET. It is therefore
not covered in this book or on the exam. You can learn more by visiting
.net/ajax/
.net/ajax/ net/ajax/
NOTE
USING AJAX TO CALL A WEB SERVICE
AJAX can be used to call a Web service from a client. This functionality is covered in
Chapter 9, “Writing and Working with Services.”
Lesson 1: Creating AJAX-Enabled Web Forms CHAPTER 6 301
n
Desktop-like UI With AJAX, you can provide users with things like modal dialog
boxes, progress indicators, masked edit boxes, ToolTips, and more. This helps blur the
line between Web and rich desktop applications.
n
Progress indication This allows you to track the progress of a server-side process and
continuously update the user. This gives users the feeling that they are in control and
the application is still processing (much like a desktop application).
n
Improved performance and higher scale You get increased performance and scale
by processing portions of a page on the client. You then leverage the user’s machine,
which takes load off the server. This results in a real and perceived performance in-
crease.
n
Web service calls from the client This allows you to call back to the server directly
from client script running in a browser and then show the results.
n
Cross-browser cross-platform support This feature allows you to maintain the
benefits of a Web site in terms of its ability to run in more client environments than the
average desktop application.
The AJAX Server Controls
The controls that ship with ASP.NET are meant to provide two basic AJAX features: partial-
page updates and client-to-server progress updates. You work with these controls in a similar
manner as other ASP.NET controls. You can drag them onto your page from the Toolbox,
manipulate their properties, and code against them. Figure 6-1 shows a model of the AJAX
Extension controls in ASP.NET.
FIGURE 6-1 The AJAX Extensions controls
Each of these controls inherits from the System.Web.UI.Control class. This ensures they
work in a similar manner as other ASP.NET Web controls. The sections that follow cover each
of these controls in detail.
3 0 2 CHAPTER 6 Working with ASP.NET AJAX and Client-Side Scripting
The ScriptManager and ScriptManagerProxy Controls
Each page you write that leverages ASP.NET AJAX requires one (and only one) instance of a
ScriptManager control. The ScriptManager control is responsible for pushing the Microsoft
AJAX Library down to the client when your page is requested. It also manages partial-page
updates, progress indicators, and more.
You add the ScriptManager control to your page source. However, it does not have a visual
representation. It is simply a control used to manage AJAX and other control processing. The
basic page markup for a ScriptManager control in Source view looks as follows:
<asp:ScriptManager ID="ScriptManager1" runat="server">
</asp:ScriptManager>
By default, the ScriptManager control’s EnablePartialRending property is set to True. This
indicates that the page supports partial-page updates. You can use this property to turn this
feature off if needed.
The ScriptManager is also used to register custom scripts with the Microsoft AJAX Library.
In this way, if you write a script, it can be registered and managed with the Microsoft AJAX
Library. This is covered in Lesson 2 of this chapter. Similarly, you can use the ScriptManager to
register Web service method calls from the client. This is covered in Chapter 9.
USING AJAX WITH MASTER PAGES AND USER CONTROLS
You will often need to support AJAX inside a user control you write or directly in the master
page of the site. This presents an issue, as a page can contain only a single ScriptManager
control. Having one inside your user control and another inside the page that consumes the
user control, for example, presents a problem. To overcome this issue, you can use the Script-
ManagerProxy control.
The ScriptManagerProxy control can be used either by child pages that use a master page
that already defines a ScriptManager control or by user and custom controls you write. You
use it much the same way you would a ScriptManager control. You can register scripts that are
specific to the child page or control you are writing. ASP.NET takes care of the rest.
The UpdatePanel Control
The UpdatePanel control allows you define areas of a page that should PostBack to the server
independent of the rest of the page. This allows a different experience between the client and
the server. Rather than the entire page being requested and thus refreshed on return, with
partial-page updates you can post portions of a page to the server and only receive updates
to those portions. In this way, the user does not see a full-screen refresh and does not lose
context where he or she is on the page.
It is important to note that partial-page updates give the illusion of running client side.
However, they do not run client side. Rather, they are smaller, asynchronous PostBacks to
the server. The ScriptManager control manages the communication between this call and its
return message.
Lesson 1: Creating AJAX-Enabled Web Forms CHAPTER 6 303
The UpdatePanel control is a container for other controls. The controls you put inside the
UpdatePanel control that cause a PostBack to the server will be managed as partial-page up-
dates. As an example, consider a GridView control that allows users to page through data. By
default, each time the user selects another page of data the entire Web page is refreshed and
redisplayed. If you embed the GridView inside an UpdatePanel you can still process the data
paging on the server. However, you now eliminate the full-page updates. The following shows
the markup of an UpdatePanel that includes a GridView control:
<asp:UpdatePanel ID="UpdatePanel1" runat="server">
<ContentTemplate>
<asp:GridView ID="GridView1" runat="server" AllowPaging="True" Width="600"
AutoGenerateColumns="False" DataKeyNames="id"
DataSourceID="SqlDataSourceVendorDb" >
<Columns>
<asp:BoundField DataField="id" HeaderText="Id" InsertVisible="False"
ReadOnly="True" SortExpression="id" />
<asp:BoundField DataField="name" HeaderText="Name" SortExpression="name" />
<asp:BoundField DataField="location" HeaderText="Location"
SortExpression="location" />
<asp:BoundField DataField="contact_name" HeaderText="Contact Name"
SortExpression="contact_name" />
<asp:BoundField DataField="contact_phone" HeaderText="Contact Phone"
SortExpression="contact_phone" />
</Columns>
</asp:GridView>
</ContentTemplate>
</asp:UpdatePanel>
CONTROLLING PARTIAL-PAGE UPDATES
You can combine multiple UpdatePanel controls on the same page. Each can update portions
of the page independently or otherwise. You might also have controls that cause standard
PostBacks on the same page as those that cause asynchronous PostBacks. In each of these
cases, you need to be able to control how and when the page elements update. The Up-
datePanel exposes the UpdateMode and ChildrenAsTriggers properties for controlling when a
PostBack should occur to trigger an update of content contained in an UpdatePanel.
The first property, UpdateMode, has two possible settings: Always and Conditional. The
Always value is used to indicate that the content of an UpdatePanel should be updated on
every PostBack that originates from the page. This includes other, asynchronous updates that
are the result of another UpdatePanel on the page as well as those that are simply standard
PostBacks on the page.
The Conditional value of the UpdatePanel.UpdateMode property is more complex. It indi-
cates that an update to the given UpdatePanel is conditional on something else on the page.
For example, consider the case of nested UpdatePanels. If you set the nested UpdatePanel
3 0 4 CHAPTER 6 Working with ASP.NET AJAX and Client-Side Scripting
control’s UpdateMode property to Conditional, it will only be updated when the parent Up-
datePanel causes a PostBack.
Another way to trigger an update to an UpdatePanel with an UpdateMode set to Condi-
tional is to explicitly call its Update method from server-side code. This might be done as the
result of another asynchronous update on the page.
If you set the UpdateMode to the Conditional value, by default nested UpdatePanel con-
trols will not cause an update to their parent. You can change this behavior by setting the
outer UpdatePanel control’s ChildrenAsTriggers property to True. In this case, any updates
triggered by the nested UpdatePanel will also trigger an update to the parent UpdatePanel.
You can also explicitly define the controls that you wish to trigger an update to an Up-
datePanel. These controls can be inside or outside the UpdatePanel, and the update happens
for both Conditional and the Always mode. Adding a trigger to the UpdatePanel indicates that
if a user triggers a PostBack from the given trigger control, the UpdatePanel content should
also PostBack and be refreshed.
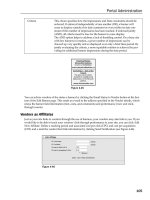
As an example, consider the GridView control discussed previously. This control is inside
an UpdatePanel as shown in Figure 6-2. It updates itself when a user pages through the data.
Now, consider that the page also supports a search function. In this case, the search is trig-
gered based on a button named Search (also displayed in Figure 6-2).
FIGURE 6-2 An .aspx page with a search button and GridView control
You might want the search to also result in a partial-page update to GridView. To do so,
you can add a trigger to the UpdatePanel that contains the GridView control. A trigger can be
defined directly in markup (or through the property window in Design view or in your code).
The following markup shows an example:
Lesson 1: Creating AJAX-Enabled Web Forms CHAPTER 6 305
<asp:UpdatePanel ID="UpdatePanel1" runat="server">
<Triggers>
<asp:AsyncPostBackTrigger ControlID="ButtonSearch" EventName="Click" />
</Triggers>
<ContentTemplate>
Grid View markup
</ContentTemplate>
</asp:UpdatePanel>
Notice that the trigger is of type AsyncPostBackTrigger. It contains both the ID of the
control that causes the PostBack and the name of the trigger control’s event that causes the
PostBack. You can add more than one trigger to the UpdatePanel as well. In this example,
clicking the Search button will update the GridView as a partial-page update.
PARTIAL-PAGE UPDATES AND ERROR HANDLING
You can handle errors that occur during a partial page update by writing a handler for the
AsyncPostBackError event of the ScriptManager control. This event is raised on the server
when an asynchronous PostBack throws an error. You can also set the AsyncPostBackErrror-
Message of the ScriptManager control to an error message you wish to display to the user
when a partial-page update error occurs.
The UpdateProgress Control
The UpdateProgress control is used to provide information in the form of graphics or text
that is displayed to the user during a partial-page update. For example, you might display an
animated .gif image that shows the system is processing while you wait for the partial-page
update to complete.
You can add an UpdateProgress control to an UpdatePanel control by nesting it inside the
UpdatePanel control’s ContentTemplate tag. This effectively associates the UpdateProgress
control with the given UpdatePanel. You then define the information you wish to display to
the user inside the ProgressTemplate tag of the UpdateProgress control. Content inside this
element can be an image, text, or similar HTML content. The content will be rendered to the
browser as a hidden <div> tag that gets shown when the partial-page update is executed.
The following markup shows an example:
<asp:UpdatePanel ID="UpdatePanel1" runat="server">
<ContentTemplate>
<asp:GridView ID="GridView1" runat="server">
</asp:GridView>
<asp:UpdateProgress ID="UpdateProgress1" runat="server">
<ProgressTemplate>
<div style="font-size: large">Processing </div>
</ProgressTemplate>
</asp:UpdateProgress>
3 0 6 CHAPTER 6 Working with ASP.NET AJAX and Client-Side Scripting
</ContentTemplate>
</asp:UpdatePanel>
The UpdateProgress control can also be associated directly with an UpdateProgress control
through the AssociatedUpdatePanelId property. You set this property to the ID value of the
UpdatePanel to which you wish to associate.
If you do not set the AssociatedUpdatePanelId property of the UpdateProgress control, any
UpdatePanel that causes an asynchronous PostBack will trigger the UpdateProgress control.
In this way, you can use a single UpdateProgress control for multiple UpdatePanels on a single
Web page.
By default, the UpdateProgress control is displayed a half-second after the partial-page
update starts. You can set the DisplayAfter property to the number of milliseconds to wait
before displaying the UpdateProgress content. This can prevent the control from showing for
very quick operations and show it only for longer operations.
MORE INFO CANCELLING AN ASYNCHRONOUS POSTBACK
You might need to allow a user to cancel an asynchronous PostBack. You could do so by
providing a Cancel button inside the UpdateProgress control. The Microsoft AJAX Library
supports this through the abortPostBack method of the PageRequestManager class. For
more information and an example, lookup the UpdateProgress class inside the MSDN
library.
The Timer Control
The ASP.NET Timer control is an AJAX control that can be used to update portions of a page
on a periodic, timed basis. This is useful if you need to update an image such as an advertise-
ment on a Web page or perhaps a value like a stock or news ticker. The Timer control can also
be used to simply run code on the server on a periodic basis.
You can add a Timer control directly to an UpdatePanel control. In this case, the Timer au-
tomatically triggers a partial-page update of the given UpdatePanel based on a time defi ned
by the Timer control’s Interval property (set to milliseconds). The following shows an example
of a Timer control embedded in an UpdatePanel:
<asp:UpdatePanel ID="UpdatePanel1" runat="server">
<ContentTemplate>
<asp:Image ID="Image1" runat="server"
ImageUrl="~/images/contoso.png" />
<asp:Timer ID="Timer1" runat="server"
Interval="5000" ontick="Timer1_Tick">
</asp:Timer>
</ContentTemplate>
</asp:UpdatePanel>
MORE INFO
CANCELLING AN ASYNCHRONOUS POSTBACK
You might need to allow a user to cancel an asynchronous PostBack. You could do so by
providing a Cancel button inside the
UpdateProgress
control. The Microsoft AJAX Library
supports this through the
abortPostBack
method of the
abortPostBack method of the abortPostBack
PageRequestManager
class. For
PageRequestManager class. For PageRequestManager
more information and an example, lookup the
UpdateProgress
class inside the MSDN
library.
Lesson 1: Creating AJAX-Enabled Web Forms CHAPTER 6 307
In this example, the Timer is set to fi re every fi ve seconds. When it does, the Timer control’s
Tick event is raised on the server and the content of the UpdatePanel gets refreshed. In this
case, the Tick event simply cycles images to be displayed to the user. When you use a Timer
with an UpdatePanel, the Timer starts again after the page has completed its PostBack to the
server.
A Timer can also be used outside of an UpdatePanel control. It, too, requires the Script-
Manager control. In this way, you can use the Timer control to update more than one Up-
datePanel on the page or the entire page itself. To associate a Timer control that is outside an
UpdatePanel to an UpdatePanel on the page you use a Trigger as discussed earlier.
Note that in the scenario where a trigger is outside an UpdatePanel, the timed interval
resets as soon as it fi res. It does not wait for the PostBack to complete. This can provide more
exact timing of intervals. However, if a PostBack is still processing when the Timer fi res, the
fi rst PostBack is cancelled.
Quick Check
1. If you were building a user control that required ASP.NET AJAX functionality,
which control would you add to the page?
2. How do you indicate that a control outside an UpdatePanel should trigger a
partial-page update to the UpdatePanel?
Quick Check Answers
1. You would have to add a ScriptManagerProxy control to the page to ensure that
the user control can work with pages that already contain a ScriptManagerCon-
trol.
2. To connect a control that is outside an UpdatePanel to an UpdatePanel, you
register it as an AsyncPostBackTrigger in the Triggers section of the UpdatePanel
markup.
Lab Building an AJAX-Enabled Web Page
In this lab, you create a Web page and enable partial-page updates. You also add support for
notifying the user when you connect to the server. Finally, you add a Timer control to periodi-
cally update a second portion of your page.
If you encounter a problem completing an exercise, the completed projects are available in
the sample fi les installed from the companion CD in the Code folder.
ExErcisE 1 Enable Partial Page Update
In this exercise, you create a new ASP.NET Web site and defi ne support for partial-page up-
dates.
Quick Check
1
. If you were building a user control that required ASP.NET AJAX functionality,
which control would you add to the page?
2
. How do you indicate that a control outside an
UpdatePanel
should trigger a
UpdatePanel should trigger a UpdatePanel
partial-page update to the
UpdatePanel
?
Quick Check Answers
1
. You would have to add a
ScriptManagerProxy
control to the page to ensure that
ScriptManagerProxy control to the page to ensure that ScriptManagerProxy
the user control can work with pages that already contain a
ScriptManagerCon-
trol
.
2
. To connect a control that is outside an
UpdatePanel
to an
UpdatePanel to an UpdatePanel
UpdatePanel
,
UpdatePanel,UpdatePanel
you
register it as an
AsyncPostBackTrigger
in the
AsyncPostBackTrigger in the AsyncPostBackTrigger
Triggers
section of the
UpdatePanel
markup.
1
2
1
2
3 0 8 CHAPTER 6 Working with ASP.NET AJAX and Client-Side Scripting
1. Open Visual Studio and create a new ASP.NET Web site named AjaxExample in either
C# or Visual Basic.
2. Add the Vendors.mdf database fi le to the App_Data folder of the site. The database fi le
can be found in the sample fi les installed from the CD inside the App_Data folder for
this exercise. This database fi le is a SQL Express database that contains a single table
called vendor.
3. Open Default.aspx in Source view. Add a ScriptManager control to the body of the
page from the AJAX Extensions tab of the Toolbox.
4. Add text to the page to serve as a title followed by a horizontal line. Your code might
look like this:
<div style="font-size: large;">Vendors</div>
<hr />
5. Add an AJAX UpdatePanel control to the page.
6. Switch to Design view and add a GridView control inside the UpdatePanel. Design view
provides UI support for binding the GridView to the database table.
7. In this step you bind the GridView to the vendor table in the Vendors.mdf database. To
start, click the smart tag in the upper right section of the GridView control to open the
GridView Tasks window. From here, select the ChooseDataSource drop-down list and
select New Data Source. This opens the Data Source Confi guration Wizard.
In the fi rst step of the wizard, select Database and enter the ID for the data source as
SqlDataSourceVendors. Click OK to open the Choose Your Data Connection page.
Next, select Vendors.mdf from the Connection drop-down list and click Next.
On the next page, choose to save the connection string and name it Connection-
StringVendors. Click Next to continue.
Next, confi gure the SQL statement to access all the data fi elds in the vendor table (se-
lect the * check box). Order the query by the vendor name (click ORDER BY and select
Name in the Sort By list). Click Next to continue and then close the wizard by clicking
Finish.
8. Again, open the GridView Tasks window using the smart tag. Select the Enable Paging
check box.
9. Run the application and view the Default.aspx page in a browser. Click the data page
numbers to move between data pages. Notice that only the grid is being updated and
not the entire page; this is due to the UpdatePanel control.
10. Next, add a section at the top of the form (outside of the UpdatePanel) that allows
a user to enter a new contact and have it added to the database. Your markup code
might look as follows:
<div style="margin: 20px 0px 20px 40px">
Name<br />
<div style="font-size: large;">Vendors</div>
<hr />
<div style="margin: 20px 0px 20px 40px">
Name<br />
Lesson 1: Creating AJAX-Enabled Web Forms CHAPTER 6 309
<asp:TextBox ID="TextBoxName" runat="server" Width="200"></asp:TextBox>
<br />
Location<br />
<asp:TextBox ID="TextBoxLocation" runat="server" Width="200"></asp:TextBox>
<br />
Contact Name<br />
<asp:TextBox ID="TextBoxContact" runat="server" Width="200"></asp:TextBox>
<br />
Contact Phone<br />
<asp:TextBox ID="TextBoxPhone" runat="server" Width="200"></asp:TextBox>
<br />
<asp:Button ID="ButtonEnter" runat="server" Text="Enter"
style="margin-top: 15px" />
</div>
11. Next, add a Click event to the ButtonEnter button defi ned previously (onclick=
”ButtonEnter_Click”). This Click event will call a stored procedure defi ned in the
Vendors.mdf database. At the end of this event, rebind the GridView control. The fol-
lowing code shows an example (assuming you have imported the namespaces System
.Data and System.Data.SqlClient):
'VB
Protected Sub ButtonEnter_Click(ByVal sender As Object, _
ByVal e As System.EventArgs) Handles ButtonEnter.Click
Dim cnnStr As String = _
System.Web.Configuration.WebConfigurationManager.ConnectionStrings( _
"ConnectionStringVendors").ConnectionString
Dim cnn As New SqlConnection(cnnStr)
Dim cmd As New SqlCommand("insert_vendor", cnn)
cmd.CommandType = Data.CommandType.StoredProcedure
Dim pName As New SqlParameter("@name", Data.SqlDbType.VarChar)
pName.Value = TextBoxName.Text
cmd.Parameters.Add(pName)
Dim pLocation As New SqlParameter("@location", Data.SqlDbType.VarChar)
pLocation.Value = TextBoxLocation.Text
cmd.Parameters.Add(pLocation)
Dim pContactName As New SqlParameter("@contact_name", _
Data.SqlDbType.VarChar)
pContactName.Value = TextBoxContact.Text
cmd.Parameters.Add(pContactName)
<asp:TextBox ID="TextBoxName" runat="server" Width="200"></asp:TextBox>
<br />
Location<br />
<asp:TextBox ID="TextBoxLocation" runat="server" Width="200"></asp:TextBox>
<br />
Contact Name<br />
<asp:TextBox ID="TextBoxContact" runat="server" Width="200"></asp:TextBox>
<br />
Contact Phone<br />
<asp:TextBox ID="TextBoxPhone" runat="server" Width="200"></asp:TextBox>
<br />
<asp:Button ID="ButtonEnter" runat="server" Text="Enter"
style="margin-top: 15px" />
</div>
'VB
Protected Sub ButtonEnter_Click(ByVal sender As Object, _
ByVal e As System.EventArgs) Handles ButtonEnter.Click
Dim cnnStr As String = _
System.Web.Configuration.WebConfigurationManager.ConnectionStrings( _
"ConnectionStringVendors").ConnectionString
Dim cnn As New SqlConnection(cnnStr)
Dim cmd As New SqlCommand("insert_vendor", cnn)
cmd.CommandType = Data.CommandType.StoredProcedure
Dim pName As New SqlParameter("@name", Data.SqlDbType.VarChar)
pName.Value = TextBoxName.Text
cmd.Parameters.Add(pName)
Dim pLocation As New SqlParameter("@location", Data.SqlDbType.VarChar)
pLocation.Value = TextBoxLocation.Text
cmd.Parameters.Add(pLocation)
Dim pContactName As New SqlParameter("@contact_name", _
Data.SqlDbType.VarChar)
pContactName.Value = TextBoxContact.Text
cmd.Parameters.Add(pContactName)
3 1 0 CHAPTER 6 Working with ASP.NET AJAX and Client-Side Scripting
Dim pContactPhone As New SqlParameter("@contact_phone", _
Data.SqlDbType.VarChar)
pContactPhone.Value = TextBoxPhone.Text
cmd.Parameters.Add(pContactPhone)
cnn.Open()
cmd.ExecuteNonQuery()
'rebind the grid
GridView1.DataBind()
End Sub
//C#
protected void ButtonEnter_Click(object sender, EventArgs e)
{
string cnnStr =
System.Web.Configuration.WebConfigurationManager.ConnectionStrings[
"ConnectionStringVendors"].ConnectionString;
SqlConnection cnn = new SqlConnection(cnnStr);
SqlCommand cmd = new SqlCommand("insert_vendor", cnn);
cmd.CommandType = CommandType.StoredProcedure;
SqlParameter pName = new SqlParameter("@name", SqlDbType.VarChar);
pName.Value = TextBoxName.Text;
cmd.Parameters.Add(pName);
SqlParameter pLocation = new SqlParameter("@location", SqlDbType.VarChar);
pLocation.Value = TextBoxLocation.Text;
cmd.Parameters.Add(pLocation);
SqlParameter pContactName = new SqlParameter("@contact_name",
SqlDbType.VarChar);
pContactName.Value = TextBoxContact.Text;
cmd.Parameters.Add(pContactName);
SqlParameter pContactPhone = new SqlParameter("@contact_phone",
SqlDbType.VarChar);
pContactPhone.Value = TextBoxPhone.Text;
cmd.Parameters.Add(pContactPhone);
cnn.Open();
cmd.ExecuteNonQuery();
Lesson 1: Creating AJAX-Enabled Web Forms CHAPTER 6 311
//rebind the grid
GridView1.DataBind();
}
Note that this code is very basic. It does not validate the data entered by the user and
is therefore prone to error. It is simply an example.
12. Run the application and enter a row in the table. Notice that the entire page refreshes.
Add behavior to the page so that the Enter button triggers a partial-page update to
the GridView. To do so, add a trigger to the UpdatePanel control and connect the trig-
ger to the ButtonEnter control. The following markup shows an example:
<asp:UpdatePanel ID="UpdatePanelVendors" runat="server">
<Triggers>
<asp:AsyncPostBackTrigger ControlID="ButtonEnter" EventName="Click" />
</Triggers>
<ContentTemplate>
<asp:GridView
Run the application again and notice that now only the GridView updates when a new
row is added.
ExErcisE 2 Add a Progress Indicator
In this exercise, you add functionality that provides a notice to the user when the page is be-
ing partially updated on the server.
1. Continue editing the project you created in the previous exercise. Alternatively, you
can open the completed Lesson 1, Exercise 1 project in the sample fi les installed from
the CD.
2. Open Default.aspx in Source view. Add an UpdateProgress control to the UpdatePanel.
Add the control to the bottom of the panel just inside the ContentTemplate element.
Add text inside the ProgressTemplate elements of the UpdateProgress control to notify
the user that processing is happening on the server. The following shows a sample
markup:
<asp:UpdateProgress ID="UpdateProgress1" runat="server">
<ProgressTemplate>
<div style="margin-top: 20px; font-size: larger; color: Green">
Processing, please wait
</div>
</ProgressTemplate>
</asp:UpdateProgress>
//rebind the grid
GridView1.DataBind();
}
<asp:UpdatePanel ID="UpdatePanelVendors" runat="server">
<Triggers>
<asp:AsyncPostBackTrigger ControlID="ButtonEnter" EventName="Click" />
</Triggers>
<ContentTemplate>
<asp:GridView
<asp:UpdateProgress ID="UpdateProgress1" runat="server">
<ProgressTemplate>
<div style="margin-top: 20px; font-size: larger; color: Green">
Processing, please wait
</div>
</ProgressTemplate>
</asp:UpdateProgress>
3 1 2 CHAPTER 6 Working with ASP.NET AJAX and Client-Side Scripting
3. The processing happens pretty fast. Therefore, add code to the ButtonEnter click event
to pause the server-side processing. You can simply put the thread to sleep for a few
seconds. The following code shows an example:
System.Threading.Thread.Sleep(2000)
4. Run the application and notice the notifi cation is shown to the user when you enter a
new record in the GridView.
ExErcisE 3 Use the Timer Control
In this exercise, you add functionality that demonstrates the use of the Timer control. You will
add an area on the page that rotates through a series of graphics fi les at a timed interval.
1. Continue editing the project you created in the previous exercise. Alternatively, you
can open the completed Lesson 1, Exercise 2 project in the sample fi les installed from
the CD.
2. Open the Default.aspx page in Source view.
3. Add an UpdatePanel to appear to the right of the new vendor data entry form. This
control will work like a rotating advertisement. It will periodically update and show a
new image from the server.
4. Inside the UpdatePanel control’s ContentTemplate element add a label with the text
Advertisement.
Under this text, add an image control. You can add a couple images to your project (or
copy them from the sample fi les installed from the CD).
5. Under the image control (and still inside the ContentTemplate element) add a Timer
control from the Ajax Extensions tab on the Toolbox.
Set the Timer control’s Interval attribute to 4,000 milliseconds (4 seconds).
6. Add an event handler for the Timer control’s Tick event. Inside this event add code to
cycle between images (a simple if statement should suffi ce).
7. Run the application and wait until the Timer event fi res. Your application should look
similar to Figure 6-3.
System.Threading.Thread.Sleep(2000)
Lesson 1: Creating AJAX-Enabled Web Forms CHAPTER 6 313
FIGURE 6-3 The Final Vendors form with an UpdatePanel that includes a Timer control
Lesson Summary
n
AJAX is a platform-independent, ECMAScript-compliant technology for communicat-
ing between code running on the client and code running on the server.
n
ASP.NET includes both a set of server controls for working with AJAX and a set of
client-side JavaScript files called the Microsoft AJAX Library.
n
The ScriptManager (or ScriptManagerProxy) control is required on all pages that work
with the AJAX extensions for ASP.NET. It manages the JavaScript files sent to the client
and the communication between the server and the client.
n
The UpdatePanel control allows you to define an area within your page that can Post-
Back to the server and receive updates independent of the rest of the page.
n
The UpdateProgress control is used to provide notice to the user that the page has
initiated a call back to the server.
n
The Timer control is used to periodically send a partial-page request (using an Up-
datePanel) to the server at timed intervals.
3 1 4 CHAPTER 6 Working with ASP.NET AJAX and Client-Side Scripting
Lesson Review
You can use the following questions to test your knowledge of the information in Lesson 1,
“Creating AJAX-Enabled Web Forms.” The questions are also available on the companion CD
if you prefer to review them in electronic form.
NOTE ANSWERS
Answers to these questions and explanations of why each answer choice is right or wrong
are located in the “Answers” section at the end of the book.
1. You need to write a page that contains a section that should be updated based on
a user’s action. This update should happen independently of the rest of the page to
minimize screen refresh and maintain user context. Which controls must you add to
the page to enable this scenario? (Choose all that apply.)
A. UpdatePanel
B. AsyncPostBackTrigger
C. ScriptManagerProxy
D. ScriptManager
2. You need to write a control that will be used across multiple pages. This control should
contain updated sales fi gures. The control should update itself at various intervals if a
containing page is left open. Which controls should you use to enable this scenario?
(Choose all that apply.)
A. UpdatePanel
B. Timer
C. ScriptManager
D. ScriptManagerProxy
3. You have an UpdatePanel defi ned on a page. You need to indicate that a given But-
ton control outside of the UpdatePanel should cause the UpdatePanel to execute an
update. What steps should you take?
A. Set the AsyncPostBackTrigger attribute of the UpdatePanel to the ID of the Button
control.
B. Set the AsyncPostBackTrigger attribute of the Button control to the ID of the Up-
datePanel.
C. Add a Trigger control to the AsyncPostBackTriggers section of the UpdatePanel. Set
the ControlID attribute of the Trigger control to the ID of the Button control.
D. Add an AsyncPostBackTrigger control to the Triggers section of the UpdatePanel.
Set the ControlID attribute of the AsyncPostBackTrigger control to the ID of the
Button control.
NOTE
ANSWERS
Answers to these questions and explanations of why each answer choice is right or wrong
are located in the “Answers” section at the end of the book.
Lesson 1: Creating AJAX-Enabled Web Forms CHAPTER 6 315
4. You are writing a page that contains an UpdatePanel for partial-page updates. You
wish to notify the user that the update is processing only if the update takes longer
than 5 seconds. Which actions should you take?
A. Add a second UpdatePanel to the page. Set it to trigger based on the first Up-
datePanel. Set the contents of this UpdatePanel to read “Processing, please wait.”
B. Add an UpdateProgress control to the UpdatePanel. Set its DisplayAfter attribute to
5,000. Set its ProgressTemplate contents to read “Processing, please wait.”
C. Add a ProgressBar control to the page. Write code on the server to call back to the
client asynchronously to update the ProgressBar control after 5 seconds.
D. Create a hidden <div> tag on your page that contains the text “Processing, please
wait.” Set the <div> tag’s ID to match that of the UpdatePanel. Set the UpdatePanel
control’s Interval property to 5,000.
3 1 6 CHAPTER 6 Working with ASP.NET AJAX and Client-Side Scripting
Lesson 2: Creating Client Scripts with the AJAX Client-
Side Library
It is important to note that JavaScript is not new. It is also not really Java. It is a C-based script-
ing language invented by Netscape to add client scripting capabilities to a browser. It is now
supported as part of every major browser on the market. The actual language is controlled
and managed by a standards body, the European Computer Manufacturers Association
(ECMA). Because it is widely deployed and offers developers the ability to write code on the
client, it has become increasingly popular. This was especially true once features for commu-
nicating between the client script and server code using JSON and XML became prevalent.
However, the JavaScript language still lacks basic object-oriented concepts found in mod-
ern programming languages. It also lacks a standard framework for developers to program
against. The Microsoft AJAX Library was written (in JavaScript) to provide these constructs.
This library combined with the AJAX Server Controls, and the support for Visual Studio
Intelli Sense for JavaScript makes building AJAX-enabled applications more approachable.
This lesson covers the basics of client scripting with JavaScript. It then introduces the Mi-
crosoft AJAX Library and shows how you can use this library to add client-side functionality to
your server controls.
After this lesson, you will be able to:
n
Add client-side script blocks to your page and call them from client-side events.
n
Use the ClientScriptManager class to add script to a page dynamically at run
time.
n
Register your client script with a page using the ScriptManager class.
n
Understand the capabilities and use of the Microsoft AJAX Library.
n
Add AJAX support for a client components and server controls.
Estimated lesson time: 90 minutes
Creating Your Own Client Scripts
Scripts that execute on the client have been around a lot longer than AJAX. Client scripts add
a client-side, dynamic nature to a Web UI. It is AJAX, however, that has pushed a resurgence
in JavaScript on the client. You will look at working with the Microsoft AJAX Library in the
next section. First, however, you learn the ways in which you can defi ne client script on your
ASP.NET Web page. There are three basic patterns for doing so:
n
Defi ne a script block on your Web page. This script block may defi ne client-side code
or an include attribute that references a JavaScript (.js) fi le.
n
Use the ClientScriptManager class to dynamically add JavaScript to a page at run time
based on server-side processing.
After this lesson, you will be able to:
n
Add client-side script blocks to your page and call them from client-side events.
n
Use the
ClientScriptManager
class to add script to a page dynamically at run
ClientScriptManager class to add script to a page dynamically at run ClientScriptManager
time.
n
Register your client script with a page using the
ScriptManager
class.
ScriptManager class.ScriptManager
n
Understand the capabilities and use of the Microsoft AJAX Library.
n
Add AJAX support for a client components and server controls.
Estimated lesson time: 90 minutes
Estimated lesson time: 90 minutes
Lesson 2: Creating Client Scripts with the AJAX Client-Side Library CHAPTER 6 317
n
Leverage the ScriptManager server control to register JavaScript with your Web page.
These methods represent a more traditional approach to working with client-side script.
Each is covered in the following sections.
Adding Script Blocks to Your ASP.NET Page
You can add client script to your page through a script block that includes code or through
an include attribute that references a JavaScript (.js) file. Adding JavaScript to a Web page has
been around for a long time. This is the traditional method of working with JavaScript on a
Web page. It enables client-side functionality but it does not necessarily leverage the features
built into the Microsoft AJAX library. The JavaScript elements are not created dynamically
in this case and they do not require the advanced features provided by the Microsoft AJAX
Library. However, this method can be useful when you need basic JavaScript functionality for
your page.
As an example, suppose you wish to provide client-side functionality that hides an area of
a Web page when the user toggles an open–close button. This provides the user with control
over what is shown on his or her UI. To enable this scenario, you must first lay out the Web
page.
The Web page should contain a titled area that includes a button for opening and closing
an area on the page. This title area should always be shown so the user can reopen the area if
required. Next, you need to define an area of the page that contains content to be shown or
hidden. Both these areas are can be defined by <div> tags. The following markup shows an
example:
<body style="font-family: Verdana;">
<form id="form1" runat="server">
<div>
<div style="width: 200px; background-color: Blue; color: White;
border-style: solid; border-width: thin; border-color: Blue">
<div style="float: left; vertical-align: middle; margin-top: 3px;">
Element Title
</div>
<div style="float: right; vertical-align: middle">
<input id="ButtonCollapse" type="button" value="Close"
onclick="Collapse()" />
</div>
</div>
<div id="DivCollapse" style="width: 200px; height: 200px;
border-style: solid; border-width: thin; border-color: Blue">
<div style="margin-top: 20px; text-align: center;">
Content area
</div>
</div>
3 1 8 CHAPTER 6 Working with ASP.NET AJAX and Client-Side Scripting
</div>
</form>
</body>
In the preceding markup, the onclick event of the input button is set to call the method
Collapse. This is a JavaScript method that will collapse (hide) the content <div> tag (called
DivCollapse). You now need to write this function. You can do so inside the head section of
the .aspx markup. Here you define a script block and a function. The following code shows an
example:
<head id="Head1" runat="server">
<title>Script Block</title>
<script language="javascript" type="text/javascript">
function Collapse()
{
if (DivCollapse.style.display == "")
{
DivCollapse.style.display = "none";
document.forms[0].ButtonCollapse.value = "Open";
}
else
{
DivCollapse.style.display = "";
document.forms[0].ButtonCollapse.value = "Close";
}
}
</script>
</head>
When you run the code, the two areas defined by the <div> tags are shown along with the
toggle button. Clicking this button executes the JavaScript on the client. Figure 6-4 shows an
example of what the page looks like in the browser.
Lesson 2: Creating Client Scripts with the AJAX Client-Side Library CHAPTER 6 319
FIGURE 6-4 The JavaScript and HTML in the browser window
NOTE A BASIC EXAMPLE
This is a basic example. This type of functionality is provided by the AJAX Control Toolkit
and Web Parts in ASP.NET.
In this example the JavaScript code is embedded directly in the page. If your JavaScript
code is reused across multiple pages, you might want to externalize it into separate .js fi les.
This allows both reuse and caching. The JavaScript fi les will be cached by browsers and thus
improve the performance of your page. The following code shows how you can link to an
external JavaScript fi le in your page:
<script type="text/javascript" src="SiteScripts.js"></script>
The preceding example does not leverage many ASP.NET controls. Instead, it uses the
standard HTML Input tag to defi ne a button. This tag’s onClick event is wired to a JavaScript
method. However, for an ASP.NET Button control, the onClick attribute is used to declaratively
connect an ASP.NET Button control to its server-side event. Therefore, to connect an ASP.NET
Button control to a client-side JavaScript method you must use the onClientClick attribute. In
fact, you can set both the onClick and onClientClick attributes to respond to both a server-
and a client-side event for the same control.
The following code shows an example of how you might replace the Input tag in the previ-
ous example with an ASP.NET Button control:
<asp:button id=" ButtonCollapse" runat="server" text="Close"
onClientClick="Collapse();" />
NOTE
A BASIC EXAMPLE
This is a basic example. This type of functionality is provided by the AJAX Control Toolkit
and Web Parts in ASP.NET.