Learning XNA 3.0 phần 4 pptx
Bạn đang xem bản rút gọn của tài liệu. Xem và tải ngay bản đầy đủ của tài liệu tại đây (704.2 KB, 50 trang )
130
|
Chapter 7: Putting It All Together
mode in the Begin method and instead always draw the background first and then the
score.
Modify the
Draw method of your Game1 class to look like this:
protected override void Draw(GameTime gameTime)
{
GraphicsDevice.Clear(Color.White);
spriteBatch.Begin( );
// Draw background image
spriteBatch.Draw(backgroundTexture,
new Rectangle(0, 0, Window.ClientBounds.Width,
Window.ClientBounds.Height), null,
Color.White, 0, Vector2.Zero,
SpriteEffects.None, 0);
// Draw fonts
spriteBatch.DrawString(scoreFont, "Score: " + currentScore,
new Vector2(10, 10), Color.DarkBlue, 0, Vector2.Zero,
1, SpriteEffects.None, 1);
spriteBatch.End( );
base.Draw(gameTime);
}
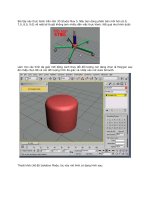
Compile and run the game, and you’ll see the impact that a background image can
have on the overall look of the game (Figure 7-7). This is getting exciting—things are
really starting to come together!
Nice job. You’ve got a background and multiple types of sprites with varying behav-
iors. Now, let’s take a look at finishing up the game scoring logic.
Game Scoring
As you’ll recall from our earlier discussion of this topic, the first thing you need to do
is determine what event(s) will trigger a change in score. For this game, you’ll be
updating the score whenever the user successfully avoids a three-blade, four-blade,
skull ball, or plus sprite. You actually have already added the logic to determine
when one of those sprites has been successfully avoided—it lies in the code that
deletes the sprites when they disappear off the edge of the screen. If a sprite makes it
across the screen and needs to be deleted, that means the user has avoided that
sprite, and if it was a three-blade, four-blade, skull ball, or plus sprite, you need to
give some points to the user.
Game Scoring
|
131
Any time you’re developing a game, scoring rules and calculations are
things you’ll need to think about. You’ll most likely formulate an idea,
implement it, and then tweak it while testing your game to see if it
feels right and plays the way you want it to. For the purposes of this
book, the scoring calculations and rules are laid out for you to learn.
However, as you begin to feel more comfortable with the concepts in
the book and this chapter specifically, feel free to change the rules and
tweak the game to whatever feels right to you as both the developer
and a player.
In the SpriteManager class, add three new class-level variables representing the three
types of sprites you’ll be sending at the player, as well as public properties for each
variable:
int automatedSpritePointValue = 10;
int chasingSpritePointValue = 20;
int evadingSpritePointValue = 0;
Figure 7-7. The game in progress with a sprite background
132
|
Chapter 7: Putting It All Together
The chasing sprites are tougher than the automated ones, which just move in a
straight line across the screen. As such, they are worth more points. The evading
objects will be used for power-ups, and while the player will want to track them
down to gain a performance bonus, there will be no scoring penalty or bonus for not
colliding with those sprites.
You now need to add to your
Game1 class a public method that will allow your
SpriteManager to add to the game score. Because the deletion of sprites takes place in
the
SpriteManager, it makes sense to calculate the score at that point in the program.
Add the following method to your
Game1 class:
public void AddScore(int score)
{
currentScore += score;
}
Next, you’ll need to locate the code that deletes the sprites when they go off the edge
of the screen. This code resides in the
Update method of your SpriteManager class.
The method actually has two different places where sprites are deleted: one for
sprites that are deleted because they have gone off the screen, and one for sprites that
are deleted because they have collided with the player object. Both cases use
SpriteList.RemoveAt(i) to remove the sprite from the list of sprites in the game.
Find the code that removes sprites because they have gone off the edge of the screen.
Currently, the code should look something like this:
// Remove object if it is out of bounds
if(s.IsOutOfBounds(Game.Window.ClientBounds))
{
spriteList.RemoveAt(i);
i;
}
You’ll need to modify the code to add the score for that sprite before removing it.
Change the code as shown here (line added shown in bold):
// Remove object if it is out of bounds
if(s.IsOutOfBounds(Game.Window.ClientBounds))
{
((Game1)Game).AddScore(spriteList[i].scoreValue);
spriteList.RemoveAt(i);
i;
}
So, you can verify that you placed the line in the correct place, your Update method
should now look something like this (changed code section highlighted in bold):
public override void Update(GameTime gameTime)
{
// Update player
player.Update(gameTime, Game.Window.ClientBounds);
Game Scoring
|
133
// Check to see if it's time to spawn a new enemy
nextSpawnTime -= gameTime.ElapsedGameTime.Milliseconds;
if (nextSpawnTime < 0)
{
SpawnEnemy( );
// Reset spawn timer
nextSpawnTime = ((Game1)Game).GetRandom.Next(
((Game1)Game).EnemySpawnMinMilliseconds,
((Game1)Game).EnemySpawnMaxMilliseconds);
}
// Update all sprites
for (int i = 0; i < spriteList.Count; ++i)
{
Sprite s = spriteList[i];
s.Update(gameTime, Game.Window.ClientBounds);
// Check for collisions
if (s.collisionRect.Intersects(player.collisionRect))
{
// Play collision sound
if(s.GetCollisionCueName != null)
((Game1)Game).PlayCue(s.GetCollisionCueName);
// Remove collided sprite from the game
spriteList.RemoveAt(i);
i;
}
// Remove object if it is out of bounds
if(s.IsOutOfBounds(Game.Window.ClientBounds))
{
((Game1)Game).AddScore(spriteList[i].GetScoreValue);
spriteList.RemoveAt(i);
i;
}
}
base.Update(gameTime);
}
The Update method of your SpriteManager class is getting pretty hairy now, so it’s
time for a little refactoring. Create a method called
UpdateSprites that takes a param-
eter of type
GameTime. Remove from the Update method the section of code that
updates your sprites (player and nonplayer), and place it in the
UpdateSprites
method. In the place of the original code in the Update method, call UpdateSprites.
Your
Update method should now look like this:
public override void Update(GameTime gameTime)
{
// Time to spawn enemy?
134
|
Chapter 7: Putting It All Together
nextSpawnTime -= gameTime.ElapsedGameTime.Milliseconds;
if (nextSpawnTime < 0)
{
SpawnEnemy( );
// Reset spawn timer
ResetSpawnTime( );
}
UpdateSprites(gameTime);
base.Update(gameTime);
}
Ahhh, yes much better. Your UpdateSprites method, in turn, should look like this:
protected void UpdateSprites(GameTime gameTime)
{
// Update player
player.Update(gameTime, Game.Window.ClientBounds);
// Update all non-player sprites
for (int i = 0; i < spriteList.Count; ++i)
{
Sprite s = spriteList[i];
s.Update(gameTime, Game.Window.ClientBounds);
// Check for collisions
if (s.collisionRect.Intersects(player.collisionRect))
{
// Play collision sound
if (s.collisionCueName != null)
((Game1)Game).PlayCue(s.collisionCueName);
// Remove collided sprite from the game
spriteList.RemoveAt(i);
i;
}
// Remove object if it is out of bounds
if (s.IsOutOfBounds(Game.Window.ClientBounds))
{
((Game1)Game).AddScore(spriteList[i].scoreValue);
spriteList.RemoveAt(i);
i;
}
}
}
Lastly, you’ll need to add the appropriate score values to the constructors used to
create each new sprite. For each
AutomatedSprite that is generated, the final param-
eter (which represents the score value for that sprite) should be the
Game Scoring
|
135
automatedSpritePointValue member variable. Likewise, for each ChasingSprite gen-
erated, the final parameter should be the
chasingSpritePointValue, and the final
parameter for each
EvadingSprite should be the evadingSpritePointValue property.
You’ll have to change these values in the constructors for each sprite type in the
SpawnEnemy method of the SpriteManager class. To find the constructors easily, search
in the SpriteManager.cs file for each instance of
spriteList.Add. Each time
spriteList.Add is called, you’re passing in a new Sprite object whose constructor
you’ll need to modify. For clarification purposes, your
SpawnEnemy method should
now look something like this (the only changes are the final parameters in the con-
structors for each of the sprite types):
private void SpawnEnemy()
{
Vector2 speed = Vector2.Zero;
Vector2 position = Vector2.Zero;
// Default frame size
Point frameSize = new Point(75, 75);
// Randomly choose which side of the screen to place enemy,
// then randomly create a position along that side of the screen
// and randomly choose a speed for the enemy
switch (((Game1)Game).rnd.Next(4))
{
case 0: // LEFT to RIGHT
position = new Vector2(
-frameSize.X, ((Game1)Game).rnd.Next(0,
Game.GraphicsDevice.PresentationParameters.BackBufferHeight
- frameSize.Y));
speed = new Vector2(((Game1)Game).rnd.Next(
enemyMinSpeed,
enemyMaxSpeed), 0);
break;
case 1: // RIGHT to LEFT
position = new
Vector2(
Game.GraphicsDevice.PresentationParameters.BackBufferWidth,
((Game1)Game).rnd.Next(0,
Game.GraphicsDevice.PresentationParameters.BackBufferHeight
- frameSize.Y));
speed = new Vector2(-((Game1)Game).rnd.Next(
enemyMinSpeed, enemyMaxSpeed), 0);
break;
case 2: // BOTTOM to TOP
position = new Vector2(((Game1)Game).rnd.Next(0,
Game.GraphicsDevice.PresentationParameters.BackBufferWidth
- frameSize.X),
Game.GraphicsDevice.PresentationParameters.BackBufferHeight);
speed = new Vector2(0,
-((Game1)Game).rnd.Next(enemyMinSpeed,
136
|
Chapter 7: Putting It All Together
enemyMaxSpeed));
break;
case 3: // TOP to BOTTOM
position = new Vector2(((Game1)Game).rnd.Next(0,
Game.GraphicsDevice.PresentationParameters.BackBufferWidth
- frameSize.X), -frameSize.Y);
speed = new Vector2(0,
((Game1)Game).rnd.Next(enemyMinSpeed,
enemyMaxSpeed));
break;
}
// Get random number between 0 and 99
int random = ((Game1)Game).rnd.Next(100);
if (random < likelihoodAutomated)
{
// Create an AutomatedSprite.
// Get new random number to determine whether to
// create a three-blade or four-blade sprite.
if (((Game1)Game).rnd.Next(2) == 0)
{
// Create a four-blade enemy
spriteList.Add(
new AutomatedSprite(
Game.Content.Load<Texture2D>(@"images\fourblades"),
position, new Point(75, 75), 10, new Point(0, 0),
new Point(6, 8), speed, "fourbladescollision",
automatedSpritePointValue));
}
else
{
// Create a three-blade enemy
spriteList.Add(
new AutomatedSprite(
Game.Content.Load<Texture2D>(@"imageshreeblades"),
position, new Point(75, 75), 10, new Point(0, 0),
new Point(6, 8), speed, "threebladescollision",
automatedSpritePointValue));
}
}
else if (random < likelihoodAutomated +
likelihoodChasing)
{
// Create a ChasingSprite.
// Get new random number to determine whether
// to create a skull or a plus sprite.
if (((Game1)Game).rnd.Next(2) == 0)
{
// Create a skull
spriteList.Add(
new ChasingSprite(
Game.Content.Load<Texture2D>(@"images\skullball"),
position, new Point(75, 75), 10, new Point(0, 0),
Game States
|
137
new Point(6, 8), speed, "skullcollision", this,
chasingSpritePointValue));
}
else
{
// Create a plus
spriteList.Add(
new ChasingSprite(
Game.Content.Load<Texture2D>(@"images
lus"),
position, new Point(75, 75), 10, new Point(0, 0),
new Point(6, 4), speed, "pluscollision", this,
chasingSpritePointValue));
}
}
else
{
// Create an EvadingSprite
spriteList.Add(
new EvadingSprite(
Game.Content.Load<Texture2D>(@"images•olt"),
position, new Point(75, 75), 10, new Point(0, 0),
new Point(6, 8), speed, "boltcollision", this,
.75f, 150, evadingSpritePointValue));
}
}
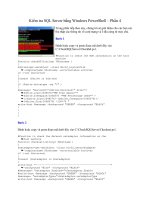
Oh yeah! Compile and run the game now, and you’ll see that as the sprites are suc-
cessfully avoided and move off the screen, the point values for those sprites are
added to the game score, as shown in Figure 7-8.
Awesome! You’ve got some sprites running around, and the game actually keeps
score! You’re all done now, right? Er uh wait a minute the game never ends.
That means every time you play you can potentially get a high score by just sitting
there and watching. Hmmm on second thought, we have a ways to go. Let’s add
some logic to add different game states and end the game when a player gets hit a
given number of times.
Game States
Your game is coming along, but there has to be a way to end the game. Typically,
when a game ends, the game window doesn’t just disappear; usually there’s some
kind of game-over screen that displays your score or at least lets you know that
you’ve failed (or succeeded) in your mission. That’s what you need to add next.
While you’re at it, it’s also common to have the same kind of thing at the beginning
of the game (perhaps a menu enabling the player to select options, or at least a splash
screen presenting instructions and maybe displaying your name as the author of this
great game). In the following sections, you’ll add both an introductory splash screen
and a closing game-over screen.
138
|
Chapter 7: Putting It All Together
Throughout the life of any game, the game will go through different states. Some-
times these states indicate that the player has moved to a different level in the game
or a different area. Sometimes the game state depicts a status change for a player (like
in Pac-Man, when you turn on the ghosts and begin to chase them rather than being
chased). Regardless of the specifics, the game moves through different states, and in
those different states the game behaves differently. One way to implement splash
screens and game-over screens is by making use of these states.
To define some states for your game, you’ll need to enumerate the different possible
states that the game can have. Create an
enum variable at the class level in your Game1
class. Currently, you’ll only have three states in your game: Start (where you display
your splash screen),
InGame (where the game is actually running), and GameOver
(where you’ll display your game over screen). You’ll also need to create a variable of
that
enum type that will hold the current state of the game. You’ll want to initialize
that current state variable to the game state representing the start of the game:
enum GameState { Start, InGame, GameOver };
GameState currentGameState = GameState.Start;
Figure 7-8. 560 points!!! That’s amazing!!!
Game States
|
139
Currently in your Game1 class, you have Update and Draw methods that let you draw
things on the game screen and update objects in the game. When you place code in
one of those methods (such as code to draw the score and the background image),
that code runs every time the method is called (i.e., in every frame throughout the life
of the game). You’re going to want to separate the logic in the
Update and Draw meth-
ods to allow you to write specific code that will only run depending on the current
state of the game. You can do this by adding a
switch statement to both methods
with different
case statements for each possible game state. Then, when you want to
write specific code to update or draw items that should take place only in a given
game state, you add that code to the
Update or Draw methods within the case for that
particular game state.
First, add a
switch statement to the Update method of your Game1 class. The Update
method should now look like this:
protected override void Update(GameTime gameTime)
{
// Only perform certain actions based on
// the current game state
switch (currentGameState)
{
case GameState.Start:
break;
case GameState.InGame:
break;
case GameState.GameOver:
break;
}
// Allows the game to exit
if (GamePad.GetState(PlayerIndex.One).Buttons.Back ==
ButtonState.Pressed)
this.Exit( );
audioEngine.Update( );
base.Update(gameTime);
}
Next, do the same thing with the Draw method. Your Draw method already has logic
in it to draw the score and the background image, but this stuff should only be
drawn when the game is in the
GameState.InGame state, so you’ll need to put that
code in the appropriate case of the
switch statement. Your Draw method should now
look like this:
protected override void Draw(GameTime gameTime)
{
// Only draw certain items based on
// the current game state
switch (currentGameState)
{
140
|
Chapter 7: Putting It All Together
case GameState.Start:
break;
case GameState.InGame:
GraphicsDevice.Clear(Color.White);
spriteBatch.Begin( );
// Draw background image
spriteBatch.Draw(backgroundTexture,
new Rectangle(0, 0, Window.ClientBounds.Width,
Window.ClientBounds.Height), null,
Color.White, 0, Vector2.Zero,
SpriteEffects.None, 0);
// Draw fonts
spriteBatch.DrawString(scoreFont,
"Score: " + currentScore,
new Vector2(10, 10), Color.DarkBlue,
0, Vector2.Zero,
1, SpriteEffects.None, 1);
spriteBatch.End( );
break;
case GameState.GameOver:
break;
}
base.Draw(gameTime);
}
If you were to compile and run the application at this point, it would look kind of
cool but a bit messed up. The score and background would be missing from the
game window, and the animated sprites would not be erased from frame to frame,
which would result in trails being left for the animations.
The score and background would be missing because the current game state is set to
GameState.Start by default, and in that game state you aren’t drawing those items.
Likewise, you’d see the trails because you don’t call
GraphicsDevice.Clear in the
GameState.Start state (you only do that in the GameState.InGame state).
The reason you’d still see your animated sprites is because the
SpriteManager class
isn’t affected by the game state logic you just added. You only added that code to the
Game1 class; the SpriteManager is a game component and is not affected by the switch
statement you just added.
To get all of this to work correctly, you’ll need to add some logic to disable your
SpriteManager game component in certain game states and enable it in other states.
Enabling/Disabling GameComponents
|
141
Enabling/Disabling GameComponents
By default, when you create an instance of a GameComponent and add it to the list of
components in a game, the
GameComponent is wired into the game loop. When the
game’s
Update method is called, so is the Update method of the GameComponent, and so
on.
There are two properties that can be used to enable and disable a
GameComponent. The
Enabled property of a GameComponent will determine whether its Update method is
called when the game’s own
Update method is called. Likewise, the Visible property
of a
DrawableGameComponent will determine whether its Draw method is called when
the game’s
Draw method is called. Both of these properties are set to true by default.
Go to the
Initialize method in your Game1 class and set both properties to false
immediately after adding the component to your list of game components (added
lines in bold):
spriteManager = new SpriteManager(this);
Components.Add(spriteManager);
spriteManager.Enabled = false;
spriteManager.Visible = false;
Why start the SpriteManager in a disabled state? Remember that the
game starts in the
GameState.Start state, which will be used for a
splash screen of some sort. You’re not going to want sprites flying in
and out of the screen at this point in the game. Hence, you’ll start the
game with a disabled
SpriteManager, and then, when the splash screen
closes, you’ll move to a game playing state and activate the
SpriteManager.
Next, add some code to show some text when the game is in the GameState.Start
state. This will serve as your splash screen, and you can add graphics, text, and even
animations or other effects to it, just as you would during the game itself. For now,
you’ll just be adding some simple text that will tell the user that he needs to avoid
the blade objects. In your
Draw method, add to the GameState.Start case of your
switch statement some code to display these simple instructions to the user:
case GameState.Start:
GraphicsDevice.Clear(Color.AliceBlue);
// Draw text for intro splash screen
spriteBatch.Begin( );
string text = "Avoid the blades or die!";
spriteBatch.DrawString(scoreFont, text,
new Vector2((Window.ClientBounds.Width / 2)
- (scoreFont.MeasureString(text).X / 2),
(Window.ClientBounds.Height / 2)
- (scoreFont.MeasureString(text).Y / 2)),
Color.SaddleBrown);
142
|
Chapter 7: Putting It All Together
text = "(Press any key to begin)";
spriteBatch.DrawString(scoreFont, text,
new Vector2((Window.ClientBounds.Width / 2)
- (scoreFont.MeasureString(text).X / 2),
(Window.ClientBounds.Height / 2)
- (scoreFont.MeasureString(text).Y / 2) + 30),
Color.SaddleBrown);
spriteBatch.End( );
break;
This code should be pretty straightforward; there’s nothing you haven’t seen before,
other than the use of the
SpriteFont’s MeasureString method. This method will
return a
Vector2 object indicating the size of the string being measured. This is help-
ful when trying to center a spritefont in the middle of the screen, which is exactly
what is being done in this code. To center the text exactly in the middle of the
screen, you divide the value of the
Window.ClientBounds.Width property by two to
find the horizontal middle of the screen, then offset the text by subtracting half the
width of the spritefont text you’re about to draw. You determine the width of the
text you’re about to draw by using the
SpriteFont.MeasureString method.
If you compile and run the code at this point, you’re going to be somewhat
disappointed. After all the work you’ve put into this game, it doesn’t work! All you
have now is a message telling you to avoid the blades or die; worse yet, the game
screen says to press any key to get started, but no matter how hard you press those
keys, nothing happens. That’s because you haven’t yet added any functionality to
move from the
GameState.Start state to the GameState.InGame state.
To move to the
GameState.InGame state, add some code to the GameState.Start case
of the
switch statement in the Update method of the Game1 class. The following code
will detect any key presses from the user and, when the player presses a key, change
the game to the
GameState.InGame state and activate your SpriteManager, which will
allow sprites to start flying around the screen:
case GameState.Start:
if (Keyboard.GetState().GetPressedKeys( ).Length > 0)
{
currentGameState = GameState.InGame;
spriteManager.Enabled = true;
spriteManager.Visible = true;
}
break;
If you wanted to, you could also add support here for the player clicking a mouse
button or pressing a button on the gamepad to start the game. In this case, you’d
probably want to instruct the player to press any key, click a mouse button, or press
a button on the gamepad to continue. It’s always a good idea to let players know
what controls they can use so they don’t have to guess—making players guess will
always lead to unsatisfied gamers.
Game-Over Logic and the Game-Over Screen
|
143
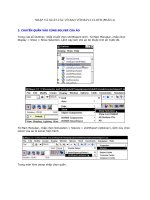
Compile and run the application now, and you’ll see a very simple splash screen
(shown in Figure 7-9) that disappears when you press any key, at which point the
game begins. Great job!
Now that you have a fancy, schmancy splash screen, it’s time to add the same type of
screen at the end of the game. Before you do that, however, you’ll need to add logic
that will actually make the game end.
Game-Over Logic and the Game-Over Screen
So, now you have to determine how your game will end. You already have an
objective for the game: avoid the three- and four-blade sprites. But when is the game
actually over? It seems a bit rough to end the game as soon as the user hits a single
blade sprite. Instead, it might make the game a bit more enjoyable if the player has a
certain number of lives to play with.
To accomplish this, first you’ll need to create a class-level variable in your
Game1 class
to keep track of the number of lives remaining, as well as a public property with
get
and set accessors to allow the SpriteManager to access and modify the value:
Figure 7-9. A very simple splash screen with a very scary message
144
|
Chapter 7: Putting It All Together
int numberLivesRemaining = 3;
public int NumberLivesRemaining
{
get { return numberLivesRemaining; }
set
{
numberLivesRemaining = value;
if (numberLivesRemaining == 0)
{
currentGameState = GameState.GameOver;
spriteManager.Enabled = false;
spriteManager.Visible = false;
}
}
}
Notice that when the property is set, its value is assigned to the numberLivesRemaining
variable, and then that variable is checked to see if its value is zero. If the value is zero,
the game state is changed to
GameState.GameOver and the SpriteManager is disabled and
hidden. This allows you to decrement this value from the
SpriteManager class and then,
when the player is out of lives, have the game automatically shut down and enter a
state in which you can display a game-over screen.
Now, not only do you want to keep track of the number of lives that a player has,
but the player needs to be able to see how many lives he has left at any given time.
Why show the number of lives remaining on the screen?
Again, this comes down to trying to make playing the game a more
enjoyable experience for the player. If the player has to constantly
keep track of the number of lives she has left on her own, it will
detract from the gameplay experience. Anything you can do to help
the player out by displaying important data (such as the score and the
number of lives remaining) will go a long way toward letting the player
focus on the most important thing: having fun playing your game.
To display the number of lives remaining, you’ll draw one animated three rings sprite
in the top-left corner of the screen (below the score) for each life that the player has
remaining.
To avoid confusion, you won’t want the sprites to be the same size as the actual
sprite being controlled by the player, so you’ll have to add some code that will allow
you to scale the sprites. Because these sprites won’t move on their own and the player
won’t interact with them, you can use the
AutomatedSprite class and specify a speed of
(0, 0) to draw these objects.
In the
Sprite class, add a class-level variable to represent the scale at which the sprite
is supposed to be drawn:
protected float scale = 1;
Game-Over Logic and the Game-Over Screen
|
145
Specifying a scale value of 1 will cause the object to be drawn at the original size of
the sprite, so you should initialize it to that value. Next, you’ll need to change the
Draw method in your Sprite class to use your newly added Scale variable for the scale
parameter. Your
Draw method should look like this:
public virtual void Draw(GameTime gameTime, SpriteBatch spriteBatch)
{
spriteBatch.Draw(textureImage,
position,
new Rectangle(currentFrame.X * frameSize.X,
currentFrame.Y * frameSize.Y,
frameSize.X, frameSize.Y),
Color.White, 0, Vector2.Zero,
scale, SpriteEffects.None, 0);
}
Finally, you’ll need to add to the Sprite class a new constructor that will accept a
scale value as a parameter:
public Sprite(Texture2D textureImage, Vector2 position, Point frameSize,
int collisionOffset, Point currentFrame, Point sheetSize, Vector2 speed,
string collisionCueName, int scoreValue, float scale)
: this(textureImage, position, frameSize, collisionOffset, currentFrame,
sheetSize, speed, defaultMillisecondsPerFrame, collisionCueName,
scoreValue)
{
this.scale = scale;
}
and add to the AutomatedSprite class a new constructor that will accept a scale
parameter and pass that value on to the base class:
public AutomatedSprite(Texture2D textureImage, Vector2 position,
Point frameSize, int collisionOffset, Point currentFrame, Point sheetSize,
Vector2 speed, string collisionCueName, int scoreValue, float scale)
: base(textureImage, position, frameSize, collisionOffset, currentFrame,
sheetSize, speed, collisionCueName, scoreValue, scale)
{
}
Your AutomatedSprite class is now ready to be used to create the sprites that you’ll
use to display the number of lives remaining for the player. In the
SpriteManager
class, add a class-level variable to keep track of the sprites used for player lives:
List<AutomatedSprite> livesList = new List<AutomatedSprite>( );
In the SpriteManager’s LoadContent method, you’ll need to fill the livesList list with
a number of sprites equaling the number of lives a player begins with. In each frame,
you’ll draw the list of items in the
livesList variable in the top-left corner of the
screen. This will be a visual indicator to the player of how many lives she has remain-
ing. To fill the list, create a loop that runs as many times as the player has lives, add-
ing a new
AutomatedSprite object to the list each time through the loop:
146
|
Chapter 7: Putting It All Together
for (int i = 0; i < ((Game1)Game).NumberLivesRemaining; ++i)
{
int offset = 10 + i * 40;
livesList.Add(new AutomatedSprite(
Game.Content.Load<Texture2D>(@"images\threerings"),
new Vector2(offset, 35), new Point(75, 75), 10,
new Point(0, 0), new Point(6, 8), Vector2.Zero,
null, 0, .5f));
}
The only complex thing going on in this code is the second parameter, which repre-
sents the position of the sprite. The parameter is of the type
Vector2. Your goal in
this list is to create a set of sprites that do not move and that are staggered in a row
across the top-left corner of the screen. The X portion of the parameter is first offset
by 10 (so that the leftmost image is offset slightly from the edge of the screen) and
then multiplied by 40 (so each image is drawn 40 units to the right of the previous
image). The Y portion of the parameter is set to 35 to offset it just below the score
text.
Now all that’s left to do is update your
livesList objects each time Update is called in
the
SpriteManager class and draw your objects each time Draw is called.
To do this, add the following code at the end of the
UpdateSprites method in your
SpriteManager class:
foreach (Sprite sprite in livesList)
sprite.Update(gameTime, Game.Window.ClientBounds);
and add the following code to the Draw method, just above the call to spriteBatch.End:
foreach (Sprite sprite in livesList)
sprite.Draw(gameTime, spriteBatch);
Compile and run the game at this point, and you’ll see three sprites in the top-left
corner of the screen, indicating the number of lives the player has left (see
Figure 7-10).
Good job! Now you just need to add some logic to remove a life when the player col-
lides with a blade sprite and to display a game-over screen when the game ends.
Removing one of the life sprites is pretty straightforward. You have code that detects
collisions between the player and the moving sprites on the screen. When such a col-
lision occurs, you need to check the type of the sprite that collided with the player: if
the type is
AutomatedSprite, you’ll remove a life sprite from the end of the list of life
sprites. Make sure you remove the sprite from the end of the list because you
inserted them in order from left to right.
In addition to removing a sprite from the list of sprites representing lives remaining,
you’ll need to decrement the value of the
numberLivesRemaining variable from the
Game1 class by using its accessor.
Game-Over Logic and the Game-Over Screen
|
147
The code for the collision checks is located in your SpriteManager’s UpdateSprites
method. In that method, you have logic to remove sprites in two cases: when a sprite
collides with the player, and when a sprite leaves the game screen. Both cases use the
spriteList.RemoveAt method to remove the sprite from the game. Search for the two
instances of
spriteList.RemoveAt within the UpdateSprites method of the
SpriteManager class and find the one used for collisions (you’ll see code used to play
collision sounds nearby). Add the following code to the method, just before the code
to remove the sprite when a collision occurs:
if (s is AutomatedSprite)
{
if (livesList.Count > 0)
{
livesList.RemoveAt(livesList.Count - 1);
((Game1)Game).NumberLivesRemaining;
}
}
For clarity, the entire UpdateSprites method is posted here, with the added code
marked in bold so you can see exactly where to put that code:
Figure 7-10. Three lives left!
148
|
Chapter 7: Putting It All Together
protected void UpdateSprites(GameTime gameTime)
{
// Update player
player.Update(gameTime, Game.Window.ClientBounds);
// Update all non-player sprites
for (int i = 0; i < spriteList.Count; ++i)
{
Sprite s = spriteList[i];
s.Update(gameTime, Game.Window.ClientBounds);
// Check for collisions
if (s.collisionRect.Intersects(player.collisionRect))
{
// Play collision sound
if (s.collisionCueName != null)
((Game1)Game).PlayCue(s.collisionCueName);
// If collided with AutomatedSprite
// remove a life from the player
if (s is AutomatedSprite)
{
if (livesList.Count > 0)
{
livesList.RemoveAt(livesList.Count - 1);
((Game1)Game).NumberLivesRemaining;
}
}
// Remove collided sprite from the game
spriteList.RemoveAt(i);
i;
}
// Remove object if it is out of bounds
if (s.IsOutOfBounds(Game.Window.ClientBounds))
{
((Game1)Game).AddScore(spriteList[i].scoreValue);
spriteList.RemoveAt(i);
i;
}
}
// Update lives-list sprites
foreach (Sprite sprite in livesList)
sprite.Update(gameTime, Game.Window.ClientBounds);
}
If you run the game now, you’ll notice that a life is removed every time you run into
a three- or four-blade sprite. When all your lives are used up, the game will appear to
Game-Over Logic and the Game-Over Screen
|
149
freeze. It actually isn’t frozen, though; it’s simply entered a game state in which you
aren’t doing anything (
GameState.GameOver). The last step in this section is to create a
game-over screen, similar to the splash screen you created earlier.
First, in the
Update method of the Game1 class, add some code that will allow the
player to close the game window when the game is in the game-over state. Here,
you’ll close the game when the player presses the Enter key. Add the following code
to detect when the Enter key is pressed and to call the
Exit( ) method, which will
shut down the game entirely (if you added support for starting the game by pressing
a mouse or gamepad button, you should probably add similar input support here to
close the game as well):
case GameState.GameOver:
if (Keyboard.GetState( ).IsKeyDown(Keys.Enter))
Exit( );
break;
To clarify, your Game1 class’s Update method should now look something like this
(changes are in bold):
protected override void Update(GameTime gameTime)
{
// Only perform certain actions based on
// the current game state
switch (currentGameState)
{
case GameState.Start:
if (Keyboard.GetState().GetPressedKeys().Length > 0)
{
currentGameState = GameState.InGame;
spriteManager.Enabled = true;
spriteManager.Visible = true;
}
break;
case GameState.InGame:
break;
case GameState.GameOver:
if (Keyboard.GetState().IsKeyDown(Keys.Enter))
Exit();
break;
}
// Allows the game to exit
if (GamePad.GetState(PlayerIndex.One).Buttons.Back ==
ButtonState.Pressed)
this.Exit();
//Update audio
audioEngine.Update();
base.Update(gameTime);
}
150
|
Chapter 7: Putting It All Together
Now, add some code that will draw a game-over message when the game is in the
game-over state. Of course, because you’re going to be drawing, you’ll do this in the
Draw method of the Game1 class. In the game-over case of the switch statement, add
the following code:
case GameState.GameOver:
GraphicsDevice.Clear(Color.AliceBlue);
spriteBatch.Begin( );
string gameover = "Game Over! The blades win again!";
spriteBatch.DrawString(scoreFont, gameover,
new Vector2((Window.ClientBounds.Width / 2)
- (scoreFont.MeasureString(gameover).X / 2),
(Window.ClientBounds.Height / 2)
- (scoreFont.MeasureString(gameover).Y / 2)),
Color.SaddleBrown);
gameover = "Your score: " + currentScore;
spriteBatch.DrawString(scoreFont, gameover,
new Vector2((Window.ClientBounds.Width / 2)
- (scoreFont.MeasureString(gameover).X / 2),
(Window.ClientBounds.Height / 2)
- (scoreFont.MeasureString(gameover).Y / 2) + 30),
Color.SaddleBrown);
gameover = "(Press ENTER to exit)";
spriteBatch.DrawString(scoreFont, gameover,
new Vector2((Window.ClientBounds.Width / 2)
- (scoreFont.MeasureString(gameover).X / 2),
(Window.ClientBounds.Height / 2)
- (scoreFont.MeasureString(gameover).Y / 2) + 60),
Color.SaddleBrown);
spriteBatch.End( );
break;
This code will draw three lines of text on the screen: a message indicating that the
game is over, a message indicating that to exit the player should press the Enter key,
and a message showing the player’s final score. The game-over screen will look
something like Figure 7-11.
Fine-Tuning Gameplay
With any game that you develop, you will want to tweak things during game testing
to ensure that the game plays the way that you intend and is challenging but fun at
the same time. The biggest factor is to make sure that the game is entertaining to
play. If you’re just making the game for yourself, that will obviously be your call. If,
however, you’re developing it for a wider audience, it’s important to get feedback
from that user base sooner rather than later.
Fine-Tuning Gameplay
|
151
In this case, one thing you might want to tweak is related to the mouse movement
that you’ve built into the game. You may have noticed that playing with the mouse is
much easier than playing with the keyboard keys. To make the game more challeng-
ing and to force the user to use an input form that maintains a constant speed for the
player sprite, try removing mouse support (I’d recommend leaving support for the
gamepad and keyboard input in place).
To remove support for the mouse, comment out or delete the mouse-movement code
located in the
Update method of the UserControlledSprite class:
// COMMENTED-OUT MOUSE SUPPORT
// If the mouse moved, set the position of the sprite to the mouse position
// MouseState currMouseState = Mouse.GetState( );
// if (currMouseState.X != prevMouseState.X ||
// currMouseState.Y != prevMouseState.Y)
// {
// position = new Vector2(currMouseState.X, currMouseState.Y);
// }
// prevMouseState = currMouseState;
You should also comment out the class-level prevMouseState variable in the
UserControlledSprite class:
Figure 7-11. 100 points—not too shabby!
152
|
Chapter 7: Putting It All Together
// COMMENTED-OUT MOUSE SUPPORT
// MouseState prevMouseState;
Prior to removing the mouse support for the game, the initial player sprite position
was set to the position of the mouse cursor. That won’t work anymore, so you’ll
want to start the player in the middle of the screen. You create the
player object in
the
LoadContent method of the SpriteManager class, and in the constructor for the
player object you pass in Vector2.Zero as the parameter for the position of the object
(the second parameter in the list). Change that code so you pass in the middle of the
screen as the initial position of the
player object. Your initialization code for the
player object in the LoadContent method of the SpriteManager class should now look
like this:
player = new UserControlledSprite(
Game.Content.Load<Texture2D>(@"Images/threerings"),
new Vector2(Game.Window.ClientBounds.Width / 2,
Game.Window.ClientBounds.Height / 2),
new Point(75, 75), 10, new Point(0, 0),
new Point(6, 8), new Vector2(6, 6));
Another aspect of the gameplay experience that you’ll probably want to tweak is to
make the game increasingly more difficult to play. As the game is at this point, play-
ers can play virtually forever because the game just isn’t very challenging.
How do you make the game more difficult? Well, there are a lot of ways. You could
make the blade sprites in the game move progressively faster, you could spawn dif-
ferent types of sprites that are more and more difficult to avoid. Or, you could use a
combination of those approaches, or do something totally different. The key here is
to be creative. This is video game development, and fresh and new ideas are what
make great games. Feel free to play with the game and think about what you could
do to make the experience more entertaining.
For the purposes of this book, we’re going to make the sprites spawn more and more
often in order to make the game progressively harder. You already have two vari-
ables that determine a minimum and maximum spawn time for each new sprite
(
enemySpawnMinMilliseconds and enemySpawnMaxMilliseconds in the Game1 class).
These variables are set to 1,000 and 2,000 milliseconds, respectively (in other words,
a new sprite is spawned every 1 to 2 seconds).
You don’t want to decrease the spawn times every frame, because with the game run-
ning at 60 frames per second, the rate of change would be too quick to make things
interesting. Instead, create a couple of new class-level variables in the
SpriteManager
class that you can use to decrease the spawn time every so often (in this case, every
second):
int nextSpawnTimeChange = 5000;
int timeSinceLastSpawnTimeChange = 0;
These variables may look familiar, because this is the same concept you used when
experimenting with animation speeds. Basically, you’ll add some code in the
Fine-Tuning Gameplay
|
153
Update method of the Game1 class that will add the elapsed time to the
timeSinceLastSpawnTimeChange variable. When that variable’s value is greater than
the value of the
nextSpawnTimeChange variable (which will occur after every 5 sec-
onds of gameplay because
nextSpawnTimeChange is set to 5,000 milliseconds), you’ll
decrease the values of both of the spawn-timer variables (
enemySpawnMinMilliseconds
and enemySpawnMaxMilliseconds).
However, you don’t want to decrease these values indefinitely. If the spawn time val-
ues reached zero, a new sprite would be generated every frame—that’s 60 sprites
generated every second. There’s no way anybody could ever keep up with that. To
avoid this scenario, you’ll cap off the spawn time at 500 milliseconds.
Create a new method in the
SpriteManager class that will adjust the spawning fre-
quency variables, making enemy sprites spawn more and more frequently as the
game progresses:
protected void AdjustSpawnTimes(GameTime gameTime)
{
// If the spawn max time is > 500 milliseconds
// decrease the spawn time if it is time to do
// so based on the spawn-timer variables
if (enemySpawnMaxMilliseconds > 500)
{
timeSinceLastSpawnTimeChange += gameTime.ElapsedGameTime.Milliseconds;
if (timeSinceLastSpawnTimeChange > nextSpawnTimeChange)
{
timeSinceLastSpawnTimeChange -= nextSpawnTimeChange;
if (enemySpawnMaxMilliseconds > 1000)
{
enemySpawnMaxMilliseconds -= 100;
enemySpawnMinMilliseconds -= 100;
}
else
{
enemySpawnMaxMilliseconds -= 10;
enemySpawnMinMilliseconds -= 10;
}
}
}
}
In this code, the interior if/else statement causes the spawning increments to be
decreased rapidly (subtracting 100 each time the spawn times are decremented) until
the max spawn time is less than 1 second (1,000 milliseconds). After that, the spawn
time continues to decrease until it reaches a max spawn time of 500 milliseconds,
but it decreases at a much slower rate (subtracting only 10 each time the spawn times
are decremented). Again, this is just another part of tweaking the gameplay experi-
ence to make the game play the way you want. This particular method of changing
the spawn time will cause the game to get tougher and more interesting fairly
quickly, and then slowly get harder and harder until the game is tough enough to
pose a challenge to most players.
154
|
Chapter 7: Putting It All Together
You’ll need to add a call to the new AdjustSpawnTimes method from within the Update
method of your SpriteManager class. Add the following line to the Update method
immediately before the call to
base.Update:
AdjustSpawnTimes(gameTime);
Compile and run the game at this point, and you’ll find that the longer you stay
alive, the harder and harder the game will become. At some point, you will no longer
be able to keep up, and the game will end. See Figure 7-12 for a view of how convo-
luted the game can get once it really starts rolling.
Creating Power-Ups
We’ll add one last thing to the game in this chapter, and then it will be up to you to
fine-tune and tweak it further. You have three sprites that don’t do anything at this
point: the skull ball, the plus, and the bolt. These sprites are meant not to take away
a player’s life when they collide with the player’s object, but rather to have some pos-
itive or negative effect on the player.
Figure 7-12. Ahhh!!! It’s getting crowded in here!