.NET Framework Solution In Search of the Lost Win32 API phần 7 pdf
Bạn đang xem bản rút gọn của tài liệu. Xem và tải ngay bản đầy đủ của tài liệu tại đây (336.73 KB, 43 trang )
// Locate the data area of the file.
Child.ckid = mmioFOURCC(‘d’, ‘a’, ‘t’, ‘a’);
Result = mmioDescend(MMIOHandle,
ref Child,
ref Parent,
MMIODescendFlags.MMIO_FINDCHUNK);
// Check the results.
if (Result != MMSYSERR_NOERROR)
{
// Display an error message.
MessageBox.Show("Unable to find waveform data.",
"File Error",
MessageBoxButtons.OK,
MessageBoxIcon.Error);
// Close the open MMIO file handle.
mmioClose(MMIOHandle, 0);
return;
}
// Read the data from the file.
BytesToRead = Child.cksize;
WaveData = Marshal.AllocHGlobal(BytesToRead);
if (mmioRead(MMIOHandle, WaveData, BytesToRead) != BytesToRead)
{
// Display an error message.
MessageBox.Show("File is truncated.",
"File Error",
MessageBoxButtons.OK,
MessageBoxIcon.Error);
// Free the pointer memory.
Marshal.FreeHGlobal(WaveData);
// Close the open MMIO file handle.
mmioClose(MMIOHandle, 0);
return;
}
// Close the open MMIO file handle.
mmioClose(MMIOHandle, 0);
// Enable the Play button.
btnPlay.Enabled = true;
}
else
{
// If the user didn’t select anything, return.
return;
}
}
This example requires quite a bit of code just to open the file, but that’s really the hardest part of the task. The
code begins by creating several modulewide variables. Most of these variables provide general pointers to the
Opening a File
247
data used by the rest of the application, so they’re legitimately modulewide. I’ve attempted to keep the
number of these variables small.
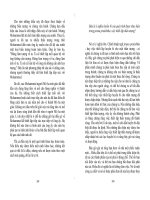
The btnOpen_Click() method begins by creating an Open WAV File Dialog that enables the user to select a
file from the drive, as shown in Figure 11.8. This is one of the few standard pieces of code in the example, but
a necessary piece in this case. If the user selects a file, then the rest of the code will open it. Otherwise, the
btnOpen_Click() method exits without doing anything.
Figure 11.8: The application provides a custom dialog box for selecting the WAV file.
Once the code has a filename to use, it uses the mmioOpen() function to open the file. The multimedia
input/output (mmio) functions enable you to open, read, write, and close files for use with multimedia
functions. We’ll see later in this listing that the mmio functions perform specific multimedia tasks. You
should never use the handle returned by an mmio function for any purpose other than multimedia calls.
The next piece of code will look rather odd unless you know a little about WAV files. The multimedia chunk
information data structure, MMCKINFO, contains information about the content of a multimedia file—a
WAV file in this case. However, to gain access to this information, we need to overcome several hurdles. The
first hurdle is the mmioFOURCC() function. In all actuality, the mmioFOURCC() function is a Visual C++
macro. Unless you want to write a special wrapper DLL just for this macro, you’ll need to translate it. The
following code shows one example of how you can translate a bit−manipulation macro into something that C#
can work with:
// This function mimics the Visual C++ macro of the same name.
public UInt32 mmioFOURCC(Char ch0, Char ch1, Char ch2, Char ch3)
{
UInt32 Temp; // The temporary variable.
// Convert each of the input characters and
// bit shift as needed.
Temp = Convert.ToUInt32(ch0);
Temp = Temp + (Convert.ToUInt32(ch1) * 0x100);
Temp = Temp + (Convert.ToUInt32(ch2) * 0x10000);
Temp = Temp + (Convert.ToUInt32(ch3) * 0x1000000);
return Temp;
}
As you can see, the code accepts four Char values as input and outputs them as a packed UInt32 value. The
Opening a File
248
original macro bit shifts the four values using Visual C++ macro code, which won’t work in C#. Of course,
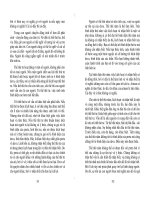
this begs the question of what a FOURCC value is. A FOURCC value stands for four−character code.
Microsoft and other vendors used FOURCC values during the initial work in creating specifications for
common files such as the WAV file. Figure 11.9 shows an example of the FOURCC values in a WAV file
that I opened in the DEBUG.EXE application.
Figure 11.9: WAV files differentiate file areas using a FOURCC entry.
Notice the key words RIFF, WAVE, fmt (with a space at the end), and data in the file. Each of these key
words defines a data area with a particular type of data. The resource interchange file format (RIFF) heading
tells any application opening the file that this is a standardized resource file. The WAVE entry tells what type
of RIFF data the file contains—wave (digitized) audio. The fmt entry marks the beginning of the format data,
while the data entry marks the beginning of the digitized sound. Understanding these key elements will make
the code a lot easier to understand.
The code uses the MMCKINFO structure to tell the mmioDescend() function which part of the file to open.
However, if you don’t open the file in an organized manner, you’ll quickly become lost. The mmioDescend()
function can accept just a single MMCKINFO structure for a root node or two MMCKINFO structures for a
child node. The root node for a WAVE file is the WAVE entry shown in Figure 11.8.
After the code finds the root entry, it needs to locate the fmt entry. The fmt entry contains information about
the structure of the file. To open a wave device, you need to know that it can play the format the file is in. The
second call to the mmioDescend() function fills out both the Child and Parent structures.
You’ll remember that earlier I discussed wave functions, and we haven’t seen any yet. The problem is that the
wave functions require information about the WAV file and its format. The WAVEFORMATEX structure is
the key to gaining that information. However, we can’t access the information directly because the
mmioRead() function used to read the data only works with unmanaged memory. As you can see in the
listing, the code has to create the WAVEFORMATEX structure variable, WF, and then create a pointer to that
structure named WFPointer by allocating memory using the Marshal.AllocHGlobal() method and creating an
association using the Marshal.StructureToPtr() method. The code uses the mmioRead() function to access the
required data. Of course, now we have to place the data pointed at by WFPointer into the WF structure using
the Marshal.PtrToStructure() method. Finally, the code frees the memory used by WFPointer.
Note Visual Basic developers will need to use the GetType(WAVEFORMATEX)
function in place of the typeof(WAVEFORMATEX) function shown in the listing
for the Marshal.PtrToStructure() method. The two techniques normally produce
functionally equivalent output. However, there is a chance of compatibility
problems, so Visual Basic developers will need to exercise care when using the
Marshal.PtrToStructure() method.
Opening a File
249
At this point, the code can finally open a wave device using the waveOutOpen() function. The code uses the
WAVE_MAPPER constant instead of a standard device identifier so that Windows can choose the best
multimedia device to play the sound based on the sound characteristics. Notice that the function doesn’t
initialize the WaveHandle argument—it’s declared as an out rather than a ref. Unlike most of the handles
we’ve used so far in the book, the WaveHandle is actually a data structure containing a single variable, as
shown here:
// This structure takes the place of the DECLARE_HANDLE(HWAVEOUT)
// macro for Visual C++.
public struct HWAVEOUT
{
public Int32 Unused;
}
Note Visual Basic developers will need to use <Out()> attribute rather than the out keyword used for C# with the
waveOutOpen() function. In this case, the two techniques have the same effect. However, the two techniques
aren’t exactly the same, so Visual Basic developers will need to exercise care in the use of the <Out()> attribute.
See the
ms−help://MS.VSCC/MS.MSDNVS/cpref/html/frlrfSystemRuntimeInteropServicesOutAttributeClassTopic.htm
help topic for additional details. See the ms−help://MS.VSCC/MS.MSDNVS/csref/html/vclrfOut.htm help topic
for a comparison of the two keywords. The <Out()> attribute is only used with COM and P/Invoke scenarios, so
Visual Basic developers can’t use it with managed code as C# developers would use the out keyword.
Visual C++ uses the same data structure. However, it uses a macro to convert a generic data structure into the
specific handle used for the call. We don’t have that option in C#, so you’ll need to create one data structure
for each multimedia use. The Unused field will contain the handle on return from a successful call—a fact that
you can verify by looking in the debugger. Never modify or use this value in any way—treat it as you would
any other handle.
Tip If you specify any type of callback function option as part of the waveOutOpen() function call, you’ll
need to implement the callback function in your code. The management environment doesn’t provide
anything in the way of multimedia handling for you. The reason that this fact is important is that many of
the Visual C++ examples show the code passing a handle to the current window for the callback function.
Using this technique will always cause a .NET application to fail (the application might actually drop
back to the Desktop without displaying any error information). Chapter 5 discusses the techniques for
creating callback functions.
The code has now determined the format of the data within the WAV file and obtained a handle to a wave
device. However, we still don’t have any data to play. Remember that we’re using a tree−like data structure,
so the code has to move back from the fmt node to the root node. The mmioAscend() function performs this
task by using the Child node as a reference point. The code then makes another call to the mmioDescend()
function to obtain access to the data node of the WAV file.
Note The example application will only read small WAV files because it creates a single small buffer.
Generally, if you want to read WAV files larger than 64KB, you need to create multiple buffers and link
them together using the lpNext field of the WAVEHDR described in the next section, "Playing a File."
Theoretically, .NET applications can handle larger files using a single buffer, but the wave functions
tend to act strangely if you pass them a buffer larger than 64KB. Consequently, it’s good to err on the
side of caution in this situation.
At this point, the code creates an unmanaged buffer to hold the WAV data using the Marshal.AllocHGlobal()
method. The mmioRead() function places the WAV file data within WaveData. The final steps are to close
MMIOHandle and enable the Play button. We’ll deallocate the memory held within WaveData later in the
Opening a File
250
application.
Playing a File
Once you have the file open, the rest of the process is easy. The previous section showed how the application
opened a WAV file, determined its format, opened a wave device, and finally read the data from the WAV file
into memory. At this point, everything is ready to actually play the data contained in the WAV file. Listing
11.4 shows one method for playing the wave data. This source code appears in the same files as Listing 11.3.
Listing 11.4: Technique for Playing Wave Data
// This function prepares a WAVE header prior to
// playing the data.
[DllImport("WinMM.DLL", CharSet=CharSet.Auto, SetLastError=true)]
public static extern Int32 waveOutPrepareHeader(HWAVEOUT hwo,
ref WAVEHDR pwh,
Int32 cbwh);
// This structure contains the WAVE header data.
public struct WAVEHDR
{
public IntPtr lpData;
public Int32 dwBufferLength;
public Int32 dwBytesRecorded;
public Int32 dwUser;
public Int32 dwFlags;
public Int32 dwLoops;
public IntPtr lpNext;
public Int32 reserved;
}
// This function writes (plays) the WAVE data.
[DllImport("WinMM.DLL", CharSet=CharSet.Auto, SetLastError=true)]
public static extern Int32 waveOutWrite(HWAVEOUT hwo,
ref WAVEHDR pwh,
Int32 cbwh);
private void btnPlay_Click(object sender, System.EventArgs e)
{
WAVEHDR Header; // The WAVE data header.
Int32 Result; // Results of the call.
// Prepare the header.
Header = new WAVEHDR();
Header.lpData = WaveData;
Header.dwBufferLength = BytesToRead;
Result = waveOutPrepareHeader(WaveHandle,
ref Header,
Marshal.SizeOf(Header));
// Check the results.
if (Result != MMSYSERR_NOERROR)
{
// Display an error message.
MessageBox.Show("Unable to create the WAVE data header.",
"Application Error",
MessageBoxButtons.OK,
MessageBoxIcon.Error);
Playing a File
251
return;
}
// Play the data.
Result = waveOutWrite(WaveHandle,
ref Header,
Marshal.SizeOf(Header));
// Check the results.
if (Result != MMSYSERR_NOERROR)
{
// Display an error message.
MessageBox.Show("Unable to play the WAVE file.",
"Application Error",
MessageBoxButtons.OK,
MessageBoxIcon.Error);
return;
}
// Enable the Pause and Stop buttons.
btnPause.Enabled = true;
btnStop.Enabled = true;
}
The waveOutPrepareHeader() function creates a header, the WAVEHDR data structure, for the wave device.
Don’t confuse this header with the formatting information data structure we created earlier. The WAVEHDR
data structure contains the format of the data the wave device will play and the actual data in the lpData field.
In addition, this data structure is buffer oriented. Notice the lpNext field. This field contains a pointer to the
next WAVEHDR data structure in a group. As mentioned earlier, you should limit each header to 64KB of
data and preferably less to ensure that the waveOutWrite() function handles it correctly.
Tip Like the PlaySound() function we discussed in Chapter 1, the waveOutWrite() function also supports the
concept of looping. However, you must specify the number of loops as part of the dwLoops field in the
WAVEHDR data structure—there isn’t any way to specify this value as part of the function call. Make
sure you include the WHDR_BEGINLOOP and WHDR_ENDLOOP flags when using looping within
your application. These flags tell Windows which block begins the loop and which block ends the loop.
The btnPlay_Click() function begins by creating the WAVEHDR data structure using the
waveOutPrepareHeader() function. The only two values that the code must include are the number of bytes of
data contained within the data buffer and a pointer to the data buffer itself. All of the other values provide
amplifying information or are used for other purposes. For example, the dwBytesRecorded field is only used
when writing the data to a file after recording it. This call can fail for a number of reasons. However, by the
time you reach this point in the application, the two most common points of failure are corrupted data or a
cbwh value that doesn’t match the actual number of data bytes in the buffer. In some cases, the system could
run out of memory, but this shouldn’t happen when using a modern computer system. The application should
check the validity of the device handle as part of the process of opening the file.
Using the waveOutWrite() function is simple. All you need to provide is the handle of the wave device, a
reference to the header, and the number of bytes in the data buffer. Generally, this call can fail for the same
reasons that the waveOutPrepareHeader() function will.
Playing a File
252
Pausing and Stopping a File
One of the main reasons to go through all of this work is to gain better control over the playback process. If
you use the PlaySound() function, there isn’t any way to pause the file and you can’t control elements such as
the volume. Listing 11.5 finally shows the benefit of using the techniques presented in this chapter. You’ll
find that most of the wave functions from this point on are as easy to use as the ones shown in the listing. In
sum, creating all of the data required to use these functions is difficult, but performing tasks is relatively easy
and you’ve gained a lot of flexibility.
Listing 11.5: Pausing and Stopping a File
// This function pauses the playback.
[DllImport("WinMM.DLL", CharSet=CharSet.Auto, SetLastError=true)]
public static extern Int32 waveOutPause(HWAVEOUT hwo);
// This function resumes the playback.
[DllImport("WinMM.DLL", CharSet=CharSet.Auto, SetLastError=true)]
public static extern Int32 waveOutRestart(HWAVEOUT hwo);
private void btnPause_Click(object sender, System.EventArgs e)
{
if (btnPause.Text == "Pause")
{
// Pause the current sound.
waveOutPause(WaveHandle);
// Set the button text.
btnPause.Text = "Resume";
}
else
{
// Resume the current sound.
waveOutRestart(WaveHandle);
// Set the button text.
btnPause.Text = "Pause";
}
}
// This function stops the playback and resets the data pointer
// to zero (the start of the WAVE file).
[DllImport("WinMM.DLL", CharSet=CharSet.Auto, SetLastError=true)]
public static extern Int32 waveOutReset(HWAVEOUT hwo);
private void btnStop_Click(object sender, System.EventArgs e)
{
// Stop the playback.
waveOutReset(WaveHandle);
// Disable the Pause and Stop buttons.
btnPause.Enabled = false;
btnStop.Enabled = false;
}
As you can see from the listing, a single call performs most tasks. It’s important to note that there’s a
difference between pausing and resuming the sound. You must use the waveOutPause() function to pause the
Pausing and Stopping a File
253
sound. However, calling this function a second time won’t do anything. To resume the sound, you must use
the waveOutRestart() function. The only value that either function needs is a handle to the wave device.
Stopping the playback means not only stopping the sound, but also moving the pointer back to the beginning
of the data. When you play the sound again, Windows will begin at the front of the data area. Always use the
waveOutReset() function to stop the playback. As with the other functions in this section, all you need to
supply is a valid handle to the wave device to use this function.
Required Application Cleanup
Almost all of the variables we used in Listings 11.4 and 11.5 came from managed sources. However, there are
two unmanaged variables in use in the application, and you must clean them up before the application exits.
Otherwise, the application will definitely leak memory that Windows won’t recover without a reboot. In
addition, in rare cases, the user could also loose access to the wave device. Generally, it’s a good idea to clean
up the remaining unmanaged variables in the frmMain_Closing() method as shown in Listing 11.6.
Listing 11.6: Cleaning Up the Remaining Variables
// This function closes a wave device.
[DllImport("WinMM.DLL", CharSet=CharSet.Auto, SetLastError=true)]
public static extern Int32 waveOutClose(HWAVEOUT hwo);
private void frmMain_Closing(object sender,
System.ComponentModel.CancelEventArgs e)
{
// Free the pointer memory.
Marshal.FreeHGlobal(WaveData);
// Close the open wave device.
waveOutClose(WaveHandle);
}
As you can see, you need the Marshal.FreeHGlobal() function to free the data memory. Make sure you free
the data memory before you close the wave device or the application might exit unexpectedly. The
waveOutClose() function closes the handle to the wave device.
Using IconForge
I’ve used IconForge from CursorArts Company for quite a few of the examples in the book. After using it for
a while and failing to exhaust the number of features it contains, I can say that it’s probably the best
special−purpose drawing program I’ve tried, especially for the low price ($37.95 plus shipping and handling
at the time of writing). While you can create certain types of icons and cursors using the Visual Studio .NET
IDE, you can’t create all of the types that IconForge provides, and the tools feel cumbersome after you’ve
tried this product. You can download an evaluation product at There’s also an
evaluation copy of the current product in the \IconForge folder of the CD.
Note I purposely used the evaluation version of the product for this section so that you could see what
the version on the CD includes. The full version of the product provides more extensive features
and also removes all of the evaluation reminder notices.
Required Application Cleanup
254
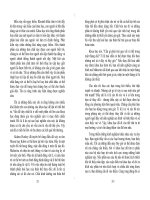
IconForge provides the features required to create both standard and animated icons, standard and animated
cursors, multiple resolution icons, and icon libraries. You can also use a screen capture as a basis for creating
a new cursor or icon. In short, IconForge provides everything you need to work with cursors and icons. Figure
11.10 shows the display for a typical 32×32−pixel icon. IconForge includes options for 16×16−, 24×24−,
32×32−, 48×48−, 64×64−, 72×72−pixel icons using 2, 16, 256, 24−bit (16.7 million), and 32−bit (16.7 million
Windows XP) colors; you can also use custom sizes for your icons.
Figure 11.10: IconForge helps you create both icons and cursors for your _applications.
As you can see from the screen shot, IconForge provides a vast array of tools compared to the tools you’ll find
in the Visual Studio .NET IDE. Along the bottom you’ll find all of the usual drawing tools, including one that
draws a transparent color. A special Splatter tool draws splatters on the screen. You can use the Nudge tool to
move an icon or cursor element a little at a time. Along the left side of the display are tools that magnify the
icon, display it in preview mode, or add another frame to the icon window.
Some of the most interesting tools provided with IconForge are those that you don’t see immediately. For
example, click the Effects button on the toolbar and you’ll see the wealth of effects shown in Figure 11.11.
Each of the effects changes the set of controls presented in the middle of the display. Change these controls
and you’ll see a change in the appearance of your icon or cursor. The change doesn’t take effect, however,
until you click Apply. Even after you click Apply, clicking Undo will remove the change and return your icon
to its previous state. IconForge will undo an almost unlimited number of changes, so it’s possible to return
your icon or cursor to its original state if you feel the changes don’t provide the impact you thought they
would.
Figure 11.11: Some of the special features that IconForge supports are special effects.
Required Application Cleanup
255
Many of the special effects supported by IconForge fall into the expected category. As with most drawing
programs, you can modify the hue and saturation of your image. Some of the special effects are truly odd and
also quite appealing. For example, the Whirlpool effect makes your icon or cursor appear as if the image
elements had been whirled. There are also special effects called Mirror, Marbleize, and Mosaic that perform
the functions their names imply. The Cloud effect is one of my favorites—it retains the original image but
adds a cloud effect to it. The cloud effect tends to add interest to the image without making it impossible to
figure out.
IconForge doesn’t forget to provide all of the essential tools for cursor and icon drawing. For example, there’s
a hotspot editor you can use to create a hotspot on cursors. One of the more interesting tools is IconWrapper,
shown in Figure 11.12. This tool enables you to add an icon to a file that normally doesn’t accept an icon,
such as a script. There’s an example of a wrapped file in the \Chapter 11\IconForge folder of the CD.
To use the IconWrapper utility with a script, you need to provide the location of the script file, the location of
the icon file, and the location of the WScript.EXE or CScript.EXE file (normally the \Windows\System32
folder). It’s essential to provide the location of the scripting engine because, otherwise, the resulting
executable will simply extract the script file and not execute it. You can also provide the name of an output
EXE file. Click Create and IconWrapper will generate an EXE file that contains the script and icon. The user
will see your icon in Explorer. Whenever the user double−clicks the file, it will execute using the script
engine as it normally does.
Figure 11.12: The IconWrapper utility enables you to add an icon to a file that doesn’t normally accept an
icon.
You can also use IconForge to extract bitmaps, icons, and cursors from other files. Simply use the File Ø
Acquire Icon from Resource command to display the Select an Executable dialog box. Choose the executable
containing the bitmap, icon, or cursor that you want to extract (I’m using Shell32.DLL as an example) and
then click OK. You’ll see the Extract Resource List from Executable File dialog box shown in Figure 11.13.
In this case, the file contains all three categories of resources.
Required Application Cleanup
256
Figure 11.13: Use IconForge to extract bitmaps, icons, or cursors from executable files.
Notice the bodiless man in this screen shot. He spends plenty of time providing you with helpful advice on
using the various application features. Sometimes the advice arrives a little late to use (as in this case), but it’s
always available. In general, you’ll find that the developers of this application have made every attempt to
create an easy−to−use environment. In some respects, the ease−of−use factor might be the best application
feature of all.
Where Do You Go from Here?
This chapter has presented you with information about the Media Player. The first section of the chapter
presented fun facts about the Media Player. Generally, it’s useful to “play” with some of the features that
Windows provides in order to gain a better understanding of what a user has to work with. The Media Player
has gone from awkward utility to full−featured application in the years since Microsoft originally created it.
The Media Player should present new opportunities for you to make your applications user friendly. Of
course, playing with the Media Player for your own needs isn’t a bad idea either. In fact, you’ll probably want
to spend some time learning more about the Media Player because we barely scratched the surface in this
chapter.
This chapter has also demonstrated some new programming techniques for media that you might not have
considered in the past. Windows development doesn’t always have to present an austere environment—it’s
nice to have fun sometimes. The examples in this chapter have shown you both the practical and the fun
aspects of the Media Player. Now it’s up to you to determine if these new techniques fit somewhere in your
organization. You might find that the help desk gets fewer calls when users like the applications they’re using.
Chapter 12 shows you how to fill one of the biggest holes in the .NET Framework, Microsoft Management
Console (MMC) support. MMC is a container application that has absolutely no function other than to host
snap−ins. These snap−ins perform most of the administrative work under Windows 2000 and Windows XP. It
might surprise you to know that many of the Visual Studio .NET beta testers asked for this particular feature
but Microsoft didn’t supply it for whatever reason. Chapter 12 will show you that creating an MMC snap−in
doesn’t mean resorting to an older version of Visual C++. You can create MMC snap−ins in the managed
environment even without the use of a wizard.
Where Do You Go from Here?
257
Chapter 12: Working with Microsoft Management
Console
Overview
The Microsoft Management Console (MMC) is a container application that has no functionality outside of the
snap−ins (COM controls) that it supports. Yet this particular application is the center of most of the
management tools that Microsoft provides with Windows 2000 and Windows XP. In addition, it’s one of the
tools that you’ll see used most often by third−party developers because the MMC environment is so flexible.
As you’ll see later, there’s little doubt that MMC is one of Microsoft’s better ideas because it can support a
wide range of COM control snap−ins—anything you can imagine, in fact.
It’s hardly surprising, then, that one of the most requested feature additions during the Visual Studio .NET
beta test was support for the MMC snap−in. In fact, requests for this feature appeared on all of the
newsgroups—language didn’t seem to matter. Unfortunately, while support for the MMC snap−in appeared in
early versions of the Visual C++ .NET beta, support was eventually dropped even for this language. None of
the other .NET languages have ever supported the MMC snap−in directly. This omission is particularly
difficult to understand considering that MMC is still a major part of Microsoft’s strategy for Windows 2000
and Windows XP administrative tools.
Note One of the reasons that Microsoft support personnel offered for the omission of MMC support is the
complexity of creating an MMC snap−in using the .NET Framework. Indeed, creating an MMC snap−in
would be difficult in any environment without proper library and wizard support, but it can be done.
Visual C++ 6 offered both library and wizard support for this task, making it relatively easy to write an
MMC snap−in.
Writing an MMC snap−in means working intimately with COM. In fact, everything that MMC does is based
on some type of COM interpretability. This chapter will show you how to create a basic MMC snap−in. This
MMC snap−in demonstrates all of the principles you’ll need to create an MMC snap−in of almost any
complexity.
We’ll also create an MMC wrapper DLL that you can use to create basic snap−ins and modify to meet your
specific needs. The examples and the DLL should make it easier for most .NET developers to create an MMC
snap−in as part of the application management strategy. In addition, these examples show how to work with
COM using .NET—something that developers will have to do for the foreseeable future since there are so
many components written for use with COM and most companies can’t afford to throw away such a large
investment.
Note None of the examples in this chapter work with Visual Basic and the CD lacks any Visual Basic source
code for the examples. The main reason for this omission is that Visual Basic presents problems when
you’re working with pointers and some COM concepts. While Visual Basic developers can use most
COM components, the purpose of this section is to provide an advanced COM example and the Visual
Basic environment lacks the proper support.
Using GUIDGen
258
As with all COM objects, MMC snap−ins rely on registry entries to provide information about component
configuration. The use of registry entries means that you need some way to uniquely identify your component,
which means using a globally unique identifier (GUID). Because Visual Studio .NET doesn’t provide this
information automatically as the older, native code versions of the product did, you need to obtain the GUID
manually. Fortunately, you can use a utility named GUIDGen to create the required GUIDs. You can access
this utility using the Tools Ø Create GUID command from within the Visual Studio .NET IDE or from within
the \Program Files\Microsoft Visual Studio.NET\Common7\Tools folder. Figure 12.1 shows how this tool
looks.
Figure 12.1: The GUIDGen utility enables you to create GUIDs for your _components.
Notice that the figure shows option 4, Registry Format, selected. Make sure you always use this format for
components created in C#. Click Copy to place the GUID on the Clipboard. You can then place it within the
application using the following code:
[Guid("B6BBA1A8−6D1C−47f9−A9CC−FAC427315CAF")]
public class MySnapInData : IComponentData, IExtendPropertySheet
{
};
Of course, the class will contain other information. The important piece here is the placement of the [Guid]
attribute. You need to provide GUIDs for both the component and the About dialog. The GUIDs also appear
in the registry entry and serve to identify the snap−in to MMC. Here are the registry entries for the example
MMC snap−in. Note that the entry wraps, in some cases, and that the actual entry would appear on a single
line, as shown in the source code:
REGEDIT4
[HKEY_LOCAL_MACHINE\Software\Microsoft\MMC\Snapins\{B6BBA1A8−6D1C−47f9−
A9CC−FAC427315CAF}]
"About" = "{BACD4F1D−8338−41ee−9D55−DDECE3D8BBCE}"
"NameString" = "An Example of an MMC Snap−In"
"Provider" = "DataCon Services"
"Version" = "1.0"
[HKEY_LOCAL_MACHINE\Software\Microsoft\MMC\Snapins\{B6BBA1A8−6D1C−47f9−
A9CC−FAC427315CAF}\StandAlone]
There are a few notes about this part of the example. I began by adding a new text file to the project and
simply renamed it with a .REG extension. The file must begin with REGEDIT4 as shown, and you need to
add the main GUID key. Notice the use of curly brackets around the GUID entry (they don’t appear in the
[Guid] attribute entry). Only provide the About value if your snap−in has an About dialog. The NameString,
Chapter 12: Working with Microsoft Management Console
259
Provider, and Version values are also optional. You must provide the StandAlone key, as shown, if you’re
following this example—snap−in extensions require different programming techniques from the ones shown
for this example.
The Case for an MMC Snap−In
We’ll work on a MMC snap−in example in this chapter because I consider it the most common example of a
specialty application. A lot of developers on Microsoft’s various newsgroups have asked how to create an
MMC snap−in, and I’m sure that many more are wondering how to perform this task. The lack of any MMC
projects in Visual Studio .NET and the changes to the MMC snap−in in Windows XP have led some
developers to believe the MMC snap−in is going to become history very soon. That may be, but for today, the
MMC snap−in still represents the best way of writing a configuration utility.
MMC is the application used by Windows 2000 and Windows XP to manage operating system functionality.
You’ll find it in the \System32 folder as MMC.EXE. MMC is a container application that hosts snap−ins—the
container doesn’t do much more than provide a place for the snap−in to perform its work. Of course, the
container does lend a consistency to the user interface and ensures that each snap−in behaves in a certain way.
Each configuration of snap−ins is called a console, and you’ll find a list of these consoles in the
Administrative Tools folder of the Control Panel. Figure 12.2 shows a typical example of a console—the
Performance console.
In this case, the System Monitor and the Performance Logs and Alerts are actually two separate MMC
snap−ins that appear together in this console. You can use the File Ø Add/Remove Snap−in command to
display the Add/Remove Snap−in dialog box, which contains a list of snap−ins used to create a particular
console, as shown in Figure 12.3. Note that the folders beneath the Performance Logs and Alerts entry in
Figure 12.2 are actually part of a single MMC snap−in.
Figure 12.2: MMC consoles pair one or more MMC snap−ins with the MMC container application.
You should also notice that the System Monitor is an ActiveX Control snap−in, not a standard MMC snap−in.
You can always use standard ActiveX controls as MMC snap−ins, but most ActiveX controls lack the
interfaces required to interact with the MMC container application. For example, I created a special type of
pushbutton and inserted it in MMC (just to see what it would do). Yes, I could see the button and it reacted
when I clicked it, but that’s it. However, my pushbutton example does demonstrate that MMC is just another
way to use COM, nothing more or less.
The Case for an MMC Snap−In
260
Notice the Extensions tab in Figure 12.3. Some MMC snap−ins include augmented features—additions that
you can choose to include in the console. Figure 12.4 shows the extensions for the Computer Management
snap−in. The extensions in this list add data views to a console created using the Computer Management
snap−in. If you scroll through the list, you’ll notice that some snap−ins are also used in stand−alone mode,
which indicates the duality of their nature. Extension snap−ins rely on the host snap−in for some types of
services and must implement additional interfaces as well as provide extra code for working with the host
snap−in. However, they also provide the basic level of snap−in functionality that we’ll discus in the first
example in the chapter.
Figure 12.3: Many consoles appear to contain just one control but are actually made of several controls.
Figure 12.4: Some snap−ins provide extended functionality for a stand−alone MMC snap−in.
The “magic” for the MMC application is the MSC file. This file contains the information required to create a
console. In fact, if you look in the \System32 folder, you’ll find the PerfMon.MSC file that contains the
information to create the Performance console. Interestingly enough, this file uses XML to store information
and has used it long before XML was very popular on the Internet. Figure 12.5 shows a view of the MSC file
using XML Notepad.
Tip XML is almost, but not quite, readable by the average human. Reading simple files is almost a trivial
The Case for an MMC Snap−In
261
exercise, but once the data gets nested a few layers deep, reading it can become tiresome. That’s why you
should have a tool for reading XML in your developer toolkit. The only problem is that some of these
tools cost quite a bit for the occasional user. Microsoft has remedied this problem a little with the
introduction of XML Notepad
( />This utility is free for the price of a download and does a reasonable job of reading most XML files.
Figure 12.5: MMC relies on MSC files that store configuration information in XML format.
Figure 12.5 shows an important bit of information about the MMC application. The first and third MMC
snap−in globally unique identifier (GUID) entries correspond to the MMC snap−ins for the console. (You can
validate this information by looking the GUIDs up in the registry using RegEdit.) The third entry actually
points to the control responsible for handling ActiveX controls. If you look up the GUID for the second GUID
entry, you’ll notice that it’s for a folder snap−in, the Console Root folder in Figure 12.2.
MMC does have quite a bit to offer in the way of control organization and presentation. While this chapter
won’t explore every MMC feature, you’ll learn about quite a few of them. We’ll explore the MMC
application in more detail later as part of the example. For now, you have enough information to understand
some MMC basics.
Creating a Wrapper DLL
There are many reasons to create a wrapper DLL for this example. However, there are two reasons that are
more important than any other reason you might consider. The first reason is that MMC snap−ins are common
and you’ll probably create more than one during your career. Placing all of the common code in a wrapper
DLL means that you don’t have to cut and paste it later. The second reason is that no matter what you do,
MMC requires access to some functions in the MMC.LIB file and this library is simply inaccessible from any
.NET language.
Unless you develop your MMC snap−in in Visual C++ (in which case, you don’t need this chapter), you’ll
have to write parts using C# and other parts using Visual C++. Using more than one language means creating
multiple DLLs, which means using multiple files.
Tip One of the most common mistakes that developers will make is attempting to use a struct in
place of a class to implement an interface when working with C#. As a rule, you should never
Creating a Wrapper DLL
262
use a struct where a class is required. In this case, the struct is boxed by CLR, which means any
changes you make to the interface are reflected in the boxed copy, not in the original struct.
Using a class ensures that any changes you make in the interface appear as planned.
Unfortunately, debugging this type of problem can be intimidating unless you know what to
look for. You can always avoid the struct versus class conflict by using a class whenever you
have doubts.
The following sections will describe the steps for creating an MMC wrapper DLL. The code for this example
is too large to fit within the book, so we’ll look at important segments of it. The full source code for this
example appears in the \Chapter 12\MMCHelper folder of the CD. Note that there’s a second Visual C++
project included with this DLL that appears in the \Chapter 12\MMCHelper\MMCHelper2 folder. A single
solution file opens both projects because both projects form a single wrapper DLL in all reality.
Creating an Interface
There are a few problems you need to address when working with COM in a managed environment. The fact
that the two environments are so different doesn’t help matters much. COM uses an entirely different set of
rules from the ones you’ve used with the .NET Framework.
One of the first problems that you’ll need to consider is how to create a managed version of a COM interface.
The best way to do this is to add three attributes to the interface description. These attributes tell the compiler
to add information to the assembly that it wouldn’t normally provide. The following list tells you about each
of the attributes:
[ComImport] This attribute tells the compiler that the interface is based on a COM interface with the same
name. The .NET environment will actually import the COM definition for you. To use this attribute, the class
in question must derive from Object, which means that many COM interfaces won’t work with this attribute.
Make sure you read the documentation for the interface completely. The [ComImport] attribute is always used
with the [Guid] attribute—you must specify the GUID of the COM class that the interface will use. Finally,
the class must not have any members—the .NET environment creates the required public constructor (without
any parameters) automatically. In sum, this is a fast way to create an interface definition, but it’s limited.
[InterfaceType] This attribute describes the type of exposure to provide for the interface when exposed to
COM. The acceptable values include dual, IUnknown, and IDispatch. Generally, implementing a dual
interface is best because older versions of Visual Basic rely on IDispatch while older versions of Visual C++
rely on IUnknown. However, you can make the component slightly smaller by implementing one interface or
the other if the component has a specific target environment.
[Guid] This attribute assigns a globally unique identifier (GUID) to the interface. This must be the same
GUID used by the COM unmanaged counterpart. If you aren’t implementing an existing interface, then use
GUIDGen (see the section entitled "Using GUIDGen" earlier in this chapter) to create a new GUID. Using the
[Guid] attribute isn’t mandatory, but it should be to ensure that the GUID for your component remains
consistent.
Now that you know how to identify a COM interface substitute, let’s look at a typical interface example.
Here’s the ISnapinHelp2 interface used to add help support to an MMC snap−in. The ISnapinHelp2 interface
was introduced for MMC 1.1 and includes a second method for adding Web−based help to your snap−in:
[ComImport,
InterfaceType(ComInterfaceType::InterfaceIsIUnknown),
Guid("4861A010−20F9−11d2−A510−00C04FB6DD2C")]
Creating an Interface
263
public __gc __interface ISnapinHelp2
{
public:
virtual /* [helpstring] */ HRESULT GetHelpTopic(
/* [out] */ [Out]IntPtr *lpCompiledHelpFile) = 0;
virtual /* [helpstring] */ HRESULT GetLinkedTopics(
/* [out] */ [Out]IntPtr *lpCompiledHelpFiles) = 0;
};
Note The example code is written in Visual C++ because that’s what the Platform SDK
documentation uses—we’ll use C#, whenever possible, for the remaining examples in the
book. The reason I’m using Visual C++ in this section is to make it easier to identify the
components from the Platform SDK. In addition, you’ll find some interfaces are actually
easier to implement using Visual C++.
The first thing you need to notice about the interface is the __interface keyword. Visual C++ will compile an
interface that uses the interface keyword without a single word of complaint until you attempt to use attributes
with it. Because you won’t always need to use attributes with interfaces, it’s possible to create an interface
that relies on the interface keyword instead of the __interface keyword. The interface version will never work
properly in a managed environment.
If you’re familiar with the ISnapinHelp2 declaration in MMC.H, you’ll know that it derives from ISnapinHelp
and lacks the GetHelpTopic() method declaration shown in the example code. It’s impossible to derive a
managed interface from an unmanaged interface. Consequently, it’s often easier to create a combined
managed interface, as shown in the example (that is, unless you expect someone to use the older interface for
some reason, in which case you should implement both). Now that you’ve seen the Visual C++
implementation of the ISnapinHelp2 interface, let’s look at the C# equivalent:
[ComImport,
InterfaceType(ComInterfaceType.InterfaceIsIUnknown),
Guid("4861A010−20F9−11d2−A510−00C04FB6DD2C")]
public interface ISnapinHelp2
{
[PreserveSig()]
int GetHelpTopic(out IntPtr lpCompiledHelpFile);
[PreserveSig()]
int GetLinkedTopics(out IntPtr lpCompiledHelpFiles);
}
While the Visual C++ code shares many similarities with the C# code, there are also some important
differences (other than language−specific differences). Notice the use of the [PreserveSig()] attribute.
Normally, the .NET environment converts interface method calls to an HRESULT format because that’s what
most of them use. The GetHelpTopic() function would actually appear as follows, without the [PreserveSig()]
attribute:
HRESULT GetHelpTopic([out] IntPtr lpCompiledHelpFile,
[out, retval] int i);
In some cases, this conversion can cause odd application errors and even prevent the interface from working
properly. The [PreserveSig()] attribute maintains the method signature you create for the interface as part of
the interface definition. While using the [PreserveSig()] attribute is purely discretionary in Visual C++
because this language is able to use HRESULT values, C# developers should always use the [PreserveSig()]
attribute unless they actually anticipate using the HRESULT value. The best idea is to look at the Platform
SDK to see if the HRESULT value is used. In addition, look at a Visual C++ implementation of the same
Creating an Interface
264
interface. Finally, if you have problems getting the interface to work in an application, try using the
[PreserveSig()] attribute.
A second major difference in the two interface implementations is that the C# code relies on the out keyword
while the Visual C++ counterpart uses the [out] attribute. Always use the out keyword, whenever possible,
when writing interfaces using C#. Microsoft didn’t spend a lot of time documenting the difference between
the two, but you’ll find that the out keyword works with fewer problems in C# code.
Because an MMC snap−in is normally an unmanaged COM object, your managed MMC snap−in will have to
mimic its behavior. This means implementing at least the minimal subset of interfaces to create an operational
MMC snap−in. The following list shows which interfaces the first example in the chapter will use:
IDataObject•
IComponent•
IComponentData•
ISnapinAbout•
Note The smallest possible MMC snap−in implementation must contain four interfaces: IDataObject,
IComponent, IComponentData, and IClassFactory. You don’t need to implement IClassFactory, but the
other three interfaces must appear within your code. However, the snap−in won’t display correctly in the
Add Standalone Snap−in dialog box (associated with the MMC application) without the ISnapinAbout
interface. So, while you can get by without implementing it, the ISnapinAbout interface is actually a
required interface.
A fully functional MMC snap−in will include several other interfaces. These interfaces aren’t required to
make the MMC snap−in work—you implement them to ensure the user can access features such as help and
context menus. In other words, these are helpful user interface features. Generally, you’ll want to implement
the following list of interfaces to ensure the MMC snap−in will meet all users’ needs:
ISnapinHelp2•
IDisplayHelp•
IExtendContextMenu•
IExtendControlbar•
IExtendPropertySheet•
There are a number of other interfaces you can implement as part of an MMC snap−in, all of which appear in
the MMC.H file. MMC also implements a number of interfaces for you. While you can override these
interfaces to provide special behavior, you don’t need to create them for a simple MMC snap−in. These
MMC−provided interfaces include the following:
IPropertySheetProvider•
IPropertySheetCallback•
IConsoleNamespace2•
IHeaderCtrl•
IResultData•
IImageList•
IConsole2•
IContextMenuCallback•
IControlbar•
IToolbar•
IConsoleVerb•
Creating an Interface
265
As you can see, creating a managed substitute for unmanaged COM is often a matter of knowing which
interfaces to implement. Ultimately, the interfaces you implement affect the functionality of the resulting
component and determine the utility of the component you create. For example, you don’t have to implement
the ISnapinAbout interface to create a functional MMC snap−in, but this interface is required if you want to
provide at least some information to the user about the purpose of the MMC snap−in.
Even the optional interfaces will have a place in the wrapper DLL. For example, the IConsole2 interface
provides the means to access the MMC environment. Therefore, even though you don’t have to implement the
IConsole2 interface, you’ll need to include it in the DLL so that you can gain access to required MMC
functionality. Another example is the IControlbar interface. This interface is used by the IExtendControlbar
interface to add and remove toolbars and other controls to the MMC environment. Even though you don’t
need to implement the IControlbar interface, the IExtendControlbar interface requires access to it. These
reference interfaces are clearly identified in the source code so you can see how they interact with the snap−in
as a whole.
One of the best ways that I’ve found to learn about COM interfaces is to view implementations of similar
controls using the OLE/COM Object Viewer utility. This utility shows which interfaces an existing control
implements and therefore provides valuable clues when implementing similar controls when working with
.NET. You’ll also find clues in the various C/C++ header files because they normally define the interfaces for
a particular type of control or component. The Microsoft documentation and online sources often point to the
interface requirements for certain types of components as well. All it takes is a little detective work to learn
which interfaces you must implement to create a basic component and which interfaces to add in order to gain
some level of component functionality.
Tip Even though you don’t have to create multiple files when working with Visual Studio .NET, it’s often
helpful to do so when working with moderate− to large−sized wrapper DLLs such as the one used in this
example. Dividing code by type makes it easier to locate a specific piece of code. The example uses
separate files for function implementations, structures, enumerations, and interfaces.
Writing the MMC Wrapper DLL
This section describes the portions of the MMCHelper.DLL that we’ll use for every MMC snap−in that you
create. You’ll learn about some essential functions, the interface descriptions, enumerations, and structures.
Each element of the MMCHelper.DLL will appear in a separate file to make it easier to view and modify the
code later. This is a good practice to follow when you create large DLLs designed to act as helpers to
components. Each file is named to reflect the content of one of the sections that follow.
Adding the MMC Functions
There are two types of functions that you’ll need to access when writing an MMC snap−in. The first type is
utility functions—the type of functions that convert data and perform other types of tasks required to marshal
data between the managed and unmanaged environments. The second type is found in the MMC.LIB file.
These functions perform MMC−specific tasks that you can’t duplicate in any other way. A minimal MMC
wrapper DLL will include property page support as a minimum, but there are other C library functions that
you’ll eventually need to add.
Now that you have some idea of what we’re going to do in this section, let’s discuss the functions. Listing
12.1 shows the data translation functions we’ll need for this example. These functions help marshal the data
from the managed environment to the unmanaged environment. Note that the source code contains additional
documentation that doesn’t appear as part of Listing 12.1. You’ll find this source code in the Functions.CS
file found in the \Chapter 12\MMCHelper folder.
Writing the MMC Wrapper DLL
266
Listing 12.1: An Overview of MMC Functions
public static Int32 RGB(Byte Blue, Byte Red, Byte Green)
{
Int32 Temp; // The output value.
// Bit shift the three values.
Temp = Red;
Temp = Temp + (Green * 0x100);
Temp = Temp + (Blue * 0x10000);
// Return the value.
return Temp;
}
public static IntPtr TranslateBitmap(IntPtr InputBitmap)
{
IntPtr OutputBitmap; // Handle for the translated bitmap.
IntPtr hdc; // Handle to the current device context.
DIBSECTION ds; // Device Independent Bitmap definition.
BITMAPINFO bmi; // Bitmap information structure.
IntPtr Bits; // Pointer to the bit values
UInt16 OldColorDepth; // Original color depth of the bitmap.
Int32 BitmapLength; // Size of the input bitmap.
// Initialize the structures.
ds = new DIBSECTION();
ds.dsBm = new BITMAP();
ds.dsBmih = new BITMAPINFOHEADER();
bmi = new BITMAPINFO();
bmi.bmiColors = new RGBQUAD();
bmi.bmiHeader = new BITMAPINFOHEADER();
// Obtain the device context for this display.
hdc = CreateCompatibleDC(IntPtr.Zero);
// Obtain the bitmap information passed from the snap−in.
BitmapLength = GetObject(InputBitmap,
Marshal.SizeOf(ds),
ref ds);
// Create a BITMAPINFO structure based on the DIBSECTION.
bmi.bmiHeader = ds.dsBmih;
// Change the color depth of the bitmap to match the screen
// color depth.
OldColorDepth = bmi.bmiHeader.biBitCount;
bmi.bmiHeader.biBitCount =
(UInt16)GetDeviceCaps(hdc, DevCapParm.BITSPIXEL);
// Create a bitmap handle that uses the same color depth as
// the current screen.
OutputBitmap = CreateDIBSection(hdc,
ref bmi,
0,
out Bits,
IntPtr.Zero, 0);
// Return the bitmap’s original color depth.
bmi.bmiHeader.biBitCount = OldColorDepth;
Writing the MMC Wrapper DLL
267
// Translate the bitmap into something the screen can display.
SetDIBits(hdc,
OutputBitmap,
0,
bmi.bmiHeader.biHeight,
ds.dsBm.bmBits,
ref bmi,
0);
// Delete the device context to free memory.
DeleteDC(hdc);
return OutputBitmap;
}
public static Byte[] StringToByteArray(String Input)
{
Char []CArray; // Character array holding the string.
Byte []Output; // Output data.
Int32 CharCount; // Character loop counter.
Int32 UniCount; // Unicode character loop counter.
// Convert the input string to a character array.
CArray = Input.ToCharArray();
// Initialize the output array and counter.
Output = new Byte[(Input.Length + 1) * 2];
UniCount = 0;
// Use a loop to place the character array values into the
// Byte array.
for (CharCount = 0; CharCount < Input.Length; CharCount++)
{
// MMC uses Unicode strings, so we need to convert each
// single input character into a Unicode equivalent.
Output[UniCount++] = (Byte)CArray[CharCount];
Output[UniCount++] = 0;
}
// Add a null terminator.
Output[UniCount++] = 0;
Output[UniCount] = 0;
// Return the result.
return Output;
}
The RGB() method is a conversion of yet another Visual C++ macro. In this case, the method accepts three
color values as input, shifts the color values as needed to keep them separate within a single variable, and then
returns that value. MMC often requires an application to provide a color mask for the icons it uses. This
function helps create the value used to represent the color in the color mask.
One of the hidden issues of working with .NET is that it assumes that images should have certain features.
Unfortunately, the assumptions it makes contrast with those required by MMC. One of the major issues is that
.NET usually tries to use 32−bit color for all images while MMC requires that the color depth and other
features of the bitmap match the operating system environment. The TranslateBitmap() method accepts a
.NET bitmap as input and translates it into something that MMC can use.
Writing the MMC Wrapper DLL
268
Let’s begin by looking at one of the variables used for this portion of the example. The example code requires
access to a number of data structures—most of which are quite mundane. However, the DIBSECTION data
structure is a little unusual and we’ll want to discuss it as part of the TranslateBitmap() method. Here’s the
definition for the DIBSECTION data structure:
/// <summary>
/// This structure is used with the CreateDIBSection() function
/// to store information about the device independent bitmap (DIB).
/// </summary>
[StructLayout(LayoutKind.Sequential, Pack=1, CharSet=CharSet.Auto)]
private struct DIBSECTION
{
BITMAP dsBm;
BITMAPINFOHEADER dsBmih;
// The original structure calls for an array of three
// DWORD values.
// DWORD dsBitfields[3];
// We can substitute three UInt32 values instead.
UInt32 dsBitfields0;
UInt32 dsBitfields1;
UInt32 dsBitfields2;
IntPtr dshSection;
UInt32 dsOffset;
}
Throughout the book, we’ve had to work hard to revolve certain data elements within structures. The
DIBSECTION data structure contains one of those elements in the form of a DWORD array. Fortunately, it’s
easy to substitute three UInt32 fields in place of the DWORD array in this case. Don’t get the idea that this
solution is free. You must include the Pack=1 argument in the [StructLayout] attribute for this solution to
work. Otherwise, you’ll see a wealth of strange and intermittent errors in your code. The rest of this data
structure is relatively straightforward.
The TranslateBitmap() method code begins by initializing the data structures used to translate the bitmap. It
then creates a compatible device context using the CreateCompatibleDC() function. The device context is
normally used for drawing, but it also provides information about the current display environment. MMC
requires a bitmap that has the same features as the current display environment, so learning what those
features are is a logical first step. Notice that we pass a null pointer to the CreateCompatibleDC() function,
which means it will return the drawing information for the Desktop rather than the current application.
Now that the code has an information source, it begins to create a BITMAPINFO data structure that contains
the statistics for the current bitmap. Part of this process also creates the DIBSECTION data structure
discussed earlier using the GetObject() function. One of the entries in the BITMAPINFO data structure
contains the color depth of the current bitmap, which the code saves in OldColorDepth for later use. The code
obtains the correct color depth for the display setup using the GetDeviceCaps() function with the compatible
device context handle obtained earlier and places it in the BITMAPINFO data structure. The final step is to
use the CreateDIBSection() function to create a new bitmap based on the old bitmap data and new
BITMAPINFO data structure content. The code returns the original color depth to the BITMAPINFO data
structure for use in a final call.
At this point, the code has created a new bitmap, but the bitmap lacks data. All it has is a data structure that
provides information about the format of the bitmap. The code uses the SetDIBits() function to move the data
from the original bitmap to the new bitmap while taking the differences in bitmap structure into account. This
Writing the MMC Wrapper DLL
269
means translating some colors to new values in order to make the new data compatible with the color depth
information. The final step is to delete the compatible device context and output the modified bitmap.
The StringToByteArray() method fills in one of the few data translation gaps in the .NET arsenal. This
function accepts a standard string as input and converts it to an array of bytes for use with MMC. The first
step in this process is to create a character array from the string. The code then computes the length of the byte
array by allowing two bytes for each character (for a Unicode representation) and adding two bytes for a
terminating null character.
The code relies on a for loop to perform the actual conversion and data transfer. Each character consumes two
bytes. The first byte is always a zero, while the second byte contains the current ANSI value of the individual
characters in the character array. The final step is to add the null termination. The byte array will actually
appear as a series of numbers that MMC will convert back to a string for display on screen. Interestingly
enough, you only need to perform this conversion for some strings. For example, the strings for the About
dialog box don’t require conversion, but those displayed in the Scope pane do. Make sure you check the
example code for the quirks in displaying strings in MMC.
As previously mentioned, we also require access to some of the functions found in the MMC.LIB file. The
only problem with this requirement is that we’ll need to use Visual C++ to create the required access. The use
of two languages means that the wrapper DLL will actually have two DLL files. The use of two files further
complicates things by creating a split in the MMCHelper namespace. It’s enough to drive you mad, but there’s
an easy way to fix the problem. Let’s begin by looking at the code for the two library calls. You’ll find this
source code in the MMCHelper2.H file found in the Chapter 12\MMCHelper\MMCHelper2 folder:
public __gc class HelperFunctions
{
public:
// Allows the property sheet to notify the MMC snap−in component
// that the user has made a change to the object settings.
static HRESULT DoMMCPropertyChangeNotify(Int32 lNotifyHandle,
LPARAM param)
{
return MMCPropertyChangeNotify(lNotifyHandle, param);
}
// Frees the handle to an MMCN_PROPERTY_CHANGE message. This message
// is sent by the system as the result of a
// MMCPropertyChangeNotify()
// call by the property sheet.
static HRESULT DoMMCFreeNotifyHandle(Int32 lNotifyHandle)
{
return MMCFreeNotifyHandle(lNotifyHandle);
}
};
As you can see, there’s nothing unusual about this part of the wrapper. We use the Visual C++
HelperFunctions class to create a connection to the MMC.LIB functions. As previously mentioned, however,
that access is in a separate file named MMCHelper2.DLL and somewhat inaccessible to the developer. To fix
this section problem, we’ll create another class in the C# portion of the code, as shown here. (Note that the
source code file contains more documentation.) You’ll find this source code in the MMCFunc.CS file found
in the \Chapter 12\MMCHelper folder:
public class MMCImportedFuncs
{
public static Int32 MMCPropertyChangeNotify(Int32 lNotifyHandle,
Writing the MMC Wrapper DLL
270
Int32 param)
{
return HelperFunctions.DoMMCPropertyChangeNotify(lNotifyHandle,
param);
}
public static Int32 MMCFreeNotifyHandle(Int32 lNotifyHandle)
{
return HelperFunctions.DoMMCFreeNotifyHandle(lNotifyHandle);
}
}
This two−level approach does incur a small performance penalty, and there’s no good way to overcome the
problem. However, now the functions are easily accessible through the MMCImportedFuncs class to the
developer using the MMCHelper.DLL file, and the function names are precisely the same as those found in
the Visual C++ documentation for MMC. In short, sometimes you need to use multiple levels of declarations
in order to achieve usability goals and the cost of a small hit in performance. However, it’s important to at
least try to find a solution that doesn’t involve this approach whenever possible.
Defining the Interfaces
As previously mentioned, there are four essential interfaces you must define for an MMC snap−in:
IComponent, IComponentData, IDataObject, and ISnapinAbout. Listing 12.2 shows the code for these four
interfaces. Notice that working with interfaces in C# is similar to working with them in either the managed or
unmanaged Visual C++ environment. Sure, there are some differences (and we’ll discuss them all), but the
essential coding technique is the same. Note that the listing doesn’t include all of the comments that you’ll
find in the standard source code. You’ll find this source code in the Interfaces.CS file found in the \Chapter
12\MMCHelper folder.
Listing 12.2: The Four Basic MMC Interfaces
[ComImport,
InterfaceType(ComInterfaceType.InterfaceIsIUnknown),
Guid("43136EB2−D36C−11CF−ADBC−00AA00A80033")]
public interface IComponent
{
void Initialize(
[MarshalAs(UnmanagedType.Interface)]Object lpConsole);
[PreserveSig()]
RESULT_VAL Notify(IntPtr lpDataObject,
MMC_NOTIFY_TYPE aevent,
Int32 arg,
Int32 param);
void Destroy(Int32 cookie);
void QueryDataObject(Int32 cookie,
DATA_OBJECT_TYPES type,
out IDataObject ppDataObject);
[PreserveSig()]
RESULT_VAL GetResultViewType(Int32 cookie,
out IntPtr ppViewType,
out Int32 pViewOptions);
void GetDisplayInfo(ref RESULTDATAITEM ResultDataItem);
[PreserveSig()]
RESULT_VAL CompareObjects(IDataObject lpDataObjectA,
IDataObject lpDataObjectB);
}
Writing the MMC Wrapper DLL
271