Pro VB 2005 and the .NET 2.0 Platform Second Edition phần 8 potx
Bạn đang xem bản rút gọn của tài liệu. Xem và tải ngay bản đầy đủ của tài liệu tại đây (2.08 MB, 109 trang )
Figure 23-4. The many faces of the TextBox type
Figure 23-5. Extracting values from TextBox types
CHAPTER 23 ■ PROGRAMMING WITH WINDOWS FORMS CONTROLS 715
Fun with MaskedTextBoxes
As of .NET 2.0, we now have a masked text box that allows us to specify a valid sequence of charac-
ters that will be accepted by the input area (Social Security number, phone number with area code,
zip code, or whatnot). The mask to test against (termed a mask expression) is established using spe-
cific tokens embedded into a string literal. Once you have created a mask expression, this value is
assigned to the Mask property. Table 23-3 documents some (but not all) valid masking tokens.
Table 23-3. Mask Tokens of MaskedTextBox
Mask Token Meaning in Life
0 Represents a mandatory digit with the value 0–9
9 Represents an optional digit or a space
L Required letter (in uppercase or lowercase), A–Z
? Optional letter (in uppercase or lowercase), A–Z
, Represents a thousands separator placeholder
: Represents a time placeholder
/ Represents a date placeholder
$ Represents a currency symbol
5785ch23.qxd 3/31/06 11:26 AM Page 715
CHAPTER 23 ■ PROGRAMMING WITH WINDOWS FORMS CONTROLS716
■Note The characters understood by the MaskedTextBox
do not
directly map to the syntax of regular expressions.
Although .NET provides namespaces to work with proper regular expressions (
System.Text.RegularExpressions
and System.Web.RegularExpressions), the MaskedTextBox uses syntax based on the legacy MaskedEdit VB6
COM control.
In addition to the Mask property, the MaskedTextBox has additional members that determine
how this control should respond if the user enters incorrect data. For example, BeepOnError will
cause the control to (obviously) issue a beep when the mask is not honored, and it prevents the ille-
gal character from being processed.
To illustrate the use of the MaskedTextBox, add an additional Label and MaskedTextBox to your
current Form. Although you are free to build a mask pattern directly in code, the Properties window
provides an ellipsis button for the Mask property that will launch a dialog box with a number of pre-
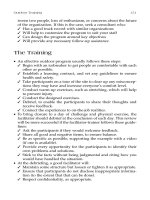
defined masks, as shown in Figure 23-6.
Find a masking pattern (such as Phone number), enable the BeepOnError property, and take
your program out for another test run. You should find that you are unable to enter any alphabetic
characters (in the case of the Phone number mask).
As you would expect, the MaskedTextBox will send out various events during its lifetime, one of
which is MaskInputRejected, which is fired when the end user enters erroneous input. Handle this
event using the Properties window and notice that the second incoming argument of the generated
event handler is of type MaskInputRejectedEventArgs. This type has a property named RejectionHint
that contains a brief description of the input error. For testing purposes, simply display the error on
the Form’s caption.
Private Sub txtMaskedTextBox_MaskInputRejected(ByVal sender As System.Object, _
ByVal e As System.Windows.Forms.MaskInputRejectedEventArgs) _
Handles txtMaskedTextBox.MaskInputRejected
Me.Text = String.Format("Error: {0}", e.RejectionHint)
End Sub
Figure 23-6. Predefined mask values of the Mask property
5785ch23.qxd 3/31/06 11:26 AM Page 716
CHAPTER 23 ■ PROGRAMMING WITH WINDOWS FORMS CONTROLS 717
■Source Code The LabelsAndTextBoxes project is included under the Chapter 23 subdirectory.
Fun with Buttons
The role of the System.Windows.Forms.Button type is to provide a vehicle for user confirmation,
typically in response to a mouse click or keypress. The Button class immediately derives from an
abstract type named ButtonBase, which provides a number of key behaviors for all derived types
(such as CheckBox, RadioButton, and Button). Table 23-4 describes some (but by no means all) of the
core properties of ButtonBase.
Table 23-4. ButtonBase Properties
Property Meaning in Life
FlatStyle Gets or sets the flat style appearance of the Button control, using members of the
FlatStyle enumeration.
Image Configures which (optional) image is displayed somewhere within the bounds of
a ButtonBase-derived type. Recall that the Control class also defines a BackgroundImage
property, which is used to render an image over the entire surface area of a widget.
ImageAlign Sets the alignment of the image on the Button control, using the ContentAlignment
enumeration.
TextAlign Gets or sets the alignment of the text on the Button control, using the ContentAlignment
enumeration.
The TextAlign property of ButtonBase makes it extremely simple to position text at just about
any location. To set the position of your Button’s caption, use the ContentAlignment enumeration
(defined in the System.Drawing namespace). As you will see, this same enumeration can be used to
place an optional image on the Button type:
Enum ContentAlignment
BottomCenter
BottomLeft
BottomRight
MiddleCenter
MiddleLeft
MiddleRight
TopCenter
TopLeft
TopRight
End Enum
FlatStyle is another property of interest. It is used to control the general look and feel of the
Button control, and it can be assigned any value from the FlatStyle enumeration (defined in the
System.Windows.Forms namespace):
Enum FlatStyle
Flat
Popup
Standard
System
End Enum
5785ch23.qxd 3/31/06 11:26 AM Page 717
CHAPTER 23 ■ PROGRAMMING WITH WINDOWS FORMS CONTROLS718
To illustrate working with the Button type, create a new Windows Forms application named
Buttons. On the Forms designer, add three Button types (named btnFlat, btnPopup, and
btnStandard) and set each Button’s FlatStyle property value accordingly (e.g., FlatStyle.Flat,
FlatStyle.Popup, or FlatStyle.Standard). As well, set the Text value of each Button to a fitting value
and handle the Click event for the btnStandard Button. As you will see in just a moment, when the
user clicks this button, you will reposition the button’s text using the TextAlign property.
Now, add a final fourth Button (named btnImage) that supports a background image (set via the
BackgroundImage property) and a small bull’s-eye icon (set via the Image property), which will also be
dynamically relocated when the btnStandard Button is clicked. Feel free to use any image files to
assign to the BackgroundImage and Image properties, but do note that the downloadable source code
contains the images used here.
Given that the designer has authored all the necessary UI prep code within InitializeComponent(),
the remaining code makes use of the ContentAlignment enumeration to reposition the location of the
text on btnStandard and the icon on btnImage. In the following code, notice that you are calling
the shared Enum.GetValues() method to obtain the list of names from the ContentAlignment
enumeration:
Public Class MainForm
' Hold the current text alignment
Private currAlignment As ContentAlignment = ContentAlignment.MiddleCenter
Private currEnumPos As Integer = 0
Private Sub btnStandard_Click(ByVal sender As System.Object, _
ByVal e As System.EventArgs) Handles btnStandard.Click
' Get all possible values
' of the ContentAlignment enum.
Dim values As Array = [Enum].GetValues(currAlignment.GetType())
' Bump the current position in the enum.
' & check for wrap around.
currEnumPos += 1
If currEnumPos >= values.Length Then
currEnumPos = 0
End If
' Bump the current enum value.
currAlignment = CType([Enum].Parse(currAlignment.GetType(), _
values.GetValue(currEnumPos).ToString()), ContentAlignment)
btnStandard.TextAlign = currAlignment
' Paint enum value name on button.
btnStandard.Text = currAlignment.ToString()
' Now assign the location of the icon on
' btnImage
btnImage.ImageAlign = currAlignment
End Sub
End Class
Now run your program. As you click the middle button, you will see its text is set to the current
name and position of the currAlignment member variable. As well, the icon within the btnImage is
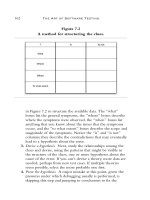
repositioned based on the same value. Figure 23-7 shows the output.
5785ch23.qxd 3/31/06 11:26 AM Page 718
CHAPTER 23 ■ PROGRAMMING WITH WINDOWS FORMS CONTROLS 719
Figure 23-7. The many faces of the Button type
■Source Code The Buttons project is included under the Chapter 23 directory.
Fun with CheckBoxes, RadioButtons, and GroupBoxes
The System.Windows.Forms namespace defines a number of other types that extend ButtonBase,
specifically CheckBox (which can support up to three possible states) and RadioButton (which can be
either selected or not selected). Like the Button, these types also receive most of their functionality
from the Control base class. However, each class defines some additional functionality. First, con-
sider the core properties of the CheckBox widget described in Table 23-5.
Table 23-5. CheckBox Properties
Property Meaning in Life
Appearance Configures the appearance of a CheckBox control, using the Appearance enumeration.
AutoCheck Gets or sets a value indicating if the Checked or CheckState value and the CheckBox’s
appearance are automatically changed when it is clicked.
CheckAlign Gets or sets the horizontal and vertical alignment of a CheckBox on a CheckBox
control, using the ContentAlignment enumeration (much like the Button type).
Checked Returns a Boolean value representing the state of the CheckBox (checked or
unchecked). If the ThreeState property is set to true, the Checked property returns
true for either checked or indeterminately checked values.
CheckState Gets or sets a value indicating whether the CheckBox is checked, using a CheckState
enumeration rather than a Boolean value.
ThreeState Configures whether the CheckBox supports three states of selection (as specified
by the CheckState enumeration) rather than two.
5785ch23.qxd 3/31/06 11:26 AM Page 719
CHAPTER 23 ■ PROGRAMMING WITH WINDOWS FORMS CONTROLS720
The RadioButton type requires little comment, given that it is (more or less) just a slightly
redesigned CheckBox. In fact, the members of a RadioButton are almost identical to those of the
CheckBox type. The only notable difference is the CheckedChanged event, which (not surprisingly) is
fired when the Checked value changes. Also, the RadioButton type does not support the ThreeState
property, as a RadioButton must be on or off.
Typically, multiple RadioButton objects are logically and physically grouped together to function
as a whole. For example, if you have a set of four RadioButton types representing the color choice of
a given automobile, you may wish to ensure that only one of the four types can be checked at a time.
Rather than writing code programmatically to do so, simply use the GroupBox control to ensure all
RadioButtons are mutually exclusive.
To illustrate working with the CheckBox, RadioButton, and GroupBox types, let’s create a new
Windows Forms application named CarConfig, which you will extend over the next few sections.
The main Form allows users to enter (and confirm) information about a new vehicle they intend to
purchase. The order summary is displayed in a Label type once the Confirm Order button has been
clicked. Figure 23-8 shows the initial UI.
Assuming you have leveraged the Forms designer to build your UI, you will now have numer-
ous member variables representing each GUI widget. As well, the InitializeComponent() method
will be updated accordingly. The first point of interest is the construction of the CheckBox type. As
with any Control-derived type, once the look and feel has been established, it must be inserted into
the Form’s internal collection of controls:
Private Sub InitializeComponent()
' checkFloorMats
'
Me.checkFloorMats.Name = "checkFloorMats"
Me.checkFloorMats.TabIndex = 0
Me.checkFloorMats.Text = "Extra Floor Mats"
Me.Controls.Add(Me.checkFloorMats)
End Sub
Next, you have the configuration of the GroupBox and its contained RadioButton types. When
you wish to place a control under the ownership of a GroupBox, you want to add each item to the
GroupBox’s Controls collection (in the same way you add widgets to the Form’s Controls collection).
Figure 23-8. The initial UI of the CarConfig Form
5785ch23.qxd 3/31/06 11:26 AM Page 720
CHAPTER 23 ■ PROGRAMMING WITH WINDOWS FORMS CONTROLS 721
Private Sub InitializeComponent()
' radioRed
'
Me.radioRed.Name = "radioRed"
Me.radioRed.Size = new System.Drawing.Size(64, 23)
Me.radioRed.Text = "Red"
'
' groupBoxColor
'
Me.groupBoxColor.Controls.Add(Me.radioRed)
Me.groupBoxColor.Text = "Exterior Color"
End Sub
To make things a bit more interesting, use the Properties window to handle the Enter and Leave
events sent by the GroupBox object. Understand, of course, that you do not need to capture the Enter
or Leave event for a GroupBox. However, to illustrate, the event handlers update the caption text of
the GroupBox as shown here:
Public Class MainForm
Private Sub groupBoxColor_Enter(ByVal sender As System.Object, _
ByVal e As System.EventArgs) Handles groupBoxColor.Enter
groupBoxColor.Text = "Exterior Color: You are in the group "
End Sub
Private Sub groupBoxColor_Leave(ByVal sender As System.Object, _
ByVal e As System.EventArgs) Handles groupBoxColor.Leave
groupBoxColor.Text = "Exterior Color: Thanks for visiting the group "
End Sub
End Class
The final GUI widgets on this Form (the Label and Button types) will also be configured and
inserted in the Form’s Controls collection via InitializeComponent(). The Label is used to display
the order confirmation, which is formatted in the Click event handler of the order Button,as
shown here:
Private Sub btnOrder_Click(ByVal sender As Object, _
ByVal e As System.EventArgs) Handles btnOrder.Click
' Build a string to display information.
Dim orderInfo As String = ""
If checkFloorMats.Checked Then
orderInfo += "You want floor mats." & Chr(10) & ""
End If
If radioRed.Checked Then
orderInfo += "You want a red exterior." & Chr(10) & ""
End If
If radioYellow.Checked Then
orderInfo += "You want a yellow exterior." & Chr(10) & ""
End If
If radioGreen.Checked Then
orderInfo += "You want a green exterior." & Chr(10) & ""
End If
If radioPink.Checked Then
orderInfo += "Why do you want a PINK exterior?" & Chr(10) & ""
End If
5785ch23.qxd 3/31/06 11:26 AM Page 721
CHAPTER 23 ■ PROGRAMMING WITH WINDOWS FORMS CONTROLS722
' Send this string to the Label.
infoLabel.Text = orderInfo
End Sub
Notice that both the CheckBox and RadioButton support the Checked property, which allows you
to investigate the state of the widget. Finally, recall that if you have configured a tri-state CheckBox,
you will need to check the state of the widget using the CheckState property.
Fun with CheckedListBoxes
Now that you have explored the basic Button-centric widgets, let’s move on to the set of list selection–
centric types, specifically CheckedListBox, ListBox, and ComboBox. The CheckedListBox widget allows
you to group related CheckBox options in a scrollable list control. Assume you have added such
a control to your CarConfig Form that allows users to configure a number of options regarding an
automobile’s sound system (see Figure 23-9).
To insert new items in a CheckedListBox, call Add() for each item, or use the AddRange() method
and send in an array of objects (strings, to be exact) that represent the full set of checkable items.
Be aware that you can fill any of the list types at design time using the Items property located on the
Properties window (just click the ellipsis button and type the string values). Here is the relevant code
within InitializeComponent() that configures the CheckedListBox:
Private Sub InitializeComponent()
' checkedBoxRadioOptions
'
Me.checkedBoxRadioOptions.Items.AddRange(New Object() _
{"Front Speakers", "8-Track Tape Player", _
"CD Player", "Cassette Player", "Rear Speakers", "Ultra Base Thumper"})
Figure 23-9. The CheckedListBox type
5785ch23.qxd 3/31/06 11:26 AM Page 722
CHAPTER 23 ■ PROGRAMMING WITH WINDOWS FORMS CONTROLS 723
Me.Controls.Add (Me.checkedBoxRadioOptions)
End Sub
Now update the logic behind the Click event for the Confirm Order button. Ask the CheckedListBox
which of its items are currently selected and add them to the orderInfo string. Here are the relevant
code updates:
Private Sub btnOrder_Click(ByVal sender As Object, _
ByVal e As EventArgs) Handles btnOrder.Click
' Build a string to display information.
Dim orderInfo As String = ""
orderInfo += " " & Chr(10) & ""
For i As Integer = 0 To checkedBoxRadioOptions.Items.Count - 1
' For each item in the CheckedListBox:
' Is the current item checked?
If checkedBoxRadioOptions.GetItemChecked(i) Then
' Get text of checked item and append to orderinfo string.
orderInfo &= "Radio Item: "
orderInfo &= checkedBoxRadioOptions.Items(i).ToString()
orderInfo &= "" & Chr(10) & ""
End If
Next
End Sub
The final note regarding the CheckedListBox type is that it supports the use of multiple columns
through the inherited MultiColumn property. Thus, if you make the following update:
checkedBoxRadioOptions.MultiColumn = True
you see the multicolumn CheckedListBox shown in Figure 23-10.
Figure 23-10. Multicolumn CheckedListBox type
5785ch23.qxd 3/31/06 11:26 AM Page 723
CHAPTER 23 ■ PROGRAMMING WITH WINDOWS FORMS CONTROLS724
Fun with ListBoxes
As mentioned earlier, the CheckedListBox type inherits most of its functionality from the ListBox type.
To illustrate using the ListBox type, let’s add another feature to the current CarConfig application: the
ability to select the make (BMW, Yugo, etc.) of the automobile. Figure 23-11 shows the desired UI.
As always, begin by creating a member variable to manipulate your type (in this case, a ListBox
type). Next, configure the look and feel using the following snapshot from InitializeComponent():
Private Sub InitializeComponent()
' carMakeList
'
Me.carMakeList.Items.AddRange(New Object() {"BMW", "Caravan", "Ford", _
"Grand Am", "Jeep", "Jetta", _
"Saab", "Viper", "Yugo"})
Me.Controls.Add (Me.carMakeList)
End Sub
The update to the btnOrder_Click() event handler is also simple:
Private Sub btnOrder_Click(ByVal sender As Object, _
ByVal e As EventArgs) Handles btnOrder.Click
' Build a string to display information.
Dim orderInfo As String = ""
' Get the currently selected item (not index of the item).
If carMakeList.SelectedItem IsNot Nothing Then
orderInfo += "Make: " + carMakeList.SelectedItem + "" & Chr(10) & ""
End If
End Sub
Figure 23-11. The ListBox type
5785ch23.qxd 3/31/06 11:26 AM Page 724
CHAPTER 23 ■ PROGRAMMING WITH WINDOWS FORMS CONTROLS 725
Fun with ComboBoxes
Like a ListBox, a ComboBox allows users to make a selection from a well-defined set of possibilities.
However, the ComboBox type is unique in that users can also insert additional items. Recall that
ComboBox derives from ListBox (which then derives from Control). To illustrate its use, add yet another
GUI widget to the CarConfig Form that allows a user to enter the name of a preferred salesperson. If
the salesperson in question is not on the list, the user can enter a custom name. One possible UI
update is shown in Figure 23-12 (feel free to add your own salesperson monikers).
This modification begins with configuring the ComboBox itself. As you can see here, the logic
looks identical to that for the ListBox:
Private Sub InitializeComponent()
' comboSalesPerson
'
Me.comboSalesPerson.Items.AddRange(New Object() _
{"Baby Ry-Ry", "Dan 'the Machine'", _
"Cowboy Dan", "Tom 'the Style' "})
Me.Controls.Add (Me.comboSalesPerson)
End Sub
The update to the btnOrder_Click() event handler is again simple, as shown here:
Private Sub btnOrder_Click(ByVal sender As Object, _
ByVal e As EventArgs) Handles btnOrder.Click
' Build a string to display information.
Dim orderInfo As String = ""
' Use the Text property to figure out the user's salesperson.
If comboSalesPerson.Text <> "" Then
orderInfo += "Sales Person: " + comboSalesPerson.Text & "" & Chr(10) & ""
Figure 23-12. The ComboBox type
5785ch23.qxd 3/31/06 11:26 AM Page 725
CHAPTER 23 ■ PROGRAMMING WITH WINDOWS FORMS CONTROLS726
Else
orderInfo += "You did not select a sales person!" & "" & Chr(10) & ""
End If
End Sub
Configuring the Tab Order
Now that you have created a somewhat interesting Form, let’s formalize the issue of tab order. As
you may know, when a Form contains multiple GUI widgets, users expect to be able to shift focus
using the Tab key. Configuring the tab order for your set of controls requires that you understand
two key properties: TabStop and TabIndex.
The TabStop property can be set to true or false, based on whether or not you wish this GUI
item to be reachable using the Tab key. Assuming the TabStop property has been set to true for
a given widget, the TabOrder property is then set to establish its order of activation in the tabbing
sequence (which is zero based). Consider this example:
' Configure tabbing properties.
radioRed.TabIndex = 2
radioRed.TabStop = True
The Tab Order Wizard
The Visual Studio 2005 IDE supplies a Tab Order Wizard, which you access by choosing View ➤ Ta b
Order (be aware that you will not find this menu option unless the Forms designer is active). Once
activated, your design-time Form displays the current TabIndex value for each widget. To change
these values, click each item in the order you choose (see Figure 23-13).
To exit the Tab Order Wizard, simply press the Esc key.
Figure 23-13. The Tab Order Wizard
5785ch23.qxd 3/31/06 11:26 AM Page 726
CHAPTER 23 ■ PROGRAMMING WITH WINDOWS FORMS CONTROLS 727
Setting the Form’s Default Input Button
Many user-input forms (especially dialog boxes) have a particular Button that will automatically
respond to the user pressing the Enter key. For the current Form, if you wish to ensure that when the
user presses the Enter key, the Click event handler for btnOrder is invoked, simply set the Form’s
AcceptButton property as follows:
' When the Enter key is pressed, it is as if
' the user clicked the btnOrder button.
Me.AcceptButton = btnOrder
■Note Some Forms require the ability to simulate clicking the Form’s Cancel button when the user presses the
Esc key.This can be done by assigning the
CancelButton property to the Button object representing the Cancel
button.
Working with More Exotic Controls
At this point, you have seen how to work most of the basic Windows Forms controls (Labels,
TextBoxes, and the like). The next task is to examine some GUI widgets, which are a bit more high-
powered in their functionality. Thankfully, just because a control may seem “more exotic” does not
mean it is hard to work with, only that it requires a bit more elaboration from the outset. Over the
next several pages, we will examine the following GUI elements:
• MonthCalendar
• ToolTip
• TabControl
• TrackBar
• Panel
• The UpDown controls
• ErrorProvider
• TreeView
• WebBrower
To begin, let’s wrap up the CarConfig project by examining the MonthCalendar and ToolTip controls.
Fun with MonthCalendars
The System.Windows.Forms namespace provides an extremely useful widget, the MonthCalendar con-
trol, that allows the user to select a date (or range of dates) using a friendly UI. To showcase this new
control, update the existing CarConfig application to allow the user to enter in the new vehicle’s
delivery date. Figure 23-14 shows the updated (and slightly rearranged) Form.
5785ch23.qxd 3/31/06 11:26 AM Page 727
CHAPTER 23 ■ PROGRAMMING WITH WINDOWS FORMS CONTROLS728
Although the MonthCalendar control offers a fair bit of functionality, it is very simple to program-
matically capture the range of dates selected by the user. The default behavior of this type is to always
select (and mark) today’s date automatically. To obtain the currently selected date programmatically,
you can update the Click event handler for the order Button, as shown here:
Private Sub btnOrder_Click(ByVal sender As System.Object, _
ByVal e As System.EventArgs) Handles btnOrder.Click
' Build a string to display information.
Dim orderInfo As String = ""
' Get ship date.
Dim d As DateTime = monthCalendar.SelectionStart
Dim dateStr As String = _
String.Format("{0}/{1}/{2} ", d.Month, d.Day, d.Year)
orderInfo &= "Car will be sent: " & dateStr
End Sub
Notice that you can ask the MonthCalendar control for the currently selected date by using the
SelectionStart property. This property returns a DateTime reference, which you store in a local
variable. Using a handful of properties of the DateTime type, you can extract the information you
need in a custom format.
At this point, I assume the user will specify exactly one day on which to deliver the new auto-
mobile. However, what if you want to allow the user to select a range of possible shipping dates? In
that case, all the user needs to do is drag the cursor across the range of possible shipping dates. You
already have seen that you can obtain the start of the selection using the SelectionStart property.
The end of the selection can be determined using the SelectionEnd property. Here is the code update:
Figure 23-14. The MonthCalendar type
5785ch23.qxd 3/31/06 11:26 AM Page 728
CHAPTER 23 ■ PROGRAMMING WITH WINDOWS FORMS CONTROLS 729
Private Sub btnOrder_Click(ByVal sender As System.Object, _
ByVal e As System.EventArgs) Handles btnOrder.Click
' Build a string to display information.
Dim orderInfo As String = ""
' Get ship date range
Dim startD As DateTime = monthCalendar.SelectionStart
Dim endD As DateTime = monthCalendar.SelectionEnd
Dim dateStartStr As string = _
String.Format("{0}/{1}/{2} ", startD.Month, startD.Day, startD.Year)
Dim dateEndStr As string = _
String.Format("{0}/{1}/{2} ", endD.Month, endD.Day, endD.Year)
' The DateTime type supports overloaded operators!
If dateStartStr <> dateEndStr Then
orderInfo &= "Car will be sent between " & _
dateStartStr & " and" & Chr(10) & "" & dateEndStr
Else
orderInfo &= "Car will be sent on " & dateStartStr
' They picked a single date.
End If
End Sub
■Note The Windows Forms toolkit also provides the DateTimePicker control, which exposes a MonthCalendar
from a DropDown control.
Fun with ToolTips
As far as the CarConfig Form is concerned, we have one final point of interest. Most modern UIs
support tool tips. In the System.Windows.Forms namespace, the ToolTip type represents this func-
tionality. These widgets are simply small floating windows that display a helpful message when the
cursor hovers over a given item.
To illustrate, add a tool tip to the CarConfig’s Calendar type. Begin by dragging a new ToolTip
control from the Toolbox onto your Forms designer, and rename it to calendarTip. Using the Prop-
erties window, you are able to establish the overall look and feel of the ToolTip widget, for example:
Private Sub InitializeComponent()
' calendarTip
'
Me.calendarTip.IsBalloon = True
Me.calendarTip.ShowAlways = True
Me.calendarTip.ToolTipIcon = System.Windows.Forms.ToolTipIcon.Info
End Sub
To associate a ToolTip with a given control, select the control that should activate the ToolTip
and set the “ToolTip on controlName” property (see Figure 23-15).
5785ch23.qxd 3/31/06 11:26 AM Page 729
CHAPTER 23 ■ PROGRAMMING WITH WINDOWS FORMS CONTROLS730
Figure 23-16. The ToolTip in action
At this point, the CarConfig project is complete. Figure 23-16 shows the ToolTip in action.
■Source Code The CarConfig project is included under the Chapter 23 directory.
Fun with TabControls
To illustrate the remaining “exotic” controls, you will build a new Form that maintains a TabControl.
As you may know, TabControls allow you to selectively hide or show pages of related GUI content
via clicking a given tab. To begin, create a new Windows Forms application named ExoticControls
and rename your initial Form to MainWindow.
Figure 23-15. Associating a ToolTip to a given widget
5785ch23.qxd 3/31/06 11:26 AM Page 730
CHAPTER 23 ■ PROGRAMMING WITH WINDOWS FORMS CONTROLS 731
As you are designing your TabControl, be aware that each page is represented by a TabPage
object, which is inserted into the TabControl’s internal collection of pages. Once the TabControl has
been configured, this object (like any other GUI widget within a Form) is inserted into the Form’s
Controls collection. Consider the following partial InitializeComponent() method:
Private Sub InitializeComponent()
'
'tabControlExoticControls
'
Me.tabControlExoticControls.Controls.Add(Me.pageTrackBars)
Me.tabControlExoticControls.Controls.Add(Me.pagePanels)
Me.tabControlExoticControls.Controls.Add(Me.pageUpDown)
Me.tabControlExoticControls.Controls.Add(Me.pageErrorProvider)
Me.tabControlExoticControls.Controls.Add(Me.pageTreeView)
Me.tabControlExoticControls.Controls.Add(Me.pageWebBrowser)
Me.tabControlExoticControls.Location = New System.Drawing.Point(11, 16)
Me.tabControlExoticControls.Name = "tabControlExoticControls"
Me.tabControlExoticControls.SelectedIndex = 0
Me.tabControlExoticControls.Size = New System.Drawing.Size(644, 367)
Me.tabControlExoticControls.TabIndex = 1
Me.Controls.Add(Me.tabControlExoticControls)
End Sub
Now that you have a basic Form supporting multiple tabs, you can build each page to illustrate
the remaining exotic controls. First up, let’s check out the role of the TrackBar.
■Note The TabControl widget supports Selected, Selecting, Deselected, and Deselecting events. These
can prove helpful when you need to dynamically generate the elements within a given page.
Figure 23-17. A multipage TabControl
Next, add a TabControl onto the Forms designer and, using the Properties window, open the
page editor via the TabPages collection (just click the ellipsis button on the Properties window).
A dialog configuration tool displays. Add a total of six pages, setting each page’s Text and Name prop-
erties based on the completed TabControl shown in Figure 23-17.
5785ch23.qxd 3/31/06 11:26 AM Page 731
CHAPTER 23 ■ PROGRAMMING WITH WINDOWS FORMS CONTROLS732
Fun with TrackBars
The TrackBar control allows users to select from a range of values, using a scroll bar–like input
mechanism. When working with this type, you need to set the minimum and maximum range, the
minimum and maximum change increments, and the starting location of the slider’s thumb. Each
of these aspects can be set using the properties described in Table 23-6.
Table 23-6. TrackBar Properties
Properties Meaning in Life
LargeChange The number of ticks by which the TrackBar changes when an event considered
a large change occurs (e.g., clicking the mouse button while the cursor is on the
sliding range and using the Page Up or Page Down key).
Maximum Configure the upper and lower bounds of the TrackBar’s range.
Minimum
Orientation The orientation for this TrackBar. Valid values are from the Orientation
enumeration (i.e., horizontally or vertically).
SmallChange The number of ticks by which the TrackBar changes when an event considered
a small change occurs (e.g., using the arrow keys).
TickFrequency Indicates how many ticks are drawn. For a TrackBar with an upper limit of 200,
it is impractical to draw all 200 ticks on a control 2 inches long. If you set the
TickFrequency property to 5, the TrackBar draws 20 total ticks (each tick
represents 5 units).
TickStyle Indicates how the TrackBar control draws itself. This affects both where the
ticks are drawn in relation to the movable thumb and how the thumb itself is
drawn (using the TickStyle enumeration).
Value Gets or sets the current location of the TrackBar. Use this property to obtain the
numeric value contained by the TrackBar for use in your application.
To illustrate, you’ll update the first tab of your TabControl with three TrackBars, each of which
has an upper range of 255 and a lower range of 0. As the user slides each thumb, the application
intercepts the Scroll event and dynamically builds a new System.Drawing.Color type based on the
value of each slider. This Color type will be used to display the color within a PictureBox widget (named
colorBox) and the RGB values within a Label type (named lblCurrColor). Figure 23-18 shows the
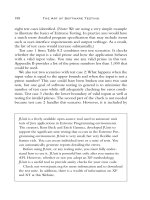
(completed) first page in action.
Figure 23-18. The TrackBar page
5785ch23.qxd 3/31/06 11:26 AM Page 732
CHAPTER 23 ■ PROGRAMMING WITH WINDOWS FORMS CONTROLS 733
First, place three TrackBars onto the first tab using the Forms designer and rename your member vari-
ables with an appropriate value (redTrackBar, greenTrackBar, and blueTrackBar). Next, handle the
Scroll event for each of your TrackBar controls. Here is the relevant code within InitializeComponent()
for blueTrackBar (the remaining bars look almost identical):
Private Sub InitializeComponent()
'
'blueTrackBar
'
Me.blueTrackBar.Location = New System.Drawing.Point(132, 151)
Me.blueTrackBar.Maximum = 255
Me.blueTrackBar.Name = "blueTrackBar"
Me.blueTrackBar.Size = New System.Drawing.Size(310, 45)
Me.blueTrackBar.TabIndex = 18
Me.blueTrackBar.TickFrequency = 5
Me.blueTrackBar.TickStyle = System.Windows.Forms.TickStyle.TopLeft
End Sub
Note that the default minimum value of the TrackBar is 0 and thus does not need to be explicitly
set. Now, to handle the Scroll event handlers for each TrackBar, you make a call to a yet-to-be-written
helper function named UpdateColor():
Private Sub blueTrackBar_Scroll(ByVal sender As System.Object, _
ByVal e As System.EventArgs) Handles blueTrackBar.Scroll
UpdateColor()
End Sub
UpdateColor() is responsible for two major tasks. First, you read the current value of each TrackBar
and use this data to build a new Color variable using Color.FromArgb(). Once you have the newly con-
figured color, update the PictureBox member variable (again, named colorBox) with the current
background color. Finally, UpdateColor() formats the thumb values in a string placed on the Label
(lblCurrColor), as shown here:
Private Sub UpdateColor()
' Get the new color based on track bars.
Dim c As Color = Color.FromArgb(redTrackBar.Value, _
greenTrackBar.Value, blueTrackBar.Value)
' Change the color in the PictureBox.
colorBox.BackColor = c
' Set color label.
lblCurrColor.Text = _
String.Format("Current color is: (R:{0}, G:{1}, B:{2})", _
redTrackBar.Value, greenTrackBar.Value, blueTrackBar.Value)
End Sub
The final detail is to set the initial values of each slider when the Form comes to life and render
the current color, within a custom default constructor:
Sub New()
' This call is required by the Windows Form Designer.
InitializeComponent()
CenterToScreen()
' Set initial position of each slider.
redTrackBar.Value = 100
greenTrackBar.Value = 255
blueTrackBar.Value = 0
5785ch23.qxd 3/31/06 11:26 AM Page 733
CHAPTER 23 ■ PROGRAMMING WITH WINDOWS FORMS CONTROLS734
UpdateColor()
End Sub
Fun with Panels
As you saw earlier in this chapter, the GroupBox control can be used to logically bind a number of
controls (such as RadioButtons) to function as a collective. Closely related to the GroupBox is the
Panel control. Panels are also used to group related controls in a logical unit. One difference is that
the Panel type derives from the ScrollableControl class, thus it can support scroll bars, which is not
possible with a GroupBox.
Panels can also be used to conserve screen real estate. For example, if you have a group of con-
trols that takes up the entire bottom half of a Form, you can contain the group in a Panel that is half
the size and set the AutoScroll property to true. In this way, the user can use the scroll bar(s) to view
the full set of items. Furthermore, if a Panel’s BorderStyle property is set to None, you can use this
type to simply group a set of elements that can be easily shown or hidden from view in a manner
transparent to the end user.
To illustrate, let’s update the second page of the TabControl with two Button types (btnShowPanel
and btnHidePanel) and a single Panel that contains a pair of text boxes (txtNormalText and txtUpperText)
and an instructional Label. (Mind you, the widgets on the Panel are not terribly important for this
example.) Figure 23-19 shows the final GUI.
Figure 23-19. The TrackBar page
Using the Properties window, handle the TextChanged event for the first TextBox, and within the
generated event handler, place an uppercase version of the text entered within txtNormalText into
txtUpperText:
Private Sub txtNormalText_TextChanged(ByVal sender As System.Object, _
ByVal e As System.EventArgs) Handles txtNormalText.TextChanged
txtUpperText.Text = txtNormalText.Text.ToUpper()
End Sub
5785ch23.qxd 3/31/06 11:26 AM Page 734
CHAPTER 23 ■ PROGRAMMING WITH WINDOWS FORMS CONTROLS 735
Now, handle the Click event for each button. As you might suspect, you will simply hide or
show the Panel (and all of its contained UI elements):
Private Sub btnShowPanel_Click(ByVal sender As System.Object, _
ByVal e As System.EventArgs) Handles btnShowPanel.Click
panelTextBoxes.Visible = True
End Sub
Private Sub btnHidePanel_Click(ByVal sender As System.Object, _
ByVal e As System.EventArgs) Handles btnHidePanel.Click
panelTextBoxes.Visible = False
End Sub
If you now run your program and click either button, you will find that the Panel’s contents are
shown and hidden accordingly. While this example is hardly fascinating, I am sure you can see the
possibilities. For example, you may have a menu option (or security setting) that allows the user to
see a “simple” or “complex” view. Rather than having to manually set the Visible property to false
for multiple widgets, you can group them all within a Panel and set its Visible property accordingly.
Fun with the UpDown Controls
Windows Forms provide two widgets that function as spin controls (also known as up/down controls).
Like the ComboBox and ListBox types, these new items also allow the user to choose an item from a range
of possible selections. The difference is that when you’re using a DomainUpDown or NumericUpDown control,
the information is selected using a pair of small up and down arrows. For example, check out
Figure 23-20.
Figure 23-20. Working with UpDown types
Given your work with similar types, you should find working with the UpDown widgets painless.
The DomainUpDown widget allows the user to select from a set of string data. NumericUpDown allows
selections from a range of numeric data points. Each widget derives from a common direct base
class, UpDownBase. Table 23-7 describes some important properties of this class.
5785ch23.qxd 3/31/06 11:26 AM Page 735
CHAPTER 23 ■ PROGRAMMING WITH WINDOWS FORMS CONTROLS736
Table 23-7. UpDownBase Properties
Property Meaning in Life
InterceptArrowKeys Gets or sets a value indicating whether the user can use the up arrow and
down arrow keys to select values
ReadOnly Gets or sets a value indicating whether the text can only be changed by the
use of the up and down arrows and not by typing in the control to locate
a given string
Text Gets or sets the current text displayed in the spin control
TextAlign Gets or sets the alignment of the text in the spin control
UpDownAlign Gets or sets the alignment of the up and down arrows on the spin control,
using the LeftRightAlignment enumeration
The DomainUpDown control adds a small set of properties (see Table 23-8) that allow you to con-
figure and manipulate the textual data in the widget.
Table 23-8. DomainUpDown Properties
Property Meaning in Life
Items Allows you to gain access to the set of items stored in the widget
SelectedIndex Returns the zero-based index of the currently selected item (a value of –1
indicates no selection)
SelectedItem Returns the selected item itself (not its index)
Sorted Configures whether or not the strings should be alphabetized
Wrap Controls whether the collection of items continues to the first or last item if the
user continues past the end of the list
The NumericUpDown type is just as simple (see Table 23-9).
Table 23-9. NumericUpDown Properties
Property Meaning in Life
DecimalPlaces Used to configure how the numerical data is to be displayed.
ThousandsSeparatorHexadecimal
Increment Sets the numerical value to increment the value in the control
when the up or down arrow is clicked. The default is to
advance the value by 1.
Minimum Set the upper and lower limits of the value in the control.
Maximum
Value Returns the current value in the control.
The Click event handler for this page’s Button type simply asks each type for its current value
and places it in the appropriate Label (lblCurrSel) as a formatted string, as shown here:
Private Sub btnGetSelections_Click(ByVal sender As System.Object, _
ByVal e As System.EventArgs) Handles btnGetSelections.Click
' Get info from updowns
lblCurrSel.Text = _
String.Format("String: {0}" & Chr(13) & "Number: {1}", _
domainUpDown.Text, numericUpDown.Value)
End Sub
5785ch23.qxd 3/31/06 11:26 AM Page 736
CHAPTER 23 ■ PROGRAMMING WITH WINDOWS FORMS CONTROLS 737
Fun with ErrorProviders
Most Windows Forms applications will need to validate user input in one way or another. This is
especially true with dialog boxes, as you should inform users if they make a processing error before
continuing forward. The ErrorProvider type can be used to provide a visual cue of user input error.
For example, assume you have a Form containing a TextBox and Button widget. If the user enters
more than five characters in the TextBox and the TextBox loses focus, the error information shown
in Figure 23-21 could be displayed.
Figure 23-21. The ErrorProvider in action
Here, you have detected that the user entered more than five characters and responded by
placing a small error icon (!) next to the TextBox object. When the user places his cursor over this
icon, the descriptive error text appears as a pop-up. Also, this ErrorProvider is configured to cause
the icon to blink a number of times to strengthen the visual cue (which, of course, you can’t see
without running the application).
If you wish to support this type of input validation, the first step is to understand the properties
of the Control class shown in Table 23-10.
Table 23-10. Control Properties
Property Meaning in Life
CausesValidation Indicates whether selecting this control causes validation on the controls
requiring validation
Validated Occurs when the control is finished performing its validation logic
Validating Occurs when the control is validating user input (e.g., when the control
loses focus)
Every GUI widget can set the CausesValidation property to true or false (the default is true).
If you set this bit of state data to true, the control forces the other controls on the Form to validate
themselves when it receives focus. Once a validating control has received focus, the Validating
and Validated events are fired for each control. In the scope of the Validating event handler, you
5785ch23.qxd 3/31/06 11:26 AM Page 737
CHAPTER 23 ■ PROGRAMMING WITH WINDOWS FORMS CONTROLS738
configure a corresponding ErrorProvider. Optionally, the Validated event can be handled to determine
when the control has finished its validation cycle.
The ErrorProvider type has a small set of members. The most important item for your purposes
is the BlinkStyle property, which can be set to any of the values of the ErrorBlinkStyle enumeration
described in Table 23-11.
Table 23-11. ErrorBlinkStyle Properties
Property Meaning in Life
AlwaysBlink Causes the error icon to blink when the error is first displayed or when
a new error description string is set for the control and the error icon is
already displayed
BlinkIfDifferentError Causes the error icon to blink only if the error icon is already displayed,
but a new error string is set for the control
NeverBlink Indicates the error icon never blinks
To illustrate, update the UI of the Error Provider page with a Button, TextBox, and Label as
shown in Figure 23-21. Next, drag an ErrorProvider widget named tooManyCharactersErrorProvider
onto the designer. Here is the configuration code within InitializeComponent():
Private Sub InitializeComponent()
'
'tooManyCharactersErrorProvider
'
Me.tooManyCharactersErrorProvider.BlinkRate = 500
Me.tooManyCharactersErrorProvider.BlinkStyle = _
System.Windows.Forms.ErrorBlinkStyle.AlwaysBlink
Me.tooManyCharactersErrorProvider.ContainerControl = Me
End Sub
Once you have configured how the ErrorProvider looks and feels, you bind the error to the
TextBox within the scope of its Validating event handler, as shown here:
Private Sub txtInput_Validating(ByVal sender As System.Object, _
ByVal e As System.ComponentModel.CancelEventArgs) Handles txtInput.Validating
' Check if the text length is greater than 5.
If txtInput.Text.Length > 5 Then
tooManyCharactersErrorProvider.SetError(txtInput, "Can't be greater than 5!")
Else
tooManyCharactersErrorProvider.SetError(txtInput, "")
' Things are OK, don't show anything.
End If
End Sub
Fun with TreeViews
TreeView controls are very helpful types in that they allow you to visually display hierarchical data
(such as a directory structure or any other type of parent/child relationship). As you would expect,
the Window Forms TreeView control can be highly customized. If you wish, you can add custom
images, node colors, node subcontrols, and other visual enhancements. (I’ll assume interested
readers will consult the .NET Framework 2.0 SDK documentation for full details of this widget.)
5785ch23.qxd 3/31/06 11:26 AM Page 738
CHAPTER 23 ■ PROGRAMMING WITH WINDOWS FORMS CONTROLS 739
To illustrate the basic use of the TreeView, the next page of your TabControl will programmati-
cally construct a TreeView defining a series of topmost nodes that represent a set of Car types. Each
Car node has two subnodes that represent the selected car’s current speed and favorite radio sta-
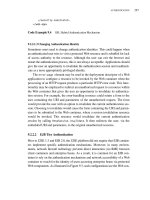
tion. In Figure 23-22, notice that the selected item will be highlighted. Also note that if the selected
node has a parent (and/or sibling), its name is presented in a Label widget.
Figure 23-22. The TreeView in action
Assuming your Tree View UI is composed of a TreeView control (named treeViewCars) and
a Label (named lblNodeInfo), insert a new VB 2005 file into your ExoticControls project that models
a trivial Car that “has-a” Radio:
Class Car
Public Sub New(ByVal pn As String, ByVal cs As Integer)
petName = pn
currSp = cs
End Sub
' Public to keep the example simple.
Public petName As String
Public currSp As Integer
Public r As Radio
End Class
Class Radio
Public favoriteStation As Double
Public Sub New(ByVal station As Double)
favoriteStation = station
End Sub
End Class
The Form-derived type will maintain a generic List(Of T) (named listCars) of 100 Car types,
which will be populated in the default constructor of the MainForm type. As well, the constructor will
call a new subroutine named BuildCarTreeView() which takes no arguments. Here is the initial
update:
5785ch23.qxd 3/31/06 11:26 AM Page 739