Pro VB 2005 and the .NET 2.0 Platform Second Edition phần 9 ppt
Bạn đang xem bản rút gọn của tài liệu. Xem và tải ngay bản đầy đủ của tài liệu tại đây (2.6 MB, 109 trang )
CHAPTER 24 ■ DATABASE ACCESS WITH ADO.NET824
' Update Inventory Table with new row.
Dim newCar As DataRow = dsCarInventory.Tables("Inventory").NewRow()
newCar("CarID") = newCarID
newCar("Make") = newCarMake
newCar("Color") = newCarColor
newCar("PetName") = newCarPetName
dsCarInventory.Tables("Inventory").Rows.Add(newCar)
Try
dAdpater.Update(dsCarInventory.Tables("Inventory"))
Catch
Console.WriteLine("Sorry! Error! Canceling request")
End Try
End Sub
Once you have created your command object, you plug it into the adapter via the InsertCommand
property. Next, you add a new row to the Inventory DataTable maintained by the dsCarInventory
object. Once you have added this DataRow back into the DataTable, the adapter will execute the SQL
found within the InsertCommand property, given that the RowState of this new row is DataRowState.Added.
Setting the UpdateCommand Property
The modification of the UpdateCarPetName() method is more or less identical. Simply build a new
command object and plug it into the UpdateCommand property.
Private Sub UpdateCarPetName(ByVal dAdpater As SqlDataAdapter)
Dim carToUpdate As Integer = 0
Dim newPetName As String = ""
Console.Write("Enter CarID of car to modify: ")
Try
carToUpdate = Integer.Parse(Console.ReadLine())
Catch ex As FormatException
Console.WriteLine(ex.Message)
Return
End Try
Console.Write("Enter new pet name: ")
newPetName = Console.ReadLine()
Dim sql As String = _
String.Format("Update Inventory Set PetName = '{0}' Where CarID = '{1}'", _
newPetName, carToUpdate)
Dim cmd As SqlCommand = New SqlCommand(sql, cnObj)
dAdpater.UpdateCommand = cmd
Dim carRowToUpdate As DataRow() = _
dsCarInventory.Tables("Inventory").Select(String.Format("CarID = '{0}'", _
carToUpdate))
carRowToUpdate(0)("PetName") = newPetName
Try
dAdpater.Update(dsCarInventory.Tables("Inventory"))
Catch
Console.WriteLine("Sorry! Error! Canceling request")
End Try
End Sub
In this case, when you select a specific row (via the Select() method), the RowState value of
said row is automatically set to DataRowState.Modified. The only other point of interest here is that
the Select() method returns an array of DataRow objects; therefore, you must specify the exact row
you wish to modify.
5785ch24.qxd 3/31/06 11:32 AM Page 824
CHAPTER 24 ■ DATABASE ACCESS WITH ADO.NET 825
Setting the DeleteCommand Property
Last but not least, you have the following update to the DeleteCar() method:
Private Sub DeleteCar(ByVal dAdpater As SqlDataAdapter)
' Get ID of car to delete, then do so.
Dim sql As String = _
String.Format("Delete from Inventory where CarID = '{0}'", carToDelete)
Dim cmd As SqlCommand = New SqlCommand(sql, cnObj)
dAdpater.DeleteCommand = cmd
Dim carRowToDelete As DataRow() = _
dsCarInventory.Tables("Inventory").Select(String.Format("CarID = '{0}'", _
carToDelete))
carRowToDelete(0).Delete()
Try
dAdpater.Update(dsCarInventory.Tables("Inventory"))
Catch
Console.WriteLine("Sorry! Error! Canceling request")
End Try
End Sub
In this case, you find the row you wish to delete (again using the Select() method) and then set
the RowState property to DataRowState.Deleted by calling Delete().
■Source Code The CarsInvertoryUpdaterDS project is included under the Chapter 24 subdirectory.
Autogenerating SQL Commands Using
CommandBuilder Types
You might agree that working with data adapters can entail a fair amount of code, given the need
to build each of the four command objects and the associated connection string (or DbConnection-
derived object). To help simplify matters, each of the ADO.NET data providers that ships with .NET 2.0
provides a command builder type. Using this type, you are able to automatically obtain command
objects that contain the correct Insert, Delete, and Update command types based on the initial
Select statement.
The SqlCommandBuilder automatically generates the values contained within the SqlDataAdapter’s
InsertCommand, UpdateCommand, and DeleteCommand properties based on the initial SelectCommand.
Clearly, the benefit is that you have no need to build all the SqlCommand and SqlParameter types by
hand.
An obvious question at this point is how a command builder is able to build these SQL command
objects on the fly. The short answer is metadata. At runtime, when you call the Update() method of
a data adapter, the related command builder will read the database’s schema data to autogenerate
the underlying insert, delete, and update command objects.
Consider the following example, which deletes a row in a DataSet using the autogenerated SQL
statements.
Sub Main()
Dim theCarsInventory As DataSet = New DataSet("CarsDS")
' Make connection.
Dim cn As SqlConnection = _
New SqlConnection("server=(local);User ID=sa;Pwd=;database=Cars")
5785ch24.qxd 3/31/06 11:32 AM Page 825
CHAPTER 24 ■ DATABASE ACCESS WITH ADO.NET826
' Autogenerate INSERT, UPDATE, and DELETE commands
' based on exiting SELECT command.
Dim da As SqlDataAdapter = New SqlDataAdapter("SELECT * FROM Inventory", cn)
Dim invBuilder As SqlCommandBuilder = New SqlCommandBuilder(da)
' Fill data set.
da.Fill(theCarsInventory, "Inventory")
PrintDataSet(theCarsInventory)
' Delete row based on user input and update database.
Try
Console.Write("Row # to delete: ")
Dim rowToDelete As Integer = Integer.Parse(Console.ReadLine())
theCarsInventory.Tables("Inventory").Rows(rowToDelete).Delete()
da.Update(theCarsInventory, "Inventory")
Catch e As Exception
Console.WriteLine(e.Message)
End Try
' Refill and reprint Inventory table.
theCarsInventory = New DataSet()
da.Fill(theCarsInventory, "Inventory")
PrintDataSet(theCarsInventory)
End Sub
In the previous code, notice that you made no use of the command builder object
(SqlCommandBuilder in this case) beyond passing in the data adapter object as a constructor
parameter. As odd as this may seem, this is all you are required to do (at a minimum). Under the
hood, this type will configure the data adapter with the remaining command objects.
Now, while you may love the idea of getting something for nothing, do understand that com-
mand builders come with some critical restrictions. Specifically, a command builder is only able to
autogenerate SQL commands for use by a data adapter if all of the following conditions are true:
• The Select command interacts with only a single table (e.g., no joins).
• The single table has been attributed with a primary key.
• The column(s) representing the primary key is accounted for in your SQL Select statement.
If these restrictions are unacceptable, rest assured that much of the ADO.NET “grunge” code
will be autogenerated by the Visual Studio 2005 Windows Forms and ASP.NET designer surfaces and
integrated wizards. You’ll see the Windows Forms ADO.NET wizards in action at the conclusion of
this chapter (and their ASP.NET counterparts in Part 7).
■Source Code The MySqlCommandBuilder project is found under the Chapter 24 subdirectory.
Multitabled DataSets and DataRelation Objects
Currently, all of this chapter’s examples involved DataSets that contained a single DataTable object.
However, the power of the disconnected layer really comes to light when a DataSet object contains
numerous interrelated DataTables. In this case, you are able to insert any number of DataRelation
objects into the DataSet’s DataRelation collection to account for the interdependencies of the tables.
Using these objects, the client tier is able to navigate between the table data without incurring
network round-trips.
5785ch24.qxd 3/31/06 11:32 AM Page 826
CHAPTER 24 ■ DATABASE ACCESS WITH ADO.NET 827
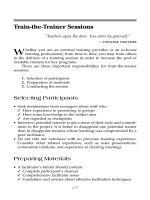
Figure 24-17. Viewing related DataTables
To illustrate the use of data relation objects, create a new Windows Forms project called Multi-
tabledDataSet. The GUI is simple enough. In Figure 24-17 you can see three DataGridView widgets
that hold the data retrieved from the Inventory, Orders, and Customers tables of the Cars database.
In addition, the single Button pushes any and all changes back to the data store.
To keep things simple, the MainForm will make use of command builders to autogenerate the
SQL commands for each of the three SqlDataAdapters (one for each table). Here is the initial update
to the Form-derived type:
Public Class MainForm
' Formwide DataSet.
Private carsDS As DataSet = New DataSet("CarsDataSet")
' Make use of command builders to simplify data adapter configuration.
Private sqlCBInventory As SqlCommandBuilder
Private sqlCBCustomers As SqlCommandBuilder
Private sqlCBOrders As SqlCommandBuilder
' Our data adapters (for each table).
Private invTableAdapter As SqlDataAdapter
Private custTableAdapter As SqlDataAdapter
Private ordersTableAdapter As SqlDataAdapter
' Formwide connection object.
Private cn As SqlConnection = _
New SqlConnection("server=(local);uid=sa;pwd=;database=Cars")
End Class
5785ch24.qxd 3/31/06 11:32 AM Page 827
CHAPTER 24 ■ DATABASE ACCESS WITH ADO.NET828
The Form’s constructor does the grunge work of creating your data-centric member variables and
filling the DataSet. Also note that there is a call to a private helper function, BuildTableRelationship(),
as shown here:
Sub New()
' This call is required by the Windows Forms designer.
InitializeComponent()
CenterToScreen()
' Create adapters.
invTableAdapter = New SqlDataAdapter("Select * from Inventory", cn)
custTableAdapter = New SqlDataAdapter("Select * from Customers", cn)
ordersTableAdapter = New SqlDataAdapter("Select * from Orders", cn)
' Autogenerate commands.
sqlCBInventory = New SqlCommandBuilder(invTableAdapter)
sqlCBOrders = New SqlCommandBuilder(ordersTableAdapter)
sqlCBCustomers = New SqlCommandBuilder(custTableAdapter)
' Add tables to DS.
invTableAdapter.Fill(carsDS, "Inventory")
custTableAdapter.Fill(carsDS, "Customers")
ordersTableAdapter.Fill(carsDS, "Orders")
' Build relations between tables.
BuildTableRelationship()
' Bind to grids
dataGridViewInventory.DataSource = carsDS.Tables("Inventory")
dataGridViewCustomers.DataSource = carsDS.Tables("Customers")
dataGridViewOrders.DataSource = carsDS.Tables("Orders")
End Sub
The BuildTableRelationship() helper function does just what you would expect. Recall
that the Cars database expresses a number of parent/child relationships, accounted for with the
following code:
Private Sub BuildTableRelationship()
' Create CustomerOrder data relation object.
Dim dr As DataRelation = New DataRelation("CustomerOrder", _
carsDS.Tables("Customers").Columns("CustID"), _
carsDS.Tables("Orders").Columns("CustID")) _
carsDS.Relations.Add(dr)
' Create InventoryOrder data relation object.
dr = New DataRelation("InventoryOrder", _
carsDS.Tables("Inventory").Columns("CarID"), _
carsDS.Tables("Orders").Columns("CarID")) _
carsDS.Relations.Add(dr)
End Sub
Now that the DataSet has been filled and disconnected from the data source, you can manipulate
each table locally. To do so, simply insert, update, or delete values from any of the three DataGridViews.
When you are ready to submit the data back for processing, click the Form’s Update button. The
code behind the Click event should be clear at this point:
Private Sub btnUpdate_Click(ByVal sender As System.Object, _
ByVal e As System.EventArgs) Handles btnUpdate.Click
5785ch24.qxd 3/31/06 11:32 AM Page 828
CHAPTER 24 ■ DATABASE ACCESS WITH ADO.NET 829
Try
invTableAdapter.Update(carsDS, "Inventory")
custTableAdapter.Update(carsDS, "Customers")
ordersTableAdapter.Update(carsDS, "Orders")
Catch ex As Exception
MessageBox.Show(ex.Message)
End Try
End Sub
Once you update, you will find that each table in the Cars database has been correctly altered.
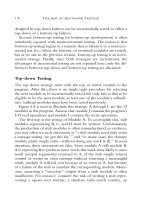
Navigating Between Related Tables
To illustrate how a DataRelation allows you to move between related tables programmatically,
extend your GUI to include a new Button type and a related TextBox. The end user is able to enter
the ID of a customer and obtain all the information about that customer’s order, which is placed in
a simple message box. The Button’s Click event handler is implemented as follows:
Private Sub btnGetInfo_Click(ByVal sender As System.Object, _
ByVal e As System.EventArgs) Handles btnGetInfo.Click
Dim strInfo As String = ""
Dim drCust As DataRow = Nothing
Dim drsOrder As DataRow() = Nothing
' Get the specified CustID from the TextBox.
Dim theCust As Integer = Integer.Parse(Me.txtCustID.Text)
' Now based on CustID, get the correct row in Customers table.
drCust = carsDS.Tables("Customers").Rows(theCust)
strInfo &= "Cust #" & drCust("CustID").ToString() & "" & Chr(10) & ""
' Navigate from customer table to order table.
drsOrder = drCust.GetChildRows(carsDS.Relations("CustomerOrder"))
' Get order number.
For Each r As DataRow In drsOrder
strInfo &= "Order Number: " & r("OrderID").ToString() & "" & Chr(10) & ""
Next
' Now navigate from order table to inventory table.
Dim drsInv As DataRow() = _
drsOrder(0).GetParentRows(carsDS.Relations("InventoryOrder"))
' Get Car info.
For Each r As DataRow In drsInv
strInfo &= "Make: " & r("Make").ToString() & "" & Chr(10) & ""
strInfo &= "Color: " & r("Color").ToString() & "" & Chr(10) & ""
strInfo &= "Pet Name: " & r("PetName").ToString() & "" & Chr(10) & ""
Next
MessageBox.Show(strInfo, "Info based on cust ID")
End Sub
As you can see, the key to moving between data tables is to use a handful of methods defined
by the DataRow type. Let’s break this code down step by step. First, you obtain the correct customer
ID from the text box and use it to grab the correct row in the Customers table (using the Rows property,
of course). Next, you navigate from the Customers table to the Orders table, using the CustomerOrder
data relation. Notice that the DataRow.GetChildRows() method allows you to grab rows from your child
table. Once you do, you can read information out of the table.
Your final step is to navigate from the Orders table to its parent table (Inventory) using the
GetParentRows() method. At this point, you can read information from the Inventory table using the
Make, PetName, and Color columns. Figure 24-18 shows one possible output.
5785ch24.qxd 3/31/06 11:32 AM Page 829
CHAPTER 24 ■ DATABASE ACCESS WITH ADO.NET830
Hopefully, this last example has you convinced of the usefulness of the DataSet type. Given that
a DataSet is completely disconnected from the underlying data source, you can work with an in-
memory copy of data and navigate around each table to make any necessary updates, deletes, or
inserts. Once you’ve finished, you can then submit your changes to the data store for processing.
■Source Code The MultitabledDataSetApp project is included under the Chapter 24 subdirectory.
We’re Off to See the (Data) Wizard
At this point in the chapter, you have seen numerous ways to interact with the types of ADO.NET in
a “wizard-free” manner. While it is (most definitely) true that understanding the ins and outs of work-
ing with your data provider is quite important, it is also true that this can lead to hand cramps from
typing the large amount of boilerplate code. To wrap things up, therefore, I’d like to point out a few
data-centric wizards you may wish to make use of when buildingWindows Forms applications.
Be aware that space does not allow me to comment on all of the UI-centric data wizards pro-
vided by Visual Studio 2005, but to illustrate the basics, let’s examine some additional configuration
options of the DataGridView widget. Assume you have created a new Windows Forms application
(named EasyDataAccessForm) that has a single Form containing a DataGridView control named
inventoryDataGridView. Using the designer, activate the inline editor for this widget, and from the
Choose Data Source drop-down listbox, click the Add Project Data Source link (see Figure 24-19).
This will launch the Data Source Configuration Wizard. On the first step, simply select the
Database icon and click Next. On the second step, click New Connection and establish a connection
to the Cars database (using the same set of steps described earlier in this chapter within the “Connect-
ing to the Cars Database from Visual Studio 2005” section). The third step allows you to inform the
wizard to store the connection string within an external app.config file (which is generally a good
idea) within a properly configured <connectionStrings> element. As the final step, you are able to
select which database objects you wish to account for within the generated DataSet, which for your
purposes here will simply be the Inventory table, as shown in Figure 24-20.
Figure 24-18. Navigating data relations
5785ch24.qxd 3/31/06 11:32 AM Page 830
CHAPTER 24 ■ DATABASE ACCESS WITH ADO.NET 831
Once you complete the wizard, you will notice that the DataGridView automatically displays the
column names within the designer. In fact, if you run your application as is, you will find the contents
of the Inventory table displayed within the grid’s UI!
As you might be suspecting, this wizard updated your Form with numerous lines of code;
however, if you examine the code behind the Forms designer, you find little else than the following
implementation of the Form’s Load event:
Figure 24-19. Adding a data source
Figure 24-20. Selecting the Inventory table
5785ch24.qxd 3/31/06 11:32 AM Page 831
Public Class MainForm
Private Sub MainForm_Load(ByVal sender As System.Object, _
ByVal e As System.EventArgs) Handles MyBase.Load
'TODO: This line of code loads data into the 'CarsDataSet.Inventory' table.
'You can move, or remove it, as needed.
Me.InventoryTableAdapter.Fill(Me.CarsDataSet.Inventory)
End Sub
End Class
To understand what this code is in fact doing, you need to first understand the role of strongly
typed DataSet objects.
Strongly Typed DataSets
Strongly typed DataSets (as the name implies) allow you to interact with a DataSet’s internal tables
using database-specific properties, methods, and events, rather than via the generalized Tables
property. If you activate the View ➤ Class View menu option of Visual Studio 2005, you will find that
the wizard has created a new type deriving from DataSet named CarsDataSet. As you can see in
Figure 24-21, this class type defines a number of members that allow you to select, modify, and
update its contents.
CHAPTER 24 ■ DATABASE ACCESS WITH ADO.NET832
Figure 24-21. The strongly typed DataSet
Once the wizard completes its task, it places a member variable of type CarDataSet within your
Form’s *.Designer.vb file (which is the same member variable manipulated in the Load event of
your Form):
Partial Class MainForm
Inherits System.Windows.Forms.Form
Friend WithEvents CarsDataSet As EasyDataAccessForm.CarsDataSet
End Class
5785ch24.qxd 3/31/06 11:32 AM Page 832
The Autogenerated Data Component
In addition to the strongly typed DataSet, the wizard generated a data component (named
InventoryTableAdapter in this example) that encapsulates the underlying data connection, data
adapter, and command objects used to interact with the Inventory table, as you see in Figure 24-22.
CHAPTER 24 ■ DATABASE ACCESS WITH ADO.NET 833
Figure 24-22. The autogenerated table adapter data component
As well, this component defines custom Fill() and Update() methods that are tailor-made to
operate on your CarsDataSet, in addition to a set of members used to insert, update, or delete row
data from the internal Inventory table. I’ll leave it up to interested readers to dive into the implemen-
tation details of each member. The good news is that after all your work in this chapter, the code
behind each member should look quite familiar.
■Source Code The EasyDataAccessForm project is included under the Chapter 24 subdirectory.
■Note If you are interested in taking a deeper look at the ADO.NET object model, including the numerous Visual
Studio 2005 designers, check out
Pro ADO.NET 2.0
by Sahil Malik (Apress, 2005).
Summary
ADO.NET is a new data access technology developed with the disconnected n-tier application
firmly in mind. The System.Data namespace contains most of the core types you need to program-
matically interact with rows, columns, tables, and views. As you have seen, the .NET platform ships
with numerous data providers that allow you to leverage the connected and disconnected layers of
ADO.NET.
5785ch24.qxd 3/31/06 11:32 AM Page 833
CHAPTER 24 ■ DATABASE ACCESS WITH ADO.NET834
Using connection objects, command objects, and data reader objects of the connected layer,
you are able to select, update, insert, and delete records. As you have seen, command objects support
an internal parameter collection, which can be used to add some type safety to your SQL queries
and is quite helpful when triggering stored procedures.
The centerpiece of the disconnected layer is the DataSet. This type is an in-memory representation
of any number of tables and any number of optional interrelationships, constraints, and expressions.
The beauty of establishing relations on your local tables is that you are able to programmatically
navigate between them while disconnected from the remote data store.
You also examined the role of the data adapter in this chapter. Using this type (and the related
SelectCommand, InsertCommand, UpdateCommand, and DeleteCommand properties), the adapter can
resolve changes in the DataSet with the original data store. Also, you learned about the connected
layer of ADO.NET and came to understand the role of data reader types.
5785ch24.qxd 3/31/06 11:32 AM Page 834
Web Applications and XML
Web Services
PART 7
■ ■ ■
5785ch25.qxd 3/31/06 11:39 AM Page 835
5785ch25.qxd 3/31/06 11:39 AM Page 836
837
CHAPTER 25
■ ■ ■
Building ASP.NET 2.0 Web Pages
Until now, all of the example applications in this text have focused on console-based and Windows
Forms front ends. In the next three chapters, you’ll explore how the .NET platform facilitates the
construction of browser-based presentation layers using a technology named ASP.NET. To begin, you’ll
quickly review a number of key web-centric concepts (HTTP, HTML, client-side, and server-side script)
and examine the role of the Microsoft’s commercial web server (IIS) as well as the ASP.NET 2.0 devel-
opment server, WebDev.WebServer.exe.
With this web primer out of the way, the remainder of this chapter concentrates on the structure
of ASP.NET web pages (including the single-page and enhanced code-behind model) as well as the
composition of a Page type. This chapter will also define the role of the web.config file, which will be
used throughout the remainder of this text. Do be aware that the information presented here will
serve as a foundation for the next two chapters, when we examine web controls, themes, master pages,
and numerous state management techniques.
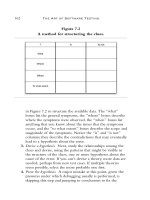
The Role of HTTP
Web applications are very different animals from traditional desktop applications (to say the least).
The first obvious difference is that a production-level web application will always involve at least two
networked machines (of course, during development it is entirely possible to have a single machine
play the role of both client and server). Given this fact, the machines in question must agree upon
a particular wire protocol to determine how to send and receive data. The wire protocol that connects
the computers in question is the Hypertext Transfer Protocol (HTTP).
When a client machine launches a web browser (such as Netscape Navigator, Mozilla Firefox, or
Microsoft Internet Explorer), an HTTP request is made to access a particular resource (such as an *.aspx
or *.htm file) on the remote server machine. HTTP is a text-based protocol that is built upon a standard
request/response paradigm. For example, if you navigate to , the
browser software leverages a web technology termed Domain Name Service (DNS) that converts the reg-
istered URL into a four-part, 32-bit numerical value, termed an IP address. At this point, the browser
opens a socket connection (typically via port 80) and sends the HTTP request for the default page at the
website, at which point the browser displays the site’s default page.
Once the user posts back to the web server, it is then able to process the incoming HTTP request
and may scrape out any client-supplied input values (such as values within a text box) in order to
format a proper HTTP response. Web programmers may leverage any number of technologies (CGI,
ASP, ASP.NET, Java servlets, etc.) to dynamically generate the content to be emitted into the HTTP
response. At this point, the client-side browser renders the HTML sent from the web server. Figure 25-1
illustrates the basic HTTP request/response cycle.
5785ch25.qxd 3/31/06 11:39 AM Page 837
CHAPTER 25 ■ BUILDING ASP.NET 2.0 WEB PAGES838
Another aspect of web development that is markedly different from traditional desktop program-
ming is the fact that HTTP is an essentially stateless wire protocol. As soon as the web server emits
a response to the client, everything about the previous interaction is forgotten. Therefore, as a web
developer, it is up to you take specific steps to “remember” information (such as items in a shopping
cart) about the users who are currently logged on to your site. As you will see in Chapter 27, ASP.NET
provides numerous ways to handle state, many of which are commonplace to any web platform (ses-
sion variables, cookies, and application variables) as well as some new techniques such as view state,
the cache object, and the ASP.NET 2.0 profile management API.
Understanding Web Applications and Web Servers
A web application can be understood as a collection of files (*.htm, *.asp, *.aspx, image files, etc.)
and related components (such as a .NET code library or legacy COM server) stored within a particu-
lar set of directories on a given web server. As shown in Chapter 27, ASP.NET web applications have
a specific life cycle and provide numerous events (such as initial startup or final shutdown) that you
can hook into to perform specialized processing.
A web server is a software product in charge of hosting your web applications, and it typically
provides a number of related services such as integrated security, File Transfer Protocol (FTP) support,
mail exchange services, and so forth. Internet Information Server (IIS) is Microsoft’s enterprise-level
web server product, and as you would guess, it has intrinsic support for classic ASP as well as ASP.NET
web applications.
When you build ASP.NET web applications, you will often need to interact with IIS. Be aware,
however, that IIS is not automatically selected when you install the Windows Server 2003 or Windows
XP Professional Edition. Sadly, you can’t install IIS on the Home editions of the Windows operating
system, but hang tight! ASP.NET does provide an alternative server for testing and development,
which I’ll comment on shortly.
Depending on the configuration of your development machine, you may be required to manually
install IIS before proceeding through this chapter. To do so, simply access the Add/Remove Program
applet from the Control Panel folder and select Add/Remove Windows Components.
■Note Ideally, your development machine will have IIS installed
before
you install the .NET Framework. If you
install IIS
after
you install the .NET Framework, none of your ASP.NET web applications will execute correctly (you
will simply get back a blank page). Luckily, you can reconfigure IIS to host .NET applications by running the
aspnet_regiis.exe command-line tool and specifying the /i option.
Figure 25-1. The HTTP request-and-response cycle
5785ch25.qxd 3/31/06 11:39 AM Page 838
CHAPTER 25 ■ BUILDING ASP.NET 2.0 WEB PAGES 839
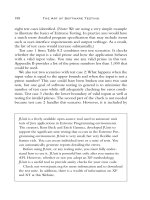
Assuming you have IIS properly installed on your workstation, you can interact with IIS from
the Administrative Tools folder (located in the Control Panel folder) by double-clicking the Internet
Information Services applet. For the purposes of this chapter, you are concerned only with the
Default Web Site node (see Figure 25-2).
Working with IIS Virtual Directories
A single IIS installation is able to host numerous web applications, each of which resides in a virtual
directory. Each virtual directory is mapped to a physical directory on the local hard drive. Therefore,
if you create a new virtual directory named CarsRUs, the outside world can navigate to this site
using a URL such as (assuming your site’s IP address has been registered
with the world at large). Under the hood, the virtual directory maps to a physical root directory such
as C:\inetpub\wwwroot\AspNetCarsSite, which contains the content of the web application.
When you create ASP.NET web applications usingVisual Studio 2005, you have the option of
generating a new virtual directory for the current website. However, you are also able to manually
create a virtual directory by hand. For the sake of illustration, assume you wish to create a simple
web application named Cars. The first step is to create a new folder on your machine to hold the
collection of files that constitute this new site (which I will assume during this example is C:\CodeTests\
CarsWebSite).
Next, you need to create a new virtual directory to host the Cars site. Simply right-click the
Default Web Site node of IIS and select New ➤ Virtual Directory from the context menu. This menu
selection launches an integrated wizard. Skip past the welcome screen and give your website a name
(Cars). Next, you are asked to specify the physical folder on your hard drive that contains the various
files and images that represent this site (in this case, C:\CodeTests\CarsWebSite).
The final step of the wizard prompts you for some basic traits about your new virtual directory
(such as read/write access to the files it contains, the ability to view these files from a web browser,
the ability to launch executables [e.g., CGI applications], etc.). For this example, the default selections
are just fine (be aware that you can always modify your selections after running this tool using various
right-click-activated Property dialog boxes integrated within IIS). When you are finished, you will
see that your new virtual directory has been registered with IIS (see Figure 25-3).
Figure 25-2. The IIS applet
5785ch25.qxd 3/31/06 11:39 AM Page 839
CHAPTER 25 ■ BUILDING ASP.NET 2.0 WEB PAGES840
We’ll add some web content to this virtual directory in just a moment; however, before we do,
allow me to introduce a new web server, which is the programmer’s alternative to IIS.
The ASP.NET 2.0 Development Server
Prior to .NET 2.0, ASP.NET developers were required to make use of IIS virtual directories during the
development and testing of their web content. In many cases, this tight dependency to IIS made team
development more complex than necessary (not to mention that many IT professionals frowned
upon installing IIS on every developer’s machine). Thankfully, as of ASP.NET 2.0, we are provided
with a lightweight web server named WebDev.WebServer.exe. This utility allows developers to host
an ASP.NET 2.0 web application outside the bounds of IIS. Using this tool, you can build and test
your web pages from any directory on your machine (which is quite helpful for team development
scenarios and for building ASP.NET 2.0 web programs on Windows XP Home Edition, which does
not support IIS installations).
■Note WebDev.WebServer.exe cannot be used to test or host classic (COM-based) ASP web applications. This
web server can only host ASP.NET web applications and/or .NET-based XML web services.
When building a website with Visual Studio 2005, you have the option of using WebDev.
WebServer.exe to host your pages (as you will see a bit later in this chapter). However, you are also
able to manually interact with this tool from a .NET command prompt. If you enter the following
command:
WebDev.WebServer.exe -?
you will be presented with a message box that describes the valid command-line options. In a nutshell,
you will need to specify an unused port (via the /port: option), the root directory of the web appli-
cation (via the /path: option), and an optional virtual path using the /vpath: option (if you do not
supply a /vpath: option, the default is simply /). Consider the following usage:
WebDev.WebServer.exe /port:12345 /path:"C:\CodeTests\CarsWebSite"
Once you have entered this command, you can launch your web browser of choice to request pages.
Thus, if the CarsWebSite folder had a file named Default.aspx, you could enter the following URL:
http://localhost:12345/CarsWebSite/Default.aspx
Figure 25-3. The Cars virtual directory
5785ch25.qxd 3/31/06 11:39 AM Page 840
CHAPTER 25 ■ BUILDING ASP.NET 2.0 WEB PAGES 841
Many of the examples in this chapter and the next will make use of WebDev.WebServer.exe via
Visual Studio 2005, rather than manually constructing a virtual directory under IIS. While this approach
can simplify the development of your web application, do be very aware that this web server is not
intended to host production-level web applications. It is purely intended for development and test-
ing purposes. Once a web application is ready for prime time, your site will need to be copied to an
IIS virtual directory.
■Note As yet another alternative web server, be aware that the Mono project (see Chapter 1) provides a free ASP.NET
plug-in for the Apache web server.This makes it possible to build and host ASP.NET web applications on operating sys-
tems other than MS Windows. If you are interested, check out for details.
The Role of HTML
Now that you have configured a directory to host your web application, and have chosen a web server
to serve as the host, you need to create the content itself. Recall that web application is simply the
term given to the set of files that constitute the functionality of the site. To be sure, a vast number of
these files will contain syntactic tokens defined by the Hypertext Markup Language (HTML). HTML
is a standard markup language used to describe how literal text, images, external links, and various
HTML-based UI widgets are to be rendered within the client-side browser.
This particular aspect of web development is one of the major reasons why many programmers
dislike building web-based programs. While it is true that modern IDEs (including Visual Studio 2005)
and web development platforms (such as ASP.NET) generate much of the HTML automatically, you
will do well to have a working knowledge of HTML as you work with ASP.NET.
While this section will most certainly not cover all aspects of HTML (by any means), let’s check
out some basics and build a simple web application using HTML, classic (COM-based) ASP, and IIS.
This will serve as a roadmap for those of you who are coming to ASP.NET from a traditional desktop
application development background.
■Note If you are already comfortable with the overall process of web development, feel free to skip ahead to the
section “Problems with Classic ASP.”
HTML Document Structure
An HTML file consists of a set of tags that describe the look and feel of a given web page. As you would
expect, the basic structure of an HTML document tends to remain the same. For example, *.htm files
(or, alternatively, *.html files) open and close with <html> and </html> tags, typically define a <body>
section, and so forth. Keep in mind that HTML is not case sensitive. Therefore, in the eyes of the host-
ing browser, <HTML>, <html>, and <Html> are identical.
To illustrate some HTML basics, open Visual Studio 2005, insert an empty HTML file using the
File ➤ New ➤ File menu selection, and save this file under your C:\CodeTests\CarsWebSite directory
as default.htm. As you can see, the initial markup is rather uneventful:
<!DOCTYPE html PUBLIC "-//W3C//DTD XHTML 1.0 Transitional//EN"
" /><html xmlns=" >
<head>
<title>Untitled Page</title>
</head>
<body>
5785ch25.qxd 3/31/06 11:39 AM Page 841
CHAPTER 25 ■ BUILDING ASP.NET 2.0 WEB PAGES842
</body>
</html>
First of all, notice that this HTML file opens with a DOCTYPE processing instruction (at least
when you use Visual Studio 2005). This informs the IDE that the contained HTML tags should be
validated against the XHTML standard. As you may know, traditional HTML was very “loose” in its
syntax. For example, it was permissible to define an opening element (such as <br>, for a line break)
that did not have a corresponding closing break (</br> in this case). The XHTML standard is a W3C
specification that adds some much needed rigor to the HTML markup language.
■Note By default, Visual Studio 2005 validates all HTML documents against the XHTML 1.0 Transitional validation
scheme. Simply put, HTML
validation schemes
are used to ensure the markup is in sync with specific standards. If
you wish to specify an alternative validation scheme, activate the Tools ➤ Options dialog box, then select the
Validation node under HTML. If you would rather not see validation errors, simply uncheck the Show Errors check
box (which I will assume you have done during the remainder of this chapter).
The <html> and </html> tags are used to mark the beginning and end of your document. Notice
that the opening <html> tag is further qualified with an xmlns (XML namespace) attribute that quali-
fies the various tags that may appear within this document (again, by default these tags are based
on the XHTML standard). Web browsers use these particular tags to understand where to begin
applying the rendering formats specified in the body of the document. The <body> scope is where
the vast majority of the actual content is defined. To spruce things up just a bit, update the title of
your page as follows:
<head>
<title>This is the Cars web site</title>
</head>
Not surprisingly, the <title> tags are used to specify the text string that should be placed in the
title bar of the calling web browser.
HTML Form Development
The real meat of an *.htm file occurs within the scope of the <form> elements. An HTML form is
simply a named group of related UI elements used to gather user input, which is then transmitted
to the web application via HTTP. Do not confuse an HTML form with the entire display area shown
by a given browser. In reality, an HTML form is more of a logical grouping of widgets placed in the
<form> and </form> tag set:
<html xmlns=" >
<head>
<title>This Is the Cars Web site</title>
</head>
<body>
<form id="defaultPage">
<! Insert web UI content here ->
</form>
</body>
</html>
This form has been assigned the ID and name of “defaultPage”. Typically, the opening <form>
tag supplies an action attribute that specifies the URL to which to submit the form data, as well as
the method of transmitting that data itself (POST or GET). You will examine this aspect of the <form>
5785ch25.qxd 3/31/06 11:39 AM Page 842
CHAPTER 25 ■ BUILDING ASP.NET 2.0 WEB PAGES 843
tag in just a bit. For the time being, let’s look at the sorts of items that can be placed in an HTML
form (in addition to simple literal text). Visual Studio 2005 provides an HTML tab on the Toolbox
that allows you to select each HTML-based UI widget, as shown in Figure 25-4.
Building an HTML-based User Interface
Before you add the HTML widgets to the HTML <form>, it is worth pointing out that Visual Studio
2005 allows you to edit the overall look and feel of the *.htm file itself using the integrated HTML
designer and the Properties window. If you select DOCUMENT from the Properties window, as
shown in Figure 25-5, you are able to configure various aspects of the HTML page, such as the back-
ground color.
Figure 25-4. The HTML tab of the Toolbox
Figure 25-5. Editing an HTML document via the VS 2005 Properties window
5785ch25.qxd 3/31/06 11:39 AM Page 843
CHAPTER 25 ■ BUILDING ASP.NET 2.0 WEB PAGES844
Update the <body> of the default.htm file to display some literal text that prompts the user to
enter a user name and password, and choose a background color of your liking (be aware that you
can enter and format textual content by typing directly on the HTML designer):
<html xmlns=" >
<head>
<title>This is the Cars Web Site</title>
</head>
<body bgcolor="NavajoWhite">
<! Prompt for user input >
<h1 align="center"> The Cars Login Page</h1>
<p align="center"> <br/>
Please enter your <i>user name</i> and <i>password</i>.
</p>
<form id="defaultPage">
</form>
</body>
</html>
Now let’s build the HTML form itself. In general, each HTML widget is described using a name
attribute (used to identify the item programmatically) and a type attribute (used to specify which UI
element you are interested in placing in the <form> declaration). Depending on which UI widget you
manipulate, you will find additional attributes specific to that particular item that can be modified
using the Properties window.
The UI you will build here will contain two text fields (one of which is a Password widget) and
two button types (one to submit the form data and the other to reset the form data to the default
values):
<! Build a form to get user info >
<form id="defaultPage">
<p align="center">
User Name:
<input id="txtUserName" type="text" name="txtUserName"></p>
<p align="center">
Password:
<input name="txtPassword" type="password" id="txtPassword"></p>
<p align="center">
<input name="btnSubmit" type="submit" value="Submit" id="btnSubmit">
<input name="btnReset" type="reset" value="Reset" id="btnReset">
</p>
</form>
Notice that you have assigned relevant names and IDs to each widget (txtUserName, txtPassword,
btnSubmit, and btnReset). Of greater importance, note that each input item has an extra attribute
named type that marks these buttons as UI items that automatically clear all fields to their initial
values (type = "reset"), mask the input as a password (type="password"), or send the form data to
the recipient (type = "submit"). Figure 25-6 displays the page thus far.
5785ch25.qxd 3/31/06 11:39 AM Page 844
CHAPTER 25 ■ BUILDING ASP.NET 2.0 WEB PAGES 845
The Role of Client-side Scripting
In addition to HTML UI elements, a given *.htm file may contain blocks of script code that will be
emitted into the response stream and processed by the requesting browser. There are two major
reasons why client-side scripting is used:
• To validate user input before posting back to the web server
• To interact with the Document Object Model (DOM) of the target browser
Regarding the first point, understand that the inherent evil of a web application is the need to
make frequent round-trips (termed postbacks) to the server machine to update the HTML rendered
into the browser. While postbacks are unavoidable, you should always be mindful of ways to mini-
mize travel across the wire. One technique that saves round-trips is to use client-side scripting to
validate user input before submitting the form data to the web server. If an error is found (such as
not supplying data within a required field), you can prompt the user of the error without incurring
the cost of posting back to the web server (after all, nothing is more annoying to users than posting
back on a slow connection, only to receive instructions to address input errors!).
In addition to validating user input, client-side scripts can also be used to interact with the
underlying object model (the DOM) of the web browser itself. Most commercial browsers expose
a set of objects that can be leveraged to control how the browser should behave. One major annoyance
is the fact that different browsers tend to expose similar, but not identical, object models. Thus, if
you emit a block of client-side script code that interacts with the DOM, it may not work identically
on all browsers.
■Note ASP.NET provides the HttpRequest.Browser property, which allows you to determine at runtime the
capacities of the browser that sent the current request.
There are many scripting languages that can be used to author client-side script code. Two of
the more popular are VBScript and JavaScript. VBScript is a subset of the Visual Basic 6.0 programming
language. Be aware that Microsoft Internet Explorer (IE) is the only web browser that has built-in
support for client-side VBScript support (other browsers may or may not provide optional plug-ins).
Thus, if you wish your HTML pages to work correctly in any commercial web browser, do not use
VBScript for your client-side scripting logic.
Figure 25-6. The initial crack at the default.htm page
5785ch25.qxd 3/31/06 11:39 AM Page 845
CHAPTER 25 ■ BUILDING ASP.NET 2.0 WEB PAGES846
The other popular scripting language is JavaScript. Be very aware that JavaScript is in no way,
shape, or form a subset of the Java language. While JavaScript and Java have a somewhat similar
syntax, JavaScript is not a full-fledged OOP language, and thus is far less powerful than Java. The
good news is that all modern-day web browsers support JavaScript, which makes it a natural candi-
date for client-side scripting logic.
■Note To further confuse the issue, recall that JScript .NET is a managed language that can be used to build
valid .NET assemblies using a scripting-like syntax.
A Client-side Scripting Example
To illustrate the role of client-side scripting, let’s first examine how to intercept events sent from
client-side HTML GUI widgets. Assume you have added an additional HTML button (btnHelp) to
your default.htm page that allows the user to view help information. To capture the Click event for
this button, activate the HTML view and select your button from the left drop-down list. Using the
right drop-down list, select the onclick event. This will add an onclick attribute to the definition of
the new Button type:
<input id="btnHelp" type="button" value="Help" language="javascript"
onclick="return btnHelp_onclick()" />
Visual Studio 2005 will also create an empty JavaScript function that will be called when the
user clicks the button. Within this stub, simply make use of the alert() method to display a client-
side message box:
<script language="javascript" type="text/javascript">
<!
function btnHelp_onclick() {
alert("Dude, it is not that hard. Click the Submit button!");
}
// >
</script>
Note that the scripting block has been wrapped within HTML comments (<! >). The rea-
son is simple. If your page ends up on a browser that does not support JavaScript, the code will be
treated as a comment block and ignored. Of course, your page may be less functional, but the
upside is that your page will not blow up when rendered by the browser.
Validating the default.htm Form Data
Now, let’s update the default.htm page to support some client-side validation logic. The goal is to
ensure that when the user clicks the Submit button, you call a JavaScript function that checks each
text box for empty values. If this is the case, you pop up an alert that instructs the user to enter the
required data. First, handle an onclick event for the Submit button:
<input name="btnSubmit" type="submit" value="Submit" id="btnSubmit"
language="javascript" onclick="return btnSubmit_onclick()">
Implement this handler like so:
function btnSubmit_onclick(){
// If they forget either item, pop up a message box.
if((defaultPage.txtUserName.value == "") ||
(defaultPage.txtPassword.value == ""))
{
5785ch25.qxd 3/31/06 11:39 AM Page 846
CHAPTER 25 ■ BUILDING ASP.NET 2.0 WEB PAGES 847
alert("You must supply a user name and password!");
return false;
}
return true;
}
At this point, you can open your browser of choice and navigate to the default.htm page
hosted by your Cars virtual directory and test out your client-side script logic:
http://localhost/Cars/default.htm
Submitting the Form Data (GET and POST)
Now that you have a simple HTML page, you need to examine how to transmit the form data back
to the web server for processing. When you build an HTML form, you typically supply an action
attribute on the opening <form> tag to specify the recipient of the incoming form data. Possible
receivers include mail servers, other HTML files, an Active Server Page file, and so forth. For this
example, you’ll use a classic ASP file named ClassicAspPage.asp. Update your default.htm file by
specifying the following attribute in the opening <form> tag:
<form name="defaultPage" id="defaultPage"
action="http://localhost/Cars/ClassicAspPage.asp" method = "GET">
</form>
These extra attributes ensure that when the Submit button for this form is clicked, the form
data will be sent to the ClassicAspPage.asp at the specified URL. When you specify method = "GET"
as the mode of transmission, the form data is appended to the query string as a set of name/value
pairs separated by ampersands:
http://localhost/Cars/ClassicAspPage.asp?txtUserName=
Andrew&txtPassword=Foo$&btnSubmit=Submit
The other method of transmitting form data to the web server is to specify method = "POST":
<form name="defaultPage" id="defaultPage"
action="http://localhost/Cars/ClassicAspPage.asp" method = "POST">
</form>
In this case, the form data is not appended to the query string, but instead is written to a sepa-
rate line within the HTTP header. Using POST, the form data is not directly visible to the outside
world. More important, POST data does not have a character-length limitation (many browsers
have a limit for GET queries). For the time being, make use of HTTP GET to send the form data to
the receiving *.asp page.
Building a Classic ASP Page
A classic ASP page is a hodgepodge of HTML and server-side script code. If you have never worked
with classic ASP, understand that the goal of ASP is to dynamically build HTML on the fly using
server-side script and a small set of COM objects. For example, you may have a server-side VBScript
(or JavaScript) block that reads a table from a data source using classic ADO and returns the rows as
a generic HTML table.
5785ch25.qxd 3/31/06 11:39 AM Page 847
CHAPTER 25 ■ BUILDING ASP.NET 2.0 WEB PAGES848
For this example, the ASP page uses the intrinsic ASP Request COM object to read the values of
the incoming form data (appended to the query string) and echo them back to the caller (not terri-
bly exciting, but it illustrates the point of the request/response cycle). The server-side script logic will
make use of VBScript (as denoted by the language directive).
To do so, create a new HTML file using Visual Studio 2005 and save this file under the name
ClassicAspPage.asp into the folder to which your virtual directory has been mapped (e.g., C:\
CodeTests\CarsWebSite). Implement this page as follows:
<%@ language="VBScript" %>
<html>
<head>
<title>The Cars Page</title>
</head>
<body>
<h1 align="center">Here is what you sent me:</h1>
<P align="center"> <b>User Name: </b>
<%= Request.QueryString("txtUserName") %> <br>
<b>Password: </b>
<%= Request.QueryString("txtPassword") %> <br>
</P>
</body>
</html>
Here, you use the classic ASP Request COM object to call the QueryString() method to examine
the values contained in each HTML widget submitted via method = "GET". The <%= %> notation is
a shorthand way of saying, “Insert the following directly into the outbound HTTP response.” To gain
a finer level of flexibility, you could interact with the ASP Response COM object within a full server-
side script block (denoted by the <%, %> notation). You have no need to do so here; however, the
following is a simple example:
<%
Dim pwd
pwd = Request.QueryString("txtPassword")
Response.Write(pwd)
%>
Obviously, the Request and Response objects of classic ASP provide a number of additional
members beyond those shown here. Furthermore, classic ASP also defines a small number of addi-
tional COM objects (Session, Server, Application, and so on) that you can use while constructing
your web application.
■Note Under ASP.NET, these COM objects are officially dead. However, you will see that the System.Web.UI.Page
base class defines identically named properties that expose objects with similar functionality.
To test the ASP logic, simply load the default.htm page from a browser and submit the form
data. Once the script is processed on the web server, you are returned a brand new (dynamically
generated) HTML display, as you see in Figure 25-7.
5785ch25.qxd 3/31/06 11:39 AM Page 848