Programming in Objective-C 2.0 edition phần 9 pps
Bạn đang xem bản rút gọn của tài liệu. Xem và tải ngay bản đầy đủ của tài liệu tại đây (1.53 MB, 59 trang )
463
Your First iPhone Application
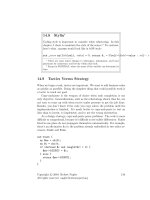
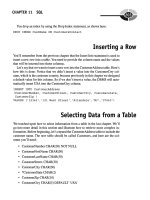
Figure 21.4 New iPhone project iPhone_1 is created.
Returning to your New Project window, select Window-Based Application in the top
rightmost pane and then click on the Choose button.When next prompted to enter the
project name (in the Save As box), enter the text
iPhone_1 and click Save.This also be-
comes your application’s name by default. As you know from previous projects you cre-
ated with Xcode, a new project will now be created for you that contains templates for
files you’ll want to use.This is shown in Figure 21.4.
Depending on your settings and previous uses of Xcode, your window might not ap-
pear precisely as depicted in Figure 21.4.You can choose to follow along with whatever
your current layout resembles or else try to make it match the figure more closely.
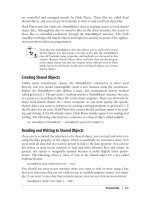
In the top-left corner of your Xcode window, you see a drop-down labeled with your
current selection of SDK and Active Configuration. Because we’re not developing your
application to run directly on the iPhone, you want the SDK set up to run with the
iPhone simulator and the Configuration to be set to Debug. If the drop-down is not la-
beled Simulator | Debug, set the appropriate options as shown in Figure 21.5.
Entering Your Code
Now we’re ready to modify some of your project files. Notice that a class called project-
name AppDelegate.h and project-name AppDelegate.m were created for you, where in this
example project-name is iPhone_1.The work of handling the various buttons and labels in
the type of Window-based application you’re creating gets delegated to a class called project-
name AppDelegate, or in this case,
iPhone_1AppDelegate. In this class we’ll define meth-
Simpo PDF Merge and Split Unregistered Version -
464
Chapter 21 Writing iPhone Applications
Figure 21.5 iPhone_1 project with SDK
and Configuration options set.
ods to respond to actions that occur in the iPhone’s window, such as the pressing of a but-
ton or the movement of a slider.As you’ll see, it’s in the Interface Builder application that
you make the actual connection between these controls and the corresponding methods.
The class will also have instance variables whose values correspond to some control in
your iPhone’s window, such as the name on a label or the text displayed in an editable
text box.These variables are known as outlets, and like your action routines, in Interface
Builder you connect your instance variables to the actual control in the iPhone’s window.
For our first application, we need a method that responds to the action of the pressing of
the button labeled 1.We also need an outlet variable that contains (among other informa-
tion) the text to be displayed in the label that we create at the top of the iPhone’s window.
Edit the file iPhone_1AppDelegate.h to add a new UILabel variable called display
and declare an action method called click1: to respond to the pressing of the button.
Your interface file should look as shown in Program 21.1. (The comment lines automati-
cally inserted at the head of the file are not shown here.)
Program 21.1 iPhone_1AppDelegate.h
#import <UIKit/UIKit.h>
@interface iPhone_1AppDelegate : NSObject <UIApplicationDelegate> {
UIWindow *window;
Simpo PDF Merge and Split Unregistered Version -
465
Your First iPhone Application
UILabel *display;
}
@property (nonatomic, retain) IBOutlet UIWindow *window;
@property (nonatomic, retain) IBOutlet UILabel *display;
- (IBAction) click1: (id) sender;
@end
Notice that iPhone applications import the header file <UIKit/UIKit.h>.This header
file, in turn, imports other UIKit header files, in a similar way that the
Foundation.h
header file imported other header files you needed, such as NSString.h and NSObject.h.
If you want to examine the contents of this file, you have to hunt a bit. Here’s where it’s
installed on my system at the time of this writing:
/Developer/Platforms/iPhoneSimulator.platform/Developer/SDKs/iPhoneSimulat
or2.1.sdk/System/Library/Frameworks/UIKit.framework/Headers/UIKit.h
.
The
iPhone_1AppDelegate class now has two instance variables.The first is a
UIWindow object called window.That instance variable is created automatically when you
create the project, and it references the iPhone’s main window.You added another instance
variable belonging to the
UILabel class called display.This will be an outlet variable that
will be connected to a label.When you set this variable’s text field, it updates the corre-
sponding text for the label in the window. Other methods defined for the
UILabel class
allow you to set and retrieve other attributes of a label, such as its color, the number of
lines, and the size of the font.
You’ll want to use other classes in your interface as you learn more about iPhone pro-
gramming that we won’t describe here.The names of some of these give you a clue as to
their purpose: UITextField, UIFont, UIView, UITableView, UIImageView, UIImage, and
UIButton.
Both the
window and display instance variables are outlets, and in the property decla-
rations for these two variables, note the use of
IBOutlet identifier. IBOutlet is really
defined as nothing in the UIKit header file UINibDeclarations.h. (That is, it is literally
replaced by nothing in the source file by the preprocessor.) However, it’s needed because
Interface Builder looks for
IBOutlet when it reads your header file to determine which
of your variables can be used as outlets.
In the interface file, note that we declare a method called
click1: that takes a single
argument called
sender.When the click1: method is called, the method will be passed
information related to the event in this argument. For example, if you had a single action
routine that you used to handle the pressing of different buttons, the argument can be
queried to ascertain the particular button that was pressed.
The
click1: method is defined to return a value of type IBAction. (This is defined as
void in the UINibDeclarations.h header file.) Like IBOutlet, Interface Builder uses this
Simpo PDF Merge and Split Unregistered Version -
466
Chapter 21 Writing iPhone Applications
identifier when it examines your header file to identify methods that can be used as ac-
tions.
Now it’s time to modify the corresponding
iPhone_1AppDelegate.m implementation
file for your class. Here you synthesize the accessor methods for your
display variable
(the
window access methods are already synthesized for you) and add the definition for
your
click1: method.
Edit your implementation file so that it resembles the one shown in Program 21.1.
Program 21.1 iPhone_1AppDelegate.m
#import ““iPhone_1AppDelegate.h””
@implementation iPhone_1AppDelegate
@synthesize window, display;
- (void) applicationDidFinishLaunching:(UIApplication *)application {
// Override point for customization after application launch
[window makeKeyAndVisible];
}
-(IBAction) click1: (id) sender
{
[display setText: @”1”];
}
- (void) dealloc {
[window release];
[super dealloc];
}
@end
The applicationDidFinishLaunching: method is automatically called by the iPhone
runtime system once; as its name implies, your application has finished launching.This is
the place where you can initialize your instance variables, draw things on the screen, and
make your window visible to display its contents.This last action is done by sending the
makeKeyAndVisible message sent to your window at the end of the method.
The
click1: method sets the outlet variable display to the string 1 by using
UILabel’s setText: method.After you connect the pressing of the button to the invoca-
tion of this method, it can perform the desired action of putting a
1 into the display in the
iPhone’s window.To make the connection, you must now learn how to use Interface
builder. Before you do that, build the program to remove any compiler warning or error
messages.
Simpo PDF Merge and Split Unregistered Version -
467
Your First iPhone Application
Designing the Interface
In Figure 21.4, and in your Xcode main window, notice a file called MainWindow.xib.An
xib file contains all the information about the user interface for your program, including
information about its windows, buttons, labels, tab bars, text fields, and so on. Of course
you don’t have a user interface yet! That’s the next step.
Double-click on the
MainWindow.xib file.This causes another application, called Inter-
face Builder, to launch.You can also access the XIB file from the Resources folder of your
project.
When Interface Builder starts, you get a series of windows drawn on your screen, as
depicted in Figures 21.6, 21.7, and 21.8.The actual windows that are opened might differ
from the figures.
The Library window provides a palette of controls that you can use for your interface.
This window is depicted in Figure 21.6 in one of its display formats.
The
MainWindow.xib window (Figure 21.7) is the controlling window for establishing
connections between your application code and the interface, as you’ll see shortly.
Figure 21.6 Interface Builder Library window.
Simpo PDF Merge and Split Unregistered Version -
468
Chapter 21 Writing iPhone Applications
Figure 21.7 Interface Builder MainWindow.xib.
The window simply labeled Window shows the layout of the iPhone’s main window.
Because you haven’t designed anything for your iPhone’s window yet, it starts out empty,
as shown in Figure 21.8.
The first thing we’ll do is set the iPhone’s window to black.To do this, first click inside
the window labeled
Window. Now, select Inspector from the Tools menu.This should bring
up the Inspector window, as shown in Figure 21.9.
Make sure your Inspector window is labeled Window Attributes, as shown in Figure
21.8. If it isn’t, click on the leftmost tab in the top tab bar to get the correct window dis-
played.
If you glance down to the View section of the window, you see an attribute labeled
Background. If you double-click inside the white-filled rectangle next to Background, it
brings up a color picker for you. Choose black from the picker, which changes the rectan-
gle next to Background attribute in the Inspector from white to black (see Figure 21.10).
If you take a look at the window labeled
Window, which represents the iPhone’s display
window, you see that it’s been changed to black, as shown in Figure 21.11.
You can now close the Colors window.
You create new objects in your iPhone interface window by click-dragging an object
from the Library window into your iPhone window. Click-drag a Label now. Release the
mouse when the label is near the center of the window, close to the top, as shown in
Figure 21.12.
Blue guide lines appear in your window as you move the label around inside your win-
dow. Sometimes they appear to help you align objects with other objects previously
placed in the window.At other times, they appear to make sure your objects are spaced far
enough apart from other objects and from the edges of the window, to be consistent with
Apple’s interface guidelines.
Simpo PDF Merge and Split Unregistered Version -
469
Your First iPhone Application
Figure 21.8 Interface Builder iPhone window.
Figure 21.9 Interface Builder Inspector window.
Simpo PDF Merge and Split Unregistered Version -
470
Chapter 21 Writing iPhone Applications
Figure 21.10 Changing the window’s background color.
Figure 21.11 Interface window changes to black.
Simpo PDF Merge and Split Unregistered Version -
471
Your First iPhone Application
You can always reposition the label in the window at any time in the future by click-
dragging it to another spot inside the window.
Let’s now set some attributes for this label. In your window, if it’s not currently se-
lected, click the label you just created to select it. Notice that the Inspector window auto-
matically changes to give you information about the currently selected object in your
window.We don’t want any text to appear by default for this label, so change the Text
value to an empty string. (That is, delete the string
Label from the text field shown in the
Inspector’s window.)
For the Layout attribute, select Right-justified for the alignment. Finally, change the
background color for the label to blue (or any other color you choose), like you changed
the window’s background color to black.Your Inspector window should resemble Figure
21.13.
Now let’s change the size of the label. Go back to
Window and simply resize the label
by pulling out along its corners and sides. Resize and reposition the label so that it looks
like the one shown in Figure 21.14
Now we add a button to the interface. From the Library window, click-drag a Round
Rect Button object into your interface window, placing it toward the lower-left corner of
the window, as shown in Figure 21.15.You can change the label on the button in one of
Figure 21.12 Adding a label.
Simpo PDF Merge and Split Unregistered Version -
472
Chapter 21 Writing iPhone Applications
two ways: by double-clicking on the button and then typing your text, or by setting the
Title field in the Inspector window. Either way you choose, make you window match the
one shown in Figure 21.15.
Now we have a label that we want to connect to our
display instance variable in our
program so that when we set the variable in our program the label’s text will be changed.
We also have a button labeled
1 that we want to set to invoke our click1: method
whenever it gets pressed.That method sets the value of
display’s text field to 1.And be-
cause that variable will be connected to the label, the label will then be updated.As a re-
cap, here’s the sequence we want to set up:
1. The user presses the button labeled 1.
2. This event causes the click1: method to be invoked.
3. The click1: method changes the text of the instance variable display to the
string
1.
4. Because the UILabel object display connects to the label in the iPhone’s window,
this label updates to the corresponding text value, or to the value
1.
Figure 21.13 Changing the label’s attributes.
Simpo PDF Merge and Split Unregistered Version -
473
Your First iPhone Application
Figure 21.14 Sizing and positioning a label.
Figure 21.15 Adding a button to the interface.
Simpo PDF Merge and Split Unregistered Version -
474
Chapter 21 Writing iPhone Applications
Figure 21.16 Adding an action for a button.
For this sequence to work, we just need to make the two connections. Let’s discuss
how to do it.
First, let’s connect the button to the
IBAction method click1:.You do this by hold-
ing down the Control key while you click on the button and drag the blue line that ap-
pears on the screen to the application delegate in the
MainWindow.xib window.This is
shown in Figure 21.16.
When you release the mouse over the Delegate cube, a drop-down appears that allows
you to select an
IBAction method to connect to this button. In our case, we have only
one such method called
click1: so that appears in the drop down. Select that method to
make the connection, as shown in Figure 21.17.
Now, let’s connect the
display variable to the label.Whereas pressing the button
causes a method in the application to be executed (that is, the flow of action is from the
interface to the application delegate), setting the value of an instance variable in the appli-
cation causes the label in the iPhone’s window to be updated. (Here the flow is from the
application delegate to the interface.) So for this reason, you start by holding down the
Control key while clicking on the application delegate icon and dragging the blue line
that appears to the label in
Window.This is shown in Figure 21.18.
Simpo PDF Merge and Split Unregistered Version -
475
Your First iPhone Application
Figure 21.17 Connecting the event to the method.
Figure 21.18 Connecting an outlet variable.
Simpo PDF Merge and Split Unregistered Version -
476
Chapter 21 Writing iPhone Applications
When you release the mouse, you get a list of IBOutlet variables of the corresponding
class as the control (
UILabel) to choose from.We have one such variable in our program,
and it’s called
display. Choose this variable (as shown in Figure 21.19) and make the
connection.
That’s it; you’re done! Select File->Save from Interface Builder’s menu bar and then
Build and Go from Xcode. (You can initiate this from Interface Builder as well.)
If all goes well, the program will successfully build and begin execution.When execu-
tion begins, your program will be loaded into the iPhone simulator, which will appear on
your computer’s display.The simulator window should appear as shown in Figure 21.1 at
the start of this chapter.You simulate pressing a button with the simulator by simply click-
ing it.When you do that, the sequence of steps we outlined and the connections you
made should result in the display of the string 1 in the label at the top of the display, as
shown in Figure 21.2.
Figure 21.19 Finishing the connection.
An iPhone Fraction Calculator
The next example is a bit more involved, but the concepts from the previous example
equally apply.We’re not going to show all the steps to create this example, but rather give
Simpo PDF Merge and Split Unregistered Version -
477
An iPhone Fraction Calculator
a summary of the steps and an overview of the design methodology. Of course, we’ll also
show all the code.
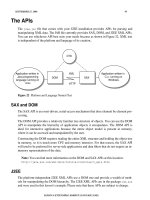
First, let’s see how the application works. Figure 21.20 shows what the application
looks like in the simulator just after launching.
The calculator application allows you to enter fractions by first keying in the numera-
tor, pressing the key labeled Over, and then keying in the denominator. So to enter the
fraction 2/5, you would press 2, followed by Over, followed by 5.You’ll note that, unlike
other calculators, this one actually shows the fraction in the display, so 2/5 is displayed as
2/5.
After keying in one fraction, you then choose an operation—addition, subtraction,
multiplication, or division—by pressing the appropriately labeled key +, –, ×, or ÷, respec-
tively.
After keying-in the second fraction, you then complete the operation by pressing the
= key, just as you would with a standard calculator.
Figure 21.20 Fraction calculator after launch.
Note
This calculator is designed to perform just a single operation between two fractions. It’s left
as an exercise at the end of this chapter for you to remove this limitation.
Simpo PDF Merge and Split Unregistered Version -
478
Chapter 21 Writing iPhone Applications
Figure 21.21 Keying in an operation.
The display is continuously updated as keys are pressed. Figure 21.21 shows the display
after the fraction 4/6 has been entered and the multiplication key has been pressed.
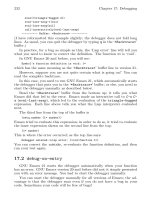
Figure 21.22 shows the result of multiplying the fractions 4/6 and 2/8 together.You’ll
note that the result of 1/6 indicates that the result has first been reduced.
Starting the New Fraction_Calculator Project
The first iPhone program started from a Windows-based project template. Here you did
your (minimal) UI work directly in the application controller (the AppDelegate class).
This is not the recommended approach for developing UI-rich applications.The AppDel-
egate class typically just handles changes related to the state of the application itself, such
as when the application finishes launching or when it is about to be deactivated.
The view controller (implemented with the
UIViewController class) is where you
should perform your actions related to the UI.This might be displaying text, reacting to
the pressing of a button, or putting an entirely new view on the iPhone’s screen.
For this second program example, you’ll start by creating a new project.This time, se-
lect View-Based Application from the New Project window. Call your new project
Fraction_Calculator.
Simpo PDF Merge and Split Unregistered Version -
479
An iPhone Fraction Calculator
When your project is created, this time you’ll notice you get two class templates de-
fined for you.
Fraction_CalculatorAppDelegate.h and
Fraction_CalculatorAppDelegate.m define the application’s controller class for your
project, while
Fraction_CalculatorViewController.h and
Fraction_CalculatorViewController.m define the view controller class for your proj-
ect.As noted, it’s in this latter class where you’ll perform all your work.
We’ll start first with the application controller class. It contains two instance variables:
one for referencing the iPhone’s window and another for the view controller.These have
both been set up for you by Xcode. In fact, there are no changes you need to make to
either the application controller’s .h or .m files.
The
Fraction_CalculatorAppDelegate interface file is shown in Program 21.2.
Program 21.2 Fraction_CalculatorAppDelegate.h Interface File
#import <UIKit/UIKit.h>
@class Fraction_CalculatorViewController;
@interface Fraction_CalculatorAppDelegate : NSObject <UIApplicationDelegate> {
IBOutlet UIWindow *window;
IBOutlet Fraction_CalculatorViewController *viewController;
}
Figure 21.22 The result of multiplying two fractions.
Simpo PDF Merge and Split Unregistered Version -
480
Chapter 21 Writing iPhone Applications
@property (nonatomic, retain) UIWindow *window;
@property (nonatomic, retain) Fraction_CalculatorViewController *viewController;
@end
The UIWindow instance variable window serves the same purpose as in the first pro-
gram example: it represents the iPhone’s window.The
Fraction_CalculatorViewController instance variable represents the view controller
that will manage all the interaction with the user, as well as the display. In the implemen-
tation file for this class you will put all the work associated with these tasks.
Program 21.2 shows the implementation file for the application controller class.As
noted, we’re not doing any of the work in this file like we did in Program 21.1; that’s all
being delegated to the view controller. So this file appears untouched, exactly as it was
generated by Xcode for you when you created the new project.
Program 21.2 Fraction_CalculatorAppDelegate.m Implementation File
#import “Fraction_CalculatorAppDelegate.h”
#import “Fraction_CalculatorViewController.h”
@implementation Fraction_CalculatorAppDelegate
@synthesize window;
@synthesize viewController;
- (void)applicationDidFinishLaunching:(UIApplication *)application {
// Override point for customization after app launch
[window addSubview:viewController.view];
[window makeKeyAndVisible];
}
- (void)dealloc {
[viewController release];
[super dealloc];
}
Defining the View Controller
Now let’s write the code for the view controller class
Fraction_CalculatorViewController.We’ll start with the interface file.This is shown
in Program 21.2.
Program 21.2 Fraction_CalculatorViewController.m Interface File
#import <UIKit/UIKit.h>
#import “Calculator.h”
@interface Fraction_CalculatorViewController : UIViewController {
UILabel *display;
char op;
Simpo PDF Merge and Split Unregistered Version -
481
An iPhone Fraction Calculator
int currentNumber;
NSMutableString *displayString;
BOOL firstOperand, isNumerator;
Calculator *myCalculator;
}
@property (nonatomic, retain) IBOutlet UILabel *display;
@property (nonatomic, retain) NSMutableString *displayString;
-(void) processDigit: (int) digit;
-(void) processOp: (char) op;
-(void) storeFracPart;
// Numeric keys
-(IBAction) clickDigit: (id) sender;
// Arithmetic Operation keys
-(IBAction) clickPlus: (id) sender;
-(IBAction) clickMinus: (id) sender;
-(IBAction) clickMultiply: (id) sender;
-(IBAction) clickDivide: (id) sender;
// Misc. Keys
-(IBAction) clickOver: (id) sender;
-(IBAction) clickEquals: (id) sender;
-(IBAction) clickClear: (id) sender;
@end
There are housekeeping variables for building the fractions (currentNumber,
firstOperand, and isNumerator), and for building the string for the display
(
displayString).There is also a Calculator object (myCalculator) that can perform
the actual calculation between the two fractions.We will associate a single method called
clickDigit: to handle the pressing of any of the digit keys 0-9. Finally, we define meth-
ods to handle storing the operation to be performed (
clickPlus:, clickMinus:,
clickMultiply:, clickDivide:), carrying out the actual calculation when the = key is
pressed (
clickEquals:), clearing the current operation (clickClear:), and separating the
numerator from the denominator when the Over key is pressed (
clickOver:). Several
methods (
processDigit:, processOp:, and storeFracPart) are defined to assist in the
aforementioned chores.
Program 21.2 shows the implementation file for this controller class.
Program 21.2 Fraction_CalculatorViewController.m Implementation File
#import “Fraction_CalculatorAppDelegate.h”
@implementation Fraction_CalculatorAppDelegate
@synthesize window, displayString, display;
- (void)applicationDidFinishLaunching:(UIApplication *)application {
Simpo PDF Merge and Split Unregistered Version -
482
Chapter 21 Writing iPhone Applications
// Override point for customization after application launch
firstOperand = YES;
isNumerator = YES;
self.displayString = [NSMutableString stringWithCapacity: 40];
myCalculator = [[Calculator alloc] init];
[window makeKeyAndVisible];
}
-(void) processDigit: (int) digit
{
currentNumber = currentNumber * 10 + digit;
[displayString appendString: [NSString stringWithFormat: @”%i”, digit]];
[display setText: displayString];
}
- (IBAction) clickDigit:(id)sender
{
int digit = [sender tag];
[self processDigit:digit];
}
-(void) processOp: (char) theOp
{
NSString *opStr;
op = theOp;
switch (theOp) {
case ‘+’:
opStr = @” + “;
break;
case ‘-’:
opStr = @” – “;
break;
case ‘*’:
opStr = @” × “;
break;
case ‘/’:
opStr = @” ÷ “;
break;
}
[self storeFracPart];
firstOperand = NO;
isNumerator = YES;
[displayString appendString: opStr];
[display setText: displayString];
}
-(void) storeFracPart
{
Simpo PDF Merge and Split Unregistered Version -
483
An iPhone Fraction Calculator
if (firstOperand) {
if (isNumerator) {
myCalculator.operand1.numerator = currentNumber;
myCalculator.operand1.denominator = 1; // e.g. 3 * 4/5 =
}
else
myCalculator.operand1.denominator = currentNumber;
}
else if (isNumerator) {
myCalculator.operand2.numerator = currentNumber;
myCalculator.operand2.denominator = 1; // e.g. 3/2 * 4 =
}
else {
myCalculator.operand2.denominator = currentNumber;
firstOperand = YES;
}
currentNumber = 0;
}
-(IBAction) clickOver: (id) sender
{
[self storeFracPart];
isNumerator = NO;
[displayString appendString: @”/”];
[display setText: displayString];
}
// Arithmetic Operation keys
-(IBAction) clickPlus: (id) sender
{
[self processOp: ‘+’];
}
-(IBAction) clickMinus: (id) sender
{
[self processOp: ‘-’];
}
-(IBAction) clickMultiply: (id) sender
{
[self processOp: ‘*’];
}
-(IBAction) clickDivide: (id) sender
{
[self processOp: ‘/’];
}
// Misc. Keys
-(IBAction) clickEquals: (id) sender
{
[self storeFracPart];
[myCalculator performOperation: op];
Simpo PDF Merge and Split Unregistered Version -
484
Chapter 21 Writing iPhone Applications
[displayString appendString: @” = “];
[displayString appendString: [myCalculator.accumulator convertToString]];
[display setText: displayString];
currentNumber = 0;
isNumerator = YES;
firstOperand = YES;
[displayString setString: @””];
}
-(IBAction) clickClear: (id) sender
{
isNumerator = YES;
firstOperand = YES;
currentNumber = 0;
[myCalculator clear];
[displayString setString: @””];
[display setText: displayString];
}
- (void)dealloc {
[window release];
[myCalculator dealloc];
[super dealloc];
}
@end
The calculator’s window still contains just one label as in the previous application, and
we still call it
display.As the user enters a number digit-by-digit, we need to build the
number along the way.The variable
current_Number holds the number-in-progress,
while the
BOOL variables firstOperand and isNumerator keep track of whether this is
the first or second operand entered and whether the user is currently keying in the nu-
merator or the denominator of that operand.
When a digit button is pressed on the calculator, we set it up so that some identifying
information will be passed to the
clickDigit: method to identify which digit button
was pressed.This is done by setting the button’s attribute (using Interface Builder’s In-
spector) called
tag to a unique value for each digit button. In this case, we want to set the
tag to the corresponding digit number. So the tag for the button labeled 0 will be set to
0, the tag for the button labeled 1 to 1, and so on. By then sending the
tag message to
the
sender parameter that is passed to the clickDigit: method, you can retrieve the
value of the button’s tag.This is done in the
clickDigit: method as shown:
- (IBAction) clickDigit:(id)sender
{
int digit = [sender tag];
[self processDigit:digit];
}
Simpo PDF Merge and Split Unregistered Version -
485
An iPhone Fraction Calculator
There are a lot more buttons in Program 21.2 than in the first application. Most of the
complexity in the view controller’s implementation file revolves around building the frac-
tions and displaying them.As noted, as a digit button 0–9 gets pressed, the action method
clickDigit: gets executed.That method calls the processDigit: method to tack the
digit onto the end of the number that’s being built in the variable
currentNumber.That
method also adds the digit to the current display string that’s kept in the variable
displayString, and updates the display:
-(void) processDigit: (int) digit
{
currentNumber = currentNumber * 10 + digit;
[displayString appendString: [NSString stringWithFormat: @”%i”, digit]];
[display setText: displayString];
}
When the = key is pressed, the clickEquals: method gets invoked to perform the
operation.The calculator performs the operation between the two fractions, storing the
result in its accumulator.This accumulator is fetched inside the
clickEquals: method,
and the result is added to the display.
The Fraction Class
The Fraction class remains largely unchanged from earlier examples in this text.There is
a new
convertToString method that was added to convert a fraction to its equivalent
string representation. Program 21.2 shows the
Fraction interface file followed immedi-
ately by the corresponding implementation file.
Program 21.2 Fraction.h Interface File
#import <UIKit/UIKit.h>
@interface Fraction : NSObject {
int numerator;
int denominator;
}
@property int numerator, denominator;
-(void) print;
-(void) setTo: (int) n over: (int) d;
-(Fraction *) add: (Fraction *) f;
-(Fraction *) subtract: (Fraction *) f;
-(Fraction *) multiply: (Fraction *) f;
-(Fraction *) divide: (Fraction *) f;
-(void) reduce;
-(double) convertToNum;
-(NSString *) convertToString;
@end
Simpo PDF Merge and Split Unregistered Version -
486
Chapter 21 Writing iPhone Applications
Program 21.2 Fraction.m Implementation File
#import “Fraction.h”
@implementation Fraction
@synthesize numerator, denominator;
-(void) setTo: (int) n over: (int) d
{
numerator = n;
denominator = d;
}
-(void) print
{
NSLog (@”%i/%i”, numerator, denominator);
}
-(double) convertToNum
{
if (denominator != 0)
return (double) numerator / denominator;
else
return 1.0;
}
-(NSString *) convertToString;
{
if (numerator == denominator)
if (numerator == 0)
return @”0”;
else
return @”1”;
else if (denominator == 1)
return [NSString stringWithFormat: @”%i”, numerator];
else
return [NSString stringWithFormat: @”%i/%i”,
numerator, denominator];
}
// add a Fraction to the receiver
-(Fraction *) add: (Fraction *) f
{
// To add two fractions:
// a/b + c/d = ((a*d) + (b*c)) / (b * d)
// result will store the result of the addition
Fraction *result = [[Fraction alloc] init];
int resultNum, resultDenom;
Simpo PDF Merge and Split Unregistered Version -
487
An iPhone Fraction Calculator
resultNum = numerator * f.denominator + denominator * f.numerator;
resultDenom = denominator * f.denominator;
[result setTo: resultNum over: resultDenom];
[result reduce];
return [result autorelease];
}
-(Fraction *) subtract: (Fraction *) f
{
// To sub two fractions:
// a/b - c/d = ((a*d) - (b*c)) / (b * d)
Fraction *result = [[Fraction alloc] init];
int resultNum, resultDenom;
resultNum = numerator * f.denominator - denominator * f.numerator;
resultDenom = denominator * f.denominator;
[result setTo: resultNum over: resultDenom];
[result reduce];
return [result autorelease];
}
-(Fraction *) multiply: (Fraction *) f
{
Fraction *result = [[Fraction alloc] init];
[result setTo: numerator * f.numerator over: denominator
* f.denominator];
[result reduce];
return [result autorelease];
}
-(Fraction *) divide: (Fraction *) f
{
Fraction *result = [[Fraction alloc] init];
[result setTo: numerator * f.denominator over: denominator * f.numerator];
[result reduce];
return [result autorelease];
}
- (void) reduce
{
int u = numerator;
int v = denominator;
int temp;
if (u == 0)
return;
else if (u <0)
u = -u;
Simpo PDF Merge and Split Unregistered Version -