Programming Java 2 Micro Edition on Symbian OS A developer’s guide to MIDP 2.0 phần 4 ppsx
Bạn đang xem bản rút gọn của tài liệu. Xem và tải ngay bản đầy đủ của tài liệu tại đây (601.27 KB, 50 trang )
122 MIDP 2.0 AND THE JTWI
for (int i=0; i < connections.length; i++) {
if(connections[i].equals(“sms://:1234”)){
new Thread(){
public void run(){
Receiver.openReceiver();
}
}.start();
}
}
}
One other use of the push registry should be mentioned before we
leave this topic. The PushRegistry class provides the register-
Alarm() method:
public static long registerAlarm(String midlet, long time)
This allows a running MIDlet to register itself or another MIDlet in
the same suite for activation at a given time. The midlet argument is
the class name of the MIDlet to be launched at the time specified by
the time argument. The launch time is specified in milliseconds since
January 1, 1970, 00:00:00 GMT. The push registry may contain only one
outstanding activation time entry per MIDlet in each installed MIDlet
suite. If a previous activation entry is registered, it will be replaced by
the current invocation and the previous value returned. If no previous
wakeup time has been set, a zero is returned.
3.3.5.3 The Push Registry and the Security Model
The PushRegistry is a protected API and, as such, a signed
MIDlet suite which registers connections statically or contains MIDlets
which register connections and/or alarms, must explicitly request
the javax.microedition.io.PushRegistry permission in its
MIDlet-Permissions attribute, for example:
MIDlet-Permissions: javax.microedition.io.PushRegistry,
Note that a signed MIDlet suite must also explicitly request the per-
missions necessary to open the connection types of any connections it
wishes to register either statically or dynamically. If the protection domain
to which the signed MIDlet suite would be bound grants, or potentially
grants, the requested permission, the MIDlet suite can be installed and the
MIDlets it contains will be able to register and deregister connections, and
register alarms, either automatically, or with user permission, depending
on the security policy in effect.
MIDP 2.0 123
Untrusted MIDlets do not require a MIDlet-Permissions entry.
Whether access is granted to the Push Registry API will depend on the
security policy for the untrusted protection domain in effect on the device.
On the Sony Ericsson P900/P908 and Nokia 6600, MIDlets in untrusted
MIDlet suites can use the Push Registry APIs (Application Auto-Invocation
function group) with user permission. On both the 6600 and the
P900/P908, the default user permission is set to session. On the Nokia
6600, the default value can be changed by the user to oneshot or disal-
lowed. For the Sony Ericsson P900/P908, the security policy in effect for
MIDlets in MIDlet suites bound to the trusted protection domain allows
automatic access to the Push Registry API.
3.3.5.4 Symbian’s Implementation
At the time of writing, the current version of Symbian OS, Version 7.0s,
supports the following connection types in its implementation of the
MIDP 2.0 push architecture:
• Server socket
• Datagram
• SMS.
In Symbian’s implementation, all connections that can be registered as
push connections are managed by the system AMS, even if they are not
requested to be push-enabled by an application. In the case of server
connections that spawn off a connected stream due to an incoming
connection, the stream connections are also maintained through the
system AMS.
Future releases of Symbian OS are likely to increase the types of
connections supported by the push architecture to include Bluetooth,
L2CAP and RFCOMM connections.
3.3.6 Additions to the LCDUI
3.3.6.1 A Quick Tour
The MIDP 2.0 specification introduces a number of new features to the
LCDUI toolkit which are designed to give developers more control over
their application’s user interface. In this section we briefly look at some
of them.
Display
MIDP 2.0 introduces two useful new methods to the Display class
which allow MIDlets to control the screen backlight and the vibration of
the phone:
124 MIDP 2.0 AND THE JTWI
public boolean flashBackLight(int duration)
public boolean vibrate(int duration)
The duration of the effect is specified by the duration parameter – a
value of zero causes the action to stop. The return value is false if the
relevant feature is not supported by the phone.
Form
MIDP 2.0 introduces a new layout algorithm for arranging items in
a Form. The layout algorithm arranges items in rows according to a
layout direction defined by the implementation for the language con-
vention in use. For European and North American markets the default
layout direction will be left to right. The layout algorithm then arranges
items from left to right and starts a new row when there is insuffi-
cient space in the row to accommodate the next Item. The layout
algorithm uses the concept of current alignment. For an implementa-
tion with a left to right layout direction the initial current alignment is
Item.LAYOUT_LEFT. Other possible values for the current alignment
are Item.LAYOUT_RIGHT and Item.LAYOUT_CENTER. The current
alignment changes when the layout algorithm encounters an Item with
a (horizontal) layout value other than the current setting (the layout direc-
tive for an Item is set using the setLayout() method). When this
happens, the layout algorithm adds that Item on a new row and uses the
new alignment value until an Item with a different horizontal directive
is encountered.
Vertical layout directives provided are Item.LAYOUT_TOP, Item.
LAYOUT_BOTTOM and Item.LAYOUT_VCENTER. These are used to indi-
cate the required vertical alignment of an Item within the current row.
MIDP 2.0 added the getPreferredWidth(), getPreferred-
Height(), getMinimumWidth() and getMinimumHeight() meth-
ods to the Item class. These are used by the form layout algorithm
to position and size Items within rows. In addition a MIDlet can
influence the size of an Item by using the Item.LAYOUT_EXPAND,
Item.LAYOUT_VEXPAND and Item.LAYOUT_SHRINK and Item.
LAYOUT_VSHRINK directives.
When filling a row, the layout algorithm first adds each Item accord-
ing to its preferred width (or minimum width, if the LAYOUT_SHRINK
directive is set). Once the row has been filled, any remaining space is
proportionately distributed amongst the items by expanding their widths.
Any Item with the LAYOUT_SHRINK directive set is expanded to no
more than its preferred size and then any remaining space is taken up
expanding Items with the LAYOUT_EXPAND directive set.
The height of a row is determined by the tallest Item in the row.
The height of an Item is determined by its preferred height (unless
the LAYOUT_VSHRINK directive has been set, in which case initially the
MIDP 2.0 125
minimum height is used). Once the height of the row has been determined,
any Item shorter than the row height that has its LAYOUT_VEXPAND
directive set is expanded to the height of the row. Any Item with its
LAYOUT_VSHRINK directive set is expanded to its preferred size or the
height of the row, whichever is shorter. Finally, any Item with vertical
directives (LAYOUT_TOP, LAYOUT_BOTTOM or LAYOUT_CENTER)setis
positioned accordingly in the row. Remaining items with no vertical
directive are positioned at the bottom of the row.
It is possible to force a row break using setLayout(Item.LAYOUT_
NEWLINE_BEFORE) and setLayout(Item.LAYOUT_NEWLINE_
AFTER). In the first case, the item will be added on a new row. In
the second case, a row break will occur immediately after the item that
called the method. Note that for backward compatibility with MIDP
1.0, TextField, DateField, Gauge and ChoiceGroup items are
always positioned with a row to themselves unless the Item.LAYOUT_2
directive has been set.
Item
MIDP 2.0 introduces new features into the Item class including:
• support for the new layout algorithm with new directives defined as
public static final int (see above)
• the addCommand() method; an item can have commands associated
with it
• the setItemCommandListener() method
• the getMinimumHeight(), getMinimumWidth(), getPre-
ferredHeight()and getPreferredWidth() methods.
It also introduces new public static final int appearance modes:
• BUTTON indicates the item is to appear as a button
• HYPERLINK indicates the item is to appear as a hyperlink
• PLAIN indicates the item is to have a normal appearance.
CustomItem
This is a new class introduced in MIDP 2.0 that can be sub-classed to
create new visual elements for use in Forms.
StringItem
MIDP 2.0 introduces a new constructor to the StringItem class that
creates a StringItem with the indicated appearance mode: PLAIN,
BUTTON,orHYPERLINK.
public StringItem(String label,String text,int appearanceMode)
126 MIDP 2.0 AND THE JTWI
ItemCommandListener
A listener type introduced in MIDP 2.0 for receiving notification of
commands that have been invoked on Item objects.
Spacer
A new class introduced in MIDP 2.0 representing a blank Item with a
settable minimum size whose primary purpose is to position other items.
Choice
New features introduced in MIDP 2.0 to the Choice interface include:
• static int POPUP
• static int TEXT_WRAP_DEFAULT
• static int TEXT_WRAP_OFF
• static int TEXT_WRAP_ON
• deleteAll()
• getFitPolicy()
• getFont()
• setFitPolicy(int fitPolicy)
• setFont(int elementNum, Font font).
3.3.6.2 Exploring the LCDUI: the KeyPad Example
Rather than exploring the new features of the LCDUI API by API, we will
instead discuss an example MIDlet that illustrates some of the features.
For a more thorough exposition of the LCDUI APIs, the reader is referred
to Sun’s MIDP 2.0 documentation.
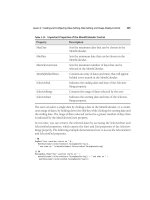
We will use as the example a simple numeric keypad. Screenshots of
our KeyPad MIDlet running on the Series 60 and UIQ reference designs
are shown in Figure 3.7.
The KeyPad MIDlet consists of two classes: the KeyPad class extends
MIDlet and provides the main UI in the guise of a Form instance; and
the Button class extends CustomItem and models a simple button.
The Button instances are appended to the Form to create our keypad.
First, let’s consider the KeyPad class:
import javax.microedition.midlet.MIDlet;
import javax.microedition.lcdui.*;
public class KeyPad extends MIDlet implements CommandListener {
private Display display;
private Form container;
private Command exit;
MIDP 2.0 127
Figure 3.7 The KeyPad MIDlet on Series 60 and UIQ.
private Command clear;
private TextField field;
public KeyPad() {
display = Display.getDisplay(this);
container = new Form("");
clear = new Command("CLEAR",Command.SCREEN,1);
exit = new Command("EXIT",Command.EXIT,1);
container.addCommand(exit);
container.addCommand(clear);
container.setCommandListener(this);
Button one = new Button(this, "1");
Button two = new Button(this, "2");
Button three = new Button(this, "3");
Button four = new Button(this, "4");
Button five = new Button(this, "5");
Button six = new Button(this, "6");
Button seven = new Button(this, "7");
Button eight = new Button(this, "8");
Button nine = new Button(this, "9");
Button zero = new Button(this, "0");
field = new TextField(null,null,32,TextField.UNEDITABLE);
int bheight = one.getPrefContentHeight(-1);
int bwidth = one.getPrefContentWidth(-1);
128 MIDP 2.0 AND THE JTWI
container.append(new Spacer
(container.getWidth(),bheight/2));
container.append(new Spacer (bwidth/2, bheight));
container.append(one);
container.append(new Spacer (bwidth/2, bheight));
container.append(two);
container.append(new Spacer (bwidth/2, bheight));
container.append(three);
container.append(new Spacer
(container.getWidth(),bheight/4));
container.append(new Spacer (bwidth/2, bheight));
container.append(four);
container.append(new Spacer (bwidth/2, bheight));
container.append(five);
container.append(new Spacer (bwidth/2, bheight));
container.append(six);
container.append(new Spacer
(container.getWidth(),bheight/4));
container.append(new Spacer (bwidth/2, bheight));
container.append(seven);
container.append(new Spacer (bwidth/2, bheight));
container.append(eight);
container.append(new Spacer (bwidth/2, bheight));
container.append(nine);
container.append(new Spacer (bwidth/2, bheight));
container.append(zero);
container.append(new Spacer
(container.getWidth(),bheight/2));
container.append(field);
}
public void setString(String s) {
String current = field.getString();
field.setString(current.concat(s));
}
public void commandAction(Command c, Displayable d) {
if(c == exit) {
notifyDestroyed();
}
else if(c == clear) {
field.setString("");
}
}
public void startApp() {
display.setCurrent(container);
}
public void pauseApp() {
MIDP 2.0 129
}
public void destroyApp(boolean unconditional) {
}
}
The main work is done in the constructor. We create the Form,plus
a couple of Command instances. We add the commands to the form and
set the CommandListener. Then we create various instances of our
Button and a TextField to display the output of the button presses.
We append the Button instances to the Form, separated by instances
of the Spacer class, plus the TextField instance. We implement a
setString() callback method that is invoked by a Button instance,
taking the button’s label as its parameter. Finally, we implement the
commandAction() method mandated by the CommandListener
interface, which our KeyPad class implements.
Now let’s look at the Button class:
import javax.microedition.lcdui.*;
public class Button extends CustomItem{
private static final int HEIGHT = 20;
private static final int WIDTH = 20;
private static final int DELTA = 2;
private String num;
private KeyPad pad;
public Button(KeyPad pad, String num){
super("");
this.pad = pad;
this.num = num;
}
protected void paint(Graphics g, int w, int h){
g.setColor(0, 0, 0);
g.fillRect(0, 0, WIDTH+DELTA, HEIGHT+DELTA);
g.setColor(128, 128, 128);
g.fillRect(0, 0, WIDTH-DELTA, HEIGHT-DELTA);
int xOffset = WIDTH/3;
int yOffset = 2*HEIGHT/3;
g.setColor(255, 255, 255);
g.drawString(num, xOffset, yOffset,
Graphics.BASELINE | Graphics.LEFT);
}
protected int getPrefContentHeight(int width) {
return getMinContentWidth();
}
protected int getPrefContentWidth(int height) {
return getMinContentHeight();
}
protected int getMinContentHeight() {
130 MIDP 2.0 AND THE JTWI
return HEIGHT;
}
protected int getMinContentWidth() {
return WIDTH;
}
protected void pointerPressed(int x, int y) {
pad.setString(num);
}
public void keyPressed(int keyCode){
int gameAction = getGameAction(keyCode);
if (gameAction == Canvas.FIRE){
pad.setString(num);
}
}
}
The constructor takes as arguments the KeyPad instance, to facilitate a
callback, and a String acting as the button label. The paint() method
must be implemented to render the CustomItem. In the example code
above we have produced a minimal button, leaving it as an exercise
to the reader to add the embellishments. We must also implement the
getPrefContentWidth(), getPrefContentHeight(), getMin-
ContentWidth() and getMinContentHeight() methods inherited
from CustomItem; here we have provided trivial implementations. An
attractive feature of CustomItem is the optional support for pointer
input, via the protected pointerPressed(), pointerDragged()
and pointerReleased() methods. The Button class redefines the
pointerPressed() method to provide support for touch screen user
interfaces such as Symbian’s UIQ.
Of course, we could have adopted a simpler approach to our keypad.
Instead of providing a custom Button class extending CustomItem we
could have simply used StringItem instances with appearanceMode
set to Item.BUTTON:
public StringItem (String label, String text, int appearanceMode)
We would then add a Command to the StringItem to take appro-
priate action when it is selected and implement an ItemCommandLis-
tener on each StringItem instance, as shown below:
public class KeyPad extends MIDlet implements CommandListener,
ItemCommandListener{
public KeyPad() {
StringItem button1 = new StringItem(null, “1”, Item.BUTTON);
MIDP 2.0 131
button1.setDefaultCommand(new Command(“Select 1”,
Command.Item, 1));
button1.setItemCommandListener(this);
form.append(button1);
}
public void commandAction(Command command, Item item) {
StringItem button = (StringItem)item;
setString(button.getText());
}
}
We adopted the CustomItem approach for our keypad example
for two reasons: it provides an opportunity to illustrate the use of
CustomItem, and its inherent support for touch screens; and the par-
ticular variant of StringItem shown above was subject to a defect
on the original Nokia 6600 firmware release (but should be fixed in
future upgrades).
3.3.7 The Game API
3.3.7.1 Introduction
The MIDP 1.0 specification, though limited in many respects, proved a
big hit with the gaming fraternity. The vast majority of MIDlets developed
so far are games.
As mentioned briefly in Chapter 2, the MIDP 2.0 specification extends
support for games developers with the introduction of the javax.micro-
edition.lcdui.game package. We will now discuss programming
this API in more detail. The aim of the API is to facilitate richer gaming
content by providing a set of APIs, targeted at games developers, that
map directly to native functionality, taking advantage of the performance
enhancements offered by native code and minimizing the amount of
work required in pure Java code.
The game package contains the following classes:
• GameCanvas
• LayerManager
• Layer
• Sprite
• TiledLayer.
In the next few sections we shall look at the functionality offered by these
classes, illustrating some of the key concepts with sample code.
132 MIDP 2.0 AND THE JTWI
3.3.7.2 GameCanvas
A basic game user interface class extending javax.microedition.
lcdui.Canvas, GameCanvas provides an offscreen buffer as part of
the implementation even if the underlying device doesn’t support double
buffering. The Graphics object obtained from the getGraphics()
method is used to draw to the screen buffer. The contents of the screen
buffer can then be rendered to the display synchronously by calling the
flushGraphics() method.
The GameCanvas class also provides the ability to query key states
and return an integer value in which each bit represents the state of a
specific key on the device:
public int getKeyStates()
If the bit representing a key is set to 1 then this key is pressed or
has been pressed at least once since the last invocation of the method.
The returned integer can be ANDed against a set of predefined constants
(shown below), each representing the appropriate bit for a specific key
set to 1 (support for the last four values is optional).
public static final int UP_PRESSED
public static final int DOWN_PRESSED
public static final int LEFT_PRESSED
public static final int RIGHT_PRESSED
public static final int FIRE_PRESSED
public static final int GAME_A_PRESSED
public static final int GAME_B_PRESSED
public static final int GAME_C_PRESSED
public static final int GAME_D_PRESSED
We would use these values to ascertain the state of a key in the manner
shown below.
if ( getKeyStates() & FIRE_PRESSED != 0 ) {
// FIRE key is down or has been pressed
// take appropriate action
}
3.3.7.3 TiledLayer
The abstract Layer class is the parent class of TiledLayer and Sprite.
A TiledLayer consists of a grid of cells each of which can be filled
with an image tile. An instance of TiledLayer is created by invoking
the constructor of the TiledLayer class:
public TiledLayer(int columns, int rows, Image image, int tileWidth,
int tileHeight)
MIDP 2.0 133
The columns and rows arguments represent the number of columns
and rows in the grid. The tileWidth and tileHeight arguments
represent the width and height of a single tile in pixels. The image
argument represents the image used for creating the set of tiles that will
be employed to populate the TiledLayer. Naturally, the dimension
of the image in pixels must be an integral multiple of the dimension
of an individual tile. The use of TiledLayer is best illustrated with
an example.
The image in Figure 3.8 (taken with a Symbian OS phone) is a
panoramic view of Prague. The dimensions of the image are 560 × 140
pixels and we will use it to provide the tile set for our TiledLayer.
We will use a TiledLayer to pan through this view. To fit comfortably
in the display of a phone we will display samples of the image on a
TiledLayer of 140 × 140 pixels, consisting of a 7 × 7 grid, as shown
in Figure 3.9.
Note that cells are identified by their column and row number, the
top left cell having coordinates (0, 0) and the bottom right (7, 7). The
dimensions of the TiledLayer and the number of cells it contains
dictates that the individual tile dimensions are 20 × 20 pixels in this
example and that the image can be treated as a 28 × 7 matrix of tiles (see
Figure 3.10).
A given tile is specified by its tile index. Tile indices in this example
run from 1 for the top left tile to 196 for the bottom right tile.
Figure 3.8 Basic image for use by a TiledLayer.
Figure 3.9 Example of a 7 × 7 TiledLayer.
134 MIDP 2.0 AND THE JTWI
Figure 3.10 Dividing our image into tiles.
Figure 3.11 Panning through a panoramic view using TiledLayer.
To pan through the whole image we simply shift each column of tiles
one position left within the TiledLayer, as shown in Figure 3.11.
The source code for the TiledLayerCanvas class, which renders
the panned view, is listed below:
import javax.microedition.lcdui.*;
import javax.microedition.lcdui.game.*;
import java.io.*;
public class TiledLayerCanvas extends Canvas implements Runnable {
private Image image;
private int x;
private int y;
MIDP 2.0 135
private TiledLayer layer;
public TiledLayerCanvas(String imageName)
throws ApplicationException {
//create the image
try {
image = Image.createImage(imageName);
layer = new TiledLayer(7, 7, image, 20, 20);
x = (getWidth() - layer.getHeight())/2;
y = (getHeight() - layer.getWidth())/2;
layer.setPosition(x, y);
}catch(IOException ioe) {
throw new ApplicationException("Unable to create image");
}
}
public void paint(Graphics g) {
layer.paint(g);
}
public void run() {
int n = 0;
while ( n <= 21) {
for(int i = 0; i < 7; i++) {
for(int j = 0; j < 7; j++) {
layer.setCell(i, j, (i + 1) + n +(j*28));
}
}
repaint();
try {
Thread.sleep(100);
}catch(InterruptedException ie) {}
n++;
}
}
}
The TiledLayerCanvas constructor creates an instance of Image
from a resource file containing the panoramic view. This is then used to
create the TiledLayer instance:
layer = new TiledLayer(7, 7, image, 20, 20);
This consists of a 7 × 7 grid, to be populated with tiles of dimensions
20 × 20 pixels. The position of the TiledLayer relative to the containing
Canvas is defined by the setPosition() method of the parent Layer
class. To render the TiledLayer, we call its paint() method from
the Canvas paint() method. We pan through the image using a
while loop that increments a counter running from 0 to 21 for each
new tile set. Each iteration of the while loop sets the tile set and then
calls repaint (and increments the counter). The TiledLayer grid is
populated with a tile set by multiple calls to setCell from within nested
for loops:
136 MIDP 2.0 AND THE JTWI
for(int i = 0; i < 7; i++) {
for(int j = 0; j < 7; j++) {
layer.setCell(i, j, (i + 1) + n +(j*28));
}
}
repaint();
The setCell() method of TiledLayer takes integers representing
the row and column of the TiledLayer grid (which in this case run from
0to6fora7× 7 grid) in which the tile is to be placed, and an integer
representing the index of the tile within the image (which in this example
runs from 1 to 196 for an image consisting of 28 × 7 tiles) as arguments.
public void setCell(int col, int row, int tileIndex)
The full source code and JAR and JAD files for the Panorama MIDlet
can be downloaded from the Symbian website at
www.symbian.com/
books
.
One of the principal uses of TiledLayer is the creation of large
scrolling backgrounds from relatively few tiles. Consider the rather sim-
plistic, but nonetheless illustrative, example in Figure 3.12.
We have built up a background TiledLayer from just four tiles.
By changing the arrangement of the four tiles within the TiledLayer
grid we can convey the impression of an infinite scrolling background.
For more information on using TiledLayer to create backgrounds,
including the use of animation, consult the MIDP 2.0 documentation
which includes a comprehensive example.
Figure 3.12 A simple background TiledLayer built up from four tiles.
3.3.7.4 Sprite
Sprite is a basic visual element suitable for creating animations.
A Sprite consists of an image composed of several smaller images
(frames). The Sprite can be rendered as one of the frames. By rendering
MIDP 2.0 137
Figure 3.13 A Sprite image consisting of two frames.
different frames in a sequence, a Sprite provides animation. Let us
consider a simple example. Figure 3.13 consists of two frames, each of
the same width and height.
By displaying the frames in a sequence, we can produce an animation.
The following code shows how this can be achieved:
import javax.microedition.lcdui.*;
import javax.microedition.lcdui.game.*;
import java.io.*;
public class SpriteCanvas extends Canvas implements Runnable {
private static final int SPRITE_WIDTH = 140;
private static final int SPRITE_HEIGHT = 140;
private Sprite plane;
private int spritePositionX;
private int spritePositionY;
private boolean running = false;
public SpriteCanvas(String imageName) throws
ApplicationException {
try {
Image image = Image.createImage(imageName);
plane = new Sprite(image, SPRITE_WIDTH, SPRITE_HEIGHT);
spritePositionX = (getWidth() – SPRITE_WIDTH)/2;
spritePositionY = (getHeight() – SPRITE_HEIGHT)/2;
plane.setPosition(spritePositionX, spritePositionY);
}catch(IOException ioe) {
throw new ApplicationException("Unable to create image");
}
}
public void paint(Graphics g) {
g.setColor(255, 255, 255);
g.fillRect(0, 0, getWidth(), getHeight());
//paint background white
plane.paint(g);
}
138 MIDP 2.0 AND THE JTWI
public void run() {
running = true;
while (running) {
repaint();
plane.nextFrame();
try {
Thread.sleep(50);
} catch(InterruptedException ie){}
}
}
public void stop() {
running = false;
}
}
AnewSprite is created using the following constructor:
public Sprite(Image image, int frameWidth, int frameHeight)
The first argument is the image consisting of the sequence of frames.
The second and third arguments indicate the width and height in pixels
of the individual frames within the image. Note that the width and height
of the image in pixels must be an integer multiple of the frame width
and height.
The setPosition() method of Sprite is used to position the
Sprite in the coordinate space of the containing object, a Canvas in
this example.
plane.setPosition(spritePositionX, spritePositionY);
To render the Sprite, we call the paint() method. Here this is
done within the paint() method of SpriteCanvas:
public void paint(Graphics g) {
g.setColor(255, 255, 255);
g.fillRect(0, 0, getWidth(), getHeight());
plane.paint(g);
}
To animate the sprite we call the nextFrame() method of Sprite
after a repaint(), as shown below:
while (running) {
repaint();
plane.nextFrame();
}
MIDP 2.0 139
Figure 3.14 PlaneSprite running on the Nokia 6600.
Figure 3.14 illustrates the PlaneSprite MIDlet running on a Nokia
6600. The full source code for the PlaneSprite MIDlet can be
downloaded from Symbian’s website at
www.symbian.com/books
.
In addition to various transformations such as rotation and mirroring,
the Sprite class also provides collision detection. Collision detection
allows the developer to detect when the sprite collides with another
element. The following three methods are available in the Sprite class:
public final boolean collidesWith(Image image, int x, int y,
boolean pixelLevel)
public final boolean collidesWith(Sprite s, boolean pixelLevel)
public final boolean collidesWith(TiledLayer t, boolean pixelLevel)
The first method detects collisions between the invoking Sprite and
the specified Image, while the second detects collisions with another
Sprite and the last method detects collisions with the specified Tiled-
Layer.IfpixelLevel is set to true, collision detection is performed
on a pixel by pixel basis; if it is false then collision detection is per-
formed on the basis of the bounding rectangle of the sprite. The bounding
rectangle of the sprite can be set using the method:
public void defineCollisionRectangle(int x, int y, int width,
int height)
Otherwise, the default, bounding rectangle is located at (0,0) in the
coordinate space of the sprite and is of the same dimensions as the sprite.
For more information on using sprites refer to the MIDP 2.0 docu-
mentation.
140 MIDP 2.0 AND THE JTWI
3.3.7.5 Layer Manager
As the name implies, the LayerManager manages a series of Layer
objects. Sprite and TiledLayer both extend Layer. More specifi-
cally a LayerManager controls the rendering of Layer objects. The
LayerManager maintains an ordered list so that they are rendered
according to their z-values (in standard computer graphics terminology).
We add a Layer to the list using the method:
public void append(Layer l)
The first layer appended has index zero and the lowest z-value, that is,
it appears closest to the user (viewer). Subsequent layers have successively
greater z-values and indices. Alternatively we can add a layer at a specific
index using the method:
public void insert(Layer l, int index)
To remove a layer from the list we use the method:
public void remove(Layer l)
We position a layer in the LayerManager’s coordinate system using
the setPosition() method. The contents of LayerManager are not
rendered in their entirety, instead a view window is rendered using the
paint() method of the LayerManager:
public void paint(Graphics g, int x, int y)
The x and y arguments are used to position the view window on
the Displayable object the Canvas or GameCanvas upon which the
LayerManager is ultimately rendered and therefore the device’s screen.
The size of the view window is set using the method:
public void setViewWindow(int x, int y, int width, int height)
The x and y values determine the position of the top left corner of
the rectangular view window in the coordinate system of the Layer-
Manager. The width and height arguments determine the width and
height of the view window and are usually set to a size appropriate for the
device’s screen. By varying the x and y coordinates we can pan through
the contents of the LayerManager.
We shall illustrate using LayerManager to display our plane sprite
against a simple moving background. The image used to make up the
MIDP 2.0 141
Figure 3.15 The background image for the LayerManager Demo MIDlet.
background TiledLayer is shown in Figure 3.15 and consists of just
one tile.
The source code for the LayerManagerCanvas class is listed below.
import javax.microedition.lcdui.game.*;
import javax.microedition.lcdui.*;
import java.io.*;
public class LayerManagerCanvas extends Canvas implements Runnable {
private static final int TILE_WIDTH = 140;
private static final int TILE_HEIGHT = 140;
private static final int SPRITE_WIDTH = 140;
private static final int SPRITE_HEIGHT = 140;
private static final int WINDOW_WIDTH = 140;
private static final int WINDOW_HEIGHT = 140;
private Sprite sprite;
private TiledLayer backgroundLayer;
private LayerManager layerManager;
private boolean running = false;
private int x;
private int y;
public LayerManagerCanvas(String spriteImageName,
String backgroundImageName) throws ApplicationException {
try {
Image spriteImage = Image.createImage(spriteImageName);
Image backgroundImage =
Image.createImage(backgroundImageName);
sprite = new Sprite(spriteImage, SPRITE_WIDTH,
SPRITE_HEIGHT);
backgroundLayer = new TiledLayer(2, 1, backgroundImage,
TILE_WIDTH, TILE_HEIGHT);
backgroundLayer.setCell(0,0,1);
backgroundLayer.setCell(1,0,1);
layerManager = new LayerManager();
layerManager.append(sprite);
layerManager.append(backgroundLayer);
//set layer position relative to LayerManager origin
// this is the default anyway
sprite.setPosition(0, 0);
142 MIDP 2.0 AND THE JTWI
//this is the default anyway
backgroundLayer.setPosition(0, 0);
//set view window size and position relative to
//LayerManager's origin
layerManager.setViewWindow(0, 0, WINDOW_WIDTH,
WINDOW_HEIGHT);
//calculate coordinates to position view window in Canvas
x = (getWidth() - WINDOW_WIDTH)/2;
y = (getHeight() - WINDOW_HEIGHT)/2;
}catch(IOException ioe) {
throw new ApplicationException("Unable to create image");
}
}
public void paint(Graphics g) {
g.setColor(255, 255, 255);
//paint Canvas background white
g.fillRect(0, 0, getWidth(), getHeight());
//position view window in Canvas and render
layerManager.paint(g, x, y);
}
public void run() {
running = true;
int layerX = -TILE_WIDTH;
while ( running) {
if (layerX == 0) {
layerX = -TILE_WIDTH;
}
backgroundLayer.setPosition(layerX, 0);
sprite.nextFrame();
repaint(x, y, TILE_WIDTH, TILE_HEIGHT);
try {
Thread.sleep(30);
}catch(InterruptedException ie) {}
layerX++;
}
}
public void stop() {
running = false;
}
}
The class constructor first creates the Sprite and a TiledLayer for
the background, as shown below.
Image spriteImage = Image.createImage(spriteImageName);
Image backgroundImage = Image.createImage(backgroundImageName);
sprite = new Sprite(spriteImage, SPRITE_WIDTH, SPRITE_HEIGHT);
backgroundLayer = new TiledLayer(2, 1, backgroundImage,
TILE_HEIGHT);
MIDP 2.0 143
Figure 3.16 The background TiledLayer.
backgroundLayer.setCell(0,0,1);
backgroundLayer.setCell(1,0,1);
Our background TiledLayer consists of a 2 × 1 grid of tiles (see
Figure 3.16) sufficient to simulate an infinite scene.
Next a LayerManager is created and the sprite and background
layers are appended:
layerManager = new LayerManager();
layerManager.append(sprite);
layerManager.append(backgroundLayer);
//this is the default anyway
sprite.setPosition(0, 0);
//this is the default anyway
backgroundLayer.setPosition(0, 0);
layerManager.setViewWindow(0, 0, WINDOW_WIDTH, WINDOW_HEIGHT);
x = (getWidth() – WINDOW_WIDTH)/2;
y = (getHeight() – WINDOW_HEIGHT)/2;
The layers are positioned relative to the LayerManager’s coordinate
system using their setPosition() methods.
The LayerManager’s view window is rendered by the paint()
method of Canvas as follows:
public void paint(Graphics g) {
g.setColor(255, 255, 255);
//paint Canvas background white
g.fillRect(0, 0, getWidth(), getHeight());
//position view window in Canvas and render
layerManager.paint(g, x, y);
}
The animation of the MIDlet is handled in the run() method listed
below.
public void run() {
running = true;
int layerX = -TILE_WIDTH;
144 MIDP 2.0 AND THE JTWI
while ( running) {
if (layerX == 0) {
layerX = -TILE_WIDTH;
}
backgroundLayer.setPosition(layerX, 0);
sprite.nextFrame();
repaint(x, y, TILE_WIDTH, TILE_HEIGHT);
try {
Thread.sleep(30);
}catch(InterruptedException ie) {}
layerX++;
}
}
In this example, to generate the illusion of motion, instead of moving
the sprite, we move the background layer relative to the coordinate
system of the Canvas using the setPosition() method. The plane
sprite remains stationary while alternating between its two frames on each
cycle. The background layer is initially offset in a negative direction by
an amount equal to TILE_WIDTH. On each cycle we move its position
by one pixel in the positive direction until it has shifted by a total amount
equal to TILE_WIDTH. We then reset the position of the background
layer back to its initial position to avoid running out of scenery. Because
of the symmetrical nature of the background image the effect is to simulate
an infinitely scrolling background (see Figure 3.17).
To observe the full effect, download and run the example. The source
code and JAR and JAD files for the LayerManagerDemo MIDlet are
available from the Symbian website at
www.symbian.com/books
.
The DemoRacer case study, discussed in Chapter 5, provides a fur-
ther detailed study of programming the Game API, including using
collision detection.
Figure 3.17 The LayerManagerDemo MIDlet.
MIDP 2.0 145
3.3.8 The Media API
As mentioned in Chapter 2, MIDP 2.0 introduces support for audio
playback and sound generation in two new packages:
• javax.microedition.media
• javax.microedition.media.control.
Specifically, the Media API mandates support for tone generation and
audio playback of WAV files. Support for other audio formats is optional.
Symbian’s MIDP 2.0 Media API implementation, at the time of writing,
does not provide support for additional optional audio formats. However,
licensee phones built on Symbian OS may provide support for additional
audio formats, particularly if they provide implementations of the full
Mobile Media API (JSR 135), such as found on the Series 60 Nokia 6600.
The MIDP 2.0 Media API is an audio-only building block subset of the
Mobile Media API that is fully upward compatible with the Mobile Media
API. The rationale behind providing only audio support in the Media API
was that the MIDP 2.0 specification is targeted at the whole spectrum of
mobile phones including mass-market low-end phones with no support
for video rendering capabilities. In contrast, the optional Mobile Media
API is targeted at high-end feature phones and PDAs with advanced
sound and video capabilities.
Since the Media API is a proper subset of the Mobile Media API we
shall leave a detailed discussion of programming tone generation and
audio playback to later in the chapter where a section is devoted to the
Mobile Media API.
3.3.9 Other New Features
3.3.9.1 MIDlet Class
MIDP 2.0 brings a couple of new methods into the MIDlet class including
the platformRequest() method:
public final boolean platformRequest(String URL)
This method allows the MIDlet to bring certain native applications
to the foreground and permits the user to interact with the context while
the MIDlet continues running in the background. Forms of the String
URL argument required by the MIDP 2.0 specification include:
platformRequest("www.symbian.com/mobile/MyMidlet.jad")
or:
platformRequest("tel:07940176427")
146 MIDP 2.0 AND THE JTWI
The former launches the installer to install the indicated MIDlet
suite. The latter launches the native phone application, if supported by
the device. If the platform cannot handle the specified URL request a
ConnectionNotFoundException will be thrown. Note that at the
time of writing platformRequest() was not supported on the current
firmware release (3.42.1) available on the Nokia 6600. Later versions of
the firmware will support this feature (see
Known Issues in the Nokia
6600 MIDP 2.0 Implementation
Version 1.2 at
www.forum.nokia.com
).
Another new method introduced in MIDP 2.0 is the checkPermis-
sion() method.
public final int checkPermission(String permission)
This allows the MIDlet to check the permission of a particular API,
passedinasthepermission argument. For example, the code shown
below would check the permission to open an SMS connection.
checkPermission(“javax.microedition.io.Connector.sms”)
The return value can be:
• 1 – if the permission is Allowed
• 0 – if the permission is denied (including when the API is not supported
on the device)
•−1 – if the permission is unknown, including the case where the
permission requires user interaction.
3.3.9.2 Alpha Blending
MIDP 2.0 adds functionality to the Image and Graphics classes to
provide support for alpha blending. Alpha blending is a way of combining
a semi-transparent mask image with a background image to create a
blended image with the appearance of transparency. The degree of
transparency depends on the alpha coefficient. The alpha coefficient can
take a value ranging from 0, in which case the mask is totally transparent
and the blended image is simply the background image, to 1 (FF) in which
case the mask is completely opaque and therefore the blended image is
the same as the mask image.
In particular, MIDP 2.0 provides the createRGBImage() method of
the Image class, which allows an image to be created from an array of
ARGB values:
public static Image createRGBImage(int[] rgb, int width, int height,
boolean processAlpha)