Professional Visual Basic 2010 and .neT 4 phần 8 docx
Bạn đang xem bản rút gọn của tài liệu. Xem và tải ngay bản đầy đủ của tài liệu tại đây (3.85 MB, 133 trang )
888
❘
CHAPTER 26 wiNdows woRkFlow FouNdatioN
➤ Activities that communicate with external code — These activities are either called by external
code to initiate a workflow or used to call to external code as part of a workflow. This category also
includes activities that communicate with external systems to persist the workflow state.
ACTIVITY DESCRIPTION
Receive Receives a one-way WCF message
ReceiveAndSendReply Receives a WCF message and sends back a result
Send Sends a one-way WCF message
SendAndReceiveReply Sends a WCF message and waits for a result
Persist Saves the current state of the workflow. This is very useful for long-running
workflows, as it enables you to save the current state of the workflow, saving
memory. You can then reload the workflow as it was persisted as needed later.
ACTIVITY DESCRIPTION
CancellationScope Marks the boundaries of a set of activities to perform if a process is cancelled.
Typically, this would be used to close any handles, undo any partially
completed steps, etc.
CompensableActivity Marks the boundaries of an activity that may be “undone.” This activity groups one
or more actions to be performed. In addition, it contains actions to undo whatever
steps may have already been performed. This is typically to enable rollback of a
partially failed transaction. This activity is used as an alternative to transactions
when you don’t necessarily control the success of each of the steps in a process.
For example, if you send a request to a Web service, and then fail another step,
the CompensableActivity can send a cancel request to the Web service.
Compensate Invokes the compensation activity in a CompensableActivity activity. That
is, it “undoes” whatever activity was performed.
Confirm Performs the equivalent of a commit on the CompensableActivity
TransactionScope Marks the boundaries of a transaction within the workflow
Rethrow Rethrows an existing exception. This is typically done within the Catch clause of a
Try Catch activity to propagate the exception to another part of the workflow.
Throw Creates an exception within a workflow
TryCatch Wraps an activity (use a sequence if you need multiple children) within a
Try Catch block to handle exceptions
CorrelationScope Marks the boundaries of a set of Web services that will share a correlation handle
InitializeCorrelation Allows you to initialize a correlation. Typically, this is done using a message,
but this activity allows you to start it without an explicit correlation message.
TransactedReceiveScope Allows you to flow a transaction into a WCF communication
➤ Transaction activities — These activities group a number of other activities together into some logical
element. This is usually done to mark a number of activities that participate in a transaction.
ACTIVITY DESCRIPTION
Switch<T> Works like the VB case statement. Switches the flow through a workflow based
on the value of a variable or condition.
While Works like the VB while…end while loop. Performs a child activity (use a
sequence if you need multiple steps) while a condition is true.
TerminateWorkflow Stops the workflow before the end of the workflow is reached. This is useful
in the event of errors in the workflow, or if the data input doesn’t allow for
completion. Also used for flowchart workflows as a means of completion.
(continued)
Simpo PDF Merge and Split Unregistered Version -
➤ Flowchart activities — These activities are used in flowchart-style workflows and allow for the
organization of the steps, simple decisions, and other stages.
ACTIVITY DESCRIPTION
Flowchart This activity is used to create a flowchart workflow. It is a container for all the steps
involved in the workflow.
FlowDecision A simple If statement within a flowchart workflow. This is used to control the actions of a
workflow based on a condition.
FlowSwitch A switch statement within a flowchart workflow. This works similar to the VB case
statement in that you have multiple cases that work based on the assigned condition. You
also define a default condition if none of the cases apply.
A Less Simple Workflow
To see a few of these activities together, create a new
Workflow Console Application named Fulfillment.
This will be used to create part of a workflow for
an order fulfillment application. The workflow will
collect an XML file from a directory on disk, validate
it using a few simple rules, and add it to a collection
representing the order queue. Other workflows might
then retrieve items from this collection for actual
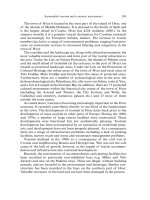
processing. Figure 26-13 shows the final workflow.
As you can see from the figure, the workflow is a
flowchart consisting of four stages. The
DisplayName
property of each of these stages has been set to
better describe the contents of the stage. As you
would expect, this is invaluable in improving the
understanding of the workflow when you come back
to it later (or try to explain it to end users). The basic
outline of the workflow is as follows:
The workflow begins a loop to monitor ➤
a directory for XML files. This file will
represent an order, with one or more details. This is a
DoWhile activity.
Once an order is received, a few simple validations are performed by calling a method on a .NET
➤
class. This is an InvokeMethod activity.
If the order is valid, it is added to a collection for later processing. If not, the validation errors are
➤
displayed and the workflow completes. This is an If activity.
To demonstrate additional processing, the orders collection is simply displayed to the console. Of
➤
course, in a real application, this stage would send the orders on to another application for actual
fulfillment and shipping. This is a
ForEach<T> activity.
Before you begin building the workflow, there are some helper classes that you need to build. These
represent an order, an order detail line, and a manager class for processing the order. Add a new Class
Library project to the solution, named OrderManager. This has three classes: Order, OrderDetail, and
OrderSystem.
The
Order class represents an order in the system. For this example, it consists of a few properties,
including the collection of order details.:
Public Class Order
Public Property OrderID As Integer
Public Property OrderDate As Date
Public Property CustomerName As String
Public Property ShipAddress As String
FIGURE 2613
Building Workflows
❘
889
Simpo PDF Merge and Split Unregistered Version -
890
❘
CHAPTER 26 wiNdows woRkFlow FouNdatioN
Public Property Details As List(Of OrderDetail)
Public Sub New()
Details = New List(Of OrderDetail)
End Sub
End Class
Code snippet from OrderManager
The OrderDetail class is an individual line item within an order. Again, for this example it is greatly
simplified:
Public Class OrderDetail
Public Property Parent As Order
Public Property ItemName As String
Public Property Quantity As Integer
End Class
Code snippet from OrderManager
The OrderSystem class is a general manager class for the orders. In addition to the functionality for this
demo, it would likely be responsible for saving orders to a database, and so on:
Public Class OrderSystem
Public Function GetOrderFromDropFile(ByVal path As String) As Order
Dim result As Order = Nothing
Dim files As String()
Dim doc As New XDocument
Dim detail As OrderDetail
files = IO.Directory.GetFiles(path)
If files.Length > 0 Then
doc = XDocument.Load(files(0))
'load header
result = New Order
With result
.OrderID = CInt(doc.Root.Attribute("id").Value)
.CustomerName = doc.Root.Element("customerName").Value
.OrderDate = CDate(doc.Root.Element("orderDate").Value)
.ShipAddress = doc.Root.Element("shipAddress").Value
End With
'load detail rows
Dim details As List(Of XElement) = (From item In doc.Descendants
Where item.Name = "orderDetail"
Select item).ToList
For Each d In details
detail = New OrderDetail
With detail
.Parent = result
.ItemName = d.Element("itemName").Value
.Quantity = CDec(d.Element("quantity").Value)
End With
result.Details.Add(detail)
Next
'delete file to avoid calling this again
'likely you would move to a backup directory instead
' IO.File.Delete(files(0))
End If
Return result
Simpo PDF Merge and Split Unregistered Version -
End Function
Public Function ValidateOrder(ByVal anOrder As Order) As String()
Dim result As New List(Of String)
'check for OrderID
If Not IsNumeric(anOrder.OrderID) Then
result.Add("Order ID is not valid")
End If
'check for ship address
If Not String.IsNullOrEmpty(anOrder.ShipAddress) Then
result.Add("No ship address")
End If
'check for at least one OrderDetail
If anOrder.Details.Count < 1 Then
result.Add("Must have at least one item in order")
End If
'other checks here
Return result.ToArray
End Function
End Class
Code snippet from OrderManager
For this example, the OrderSystem class exposes two methods. The first attempts to load an XML file
from an assigned directory. Once a file has been loaded, it converts the contents of the XML file into
an Order object, and one or more OrderDetail objects. LINQ to XML is used to retrieve the rows
containing order details.
The second method does a few simple validations on the order, and returns a list of validation errors (as
strings) to the calling program.
The following code shows a sample order XML file (also included in the source code for the
OrderManager
project):
<?xml version=”1.0” encoding=”utf-8” ?>
<order id=”1234”>
<orderDate>2009-12-01</orderDate>
<customerName>Moe’s Family Diner</customerName>
<shipAddress>1313 Mockingbird Lane, Springfield, AK</shipAddress>
<orderDetails>
<orderDetail>
<itemName>Mango puree</itemName>
<quantity>2</quantity>
</orderDetail>
<orderDetail>
<itemName>Everso Sharp Knives</itemName>
<quantity>15</quantity>
</orderDetail>
<orderDetail>
<itemName>Mega frier</itemName>
<quantity>1</quantity>
</orderDetail>
<orderDetail>
<itemName>Case of sparklers</itemName>
<quantity>200</quantity>
</orderDetail>
</orderDetails>
</order>
Code snippet from OrderManager
Building Workflows
❘
891
Simpo PDF Merge and Split Unregistered Version -
892
❘
CHAPTER 26 wiNdows woRkFlow FouNdatioN
Build the project to ensure you have no errors, and then you’re ready to build the workflow to use these
classes. Add a new Flowchart activity to the designer, and add the four activities shown in Figure 26-12,
connecting them as shown.
The workflow will make use of the objects in the
OrderManager project. As such, you should import
that namespace into your workflow. First, add a
reference to the OrderManager project: Right click on
the Fulfillment project and select Add Reference.
Select the OrderManager project on the Projects tab.
Next, click the Imports link at the bottom of the
workflow designer on the FulfillmentWorkflow.
This displays the current list of namespaces available
to your workflow. Add the OrderManager namespace
by entering it in the space at the top of the list and
pressing Enter to save it to the list.
The
DoWhile loop consists of a Sequence, which in
turn contains a Delay activity and an InvokeMethod
activity (see Figure 26-14). The DoWhile activity
requires that you set a condition that will end the
loop. In this case, it will be when an order has been
picked up by the InvokeMethod.
The following table describes the property settings
for the added activities.
FIGURE 2614
ACTIVITY PROPERTY VALUE DESCRIPTION
DoWhile Condition theOrder Is Nothing You will create the theOrder variable
shortly. This variable will hold an
instance of an Order class for
processing.
Delay Duration 00:00:10 The Duration property is a
TimeSpan. In this case, the
delay is set for 10 seconds. In a
real-world application, you would
set this based on the frequency
of orders being processed.
InvokeMethod TargetObject manager This is an instance of an
OrderSystem class.
MethodName GetOrderFromDropFile A method on the OrderSystem class
Result theOrder Once a new file has been processed,
the resulting order is saved for
processing within the workflow.
Parameters
System
.Configuration
.ConfigurationManager
.AppSettings(“dropFilePath”)
.ToString()
The directory to monitor will be
set using the application
configuration file.
The InvokeMethod activity is used to call the ValidateOrder method on the manager object. Set the
properties on this activity as shown in this table:
Simpo PDF Merge and Split Unregistered Version -
FIGURE 2615
ACTIVITY PROPERTY VALUE DESCRIPTION
InvokeMethod TargetObject manager This is an instance of an OrderSystem class.
MethodName ValidateOrder A method on the OrderSystem class
Result ValidationErrors A variable that will be added to the
workflow shortly
Parameters theOrder The instance of the Order class created by
the GetOrderFromDropFile method above
Building Workflows
❘
893
ACTIVITY PROPERTY VALUE DESCRIPTION
If Condition
ValidationErrors
.Length > 0
The condition will return true if any
errors were added to the collection
by the earlier ValidateOrder call.
AddToCollection<T> TypeArgument
OrderManager
.Order
This defines the type of objects
stored in the collection.
Collection Orders This is a variable of the workflow
that will store the orders.
Item theOrder The item to add to the collection. In
this case it is a workflow variable.
ForEach<T> TypeArgument String This will iterate over each of the
items in the ValidationErrors
collection to display them.
Values ValidationErrors This is the collection to iterate over.
WriteLine Text ValidationError This is the value of the current
iteration in the loop.
TerminateWorkflow Reason
“One or more
orders have
errors”
This will be available to the calling
application to determine why the
workflow terminated.
Next, the processing branches based on whether errors are encountered in the order. If the order is valid,
then it is added to a collection for further processing. If, however, there are any validation errors, they are
displayed and the workflow ends (see Figure 26-15). Set the properties for these activities as follows:
Simpo PDF Merge and Split Unregistered Version -
894
❘
CHAPTER 26 wiNdows woRkFlow FouNdatioN
Finally, the orders are simply displayed on the console to confirm they have been processed. This is done
with another ForEach<T> activity that writes the order’s information, followed by each of the detail rows in
the order (see Figure 26-16). The properties of these activities are defined as follows:
ACTIVITY PROPERTY VALUE DESCRIPTION
ForEach<T> TypeArgument OrderManager.Order This will iterate over each of the orders
in the collection to display them.
Values Orders This is a workflow variable containing
the orders submitted.
WriteLine Text
String
.Format(“Order on {0}
by {1} for:”, item
.OrderDate, item
.CustomerName)
Displays the contents of the order’s
header information
ForEach<T> TypeArgument
OrderManager
.OrderDetails
This will iterate over the detail
rows contained within the
submitted order.
Values item.Details This is the collection of order details
within the current order.
WriteLine Text
String
.Format(“{0} {1}(s)”,
detail
.Quantity, detail
.ItemName)
Displays the contents of the fields of
each order detail row
FIGURE 2616
Simpo PDF Merge and Split Unregistered Version -
VARIABLE TYPE DESCRIPTION
theOrder OrderManager.Order Will hold the current submitted order
Orders List<Order> Represents the current queue of orders for processing.
Set the default to New List(Of Order) to ensure that
the collection is initialized.
ValidationErrors String() Will hold any validation errors in the current submitted
order
ARGUMENT TYPE DESCRIPTION
manager OrderManager.OrderSystem Will hold the object that provides the processing for
the loading and validating of the orders
As described above, you will use a number of workflow variables needed to store data during processing.
These are described in the following table:
All that remains is to update the host application. As described above, you will provide an instance of the
OrderSystem class to the workflow. This is done in the Main method for the Console application:
Shared Sub Main()
Dim inputs As New Dictionary(Of String, Object)
'Workflow expects the OrderSystem as parameter
Dim sys As New OrderManager.OrderSystem
inputs.Add("manager", sys)
WorkflowInvoker.Invoke(New FulfilmentWorkflow(), inputs)
Console.WriteLine("Press ENTER to exit")
Console.ReadLine()
End Sub
Code snippet from Fulfillment
Recall that the input for a workflow is a Dictionary(Of String, Object), and that the key in this
dictionary must match the name of an argument in the system — in this case, manager.
Before running the application, you also need to add an application configuration file. This will include a
single application setting named
dropFilePath that should be set to the location where you will add the
XML files.
Run the application and copy an XML file to the monitored directory. After a brief delay, you should see the
contents of the order displayed on the console (see Figure 26-17).
FIGURE 2617
Building Workflows
❘
895
In addition to those variables, an instance of the OrderSystem class will be passed into the workflow as an
argument. Open the Arguments pane and add the following item.
Simpo PDF Merge and Split Unregistered Version -
896
❘
CHAPTER 26 wiNdows woRkFlow FouNdatioN
Building Custom Activities
In addition to the standard activity library, WF supports extensibility through the creation of custom
activities. Creating custom activities is a matter of creating a new class that inherits from Activity (or one
of the existing child classes). Creating custom activities is the primary means of extending WF. You might
use custom activities to simplify a complex workflow, grouping a number of common activities into a single
new activity. Alternatively, custom activities can create a workflow that is easier to understand, using terms
that are more familiar to the developers and business experts. Finally, custom activities can be used to
support software used within the business, such as activities to communicate with a Customer Relationship
Management (CRM) or Enterprise Resource Planning (ERP) system.
Creating custom activities with WF 4 is much easier than it was with earlier releases. To create a custom
activity, you inherit from
Activity, or one of the existing children of Activity, and override the
appropriate methods. The most common classes you will inherit from are as follows:
➤ Activity — The base class. Use only if one of the other following three classes are too specific for
your needs.
➤ CodeActivity — Use when your activity performs some action. You override the Execute method
to carry out your action. This activity works synchronously (as opposed to the
AsyncCodeActivity
below), so the entire activity must complete before the workflow continues.
➤ AsyncCodeActivity — Similar to CodeActivity, but the work is performed asynchronously. This
is the most commonly used class to inherit from when creating custom activities.
➤ NativeActivity — Use this when your activity needs to interact with the workflow engine itself. For
example, the flow control activities inherit from this class.
When defining properties for your custom activities, you do not use the standard types. Instead, you use a
generic class to wrap the type. This enables your properties to communicate with the running workflow.
There are three wrappers you should use in your activities:
➤ InArgument(Of type) — Used to wrap a property that will be provided to the workflow
➤ OutArgument(Of type) — Used to wrap a property that the workflow will expose to the calling
code
➤ InOutArgument(Of type) — Used to wrap a property that will be provided to the workflow, as well
as returned
To see how you can easily create a new activity and use it within a workflow, create a new Workflow
Console application (CustomActivity). Add a new class (EncryptActivity) to the project for your
new activity. This new activity will be used to encrypt a string within a workflow (you’ll also be creating
an activity to decrypt the text):
Imports System.Activities
Imports System.Security.Cryptography
Imports System.Text
Public Class EncryptActivity
Inherits CodeActivity
Public Property Input As InArgument(Of String)
Public Property Password As InArgument(Of String)
Public Property Output As OutArgument(Of String)
Protected Overrides Sub Execute(ByVal context As CodeActivityContext)
Dim aes As New AesCryptoServiceProvider
Dim hash As New MD5CryptoServiceProvider
'load the properties from the current workflow context
Dim plaintext As String = Input.Get(context)
Simpo PDF Merge and Split Unregistered Version -
Dim pwd As String = Password.Get(context)
Dim inBuffer As Byte()
Dim outBuffer As Byte()
'the key is the input to the encryptor
'we can only decrypt using the same password
aes.Key = hash.ComputeHash(Encoding.ASCII.GetBytes(pwd))
'Electronic CodeBook format (each block is encrypted individually)
aes.Mode = CipherMode.ECB
Dim encrypt As ICryptoTransform = aes.CreateEncryptor
inBuffer = Encoding.ASCII.GetBytes(plaintext)
'here's the actual encryption
outBuffer = encrypt.TransformFinalBlock(inBuffer,
0, inBuffer.Length)
'store the output in the current workflow context
'Base64 to avoid any high ASCII issues
Output.Set(context, Convert.ToBase64String(outBuffer))
End Sub
End Class
Code snippet from CustomActivity
The encryption uses the AES encryption, although you could use any of the encryption methods in the
System.Security.Cryptography namespace. You can see Chapter 34 for more details on the classes in
this namespace, but the mechanics of using them are as follows:
1. Create an instance of one of the cryptography service providers.
2. Set the Key (and optionally IV, or initialization vector, properties) on the service provider. This is the
value used to provide the encryption (i.e., the password).
3. Create an actual encryptor using the service provider.
4. Encrypt the text. Note that the encryption method (TransformFinalBlock) does not take a string, but
an array of bytes, so you need to convert your input (and output).
Add another class (DecryptActivity) to the project. The code for the DecryptActivity is basically a
mirror image of the EncryptActivity:
Imports System.Activities
Imports System.Security.Cryptography
Imports System.Text
Public Class DecryptActivity
Inherits CodeActivity
Public Property Input As InArgument(Of String)
Public Property Password As InArgument(Of String)
Public Property Output As OutArgument(Of String)
Protected Overrides Sub Execute(ByVal context As CodeActivityContext)
Dim aes As New AesCryptoServiceProvider
Dim hash As New MD5CryptoServiceProvider
'convert the input parameters from the current context
Dim encryptedtext As String = Input.Get(context)
Dim pwd As String = Password.Get(context)
Dim inBuffer As Byte()
Building Workflows
❘
897
Simpo PDF Merge and Split Unregistered Version -
898
❘
CHAPTER 26 wiNdows woRkFlow FouNdatioN
Dim outBuffer As Byte()
'generate security hash from the password
aes.Key = hash.ComputeHash(Encoding.ASCII.GetBytes(pwd))
aes.Mode = CipherMode.ECB
'create decryptor
Dim decrypt As ICryptoTransform = aes.CreateDecryptor
inBuffer = Convert.FromBase64String(encryptedtext)
'do actual decryption
outBuffer = decrypt.TransformFinalBlock(inBuffer, 0, inBuffer.Length)
'Save the decrypted text to the current workflow context
Output.Set(context, Encoding.ASCII.GetString(outBuffer))
End Sub
End Class
Code snippet from CustomActivity
The main difference between the two activities is that rather than create an
encryptor, you create a decryptor. In addition, because the output of the
encryptor was converted to a base 64 string, it is converted to a byte array using
FromBase64String.
New activities will not appear in the Toolbox until they have been compiled, so
build the project to ensure that everything is working. Once you have done that,
you can build your workflow to test the two activities. Switch to the workflow
designer. You should see the new activities in the Toolbox (see Figure 26-18).
Drag a
Sequence activity onto the designer, and then add an EncryptActivity,
DecryptActivity, and WriteLine activity to it. The final workflow should
look like Figure 26-19.
The input parameters will be provided by the host console application. To do
this, you need to configure the workflow with the desired parameters. You then
provide them to the workflow by including a
Dictionary containing those
parameters. Click the Arguments link on the workflow designer. You will use
two input parameters (for the text to encrypt and the password) and an output
parameter (for the decrypted text). The names of these parameters do not
need to match the properties of the custom activities, but the case is significant
in the Dictionary, so you need to ensure that they are added correctly (see
Figure 26-20).
FIGURE 2618
FIGURE 2619
FIGURE 2620
Similarly, you need a variable to hold the temporary value after the encryption, so add a new variable using
the Variables pane of the designer. The name is not important, but it should be a String. In the table below,
this variable is called tempText.
Now you’re ready to set the properties for the activities. The following table shows how they should be set:
Simpo PDF Merge and Split Unregistered Version -
You can now turn your attention to the main routine that will call the workflow. The input to the workflow
and the output of the Invoke method are both of type Dictionary(Of String, Object). The key you use
to add the item to the Dictionary is important, as it should match the names of the arguments you added to
the workflow, including the case of the name. The following code shows the Main method of the console
application:
Shared Sub Main()
Dim parms As New Dictionary(Of String, Object)
Dim output As New Dictionary(Of String, Object)
'add the input parameters
parms.Add("inputText", "Some text to encrypt")
parms.Add("password", "5up3r53cr3t!")
Console.WriteLine("The original text is: {0}",
parms.Item("inputText").ToString())
output = WorkflowInvoker.Invoke(New Workflow1(), parms)
Console.WriteLine("The decrypted string is: {0}",
output.Item("outputText").ToString())
Console.WriteLine("Press ENTER to exit")
Console.ReadLine()
End Sub
Code snippet from CustomActivity
You could reuse the Dictionary for both input and output, but in this case two dictionaries are created
to avoid any confusion. The two input parameters are added to the input dictionary, keeping in mind
that case is significant and should match the arguments you created earlier on the workflow. This input
dictionary is added as a parameter in the call to the WorkflowInvoker.Invoke. This also populates the
output dictionary with any OutArgument arguments of the workflow — in this case, the outputText value.
Running this workflow should display the same text for input and output.
Dynamically Loading Workflows
As each workflow is a self-contained block of XAML, you might want to dynamically load your workflows,
rather than compile them into the application. This gives you easier access to changing or extending your
application by creating or editing the XAML and making it available to your application.
In order to have the XAML files left “loose” when you compile them, you need to change the properties for
the XAML file. Select the workflow file in the Solution Explorer and set the Build Action to Content and
ACTIVITY PROPERTY VALUE
EncryptActivity Input inputText
Password password
Output tempText
DecryptActivity Input tempText
Password password
Output outputText
WriteLine Text
String
.Format(“{0} encrypted is {1}
. Decrypted to {2}”, inputText, tempText,
outputText)
Building Workflows
❘
899
Simpo PDF Merge and Split Unregistered Version -
900
❘
CHAPTER 26 wiNdows woRkFlow FouNdatioN
the Copy to Output Directory to Copy if newer. This will move the XAML files to the output directory
when you build the application. The DynamicallyLoadingWorkflows sample includes three sample
workflows.
To load one of the workflows, you use the
ActivityXamlServices.Load method. This is from the System
.Activities.XamlIntegration
namespace. The method takes a path to a XAML file and loads it. You
can then pass it on to the WorkflowInvoker to execute as normal:
Shared Sub Main()
'load a workflow
' in this case based on the current tick
' of the clock
' (( in this case 0 to 2 ))
Dim pick As Integer = DateTime.Now.Second Mod 3
Dim filename As String =
String.Format("Workflow{0}.xaml", pick + 1)
WorkflowInvoker.Invoke(ActivityXamlServices.Load(filename))
Console.WriteLine("Press ENTER to exit")
Console.ReadLine()
End Sub
Code snippet from DynamicallyLoadingWorkflow
The preceding code expects three XAML files in the same directory as the executable. It randomly selects
one of the three, loads it using ActivityXamlServices.Load, and executes it. You can run this multiple
times to confirm that it selects the different workflows.
While this is a simple example of loading the workflows dynamically, the method can be quite useful when
building workflow applications. For example, you may have separate workflows based on customer type or
product. You can use this method to load the correct workflow from a library of workflows as needed. In
addition, as your needs change, you can update the XAML files, without having to update your application
to reflect the changes.
REHOSTING THE WORKFLOW DESIGNER
One common request when working with workflows is to enable users to create and edit their own workflows.
In the past, this has been problematic because you’d then have to either recreate the functionality yourself
using WPF or figure out the interfaces required to get it to work. With this version of WF, however, it has
become much easier.
You can host the workflow designer surface in any WPF application by creating a new instance of
the
WorkflowDesigner class and inserting the View property into the location of the host. The
WorkflowDesigner class also makes the standard property grid available to your application using
the PropertyInspectorView property.
Create a new WPF application to host the workflow designer. The main window of the application will host
a collection of available controls, as well as the workflow designer and property window. The following
code shows the XAML for the application:
<Window x:Class=”MainWindow”
xmlns=” /> xmlns:x=” /> xmlns:sys=”clr-namespace:System;assembly=mscorlib”
xmlns:tool=”clr-namespace:System.Activities.Presentation.Toolbox;
assembly=System.Activities.Presentation”
Title=”Rehosting Workflow Designer” Height=”500” Width=”700” >
<Window.Resources>
Simpo PDF Merge and Split Unregistered Version -
<sys:String x:Key=”AssemblyName”>System.Activities, Version=4.0.0.0,
Culture=neutral, PublicKeyToken=31bf3856ad364e35</sys:String>
<sys:String x:Key=”CustomActivityAssembly”>CustomActivities</sys:String>
</Window.Resources>
<Grid x:Name=”DesignerGrid”>
<Grid.ColumnDefinitions>
<ColumnDefinition Width=”200” />
<ColumnDefinition Width=”*” />
</Grid.ColumnDefinitions>
<Grid.RowDefinitions>
<RowDefinition Height=”1*” />
<RowDefinition Height=”1*” />
</Grid.RowDefinitions>
<Border>
<tool:ToolboxControl>
<tool:ToolboxControl.Categories>
<tool:ToolboxCategory CategoryName=”Basic”>
<tool:ToolboxItemWrapper
AssemblyName=”{StaticResource AssemblyName}” >
<tool:ToolboxItemWrapper.ToolName>
System.Activities.Statements.Sequence
</tool:ToolboxItemWrapper.ToolName>
</tool:ToolboxItemWrapper>
<tool:ToolboxItemWrapper
AssemblyName=”{StaticResource AssemblyName}”>
<tool:ToolboxItemWrapper.ToolName>
System.Activities.Statements.WriteLine
</tool:ToolboxItemWrapper.ToolName>
</tool:ToolboxItemWrapper>
<tool:ToolboxItemWrapper
AssemblyName=”{StaticResource CustomActivityAssembly}”>
<tool:ToolboxItemWrapper.ToolName>
CustomActivities.EncryptActivity
</tool:ToolboxItemWrapper.ToolName>
</tool:ToolboxItemWrapper>
<tool:ToolboxItemWrapper
AssemblyName=”{StaticResource CustomActivityAssembly}”>
<tool:ToolboxItemWrapper.ToolName>
CustomActivities.DecryptActivity
</tool:ToolboxItemWrapper.ToolName>
</tool:ToolboxItemWrapper>
</tool:ToolboxCategory>
</tool:ToolboxControl.Categories>
</tool:ToolboxControl>
</Border>
<Border Name=”DesignerBorder” Grid.Column=”1” Grid.RowSpan=”2” />
<Border Grid.Row=”2” Grid.Column=”0” Name=”PropertyGridBorder” />
</Grid>
</Window>
The application’s main window uses a grid to lay out the ”Toolbox” of available activities added above and
a property view on the left, and the bulk of the window hosting the designer. The designer and property
grid will be added in code later, but Border controls have been added at the appropriate locations in the
XAML where they will appear. Figure 26-21 shows the resulting window in the designer.
Notice that a custom namespace has been added to the XAML for the
System.Activities.Presentation
namespace. This includes the classes that will be used to insert the Toolbox items. You need to add each of
the desired activities individually. This gives you the flexibility to customize the controls you present to end
users.
Rehosting the Workflow Designer
❘
901
Simpo PDF Merge and Split Unregistered Version -
902
❘
CHAPTER 26 wiNdows woRkFlow FouNdatioN
In addition to the standard controls, you can also include custom controls. I created a new Activity Library
project (CustomActivities) and added the EncryptActivity and DecryptActivity activities to that project.
I then referenced that project from this one. If you look at the preceding XAML, you will see a new resource
created pointing at that assembly. The activities are then loaded just as you load the standard activities.
All that remains is to create the new instance of the
WorkflowDesigner, and insert it into the application:
Imports System.Activities
Imports System.Activities.Core.Presentation
Imports System.Activities.Presentation
Class MainWindow
Public Sub New()
InitializeComponent()
'load the standard control metadata (for the "toolbox")
Dim designerMeta As New DesignerMetadata
designerMeta.Register()
'create the new design surface
Dim designer As New WorkflowDesigner()
'adding a sequence as a default activity
designer.Load(New System.Activities.Statements.Sequence())
'add the designer into the app
DesignerBorder.Child = designer.View
'add the default property grid to the app
PropertyGridBorder.Child = designer.PropertyInspectorView
End Sub
Code snippet from RehostingDesigner
The DesignerMetadata class provides the information used by the designer to display the controls
on the design surface. If you fail to register this class first, the designer won’t be able to draw the
appropriate designers for each control.
FIGURE 2621
Simpo PDF Merge and Split Unregistered Version -
You can customize the WorkflowDesigner before adding it to the application. In this case, a default
Sequence activity is added.
Finally, the designer and property window are inserted into the main window. The final result (see
Figure 26-22) allows the end user to create or edit workflows. Saving the workflow is left as an exercise
for you (but the
WorkflowDesigner.Save and WorkflowDesigner.Load methods would likely come
in handy).
FIGURE 2622
SUMMARY
While Windows Workflow Foundation does not have the visual glitz of WPF or the broad reach of WCF, it is
a highly useful addition to the .NET Framework. Most business applications have some need for workflows,
and having a standard means of creating a workflow ensures that the workflow is fully featured and accurately
reflects business needs. As WF is readily available with the .NET Framework, you no longer need to create
your own workflow capabilities for each application. Moreover, WF is extensible, so you can take advantage
of it in your applications without being limited to the included features.
As with the other components of the .NET Framework, WF integrates well into other applications, including
Windows Forms and ASP.NET applications. It provides the means to extract the frequently complex workflow
from those applications and to graphically design it. This graphical representation can be used to communicate
the process to business users, increasing the chance that the workflow is represented correctly. Finally, as
business needs change, it is a simple process to update the workflow, without requiring changes to the core
application.
Summary
❘
903
Simpo PDF Merge and Split Unregistered Version -
Simpo PDF Merge and Split Unregistered Version -
27
Lo c a l i z a t i o n
WHAT YOU WILL LEARN IN THIS CHAPTER
Understanding culture types ➤
Getting culture settings from a thread ➤
Declaring culture in ASP.NET ➤
Understanding di erences in dates ➤
Understanding di erences in currency & numbers ➤
Understanding di erences in sorting ➤
Using culture specifi c resource fi les ➤
As the audience for an application expands, businesses often realize they need to globalize the
application. Of course, the ideal is to build the application to handle an international audience right
from the start, but in most cases this may not be feasible because building for localized versions
requires extra work and cost.
The core of any localization effort is the translation of resources, and user interface changes. Such
changes are application specifi c and therefore not really open to generic implementation across the
multitude of potential cultures for which you might choose to target an application. However,
some common elements of localization such as date support or numeric and currency formats can
be implemented by .NET Framework classes.
The .NET Framework has made a considerable effort to support the internationalization of .NET
applications. API support, server controls, and even Visual Studio itself equip you to do the extra
work required to bring your application to an international audience. This chapter looks at some of
the important items to consider when building your applications for the world.
CULTURES AND REGIONS
As an example, the ASP.NET page that is pulled up in an end user ’ s browser runs under a specifi c
culture and region setting. When building an ASP.NET application or page, the defi ned culture in
which it runs is dependent upon a culture and region setting specifi ed either in the server in which
the application is run or in a setting applied by the client (the end user). By default, ASP.NET runs
under a culture setting defi ned by the server. Stated simply, unless you specifi cally look for a client ’ s
requested culture, your application will run based on the server ’ s culture settings.
Simpo PDF Merge and Split Unregistered Version -
906
❘
CHAPTER 27 loCaliZatioN
The world is made up of a multitude of cultures, each of which has a language and a set of defined ways
in which it views and consumes numbers, uses currencies, sorts alphabetically, and so on. The .NET
Framework defines languages and regions using the Request for Comments 1766 standard definition (tags
for identification of languages — www.ietf.org/rfc/rfc1766.txt), which specifies a language and region
using two-letter codes separated by a dash. The following table provides examples of some culture definitions:
CULTURE CODE DESCRIPTION
en-US English language; United States
en-GB English language; United Kingdom (Great Britain)
en-AU English language; Australia
en-CA English language; Canada
fr-CA French language; Canada
The examples in this table define five distinct cultures. These
five cultures have some similarities and some differences.
Four of the cultures speak the same language (English), so
the language code of “en” is used in these culture settings.
Following the language setting is the region setting. Even
though most of these cultures speak the same language, it is
important to distinguish them further by setting their region
(such as US for the United States, GB for the United Kingdom,
AU for Australia, and CA for Canada). These settings reflect the
fact that the English used in the United States is slightly different
from the English used in the United Kingdom, and so forth.
Beyond language, differences exist in how dates and numerical
values are represented. This is why a culture’s language and
region are presented together.
The differences between the cultures in the table do not
break down by region only. Many countries contain more
than a single language, and each may have its own preference
for notation of dates and other items. For example, en-CA
specifies English speakers in Canada. Because Canada is not
only an English-speaking country, it also includes the culture
setting of fr-CA for French-speaking Canadians.
Understanding Culture Types
The culture definition just given is called a specific culture
definition. This definition is as detailed as you can possibly
get, defining both the language and the region. The other
type of culture definition is a neutral culture definition. Each
specific culture has a specified neutral culture with which it is
associated. For instance, the English language cultures shown
in the previous table are separate, but they also belong to one
neutral culture: EN (English). The diagram presented in Figure
27-1 illustrates how these culture types relate to one another.
From this diagram, you can see that many specific cultures belong to a neutral culture. Higher in the
hierarchy than the neutral culture is an invariant culture, which is an agnostic culture setting that should be
utilized when passing items (such as dates and numbers) around a network. When performing these kinds
of operations, you should make your back-end data flows devoid of user-specific culture settings. Instead,
apply these settings in the business and presentation layers of your applications.
en-US
en-GB
en-AU
es-ES
es-MX
es-AR
en-CA
Invariant
Culture
EN
(Neutral Culture)
ES
(Neutral Culture)
FIGURE 271
Simpo PDF Merge and Split Unregistered Version -
In addition, pay attention to neutral culture when working with your applications. In most cases, you are
going to build applications with views that are more dependent on a neutral culture than on a specific
culture. For instance, if you have a Spanish version of your application, you’ll probably make this version
available to all Spanish speakers regardless of where they live. In many applications, it won’t matter whether
the Spanish speaker is from Spain, Mexico, or Argentina. In cases where it does make a difference, use the
specific culture settings.
Looking at Your Thread
When the end user requests an ASP.NET page or runs a Windows Forms dialog, the item is executed on a
thread from the thread pool. That thread has a culture associated with it. You can get information about the
culture of the thread programmatically and then check for particular details about that culture.
To see an example of working with a thread and reading the culture information of that thread, start with
the basic Windows Forms application created in Chapter 1. To reproduce this create a new project called
ProVB2010_Localization, and add the appropriate button and text box controls. A copy of the code in this
chapter is part of the code download with the name ProVB2010_Localization.
Add a new
Sub DisplayCultureInfo and have it called by the Click event handler for the test button
on the form. When the TestButton_Click event is fired, the user’s culture information is retrieved and
displayed in the TextBox control. The code for the new Sub is presented here:
Private Sub DisplayCultureInfo()
Dim ci As New System.Globalization.CultureInfo(
System.Threading.Thread.CurrentThread.CurrentCulture.ToString())
TextBox1.Text = "CURRENT CULTURE'S INFO" & Environment.NewLine
TextBox1.Text += "Name: " & ci.Name & Environment.NewLine
TextBox1.Text += "Parent Name: " & ci.Parent.Name & Environment.NewLine
TextBox1.Text += "Display Name: " & ci.DisplayName & Environment.NewLine
TextBox1.Text += "English Name: " & ci.EnglishName & Environment.NewLine
TextBox1.Text += "Native Name: " & ci.NativeName & Environment.NewLine
TextBox1.Text += "Three Letter ISO Name: " &
ci.ThreeLetterISOLanguageName & Environment.NewLine
TextBox1.Text += "Calendar Type: " & ci.Calendar.ToString() & Environment.NewLine
End Sub
Code snippet from Form1.vb
This simple form creates a CultureInfo object
from the System.Globalization namespace
and assigns the culture from the current thread
that is running using the System.Threading
.Thread.CurrentThread.CurrentCulture
.ToString
call. Once the CultureInfo object is
populated with the end user’s culture, details about
that culture can be retrieved using a number of
available properties that the CultureInfo object
offers. Example results of running the form are
shown in Figure 27-2.
Note that in the code download there is an
additional button on the form based on additional
changes that are made to this sample project.
The
CultureInfo object contains a number of
properties that provide you with specific culture
FIGURE 272
Cultures and Regions
❘
907
Simpo PDF Merge and Split Unregistered Version -
908
❘
CHAPTER 27 loCaliZatioN
information. The items displayed are only a small sampling of what is available from this object. From this
figure, you can see that the en-US culture is the default setting in which the thread executes. In addition
to this, you can use the CultureInfo object to get at a lot of other descriptive information about the
culture. You can always change a thread’s culture on the overloads provided via a new instantiation of
the CultureInfo object, as shown here:
Private Sub DisplayCultureInfo()
System.Threading.Thread.CurrentThread.CurrentCulture =
New Globalization.CultureInfo(“th-TH”)
Dim ci As Globalization.CultureInfo =
System.Threading.Thread.CurrentThread.CurrentCulture
' Dim ci As New System.Globalization.CultureInfo(
' System.Threading.Thread.CurrentThread.CurrentCulture.ToString())
TextBox1.Text = "CURRENT CULTURE'S INFO" & Environment.NewLine
TextBox1.Text += "Name: " & ci.Name & Environment.NewLine
TextBox1.Text += "Parent Name: " & ci.Parent.Name & Environment.NewLine
TextBox1.Text += "Display Name: " & ci.DisplayName & Environment.NewLine
TextBox1.Text += "English Name: " & ci.EnglishName & Environment.NewLine
TextBox1.Text += "Native Name: " & ci.NativeName & Environment.NewLine
TextBox1.Text += "Three Letter ISO Name: " &
ci.ThreeLetterISOLanguageName & Environment.NewLine
TextBox1.Text += "Calendar Type: " & ci.Calendar.ToString() & Environment.NewLine
End Sub
Code snippet from Form1.vb
In this example, only a couple of lines of code
are changed to assign a new instance of the
CultureInfo object to the CurrentCulture
property of the thread being executed by
the application. The culture setting enables the
CultureInfo object to define the culture you
want to utilize. In this case, the Thai language of
Thailand is assigned. The results produced in the
TextBox control are illustrated in Figure 27-3.
From this figure, you can see that the
.NET Framework provides the native name
of the language used even if it is not a Latin-based
letter style. In this case, the results are presented
for the Thai language in Thailand, including some
of the properties associated with this culture (such
as an entirely different calendar than the one used
in Western Europe and the United States).
Declaring Culture Globally in ASP.NET
ASP.NET enables you to easily define the culture that is used either by your entire ASP.NET application or
by a specific page within your Web application, using what are termed server-side culture declarations. You
can specify the culture for any of your ASP.NET applications by means of the appropriate configuration
files. To demonstrate this, close the ProVB2010_Localization application you started with and create a new
ASP.NET website called ProVB_Russian. Alternatively, you can open this download folder as a website in
Visual Studio 2010. On the default.aspx page add a new Calendar control from the toolbox, following the
text: Welcome to ASP.NET!
FIGURE 273
Simpo PDF Merge and Split Unregistered Version -
To change the default language used by this control you can specify culture settings in the web.config file
of the application itself, as illustrated here:
<configuration>
<system.web>
<globalization culture="ru-RU" uiCulture="ru-RU" />
</system.web>
</configuration>
Code snippet from ProVB_Russian\web.config
Only the <globalization> line will need to be added to your default web.config file; it should also be
noted that based on the page specific settings described below, this line has been commented out in the code
download.
Note the two attributes represented:
culture and uiCulture. The culture attribute enables you to define
the culture to use for processing incoming requests, whereas the uiCulture attribute enables you to define the
default culture needed to process any resource files in the application (use of these attributes is covered later
in the chapter).
Note that one additional option you have when specifying a culture on the server is to define this culture in
the root
web.config file for the server. Thus, if you are setting up a web server that will be used with only
a single culture, you can specify that culture at the server level, instead of needing to specify it as part of the
settings for each application running on the server. This can be useful if you are installing Web applications
created outside of your native culture, but where you want date, currency, sorting, and similar formats to
default appropriately.
In the preceding snippet, the culture established for this ASP.NET application is the Russian language in the
country of Russia. In addition to setting the culture at either the server-wide or the application-wide level,
another option is to set the culture at the page level, as shown here:
<%@ Page Title="Home Page" Language="VB" MasterPageFile="~/Site.Master"
AutoEventWireup="false"
CodeFile="Default.aspx.vb" Inherits="_Default"
UICulture="ru-RU" Culture="ru-RU"%>
%>
Code snippet from ProVB_Russian\default.aspx
This example specifies that the Russian language and culture
settings are used for everything on the page. You can see this
in action by using this @Page directive and a simple calendar
control on the page. Figure 27-4 shows the output. Notice
that marking the page as using Russian settings does not
automatically translate text within the page; it only updates the
embedded control added to the page.
Adopting Culture Settings in ASP.NET
In addition to using server-side settings to define the culture
for your ASP.NET pages, you also have the option to define
the culture according to what the client has set as his or her
preference in a browser instance.
When end users install Microsoft’s Internet Explorer or some
other browser, they have the option to select their preferred cultures in a particular order (if they have
selected more than a single culture preference). To see this in action in IE, select Tools
➪ Internet Options
FIGURE 274
Cultures and Regions
❘
909
Simpo PDF Merge and Split Unregistered Version -
910
❘
CHAPTER 27 loCaliZatioN
from the IE menu. On the first tab provided (General) is
a Languages button at the bottom of the dialog. Select
this button and you are provided with the Language
Preference dialog shown in Figure 27-5.
To add any additional cultures to the list, click the Add
button and select the appropriate culture from the
list. After you have selected any cultures present in
the list, you can select the order in which you prefer to
use them. Thus, a user with multiple settings in this list
will have a version of the application with their first
language choice before anything else; if a version that
supports that language is not available, their second and
then consecutive versions are checked. The first available
language matching one of their preferences will be
presented.
Making language selections, the end user can leverage
the automatic culture recognition feature provided in
ASP.NET. Instead of specifying a distinct culture in any
of the configuration files or from the
@Page directive, you
can also state that ASP.NET should automatically select
the culture provided by the end user requesting the page.
This is done using the auto keyword, as illustrated here:
<%@ Page UICulture="auto" Culture="auto" %>
With this construction in your page, the dates, calendars,
and numbers appear in the preferred culture of the
requester. What happens if you have translated resources
in resource files (shown later in the chapter) that depend on a culture specification? Or what if you have
only specific translations and therefore can’t handle every possible culture that might be returned to your
ASP.NET page? In this case, you can specify the auto option with an additional fallback option if ASP
.NET cannot find any of the culture settings of the user (such as culture-specific resource files). This usage is
illustrated in the following code:
<%@ Page UICulture="auto:en-US" Culture="auto:en-US" %>
In this case, the automatic detection is utilized; but if the culture preferred by the end user is not present,
then en-US is used.
TRANSLATING VALUES AND BEHAVIORS
In the process of globalizing your .NET application, you may notice a number of aspects that are handled
differently compared to building an application that is devoid of globalization, including how dates are
represented and how currencies are shown. This section looks at some of these issues.
Understanding Dierences in Dates
Different cultures specify dates and time very differently. For instance, take the following date as an example:
08/11/2008
Is this date August 11, 2008 or is it November 8, 2008? It should be the job of the business logic layer
or the presentation layer to convert all date and times for use by the end user. To avoid interpretation
errors, always use the same culture (or invariant culture) when storing values, such as dates and times, in a
database or other data store.
FIGURE 275
Simpo PDF Merge and Split Unregistered Version -
Setting the culture at the server level in ASP.NET or within a Windows Forms application, as shown in the
earlier examples, enables your .NET application to make these conversions for you. You can also simply
assign a new culture to the thread in which the code is running. For instance, consider the following sub,
which can be called from the ButtonTest Click event handler (note that this Sub is dependent on these
Imports statements):
Imports System.Globalization
Imports System.Threading
Private Sub DisplayCalendarByCulture()
Dim dt As DateTime = New DateTime(2010, 3, 2, 13, 5, 1, 10)
Thread.CurrentThread.CurrentCulture = New CultureInfo("pt-br")
TextBox1.Text +=
Thread.CurrentThread.CurrentCulture.EnglishName & " : " & _
dt.ToString() & Environment.NewLine
Thread.CurrentThread.CurrentCulture = New CultureInfo("en-US")
TextBox1.Text +=
Thread.CurrentThread.CurrentCulture.EnglishName & " : " & _
dt.ToString() & Environment.NewLine
Thread.CurrentThread.CurrentCulture = New CultureInfo("es-mx")
TextBox1.Text +=
Thread.CurrentThread.CurrentCulture.EnglishName & " : " & _
dt.ToString() & Environment.NewLine
Thread.CurrentThread.CurrentCulture = New CultureInfo("es-es")
TextBox1.Text +=
Thread.CurrentThread.CurrentCulture.EnglishName & " : " & _
dt.ToString() & Environment.NewLine
Thread.CurrentThread.CurrentCulture = New CultureInfo("ru-RU")
TextBox1.Text +=
Thread.CurrentThread.CurrentCulture.EnglishName & " : " & _
dt.ToString() & Environment.NewLine
Thread.CurrentThread.CurrentCulture = New CultureInfo("fi-FI")
TextBox1.Text +=
Thread.CurrentThread.CurrentCulture.EnglishName & " : " & _
dt.ToString() & Environment.NewLine
Thread.CurrentThread.CurrentCulture = New CultureInfo("ar-SA")
TextBox1.Text +=
Thread.CurrentThread.CurrentCulture.EnglishName & " : " & _
dt.ToString() & Environment.NewLine
Thread.CurrentThread.CurrentCulture = New CultureInfo("am-ET")
TextBox1.Text +=
Thread.CurrentThread.CurrentCulture.EnglishName & " : " & _
dt.ToString() & Environment.NewLine
Thread.CurrentThread.CurrentCulture = New CultureInfo("as-IN")
TextBox1.Text +=
Thread.CurrentThread.CurrentCulture.EnglishName & " : " & _
dt.ToString() & Environment.NewLine
Thread.CurrentThread.CurrentCulture = New CultureInfo("th-TH")
TextBox1.Text +=
Thread.CurrentThread.CurrentCulture.EnglishName & " : " & _
Translating Values and Behaviors
❘
911
Simpo PDF Merge and Split Unregistered Version -
912
❘
CHAPTER 27 loCaliZatioN
dt.ToString() & Environment.NewLine
Thread.CurrentThread.CurrentCulture = New CultureInfo("zh-cn")
TextBox1.Text +=
Thread.CurrentThread.CurrentCulture.EnglishName & " : " & _
dt.ToString() & Environment.NewLine
Thread.CurrentThread.CurrentCulture = New CultureInfo("zh-tw")
TextBox1.Text +=
Thread.CurrentThread.CurrentCulture.EnglishName & " : " & _
dt.ToString() & Environment.NewLine
Thread.CurrentThread.CurrentCulture = New CultureInfo("ko-kr")
TextBox1.Text +=
Thread.CurrentThread.CurrentCulture.EnglishName & " : " & _
dt.ToString() & Environment.NewLine
Thread.CurrentThread.CurrentCulture = New CultureInfo("zh-hk")
TextBox1.Text +=
Thread.CurrentThread.CurrentCulture.EnglishName & " : " & _
dt.ToString() & Environment.NewLine
End Sub
Code snippet from Form1.vb
Using the ProVB2010_Localization test form again, you can test this code. The code snippet captures the
current date time for output, but does so while referencing a dozen or more different cultures, one for
each copy output to the screen. The date/time construction used by the defined culture is written to the
TextBox control. The result from this code operation is presented in Figure 27-6.
FIGURE 276
Clearly, the formats used to represent a date/time value can be dramatically different between cultures —
some, such as Saudi Arabia (ar-SA) and Thailand, (th-TH) use entirely different calendar baselines.
Simpo PDF Merge and Split Unregistered Version -