Real World Mac Maintenance and Backups phần 10 ppsx
Bạn đang xem bản rút gọn của tài liệu. Xem và tải ngay bản đầy đủ của tài liệu tại đây (4.36 MB, 32 trang )
198
Real World Mac Maintenance and Backups
7. Click the Options button. Make sure the Verification checkbox is se-
lected, and click OK.
8. Click the Schedule button and add in your desired schedule. (I talk
more about setting up schedules in Schedule a Duplicate, ahead.) When
you finish, click OK.
9. Close the Duplicate window, and click Save when prompted.
Your Duplicate script is now ready to go, and will run on the schedule you
set—even if you quit Retrospect. If you want to run it immediately, choose
the script’s name from the Run menu.
After testing your duplicate (read Test Your Duplicate, page 165), you can
repeat this procedure to set up Duplicate scripts for additional hard disks
or other media.
Schedule a Duplicate
You can schedule duplicates to occur as frequently or as seldom as you
wish, but I suggest running them at least once a week. Better yet, use two
or more hard drives and alternate your duplicates between them—drive
#1 one week, then drive #2, and so on. This scheme will enable you to keep
one of the drives off-site at all times. In this example, I show how to sched-
ule duplicates to run once a week, alternating between two drives. Feel free
to alter these instructions to meet your needs if you’re using a different
number of drives or want to run duplicates at a different frequency.
To schedule an alternating weekly duplicate in Retrospect, follow these
steps:
1. Select the Automate tab and click the Scripts button.
2. Select the Duplicate script that you created for your first drive; then
click Edit.
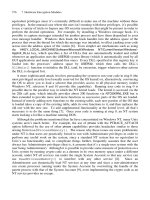
3. Click the Schedule button, and then the Add button (Figure 16).
Prepared for Apple Consultants Network Partners. Real World Mac Maintenance and Backups by Joe Kissell. Copyright © 2007. Used with permission of Pearson Education, Inc. and Peachpit Press.
Appendix C: A Retrospect Primer
199
Figure 16
Retrospect’s Schedule
list (still empty in this
example) appears when
you click the Schedule
button for a script. Add a
new schedule by clicking
the Add button in this
dialog.
4. For the kind of schedule to add, choose Repeating Interval.
5. Enter today’s date as the start date.
6. Choose the day of the week on which you want the backup to occur,
and select a time.
7. From the Repeat pop-up menu, choose Every < x > Weeks on < day of
week >.
8. In the fi eld labeled Weeks, enter . if you have two sets of media or /
if you have three sets of media. Figure 17 on the next page shows an
example of what the fi nished schedule may look like.
9. Confi rm that the text at the top of the dialog matches your expecta-
tions, as in “Do Duplicate Every other week on Wednesday, starting
12/01/2005 at 2:00 AM.” Then click OK.
10. Select your next Duplicate script and repeat Steps 3–8, but in Step 4,
choose a start date 1 week later.
Your selected scripts will now alternate on a weekly basis.
Prepared for Apple Consultants Network Partners. Real World Mac Maintenance and Backups by Joe Kissell. Copyright © 2007. Used with permission of Pearson Education, Inc. and Peachpit Press.
200
Real World Mac Maintenance and Backups
Figure 17
This repeating interval
schedule in Retrospect
runs every 2 weeks on
Saturday. To change it to
every 3 weeks, enter 3 in
the Weeks fi eld; to change
the interval from weeks
to days or months, use the
Repeat pop-up menu.
Note: After you set up a schedule, you can quit Retrospect. Retrospect
installs a small background application in your +He^n]nu+Op]npqlEpaio
folder called RetroRun, which monitors your scheduled backups and
launches Retrospect, when necessary, to run them at the proper times.
Set Up a Backup Server Script
Backup Server is a wonderful feature—actually a script type, which can
make rotating archives incredibly easy. (Unfortunately, it cannot be used
for duplicates.) Backup Server has two main attributes:
It constantly polls all designated sources (which could be a folder on
a local volume or another computer on your network) to see if they’ve
been backed up within the past 24 hours—or whatever interval you
choose—and if not, it performs a backup immediately. (You can also
restrict the Backup Server to run only during certain times of certain
days.) This way, even if your laptop is not available for daily backups
on a fi xed schedule, you can be sure backups will occur when it is
present.
It uses any designated media that happens to be available at the
moment. So you could set up three different hard drives as backup
destinations, attach or detach them whenever you like, and Retrospect
automatically updates the oldest archive available the next time it
g
g
Prepared for Apple Consultants Network Partners. Real World Mac Maintenance and Backups by Joe Kissell. Copyright © 2007. Used with permission of Pearson Education, Inc. and Peachpit Press.
Appendix C: A Retrospect Primer
201
runs. This eliminates the need to maintain a strict schedule for swap-
ping media to take it off-site.
If you’re using Retrospect Desktop, Backup Server is generally a much bet-
ter choice for automated archives than a fi xed schedule. (This feature is
absent in Retrospect Express, so if you’re using Express, or wish to follow
a fi xed schedule, see Set Up a Backup Script, page 203.)
To use Retrospect’s Backup Server feature, follow these steps:
1. Click the Automate tab, and then click the Scripts button.
2. In the Scripts window that appears, click New to create a new script,
and choose Backup Server in the dialog that appears (Figure 18).
Figure 18
To use Retrospect’s
Backup Server feature,
select it as the script type
in this dialog.
3. Enter a name for your script (see Label Media and Files, page 162, for
suggestions) and click OK. The Backup Server window appears.
4. Click the Source button to display the Volume Selection window. To
back up an entire volume, select it in here. To back up just part of a
volume, select the volume and click Subvolume. Navigate to a folder
you’d like to back up (such as your home folder) and click Defi ne. You
can repeat this as many times as necessary. Each subvolume you defi ne
then appears as a folder in the Volume Selection window. (To select
multiple volumes or subvolumes in this window, hold down Command
while clicking.) When you’re fi nished selecting sources, click OK.
Prepared for Apple Consultants Network Partners. Real World Mac Maintenance and Backups by Joe Kissell. Copyright © 2007. Used with permission of Pearson Education, Inc. and Peachpit Press.
202
Real World Mac Maintenance and Backups
5. Click the Destination button. Two dialogs open: the Destinations dialog
and, in front of that, the Backup Set Selection dialog. You should add
backup sets for each of the drives you’re using to store your archives. If
you’ve already defined the backup set(s) you want to use, select them
here (Command-click to select more than one backup set). If not,
follow these steps:
a. Click New to create a new backup set.
b. Choose File (not Removable Disk!) from the Backup Set Type pop-
up menu.
c. If you want to encrypt the backup set, click the Secure button, select
an encryption type, and enter a passphrase.
Note: You must decide whether to use encryption when you initially
create a backup set. You can’t change the encryption settings for a
backup set after the fact.
d. Give your backup set a descriptive name and click New.
e. Select the volume (normally an external hard disk) where you want
to store the backup set and click Save.
f. Repeat Steps a–e, if necessary, for additional backup sets; then,
select the set(s) you want to use and click OK.
When you’ve finished adding backup sets to the script, click OK to
dismiss the Destinations dialog.
6. Optionally, click the Selecting button and make a selection from the
pop-up menu to restrict which files are copied. You might, for example,
choose All Files Except Cache Files or All Except Cache & Spotlight;
these two choices will speed up the backup while omitting non-critical
files. You can click More Choices to access more-sophisticated selec-
tors. When you’re finished, click OK.
7. Click the Options button. Enter the maximum frequency for your back-
ups—such as “every 1 day” or “every 4 hours.” If you want to turn on
compression (a good idea), click More Choices, then select Backup in
Prepared for Apple Consultants Network Partners. Real World Mac Maintenance and Backups by Joe Kissell. Copyright © 2007. Used with permission of Pearson Education, Inc. and Peachpit Press.
Appendix C: A Retrospect Primer
203
the list on the left and select the Backup Compression (In Software)
checkbox. Click OK.
8. To restrict Backup Server to certain days or times, click the Schedule
button. Select the Custom Schedule radio button, and then click Cus-
tom. Select the times and days you want the Backup Server to run,
then click OK. Finally, click OK a second time to dismiss the Schedule
window, and close the Backup Server window.
Backup Server is now configured to archive your files onto the selected
backup media whenever they are available. To activate the Backup Serv-
er script immediately, choose Run > Start Backup Server. When Backup
Server is running, the main Retrospect Directory disappears and the Back-
up Server window appears instead. To return to the Directory (to make
other changes in Retrospect), you must close the Backup Server window
and confirm that you really do want to stop the execution of the Backup
Server.
Set Up a Backup Script
If you own Retrospect Express and therefore can’t use the Backup Server
script type—or if you simply prefer to have your backups run on a regular
schedule—you should set up a Backup script to perform additive incre-
mental archives. The instructions are similar to those for the Backup Server
script, just previously, except that you must specify an explicit schedule.
To set up a Backup script, follow these steps:
1. Click the Automate tab, and then click the Scripts button. The Scripts
window appears.
2. Click New to create a new script, and choose Backup in the dialog that
appears.
3. Enter a name for your script (see Label Media and Files, page 162, for
suggestions) and click OK. The Backup window appears.
4. Click the Source button to display the Volume Selection window. To
back up an entire volume, select it in this window. To back up just
part of a volume, select the volume and click Subvolume. Navigate to
Prepared for Apple Consultants Network Partners. Real World Mac Maintenance and Backups by Joe Kissell. Copyright © 2007. Used with permission of Pearson Education, Inc. and Peachpit Press.
204
Real World Mac Maintenance and Backups
a folder you’d like to back up (such as your home folder) and click De-
fine. You can repeat this as many times as necessary. Each subvolume
you define then appears as a folder in the Volume Selection window.
(To select multiple volumes or subvolumes in this window, hold down
Command while clicking.) When you’re finished selecting sources,
click OK.
5. Click the Destination button. Two dialogs open: the Destinations dia-
log and, in front of that, the Backup Set Selection dialog. Ordinarily,
you’ll select just one backup set here (and then create an entirely new
backup script for each additional destination drive). If you’ve already
defined the backup set you want to use, select it here. If not, follow
these steps:
a. Click New to create a new backup set.
b. Choose File (not Removable Disk!) from the Backup Set Type pop-
up menu.
c. If you want to encrypt the backup set, click the Secure button, select
an encryption type, and enter a passphrase.
Note: You must decide whether to use encryption when you initially
create a backup set. You can’t change the encryption settings for a
backup set after the fact.
d. Give your backup set a descriptive name and click New.
e. Select the volume (normally an external hard disk) where you want
to store the backup set and click Save.
f. Select the set you want to use and click OK.
When you’ve added your backup set to the script, click OK to dismiss
the Destinations dialog.
6. Optionally, click the Selecting button and make a selection from the
pop-up menu to restrict which files are copied. You might, for example,
choose All Files Except Cache Files or All Except Cache & Spotlight;
these two choices will speed up the backup while omitting non-critical
Prepared for Apple Consultants Network Partners. Real World Mac Maintenance and Backups by Joe Kissell. Copyright © 2007. Used with permission of Pearson Education, Inc. and Peachpit Press.
Appendix C: A Retrospect Primer
205
files. If you’re using Retrospect Desktop, you can click More Choices
to access more-sophisticated selectors. When you finish, click OK.
7. Click the Options button. Make sure the Verification checkbox is se-
lected, and if you want to turn on compression (a good idea), select
the Backup Compression (In Software) checkbox. Click OK.
8. Click the Schedule button and set your schedule. (For more details
about setting up schedules, see Schedule Backups, just ahead.) When
you finish, click OK.
9. Close the Backup window, and click Save when prompted to do so.
Your Backup script is now ready to go, and will run on the schedule you
set—even if you quit Retrospect. If you want to run it immediately, choose
the script’s name from the Run menu.
After testing your archive (see Test Your Archive, page 169), you can repeat
this procedure to set up Backup scripts for additional hard disks or other
media.
Note: Execution Errors. After Retrospect completes a backup, it may
display a window saying there were execution errors. Don’t worry about
this. No, really: don’t worry about it. Execution errors are common and
don’t necessarily indicate a problem. Most frequently, an “error” means
that something didn’t match between Retrospect’s pre-backup scan and
its post-backup verification, which will be the case if files (such as tem-
porary system files) change while the backup is in progress—which they
often do.
Schedule Backups
You can schedule backups to occur as frequently or as seldom as you
wish, but I suggest running them at least once a day. Better yet, use two or
more hard drives and alternate your backups between them on a weekly
basis—drive #1 every day one week, then drive #2 every day the following
week, and so on. This sort of scheme enables you to keep one of the drives
off-site at all times. In this example, I show how to schedule backups to run
Prepared for Apple Consultants Network Partners. Real World Mac Maintenance and Backups by Joe Kissell. Copyright © 2007. Used with permission of Pearson Education, Inc. and Peachpit Press.
206
Real World Mac Maintenance and Backups
daily, alternating between two drives on a weekly basis. Feel free to alter
these instructions to meet your needs if you’re using a different number
of drives or want to run duplicates at a different frequency.
To schedule your backups scripts, follow these steps:
1. Select the Automate tab and click Scripts.
2. Select your fi rst Backup script, and then click Edit.
3. Click the Schedule button, then the Add button.
4. For the kind of schedule to add, choose Day of Week.
5. Enter today’s date as the start date.
6. Select the days of the week on which you want the backup to occur,
(usually all of them) and select a time.
7. In the fi eld labeled Weeks, enter . if you have two sets of media or / if
you have three sets of media (Figure 19).
Figure 19
This Day of Week schedule
in Retrospect runs
every day for a week, in
alternating weeks. To
change it to alternate every
3 weeks (if you use three
sets of backup media),
enter 3 in the Weeks fi eld.
8. Choose Normal Backup from the Action pop-up menu.
9. Confi rm that the text at the top of the dialog matches your expecta-
tions, as in “Do Normal backup to Maggie Backup Set Every other week
on SMTWTFS, starting 11/27/2004 at 10:00 PM.” Then click OK.
Prepared for Apple Consultants Network Partners. Real World Mac Maintenance and Backups by Joe Kissell. Copyright © 2007. Used with permission of Pearson Education, Inc. and Peachpit Press.
Appendix C: A Retrospect Primer
207
10. Select your next Backup script and repeat Steps 3–8, but in Step 4,
choose a start date 1 week later.
Your selected scripts will now run daily, but alternate on a weekly basis.
Tip: If you have an old Mac (or, say, a Mac mini) that you’d like to
turn into a dedicated backup server, read my article “Turn your old
Mac into a backup server” in the September 2005 issue of Macworld:
sss*i]_sknh`*_ki+.,,1+,4+ba]pqnao+kh`i]_jaspne_go-+.
Back Up Network Clients
Retrospect Desktop is capable of backing up the machine it’s running on,
plus up to three other client machines. (You can purchase additional cli-
ent licenses—or, for larger groups, upgrade to Retrospect Workgroup or
Retrospect Server.) This means you can use just one set of backup media
and one schedule for several computers, instead of setting up a backup
system on each one individually. All you have to do is install Retrospect
Client on each client machine, add the clients to Retrospect’s list, and
select the volumes or subvolumes you want to back up on each one.
The first part of the process is to set up the clients. Follow these steps:
1. On a client machine, install Retrospect Client (the installer is included
with Retrospect Desktop).
2. At the end of the installation process, the installer asks you for a
password. Choose something different from your standard Mac OS X
password—it need not be particularly secure—and confirm it when
prompted.
3. The installer then asks if you want to enable a firewall exception for
Retrospect. If Mac OS X’s firewall is turned on, be sure to answer Yes.
4. Click the installer’s Restart button to restart your computer.
5. Open the Retrospect Client application and make sure the On radio
button is selected.
Prepared for Apple Consultants Network Partners. Real World Mac Maintenance and Backups by Joe Kissell. Copyright © 2007. Used with permission of Pearson Education, Inc. and Peachpit Press.
208
Real World Mac Maintenance and Backups
Repeat these steps for each client machine. That’s it—your clients are now
ready to go. The rest of the process happens on the server machine. To
configure the server, follow these steps:
1. Open Retrospect Desktop, go to the Configure pane, and click the
Clients button.
2. Click the Network button to display a window listing all the clients
Retrospect can find on your local network (these are machines with
Retrospect Client installed and turned on which are within the same
subnet—and not blocked by a firewall). You should have TCP/IP
selected as the Network Protocol, and Mac OS X selected as the Type.
Tip: If the machine you’re using as a server has a firewall turned on, you
must also add an exception for Retrospect. Go to the Firewall tab of the
Sharing pane of System Preferences, click New, and choose Retrospect
from the Port Name pop-up menu. If it does not appear in the menu,
choose Other and enter 053 in the TCP Port Number(s) field.
3. If the client you want to add appears in the list, select its name. If the
client does not appear in the list, click Add by Address and enter the
IP address of the client computer; then, select the client’s name in the
list. Click Log In, and type in the password you specified when you set
up that client. Also confirm (or modify) the name for the client as it will
appear in the server’s lists. Repeat this step as necessary for additional
clients.
4. After adding a client, the Client Configuration dialog should appear. (If
it does not, double-click the client name in the Backup Client Database
window.) On the General pane of this dialog, select Link Encryption
if the client is connecting over a wireless network, or you want to add
extra security to the data as it travels between the client and the server.
From the Backup pop-up menu, choose Selected Volumes.
5. On the Volumes pane, select all the volumes from the client machine
that contain files or folders you want to back up. Click OK. Repeat as
necessary for additional clients, and close the Backup Client Database
window.
Prepared for Apple Consultants Network Partners. Real World Mac Maintenance and Backups by Joe Kissell. Copyright © 2007. Used with permission of Pearson Education, Inc. and Peachpit Press.
Appendix C: A Retrospect Primer
209
Now your clients are ready to be added to your backup scripts. Follow
the instructions in Set Up a Duplicate Script (page 196), Set Up a Backup
Server Script (page 200), or Set Up a Backup Script (page 203) to add cli-
ents to your scripts; the volume(s) you selected in Step 5 will appear in
the Sources lists, and you can define subvolumes and selectors just as you
did for items on the server itself.
Tip: If you’re making duplicates of clients over the network, remember to
choose a volume—not a subvolume!—as the destination. You’ll probably
want to store each duplicate on a separate FireWire hard drive, or at least
a separate partition of a FireWire hard drive, so that you can later attach
that drive to the client machine if you need to boot from the duplicate.
Recycle a Backup Set
If you’re storing your archives on hard disks, they will eventually fill up.
How long that takes depends on the size of the disks, whether or not you
use compression, and how frequently your files change. If the disk holding
a backup set becomes completely full, Retrospect will continue attempt-
ing to run your backup scripts, but each one will fail due to a lack of disk
space. Therefore, you should check on your free space periodically and,
when it begins to get low, recycle your media—in other words, erase the
backup set and start over with a full backup.
The procedure to do so is easy, but it isn’t obvious. To recycle a backup
set, follow these steps:
1. On the Configure pane, click the Backup Sets button. The Backup Sets
window appears.
2. Select the backup set you want to recycle—the one that’s stored on
whichever volume is closest to being full. Click Configure. A new dialog
opens.
3. Click the Options tab. At the bottom of the Options pane is a Media
section with a single button: Action. Click the Action button. The Media
Control Manual Override dialog appears.
Prepared for Apple Consultants Network Partners. Real World Mac Maintenance and Backups by Joe Kissell. Copyright © 2007. Used with permission of Pearson Education, Inc. and Peachpit Press.
210
Real World Mac Maintenance and Backups
4. Select the Recycle radio button and click OK. This tells Retrospect that
for the next run of this script only, it should use the Recycle action—
erase the backup set and then perform a full backup.
5. Close all the other windows, saving your changes if prompted.
The next time your backup script runs, it will recycle that backup set.
Needless to say, when you recycle a backup set, you lose all the old incre-
mental archives from that set. Therefore, you should not recycle if you’ve
had any computer problems recently that make you suspect you’ll need
to access older versions of your files! The best practice, assuming you have
more than one backup set for your archives, is to stagger their recycling
dates—by a month or more, if possible. That way, you’ll always have at
least several older copies of your files.
Restore a Backup
Retrospect’s Restore feature can sometimes be confusing. But don’t panic.
When you need to recover backed-up files, follow the instructions here
that most closely match your situation.
Whichever method you choose, remember that Retrospect treats Restore
operations in a method very similar to Backup or Duplicate operations—
you choose the Source (the volume or backup set containing the files you
want to restore), the Destination (where to put the restored files), and
various Options. You also, in some cases, choose particular files within the
Source that you want to recover. Then perform the actual restoration.
Restore a Duplicate
Before restoring a duplicate, consider whether that’s really what you want
to do. Remember that you can boot your computer from a duplicate (as
long as it’s stored on its own volume on a FireWire hard drive or, if you’re
using an Intel Mac, a USB drive). If your internal disk has problems, you
may find that you can boot from the duplicate and then run a utility to
repair your internal disk. That can save you some time and effort over
restoring the duplicate.
Prepared for Apple Consultants Network Partners. Real World Mac Maintenance and Backups by Joe Kissell. Copyright © 2007. Used with permission of Pearson Education, Inc. and Peachpit Press.
Appendix C: A Retrospect Primer
211
Note: If you want to boot from a duplicate you created over a network,
either physically connect the hard drive it’s on (internally or via FireWire)
to the client machine, or restore the duplicate onto the client’s hard drive
over the network. You can’t boot from a duplicate over a network.
However, if disk repair doesn’t work (or if, for any other reason, you want
to restore a duplicate, in its entirety, to the original volume), do not use
Retrospect’s Restore command! The Restore feature is only for files stored
in backup sets (that is, archives). Instead, click the Duplicate button on the
Immediate pane. Follow the same procedure you used for creating your
duplicate, only swap the Source and Destination drives. Retrospect will
then copy your duplicate back onto its original volume.
Restore the Entire Contents of a Backup
If you’ve been archiving files to a backup set using a backup script and
you want to replace the entire set of files on your original volume with
the backed-up copies (whether the most recent snapshot or not), follow
these steps:
1. On the Immediate pane, click the Restore button. A dialog appears.
2. Select the Restore an Entire Disk radio button (yes, even if you didn’t
back up your entire disk) and click OK. The Restore from Backup:
Source dialog appears.
3. Select the backup set containing the files you want to restore. If you’ve
backed up to multiple backup sets on different drives, you’ll generally
want to select the backup set with the most recent date.
4. When you select a backup set, the bottom portion of the window
displays the most recent snapshot for each of the volumes (or sub-
volumes) in that set. If you want to restore files from the most recent
snapshot, simply select the volume you want to restore in this list.
However, if you want to restore the files as they appeared at an earlier
time, click Add Snapshot. The Snapshot Retrieval window appears,
listing snapshots for every backup session stored in this backup set.
Prepared for Apple Consultants Network Partners. Real World Mac Maintenance and Backups by Joe Kissell. Copyright © 2007. Used with permission of Pearson Education, Inc. and Peachpit Press.
212
Real World Mac Maintenance and Backups
Select the one you want and click Retrieve. Then, select that snapshot
in the Restore from Backup: Source dialog and click OK.
5. In the Destination Selection dialog that appears, select the original vol-
ume or subvolume corresponding to the snapshot you selected in Step
4. Make sure the pop-up menu at the top of the window says Replace
Entire Disk (the default setting), and click OK. When the confirmation
alert appears, click Replace.
Warning! Although it should be obvious by now, you are about to over-
write the files on your hard disk with the ones from your backup. If you
are not completely certain this is what you want to do, select a different
destination in Step 5 and then manually move the files to their original
locations.
6. After a few minutes of file scanning, Retrospect displays the Restore
from Backup summary window. This is your last chance to make
changes to your source, destination, or options before restoring your
files. When you’re ready to go for it, click Restore.
Retrospect restores all the files from your selected snapshot to their origi-
nal locations.
Restore Individual Files
or Folders from a Backup
Most of the time when I dip into an archive, it’s to find an older version of
a particular file or folder I inadvertently modified or deleted. These situ-
ations fall into two categories. In the first case, I know (at least roughly)
when the version of the file I’m looking for would have been backed up—
and thus, I know which backup set likely contains it. In the second case,
the file could be in any of several backup sets, and I’m not certain when a
good copy was last backed up. Each situation requires a slightly different
procedure.
If you know which backup set contains the files you want and when
they were backed up, follow these steps to restore your files:
1. On the Immediate pane, click the Restore button. A dialog appears.
Prepared for Apple Consultants Network Partners. Real World Mac Maintenance and Backups by Joe Kissell. Copyright © 2007. Used with permission of Pearson Education, Inc. and Peachpit Press.
Appendix C: A Retrospect Primer
213
2. Select the Restore Files from a Backup button and click OK. The Restore
from Backup: Source dialog appears.
3. Select the backup set containing the files you want to restore. If you’ve
backed up to multiple backup sets on different drives, you’ll generally
want to select the backup set with the most recent date.
4. When you select a backup set, the bottom portion of the window dis-
plays the most recent snapshot for each of the volumes (or subvolumes)
in that set. If you want to restore files from the most recent snapshot,
simply select the volume you want to restore in this list. However, if you
want to restore the files as they appeared at an earlier time, click Add
Snapshot. The Snapshot Retrieval window appears, listing snapshots
for every backup session stored in this backup set. Select the one you
want and click Retrieve. Then, select that snapshot in the Restore from
Backup: Source dialog and click OK.
Note: Right now, you’re selecting only the snapshot containing the files
or folders you want to restore. Later, in Step 7, you’ll narrow that down
to particular files or folders.
5. In the Destination Selection dialog that appears, select the volume
or subvolume where you want to put the restored files. Although you
can choose the original location, a safer option is to leave the existing
copies of the files and folders (if any) alone and restore the backups to
another location. Make sure the pop-up menu at the top of the window
says Retrieve Files & Folders (the default setting), and click OK.
6. After a few minutes of file scanning, Retrospect displays the Restore
from Backup summary window. To select the files and folders you want
to restore, click the Files Chosen button. A window appears listing all
the files in the snapshot you selected.
7. In the snapshot list, navigate to the file(s) or folder(s) you want to re-
store. Double-click an item (or select it and click the Mark button at the
top of the window) to indicate that you want to restore it. (A checkmark
appears next to each file selected for restoration.) Repeat for as many
items as you wish. When you finish selecting files, close the window.
Prepared for Apple Consultants Network Partners. Real World Mac Maintenance and Backups by Joe Kissell. Copyright © 2007. Used with permission of Pearson Education, Inc. and Peachpit Press.
214
Real World Mac Maintenance and Backups
8. Back in the Restore from Backup summary window, click Restore.
Retrospect copies the items you marked to the specified destination. It
maintains the original folder structure, so what you’ll see if you look in the
destination location is a folder with the same name as your backup set.
Inside that folder will normally be another series of folders mirroring the
original folder hierarchy, and if you navigate down through these folders,
you’ll find the files you just restored.
If you’re unsure where the files you want are located or when they
were backed up, follow these steps to restore your files:
1. On the Immediate pane, click the Restore button. A dialog appears.
2. Select the Search for Files and Folders button and click OK. The Restore
from Backup: Source dialog appears.
3. Select one or more backup sets—if you have no idea where your files
may be, select all the backup sets. Then click OK.
4. In the Destination Selection dialog that appears, select the volume
or subvolume where you want to put the restored files. Although you
can choose the original location, a safer option is to leave the existing
copies of the files and folders (if any) alone and restore the backups to
another location. Make sure the pop-up menu at the top of the window
says Retrieve Files & Folders (the default setting), and click OK.
5. Retrospect displays the Searching & Retrieval dialog. Use the pop-up
menus to specify search criteria (just as you would in a Finder search)
and click OK. Retrospect searches through the selected backup set(s)
and selects all matching files.
6. The Searching & Retrieval summary window appears. In the Files
Chosen section, the window lists the total number of matching files it
found.
7. If you want to narrow that list down further to just particular files, click
the Files Chosen button. In the list that appears, double-click an item
(or select it and click the Unmark button at the top of the window) to
indicate that you want to exclude it from the restoration. (A checkmark
appears next to each file selected for restoration.) Repeat for as many
Prepared for Apple Consultants Network Partners. Real World Mac Maintenance and Backups by Joe Kissell. Copyright © 2007. Used with permission of Pearson Education, Inc. and Peachpit Press.
Appendix C: A Retrospect Primer
215
items as you wish. When you finish selecting or deselecting files, close
the window.
8. In the Searching & Retrieval summary window, click Retrieve.
Retrospect copies the items you marked to the specified destination. It
maintains the original folder structure, so what you’ll see if you look in the
destination location is a folder with the same name as your backup set.
Inside that folder will normally be another series of folders that mirror the
original folder hierarchy, and if you navigate down through these folders,
you’ll find the files you just restored.
Prepared for Apple Consultants Network Partners. Real World Mac Maintenance and Backups by Joe Kissell. Copyright © 2007. Used with permission of Pearson Education, Inc. and Peachpit Press.
This page intentionally left blank
Prepared for Apple Consultants Network Partners. Real World Mac Maintenance and Backups by Joe Kissell. Copyright © 2007. Used with permission of Pearson Education, Inc. and Peachpit Press.
217
additive: When a backup copies files that are new, renamed, or modified
since the last session without deleting or overwriting older versions, that
backup (normally an archive) is additive.
additive incremental archive: A type of backup in which files that are new
or modified since the last run are added to an archive, without replacing
or deleting earlier versions of those files.
AFP: Apple Filing Protocol, the network file-sharing protocol used by Per-
sonal File Sharing.
archive: An archive is a copy of your files as they appeared at multiple
points in time, sometimes stored as a single, larger file. Some backup
programs use the term archive to refer to a backup in which the original
files are deleted from the source volume after being copied to the backup
medium.
client: A program that works with a server program is a client. For in-
stance, Retrospect Client is a small program you can install on each of
your computers. Retrospect Client communicates with the full version of
Glossary
Prepared for Apple Consultants Network Partners. Real World Mac Maintenance and Backups by Joe Kissell. Copyright © 2007. Used with permission of Pearson Education, Inc. and Peachpit Press.
218
Real World Mac Maintenance and Backups
Retrospect on the server, which does the bulk of the work. The computer
running client software is often called a client as well.
client-server: A type of network backup system in which client comput-
ers use a small background program to send files over a network without
mounting a volume in the Finder. Backups are initiated by the server and
stored on media connected to the server.
Combo drive: A Combo drive is an optical drive, standard on some Mac-
intosh computers, that can read from DVD media and write to CD-Rs and
CD-RW media.
data fork: Although this is less common in Mac OS X than in previous ver-
sions of the Mac OS, Macintosh files can be composed of two portions, a
data fork and a resource fork. In general, the data fork holds data for the
file—text, graphics, video, and so on—that could be relevant to any plat-
form, whereas the resource fork stores information that’s relevant only
when the file is used on a Mac. (Often this information is ancillary, but
other times it is quite important. For example, Classic versions of Nisus
Writer store formatting in the resource fork.)
destination: The volume (hard disk, partition, optical disc, etc.) to
which files are copied during a backup. Also called target. Compare with
source.
differential: A type of backup in which each run copies all files which are
new or modified since the initial full backup. Compare with incremental.
duplicate: A duplicate is a complete, exact copy of your entire hard disk
that (if it’s stored on, or restored onto, a hard disk) you can use to start up
your computer if necessary. Sometimes called a clone or a mirror.
FTP: File Transfer Protocol, a common method of transferring files over
the Internet.
incremental: A type of backup in which only files that have been added or
changed since the last run are copied. Compare with differential.
local: Think of local as meaning “part of your computer.” If you save a file
to your Mac’s hard disk, you are saving it locally. In contrast, you can save
it remotely on a file server, which could be down the hall or on the other
side of the globe.
Prepared for Apple Consultants Network Partners. Real World Mac Maintenance and Backups by Joe Kissell. Copyright © 2007. Used with permission of Pearson Education, Inc. and Peachpit Press.
Glossary
219
media spanning: The capability of a backup program to split data (possibly
even a single, large file) across multiple optical discs or other media—and
rejoin them when restoring the files.
multisession: The ability to record additional chunks of information on
a partially used optical disc as separate volumes after the initial write
session. Some applications, including Retrospect, can add data to par-
tially-used optical discs using a packet-writing technique; this does not
create additional volumes, and it means that only the program used to
record the discs can read them later.
NAS: See network attached storage.
network attached storage: Typically refers to one or more hard drives
with their own Ethernet (or wireless) interfaces. Compare with storage
area network.
off-site: When backup media is kept off-site, it is moved to a separate
building from the one where the original data is stored.
optical media: CDs (including CD-ROM, CD-R, and CD-RW) and DVDs
(DVD-ROM, DVD-R, DVD+R, DVD-RW, and DVD+RW). So named because
they rely on lasers to read and write data.
pull: A backup initiated by a server, in which data is copied from a mount-
ed network volume (a client computer) onto media connected locally to
the server. Compare with push.
push: A backup initiated by a client, in which data is copied from a local
disk to a mounted network volume. Compare with pull.
resource fork: Although this is less common in Mac OS X than in previous
versions of the Mac OS, Macintosh files can be composed of two portions,
a data fork and a resource fork. In general, the data fork holds data for
the file—text, graphics, video, and so on—that could be relevant to any
platform, whereas the resource fork stores information that’s relevant only
when the file is used on a Mac. (Often this information is ancillary, but
other times it is quite important. For example, Classic versions of Nisus
Writer store formatting in the resource fork.)
rotating archive: A backup scheme in which new or modified files are
added to an archive incrementally (without overwriting recent versions),
Prepared for Apple Consultants Network Partners. Real World Mac Maintenance and Backups by Joe Kissell. Copyright © 2007. Used with permission of Pearson Education, Inc. and Peachpit Press.
220
Real World Mac Maintenance and Backups
but files older than a certain date (or backed up more than a certain num-
ber of days ago) are removed to save space.
rotating backup: A backup scheme in which a complete copy of all
selected files is made during each run, the newest set of files replacing the
oldest of two or more previously copied sets.
SAN: See storage area network.
script: A set of instructions for a backup program to follow. Scripts may
include source, destination, schedule, and other options.
server: A server is a program that sends information to client programs.
Backup servers, for instance, work with backup clients to copy files from
networked computers onto centrally located media. A computer running
server software is also typically referred to as a server.
SMB: Server Message Block, the network file-sharing protocol used by
Windows and Mac OS X’s Windows Sharing. Sometimes referred to (slightly
inaccurately) as Samba.
snapshot: A list of all the files in the designated folders at the time a backup
runs. Backup software that uses snapshots generally enables the user to re-
store data to its state at the time of any backup with a single operation.
source: A source is a folder or volume from which data is copied during
a backup; the data’s original or primary location. Compare with desti-
nation.
storage area network: A device comprising one or more hard drives able
to be shared among several computers, generally via high-speed FireWire,
Fibre Channel, or SCSI connections (without using a conventional Ether-
net-based network). Compare with network attached storage.
SuperDrive: An optical drive, standard on many Macintosh models, that
can write to and read from DVD-R media and CD-R or CD-RW media.
synchronization: The process of maintaining identical copies of a file,
folder, or volume in two or more locations.
verification: The process by which a backup program confirms that each
copied file is identical to the original.
Prepared for Apple Consultants Network Partners. Real World Mac Maintenance and Backups by Joe Kissell. Copyright © 2007. Used with permission of Pearson Education, Inc. and Peachpit Press.
221
Index
A
AASync, 189
ABSplus drives, 122
Accounts pane, 21
Activity Monitor, 79–80
additive incremental archives
defined, 33–34, 94–95, 217
restoring, 179
Affleck, Andy, 29, 35
AFP (Apple Filing Protocol), 217
AFP servers, 100
AirPort wireless networks
backing up, 102
changing base station password, 62
Amazon S3, 136
Amnesia, 80
Anacron, 27
antivirus software, 29–30
APC, 31
App Monitor, 80
Apple
Apple Hardware Test, 22–24
Apple Mighty Mouse, 52
troubleshooting resources, 181, 182
AppZapper, 19
Archive Assistant, 155, 156, 187–188
archives. See also additive incremental archives
assessing need for, 89
calculating disk space for, 119–121
creating, 94–96
defined, 217
files to exclude from, 106–107
hard disks for long-term, 118
including iTMS tracks in, 106
recommended backup strategies for, 105–107
recycling media for, 173
restoring archived files, 179–180, 212–215
restoring as bootable volume, 148–149
rotating, 141–142, 200–203
setting up, 167–169
snapshots, 95, 145
testing, 169–170
yearly archival backups to DVD, 59–60
archiving software
about, 155–157, 187–188
combining duplication and archiving features, 152–
153, 183–185
audio backup strategies, 91, 110–114
automating backups, 170–172
B
BackJack, 134–135, 190
Backup 3, 156
backup hardware, 115–138. See also hard disks; optical
media
advantages of hard disks for, 116–118
Amazon S3, 136
camcorders as, 136–138
flash drives, 132
iDisk as, 134
Prepared for Apple Consultants Network Partners. Real World Mac Maintenance and Backups by Joe Kissell. Copyright © 2007. Used with permission of Pearson Education, Inc. and Peachpit Press.
backup systems. See also archives; duplicates
archive setup, 167–169
automating backups, 170–172
creating, 22
duplicate setup, 163–164
FileVault and, 168
hardware testing for, 159
installing and testing software, 161
labeling media and files, 162–163
off-site storage, 174–176
partitioning hard disks, 160–161
recycling vs. long-term archives, 172–174
restoring data from backups, 177–178
testing, 165–166, 169–170
BackupSW, 155, 156, 187–188
Belkin, 32
books on troubleshooting, 182
Boot Camp, 114
bootable backups
duplicates and, 41, 88, 92–93, 155
evaluating programs that make, 140–141
Intel Macs and, 121, 166
making before system upgrades, 73
network volumes and, 145
restoring archive as, 148–149
using Mac OS 9 for, 160
BounceBack Professional, 154, 186
BRU LE, 155, 156, 157, 187–188
C
caches
clearing, 44–46, 77
defined, 44
camcorders, 136–138
capacity of hard disk backups, 117
Carbon Copy Cloner, 70, 154, 186
cataloging software, 107–108
CDs
labeling backup, 162–163
recordable, 127
restoring duplicates to hard disk, 178–179
changing passwords, 61–64
Check for Updates checkbox (Software Update pane), 13
ChronoSync, 155, 157, 187–188
ClamXav, 30
Classic environment files, 77
cleaning
de-dusting your Mac, 55–57
iSight camera, 58
keyboard, 58
monitor screen, 51
mouse or trackball, 51–52
clearing caches, 44–46, 77
Cleese, John, 10
222
Real World Mac Maintenance and Backups
Internet backup services, 134–136
Iomega REV disks, 130–131
Iomega Zip and Jazz disks, 130
local network servers, 133
magneto-optical disks, 129–130
optical media, 125–129
overview, 115
recommendations for, 138
tape drives, 131–132
testing, 159
backup media. See also hard disks; optical media
labeling, 162–163
network backups using optical or removable, 101–102
recycling, 172–174
Backup Simplicity, 152, 183, 185
backup software, 139–157. See also Retrospect
Apple’s Backup v.3, 156
archiving features of, 141–149
archiving software, 155–157, 187–188
combining duplication and archiving features, 152–
153, 183–185
duplication software, 153–155, 186
evaluating duplication programs, 140–141
file formats, compression, and encryption, 143–144
recommendations for, 151–157
restoration from, 147–148
restoring full archive as bootable volume, 148–149
snapshots and file lists, 145
source and destination options for, 145–147
support and reputation of, 150–151
Unix utilities as, 150
backup strategies, 85–114. See also archives; duplicates
archive, 105–107
assessing need for archives, 89
before system upgrades, 73
client-server backups, 102–103
creating archives, 94–96
daily backups of changed files, 33–34
digital photos and, 90–91, 107–108
duplicates, 104
incremental or differential backups, 96
keeping multiple backups, 98–99
need for duplicates and, 88, 92–93
optical media for, 129
overview, 8–9, 85–86
redundancy and, 131
rotating backups offsite, 41–42
sample types of, 87–88
scheduling backups, 96–98
small network backups, 99–103
video and audio files, 91, 110–114
weekly backups of all files, 41
Windows, 114
yearly archival backups to DVD, 59–60
Prepared for Apple Consultants Network Partners. Real World Mac Maintenance and Backups by Joe Kissell. Copyright © 2007. Used with permission of Pearson Education, Inc. and Peachpit Press.