Securing and Optimizing Linux RedHat Edition phần 3 pptx
Bạn đang xem bản rút gọn của tài liệu. Xem và tải ngay bản đầy đủ của tài liệu tại đây (325.9 KB, 48 trang )
Linux Kernel 0
CHAPTER 5
Copyright 1999 - 2000 Gerhard Mourani, Open Network Architecture ® and OpenDocs Publishing
98
net, video, and scsi from “/usr/linux/include” to our new place “/usr/src/linux-2.2.14/include”.
After we remove the entire source directory where we had compiled the new kernel, we
create a new symbolic link named “linux” under “/usr/src” that points to our new
“/usr/src/linux-2.2.14/include” directory. With these steps, future compiled programs will know
where to look for headers related to the kernel on your server.
NOTE: This step will allow us to gain space on our hard drive and will reduce the risk of
security. The Linux kernel source directory handles a of lot files and is about 75 MB in size
when uncompressed. With the procedure described above, our Linux kernel directory began
approximately 3 MB in size so we save 72 MB for the same functionalities.
6. Finally, you need to edit the “/etc/lilo.conf” file to make your new kernel one of the boot
time options:
Step 1
Edit the lilo.conf file (vi /etc/lilo.conf) and make the appropriated change on the line that read
“image=/boot/”.
[root@deep /]# vi /etc/lilo.conf
boot=/dev/sda
map=/boot/map
install=/boot/boot.b
prompt
timeout=00
restricted
password=somepasswd
image=/boot/vmlinuz-kernel.version.number
#(add your new kernel name file here).
label=linux
root=/dev/sda6
read-only
NOTE: Don’t forget to remove the line that read “initrd=/boot/initrd-2.2.12-20.img” in the “lilo.conf”
file, since this line is not necessary now (monolithic kernel doesn’t need an initrd file).
Step 2
Once the name of the new kernel version has been put in the “lilo.conf” file as shown above, we
update our “lilo.conf” file for the change to take effect with the following command:
[root@deep /]# /sbin/lilo -v
LILO version 21, [Copyright 1992-1998 Werner Almesberger
Reading boot sector from /dev/sda
Merging with /boot/boot.b
Boot image: /boot/vmlinuz-2.2.14
Added linux *
/boot/boot.0800 exits – no backup copy made.
Writing boot sector.
IMPORTANT NOTE: If you say NO to the configuration option “Unix98 PTY support
(CONFIG_UNIX98_PTYS)” during your kernel configuration, you must edit the “/etc/fstab” file and
remove the line that read:
none /dev/pts devpts gid=5,mode=620 0 0
Linux Kernel 0
CHAPTER 5
Copyright 1999 - 2000 Gerhard Mourani, Open Network Architecture ® and OpenDocs Publishing
99
Delete program, file and lines related to modules
By default when you install Red Hat Linux for the first time (like we do), the kernel is built as a
modularized kernel. This means that each device or function we need exists as modules and is
controlled by the Kernel Daemon program named kmod, which automatically loads some
modules and functions support into memory as it is needed, and unloads it when it’s no longer
being used.
Step 1
kmod and other module management programs included in the “modutils” RPM package use the
conf.modules file located in the “/etc” directory to know for example which Ethernet card you
have, if your Ethernet card requires special configuration and so on. Since we are not using any
modules in our new compiled kernel, we can remove the “conf.modules” file and uninstall
completely the “modutils” package program.
• To remove the “conf.modules” file, use the command:
[root@deep /]# rm -f /etc/conf.modules
• To uninstall the modutils package, use the following command:
[root@deep /]# rpm -e nodeps modutils
Step 2
One last thing to do is to edit the file “rc.sysinit” and comment out all the lines related to
“depmod -a” by inserting a “#” at the beginning of the lines. This is needed since at boot time the
system read the rc.sysinit script to find module dependencies in the kernel by default.
Under Red Hat Linux 6.1
Comment out the line 260 in the rc.sysinit file (vi +260 /etc/rc.d/rc.sysinit):
if [ -x /sbin/depmod -a -n "$USEMODULES" ]; then
To read:
#if [ -x /sbin/depmod -a -n "$USEMODULES" ]; then
Comment out the lines 272 to 277 in the rc.sysinit file (vi +272 /etc/rc.d/rc.sysinit):
if [ -L /lib/modules/default ]; then
INITLOG_ARGS= action "Finding module dependencies" depmod -a default
else
INITLOG_ARGS= action "Finding module dependencies" depmod -a
fi
fi
To read:
# if [ -L /lib/modules/default ]; then
# INITLOG_ARGS= action "Finding module dependencies" depmod -a default
# else
# INITLOG_ARGS= action "Finding module dependencies" depmod -a
# fi
#fi
NOTE: The procedure described above relates to initscripts-4_70-1 package under Red Hat Linux
version 6.1.
Under Red Hat Linux 6.2
Comment out the line 243 in the rc.sysinit file (vi +243 /etc/rc.d/rc.sysinit):
Linux Kernel 0
CHAPTER 5
Copyright 1999 - 2000 Gerhard Mourani, Open Network Architecture ® and OpenDocs Publishing
100
if [ -x /sbin/depmod -a -n "$USEMODULES" ]; then
To read:
#if [ -x /sbin/depmod -a -n "$USEMODULES" ]; then
Comment out the lines 255 to 260 in the rc.sysinit file (vi +255 /etc/rc.d/rc.sysinit):
if [ -L /lib/modules/default ]; then
INITLOG_ARGS= action "Finding module dependencies" depmod -a default
else
INITLOG_ARGS= action "Finding module dependencies" depmod -a
fi
fi
To read:
# if [ -L /lib/modules/default ]; then
# INITLOG_ARGS= action "Finding module dependencies" depmod -a default
# else
# INITLOG_ARGS= action "Finding module dependencies" depmod -a
# fi
#fi
NOTE: Once again, all of this part (“Delete program, file and lines related to modules”) is required
only if you said No to “Enable loadable module support (CONFIG_MODULES)” in your kernel
configuration above.
Step 3
Now you must Reboot your system and test your results.
[root@deep /]# reboot
When the system is rebooted and you are logged in, verify the new version of your kernel with the
following command:
• To verify the version of your new kernel, use the following command:
[root@deep /]# uname -a
Linux deep.openna.com 2.2.14 #1 Mon Jan 10 10:40:35 EDT 2000 i686 unknown
[root@deep]#
Congratulation.
Making a new rescue floppy
After the reboot of your Linux server, you should have now a system with an upgraded kernel.
Therefore, it’s time is to make a new rescue image with the new kernel in case of future
emergencies. To do this, follow the simple step below:
• Login as root, and insert a new floppy, then execute the following command:
[root@deep /]# mkbootdisk device /dev/fd0 2.2.14
Insert a disk in /dev/fd0. Any information on the disk will be lost.
Press <Enter> to continue or ^C to abort:
Important note: The mkbootdisk program runs only on modularized kernel. So you can’t use it on
a monolithic kernel; instead create an emergency boot floppy as shown below if you have a
problem with your system in the future.
Making a emergency boot floppy disk
Linux Kernel 0
CHAPTER 5
Copyright 1999 - 2000 Gerhard Mourani, Open Network Architecture ® and OpenDocs Publishing
101
Because it is possible to create a rescue floppy only on modularized kernel, we must find another
way to boot our Linux system if the Linux kernel on the hard disk is damaged. This is possible
with a Linux emergency boot floppy disk. You should immediately create it after you successfully
start your system and log in as root.
• To create the emergency boot floppy disk, follow these steps:
1. Insert a floppy disk and format it with the following command:
[root@deep /]# fdformat /dev/fd0H1440
Double-sided, 80 tracks, 18 sec/track. Total capacity 1440 kB.
Formatting done
Verifying done
2. Copy the file “vmlinuz” from the “/boot” directory to the floppy disk:
[root@deep /]# cp /boot/vmlinuz /dev/fd0
cp: overwrite `/dev/fd0'? y
The “vmlinuz” file is a symbolic link that point to the real Linux kernel.
3. Determine the kernel’s root device with the following command:
[root@deep /]# rdev
/dev/sda12 /
The kernel’s root device is the disk partition where the root file system is located. In this
example, the root device is “dev/sda12”; the device name may be different on your
system.
4. Set the kernel’s root device with the following command:
[root@deep /]# rdev /dev/fd0 /dev/sda12
To set the kernel’s root device, use the device reported by the “rdev” command utility in
the previous step.
5. Mark the root device as read-only with the following command:
[root@deep /]# rdev -R /dev/fd0 1
This causes Linux initially to mount the root file system as read-only. By setting the root
device as read-only, you avoid several warning and error messages.
6. Now put the boot floppy in the drive A: and reboot your system with the following
command:
[root@deep /]# reboot
Update your “/dev” entries
If you have added new devices to your system or have done recently a major kernel upgrade (a
major kernel upgrade is for example when you pass from kernel version 2.2.9 to 2.2.15 directly), it
may be important to update your “/dev” entries to avoid problems related to missing devices. We
can accomplish this task with the MAKEDEV script utility that scan the “/dev” directory where all
devices that interfaces with drivers in the kernel are kept. A special option named “update” allow
the MAKEDEV utility to create new devices that you have configured in your kernel and delete
those which are no longer configured.
Linux Kernel 0
CHAPTER 5
Copyright 1999 - 2000 Gerhard Mourani, Open Network Architecture ® and OpenDocs Publishing
102
• To update your “/dev” entries, execute the following commands:
[root@deep /]# cd /dev
[root@deep /dev]# ./MAKEDEV update
Copyright 1999 - 2000 Gerhard Mourani, Open Network Architecture ® and OpenDocs Publishing
103
Part III Networking-Related Reference
In this Part
TCP/IP Network Management
Networking Firewall
Networking Firewall with Masquerading and Forwarding support
Copyright 1999 - 2000 Gerhard Mourani, Open Network Architecture ® and OpenDocs Publishing
104
Chapter 6 TCP/IP Network Management
In this Chapter
Install more than one Ethernet Card per machine
Files related to networking functionality
Configuring TCP/IP networking manually with the command line
Linux TCP/IP Network Management 0
CHAPTER 6
Copyright 1999 - 2000 Gerhard Mourani, Open Network Architecture ® and OpenDocs Publishing
105
Linux TCP/IP Network Management
Overview
Until now, we have not played with the networking capabilities of Linux. Linux is one of the best
existing operating systems in the world for networking features. Most Internet sites around the
world already know this, and have used it for some time. Understanding your hardware network
and all files related to it is very important if you want to have a full control of what happens on
your server. Good knowledge of primary networking commands is vital. Network management
covers a wide variety of topics. In general, it includes gathering statistical data and status of parts
of your network, and taking action as necessary to deal with failures and other changes.
The most primitive technique for network monitoring is periodic "pinging" of critical hosts. More
sophisticated network monitoring requires the ability to get specific status and statistical
information from various devices on the network. These should include various sorts of data gram
counts, as well as counts of errors of various kinds. For these reasons, in this chapter we will try
to answer fundamental questions about networking devices, files related to networking
functionality, and essential networking commands.
Install more than one Ethernet Card per Machine
You might use Linux as a gateway between two Ethernet networks. In that case, you might have
two Ethernet cards on your server. To eliminate problems at boot time, the Linux kernel doesn’t
detect multiple cards automatically. If you happen to have two or more cards, you should specify
the parameters of the cards in the “lilo.conf” file for a monolithic kernel or in the “conf.modules”
file for a modularized kernel. The following are problems you may encounter with your network
cards.
Problem 1
If the driver(s) of the card(s) is/are being used as a loadable module (modularized kernel), in the
case of PCI drivers, the module will typically detect all of the installed cards automatically. For
ISA cards, you need to supply the I/O base address of the card so the module knows where to
look. This information is stored in the file “/etc/conf.modules”.
As an example, consider we have two ISA 3c509 cards, one at I/O 0x300 and one at I/O 0x320.
For ISA cards, edit the conf.modules file (vi /etc/conf.modules) and add:
alias eth0 3c509
alias eth1 3c509
options 3c509 io=0x300,0x320
This says that the 3c509 driver should be loaded for either eth0 or eth1 (alias eth0, eth1) and it
should be loaded with the options io=0x300,0x320 so that the drivers knows where to look for the
cards. Note that 0x is important – things like 300h as commonly used in the DOS world won’t
work.
For PCI cards, you typically only need the alias lines to correlate the ethN interfaces with the
appropriate driver name, since the I/O base of a PCI card can be safely detected.
For PCI cards, edit the conf.modules file (vi /etc/conf.modules) and add:
alias eth0 3c509
alias eth1 3c509
Linux TCP/IP Network Management 0
CHAPTER 6
Copyright 1999 - 2000 Gerhard Mourani, Open Network Architecture ® and OpenDocs Publishing
106
Problem 2
If the drivers(s) of the card(s) is/are compiled into the kernel (monolithic kernel), the PCI probes
will find all related cards automatically. ISA cards will also find all related cards automatically, but
in some circumstance ISA cards still need to do the following. This information is stored in the file
“/etc/lilo.conf”. The method is to pass boot-time arguments to the kernel, which is usually done by
LILO.
For ISA cards, edit the lilo.conf file (vi /etc/lilo.conf) and add:
append=”ether=0,0,eth1”
NOTE: First test your ISA cards without the boot-time arguments in the “lilo.conf” file, and if this
fails, use the boot-time arguments.
In this case eth0 and eth1 will be assigned in the order that the cards are found at boot. Since we
have recompiled the kernel, we must use the second method (If the drivers(s) is/are compiled into
the kernel) to install our second Ethernet card on the system. Remember that this is required only
in some circumstance for ISA cards, PCI cards will be found automatically.
Files related to networking functionality
In Linux, the TCP/IP network is configured through several text files you may have to edit to make
networking work. It’s very important to know the configurations files related to TCP/IP networking,
so that you can edit and configure the files if necessary. Remember that our server doesn’t have
an Xwindow interface to configure files via graphical interface. Even if you use a GUI in your daily
activities it is important to know how to configure network in text mode. The following sections
describe the basic TCP/IP configuration files.
The “/etc/HOSTNAME” file
This file stores your system’s host name—your system’s fully qualified domain name (FQDN),
such as deep.openna.com.
Following is a sample “/etc/HOSTNAME” file:
deep.openna.com
The “/etc/sysconfig/network-scripts/ifcfg-ethN” files
File configurations for each network device you may have or want to add on your system are
located in the “/etc/sysconfig/network-scripts/” directory with Red Hat Linux 6.1 or 6.2 and are
named ifcfg-eth0 for the first interface and ifcfg-eth1 for the second, etc.
Following is a sample “/etc/sysconfig/network-scripts/ifcfg-eth0” file:
DEVICE=eth0
IPADDR=208.164.186.1
NETMASK=255.255.255.0
NETWORK=208.164.186.0
BROADCAST=208.164.186.255
ONBOOT=yes
BOOTPROTO=none
USERCTL=no
Linux TCP/IP Network Management 0
CHAPTER 6
Copyright 1999 - 2000 Gerhard Mourani, Open Network Architecture ® and OpenDocs Publishing
107
If you want to modify your network address manually, or add a new network on a new interface,
edit this file (ifcfg-ethN), or create a new one and make the appropriate changes.
DEVICE=devicename, where devicename is the name of the physical network device.
IPADDR=ipaddr, where ipaddr is the IP address.
NETMASK=netmask, where netmask is the netmask IP value.
NETWORK=network, where network is the network IP address.
BROADCAST=broadcast, where broadcast is the broadcast IP address.
ONBOOT=answer, where answer is yes or no (Does the interface will be active or inactive at boot time).
BOOTPROTO=proto, where proto is one of the following:
• none - No boot-time protocol should be used.
• bootp - The bootp (now pump) protocol should be used.
• dhcp - The dhcp protocol should be used.
USERCTL=answer, where answer is one of the following:
• yes (Non-root users are allowed to control this device).
• no (Only the super-user root is allowed to control this device).
The “/etc/resolv.conf” file
This file is another text file, used by the resolver—a library that determines the IP address for a
host name.
Following is a sample “/etc/resolv.conf” file:
search openna.com
nameserver 208.164.186.1
nameserver 208.164.186.2
NOTE: Name servers are queried in the order they appear in the file (primary, secondary).
The “/etc/host.conf” file
This file specifies how names are resolved. Linux uses a resolver library to obtain the IP address
corresponding to a host name.
Following is a sample “/etc/host.conf” file:
# Lookup names via DNS first then fall back to /etc/hosts.
order bind,hosts
# We have machines with multiple addresses.
multi on
# Check for IP address spoofing.
nospoof on
The order option indicates the order of services. The sample entry specifies that the resolver
library should first consult the name server (DNS) to resolve a name and then check the
“/etc/hosts” file.
Linux TCP/IP Network Management 0
CHAPTER 6
Copyright 1999 - 2000 Gerhard Mourani, Open Network Architecture ® and OpenDocs Publishing
108
The multi option determines whether a host in the “/etc/hosts” file can have multiple IP addresses
(multiple interface ethN). Hosts that have more than one IP address are said to be multiomed,
because the presence of multiple IP addresses implies that host has several network interfaces.
The nospoof option indicates to take care of not permitting spoofing on this machine. IP-
Spoofing is a security exploit that works by tricking computers in a trust relationship that you are
someone that you really aren't.
The “/etc/sysconfig/network” file
The “/etc/sysconfig/network” file is used to specify information about the desired network
configuration on your server.
Following is a sample “/etc/sysconfig/network” file:
NETWORKING=yes
FORWARD_IPV4=yes
HOSTNAME=deep. openna.com
GATEWAY=0.0.0.0
GATEWAYDEV=
The following values may be used:
NETWORKING=answer, where answer is yes or no (Configure networking or not configure networking).
FORWARD_IPV4=answer, where answer is yes or no (Perform IP forwarding or not perform IP forwarding).
HOSTNAME=hostname, where hostname is the hostname of your server.
GATEWAY=gwip, where gwip is the IP address of the remote network gateway (if available).
GATEWAYDEV=gwdev, where gwdev is the device name (eth#) you use to access the remote gateway.
NOTE: For compatibility with older software, the /etc/HOSTNAME file should contain the same
value as HOSTNAME=
hostname above. With the new version of Red Hat Linux 6.2 the
“
FORWARD_IPV4=” parameter is now specified in the “/etc/sysctl.conf” file instead of the
“/etc/sysconfig/network” file.
The “/etc/sysctl.conf” file
In Red Hat Linux 6.2, many kernel options related to networking security such as dropping
packets that come in over interfaces they shouldn't or ignoring ping/broadcasts request, etc can
be set in the new “/etc/sysctl.conf” file instead of the “/etc/rc.d/rc.local” file. One important
consideration is the IPv4 forwarding parameter which is now done via the sysctl program, as
opposed to being controlled by the contents of the file in “/etc/sysconfig/network”. The sysctl
settings are stored in “/etc/sysctl.conf”, and are loaded at each boot before the “/etc/rc.d/rc.local”
file is loaded. We’ve already talked about all networking security parameters that we must set into
the server in Chapter 3, “Linux General Security”, and for this reason we’ll focus only on the
kernel option for IPv4 forwarding.
• To enable IPv4 forwarding on your RH 6.2 system, use the following command:
Edit the “/etc/sysctl.conf” file and add the following line:
# Enable packet forwarding
net.ipv4.ip_forward = 1
Linux TCP/IP Network Management 0
CHAPTER 6
Copyright 1999 - 2000 Gerhard Mourani, Open Network Architecture ® and OpenDocs Publishing
109
You must restart your network for the change to take effect. The command to restart the network
is the following:
• To restart all network devices manually on your system, use the following command:
[root@deep /]# /etc/rc.d/init.d/network restart
Setting network parameters [ OK ]
Bringing up interface lo [ OK ]
Bringing up interface eth0 [ OK ]
Bringing up interface eth1 [ OK ]
NOTE: Enabling IPv4 forwarding via the sysctl.conf file is only valid for Red Hat Linux 6.2 users.
Users with version 6.1 of Red Hat must set this parameter into the “/etc/sysconfig/network” file as
explained above.
The “/etc/hosts” file
As your machine gets started, it will need to know the mapping of some hostnames to IP
addresses before DNS can be referenced. This mapping is kept in the “/etc/hosts” file. In the
absence of a name server, any network program on your system consults this file to determine
the IP address that corresponds to a host name.
Following is a sample “/etc/hosts” file:
IP Address Hostname Alias
127.0.0.1 localhost deep.openna.com
208.164.186.1 deep.openna.com deep
208.164.186.2 mail.openna.com mail
208.164.186.3 web.openna.com web
The leftmost column is the IP address to be resolved. The next column is that host’s name. Any
subsequent columns are alias for that host. In the second line, for example, the IP address
208.164.186.1 if for the host deep.openna.com. Another name for deep.openna.com is deep.
After you are finished configuring your networking files, don’t forget to restart your network for the
changes to take effect.
• To restart your network, use the following command:
[root@deep /]# /etc/rc.d/init.d/network restart
Setting network parameters [ OK ]
Bringing up interface lo [ OK ]
Bringing up interface eth0 [ OK ]
Bringing up interface eth1 [ OK ]
IMPORTANT NOTE: Time out problems for telnet or ftp connection are often caused by the server
trying to resolve the client IP address to a DNS name. Either DNS isn’t configured properly on
your server or the client machines aren’t known to DNS. If you intend to run telnet or ftp services
on your server, and aren’t using DNS, don’t forget to add the client machine name and IP in your
“/etc/hosts” file on the server or you can expect to wait several minutes for the DNS lookup to
time out, before you get a login: prompt.
Configuring TCP/IP Networking manually with the command line
The ifconfig utility is the tool used to set up and configure your network card. You should
understand this command in the event you need to configure the network by hand. An important
note to take care with is when using ifconfig to configure your network devices; the settings will
not survive a reboot.
Linux TCP/IP Network Management 0
CHAPTER 6
Copyright 1999 - 2000 Gerhard Mourani, Open Network Architecture ® and OpenDocs Publishing
110
• To assign the eth0 interface the IP-address of 208.164.186.2 use the command:
[root@deep /]# ifconfig eth0 208.164.186.2 netmask 255.255.255.0
NOTE: Usually, peoples will configure or change the TCP/IP networking manually only to make
some test on the server. If you want to keep your TCP/IP values, it’s preferable to set them in the
files related to networking functionality.
• To display all the interfaces you have on your server, use the command:
[root@deep /]# ifconfig
The output should look something like this:
eth0 Link encap:Ethernet HWaddr 00:E0:18:90:1B:56
inet addr:208.164.186.2 Bcast:208.164.186.255 Mask:255.255.255.0
UP BROADCAST RUNNING MULTICAST MTU:1500 Metric:1
RX packets:1295 errors:0 dropped:0 overruns:0 frame:0
TX packets:1163 errors:0 dropped:0 overruns:0 carrier:0
collisions:0 txqueuelen:100
Interrupt:11 Base address:0xa800
lo Link encap:Local Loopback
inet addr:127.0.0.1 Mask:255.0.0.0
UP LOOPBACK RUNNING MTU:3924 Metric:1
RX packets:139 errors:0 dropped:0 overruns:0 frame:0
TX packets:139 errors:0 dropped:0 overruns:0 carrier:0
collisions:0 txqueuelen:0
NOTE: If the ifconfig tool is invoked without any parameters, it displays all interfaces you
configured. An option of “-a” shows the inactive one as well.
• To display all interfaces as well as inactive interfaces you may have, use the command:
[root@deep /]# ifconfig -a
The output should look something like this:
eth0 Link encap:Ethernet HWaddr 00:E0:18:90:1B:56
inet addr:208.164.186.2 Bcast:208.164.186.255 Mask:255.255.255.0
UP BROADCAST RUNNING MULTICAST MTU:1500 Metric:1
RX packets:1295 errors:0 dropped:0 overruns:0 frame:0
TX packets:1163 errors:0 dropped:0 overruns:0 carrier:0
collisions:0 txqueuelen:100
Interrupt:11 Base address:0xa800
eth1 Link encap:Ethernet HWaddr 00:E0:18:90:1B:56
inet addr:192.168.1.1 Bcast:192.168.1.255 Mask:255.255.255.0
UP BROADCAST RUNNING MULTICAST MTU:1500 Metric:1
RX packets:1295 errors:0 dropped:0 overruns:0 frame:0
TX packets:1163 errors:0 dropped:0 overruns:0 carrier:0
collisions:0 txqueuelen:100
Interrupt:5 Base address:0xa320
lo Link encap:Local Loopback
inet addr:127.0.0.1 Mask:255.0.0.0
UP LOOPBACK RUNNING MTU:3924 Metric:1
RX packets:139 errors:0 dropped:0 overruns:0 frame:0
TX packets:139 errors:0 dropped:0 overruns:0 carrier:0
collisions:0 txqueuelen:0
Linux TCP/IP Network Management 0
CHAPTER 6
Copyright 1999 - 2000 Gerhard Mourani, Open Network Architecture ® and OpenDocs Publishing
111
NOTE: It is important to note that the settings configured with the ifconfig toll for your network
devices will not survive a reboot.
• To assign the default gateway for 208.164.186.1 use the command:
[root@deep /]# route add default gw 208.164.186.1
NOTE: In this example, the default route is set up to go to 208.164.186.1, your router. Once again,
if you want to keep your default gateway value, it’s preferable to set in it the files related to
networking functionality (/etc/sysconfig/network).
Verify that you can reach your hosts. Choose a host from your network, for instance
208.164.186.1.
• To verify that you can reach your hosts, use the command:
[root@deep /]# ping 208.164.186.1
The output should look something like this:
[root@deep networking]# ping 208.164.186.1
PING 208.164.186.1 (208.164.186.1) from 208.164.186.2 : 56 data bytes
64 bytes from 208.164.186.2: icmp_seq=0 ttl=128 time=1.0 ms
64 bytes from 208.164.186.2: icmp_seq=1 ttl=128 time=1.0 ms
64 bytes from 208.164.186.2: icmp_seq=2 ttl=128 time=1.0 ms
64 bytes from 208.164.186.2: icmp_seq=3 ttl=128 time=1.0 ms
208.164.186.1 ping statistics
4 packets transmitted, 4 packets received, 0% packet loss
round-trip min/avg/max = 1.0/1.0/1.0 ms
You should now display the routing information with the command route to see if both hosts have
the correct routing entry:
• To display the routing information, use the command:
[root@deep /]# route -n
The output should look something like this:
Kernel IP routing table
Destination Gateway Genmask Flags Metric Ref Use Iface
208.164.186.2 0.0.0.0 255.255.255.255 UH 0 0 0 eth0
208.164.186.0 208.164.186.2 255.255.255.0 UG 0 0 0 eth0
208.164.186.0 0.0.0.0 255.255.255.0 U 0 0 0 eth0
127.0.0.0 0.0.0.0 255.0.0.0 U 0 0 0 lo
• To check the status of the interfaces quickly, use the netstat -i command, as follows:
[root@deep /]# netstat -i
The output should look something like this:
Kernel Interface table
Iface MTU Met RX-OK RX-ERR RX-DRP RX-OVR TX-OK TX-ERR TX-DRP TX-OVR Flg
eth0 1500 0 4236 0 0 0 3700 0 0 0 BRU
lo 3924 0 13300 0 0 0 13300 0 0 0 LRU
ppp0 1500 0 14 1 0 0 16 0 0 0 PRU
Linux TCP/IP Network Management 0
CHAPTER 6
Copyright 1999 - 2000 Gerhard Mourani, Open Network Architecture ® and OpenDocs Publishing
112
Another useful netstat option is -t, which shows all active TCP connections. Following is a typical
result of netstat -t:
• To shows all active TCP connections, use the command:
[root@deep /]# netstat -t
The output should look something like this:
Active Internet connections (w/o servers)
Proto Recv-Q Send-Q Local Address Foreign Address State
Tcp 0 0 deep.openar:netbios-ssn gate.openna.com:1045 ESTABLISHED
Tcp 0 0 localhost:1032 localhost:1033 ESTABLISHED
Tcp 0 0 localhost:1033 localhost:1032 ESTABLISHED
Tcp 0 0 localhost:1030 localhost:1034 ESTABLISHED
Tcp 0 0 localhost:1031 localhost:1030 ESTABLISHED
Tcp 0 0 localhost:1028 localhost:1029 ESTABLISHED
Tcp 0 0 localhost:1029 localhost:1028 ESTABLISHED
Tcp 0 0 localhost:1026 localhost:1027 ESTABLISHED
Tcp 0 0 localhost:1027 localhost:1026 ESTABLISHED
Tcp 0 0 localhost:1024 localhost:1025 ESTABLISHED
Tcp 0 0 localhost:1025 localhost:1024 ESTABLISHED
• To shows all active and listen TCP connections, use the command:
[root@deep /]# netstat -vat
The output should look something like this:
Active Internet connections (servers and established)
Proto Recv-Q Send-Q Local Address Foreign Address State
tcp 0 0 deep.openna.co:domain *:* LISTEN
tcp 0 0 localhost:domain *:* LISTEN
tcp 0 0 deep.openna.com:ssh gate.openna.com:1682 ESTABLISHED
tcp 0 0 *:webcache *:* LISTEN
tcp 0 0 deep.openar:netbios-ssn *:* LISTEN
tcp 0 0 localhost:netbios-ssn *:* LISTEN
tcp 0 0 localhost:1032 localhost:1033 ESTABLISHED
tcp 0 0 localhost:1033 localhost:1032 ESTABLISHED
tcp 0 0 localhost:1030 localhost:1031 ESTABLISHED
tcp 0 0 localhost:1031 localhost:1030 ESTABLISHED
tcp 0 0 localhost:1028 localhost:1029 ESTABLISHED
tcp 0 0 localhost:1029 localhost:1028 ESTABLISHED
tcp 0 0 localhost:1026 localhost:1027 ESTABLISHED
tcp 0 0 localhost:1027 localhost:1026 ESTABLISHED
tcp 0 0 localhost:1024 localhost:1025 ESTABLISHED
tcp 0 0 localhost:1025 localhost:1024 ESTABLISHED
tcp 0 0 deep.openna.com:www *:* LISTEN
tcp 0 0 deep.openna.com:https *:* LISTEN
tcp 0 0 *:389 *:* LISTEN
tcp 0 0 *:ssh *:* LISTEN
• To stop all network devices manually on your system, use the following command:
[root@deep /]# /etc/rc.d/init.d/network stop
Shutting down interface eth0 [ OK ]
Disabling IPv4 packet forwarding [ OK ]
• To start all network devices manually on your system, use the following command:
Linux TCP/IP Network Management 0
CHAPTER 6
Copyright 1999 - 2000 Gerhard Mourani, Open Network Architecture ® and OpenDocs Publishing
113
[root@deep /]# /etc/rc.d/init.d/network start
Enabling IPv4 packet forwarding [ OK ]
Bringing up interface lo [ OK ]
Bringing up interface eth0 [ OK ]
Copyright 1999 - 2000 Gerhard Mourani, Open Network Architecture ® and OpenDocs Publishing
114
Chapter 7 Networking Firewall
In this Chapter
Linux IPCHAINS
Build a kernel with IPCHAINS Firewall support
Some explanation of rules used in the firewall script files
The firewall scripts files
Configuration of the script file for the Web Server
Configuration of the script file for the Mail Server
Linux IPCHAINS 0
CHAPTER 7
Copyright 1999 - 2000 Gerhard Mourani, Open Network Architecture ® and OpenDocs Publishing
115
Linux IPCHAINS
Overview
Can someone tell me why I might want something like a commercial firewall product rather than
simply using Ipchains and restricting certain packets? What am I losing by using Ipchains? Now,
there is undoubtedly room for debate on this, Ipchains is as good, and most of the time better,
than commercial firewall packages from a functionality and support standpoint. You will probably
have more insight into what's going on in your network using Ipchains than a commercial solution.
That being said, a lot of corporate types want to tell their shareholders, CEO/CTO/etc. that they
have the backing of reputable security Software Company. The firewall could be doing nothing
more than passing through all traffic, and still the corporate type would be more comfortable than
having to rely on the geeky guy in the corner cube who gets grumpy if you turn the light on before
noon.
In the end, a lot of companies want to be able to turn around and demand some sort of restitution
from a vendor if the network is breached, whether or not they'd actually get anything or even try.
All they can typically do with an open source solution is fire the guy that implemented it. At least
some of the commercial firewalls are based on Linux or something similar. It’s quite probable that
Ipchains is secure enough for you but not those engaging in serious amounts of high stakes bond
trading. Doing a cost/benefit analysis and asking a lot of pertinent questions is recommended
before spending serious money on a commercial firewall otherwise you may end up with
something inferior to your Ipchains tool. Quite a few of the NT firewalls are likely to be no better
than Ipchains and the general consensus on bugtraq and NT bugtraq are that NT is *far too
insecure* to run a serious firewall.
What is a Network Firewall Security Policy?
Network firewall security policy defines those services that will be explicitly allowed or denied,
how these services will be used and the exceptions to these rules. An organization's overall
security policy must be determined according to security and business-need analysis. Since a
firewall relates to network security alone, a firewall has little value unless the overall security
policy is properly defined. Every rule in the network firewall security policy should be implemented
on a firewall. Generally, a firewall uses one of the following methods.
Everything not specifically permitted is denied
This approach blocks all traffic between two networks except for those services and applications
that are permitted. Therefore, each desired service and application should be implemented one
by one. No service or application that might be a potential hole on the firewall should be
permitted. This is the most secure method, denying services and applications unless explicitly
allowed by the administrator. On the other hand, from the point of users, it might be more
restrictive and less convenient. This is the method we will use in our Firewall configuration files in
this book.
Everything not specifically denied is permitted
This approach allows all traffic between two networks except for those services and applications
that are denied. Therefore, each untrusted or potentially harmful service or application should be
denied one by one. Although this is a flexible and convenient method for the users, it could
potentially cause some serious security problems.
What is Packet Filtering?
Packet Filtering is the type of firewall built into the Linux kernel. A filtering firewall works at the
network level. Data is only allowed to leave the system if the firewall rules allow it. As packets
Linux IPCHAINS 0
CHAPTER 7
Copyright 1999 - 2000 Gerhard Mourani, Open Network Architecture ® and OpenDocs Publishing
116
arrive they are filtered by their type, source address, destination address, and port information
contained in each packet.
Most of the time, packet filtering is accomplished by using a router that can forward packets
according to filtering rules. When a packet arrives at the packet-filtering router, the router extracts
certain information from the packet header and makes decisions according to the filter rules as to
whether the packet will pass through or be discarded.
The following information can be extracted from the packet header:
• Source IP address
• Destination IP address
• TCP/UDP source port
• TCP/UDP destination port
• ICMP message type
• Encapsulated protocol information (TCP, UDP, ICMP or IP tunnel)
Because very little data is analyzed and logged, filtering firewalls take less CPU power and create
less latency in your network. There are lots of ways to structure your network to protect your
systems using a firewall.
The topology
All servers should be configured to block at least the unused ports, even if there are not a
firewall server. This is required for more security. Imagine someone gains access to your firewall
gateway server: if your neighborhoods servers are not configured to block unused ports, this is a
serious network risk. The same is true for local connections; unauthorized employees can gain
access from the inside to your other servers in this manner.
In our configuration we will give you three different examples that can help you to configure your
firewall rules depending on the type of the server you want to protect and the placement of these
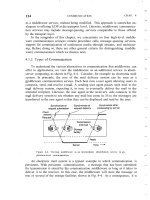
servers on your network architecture. The first example firewall rules file will be for a Web Server,
the second for a Mail Server and the last for a Gateway Server that acts as proxy for the inside
Wins, Workstations and Servers machines. See the graph below to get an idea.
Linux IPCHAINS 0
CHAPTER 7
Copyright 1999 - 2000 Gerhard Mourani, Open Network Architecture ® and OpenDocs Publishing
117
www.openna.com
Caching Only DNS
208.164.186.3
deep.openna.com
Master DNS Server
208.164.186.1
mail.openna.com
Slave DNS Server
208.164.186.2
1. Unlimited traffic on the loopback
interface allowed
2. ICMP traffic allowed
3. DNS Caching and Client Server on
port 53 allowed
4. SSH Server on port 22 allowed
5. HTTP Server on port 80 allowed
6. HTTPS Server on port 443 allowed
7. SMTP Client on port 25 allowed
8. FTP Server on ports 20, 21 allowed
9. Outgoing traceroute request
allowed
1. Unlimited traffic on the loopback
interface allowed
2. ICMP traffic allowed
3. DNS Server and Client on port 53
allowed
4. SSH Server and Client on port 22
allowed
5. HTTP Server and Client on port 80
allowed
6. HTTPS Server and Client on port
443 allowed
7. WWW-CACHE Client on port 8080
allowed
8. External POP Client on port 110
allowed
9. External NNTP NEWS Client on
port 119 allowed
10. SMTP Server and Client on port
25 allowed
11. IMAP Server on port 143 allowed
12. IRC Client on port 6667 allowed
13. ICQ Client on port 4000 allowed
14. FTP Client on port 20, 21 allowed
15. RealAudio / QuickTime Client
allowed
16. Outgoing traceroute request
allowed
1. Unlimited traffic on the loopback
interface allowed
2. ICMP traffic allowed
3. DNS Server and Client on port 53
allowed
4. SSH Server on port 22 allowed
5. SMTP Server and Client on port 25
allowed
6. IMAP Server on port 143 allowed
7. Outgoing traceroute request
allowed
The table above shows you the ports that I enable on the different servers by default in my
firewall scripts file in this book. Depending on what services must be available in the server for
Linux IPCHAINS 0
CHAPTER 7
Copyright 1999 - 2000 Gerhard Mourani, Open Network Architecture ® and OpenDocs Publishing
118
the outside, you must configure your firewall script file to allow the traffic on the specified ports.
www.openna.com is our Web Server, mail.openna.com is our Mail Hub Server for all the
internal network, and deep.openna.com is our Gateway Server for all the examples explained in
this chapter.
Build a kernel with IPCHAINS Firewall support
The first thing you need to do is ensure that your kernel has been built with Network Firewall
support enabled and Firewalling. Remember, all servers should be configured to block
unused ports, even if there are not a firewall server. In the 2.2.14 kernel version you need to
be sure that you have answered Y to the following questions:
Networking options:
Network firewalls (CONFIG_FIREFALL) [N] Y
IP:Firewalling (CONFIG_IP_FIREWALL) [N] Y
IP:TCP syncookie support (CONFIG_SYN_COOKIES) [N] Y
NOTE: If you have followed the Linux Kernel section and have recompiled your kernel, the options
“Network firewalls, IP:Firewalling, and IP:TCP syncookie support” shown above are already set.
Some explanation of rules used in the firewall script files
The following is an explanation of a few of the rules that will be used in the Firewalling examples
below. This is shown just as a reference, the firewall scripts are well commented and very easy to
modify.
Constants used in the firewall scripts files examples
Constants are used for most values. The most basic constants are:
EXTERNAL_INTERFACE
This is the name of the external network interface to the Internet. It's defined as eth0 in the
examples.
LOCAL_INTERFACE_1
This is the name of the internal network interface to the LAN, if any. It's defined as eth1 in the
examples.
LOOPBACK_INTERFACE
This is the name of the loopback interface. It's defined as lo in the examples.
IPADDR
This is the IP address of your external interface. It's either a static IP address registered with
InterNIC, or else a dynamically assigned address from your ISP (usually via DHCP).
LOCALNET_1
This is your LAN network address, if any - the entire range of IP addresses used by the machines
on your LAN. These may be statically assigned, or you might run a local DHCP server to assign
them. In these examples, the range is 192.168.1.0/24, part of the Class C private address range.
ANYWHERE
Anywhere is a label for an address used by ipchains to match any (non-broadcast) address.
Both programs provide any/0 as a label for this address, which is 0.0.0.0/0.
NAMESERVER_1
This is the IP address of your Primary DNS Server from your network or your ISP.
Linux IPCHAINS 0
CHAPTER 7
Copyright 1999 - 2000 Gerhard Mourani, Open Network Architecture ® and OpenDocs Publishing
119
NAMESERVER_2
This is the IP address of your Secondary DNS Server from your network or your ISP.
MY_ISP
This is your ISP & NOC address range. The value you specify here is used by the firewall to allow
ICMP ping request and traceroute. If you don’t specify an IP address range, then you will not be
able to ping the Internet from your internal network.
LOOPBACK
The loopback address range is 127.0.0.0/8. The interface itself is addressed as 127.0.0.1 (in
/etc/hosts).
PRIVPORTS
The privileged ports, 0 through 1023, are usually referenced in total.
UNPRIVPORTS
The unprivileged ports, 1024 through 65535, are usually referenced in total. They are addresses
dynamically assigned to the client side of a connection.
Default Policy
A firewall has a default policy and a collection of actions to take in response to specific message
types. This means that if a given packet has not been selected by any other rule, then the default
policy rule will be applied.
NOTE: People with dynamically assigned IPs from an ISP may include the following two lines in
their declarations for the firewall. The lines will determine the ppp0 IP address, and the network of
the remote ppp server.
IPADDR=`/sbin/ifconfig | grep -A 4 ppp0 | awk '/inet/ { print $2 } ' | sed -e s/addr://`
MY_ISP=`/sbin/ifconfig | grep -A 4 ppp0 | awk '/P-t-P/ { print $3 } ' | sed -e s/P-t-P:// | cut -d '.' -f 1-3`.0/24
Enabling Local Traffic
Since the default policies for all example firewall rule script files in this book are to deny
everything, some of these rules must be unset. Local network services do not go through the
external network interface. They go through a special, private interface called the loopback
interface. None of your local network programs will work until loopback traffic is allowed.
# Unlimited traffic on the loopback interface.
ipchains -A input -i $LOOPBACK_INTERFACE -j ACCEPT
ipchains -A output -i $LOOPBACK_INTERFACE -j ACCEPT
Source Address Filtering
All IP packet headers contain the source and destination IP addresses and the type of IP protocol
message (ICMP, UDP or TCP) this packet contains. The only means of identification under the
Internet Protocol (IP) is the source address in the IP packet header. This is a problem that opens
the door to source address spoofing, where the sender may replaces its address with either a
nonexistent address, or the address of some other site.
# Refuse spoofed packets pretending to be from the external address.
ipchains -A input -i $EXTERNAL_INTERFACE -s $IPADDR -l -j DENY
Also, there are at least seven sets of source addresses you should refuse on your external
interface in all cases.
These are incoming packets claiming to be from:
Linux IPCHAINS 0
CHAPTER 7
Copyright 1999 - 2000 Gerhard Mourani, Open Network Architecture ® and OpenDocs Publishing
120
• Your external IP address
• Class A private IP addresses
• Class B private IP addresses
• Class C private IP addresses
• Class D multicast addresses
• Class E reserved addresses
• The loopback interface
With the exception of your own IP address, blocking outgoing packets containing these source
addresses protects you from possible configuration errors on your part.
NOTE: Don’t forget to exclude your own IP address from outgoing packets blocked. By default I
choose to exclude the Class C private IP addresses since it’s the most used by the majority of
people at this time. If you used another class instead of the class C, then you must comment out
the lines that refer to your class under the “SPOOFING & BAD ADDRESSES” section of the
firewall script file.
The rest of the rules
Other rules used in the firewall scripts files are:
• Accessing a Service from the Outside World
• Offering a Service to the Outside World
• Masquerading the Internal Machines
The firewall scripts files
The tool ipchains allows you to set up firewalls, IP masquerading, etc. Ipchains talks to the
kernel and tells it what packets to filter. Therefore all your firewall setups are stored in the kernel,
and thus will be lost on reboot. To avoid this, we recommend using the System V init scripts to
make your rules permanent. To do this, create a firewall script file like shown below in your
“/etc/rc.d/init.d/” directory for each servers you have. Of course, each server has different services
to offer and needs a different firewall setup. For this reason, we provide you three different
firewall settings, which you can play with, and examine to fit your needs. Also I assume that you
have a minimum knowledge on how filtering firewalls and firewall rules works.
Configuration of the “/etc/rc.d/init.d/firewall” script file for the Web Server
This is the configuration script file for our Web Server. This configuration allows unlimited traffic
on the Loopback interface, ICMP, DNS Caching and Client Server (53), SSH Server (22), HTTP
Server (80), HTTPS Server (443), SMTP Client (25), FTP Server (20, 21), and OUTGOING
TRACEROUTE requests by default.
If you don’t want some services listed in the firewall rules files for the Web Server that I make ON
by default, comment them out with a "#" at the beginning of the line. If you want some other
services that I commented out with a "#", then remove the "#" at the beginning of those lines.
Create the firewall script file (touch /etc/rc.d/init.d/firewall) on your Web Server and add:
#!/bin/sh
#
#
# Last modified by Gerhard Mourani: 04-25-2000
#
# Copyright (C) 1997, 1998, 1999 Robert L. Ziegler
Linux IPCHAINS 0
CHAPTER 7
Copyright 1999 - 2000 Gerhard Mourani, Open Network Architecture ® and OpenDocs Publishing
121
#
# Permission to use, copy, modify, and distribute this software and its
# documentation for educational, research, private and non-profit purposes,
# without fee, and without a written agreement is hereby granted.
# This software is provided as an example and basis for individual firewall
# development. This software is provided without warranty.
#
# Any material furnished by Robert L. Ziegler is furnished on an
# "as is" basis. He makes no warranties of any kind, either expressed
# or implied as to any matter including, but not limited to, warranty
# of fitness for a particular purpose, exclusivity or results obtained
# from use of the material.
#
#
# Invoked from /etc/rc.d/init.d/firewall.
# chkconfig: - 60 95
# description: Starts and stops the IPCHAINS Firewall \
# used to provide Firewall network services.
# Source function library.
. /etc/rc.d/init.d/functions
# Source networking configuration.
. /etc/sysconfig/network
# Check that networking is up.
if [ ${NETWORKING} = "no" ]
then
exit 0
fi
if [ ! -x /sbin/ipchains ]; then
exit 0
fi
# See how we were called.
case "$1" in
start)
echo -n "Starting Firewalling Services: "
# Some definitions for easy maintenance.
#
# EDIT THESE TO SUIT YOUR SYSTEM AND ISP.
EXTERNAL_INTERFACE="eth0" # Internet connected interface
LOOPBACK_INTERFACE="lo" # Your local naming convention
IPADDR="my.ip.address" # Your IP address
ANYWHERE="any/0" # Match any IP address
NAMESERVER_1="my.name.server.1" # Everyone must have at least one
NAMESERVER_2="my.name.server.2" # Your secondary name server
MY_ISP="my.isp.address.range/24" # ISP & NOC address range
SMTP_SERVER="my.smtp.server" # Your Mail Hub Server.
SYSLOG_SERVER="syslog.internal.server" # Your syslog internal server
SYSLOG_CLIENT="sys.int.client.range/24" # Your syslog internal client range
LOOPBACK="127.0.0.0/8" # Reserved loopback address range
CLASS_A="10.0.0.0/8" # Class A private networks
CLASS_B="172.16.0.0/12" # Class B private networks
CLASS_C="192.168.0.0/16" # Class C private networks
CLASS_D_MULTICAST="224.0.0.0/4" # Class D multicast addresses
Linux IPCHAINS 0
CHAPTER 7
Copyright 1999 - 2000 Gerhard Mourani, Open Network Architecture ® and OpenDocs Publishing
122
CLASS_E_RESERVED_NET="240.0.0.0/5" # Class E reserved addresses
BROADCAST_SRC="0.0.0.0" # Broadcast source address
BROADCAST_DEST="255.255.255.255" # Broadcast destination address
PRIVPORTS="0:1023" # Well known, privileged port range
UNPRIVPORTS="1024:65535" # Unprivileged port range
#
# SSH starts at 1023 and works down to 513 for
# each additional simultaneous incoming connection.
SSH_PORTS="1022:1023" # range for SSH privileged ports
# traceroute usually uses -S 32769:65535 -D 33434:33523
TRACEROUTE_SRC_PORTS="32769:65535"
TRACEROUTE_DEST_PORTS="33434:33523"
#
# Default policy is DENY
# Explicitly accept desired INCOMING & OUTGOING connections
# Remove all existing rules belonging to this filter
ipchains -F
# Clearing all current rules and user defined chains
ipchains -X
# Set the default policy of the filter to deny.
# Don't even bother sending an error message back.
ipchains -P input DENY
ipchains -P output DENY
ipchains -P forward DENY
#
# LOOPBACK
# Unlimited traffic on the loopback interface.
ipchains -A input -i $LOOPBACK_INTERFACE -j ACCEPT
ipchains -A output -i $LOOPBACK_INTERFACE -j ACCEPT
#
# Network Ghouls
# Deny access to jerks
# /etc/rc.d/rc.firewall.blocked contains a list of
# ipchains -A input -i $EXTERNAL_INTERFACE -s address -j DENY
# rules to block from any access.
# Refuse any connection from problem sites
#if [ -f /etc/rc.d/rc.firewall.blocked ]; then
# . /etc/rc.d/rc.firewall.blocked
#fi
#
# SPOOFING & BAD ADDRESSES
# Refuse spoofed packets.
# Ignore blatantly illegal source addresses.
# Protect yourself from sending to bad addresses.
# Refuse spoofed packets pretending to be from the external address.
ipchains -A input -i $EXTERNAL_INTERFACE -s $IPADDR -j DENY -l
# Refuse packets claiming to be to or from a Class A private network