Ubuntu The Complete Reference phần 8 pdf
Bạn đang xem bản rút gọn của tài liệu. Xem và tải ngay bản đầy đủ của tài liệu tại đây (13.08 MB, 75 trang )
496
Part VII: System Administration
The limit you set for a quota can be hard or soft. A hard limit will deny a user the ability
to exceed his or her quota, whereas a soft limit will just issue a warning. For the soft limit,
you can designate a grace period (up to 48 hours) during which time the user can reduce
her disk space below the limit. If the disk space still exceeds the limit after the grace period
expires, the user can be denied access to her account. For example, a soft limit is typically
75MB, whereas the hard limit could be 100MB.
The quota record begins with the hard disk device name and the blocks of memory and
inodes in use. The limits segments have parameters for soft and hard limits. If these entries
are 0, no limits are in place. You can set both hard and soft limits, using the hard limit as a
firm restriction. Blocks in Linux are currently about 1000 bytes. The inodes are used by files
to hold information about the memory blocks making up a file. To set the time limit for a
soft limit, use the edquota command with the -t option. The following example displays
the quota record for larisa:
Quotas for user larisa:
/dev/hda3: blocks in use: 9000, limits (soft = 40000, hard = 60000)
inodes in use: 321, limits (soft = 0, hard = 0)
repquota and quota
As the system administrator, you can use the repquota command to generate a summary
of disk usage for a specified file system, checking to see what users are approaching or
exceeding quota limits. repquota takes as its argument the file system to check; the -a
option checks all file systems. Here’s an example:
repquota /dev/hda1
Individual users can use the quota command to check memory use and determine how
much disk space is left in their quota. Table 22-6 shows the options for the command.
Lightweight Directory Access Protocol
The Lightweight Directory Access Protocol (LDAP) is designed to implement network-
accessible directories of information. In this context, the term directory is defined as a
database of primarily read-only, simple, small, widely accessible, and quickly distributable
information. It is not designed for transactions or updates. It is primarily used to provide
information about users on a network, such as their e-mail addresses or phone numbers.
Such directories can also be used for authentication purposes, identifying that a certain
quota Option Description
-g
Prints group quotas for the user’s group
-u
Prints the user’s quota
-v
Displays quotas on file systems where no storage is allocated
-q
Prints information on file systems where usage is over quota
T
ABLE 22-6 Options for quota
PART IPART IPART IPART IPART VII
Chapter 22: Managing Users
497
user belongs to a specified network. You can find out more information on LDAP at
.
You can think of an LDAP directory for users as an Internet-accessible phone book,
where anyone can look up your e-mail address or other information. In fact, it may be more
accurate to refer to such directories as databases of user information that are accessible over
networks such as the Internet. Normally, users on a local network are spread across several
different systems, and to obtain information about a particular user, you have to know what
system the user is on and then query that system. With LDAP, user information for all users
on a network is kept in the LDAP server, so you can query only the network’s LDAP server
to obtain information about a user. For example, Sendmail can use LDAP to look up user
addresses. You can also use Firefox or Netscape to query LDAP.
NOTE
NOTE LDAP is a directory access protocol to an X.500 directory service, the OSI Directory Service.
LDAP directories are implemented as clients and servers; you use an LDAP client to
access an LDAP server that manages the LDAP database. Ubuntu uses OpenLDAP, an
open-source version of LDAP (see www.openldap.org). OpenLDAP provides an LDAP
server (slapd), an LDAP replication server (slurpd), an LDAP client, and LDAP utilities.
On Ubuntu, you install the LDAP packages using the ldap-auth-config metapackage.
This package will also select and install the ldap-auth-client, libpam-ldap, and libnss-ldap
packages. For the LDAP server, you select the slapd package. If you are running Postfix
mail server, you may want to use postfix-ldap.
When installing ldap-auth-config, you are prompted to enter in the URI for the LDAP
server, the distinguishing name of the search base, and the version to use. You are then
prompted to specify whether the administrator on your system has administrative access to
the LDAP server and if the LDAP database requires a login. Then specify the LDAP account
for the root and the LDAP root account password.
For documentation of the LDAP server on Ubuntu, check the OpenLDAP Server entry
for your distribution at .
LDAP Configuration Files
All LDAP configuration files are kept in the /etc/ldap directory. These include slapd.conf,
the LDAP server configuration file, and ldap.conf, the LDAP clients and tools configuration
file. To enable the LDAP server, you have to edit the slapd.conf file manually and change
the domain value (dc) for the suffix and rootdn entries to your own network’s domain
address. This is the network that will be serviced by the LDAP server.
To enable LDAP clients and their tools, you must specify the correct domain address in
the ldap.conf file in the BASE option, along with the server’s address in the URI option
(domain name or IP address). For clients, this is the configuration information you entered
when installing the ldap-auth-config package. You can also edit the ldap.conf file directly.
See the ldap.conf man entry for detailed descriptions of LDAP options.
If you installed the LDAP server, you can start, stop, and restart the LDAP service using
the slapd script:
sudo /etc/init.d/slapd start
498
Part VII: System Administration
You can also have the LDAP servers started when your system starts up by checking the
LDAP Server entry in the services-admin tool: choose System | Administration | Services.
TIP
TIP Keep in mind that the /etc/ldap.conf and /etc/ldap/ldap.conf files are not the same. /etc/
ldap.conf is used to configure LDAP for the Name Service Switch and PAM support, whereas
/etc/ldap/ldap.conf is used for all LDAP clients.
Configuring the LDAP Server: /etc/ldap/slapd.conf
You configure the LDAP server with the /etc/ldap/slapd.conf file, where you will find
entries for loading schemas and for specifying access controls, the database directory, and
passwords. The file is commented in detail, with default settings for most options, although
you will have to enter settings for several. First you need to specify your domain suffix and
root domain manager. The default settings are shown here:
suffix "dc=my-domain,dc=com"
rootdn "cn=Manager,dc=my-domain,dc=com"
In the next example, the suffix is changed to mytrek, for mytrek.com. The rootdn
remains the same.
suffix "dc=mytrek,dc=com"
rootdn "cn=Manager,dc=mytrek,dc=com"
Next you will have to specify a password with rootpw. Entries are available for both
plain text and encrypted versions, and both are commented. Remove the comment for one.
In the following example, the plain text password option, secret, is used:
rootpw secret
# rootpw {crypt}ijFYNcSNctBYg
For an encrypted password, you can first create the encrypted version with slappasswd,
as shown next. This will generate a text encryption string for the password. Then copy the
generated encrypted string to the rootpw entry. On GNOME, you can simply cut and paste
from a terminal window to the /etc/ldap/slapd.conf file in Text Editor (Accessories). You
can also redirect the encrypted string to a file and read it in later. SSHA encryption is used
by default.
# slappasswd
New password:
Re-enter new password:
{SSHA}0a+szaAwElK57Y8AoD5uMULSvLfCUfg5
The rootpw root password entry should then look like this:
rootpw {SSHA}0a+szaAwElK57Y8AoD5uMULSvLfCUfg5
PART IPART IPART IPART IPART VII
Chapter 22: Managing Users
499
Use the password you entered at the slappasswd prompt to access your LDAP
directory.
The configuration file also lists the schemas to be used. Schemas are included with the
include directive:
include /etc/ldap/schema/core.schema
include /etc/ldap/schema/cosine.schema
include /etc/ldap/schema/inetorgperson.schema
include /etc/ldap/schema/nis.schema
NOTE
NOTE LDAP supports the Simple Authentication and Security Layer (SASL) for secure
authentication with methods such as MD5 and Kerberos.
LDAP Directory Database: ldif
A record (also known as entry) in an LDAP database begins with a name, known as a
distinguishing name, followed by a set of attributes and their values. The distinguishing
name uniquely identifies the record. For example, a name could be a username and the
attribute would be the user’s e-mail address, the address being the attribute’s value.
Allowable attributes are determined by schemas defined in the /etc/ldap/schema directory.
This directory will hold various schema definition files, each with a schema extension. Some
will be dependent on others, enhancing their supported classes and attributes. The basic core
set of attributes is defined in the core.schema file. Here you will find definitions for attributes
such as country name and street address. Other schemas, such as inetorgperson.schema,
specify core.schema as a dependent schema, making its attributes available to the classes.
The inetOrgPerson schema will also define its own attributes such as jpegPhoto for a
person’s photograph.
Schema Attributes and Classes
Attributes and classes are defined officially by RFC specifications that are listed with each
attribute and class entry in the schema files. These are standardized definitions and should
not be changed. Attributes are defined by an attributetype definition. Each is given a
unique identifying number followed by a name by which it can be referenced. Fields
include the attribute description (DESC), search features such as EQUALITY and SUBSTR,
and the object identifier (SYNTAX). See the OpenLDAP administrative guide for a detailed
description.
attributetype ( 2.5.4.9 NAME ( 'street' 'streetAddress' )
DESC 'RFC2256: street address of this object'
EQUALITY caseIgnoreMatch
SUBSTR caseIgnoreSubstringsMatch
SYNTAX 1.3.6.1.4.1.1466.115.121.1.15{123} )
A class defines the kind of database (directory) you can create. This will specify the kinds of
attributes you can include in your records. Classes can be dependent, where one class becomes
and extension of another. The class most often used for LDAP databases is inetOrgPerson,
defined in the inetOrgPerson.schema file, shown next. The term inetOrgPerson stands for
Internet Organization Person, as many LDAP directories perform Internet tasks. The class is
500
Part VII: System Administration
derived from the organizationalPerson class defined in core.schema, which includes the
original attributes for commonly used fields such as street address and name.
# inetOrgPerson
# The inetOrgPerson represents people who are associated with an
# organization in some way. It is a structural class and is derived
# from the organizationalPerson which is defined in X.521 [X521].
objectclass ( 2.16.840.1.113730.3.2.2
NAME 'inetOrgPerson'
DESC 'RFC2798: Internet Organizational Person'
SUP organizationalPerson
STRUCTURAL
MAY (
audio $ businessCategory $ carLicense $ departmentNumber $
displayName $ employeeNumber $ employeeType $ givenName $
homePhone $ homePostalAddress $ initials $ jpegPhoto $
labeledURI $ mail $ manager $ mobile $ o $ pager $
photo $ roomNumber $ secretary $ uid $ userCertificate $
x500uniqueIdentifier $ preferredLanguage $
userSMIMECertificate $ userPKCS12 )
)
You can create your own classes, building on the standard ones already defined. You can
also create your own attributes, but each attribute will require a unique object identifier (OID).
Distinguishing Names
Data in an LDAP directory is organized hierarchically, from general categories to specific
data. So, for example, an LDAP directory can be organized starting with countries,
narrowing to states, then organizations and their subunits, and finally individuals.
Commonly, LDAP directories are organized along the lines of Internet domains. In this
format, the top category is the domain name extension, such as .com or .ca. The directory
then breaks down to the network (organization), units, and finally users.
This organization helps define distinguishing names that will identify the LDAP records.
In a network-based organization, the top-level organization is defined by a domain component
specified by the dcObject class, which includes the domainComponent (dc) attribute.
Usually you define the network and extension as domain components to make up the top-level
organization that becomes the distinguishing name for the database itself. Here’s an example:
dc=mytrek, dc=com
Under the organization name is an organizational unit, such as users. These are defined
as an organizationalUnitName (ou), which is part of the organizationalUnit class.
The distinguishing name for the user’s organizational unit would be
ou=users, dc=mytrek, dc=com
Under the organizational unit you can then have individual users. Here the username is
defined with the commonName (cn) attribute, which is used in various classes, including
Person, which is part of organizationalPerson, which in turn is part of inetOrgPerson.
The distinguishing name for the user dylan is then
cn=dylan,ou=users,dc=mytrek,dc=com
PART IPART IPART IPART IPART VII
Chapter 22: Managing Users
501
LDIF Entries
Database entries are placed in an LDAP Interchange Format (LDIF) file. This format provides
a global standard that allows a database to be accessed by any LDAP-compliant client. An
LDIF file is a simple text file with an .ldif extension placed in the /etc/ldap directory. The
entries for an LDIF record consist of a distinguishing name or attribute followed by a colon
and its list of values. Each record begins with a distinguishing name to uniquely identify the
record. Attributes then follow. You can think of the name as a record and the attributes as
fields in that record. You end the record with an empty line.
Adding the Records
Once you have created your LDIF file, you can then use the ldapadd command to add the
records to you LDAP directory. Use the -D option to specify the directory in which to add
the records and the -f option to specify the LDIF file to read from. You could use ldapadd
to enter fields directly. The -x option says to use simple password access, the -W will prompt
for the password, and the -D option specifies the directory manager:
ldapadd -x -D "cn=Manager,dc=mytrek,dc=com" -W -f mytrek.ldif
Searching LDAP
Once you have added your records, you can use the ldapsearch command to search your
LDAP directory. The -x and -W options provide simple password access, and the -b option
specifies the LDAP database to use. Following the options are the attributes to search for, in
this case the street attribute:
ldapsearch -x -W -D 'cn=Manager,dc=mytrek,dc=com' -b 'dc=mytrek,dc=com' street
If you want to see all the records listed in the database, you can use the same search
command without any attributes.
LDAP Tools
To make or change entries in the LDAP database, you use the ldapadd and ldapmodify
utilities (ldap-utils package, Ubuntu main repository). With ldapdelete, you can remove
entries. Once you have created an LDAP database, you can then query it, through the LDAP
server, with ldapsearch. For the LDAP server, you can create a text file of LDAP entries
using the LDAP Data Interchange Format (LDIF). Such text files can then be read in all at
once to the LDAP database using the slapadd tool. The slapcat tool extracts entries from
the LDAP database and saves them in an LDIF file. To reindex additions and changes, you use
the slapindex utility. See the LDAP HOWTO at the Linux Documentation Project for details
on using and setting up LDAP databases such as address books ().
Pluggable Authentication Modules
Pluggable Authentication Modules (PAM) is an authentication service that lets a system
determine the method of authentication to be performed for users. In a Linux system,
authentication has traditionally been performed by looking up passwords. When a user logs
in, the login process looks up the user’s password in the password file. With PAM, users’
502
Part VII: System Administration
requests for authentication are directed to PAM, which in turn uses a specified method to
authenticate the user. This could be a simple password lookup or a request to an LDAP
server, but it is PAM that provides authentication, not a direct password lookup by the user
or application. In this respect, authentication becomes centralized and controlled by a
specific service, PAM. The actual authentication procedures can be dynamically configured
by the system administrator. Authentication is carried out by modules that can vary
according to the kind of authentication needed. An administrator can add or replace
modules by simply changing the PAM configuration files. See the PAM Web site at
for more information and a listing of PAM modules.
PAM modules are located in the /lib/security directory.
PAM modules will usually have their own man pages that list options that can be used
for particular modules. Some of the more commonly used are pam_unix (password check),
pam_deny (lock out), pam_env (PAM environment variables), and pam_group (check
group membership). The following command in a terminal window will display the man
page for pam_unix:
man pam_unix
PAM Configuration Files
PAM uses different configuration files for different services that request authentication.
Such configuration files are kept in the /etc/pam.d directory. For example, you have a
configuration file for logging in to your system (/etc/pam.d/login), one for the graphical
login (/etc/pam.d/gdm), and one for accessing your Samba server (/etc/pam.d/samba). A
default PAM configuration file, called /etc/pam.d/other, is invoked if no services file is
present. The system-auth file contains standard authentication modules for system services.
PAM Modules
A PAM configuration file contains a list of modules to be used for authentication. They have
the following format:
module-type control-flag module-path module-args
The module-path is the module to be run, and module-args are the parameters you want
passed to that module. Though a few generic arguments can be used, most modules have
their own specific ones. The module-type refers to different groups of authentication
management: account, authentication, session, and password. The account management
performs account verification, checking such account aspects as whether the user has access
or whether the password has expired. Authentication (auth) verifies who the user is,
usually through a password confirmation. Password management performs authentication
updates such as password changes. Session management refers to tasks performed before a
service is accessed and before it is shut down. These include tasks such as initiating a log of
a user’s activity or mounting and unmounting home directories.
TIP
TIP As an alternative to the /etc/pam.d directory, you can create one configuration file called the
/etc/pam.conf file. Entries in this file have a service field, which refers to the application for which
the module is used. If the /etc/pam.d directory exists, /etc/pam.conf is automatically ignored.
PART IPART IPART IPART IPART VII
Chapter 22: Managing Users
503
The control-flag field indicates how PAM is to respond if the module fails. The control
can be a simple directive or a more complicated response that can specify return codes such
as open_err with actions to take. The simple directives are requisite, required,
sufficient, and optional. The requisite directive ends the authentication process
immediately if the module fails to authenticate. The required directive ends the
authentication only after the remaining modules are run. The sufficient directive
indicates that success of this module is enough to provide authentication unless a previous
required module has failed. The optional directive indicates the module’s success is not
needed unless it is the only authentication module for its service. If you specify return
codes, you can refine the conditions for authentication failure or success. Return codes can
be given values such as die or ok. The open_err return code could be given the action
die, which stops all authentication and returns failure.
On Ubuntu, commonly used PAM module entries are placed in the PAM files prefixed
with the common term. These include common-account, common-auth, common-password,
and common-session. The common-account modules are used to verify that the user has
a valid account on the system. The common-session modules provide support for login
sessions. The common-auth modules provide system authentication. The common-password
modules check passwords. The common-account modules include pam_unix.so (Unix
password authentication), pam_ldap.so (LDAP server authentication), and pam_deny.so
(deny access):
account sufficient pam_unix.so
account sufficient pam_ldap.so
account required pam_deny.so
The common-password modules will also include options for password length, retries,
and shadow passwords. Check the man pages for each to see their options, including
pam_cracklib:
password required pam_cracklib.so difok=2 minlen=8 dcredit=2
ocredit=2 retry=3
password sufficient pam_unix.so nullok md5 shadow use_authtok
password sufficient pam_ldap.so use_first_pass
password required pam_deny.so
A common PAM file is included in a PAM configuration file with the @include command:
@include common-account
The /etc/pam.d/vsftpd configuration file for the FTP server is shown next. The pam_listfile
module allows a particular file to be used for authentication, in this case, /etc/ftpusers. The
deny setting for the sense option will set up /etc/ftpusers to deny access to any users listed
there. The pam_shells module checks for a valid login shell. See the man pages for each for
more details and options.
auth required pam_listfile.so item=user sense=deny file=/etc/ftpusers
onerr=succeed
@include common-account
@include common-session
@include common-auth
auth required pam_shells.so
This page intentionally left blank
23
File Systems
F
iles reside on physical storage devices such as hard drives, CD-ROMs, or floppy disks.
The files on each storage device are organized into a file system, and the storage
devices on your Linux system are presented as a collection of file systems that you can
manage. When you want to add a new storage device, you need to format it as a file system
and then attach it to your Linux file structure. Hard drives can be divided into separate
storage devices called partitions, each of which has its own file system. You can perform
administrative tasks on your file systems, such as backing them up, attaching or detaching
them from your file structure, formatting new devices or erasing old ones, and checking a
file system for problems.
To access files on a device, you attach its file system to a specified directory. This is
called mounting the file system. For example, to access files on a floppy disk, you first mount
its file system to a particular directory. With Linux, you can mount a number of different
types of file systems. You can even access a Windows hard drive partition or tape drive, as
well as file systems on a remote server.
Recently developed file systems for Linux now support journaling, which allows your
system to recover from a crash or interruption easily. The ext3, ReiserFS, XFS, and Journaled
File System (JFS) from IBM maintain a record of file and directory changes, called a journal,
which can be used to recover files and directories in use when a system suddenly crashes
due to unforeseen events such as power interruptions. Most distributions currently use the
ext3 file system as their default, though you also have the option of using ReiserFS or JFS,
an independently developed journaling system.
Your Linux system is capable of handling any number of storage devices that are
connected to it. You can configure your system to access multiple hard drives, partitions on
a hard drive, CD-ROM discs, DVDs, floppy disks, and even tapes. You can elect to attach
these storage components manually or have them automatically mount when you boot.
Automatic mounts are handled by configuring the /etc/fstab file. For example, the main
partitions holding your Linux system programs are automatically mounted whenever you
boot, whereas a floppy disk can be manually mounted when you put one in your floppy
drive, though even these can also be automatically mounted. Removable storage devices
such as CD-ROMs, as well as removable devices such as USB cameras and printers, are now
handled by udev and the Hardware Abstraction Layer (HAL), as described in Chapter 25
and partially discussed here.
505
CHAPTER
Copyright © 2009 by The McGraw-Hill Companies. Click here for terms of use.
506
Part VII: System Administration
File Systems and Directory Trees
Although all the files in your Linux system are connected into one overall directory tree,
parts of that tree may reside on different storage devices such as hard drives or CD-ROMs.
Files on a particular storage device are organized into file systems, formatted devices with
their own trees of directories and files. Your Linux directory tree may encompass several file
systems, each on different storage devices. On a hard drive with several partitions, a file
system exists for each partition. The files themselves are organized into one seamless tree of
directories, beginning from the root directory. For example, if you attach a CD-ROM to your
system, a pathname will lead directly from the root directory on your hard disk partition’s
file system to the files in the CD-ROM file system.
TIP
TIP With Linux you can mount file systems of different types, including those created by other
operating systems, such as Windows, IBM OS, Unix, and SGI. Within Linux a variety of file
systems are supported, including several journaling systems such as ReiserFS and ext3.
A file system has its files organized into its own directory tree. You can think of this as a
subtree that must be attached to the main directory tree. The tree remains separate from your
system’s directory tree until you specifically connect it. For example, a floppy disk with Linux
files has its own tree of directories. You need to attach this subtree to the main tree on your
hard drive partition. Until they are attached, you cannot access the files on your floppy disk.
File System Hierarchy Standard
Linux organizes its files and directories into one overall interconnected tree, beginning from
the root directory and extending down to system and user directories. The organization and
layout for the system directories are determined by the Filesystem Hierarchy Standard
(FHS). The FHS provides a standardized layout that all Linux distributions should follow in
setting up their system directories. For example, an /etc directory must exist to hold
configuration files and a /dev directory to hold device files. You can find out more about
FHS, including the official documentation, at Linux
distributions, developers, and administrators all follow the FHS to provide a consistent
organization to the Linux file system.
Linux uses a number of specifically named directories for specialized administrative
tasks. All these directories are at the very top level of your main Linux file system, the file
system root directory, represented by a single slash, /. For example, the /dev directory holds
device files, and the /home directory holds the user home directories and all their user files.
You have access to these directories and files only as the system administrator (though users
normally have read-only access). You need to log in as the root user, placing yourself in a
special root user administrative directory called /root. From here, you can access any
directory on the Linux file system, both administrative and user.
Root Directory: /
The subdirectories held in the root directory, /, are listed in Table 23-1 along with other
useful subdirectories. Directories that you may commonly access as an administrator are the
/etc directory, which holds configuration files; the /dev directory, which holds dynamically
PART IPART IPART IPART IPART VII
Chapter 23: File Systems
507
generated device files; and the /var directory, which holds server data files for DNS, web,
mail, and FTP servers, along with system logs and scheduled tasks. For managing different
versions of the kernel, you may need to access the /boot and /lib/modules directories as
well as /usr/src/linux. The /boot directory holds the kernel image files for any new kernels
you install, and the /lib/modules directory holds modules for your different kernels.
Directory Function
/ Begins the file system structure—the root
/bin Holds the essential user commands and utility programs
/boot Holds the kernel image files and associated boot information and files
/dev Holds dynamically generated file interfaces for devices such as the terminal
and the printer (see Chapter 25)
/etc Holds system configuration files and any other system files
/etc/opt Holds system configuration files for applications in /opt
/etc/X11 Holds system configuration files for the X Window System and its
applications
/home Contains users’ home directories
/lib Holds essential shared libraries and kernel modules
/lib/modules Holds the kernel modules
/media Holds directories for mounting media-based removable file systems,
such as CD-ROMs, floppy disks, USB card readers, and digital cameras,
and automatically detected and mounted local partitions, including NTFS
partitions
/mnt Holds directories for additional file systems such as hard disks
/opt Holds added software applications (for example, KDE on some
distributions)
/proc Process directory, a memory-resident directory that contains files used to
provide information about the system
/sbin Holds administration-level commands and commands used by the root user
/sys Holds the sysfs file system for kernel objects, listing supported kernel
devices and modules
/tmp Holds temporary files
/usr Holds those files and commands used by the system; this directory breaks
down into several subdirectories
/var Holds files that vary, such as mailbox, web, and FTP files
T
ABLE 23-1 Linux File System Directories
508
Part VII: System Administration
System Directories
Your Linux directory tree contains certain directories whose files are used for different
system functions. For basic system administration, you should be familiar with the system
program directories where applications are kept, the system configuration directory (/etc)
where most configuration files are placed, and the system log directory (/var/log) that holds
the system logs, recording activity on your system. Both are covered in detail in this chapter.
Table 23-2 lists the system directories.
Program Directories
Directories with bin in the name are used to hold programs. The /bin directory holds basic user
programs, such as login, shells (BASH, TCSH, and zsh), and file commands (cp, mv, rm, ln,
and so on). The /sbin directory holds specialized system programs for such tasks as file system
management (fsck, fdisk, mkfs) and system operations such as shutdown and startup
(init). The /usr/bin directory holds program files designed for user tasks. The /usr/sbin
Directory Description
/bin Holds system-related programs
/dev Holds device files
/etc Holds configuration files for system and network services and
applications
/etc/udev Holds configuration for device files
/home Holds user home directories and server data directories, such as Web
site and FTP site files
/lib Holds system libraries
/media Where removable media file systems such as CD-ROMs, USB drives,
and floppy disks are mounted
/sbin Holds system programs for specialized tasks
/sys Holds the sysfs file system with device information for kernel-supported
devices on your system
/tmp Holds system temporary files
/usr Holds user-related programs and files; includes several key
subdirectories, such as /usr/bin, /usr/X11, and /usr/share/doc
/usr/share/hal Holds configuration for HAL removable devices
/usr/bin Holds programs for users
/usr/share Holds shared files
/usr/share/doc Holds documentation for applications
/usr/X11 Holds X Window System configuration files
/var Holds system directories whose files continually change, such as logs,
printer spool files, and lock files
T
ABLE 23-2 System Directories
PART IPART IPART IPART IPART VII
Chapter 23: File Systems
509
directory holds user-related system operation, such as useradd for adding new users. The
/lib directory holds all the libraries your system uses, including the main Linux library, libc,
and subdirectories such as modules, which holds all the current kernel modules.
Configuration Directories and Files
When you configure different elements of your system, such as user accounts, applications,
servers, or network connections, you make use of configuration files kept in certain system
directories. Configuration files are placed in the /etc directory.
The /usr Directory
The /usr directory contains a multitude of important subdirectories used to support users,
providing applications, libraries, and documentation. The /usr/bin directory holds numerous
user-accessible applications and utilities; /usr/sbin holds user-accessible administrative
utilities. The /usr/share directory holds architecture-independent data that includes an
extensive number of subdirectories, including those for documentation, such as man, info,
and doc files. Table 23-3 lists the subdirectories of the /usr directory.
The /media Directory
The /media directory is used for mountpoints (the directories in the file structure to which
the new file systems are attached) for removable media such as CD-ROM, DVD, floppy, or
Zip drives, as well as for other media-based file systems such as USB card readers, cameras,
and MP3 players. These are file systems you may be changing frequently, unlike partitions
on fixed disks. Most Linux systems use HAL to dynamically manage the creation,
mounting, and device assignment of these devices. As instructed by HAL, this tool will
create floppy, CD-ROM, storage card, camera, and MP3 player subdirectories in /media as
needed. The default subdirectory for mounting is /media/disk. Additional drives have
a number attached to their name.
Directory Description
/usr/bin Holds most user commands and utility programs
/usr/sbin Holds administrative applications
/usr/lib Holds libraries for applications, programming languages, desktops, and so on
/usr/games Holds games and educational programs
/usr/include Holds C programming language header files (.h)
/usr/doc Holds Linux documentation
/usr/local Holds locally installed software
/usr/share Holds architecture-independent data such as documentation and
configuration files
/usr/src Holds source code, including the kernel source code
/usr/X11R6 Holds X Window System–based applications and libraries
T
ABLE 23-3 /usr Directories
510
Part VII: System Administration
The /mnt Directory
The /mnt directory is usually used for mountpoints for other mounted file systems such as
Windows partitions. You can create directories for any partitions you want to mount, such
as /mnt/windows for a Windows partition.
The /home Directory
The /home directory holds user home directories. When a user account is set up, a home
directory is set up here for that account, usually with the same name as the user. As the
system administrator, you can access any user’s home directory, so you have control over
that user’s files.
The /var Directory
The /var directory holds subdirectories for tasks whose files change frequently, such as lock
files, log files, web server files, or printer spool files. For example, the /var directory holds
server data directories, such as /var/www for the Apache web server Web site files or /var/
named for the DNS server. The /tmp directory is simply a directory to hold any temporary
files programs that may be needed to perform a particular task.
The /var directories are designed to hold data that changes with the normal operation of
the Linux system. For example, spool files for documents that you are printing are kept
here. A spool file is created as a temporary printing file and is removed after printing. Other
files, such as system log files, are changed constantly. Table 23-4 lists the subdirectories of
the /var directory.
The /proc File System
The /proc file system is a special file system that is generated in system memory. It does not
exist on any disk. /proc contains files that provide important information about the state of
your system. For example, /proc/cpuinfo holds information about your computer’s CPU
processor, /proc/devices lists those devices currently configured to run with your kernel,
/proc/filesystems lists the file systems, and /proc files are really interfaces to the kernel,
obtaining information from the kernel about your system. Table 23-5 lists the /proc
subdirectories and files.
Like any file system, /proc has to be mounted. The /etc/fstab file will have a special
entry for /proc with a file system type of proc and no device specified:
none /proc proc defaults 0 0
TIP
TIP You can use sysctl, the Kernel Tuning tool, to set proc file values you are allowed to change,
such as the maximum number of files, or to turn on IP forwarding.
The sysfs File System: /sys
The sysfs file system is a virtual file system that provides a hierarchical map of your kernel-
supported devices such as PCI devices, buses, and block devices, as well as supporting kernel
modules. The classes subdirectory will list all your supported devices by category, such as
network and sound devices. With sysfs your system can easily determine the device file with
which a particular device is associated. This is very helpful for managing removable devices
PART IPART IPART IPART IPART VII
Chapter 23: File Systems
511
as well as dynamically configuring and managing devices as HAL and udev do. The sysfs file
system is used by udev to generate needed device files dynamically in the /dev directory, as well
as by HAL to manage removable device files and support as needed (HAL technically provides
information only about devices, though it can use tools to change configurations dynamically
as needed). The /sys file system type is sysfs. The /sys subdirectories organize your devices
into different categories. The file system is used by systool to display a listing of your installed
devices. The following example will list all your system devices:
systool
Like /proc, the /sys directory resides only in memory, but you still need to mount it in
the /etc/fstab file:
none /sys sysfs defaults 0 0
Device Files: /dev, udev, and HAL
To mount a file system, you have to specify its device name. The interfaces to the devices that
may be attached to your system are provided by special files known as device files. The names
of these device files are the device names. Device files are located in the /dev directories and
Directory Description
/var/account Processes accounting logs
/var/cache Holds application cache data for man pages, web proxy data, fonts, or
application-specific data
/var/crash Holds system crash dumps
/var/games Holds varying games data
/var/lib Holds state information for particular applications
/var/local Holds data that changes for programs installed in /usr/local
/var/lock Holds lock files that indicate when a particular program or file is in use
/var/log Holds log files such as /var/log/messages that contain all kernel and
system program messages
/var/mail Holds user mailbox files
/var/named Holds DNS server domain configuration files
/var/opt Holds variable data for applications installed in /opt
/var/run Holds information about the system’s running processes
/var/spool Holds applications’ spool data such as that for mail, news, and printer
queues, as well as
cron and at jobs
/var/tmp Holds temporary files that should be preserved between system reboots
/var/www Holds web server Web site files
T
ABLE 23-4 /var Subdirectories
512
Part VII: System Administration
usually have abbreviated names ending with the number of the device. For example, fd0
may reference the first floppy drive attached to your system. The prefix sd references both
Serial ATA (SATA) and SCSI hard drives, so sda2 would reference the second partition on the
first SATA or SCSI hard drive. In most cases, you can use the man command with a prefix to
obtain more detailed information about this kind of device. For example, man sd displays
the man pages for SCSI devices. A complete listing of all device names can be found in the
devices file located in the linux/doc/device-list directory at the Web site.
Table 23-6 lists several commonly used device names.
NOTE
NOTE Most newer systems use only Serial ATA (SATA) hard drives and CD/DVD drives. These
will have the prefixes sd and scd. The older IDE drives with the hd prefix are rarely used.
udev and HAL
Device files are no longer handled in a static way; they are now dynamically generated as
needed. Previously a device file was created for each possible device, leading to a very large
number of device files in the /etc/dev directory. Now your system detects only those devices
it uses and creates device files for them, resulting in a much smaller listing of device files.
File Description
/proc/num Each process is held in a directory that’s labeled by its number:
/proc/1 is the directory for process 1, for example
/proc/cpuinfo Contains information about the CPU, such as its type, make, model,
and performance
/proc/devices Lists the device drivers configured for the currently running kernel
/proc/dma Displays the Direct Memory Access (DMA) channels currently used
/proc/filesystems Lists file systems configured into the kernel
/proc/interrupts Displays the interrupts in use
/proc/ioports Shows the I/O ports in use
/proc/kcore Holds an image of the physical memory of the system
/proc/kmsg Contains messages generated by the kernel
/proc/loadavg Lists the system load average
/proc/meminfo Displays memory usage
/proc/modules Lists the kernel modules currently loaded
/proc/net Lists status information about network protocols
/proc/stat Contains system operating statistics, such as page fault occurrences
/proc/uptime Displays the time the system has been up
/proc/version Displays the kernel version
T
ABLE 23-5 /proc Subdirectories and Files
PART IPART IPART IPART IPART VII
Chapter 23: File Systems
513
The tool used to detect and generate device files is udev, user devices. Each time your system
is booted, udev will automatically detect your devices and generate device files for them in
the /etc/dev directory. This means that the /etc/dev directory and its files are re-created each
time you boot. It is a dynamic directory, no longer static. To manage these device files, you
need to use udev configuration files located in the /etc/udev directory. This means that udev
is also able to manage all removable devices dynamically; udev will generate and configure
device files for removable devices as they are attached and then remove these files when
the devices are removed. In this sense, all devices are now considered hotplugged, with fixed
devices simply being hotplugged devices that are never removed.
As /etc/dev is now dynamic, any changes you would make manually to the /etc/dev
directory will be lost when you reboot. This includes the creation of any symbolic links such
as /dev/cdrom that many software applications use. Instead, such symbolic links have to be
Device Name Description
hd IDE hard drives (rarely used on new systems)
fd Floppy disks
sd Serial ATA (SATA) and SCSI hard drives, SATA drives are standard on
new systems
ht IDE tape drives
js Analog joysticks
lp Printer ports
md RAID devices
midi Midi ports
nst SCSI tape drives, no rewind
pty Pseudoterminals (used for remote logins)
scd Serial ATA and SCSI CD-ROM drives
st SCSI tape drives
tty Terminals
ttyS Serial ports
cdrecorder Links to your CD-R or CD-RW device file, set in /etc/udev/rules.d
cdrom Links to your CD-ROM device file, set in /etc/udev/rules.d
floppy Links to your floppy device file, set in /etc/udev/rules.d
modem Links to your modem device file, set in /etc/udev/rules.d
rd/cndn The directory that holds RAID devices is rd; cn is the RAID controller
and dn is the RAID disk for that controller
scanner Links to your scanner device file, set in /etc/udev/rules.d
tape Links to your tape device file, set in /etc/udev/rules.d
T
ABLE 23-6 Device Name Prefixes
514
Part VII: System Administration
configured using udev rules listed in configuration files located in the /etc/udev/rules.d
directory. Default rules are already in place for symbolic links, but you can create rules of
your own. See Chapter 25 for more details.
In addition to udev, information about removable devices such as CD-ROMs and floppy
disks, along with cameras and USB printers, used by applications such as the desktop to
interface dynamically with them, is managed by HAL, a separate utility. HAL allows a
removable device to be recognized no matter what particular connections it may be using.
For example, you can attach a USB printer in one USB port at one time and then switch it to
another later. The fstab file is edited using the fstab-sync tool, which is invoked by HAL
rules in configuration files in /usr/share/hal/fdi directory.
HAL has a key impact on the /etc/fstab file used to manage file systems. No longer are
entries maintained in the /etc/fstab file for removable devices such as a CD-ROM. These
devices are managed directly by HAL using its set of storage callouts such as hal-system-
storage-mount to mount a device or hal-system-storage-eject to remove one. In effect, you
now have to use the HAL device information files to manage your removable file systems.
Should you want to bypass HAL and manually configure a CD-ROM device, you simply
place an entry for it in the /etc/fstab file.
Floppy and Hard Disk Devices
The device name for your floppy drive is fd0; it is located in the directory /dev. /dev/fd0
references your floppy drive. Notice the numeral 0 after fd. If you have more than one
floppy drive, additional drives are represented by fd1, fd2, and so on.
IDE hard drives use the prefix hd, whereas SATA and SCSI hard drives use the prefix sd.
RAID devices, on the other hand, use the prefix md. The prefix for a hard disk is followed
by a letter that labels the hard drive and a number for the partition. For example, hda2
references the second partition on the first IDE hard drive, where the first hard drive is
referenced with the letter a, as in hda. The device sdb3 refers to the third partition on the
second SATA hard drive (sdb). RAID devices, however, are numbered from 0, like floppy
drives. Device md0 references the first RAID device, and md1 references the second. On an
IDE hard disk device, Linux supports up to four primary IDE hard disk partitions,
numbered 1 through 4. You are allowed any number of logical partitions. To find the device
name, you can use df to display your hard partitions, examine the /etc/fstab file, or run the
GNOME Partition Manager (GParted).
NOTE
NOTE GNOME now manages all removable media directly with HAL, instead of using fstab entries.
CD-ROM Devices
The device name for your CD-ROM drive varies depending on the type of CD-ROM you use.
The device name for an IDE CD-ROM has the same prefix as an IDE hard disk partition, hd,
and is identified by a following letter that distinguishes it from other IDE devices. For
example, an IDE CD-ROM connected to your secondary IDE port may have the name hdc.
An IDE CD-ROM connected as a slave to the secondary port may have the name hdd. The
actual name is determined when the CD-ROM is installed, as happened when you installed
your Linux system. Serial ATA and SCSI CD-ROM drives use a different nomenclature for
their device names. They begin with scd for SATA or SCSI CD/DVD-ROM and are followed
by a distinguishing number. For example, the name of a SATA CD-ROM could be scd0 or
scd1. The name of your CD-ROM was determined when you installed your system.
PART IPART IPART IPART IPART VII
Chapter 23: File Systems
515
As noted previously, CD-ROM devices are now configured by HAL. HAL does this in a
device information file in its policy configuration directory. To configure a CD-ROM device,
such as by adding user mount capability, you need to configure its entry in the storage-
methods.fdi configuration file (see Chapter 25 for details). The GNOME Volume Manager
uses HAL and udev to access removable media directly and Samba to provide Windows
networking support. Media are mounted by gnome-mount, a wrapper for accessing HAL
and udev, which perform the mount (/etc/fstab is no longer used).
Mounting File Systems
Attaching a file system on a storage device to your main directory tree is called mounting the
device. The file system is mounted to an empty directory on the main directory tree. You
can then change to that directory and access those files. If the directory does not yet exist,
you have to create it. The directory in the file structure to which the new file system is
attached is the mountpoint. So, for example, to access files on a CD-ROM, you first have to
mount the CD-ROM.
Mounting fixed file systems like internal hard disks can normally be done only as the
root user. This is a system administration task and should not usually be performed by a
regular user. Removable media, though, such as CD/DVD-ROMs and USB drives, are user
mountable, and any user could mount a CD-ROM or USB drive.
Even the file systems on your hard disk partition must be explicitly mounted. When
you install your Linux system and create the Linux partition on your hard drive, however,
your system is automatically configured to mount your main file system whenever it
starts. When your system shuts down, the file systems are automatically unmounted. You
have the option of unmounting any file system, removing it from the directory tree, and
possibly replacing it with another, as is the case when you replace a CD-ROM.
Once a file system is actually mounted, an entry for it is made by the operating system
in the /etc/mstab file. Here you will find listed all file systems currently mounted.
File System Information
The file systems on each storage device are formatted to take up a specified amount of space.
For example, you may have formatted your hard drive partition to take up 3GB. Files installed
or created on that file system take up part of the space, while the remainder is available for
new files and directories. To find out how much space you have free on a file system, you can
use the df command or, on the desktop, either the GNOME System Monitor, the Disk Usage
Analyzer, or the KDE KDiskFree utility. KDiskFree displays a list of devices, showing how
much space is free on each partition and the percentage used.
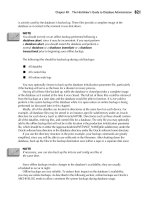
For the GNOME System Monitor (System | Administration | System Monitor), click the
File Systems tab to display a list of the free space on your file systems (see Figure 23-1). The
System Monitor will show the mountpoint (Directory), the file system type (Type), the
amount of available space, and the amount of space used (Used) with a percentage graph.
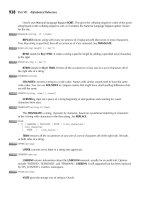
Disk Usage Analyzer
The disk usage analyzer (Baobob) lets you see how much disk space is used and available
on all your mounted hard disk partitions (see Figure 23-2). It will also check all mounted
Logical Volume Manager (LVM) and RAID arrays. Access it by choosing Applications |
Accessories | Disk Usage Analyzer. Usage is shown in simple graph, which shows you how
516
Part VII: System Administration
much overall space is available and where it is. When you scan the file system (by clicking
the Scan Filesystem button on the toolbar), disk usage for all your directories is analyzed
and displayed in the left pane and on a graph in the right pane. Passing your mouse over a
section in the graph will display its directory name and disk usage. In the left-hand listing,
each files system is first shown with a graph for its usage, as well as its size and number of
top-level directories and files. Expanding to the subdirectories, you can select one to show a
graph for just its size and contents.
From the Analyzer menu, you can scan just your home folder, a specific folder on your
system, or a folder on a remote file system. The remote folders options lets you scan
directories on FTP sites, Windows shares (Samba), or WebDAV accessible directories.
df
The df command reports file system disk space usage. It lists all your file systems by their
device names, how much disk space they take up, and the percentage of the disk space
used, as well as where they are mounted. With the -h option, it displays information in a
more readable format, such as measuring disk space in megabytes instead of memory
blocks. The df command is also a safe way to obtain a listing of all your partitions, instead
FIGURE 23-1 GNOME System Monitor, File Systems tab
PART IPART IPART IPART IPART VII
Chapter 23: File Systems
517
of using fdisk (because with fdisk you can erase partitions). df shows only mounted
partitions, however, whereas fdisk shows all partitions. Here’s an example:
$ df -h
Filesystem Size Used Avail Use% Mounted on
/dev/hda3 9.7G 2.8G 6.4G 31% /
/dev/hda2 99M 6.3M 88M 7% /boot
/dev/hda2 22G 36M 21G 1% /home
/dev/hdc 525M 525M 0 100% /media/disk
You can also use df to tell you to what file system a given directory belongs. Enter df
with the directory name or df . for the current directory:
$ df .
Filesystem 1024-blocks Used Available Capacity Mounted on
/dev/hda3 297635 169499 112764 60% /
e2fsck and fsck
To check the consistency of the file system and repair it if it is damaged, you can use file
system checking tools. fsck checks and repairs a Linux file system. e2fsck is designed to
support ext2 and ext3 file systems, whereas the more generic fsck also works on any other
file systems. The ext2 and ext3 file systems are the file systems normally used for Linux
hard disk partitions and floppy disks. Linux file systems are normally ext3, which you use
FIGURE 23-2 Disk Usage Analyzer
518
Part VII: System Administration
e2fsck to check. fsck and e2fsck take as their argument the device name of the hard
disk partition that the file system uses:
fsck device-name
Before you check a file system, be sure that the file system is unmounted. e2fsck
should not be used on a mounted file system. To use e2fsck, enter e2fsck and the device
name that references the file system. The -p option automatically repairs a file system
without first requesting approval from the user for each repair task. The following examples
check the disk in the floppy drive and the primary hard drive:
# e2fsck /dev/fd0
# e2fsck /dev/hda1
With fsck, the -t option lets you specify the type of file system to check, and the -a
option automatically repairs systems, whereas the -r option first asks for confirmation. The
-A option checks all systems in the /etc/fstab file.
Journaling
The ext3 and ReiserFS file systems introduced journaling capabilities to Linux systems.
Journaling provides for fast and effective recovery in case of disk crashes and is used
instead of using e2fsck or fsck. With journaling, a log is kept of all file system actions,
which are placed in a journal file. In the event of a crash, Linux needs to read and replay
only the journal file to restore the system to its previous (stable) state. Files that were in the
process of writing to the disk can be restored to their original state. Journaling also avoids
lengthy fsck checks on reboots that occur when your system suddenly loses power or
freezes and has to be restarted physically. Instead of using fsck to check each file and
directory manually, your system just reads its journal files to restore the file system.
Keeping a journal entails more work for a file system than any nonjournal method.
Though all journaling systems maintain a file system’s directory structure (the metadata),
they offer various levels of file data recovery. Maintaining file data recovery information can
be time-consuming, slowing down the file system’s response time. At the same time,
journaling systems make more efficient use of the file system, providing a faster response
time than the nonjournal ext2 file system.
You can use other kind of journaling file systems on Linux. These include ReiserFS, JFS,
and XFS. ReiserFS provides a completely reworked file system structure based on journaling
(namesys.com). Most distributions also provide support for ReiserFS file systems. JFS is the
IBM version of a journaling file system, designed for use on servers providing high throughput
such as e-business enterprise servers (). It is freely distributed
under the GNU public license. XFS is another high-performance journaling system
developed by Silicon Graphics ( XFS is compatible with
RAID and NFS file systems.
ext3 Journaling
Journaling is supported in the Linux kernel with ext3. The ext3 file system is also fully
compatible with the earlier ext2 version it replaces. To create an ext3 file system, you use the
mkfs.ext3 command. You can even upgrade ext2 file systems to ext3 versions automatically,
PART IPART IPART IPART IPART VII
Chapter 23: File Systems
519
with no loss of data or change in partitions. This upgrade just adds a journal file to an ext2 file
system and enables journaling on it, using the tune2fs command. Be sure to change the ext2
file type to ext3 in any corresponding /etc/fstab entries. The following example converts the
ext2 file system on /dev/hda3 to an ext3 file system by adding a journal file (-j):
tune2fs -j /dev/hda3
The ext3 file system maintains full metadata recovery support (directory tree recovery),
but it offers various levels of file data recovery. In effect, you are trading off less file data
recovery for more speed. The ext3 file system supports three options: writeback, ordered,
and journal. The default option, writeback, provides only metadata recovery, no file data
recovery. The ordered option supports limited file data recovery, and the journal option
provides for full file data recovery. Any files in the process of being changed during a crash
will be recovered. To specify a ext3 option, use the data option in the mount command:
mount -t ext3 data=ordered /dev/sd1a /mydata
ext4 File Systems
The ext4 file system enhances the ext3 file system in terms of scalability and access methods.
The ext4 file system type is designed to handle very large files efficiently, supporting a
much larger file size. Access methods now use extents instead of direct mapping, making
access of large files much more efficient. The ext3 file system, though, remains a very
effective choice for systems managing many smaller files.
ReiserFS
Though journaling is often used to recover from disk crashes, a journal-based file system
can do much more. The ext3, JFS, and XFS file systems provide only the logging operations
used in recovery, whereas ReiserFS uses journaling techniques to rework file system
operations completely. In ReiserFS, journaling is used to read and write data, abandoning
the block structure used in traditional Unix and Linux systems. This gives it the ability to
access a large number of small files very quickly, and they use only the amount of disk
space they need. However, efficiency is not that much better with larger files.
Mounting File Systems Automatically: /etc/fstab
File systems are mounted using the mount command. Although you can mount a file system
directly using a mount command, you can simplify the process by placing mount information
in the /etc/fstab configuration file. Entries in this file can tell Linux to mount certain file
systems automatically whenever your system boots. For other file systems, you can specify
configuration information, such as mountpoints and access permissions, which can be
automatically used whenever you mount the file system. Using the configuration file entries
means that you don’t need to enter this information as arguments to a mount command.
For example, if you add a new hard disk partition to your Linux system, you can add
mount information in the /etc/fstab file to have the partition automatically mounted on
startup and then unmounted when you shut down. Otherwise, you must mount and
unmount the partition explicitly each time you boot up and shut down your system. Both
KDE and GNOME will also automatically mount any unmounted file system using their
520
Part VII: System Administration
own file system detection and mount operations. On GNOME, the Gnome virtual file
system (GVFS) will detect any unmounted file systems and mount them to the /media
directory. Should you want a file system mounted to a different directory, you would have
to place a mount entry for it in the /etc/fstab file, specifying that directory.
HAL and fstab
To have Linux automatically mount a file system on a new hard disk partition, you need to
add only its name to the fstab file, but this is not the case with removable devices such as
CD-ROMs and USB printers. Removable devices are managed by HAL, using the storage
policy files located in /usr/share/hal/fdi and /etc/hal/fdi directories. The devices are
automatically detected by the haldaemon service and are managed directly by HAL
using its set of storage callouts, such as hal-system-storage-mount to mount a device or
hal-system-storage-eject to remove one. In effect, you use the HAL device information files
to manage your removable file systems. If you want different options set for the device, you
should create your own storage-methods.fdi file in the 30user directory. The configuration
is implemented using the XML language. Check the default storage file in 10osvendors/
20-storage-methods.fdi as well as samples in /usr/share/doc/halversion/conf directory.
See Chapter 25 for examples of using HAL to set device options.
fstab Fields
An entry in an fstab file contains several fields, each separated from the next by a space or
tab. These are described as the device, mountpoint, file system type, options, dump, and fsck
fields, arranged in the sequence shown here:
<device> <mountpoint> <filesystemtype> <options> <dump> <fsck>
The first field is the name of the file system to be mounted. This entry can be either a
device name or an ext2 or ext3 file system label. A device name usually begins with /dev,
such as /dev/hda3 for the third hard disk partition. A label is specified by assigning the
label name to the tag LABEL, as in LABEL=/ for an ext2 root partition. The next field is the
mountpoint directory in your file structure where you want the file system on this device
to be attached. The third field is the type of file system being mounted. Table 23-7 provides
a list of all the different types you can mount. The type for a standard Linux hard disk
partition is ext3. The next example shows an entry for the main Linux hard disk partition.
This entry is mounted at the root directory, /, and has a file type of ext3:
/dev/hda3 / ext3 defaults 0 1
The following example shows a LABEL entry for the hard disk partition, where the label
name is /:
LABEL=/ / ext3 defaults 0 1
Auto Mounts
The file system type for a floppy disk may differ depending on the disk you are trying to
mount. For example, you may want to read a Windows-formatted floppy disk at one time
and a Linux-formatted floppy disk at another time. For this reason, the file system type