Seam Framework Experience the Evolution of Java EE 2nd phần 7 potx
Bạn đang xem bản rút gọn của tài liệu. Xem và tải ngay bản đầy đủ của tài liệu tại đây (1.02 MB, 50 trang )
ptg
20.7 Pros and Cons
Ajax4jsf turns regular JSF components into AJAX-enabled components. It works with
existing JSF applications and requires little change to existing code. Ajax4jsf is easy
to learn, easy to understand, and much more versatile than the prepackaged component
approach discussed in Chapter 19.
However, Ajax4jsf also has its limitations. Since the AJAX update is based on rerender-
ing JSF components, it is difficult to add fancy JavaScript effects; you must make ex-
tensive changes to the components themselves, which, as we discussed, is not an easy
task. Sure, you can use the
a4j:mediaOutput component to render custom graphics,
but it is slow for animations and other visual effects from the server side. Also, since
Ajax4jsf uses the same lifecycle as regular JSF, it has to submit all JSF state information
in each AJAX call. That results in excessive bandwidth usage and slow response when
you use client-side state saving in JSF.
To fully resolve those issues, we must look at solutions that provide tighter integration
with JavaScript. That is the topic for the next chapter.
CHAPTER 20 ENABLING AJAX FOR EXISTING COMPONENTS
278
From the Library of sam kaplan
Simpo PDF Merge and Split Unregistered Version -
ptg
We have discussed two approaches for supporting AJAX in Seam applications. Both
require zero JavaScript or XML communication code—but they also have some
drawbacks.
The componentized AJAX UI approach (Chapter 19) is easy, but you are limited to
what the vendor offers. You face a steep learning curve if you want to implement an
AJAX-enabled JSF component to render your own custom visual effects or backend
logic. The Ajax4jsf approach (Chapter 20) works well in the JSF context, but it is
difficult to implement components with visual effects (e.g., drag-and-drops, fades,
pop-ups) beyond the standard HTML widgets already supported by the existing JSF
components. In addition, it is bandwidth-intensive to wrap JSF requests in AJAX calls,
especially if you use client-side state saving.
With so many free high-quality JavaScript libraries available, it seems silly not to take
advantage of them just because you are limited by JSF component vendors, right?
Fortunately, Seam provides a JavaScript remoting framework that enables you to access
any Seam backend component from the JavaScript UI. Thus, you can easily bind user
input captured in a JavaScript UI widget to the backend, or use the backend component
to generate AJAX data to alter the web page display dynamically.
In this chapter, we demonstrate how to use Seam Remoting JavaScript library to connect
Seam server-side components with HTML/JavaScript UI elements. In the last section,
we will give concrete examples of integrating the popular Dojo JavaScript toolkit into
Seam applications.
21
Direct JavaScript Integration
279
From the Library of sam kaplan
Simpo PDF Merge and Split Unregistered Version -
ptg
21.1 AJAX Validator Example (Reloaded)
In Chapter 20, we showed how to use AJAX to validate a name typed in by the user in
the Seam Hello World example. The user’s name is sent to the server, as soon as the
user fills out the web form, and is checked against the database. If the name already
exists in the database, a warning message is displayed next to the text input field—all
without a form submission. In the first example in this chapter, we will reimplement
this feature using the Seam Remoting approach. The example code in this section is in
the
remote project in the source code bundle. When the application is running, you can
access it at
http://localhost:8080/remote/.
To use Seam Remoting, make sure that the
jboss-seam-remoting.jar file is included
in your EAR’s
lib directory, as remoting works on EJB session beans.
21.1.1 Server-Side Component
First, we need a method in the backend Seam component to check the input name against
the database. We add a
checkName() in the ManagerAction class:
@Stateful
@Scope(SESSION)
@Name("manager")
public class ManagerAction implements Manager {
public boolean checkName (String name) {
List <Person> existing = em.createQuery(
"select p from Person p where name=:name")
.setParameter("name", name).getResultList();
if (existing.size() != 0) {
return false;
} else {
return true;
}
}
}
Now comes the important part: In the session bean interface, you must tag the method
with the
@WebRemote annotation for it to be accessible through the Seam Remoting
JavaScript.
@Local
public interface Manager {
@WebRemote
public boolean checkName (String name);
}
CHAPTER 21 DIRECT JAVASCRIPT INTEGRATION
280
From the Library of sam kaplan
Simpo PDF Merge and Split Unregistered Version -
ptg
The Seam resource servlet handles all AJAX calls from the client-side JavaScript
to the
@WebRemote-annotated methods. The AJAX calls are routed via the seam/
resource/remoting/*
URL. AJAX-related resource files (e.g., dynamically generated
JavaScript, see later) are also served via this special URL. In Section 3.3, we already
explained how to configure the resource servlet. You just need to add the following
lines in your
web.xml file:
<servlet>
<servlet-name>Seam Resource Servlet</servlet-name>
<servlet-class>org.jboss.seam.servlet.ResourceServlet</servlet-class>
</servlet>
<servlet-mapping>
<servlet-name>Seam Resource Servlet</servlet-name>
<url-pattern>/seam/resource/*</url-pattern>
</servlet-mapping>
21.1.2 Triggering a JavaScript Event on a Web Page
With the backend method ready, let’s check out how the AJAX call is triggered on a
web page.
<h:inputText id="name"
value="#{person.name}"
onfocus="hideCheckNameError()"
onblur="checkName()"
size="15"/>
<span id="nameError" style="display:none">
You have already said hello! :)
</span>
<h:message for="name" />
The onblur property on <h:inputText> indicates the JavaScript method to invoke
when the text field loses focus—so, when the user finishes the input and clicks outside
the field, the
checkName() JavaScript method is invoked. The JavaScript method
takes the input text in the field and invokes the
ManagerAction.checkName()
method on the server side via an AJAX call. The return value of the AJAX call deter-
mines whether the error message in the
<span> element should be shown. Let’s look
at how the JavaScript
checkName() method works.
Hiding and Showing the span Element
The style="display:none" property indicates that the span element for the error message
is not displayed initially. JavaScript can display it if the ManagerAction.checkName()
method returns false. The JavaScript hideCheckNameError() method makes sure that
the error message is hidden when the text field is activated again. The following are the
hideCheckNameError() and showCheckNameError() methods for manipulating the span
element:
281
21.1 AJAX VALIDATOR EXAMPLE (RELOADED)
From the Library of sam kaplan
Simpo PDF Merge and Split Unregistered Version -
ptg
function showCheckNameError () {
var e = document.getElementById("nameError");
if (!(e === null)) {
e.style.visibility = "inherit";
e.style.display = "";
}
}
function hideCheckNameError () {
var e = document.getElementById("nameError");
if (!(e === null)) {
e.style.visibility = "hidden";
e.style.display = "none";
}
}
21.1.3 Making an AJAX Call
The heart of the AJAX operation involves making the AJAX call and then getting
the result asynchronously. In the page where you need to make AJAX calls, load the
seam/resource/remoting/resource/remote.js JavaScript. The Seam resource servlet
assembles and serves this script on the fly. For each Seam component that contains
@WebRemote-annotated methods, Seam generates a custom JavaScript for accessing this
component as well. In our example, we load the
interface.js?manager JavaScript
for accessing the Seam backend component named
manager.
<script type="text/javascript"
src="seam/resource/remoting/resource/remote.js">
</script>
<script type="text/javascript"
src="seam/resource/remoting/interface.js?manager">
</script>
Now you can get a JavaScript version of the manager component via a Seam.
Component.getInstance("manager")
call. The call to the JavaScript manager.
checkName()
method is then translated into an AJAX call to the server-side
manager.checkName() method. We get the text from the text field and use the manager.
checkName()
method to check whether it already exists in the server-side database:
<script type="text/javascript">
// Seam.Remoting.setDebug(true);
// Don't display the loading indicator
Seam.Remoting.displayLoadingMessage = function() {};
Seam.Remoting.hideLoadingMessage = function() {};
// Get the "manager" Seam component
var manager = Seam.Component.getInstance("manager");
CHAPTER 21 DIRECT JAVASCRIPT INTEGRATION
282
From the Library of sam kaplan
Simpo PDF Merge and Split Unregistered Version -
ptg
// Make the async call with a callback handler
function checkName () {
var e = document.getElementById("form:name");
var inputName = e.value;
manager.checkName(inputName, checkNameCallback);
}
</script>
Creating a JavaScript Object for an Entity Bean or JavaBean POJO Component
The Seam.Component.getInstance() method obtains a singleton stub object for a Seam
session bean. You can make AJAX method calls against the session bean. But for a
Seam entity bean or simple JavaBean components, you need to create the corresponding
JavaScript objects using the Seam.Component.newInstance() method. All the getter and
setter methods on the entity bean (JavaBean) are available in the JavaScript object. You
can edit the entity objects and then pass them as call arguments in AJAX calls against
session bean components.
The JavaScript and server-side manager.checkName() methods take the same call ar-
guments. As we mentioned in the previous sidebar, you can even construct an entity
bean instance in JavaScript and then pass it to a remote AJAX method as a call argument.
However, there’s one more twist: The JavaScript method takes an additional asyn-
chronous callback handler as a call argument. The
manager.checkName() call is invoked
asynchronously so that the JavaScript does not block the UI waiting for the response,
which could potentially take a long time because the call goes through the network. So,
instead of waiting for the return value from the remote call, we pass in a
JavaScript callback handler,
checkNameCallback(), and let the JavaScript method
manager.checkName() return immediately. The checkNameCallback() method is in-
voked with the server-side method’s return value when the server method finishes. The
callback handler then decides whether to display the error message based on the return
value.
<script type="text/javascript">
function checkNameCallback (result) {
if (result) {
hideCheckNameError ();
} else {
showCheckNameError ();
}
}
</script>
283
21.1 AJAX VALIDATOR EXAMPLE (RELOADED)
From the Library of sam kaplan
Simpo PDF Merge and Split Unregistered Version -
ptg
In an earlier sidebar, we saw how the hideCheckNameError() and
showCheckNameError() methods hide and display the span element for the error mes-
sage.
That’s it for the simple example. Of course, the server-side name validation is hardly
exciting—we already did it with no JavaScript in Chapter 20. But it does serve as an
example for more complex use cases. In the next section, we will look at a more
complicated example.
The Comment Field
As you probably noticed in the remote/hello.seam form, the user comment field is not
a regular HTML text area. You click on the text to edit it and then click on the Save button
to persist the new comment. That is done with the Dojo inline editing widget which we
discuss in Section 21.3.2.
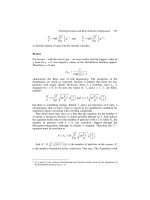
21.2 AJAX Progress Bar
The Seam AJAX Progress Bar example is a more sophisticated AJAX example for
Seam Remoting. We use it to demonstrate how to use AJAX widgets that are completely
unrelated to JSF components and how to poll for AJAX content. The source code is in
the
ProgressBar directory in the source code bundle. After you build it and
deploy the
progressbar.ear into your JBoss AS, you can access the application at
http://localhost:8080/progressbar/. On the progressbar.seam page, click on
the Go button to start the progress bar (Figure 21.1). When the progress bar reaches
100 percent, the server redirects to the
complete.seam page.
The AJAX Progress Bar in SeamFigure 21.1
CHAPTER 21 DIRECT JAVASCRIPT INTEGRATION
284
From the Library of sam kaplan
Simpo PDF Merge and Split Unregistered Version -
ptg
21.2.1 Seam Components
When you click on the Go button, the progressBarAction.doSomething() Seam
method is invoked as the event handler.
<h:commandButton value="Go!"
action="#{progressBarAction.doSomething}"/>
The progressBarAction.doSomething() method performs whatever the task is that
takes a long time to complete and, in the process, updates the
progress component
stored in the session context:
@Stateless
@Name("progressBarAction")
@Interceptors(SeamInterceptor.class)
public class ProgressBarAction implements ProgressBar {
@In(create = true)
Progress progress;
public String doSomething() {
Random r = new Random(System.currentTimeMillis());
try {
for (int i = 0; i < 100;)
{
Thread.sleep(r.nextInt(200));
progress.setPercentComplete(i);
i++;
}
}
catch (InterruptedException ex) {
}
return "complete";
}
public Progress getProgress() {
return progress;
}
}
The progress component is just a JavaBean with properties related to the progress bar:
@Name("progress")
@Scope(ScopeType.SESSION)
public class Progress {
private int percentComplete;
public int getPercentComplete() {
return percentComplete;
}
public void setPercentComplete(int percentComplete) {
this.percentComplete = percentComplete;
}
}
285
21.2 AJAX PROGRESS BAR
From the Library of sam kaplan
Simpo PDF Merge and Split Unregistered Version -
ptg
To provide a mechanism for the client JavaScript to access the progress component
via AJAX calls, we tag the
getProgress() method with the @WebRemote annotation:
@Local
public interface ProgressBar {
String doSomething();
@WebRemote Progress getProgress();
}
21.2.2 Accessing Seam Components from JavaScript
Now, load the necessary JavaScript for accessing the progressBarAction component:
<script type="text/javascript"
src="seam/resource/remoting/resource/remote.js">
</script>
<script type="text/javascript"
src="seam/resource/remoting/interface.js?progressBarAction">
</script>
<script type="text/javascript">
//<![CDATA[
// Seam.Remoting.setDebug(true);
// Don't display the loading indicator
Seam.Remoting.displayLoadingMessage = function() {};
Seam.Remoting.hideLoadingMessage = function() {};
// Get the progressBarAction Seam component
var progressBarAction =
Seam.Component.getInstance("progressBarAction");
used the progressBarAction object
// ]]>
</script>
You can now invoke the progressBarAction.getProgress() method with a callback.
The current
progress object is passed to the callback when the server-side AJAX
method exits. The
progressCallback() function uses the progressBar object defined
in the
slider.js file to actually draw the updated progress bar. Finally, since we need
to obtain the progress periodically to update the progress bar, we wrap the asynchronous
progressBarAction.getProgress() call in a setTimeout() JavaScript function,
which calls the wrapped function every time the timeout elapses (250 milliseconds in
our case).
<script type="text/javascript">
//<![CDATA[
// Make the async call with a callback handler
function getProgress() {
progressBarAction.getProgress(progressCallback);
}
CHAPTER 21 DIRECT JAVASCRIPT INTEGRATION
286
From the Library of sam kaplan
Simpo PDF Merge and Split Unregistered Version -
ptg
// The callback function for receiving the AJAX response
// and then updating the progress bar
function progressCallback(progress) {
progressBar.setPosition(progress.percentComplete);
if (progress.percentComplete < 100)
queryProgress();
}
// Wrap the async call in setTimeout so that it is
// called again and again to update the progress bar
function queryProgress() {
setTimeout("getProgress()", 250);
}
// ]]>
</script>
This JSF snippet ties together the commandButton component, the server-side
progressBarAction.doSomething() method, and the queryProgress() JavaScript
method for AJAX interaction:
<h:form onsubmit="queryProgress();return true;">
<h:commandButton value="Go!"
action="#{progressBarAction.doSomething}"/>
</h:form>
When the user clicks on the Go button, the browsers sends in a request to start the
progressBarAction.doSomething() method on the backend and, at the same time,
starts the
queryProgress() JavaScript function. While the browser is waiting for
the
progressBarAction.doSomething() method to complete, the queryProgress()
method keeps updating the progress bar via AJAX calls to the progressBarAction.
getProgress()
method.
21.3 Integrating the Dojo Toolkit
Now you have seen how to use Seam Remoting to develop vanilla AJAX applications.
But in reality, many fancy AJAX web applications use third-party JavaScript libraries
to add rich UI widgets and effects. In this section, we examine how to integrate third-
party JavaScript libraries into Seam applications. We will use the popular Dojo toolkit
as an example. Again, the sample application is in the
remote source code project.
What Is Dojo?
Dojo is an open source JavaScript library for rich web applications. AJAX developers use
it widely. You can learn more about Dojo from its web site, .
287
21.3 INTEGRATING THE DOJO TOOLKIT
From the Library of sam kaplan
Simpo PDF Merge and Split Unregistered Version -
ptg
Aside from communication and data modeling utilities, third-party JavaScript libraries
usually provide two types of UI widgets: visual effects and enhanced user input controls.
21.3.1 Visual Effects
Widgets of this type are for rich UI effects. They include visual effects such as animation,
fade in/out, drag-and-drops, etc., as well as navigation/layout widgets, such as tabs,
accordion, trees, etc. The Dojo JavaScript functions retrieve XHTML elements by their
IDs or types and then operate on those elements to create the desired visual effects. For
those functions and widgets, Seam applications are no different from other HTML web
applications. You just need to enclose a content segment in
<div> tags with the appro-
priate IDs. That is especially easy with Facelets (see Section 3.1) because Facelets pages
are simply XHTML pages with JSF components. To make our point, let’s look at two
simple Dojo examples. The following listing shows how to create a three-tab panel in
Dojo. The content in the first two tabs is loaded when the page is loaded, and the third
tab’s content is loaded from another page when you click on it.
<div id="mainTabContainer" dojoType="TabContainer" selectedTab="tab1">
<div id="tab1" dojoType="ContentPane" label="Tab 1">
<h1>First Tab</h1>
HTML and JSF component tags for tab content
</div>
<div id="tab2" dojoType="ContentPane" label="Tab 2">
More HTML and JSF component tags for tab content
</div>
<a dojoType="LinkPane" href="somepage.seam"
refreshOnShow="true">Tab 3</a>
</div>
For another example, let’s use Dojo JavaScript functions to fade in and fade out a part
of the web page enclosed in the
<div> tags:
<a href="javascript:void(dojo.lfx.html.fadeOut('fade', 300).play())">
Fade out</a> |
<a href="javascript:void(dojo.lfx.html.fadeIn('fade', 300).play())">
Fade in</a> |
<a href="javascript:void(dojo.html.setOpacity(
document.getElementById('fade'), 0.5))">
Set opacity = 50%</a>
<div id="fade">
XHTML and JSF components to be faded in/out by the above links
</div>
As you can see, these examples have nothing specific to Seam. You can enclose any
number of Seam JSF components between those
<div> tags, and the Dojo JavaScript
will work just fine.
CHAPTER 21 DIRECT JAVASCRIPT INTEGRATION
288
From the Library of sam kaplan
Simpo PDF Merge and Split Unregistered Version -
ptg
It gets more complicated when a Dojo JavaScript function needs to directly operate on
a JSF component. For most cases, you can just enclose the JSF component in a pair of
<div> tags. If that is not possible, you must manually figure out the ID of the rendered
JSF component. That is typically pretty easy; you just need to look at the HTML source
of the generated page. Note, however, that those generated IDs do change from one
JSF implementation to the next.
21.3.2 Input Widgets
The second type of Dojo widgets includes the input widgets that replace the standard
HTML input fields. For instance, Dojo provides a rich text editor, an inline text editor,
a GUI date/time picker, and many other useful input widgets. Since those widgets are
not JSF components, we cannot directly bind their values to a backing bean property.
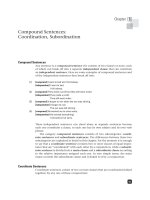
Seam Remoting can really help here. Figure 21.2 shows a Dojo rich text editor in the
hello.xhtml form. It generates HTML-styled comments.
A Dojo rich text editorFigure 21.2
The following is the relevant code for the web page. Most of it is just standard Dojo.
When the form submits, the comment in the rich text editor is not submitted to JSF be-
cause the Dojo rich text widget does not have any JSF backend value binding. Therefore,
we invoke the JavaScript function
submitComment() to submit the comment separately
when the user clicks on the Say Hello button.
<script src="dojo-0.3.1-editor/dojo.js"
type="text/javascript">
</script>
289
21.3 INTEGRATING THE DOJO TOOLKIT
From the Library of sam kaplan
Simpo PDF Merge and Split Unregistered Version -
ptg
<script type="text/javascript">
dojo.require("dojo.widget.Editor");
</script>
Comment:<br/>
<div id="comment" dojoType="Editor"></div>
<h:commandButton type="submit" value="Say Hello"
onclick="submitComment()"
action="#{manager.sayHello}"/>
This is the code for the submitComment() JavaScript function. Notice that we do not
pass in a callback function to the Seam Remoting call here because we do not need to
process the return value.
<script language="javascript">
// Get the "manager" Seam component
var manager = Seam.Component.getInstance("manager");
function submitComment () {
var ed = dojo.widget.byId("comment");
manager.setComment (ed.getEditorContent());
// This works too
// var eds = dojo.widget.byType("Editor");
// manager.setComment (eds[0].getEditorContent());
}
</script>
Of course, as we mentioned earlier, the #{manager.setComment} method must be a
Seam
@WebRemote method. It simply sets the submitted value to the person component.
@Local
public interface Manager {
@WebRemote
public void setComment (String comment);
}
@Name("manager")
public class ManagerAction implements Manager {
public void setComment (String comment) {
person.setComment (comment);
}
}
CHAPTER 21 DIRECT JAVASCRIPT INTEGRATION
290
From the Library of sam kaplan
Simpo PDF Merge and Split Unregistered Version -
ptg
An Alternative
An alternative way to use the Dojo rich text component is to render it into an HTML
textarea instead of a div. The rich text in the textarea is submitted as an HTTP request
parameter when the user submits the form. Although you still cannot directly bind a Dojo
textarea to a Seam component, you can at least retrieve the HTTP request parameter at
the backend via the @RequestParameter injection (see Chapter 15). In most cases, this is
probably easier than the Seam Remoting approach.
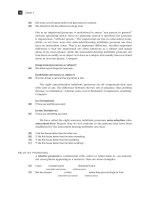
The rich text editor is simple. Now let’s take a look at a more complex example: a Dojo
inline editor on the
hello.xhtml form. The idea is that a comment appears to be normal
text until you click on it; then it becomes an editable text field, where you can change
the comment and save it to the backend (Figure 21.3).
A Dojo inline editorFigure 21.3
291
21.3 INTEGRATING THE DOJO TOOLKIT
From the Library of sam kaplan
Simpo PDF Merge and Split Unregistered Version -
ptg
The JavaScript code is a little more involved here. We give the inline editor widget an
onSave handler method, submitComment(), which saves its current content to the
backend via Seam Remoting. As you can see, even with this widget, a single line of
Seam Remoting code handles the backend communication.
<script src="dojo-0.3.1-editor/dojo.js"
type="text/javascript">
</script>
<script type="text/javascript">
dojo.require("dojo.widget.InlineEditBox");
dojo.require("dojo.event.*");
</script>
<script language="javascript">
// Get the "manager" Seam component
var manager = Seam.Component.getInstance("manager");
function submitComment (newValue, oldValue) {
manager.setComment (newValue);
}
function init () {
var commentEditor = dojo.widget.byId("comment");
commentEditor.onSave = submitComment;
}
dojo.addOnLoad(init);
</script>
<tr>
<td>Comment</td>
<td>
<div id="comment" dojoType="inlineEditBox">
Hello Seam
</div>
</td>
</tr>
Although the examples we gave here are Dojo examples, Seam Remoting can work
with any third-party JavaScript library. The possibilities are limitless!
CHAPTER 21 DIRECT JAVASCRIPT INTEGRATION
292
From the Library of sam kaplan
Simpo PDF Merge and Split Unregistered Version -
ptg
Apart from data-driven web applications, Seam supports business process-driven web
applications via the jBPM business process engine. It also supports business rules via
the Drools engine (also known as JBoss Rules). With several simple annotations, you
can attach Seam stateful components to business processes that require actions from
multiple users and can survive multiple server reboots. Each user is automatically pre-
sented with the tasks the process requires. Business processes and rules are integrated
into the very heart of the Seam framework: Seam leverages jBPM workflow to manage
the JSF pageflow in a stateful manner, and the Seam security framework makes heavy
use of the Drools engine to manage access security rules. We cover all these important
use cases in this part of the book.
293
Part V
Business Processes
and Rules
From the Library of sam kaplan
Simpo PDF Merge and Split Unregistered Version -
ptg
This page intentionally left blank
From the Library of sam kaplan
Simpo PDF Merge and Split Unregistered Version -
ptg
Business processes are closely related to business rules. Seam integrates the Drools
(also known as JBoss Rules) engine to support sophisticated rules. In fact, Seam itself
uses Drools to implement an innovative security framework for web applications.
In this chapter, we demonstrate how business rules are used to manage security.
Managed security is one of those “half-measure solutions” in enterprise Java. The
standard Java EE security model works okay for the simplest cases (e.g., to require login
to access part of the site). But more often than not, developers struggle against the
standard Java EE security schemes and work around them instead of using them.
The Seam security model, on the other hand, is based on rules. You can specify who is
permitted to access which page, which UI element, and which bean method. As with
everything else in Seam, all Seam security rules are stateful. That means each rule’s
outcome depends on the current state of the application context. You can therefore give
certain users access to certain application features only when some runtime conditions
are met. The Seam security framework offers great power and flexibility for almost
every use case a web application might encounter.
22.1 Rule-Based Access Control
In Chapter 18, we saw the extensive security features provided by Seam that
enable you to authenticate, authorize, and manage application users through their
#{credentials} and roles. The features we discussed are already quite impressive
22
Rule-Based Security
Framework
295
From the Library of sam kaplan
Simpo PDF Merge and Split Unregistered Version -
ptg
by themselves, but we have not touched business rules yet. Business rules take access
control to a whole new level, unseen in previous generations of Java security frameworks.
• Using business rules, you can put all security configuration in one file and simplify
the
Restrict tags and annotations. That is a huge plus when you have a large web
site with many user roles and many potential entry points because all access rules
can be reviewed and analyzed at once. It also allows nonprogrammers to develop
rules using GUI tools that the Drools project provides.
• Business rules give you per-instance access controls based on the current state of
the application. We will discuss this further in Section 22.4.
Of course, the downside of using access rules is that you must bundle the Drools JAR
files and configuration files with the application (see Chapter 23). But that is a small
price to pay for such advanced features.
Let’s begin by reimplementing the role-based access control scheme in rules.
22.2 Configuring Rule-Based Permissioning
Seam security provides a framework for resolving permissions. Simply by implementing
the
PermissionResolver interface, you can inject any approach for resolving user
permissions. While this gives ultimate flexibility, in most cases one of the two Seam
implementations will suit your permissioning needs. The following implementations
are provided by Seam:
RuleBasedPermissionResolver This is the permission resolver discussed throughout
this chapter. It uses Drools to resolve rule-based permission checks and provides
extensive flexibility in permissioning, allowing use of a terse scripting language
for authoring permission checks.
PersistentPermissionResolver This permission resolver stores object permissions
in a persistent store, such as a relational database. If you require ACL (Access
Control List) security restrictions where a list of permissions must be attached to
an object, this permission resolver will suit your needs. It is discussed in depth in
the Seam Reference Documentation.
To configure the
RuleBasedPermissionResolver, you will first need to define a
security.drl file in the classpath. This file will contain the rules fired to perform per-
mission checks. A rule base can then be configured which is referenced by the permission
resolver.
CHAPTER 22 RULE-BASED SECURITY FRAMEWORK
296
From the Library of sam kaplan
Simpo PDF Merge and Split Unregistered Version -
ptg
<components xmlns=" /> xmlns:drools=" /> xmlns:security=" /> xmlns:xsi=" /> xsi:schemaLocation=" /> />
/> <security:rule-based-permission-resolver
security-rules="#{securityRules}"/>
<drools:rule-base name="securityRules">
<drools:rule-files>
<value>/META-INF/security.drl</value>
</drools:rule-files>
</drools:rule-base>
We will cover the details of how to build and deploy the application with Drools in
Section 23.3, but for now let’s take an in-depth look at permissioning using rules.
22.3 Simple Access Rules
Before we discuss the access rules, let’s first explain how the Restrict tag or annotation
really works under the hood. When you have an empty
Restrict, it is equivalent to
making a call to the
#{identity.hasPermission} method. The shorthand version of
the EL is
#{s:hasPermission( )}. To understand how this works, let’s return
to the Rules Booking example discussed in Chapter 18. Previously, we used the
#{s:hasRole} operation to determine authorization, but let’s see how this can be
accomplished using rules-based permissioning.
@Name("rewardsManager")
@Scope(ScopeType.CONVERSATION)
public class RewardsManager {
@In EntityManager em;
@Out(required=false)
private Rewards rewards;
//
@Restrict
public void updateSettings() {
if(rewards.isReceiveSpecialOffers()) {
facesMessages.add("You have successfully registered to " +
"receive special offers!");
} else {
facesMessages.add("You will no longer receive our special offers.");
}
rewards = em.merge(rewards);
em.flush();
}
//
}
297
22.3 SIMPLE ACCESS RULES
From the Library of sam kaplan
Simpo PDF Merge and Split Unregistered Version -
ptg
The empty @Restrict annotation is equivalent to the following:
@Restrict("#{s:hasPermission('rewardsManager', 'updateSettings')}")
The first call parameter is the component name (the target), and the second parameter
is the method name (the
action). They form the basis of the security rule. To allow
only the users with the
rewards role to access this method, we have the following rule
in the
security.drl, our Drools configuration file:
package MyApplicationPermissions;
import org.jboss.seam.security.PermissionCheck;
import org.jboss.seam.security.Role;
rule RewardsUser
when
c: PermissionCheck(target == "rewardsManager",
action == "updateSettings")
Role(name == "rewardsuser")
then
c.grant();
end;
The name of the rule can be arbitrary. The important point is that the rule is triggered
when the
#{rewardsManager.updateSettings} method is called, and access is
granted when the current user has the
rewardsuser role. Each Role that the user has
is inserted as a fact into the
WorkingMemory. This allows you to check any role the user
may be associated with.
The
PermissionCheck is a Seam component created prior to invoking the security
rules. The component is inserted into the
WorkingMemory and is used to identify
the rule that determines the user’s permissions and to grant permission if the rule
is successful. There is no magic going on here. The initialized values of the
PermissionCheck component ensure the uniqueness of the intended security rule.
Seam checks the status of the
PermissionCheck component once rule execution is
complete. If the
grant() method has been invoked, the permission check will
return
true.
Check for Logged-in Users
If you want to grant access to all logged-in users, regardless of their roles, you can check
whether the Principal object exists. The Principal object is created in the login process.
To do that, use exists Principal() to replace the Role(name == "rewardsuser") line
in the rule we discussed earlier.
CHAPTER 22 RULE-BASED SECURITY FRAMEWORK
298
From the Library of sam kaplan
Simpo PDF Merge and Split Unregistered Version -
ptg
The <restrict> tag rules for web pages are similar. Since no component names and
method names exist here, the default
target is the JSF view-id of the page,
and the default
action is render. For instance, the following page configuration
results in a
#{s:hasPermission('/rewards/summary.xhtml', 'render')} call when
the
/rewards/summary.xhtml page is accessed:
<pages>
<page view-id="/rewards/summary.xhtml">
<restrict/>
</page>
</pages>
This is the security rule for rewardsuser-only access to the page:
rule CanUserViewRewards
when
c: PermissionCheck(target == "/rewards/summary.xhtml",
action == "render")
Role(name == "rewardsuser")
then
c.grant()
end;
22.4 Per-Instance Access Rules
So far, we have only mentioned executing rules against security object instances (i.e.,
Principals and Roles). By passing an object from the Seam stateful context to the se-
curity check method, you can create rules that grant access only when certain runtime
conditions are met. The
target we discussed before in the PermissionCheck is not
required to be a string. It can be any object from the context, even a Seam component.
The
target instance will be inserted into the WorkingMemory as a Fact from the current
context.
Returning to the Rules Booking example, the user is prompted with a list of previous
bookings on the
main.xhtml view (Figure 22.1). The user can then review one of
the bookings by selecting the Write Review link (Figure 22.2).
You are only allowed to review a
Hotel if you are logged in and have previously
booked the
Hotel. This restriction can be placed on the submit() method of the
HotelReviewAction, as shown in the following listing:
299
22.4 PER-INSTANCE ACCESS RULES
From the Library of sam kaplan
Simpo PDF Merge and Split Unregistered Version -
ptg
main.xhtml: After a hotel is booked, the user can review that hotel based
on his or her stay.
Figure 22.1
review.xhtml: Users are restricted in writing reviews based on security
rules.
Figure 22.2
CHAPTER 22 RULE-BASED SECURITY FRAMEWORK
300
From the Library of sam kaplan
Simpo PDF Merge and Split Unregistered Version -
ptg
@Name("hotelReview")
@Stateful
public class HotelReviewAction implements HotelReview
{
//
@In private EntityManager em;
@In(required=false)
@Out(required=false)
private Hotel hotel;
@End
@Restrict("#{s:hasPermission(hotelReview, 'review')}")
public void submit()
{
log.info("Submitting review for hotel: #0", hotel.getName());
hotel.addReview(review);
em.flush();
//
}
//
}
This restriction results in execution of the HotelReviewer security rule. Note that
the
s:hasPermission invocation passes the hotelReviewer component as the
target. Components or entities can be passed as a PermissionCheck target instead of
a string. This results in the component instance being added as an additional
Fact
available in the WorkingMemory for firing rules.
rule HotelReviewer
when
exists Principal()
$hotelReview: HotelReview($bookings: bookings, $hotel: hotel)
exists ( Booking( hotel == $hotel ) from $bookings )
c: PermissionCheck(target == $hotelReview, action == "review")
then
c.grant();
end;
Essentially, the rule first determines whether the user is logged in, by ensuring that the
Principal exists in WorkingMemory. The rule then ensures that the Hotel the user is
attempting to review exists in the user’s bookings. Notice the power of the rule defini-
tion—it is easy to express complex conditions through the Drools syntax. For more
information on defining rules, see Chapter 23.
The state of the
hotelReview component is used to determine whether the user has
permission to review the
Hotel. As you can imagine, the restrictions could be extended.
We would likely also want to ensure that the
checkoutDate of the Booking has passed
and that the user has not previously written a review for this
Booking. Writing additional
checks becomes simple.
301
22.4 PER-INSTANCE ACCESS RULES
From the Library of sam kaplan
Simpo PDF Merge and Split Unregistered Version -
ptg
Checking on submit is really a last resort—but this is good practice given our defense-
in-depth approach. It would also be a good idea to completely restrict access to the
review.xhtml page if the user is not authorized.
<page view-id="/review.xhtml" conversation-required="true">
<description>Hotel Review: #{hotel.name}</description>
<restrict>#{s:hasPermission(hotelReview, 'review')}</restrict>
<navigation from-action="#{hotelReview.submit}">
<redirect view-id="/main.xhtml"/>
</navigation>
<navigation from-action="#{hotelReview.cancel}">
<redirect view-id="/main.xhtml"/>
</navigation>
</page>
As demonstrated in Section 18.2.1, it is simple to restrict access to specific web pages
using the
<restrict> tag. Here we once again specify our restriction to ensure that
a user cannot access
review.xhtml without appropriate permissions.
22.5 Securing Your Entities
The lowest layer of security in Seam allows you to secure entities. It is easy to apply
security restrictions to read, insert, update, and delete actions for entities. Annotating
an entity with
@Restrict will ensure that a permission check is fired each time a persis-
tence operation occurs. The default security check that is performed is a permission
check of
entity:action, where entity is the entity instance that the permission check
is being performed against. The entity instance is inserted as a
Fact into the
WorkingMemory. The action is dependent on the persistence operation being performed:
read, insert, update, or delete. As before, it is possible to specify an EL expression
in the
@Restrict annotation to further customize this behavior.
To secure all actions for the
Rewards entity, simply annotate the entity with @Restrict:
@Entity
@Name("rewards")
@Restrict
@Table(name="Reward_Member")
public class Rewards {
//
Now a permission check can be defined for delete actions:
when
Role(name == "administrator")
$rewards : Rewards(rewardPoints == 0)
c: PermissionCheck(target == $rewards, action == "delete")
then
c.grant();
end;
CHAPTER 22 RULE-BASED SECURITY FRAMEWORK
302
From the Library of sam kaplan
Simpo PDF Merge and Split Unregistered Version -