Macromedia fireworks MX bible phần 9 pptx
Bạn đang xem bản rút gọn của tài liệu. Xem và tải ngay bản đầy đủ của tài liệu tại đây (1.38 MB, 102 trang )
777
Chapter 23 ✦ Applying Animation Techniques
Using Animation Symbols
Animation symbols are self-contained, multi-frame symbols with their own
animation properties, such as number of frames, rotation, and scaling. You can
create an animation symbol from any object, and it can even contain other symbols.
As with graphic and button symbols, animation symbols are stored in the Library
and can be reused.
You can graphically edit an animation symbol in the Symbol Editor, and its properties
in the Object panel, or with the Modify ➪ Animate ➪ Settings command. You can edit
its motion path directly in the document window.
Creating animation symbols
You can create a new animation symbol from scratch, or convert an existing object
into an animation symbol.
To create an animation symbol, follow these steps:
1. Choose Edit ➪ Insert ➪ New Symbol.
Fireworks displays the Symbol Properties dialog box, as shown in Figure 23-19.
Figure 23-19: Name your new symbol and
specify animation in the Symbol Properties
dialog box.
2. Enter a name for the new symbol.
3. Select the Animation radio button under Type. Click OK when you’re done.
Fireworks displays the Symbol Editor.
4. Use the drawing tools to create a new graphic.
5. Close the Symbol Editor window when you’re done.
Fireworks places the new animation symbol in the Library, and places a copy
of it in your document.
303662-1 ch23.F 8/2/02 2:58 PM Page 777
778
Part VI ✦ Animation
6. To add new frames to the new animation symbol, select it on the canvas and
adjust the Frames slider in the Property inspector.
7. To edit the symbol’s animation properties, select it and choose Modify ➪
Animation ➪ Settings to display the Animate dialog box.
To convert an existing object into an animation symbol, follow these steps:
1. Select the object that you want to convert into an animation symbol.
2. Choose Modify ➪ Animation ➪ Animate Selection, or use the keyboard short-
cut, Alt+Shift+F8 (Option+Shift+F8).
Fireworks displays the Animate dialog box, as shown in Figure 23-20.
Figure 23-20: Modify animation settings
in the Animate dialog box.
3. Modify the following settings in the Animate dialog box:
• Frames: The number of frames you want to include in the animation.
The Frames slider only goes to 250, but you can type a higher number in the
text field. Fireworks automatically adds the required number of frames to your
document.
• Movement: The distance that you want each object to move. Possible
values range from 0 to 250 pixels. The default is 72.
• Direction: The direction in which you want the object to move. Possible
values range from 0 to 360 degrees.
• Scaling: The percent change in size from start to finish. The default is
100 percent. You can specify a number from 0 to 250.
• Opacity: Specifies how much to fade in or out from start to finish.
Possible values range from 0, which is completely transparent, to 100
(the default), which is completely opaque.
Tip
303662-1 ch23.F 8/2/02 2:58 PM Page 778
779
Chapter 23 ✦ Applying Animation Techniques
• Rotation: The amount that the symbol rotates from start to finish,
specified in degrees. The default is 0 degrees, which is no rotation.
Specify 90 degrees for a quarter-turn, 180 for a half-turn, and 360 for a
complete rotation. Enter a number higher than 360 to start a second
rotation.
• CW and CCW: Clockwise and counterclockwise, respectively; determine
the object’s rotation direction.
4. Click OK when you’re done.
Your new symbol is added to the Library, and a copy is placed on the canvas.
Editing an animation symbol
There may be a handful of skilled animators who can create the perfect animation
symbol the first time through, but for most of us, the settings of our animation
symbols require careful adjustment in order to achieve the desired effect.
You can use a number of methods to alter the settings of an animation symbol. Let’s
explore each of them.
Adjusting animation settings
Select an animation symbol and choose Modify ➪ Animation ➪ Settings to display
the Animate dialog box. Alter any of the settings as desired.
A discussion of the settings in the Animate dialog box is included earlier in this
chapter, in the section “Creating animation symbols.”
Using the Property inspector
When an animation symbol is selected, the Property inspector changes to display
animation symbol options that are similar to the Animate dialog box, as shown in
Figure 23-21. Modify any of these options to adjust the corresponding setting.
Figure 23-21: Use the Property inspector to modify animation
symbol options.
Adjusting the motion path
When selected, Animation symbols display a motion path that describes their
frame-by-frame movement across the canvas, as shown in Figure 23-22. The green
Cross-
Reference
303662-1 ch23.F 8/2/02 2:58 PM Page 779
780
Part VI ✦ Animation
dot on the motion path indicates the start of the animation’s path, and the red dot
shows the end point. The blue points on the path represent each frame of the
animation. The object itself is shown on the current frame.
Figure 23-22: The motion path describes
the movement of the animation symbol.
The visible object is on the current frame,
frame 4.
You can change the direction of the animation symbol’s motion by changing the
angle of the motion path. Drag one of the animation handles to a new location,
as follows:
Hold down the Shift key while dragging to constrain the movement to perfectly
horizontal or vertical.
✦ Move the green point to move the starting point of the animation.
✦ Move the red point to move the ending point of the animation.
✦ Move any blue point to move the object on the corresponding frame. Click a
blue point to switch to that frame.
Converting into a graphic symbol
Choose Modify ➪ Animation ➪ Remove Animation to convert the animation symbol
into a graphic symbol. Although your symbol is no longer animated, Fireworks
retains the animation settings, in case you convert the symbol back into an anima-
tion symbol.
Removing the symbol
To remove an animation symbol from the Library, follow these steps:
1. Choose Window ➪ Library to display the Library panel.
2. In the Library panel, select the animation symbol you want to remove.
Tip
303662-1 ch23.F 8/2/02 2:58 PM Page 780
781
Chapter 23 ✦ Applying Animation Techniques
3. Click the Delete Symbol button (the trash can) on the Library panel.
4. Click Delete to remove the symbol.
Editing symbol graphics
Just as with button and graphic symbols, animation symbols are based on a graphic
that you can edit in the Symbol Editor. When you modify the graphic that your
animation symbol is based on, all of its instances — the copies on the canvas —
inherit those changes, as well.
To edit the graphic in an animation symbol, follow these steps:
1. Select the animation symbol you want to edit.
2. Choose Modify ➪ Symbol @ Edit Symbol to open the Symbol Editor.
Alternatively, you can choose Window ➪ Library and double-click your
symbol in the Library panel.
3. Perform your graphical edits in the Symbol Editor.
4. Close the Symbol Editor window when you’re done.
See Chapter 17 for more on the Symbol Editor.
Summary
Fireworks enables you to create and edit animation by using a variety of techniques,
most of which revolve around the Frames panel. When working with animation in
Fireworks, keep these points in mind:
✦ The overall weight of your animated GIF is always a consideration. Every
creative decision must be examined for its effect on file size.
✦ The Frames panel is the heart of Fireworks’ animation tools, but the Layers
panel is also important.
✦ Each frame in your Fireworks document resembles a frame of a filmstrip.
Copy objects to other frames by using the Frames panel, and then change the
objects’ locations on the canvas or their properties to create animation.
✦ Layers can be shared across multiple frames, to manage static objects better
in an animation.
✦ Onion Skinning enables you to view and edit multiple frames simultaneously.
✦ The Web design opportunities for animated GIF images are numerous,
such as animated rollover buttons, sliced animations, and animated browser
backgrounds.
Cross-
Reference
303662-1 ch23.F 8/2/02 2:58 PM Page 781
782
Part VI ✦ Animation
✦ Tweening is a great time- and work-saver because Fireworks fills in the middle
elements of an animation automatically. Any selection of two or more
instances of the same symbol can be tweened.
✦ Fireworks tweens objects starting at the bottom of the stacking order, nearest
the canvas, and moving up.
✦ Distribute a tweened sequence to frames to create an instant animation.
✦ You can use tweening to create advanced effects, such as objects fading in
and out, or flying out from the canvas.
✦ Animation symbols provide an intuitive way to work with animations.
In the next chapter, you look at how you can apply animation techniques to create
that most common species of animated GIF: the banner ad.
✦✦✦
303662-1 ch23.F 8/2/02 2:58 PM Page 782
Animating
Banner Ads
B
anner ads are nearly ubiquitous on today’s Web, and
have contributed enormously to the rapid growth of the
World Wide Web. After you have a sponsored banner ad on a
page, the page begins to pay for itself, and you crave hits —
requests for files made to your server — rather than worrying
about the bandwidth costs of a page that grows too popular.
Understanding Banner Ad Basics
Banner ads are where animated GIF images really shine. You
want a Web advertisement to be eye-catching and universally
viewable, and animated GIF images are really the only choice.
When does an animated GIF stop being an animated GIF and
start being a banner ad? Four elements are involved:
✦ It is a certain size in width and height.
✦ It is below a certain weight in kilobytes.
✦ It is placed on a Web page.
✦ It advertises something.
Let’s take a closer look at each of these points in the following
sections.
Examining size — IAB/CASIE standards
When banner ads started to proliferate on the Web, it became
apparent that some sort of standard sizing scheme would
benefit both the advertisers and the sites displaying the
advertising. If you have a Web site on which you leave a
450×50-pixel space in your design for a banner ad, and I then
send you one that’s 460×60, we have a problem. If ten other
people send you ten other ads, all slightly different in size,
then the problem becomes a big problem.
24
24
CHAPTER
✦✦✦✦
In This Chapter
Understanding
banner ad standards
Putting banners ads
in a Web page
Learning advertising
lingo
Creating banner ads
in Fireworks
Using Blur to save
frames
✦✦✦✦
313662-1 ch24.F 8/2/02 2:58 PM Page 783
785
Chapter 24 ✦ Animating Banner Ads
Looking at weight
In addition to making sure your banner ads are the correct dimensions, you need
to consider their weight (file size). No “one true standard” exists for banner ad
file sizes. Many Webmasters set an upper limit on weight, beyond which they
won’t accept your ad. If you’re designing an ad for a specific site, check with its
Webmaster first to see what the limit is, or at least check the weight of some of the
ads that are already on that site. If you’re not designing for a specific site, a general
rule is to aim for less than 10K, and certainly to keep it under 12K. If you can
produce an exciting ad in 8K, so much the better. Your ad downloads quickly, and
more viewers see your entire message.
Putting it in the page
Obviously, a banner ad is as much an image as any other GIF, and the most basic
way to place a banner ad in a page is with an ordinary
<img> tag. When you export
HTML from Fireworks, this is exactly the way you find your banner ad displayed.
Typically, though, most Web sites that depend on advertising have some sort of
dynamic scheme for rotating through a series of banner ads, so that ads are added
to pages on-the-fly by the server. Visitors who return to a page get an entirely new
ad instead of seeing the same one again. The server also keeps track of how many
times it displays each ad because the sponsor pays for the ad to be displayed a
certain number of times.
Implementing a banner ad rotation system is not nearly as hard as it might sound.
The Web has many low-cost and even free CGI (Common Gateway Interface) scripts.
A few hours of work and even the smallest site can start serving ads like the big guys.
A good place to start looking for the appropriate CGI script for your needs is the
CGI Resource Index at www.cgi-resources.com.
Advertising it
Although a complete course in Madison Avenue advertising methods is well beyond
the scope of this book, it doesn’t hurt to at least know the lingo:
✦ A page view or page impression is one Web page served with your ad on it.
✦ A hit is one request by a browser for one file — an HTML document, or an
image or multimedia file — from your server. Many people use “hits” and
“page views” interchangeably, but one Web page might be made up of
20 individual files, while another page is only 10 files. As a result, it’s best to
define your terms, and seek common ground when discussing “hits.”
✦ CPM is the cost per one thousand (Roman numeral M) page views. This is the
standard way that ad space is bought and sold on the Web. A site with excellent
demographics could demand a higher cost-per-one-thousand ads served.
Tip
313662-1 ch24.F 8/2/02 2:58 PM Page 785
786
Part VI ✦ Animation
✦ A click-through is one specific time when a viewer is interested enough in a
banner ad to click it and go to the advertiser’s site. The Web average for
click-throughs might be less than 1 percent.
✦ The click rate is the percentage of people who click-through a particular ad.
✦ Mindshare is basically brand recognition. Even though Web users don’t click-
through banner ads the way advertisers once hoped they would, studies have
shown that people do look at banner ads and take the brand away with them.
Fireworks Technique: Creating a Banner Ad
Although banner ads are often created by a chain gang of ad people, copywriters,
producers, Web artists, and others, a good way to work on the techniques involved
is to just dive in and start creating ad campaigns for fictional companies of your
own creation. This is exactly what we do as we go step-by-step through the process
of creating a banner ad in Fireworks.
The Mundane Magazine example banner ad created for this section is in both the
original Fireworks PNG format and the exported animated GIF.
Step I: Set the stage
The very first step in creating a banner ad is to make sure you know what size it
should be. Although you may sometimes come up with a creative idea that would
dictate using a certain size, most of the time when you sit down to make a banner
ad, the space has already been allotted. I follow the IAB/CASIE standards with my
banner ad, and make a 468×60 Full Banner, which can be displayed on almost any
Web site that accepts advertising.
Step II: Write the script
Now that you have a suitable “blank page” of the right size and shape, you are
ready to sit and stare at it while you come up with an idea. All the same things that
apply to regular animations apply to banner ads with regard to making a concise
statement, planning ahead, and watching file size.
Let’s face it: A 10K or 12K banner ad is not going to get into serious character
development, or include a lot of scene changes or scenery. If you can’t express your
idea in a few lines, it probably won’t fit into the banner. Think “bumper sticker” and
you’ll probably be more successful.
My ad is for a fictional magazine called Mundane Magazine. It’s a hip, youth-oriented
magazine about the Web. I want to make something that attracts the attention of
the target audience of young, hip Web surfers. Here’s the pitch for my ad: “A UFO
crash lands on a barren alien landscape. The pilot thinks, ‘&*/$.’” Not much of a
plot line, but again, what do you want from 12K?
On the
CD-ROM
313662-1 ch24.F 8/2/02 2:58 PM Page 786
787
Chapter 24 ✦ Animating Banner Ads
Step III: Create the cast of characters
Our little movie has a stage and a script. Now it needs a cast.
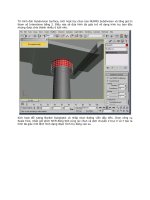
Banner ads are deliberately sized as small as can be, and I find the dimensions a bit
of a constraint when I’m drawing. Objects in banner ads are often cropped, scaled
down, or halfway off the canvas. So I like to draw and build objects in a second,
larger document window (see Figure 24-1); sort of a scratchpad — or, to keep the
showbiz analogy going, a backstage area where objects wait to be placed in their
scenes. Because Fireworks objects always remain editable and can be easily
dragged and dropped between documents, this backstage area is a convenient
way to work.
Figure 24-1: Use a second document as a scratchpad or backstage area when building
objects for use in a banner ad to avoid working entirely within the puny confines of the
ad itself.
Complex effects, such as drop shadows and glows, increase the weight of the final
animated GIF quite a bit because flat colors compress better in the GIF format.
Concentrate on drawing good-looking objects, and leave the effects for later. If your
final animation is underweight (yeah, right), then you can easily go back and add
some effects to objects.
313662-1 ch24.F 8/2/02 2:58 PM Page 787
788
Part VI ✦ Animation
These elements make up the “cast” in my ad:
✦ Some rugged, otherworldly mountains to serve as a setting
✦ Some text of the magazine’s name and catchphrase
✦ A flying saucer to do the crash-landing
✦ A thought bubble with the word “&*/$.” in it
Reusing Design Elements
The tiny face that banner ads present to the world can be very limiting creatively, but there
is one major advantage: Design elements and even bitmap images that were originally
created for a Web site or print media are easily scaled down and reused without losing
quality. Creating a banner ad for a Web site often means you have no end of big logos and
artwork readily available for repurposing in a banner ad, as shown in the following figure.
Although this strategy is efficient from a production standpoint, it’s also valid from a design
perspective to maintain a consistent look between a Web site and a banner ad that
advertises it.
313662-1 ch24.F 8/2/02 2:58 PM Page 788
789
Chapter 24 ✦ Animating Banner Ads
Each of these elements can be thought of as a cast member, an independent entity
that we need to tell what to do as we make our ad.
Step IV: Direct the action
Now you’re ready to start putting the objects where they go. Create a layer for each
of your cast members. I have four cast members, and I have a pretty good idea of
the order in which they should be stacked: The background should be on the
bottom and the text should be on the top, so I made four layers:
✦ Text
✦ Bubble
✦ Saucer
✦ Background
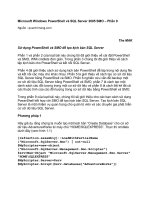
Figure 24-2 shows these layers and shows that the mountains are placed into the
layer called background, which is then shared so that it appears in every frame.
I can lock the background layer now and forget about it.
Figure 24-2: The background is going to stay the same throughout the
animation, so the background layer is shared. This layer is now the same
in every frame.
To share a layer, double-click its name in the Layers panel to view the Layer
Options dialog box and check the Shared Across Frames box.
Splitting up objects onto their own layers enables you to share a layer at any time,
if you decide that a cast member should be static. I’m not sure yet whether the text
with the name of the magazine and the catch phrase is going to be static. It probably
will be, but I might get to change that after I see my animated GIF’s weight. For now,
I place the text in the banner and share its layer, too.
Tip
313662-1 ch24.F 8/2/02 2:58 PM Page 789
790
Part VI ✦ Animation
At this point, the first frame is basically done. The mountains and logo are in
place, and the UFO hasn’t appeared yet. I like to build the last frame next, which is
where the animation rests before looping. I want to make sure that the UFO and the
thought bubble are the right size, so that they hang together nicely in that frame,
before I animate them through a bunch of middle frames (see Figure 24-3). Creating
the first and last frames before the others often makes filling in the middle frames a
lot easier. Naming your first and last frame with descriptive names helps ensure
that you always keep them first and last. Double-click the frame’s name in the
Frames panel to open a dialog box in which you can provide a name.
Figure 24-3: After you finish the first frame, create a new frame in
which to build the last frame. Your two-frame animation now has a
start and finish — named First Frame and Last Frame, here — which
makes building the middle much easier.
Finally, I’m ready to start some serious animating. In the first frame, the UFO hasn’t
appeared yet; in the last frame, it has landed. I’m going to copy the UFO from the
last frame, paste it into the first frame, and then move it to the top of the canvas,
so that it’s just peeking in.
So, in Frame 1, the saucer is just appearing. I want the next frame to be almost
identical, except that the saucer should move a little bit closer to its landing site.
The saucer doesn’t have far to travel, and I would like it to do so in seven or eight
frames, so that the whole animation is nine or ten frames long. Keeping the
animation in a small area and on a small number of frames limits its file size.
You can distribute objects to their own frames at any time with the Distribute to
Frames button on the Frames panel, so it’s often easiest to build an animation
entirely within Frame 1. In my case, I just keep duplicating and arranging copies of
the saucer in the correct positions on the canvas. Eventually, Frame 1 contains a
bunch of saucers in the correct positions on the canvas, but in the wrong frames,
as shown in Figure 24-4.
The quickest way to duplicate objects is to drag them while holding down the Alt
(Option) key.
Tip
313662-1 ch24.F 8/2/02 2:58 PM Page 790
791
Chapter 24 ✦ Animating Banner Ads
Figure 24-4: Duplicating the saucer and moving the
copies into the correct positions on the canvas gets
them ready to be distributed to their own frames.
If your animation features an object that moves in a straight line, use tweening to
generate the intermediate steps. Tweening is covered in Chapter 23.
Because the last frame is already done, I want to manually create frames before
clicking the Distribute to Frames button, so that Fireworks doesn’t have to create
any frames and overlap my final frame. I have seven saucers in Frame 1, so I need
six new frames after Frame 1.
After distributing the saucers to frames, I can preview my animation by using the
VCR controls. If necessary, I tweak the saucer’s descent by moving it a bit to the left
or right in certain frames, until I get the effect that I want, which is a bit of a rough
landing.
When you get to the point where your animation is actually playing, the inevitable
rewrites begin. In my case, I decided that I didn’t want the thought bubble to be the
last frame. Instead, the last three frames should go: Saucer lands, thought bubble
appears, and then thought bubble disappears. I also realized that the “landed”
saucer needs a little chewing up to emphasize that it has “crashed.”
Chewing up the saucer is pretty easy, but it appears in Frame 7 and Frame 8. After
modifying it in Frame 7, I selected it on the canvas and Alt-dragged (Option-dragged)
its selection icon in the Frames panel (see Figure 24-5) from Frame 7 to Frame 8. This
copies the selection from Frame 7 to Frame 8.
The quickest way to get that extra frame on the end is simply to duplicate the last
frame, and then delete the thought bubble out of it. I lose very little in bandwidth
this way, because the last two frames are almost identical, and the only addition to
the final frame is more flat color where the thought bubble was. Duplicating the last
frame is as simple as dragging it in the Frame panel to the New Frame button.
The only thing that’s left now is to set the frame timing, so that the last three
frames are a little slower. The frame timing, looping, and such are set either in the
Frames panel, or on the Animation tab of the Export Preview dialog box. Working in
the Export Preview dialog box, shown in Figure 24-6, sometimes provides smoother
animation playback than the document window, and a centralized access point for
Cross-
Reference
313662-1 ch24.F 8/2/02 2:58 PM Page 791
792
Part VI ✦ Animation
animation controls. You can see that the last three frames are set to one second,
two seconds, and one second, specified in hundredths of a second. I tested a few
combinations of speeds by using the VCR controls in the Export Preview dialog
box. Looping is set to 10 times, which is long enough that it loops for about a
minute because my banner takes a little over five seconds to play. At that point, it
becomes a static banner that still invites the viewer to visit Mundane Magazine,
without annoying them by continuing to flash away.
Figure 24-5: Dragging the selection
icon in the Frames panel from frame
to frame moves a selection. Alt-dragging
(Option-dragging) copies the selection.
Figure 24-6: Set the timing of individual frames, and set the looping
for the whole animation.
313662-1 ch24.F 8/2/02 2:58 PM Page 792
793
Chapter 24 ✦ Animating Banner Ads
If you don’t set looping to forever, make sure the last frame of your animation has
all the pertinent details, so that it provides enough information to get your
message across on its own.
Step V: Leave the excess on the cutting-room floor
Don’t be afraid to be brutal when exporting your animation and creating the
animated GIF image itself. Remember that your focus is to get a message across
quickly — not to win awards for the most colors, or the most profound use of
animation. My banner came in just under 12K, but if it were any bigger, I would
definitely have to consider one of the following options:
✦ Cut some frames, which might make the animation less smooth.
✦ Move the saucers closer together from frame to frame, so that the area that’s
animated is smaller.
✦ Flatten some areas, such as the bumpy, textured mountains. Areas of solid,
flat color compress better.
✦ Take out some colors by cutting the palette further.
✦ Remove effects, such as the inner bevel on the text and the saucer, again to
gain more areas of flat color.
✦ Make some objects smaller, such as the text, so that more of the flat, blue
background is showing, resulting in better compression.
Sometimes, swallowing your creative pride can lead to a better overall presentation
and a fast-loading, attention-attracting banner ad that’s ready to take a message to
the Web.
The final Mundane Magazine banner is exploded in Figure 24-7.
Turn to the color insert for another look at the example banner ads from this
chapter.
Fireworks Technique: Using Blur to
Save Frames
Generally, you want your ads to be dynamic and fast-moving, but as with everything
on the Web, bandwidth is always an issue. Every frame that you add to your banner
increases the file size.
Cross-
Reference
Tip
313662-1 ch24.F 8/2/02 2:58 PM Page 793
795
Chapter 24 ✦ Animating Banner Ads
Figure 24-8: The saucer seems to quickly fly across
the banner, at the meager expense of just three frames.
Find the animated GIF banner ad detailed in this section, as well as the Fireworks
PNG file, on the accompanying CD-ROM.
Summary
Banner ads are a practical and popular application of the animated GIF. When
creating banner ads in Fireworks, keep these things in mind:
✦ Standard sizes exist for banner ads. Before you create a banner ad, make sure
that you’ve selected the correct size so that your banner ad can be used on
the widest variety of Web sites.
✦ Many Web sites have upper limits on the file sizes accepted. Generally, banner
ads should be under 12K.
✦ Use motion blur to cut out frames without slowing down the action.
In the next chapter, you look at customizing Fireworks.
✦✦✦
On the
CD-ROM
313662-1 ch24.F 8/2/02 2:59 PM Page 795
313662-1 ch24.F 8/2/02 2:59 PM Page 796
Programming
with Fireworks
O
ne of the most amazing things about Fireworks MX
is the way it can be controlled by scripts written in
JavaScript, the most common scripting language for Web
authoring. Fireworks offers many ways to customize the way
you work with the program. In Part VII we look at each of
them and discover the extensive Fireworks JavaScript API
(Application Programming Interface). The final chapter
explores the brave new world of Fireworks extensions and
describes how you can use Flash to create user interfaces for
such commands.
✦✦✦✦
In This Part
Chapter 25
Customizing
Fireworks
Chapter 26
Building Fireworks
Extensions
✦✦✦✦
PART
VII
VII
323662-1 Part07.F 8/2/02 2:59 PM Page 797
323662-1 Part07.F 8/2/02 2:59 PM Page 798
Customizing
Fireworks
W
eb development has become an incredibly diverse
field. It spans the range from the person building
a personal home page, all the way to incredibly complex
Web applications that generate pages on the fly and provide
functionality that has traditionally only been found in stand-
alone applications. With the variety of technologies in use on
the Web today, imagining a Web development tool that could
be all things to all people, without demonstrating an amazing
degree of flexibility, is hard.
Macromedia has certainly demonstrated with Fireworks
that it believes an extensible Web tool is a good Web tool.
Almost every feature can be accessed through the extensive
JavaScript API, and many features are executed in easy-to-
modify HTML and JavaScript. Preferences are easily exposed
in a simple text file. Extensions are added by dropping them in
the appropriate subfolder of the Configuration folder, inside
the Fireworks program folder.
In this chapter, I show you some of the ways that you can
customize Fireworks and create your own ultimate Web
graphics editor.
Using the HTML and
JavaScript Engine
Part of the explosive growth of the Web is due to the relative
accessibility of the underlying code. HTML is —as programming
languages go —extremely easy to learn and abundantly
available. Whereas JavaScript is more difficult, it is far more
open than any compiled programming language, such as C or
C++. The Fireworks engineers applied this accessibility to a
novel approach: Portions of Fireworks itself are written in HTML
and JavaScript, stored as simple text files in subfolders of
Fireworks’ Configuration folder.
25
25
CHAPTER
✦✦✦✦
In This Chapter
The HTML and
JavaScript engine
The Configuration
folder
Adding new
extensibility files
Fireworks Preferences
file
✦✦✦✦
333662-1 ch25.F 8/2/02 2:59 PM Page 799
800
Part VII ✦ Programming with Fireworks
Fireworks uses JavaScript and HTML templates to output JavaScript and HTML
code; scripts that automate tasks in Fireworks are written in JavaScript. This open
approach makes it easy for Web designers to customize many aspects of their
Fireworks workflow completely.
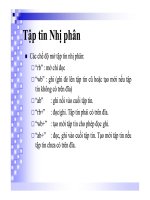
Scriptlets are stand-alone JavaScript files that run on Fireworks itself. They can be
placed in Fireworks’ Commands folder and run from the Commands menu, run with
the Commands ➪ Run Script command, or opened like any Fireworks document —
with a double-click. Scriptlets have their own icon, as shown in Figure 25-1. Double-
clicking a scriptlet, or dropping it onto the Fireworks icon, launches Fireworks and
executes the scriptlet.
Figure 25-1: Fireworks scriptlets— JSF files — are
stand-alone JavaScripts that run on Fireworks.
On Windows machines, scriptlets are their own file type, with the .jsf filename
extension. Create or edit a scriptlet as a regular text file, and then change the
filename extension from .txt to .jsf when you’re ready to run it.
On the Mac, a scriptlet is a text file with a Fireworks Creator code, just as a
Fireworks document is a PNG image with a Fireworks Creator code. Compile the
following AppleScript as an application in Script Editor, and drop files on it to
convert them to Fireworks’ Creator code. Dropping a text file marks the text file
as a scriptlet; dropping a PNG image marks it as a Fireworks PNG document.
Alternatively, use a utility, such as File Buddy or FinderPop, to change Mac Creator
and/or File Type codes.
on open
tell application “Finder”
set creator type of every file of selection to “MKBY”
end tell
end open
333662-1 ch25.F 8/2/02 2:59 PM Page 800
801
Chapter 25 ✦ Customizing Fireworks
You can use scriptlets to do an amazing range of tasks. Anything that the Fireworks
API can access is fair game, and that’s a fair number of things. Scriptlets can change
preference settings, automate tasks, batch process files, and more.
Scriptlets are also commands. Placing scriptlets in the Commands folder and
choosing their name from the Commands menu runs them from within Fireworks.
Alternatively, you can run a scriptlet from within Fireworks by choosing Commands
➪ Run Script and navigating to a scriptlet within the Open dialog box that follows.
To make your own scriptlets, study the JavaScript API in Chapter 26.
Examining the Configuration Folder
Starting with the MX version, Dreamweaver is compatible with multiple-user
operating systems including Windows NT, 2000, and XP as well as Mac OS 9 and
Mac OS X. This compatibility means that multiple users can work with a single
installation of the program but maintain their own preferences and configuration.
To achieve such flexibility, Dreamweaver maintains customized files in a special
folder for each user. These folders are stored in different locations according to the
operating system. Under multiple-user systems, the folders are within the specified
user folder, designated by the user’s ID or login name as shown in Table 25-1 and
Table 25-2. You may wish to refer to these tables are you proceed through the chapter.
Table 25-1
Default Windows User File Locations
Operating Multiple Default Location
System Users
Windows 98 No C:\Windows\Application Data\Macromedia\Fireworks MX
Windows 98 Yes C:\Windows\Profiles\<username>\Application Data\
Macromedia\Fireworks MX
Windows ME No C:\Windows\Application Data\Macromedia\Fireworks MX
Windows ME Yes C:\Windows\Profiles\<username>\Application Data\
Macromedia\Fireworks MX
Windows NT — C:\WinNT\Profiles\<username>\Application Data\
Macromedia\Fireworks MX
Windows 2000 — C:\Documents and Settings\<username>\Application Data\
Macromedia\Fireworks MX
Windows XP — C:\Documents and Settings\<username>\Application Data\
Macromedia\Fireworks MX
Cross-
Reference
333662-1 ch25.F 8/2/02 2:59 PM Page 801