Implementing SSH Strategies for Optimizing the Secure Shell phần 6 potx
Bạn đang xem bản rút gọn của tài liệu. Xem và tải ngay bản đầy đủ của tài liệu tại đây (1 MB, 41 trang )
Figure 5.11 The new set of user restrictions.
SSH: Network Access Controls
Installing an SSH management server adds tremendous flexibility and secu-
rity to any network environment. The use of SOCKS and Chroot helps further
streamline and secure management access to sensitive servers and devices.
Another method to help secure the SSH management server is the use of TCP
wrappers on Unix SSH servers and connection filters on Windows SSH
servers.
SSH TCP wrappers
TCP Wrappers is a Unix utility that permits or denies network access to a par-
ticular port to a specified set of IP addresses. TCP wrappers functions by
replacing the network service with the TCP wrapper service before the com-
munication can be completed. The IP addresses for TCP wrappers are located
in the hosts.allow and hosts.deny. For example, before any IP address can con-
nect to a particular service/port on a system using TCP wrappers, the TCP
wrappers utility first checks to see if the requesting IP address is approved to
access the service/port. If TCP wrappers deems that the IP address is allowed,
by checking the hosts.allow and hosts.deny files, the requesting IP address is
allowed to continue to access the service and port. Note that even though the
IP address is allowed to access the service/port, the IP address will still need
to carry out any authentication requirements for the service. Figure 5.12 shows
the TCP-wrappers process.
SSH Management 177
Figure 5.12 TCP wrappers with SSH.
A good way to think of TCP wrappers is simply as a set of access-control
lists applied to specific TCP ports on a Unix operating system. For example,
once an SSH management server is set up to administer sensitive servers
and/or devices, there may be a need to secure the access to the SSH server to
only the firewall admin group’s subnet, or the backup operator’s subnet, or
any machine located in the management network. Furthermore, if the admin-
level subnets or IP addresses are known on a network, there is no limitation or
reason not to place TCP wrappers on SSH servers. TCP wrappers will prevent
unauthorized internal and external employees from simple brute-force SSH
attacks by complexly eliminating any possibility of the unauthorized IP
addresses to connect to the SSH management server.
The SSH application/process can use TCP wrappers to prevent unautho-
rized users from connecting to the SSH server, while permitting valid groups,
such as firewall-management groups. To use TCP wrappers on an SSH server
using SSH Communications’ Unix SSH server, complete the following steps:
1. Change directories to your SSH2 configuration folder using the follow-
ing syntax:
#cd /usr/local/bin/ssh-3.2.3
2. Configure and make the SSH server with the libwrap binary using the
following syntax:
#./configure –with-libwrap
#make
#make install
3. Once the SSH server has compiled correctly, change directories to the
/etc directory using the following syntax:
#cd /etc
SSH Service SSH Session
SSH Client
SSH Service SSH Session
Without TCP Wrappers
TCP Wrapper
SSH Client
With TCP Wrappers
178 Chapter 5
4. Edit the two TCP wrapper files, called hosts.allow and hosts.deny. The
TCP wrappers daemon always reads IP addresses or hostnames in
hosts.allow first. If it sees a match in hosts.allow, it will permit the IP
address or hostname. If it does not see a match in hosts.allow, it will
read the hosts.deny. This being the case, you want to put a “deny all
rules” in hosts.deny. If neither the hosts.allow nor hosts.deny file con-
tains information, all IP addresses and hostnames will be allowed. The
following is the format required for the hosts.allow and hosts.deny
files, as well as examples of each:
Format . daemon : IP.address or hostname
Hosts.allow
sshd2: 10.1.0.
Hosts.deny
sshd2:ALL
5. The hosts.allow file would allow access to any IP address coming from
10.1.0.0 to 10.1.0.254. The hosts.deny file would deny access to every
other IP address.
SSH Connection Filters
Connection filters are available with VanDyke Software’s VShell SSH server.
Unlike Unix TCP wrappers, connection filters are a simple access-control list
applied to the TCP/IP interface that the SSH service is listening on. It is not a
separate process, nor does it in any way intercept the SSH client request;
rather, it accepts or rejects SSH connections based on the source IP address
located in the TCP header of an IP packet. To view the Connection Filters
screen in the VShell SSH server, complete the following steps:
1. Select Start ➪ Programs ➪ VShell ➪ VShell.
2. Highlight the Connection Filters section.
The VShell Connection Filters screen (see Figure 5.13) shows two separate
sections: the Filter entries section and the Test filter section. The Filter entries
section is where the filters would actually be set. Notice the default filter to
allow access to all IP addresses, denoted by 0.0.0.0/0.0.0.0. The Test filter sec-
tion tests the connection to any IP address specified.
SSH Management 179
Figure 5.13 The Connection Filters screen of VShell’s SSH server.
Let’s say you want to deny access to the SSH server from the users’ network
(172.16.1.0/24) but permit access to the SSH server from the management net-
work (10.1.0.0/24). Complete the following steps to add the appropriate con-
nection filters:
1. Select the Add button.
2. Select Netmask for the Filter type.
3. Enter 172.16.1.0 for the Network.
4. Enter 255.255.255.0 for the Mask.
5. Enter Users’ network for the comment.
6. Select the Deny radio button under the Action section on the left side.
7. Select OK.
8. Select the Add button.
9. Select Netmask for the Filter type.
10. Enter 10.1.0.0 for the Network.
11. Enter 255.255.255.0 for the Mask.
12. Enter Management network for the comment.
13. Select the Allow radio button under the Action section on the left side.
14. Select OK.
180 Chapter 5
15. Highlight the default filter, Allow 0.0.0.0/0.0.0.0, which allows
all IP addresses to connect, and move the filter to the bottom using the
downward arrow key on the right-hand side. The filters are read from
top to bottom. When a client attempts to connect, the top filter will be
read first. If a match is identified, the other filters are not read and the
matched filter is executed. When placing several filters on the VShell
SSH server, it is probably good practice to make a final Deny filter that
denies any IP address that does not match any of the filters before it.
You’re done. Now any IP address on the 172.16.1.0/24 network will be
restricted, and all addresses on the 10.1.0.0/24 network will be permitted (as
shown in Figure 5.14).
SSH Host Restrictions
Host restrictions are available with SSH Communications’ Windows SSH
server. SSH host restrictions are very similar to VShell’s connection filters.
Both are a simple access-control list applied to the TCP/IP interface on which
the SSH service is listening. To view the Host Restrictions screen in SSH Com-
munications’ SSH server, complete the following steps:
1. Select Start ➪ Programs ➪ SSH Secure Shell Server ➪ Configuration.
2. Highlight the Host Restrictions section.
Figure 5.14 The new set of access filters.
SSH Management 181
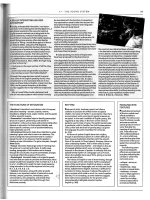
The SSH Communications’ Host Restrictions screen (see Figure 5.15) shows
two separate sections: the Allow login from hosts and the Deny login from
hosts.
Let’s say you want to deny access to the SSH server from the users’ network
(172.16.1.0/24), but permit access to the SSH server from the management net-
work (10.1.0.0/24). Both Allow and Deny fields use special syntax, denoted
with the \ symbol, to include variables, so each IP address does not need to be
entered. Complete the following steps to add the appropriate connection filters:
1. Move the mouse inside the Allow login from hosts.
2. Type 10\.1\.0\ *.
3. Move the mouse inside the Deny login from hosts.
4. Type 172\.16\.1\
5. Select Apply.
You’re done. Now any IP address on the 172.16.1.0/24 network will be
restricted and all addresses on the 10.1.0.0/24 network will be permitted (as
shown in Figure 5.16).
Figure 5.15 The Host Restrictions screen of SSH Communications’ SSH server.
182 Chapter 5
Figure 5.16 The new set of host restrictions.
Summary
In this chapter, I introduce several options that SSH can provide to deploy and
maintain secure-management processes and procedures. Management meth-
ods are often targeted by attackers as an attack vector, creating a false sense of
security for many administrators who overlook management processes and
procedures.
Secure management involves sure-management networks, but also secure
management services on devices. I cover the use of SSH services in atypical
environments such as network devices/network hardware. Various types of
devices, including routers, switches, load balancers, storage appliances, VPN
servers, and firewalls, can provide SSH services on their respective network
hardware, eliminating the need for insecure protocols such as Telnet and
greatly improving the management of these devices. For example, a VPN
server that controls access to the internal network for external users and is
managed remotely with HTTP or Telnet negates many of the security issues of
the VPN server itself (encryption). Furthermore, storage devices that hold and
protect critical company data may use a clear-text protocol for management,
making admin-level access to the machine more vulnerable.
SSH Management 183
This chapter demonstrates how SSH can secure both network devices and
management methods with the use of native SSH services on network devices
and the integration of SSH with other operating-system tools such as Chroot
and TCP Wrappers. The next chapter covers port forwarding and how an
SSH can be utilized as a remote-access solution rather than just a secure-
management solution. The next chapter expounds upon the definition of SSH
and how it can be utilized in so many ways.
184 Chapter 5
PART
Two
Remote Access
Solutions
187
We have discussed several features, utilities, and benefits that SSH provides
with a single service or subsystem, but one of the most useful and powerful
features is port forwarding. Since port forwarding is such a strong feature of
SSH, two chapters are dedicated to it. This chapter addresses the basics of port
forwarding, such as what it is, how to set it up, and some of its basic require-
ments. The next chapter discusses the advanced usages of port forwarding
and how to use it in network architecture in order to optimize it.
Port forwarding is the ability of an SSH client to connect to an SSH server
and then forward other ports within the established SSH connection. Port for-
warding is also referred to as SSH tunneling, where alternative TCP traffic is
sent over an encrypted SSH tunnel. The great part about port forwarding is
that it requires few to no changes on the SSH server, besides being enabled,
and it is fully functional on most default SSH2 installations.
For example, if an SSH connection is established between an SSH server and
an SSH client, another protocol/port, such as IMAP (port 143), could be tun-
neled within the SSH connection over port 22. Since port forwarding uses only
the existing SSH tunneling for communication, usually on port 22, only one
firewall rule is required to permit an unlimited number of ports to be tunneled
through the existing SSH session. SSH port forwarding not only requires fewer
firewall rules, which reduces the required number of ports allowed into the
internal network; it allows several insecure protocols to be secured, such as
mail (IMAP, POP3, and SMTP), file transfer (SMB, FTP, CIFS, and NFS), and
management (Telnet, VNC, and pcAnywhere). Figure 6.1 shows an example of
the tunneling process.
SSH Port Forwarding
CHAPTER
6
Figure 6.1 An established SSH connection with the IMAP protocol tunneled.
Before discussing port forwarding, let’s examine two of the three types of
port forwarding: local and remote, also referred to as outgoing and incoming,
respectively.
NOTE Dynamic port forwarding is discussed in Chapter 9, under the “Dynamic
Port Forwarding and SOCKS” section.
Local port forwarding is when an SSH client makes any type of connection
to a local port on its localhost, presumably the loopback interface (127.0.0.1),
and the connection is tunneled outbound through the established SSH con-
nection to another computer (either the SSH server or a computer that the SSH
server can make a connection to).
Remote port forwarding does the opposite of local port forwarding. It for-
wards communication coming from a remote port on a remote server, such as
the SSH server, to a local port on the SSH client (or a machine that the SSH
client has access to).
A good example of local port forwarding is the use of internal Web intranet
pages. Let’s say that business travelers need to access the internal intranet
page at least three times a day. The business travelers are usually connecting
from inside customer networks and/or hotel dial-up connections. The use of a
VPN device does not satisfy the business travelers’ needs. IPSec VPNs cannot
traverse firewall devices over Network Address Translation (NAT). Further-
more, remote access is required from other customer networks and hotel envi-
ronments, where networking configuration will always be an unknown. Let’s
say the corporate network contains only three servers and an unlimited num-
ber of business travelers. The network contains a firewall, protecting the
perimeter of the network; an SSH server, for established SSH connections; and
Established SSH Session
IMAP
SSH Client
SSH Server
Mail Serve
r
IMAP
188 Chapter 6
an internal intranet Web server, which holds the intranet Web page. The fol-
lowing five simple steps are the only ones required in order to allow business
travelers secure access to the intranet from all different types of networks:
1. Install an SSH server listening on port 22.
2. Install a single rule on the firewall that allows connections on port 22 to
reach the SSH server.
3. Set up the SSH client to locally port forward port 80 to the intranet Web
server when a connection has been requested on its lookback interface
(127.0.0.1).
4. Connect to the SSH server with the SSH client, with the port-forward
rules enabled.
5. Open a Web browser and enter the lookback IP address (127.0.0.1); the
intranet Web site should be displayed.
Figure 6.2 shows the example architecture.
Figure 6.2 SSH local port-forward architecture.
SSH Client
SSH Server
Firewall
Internet
11.17.73.1
172.16.1.1
11.17.73.2 172.16.1.2
Internal Network
Intranet Web Server
(172.16.1.100)
Step 1: Firewall
Firewall rule allows Port 22
from anywhere to SSH Server
(11.17.73.2)
Step 2: SSH client
Connection:
11.17.73.2
Local Port Forward:
Port 80:172.16.1.100
Final Result
SSH client connects to
127.0.0.1 on port 80 with
their web browser and
receives the intranet
web server application
SSH Port Forwarding 189
A good example of remote port forwarding is the use of public FTP servers.
Although using FTP and port forwarding is a very tricky procedure, due to the
use of active FTP, it still can be done. Let’s say that both internal employees
and external customers need to get files from an organization’s public FTP
server. While the FTP server contains public information for the customers to
download, it also contains private information for employees to use. The net-
work contains an FTP server, an SSH server, and an unlimited number of
employees and customers who need to access the FTP server. The use of SFTP
is a good alternative by the organization, but the organization does not want
to make its customers use SFTP, since SFTP clients do not come on most oper-
ating systems by default (it would be really nice if they did). The only require-
ment is that internal employees cannot use clear-text protocols to access
sensitive company information. To prevent the private information from being
sent over the Internet in clear-text, a remote port-forwarding session can be set
up. The following five simple steps are the only ones required in order to allow
customers to download information with FTP as well as to allow internal users
to download information with the use of encryption (shown in Figure 6.3):
1. Install an SSH server that listens on port 22.
2. Install an SSH client on the FTP server.
3. Set up the SSH client on the FTP server for a remote port-forwarding
session. Set up the session so that when the SSH client (the FTP server)
establishes a connection to the SSH server, a remote port-forwarding
session will be established that will make the SSH server listen on port
21 and redirect any connections to port 21 (on the SSH server) to port 21
on the FTP server.
4. Internal employees should FTP to the SSH server on port 21, which will
be forwarding to the FTP server on port 21 over the established SSH
session.
5. External public customers should make a regular FTP connection to the
FTP server on port 21, which will not be encrypted with SSH.
190 Chapter 6
Figure 6.3
SSH remote port-forward architecture.
Internal Employees
(172.16.1.10 - 172.16.1.254)
FTP Server
11.17.73.100
SSH Server
11.17.73.1
1. The FTP Server's SSH Client establishes
a connection to the SSH server with a
remote port forwarding setup, which
states to forward any connection on
port 21 on the SSH server to the FTP
server on port 21.
2. The SSH server is now
also listening on
port 21.
3. Internal employees make a FTP connection on port 21
to the SSH server (11.17.73.1), which will get forwarded
to the FTP server (11.17.73.100) on port 21 over an SSH
encrypted tunnel.
ENCRYPTED
SSH Port Forwarding 191
SSH port forwarding is simple and straightforward. The theory behind port
forwarding is much like the process of simple TCP relaying. ATCP relay is the
ability to accept connections on a particular port and redirect them somewhere
else. For example, every connection on port 80 on a machine’s loopback
address (127.0.0.1) is relayed to port 80 on 172.16.1.100. The only difference
with SSH port forwarding is that the connection is redirected through an
established SSH session first and then replayed to the remote machine. Some
basic requirements must be met in order for port forwarding to work, such as
a valid connection from the SSH server to the remote server (the server receiv-
ing the relayed connection); however, that is not a separate configuration step
but an assumed requirement.
A key point to keep in mind regarding port forwarding is that protocols
such as IMAP, SMTP, and POP3 being tunneled are terminated at the SSH
server. For example, if a client is connecting to an SSH server and then port for-
warding SMTP and IMAP over SSH to receive e-mail securely, the mail proto-
cols will be tunneled from the SSH client to the SSH server; then the mail
protocols will be sent over their native protocols from the SSH server to the
mail server. The communication from the SSH server to the mail server will
not be under an SSH session. Figure 6.4 shows further details.
Notice in Figure 6.4 that the IMAP and SMTP protocols are protected from
the SSH client to the SSH server by the port-forwarding tunneling process;
then they communicate with their native protocols without any tunnels from
the SSH server to the mail server.
This chapter examines some of the basics of SSH port forwarding, specifi-
cally the following topics:
■■
Networking basics of port forwarding for clients
■■
Networking basics of port forwarding for servers
Figure 6.4 Where an SSH session would be terminated.
Established SSH Session
SSH Client
SSH Server Mail Serve
r
IMAP, SMTP
IMAP
SMTP
SSH
communication
No SSH
communication
192 Chapter 6
Also, configuring local and remote SSH port forwarding on the following
SSH clients is explored:
■■
SSH command-line client (OpenSSH and commercial versions)
■■
SSH Communications’ SSH client
■■
SecureCRT SSH client
Lastly, enabling SSH port forwarding on the following SSH servers is
examined:
■■
OpenSSH (Unix and Windows)
■■
SSH Communications’ SSH server (Unix and Windows)
■■
VanDyke’s Software SSH server (Windows)
Networking Basics of Port Forwarding for Clients
Before discussing how to configure port forwarding on clients, you should
understand the basic networking concepts of port forwarding, especially in
terms of what it is, how it works, and what is happening behind the scenes. A
deep understanding of the core concepts of port forwarding will eliminate a
lot of confusion later in the advanced sections.
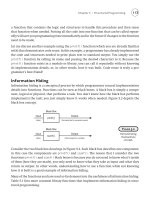
The first basic concept is the established SSH session. Each SSH client and
SSH server will have an authenticated and established SSH session. The actual
session can be used for terminal access, SFTP/SCP access, or no access, if both
the terminal session and SFTP/SCP are restricted.
NOTE An SSH session can still be established if terminal or SFTP/SCP access
is not granted.
The restriction of terminal and SFTP access usually means that the user has
the right to use the SSH session for port forwarding through the SSH server
but not for gaining access to the SSH server. Once the SSH session is estab-
lished, any port-forwarding options on the SSH client will be applied; how-
ever, any port-forwarding rules need to be configured before the SSH session
has been established. If port-forwarding options are configured during or after
the SSH session has been established, the options will not be effective until the
session is fully re-established.
The second major concept of port forwarding is that most, if not all, config-
uration of port forwarding is conducted on the client, not on the server. For
example, if port forwarding is required between an SSH client and an SSH
server, the configuration for the incoming or outgoing SSH rules will be on the
SSH Port Forwarding 193
client. In the port-forwarding architecture, the server needs to allow port for-
warding, but no specific configuration is required on the server.
NOTE Many SSH server installations allow port forwarding by default,
requiring no configuration at all after a default installation of the SSH server.
The port-forwarding rules applied to the SSH client will vary, depending on
whether the rules are local (outgoing) or remote (incoming) on the SSH client.
The use of local (outgoing) rules provides a practical and more advantageous
option than remote port forwarding. So you will probably use local port for-
warding more often than remote port forwarding.
Local port-forwarding rules redirect connections on local ports—that is,
ports local to the operating system that the SSH client is running on—to a spec-
ified port and server on the other side of the SSH established connection,
which can be the SSH server itself or a machine that the SSH server can access.
When configuring local port forwarding, the user is given the option to
specify the IP address to use for local forwarding as well as the port number.
For example, if the SSH client is installed on a machine that has an IP address
of 172.16.10.21, the options for the local IP address will be 172.16.10.21 or
127.0.0.1, which is the loopback interface of the computer. A loopback is
basically an IP address that identifies the local machine using TCP/IP. In
most cases, you will want to use the loopback address, 127.0.0.1, for local port
forwarding.
Furthermore, using the real IP address, such as 172.16.10.21, is a security
risk, since other machines could connect to your IP address (172.16.10.21) and
use your established SSH connection to tunnel communication. That being
said, that may be your intended usage, so proceed with caution.
Once you have chosen the loopback address, 127.0.0.1, for the IP address to
use for local port forwarding, you will have to choose which port you would
like to connect to. You can choose any port you like, as long as the operating
system allows you to access that port. (Some operating systems do not allow
sharing of services on a single port, such as port 445 on Windows.) The best
option for a port is to use the standard port for the protocol that will be for-
warding. For example, if Web communication will be forwarded, which uses
HTTP and HTTPS, you will probably want to use ports 80 and 443 with the
lookback interface. Keep in mind that if you use a port that is not standard,
such as port 1173, you will have to tell your client application, such as your
Web browser, to use port 1173 instead of port 80 or 443 (for example,
http://127.0.0.1:1173).
Now that you have chosen your local IP address and local port, you need to
choose which remote server you want to redirect any connections made to
your specified local address and port. For example, if the remote server is the
194 Chapter 6
internal Web server for an organization, which holds the company’s intranet
application, you need to choose the IP address of the internal Web server. Keep
in mind that the SSH server must be able to communicate with this machine
natively, without any firewall, router ACLs, or networks preventing it from
communicating with the remote machine. If the IP address of the internal Web
server is 192.168.12.15, that will be the IP address of the remote server. After
the IP address of the remote server is specified, the remote port has to be
selected also. Unlike the local-port option, the remote-port option is dictated
by the remote server. For example, if the intranet Web application uses HTTP,
which is port 80, you must specify port 80 and the remote port. Furthermore,
if the remote server is a mail server and you are forwarding mail protocols,
you have to choose SMTP and POP3, which are ports 25 and 110.
Now that you have your local IP address (127.0.0.1), local port (80), remote
server IP address (192.168.12.15), and remote port (80), selected for your local
port-forwarding rule, you are ready to forward the HTTP protocol through the
SSH connection. The following steps walk you through the process of using
the local port-forwarding session by using an SSH server with two IP
addresses: one that faces externally to the Internet, 12.15.10.21, and one that
faces internally to the internal network, 192.168.12.1:
1. Having established your local port-forwarding rules, establish an SSH
connection to the SSH server on its external IP address (12.15.10.21)
using the required authentication options (see Figure 6.5).
Figure 6.5 Local port-forwarding rules in an SSH client.
SSH Port Forwarding 195
2. The SSH session is now established with the local port-forwarding rules
enabled. (To confirm, you can type netstat –an on a command shell, and
your lookback IP address, 127.0.0.1, should be listening on port 80.)
Next, open your Web browser. In the URL section of your Web browser,
type 127.0.0.1 (see Figure 6.6).
3. Once your Web browser attempts a connection to your lookback
address, 127.0.0.1, on port 80 (by default, Web browsers connect on port
80), your port-forwarding rules will be triggered. The rules will dictate
that all connections to 127.0.0.1 on port 80 should be redirected through
the established SSH connection to 192.168.12.15 on port 80.
4. Assuming your SSH server can communicate with 192.168.12.15,
the connection is forwarded beyond your SSH server to the internal
Web server, on port 80. The internal Web server sends the results,
probably the intranet’s home page, to the SSH client’s Web browser.
See Figure 6.7.
Note that the local port-forwarding connection from your SSH client to the
SSH server is fully encrypted with SSH, but the connection from the SSH
server to the local intranet server uses its native protocol, which would be
HTTP. For an example of how this works, see Figure 6.8.
Figure 6.6 A Web browser pointing to a loopback address (127.0.0.1).
196 Chapter 6
Figure 6.7 The company’s intranet Web page to the remote SSH client, sent after
requesting 127.0.0.1 on the URL of the Web browser.
Figure 6.8 The SSH encrypted session and the native protocol (HTTP) session.
SSH Client
172.16.10.21
Intranet Web Serve
r
192.168.10.21
Local Port Forwarding Rule:
Local IP: 127.0.0.1
Local Port: 80
Remote IP: 192.168.10.21
Remote Port: 80
SSH Server
192.168.10.112.16.10.21
Internet
Encrypted with SSH
Native Protocol (HTTP)
SSH Port Forwarding 197
Remote port forwarding has functionality similar to local port forwarding;
the specific steps, however, are actually quite different. Remote port forward-
ing redirects remote connections on the SSH server to local ports on the SSH
client, that is, the operating system that the SSH client is running on, over an
SSH established connection. When configuring remote port forwarding, the
SSH client is given the option to specify the port to have the remote SSH server
listen on. For example, if the SSH client chooses port 21, the SSH server will
begin to listen on port 21 automatically once the SSH connection is established.
Once the SSH client has chosen the port number for the SSH server and has
established an SSH connection, any machine connecting to port 21 on the SSH
server will be redirected to the SSH client over an encrypted SSH tunnel. The
port number that is redirected from the SSH server to the SSH client is also
determined by the SSH client. Unlike the SSH server, the SSH client’s machine
will not automatically start listening on that port; rather it is assumed that a
service, such as FTP, is already running on that port, which would be the
whole reason to set up the remote port-forwarding rule.
Now that the SSH client has chosen the remote port for the SSH server to
listen on (port 21), the remote port-forwarding rule can be initialized. The
following steps walk you through the process of using the remote port-
forwarding session by using an SSH server with two IP addresses: one that
faces externally to the Internet, 12.15.10.21, and one that faces internally to the
internal network, 192.168.12.1:
1. Execute the remote port-forwarding rules, an established SSH connec-
tion to the SSH server on its external IP address (12.15.10.21), and the
required authentication options. See Figure 6.9.
2. Now that the SSH session is established, the remote port-forwarding
rules should be enabled. (To confirm, you can type netstat –an on the
SSH server, and port 21 should be listening.)
3. Once an FTP client connects to the SSH server on FTP, the connection
will be redirected to the SSH client on port 21, over the encrypted SSH
session.
Note that the remote port-forwarding connection from the SSH client to the
SSH server is fully encrypted with SSH but that the connection from the SSH
server to the FTP client uses the native protocol, which would be FTP. For an
example of how this operates, see Figure 6.10.
198 Chapter 6
Figure 6.9 Remote port-forwarding rules in an SSH client.
Figure 6.10 Remote port forwarding using FTP.
SSH Client
172.16.10.21
(Running a native FTP
server on port 21)
Remote Port Forwarding Rule:
Local IP: 172.16.10.21
Local Port: 21
Local service: FTP
Remote Port: 21
SSH Server
192.168.10.112.16.10.21
Internet
Encrypted with SSH
Native Protocol (HTTP)
FTP Client
FTP Connection on port 21
SSH Port Forwarding 199
Networking Basics of Port Forwarding for Servers
Unlike the networking concepts of port forwarding for SSH clients, the net-
working basics of port forwarding for SSH servers is quite simple. Port for-
warding in SSH server environments does not require any type of special
configuration for the client to use the specific feature. The only major require-
ment for the SSH servers is that the port forwarding feature be either enabled
(allowed) for the clients or, if it is not desired, disabled (disallowed).
As with SSH clients, the first basic concept of networking for SSH servers is
the established SSH session. Each SSH client and SSH server will have an
authenticated and established SSH session. The SSH server can permit access
to a terminal shell, SFTP/SCP access, or neither, thereby allowing only an
established (authenticated) session. Once the SSH session is established and
authenticated by the SSH server, any port-forwarding option can be applied
that has been configured on the SSH client. Note that while many SSH servers
allow port forwarding by default, port forwarding can be disabled by some
SSH servers and can also be limited, restricting or permitting port forwarding
on a designated set of servers or specified users and groups. This restriction or
permission of port forwarding, port-forwarding ports, and port-forwarded
servers is configured on the SSH server. If an SSH client attempts to port for-
ward a port or attempts to port forward to a server that is restricted by the SSH
server, the client will be denied access.
The port-forwarding rules applied on the SSH clients can either be outgoing
(local) or incoming (remote). The type of port forwarding on the SSH client
will determine the type of networking enabled on the SSH server.
If outgoing (local) port forwarding is being used on the SSH client, no spe-
cific networking changes are generated on the SSH server. For example, if an
SSH client is port forwarding port 143 (IMAP) to an e-mail server that the SSH
server is connected to, the SSH server will not change its networking configu-
ration but will act as a conduit for the SSH connection between the SSH client
and the e-mail server. In this architecture, the SSH client sends packets to the
SSH server destined for the e-mail server on port 143. Once the SSH server
receives the incoming packets from the authenticated SSH client on the estab-
lished SSH session, the SSH server redirects or routes the packets to the e-mail
server on port 143 on behalf of the remote SSH client. In this example, the SSH
server is acting more as a router between the authenticated and established
SSH client and the desired server; however, no networking changes or services
are modified on the SSH server itself.
200 Chapter 6
Similarly, if the SSH client is port forwarding to the SSH server, not to
another server that the SSH server may be connected to, the SSH server still
has no specific networking changes generated. For example, if the SSH server
is also acting as an FTP server on port 21 and an SSH client port forwards FTP
to the SSH server, there are no networking changes on the SSH server. Since
the SSH client is port forwarding to an existing service (port) on the SSH/FTP
server, the SSH server’s networking configuration does not change but rather
continues to act as an SSH server as well as an FTP server.
If incoming (remote) port forwarding is being used on the SSH client, net-
working changes on the remote SSH server are generated. For example, if an
SSH client is using remote port forwarding on port 21 (FTP), the authenticated
and established SSH session will generate and start a service on port 21 on the
selected networking interfaces on the SSH server. In this architecture, the SSH
client waits for redirect packets from the SSH server. In this example, a remote
FTP client connects to the generated FTP service on the SSH server. Once the
SSH server receives the incoming packets from the FTP client, the SSH server
redirects and relays the packets to the SSH client’s FTP service on port 21 on
behalf of the FTP client. Slightly different from the preceding example, the SSH
server is acting as a redirector on port 21 between the authenticated and estab-
lished SSH client and the remote FTP client.
SSH Port Forwarding
Now that you have looked at some of the basic concepts of port forwarding,
turn your attention to how to configure port forwarding in several SSH clients
and SSH servers. The discussion in the paragraphs that follow provides the
foundation for the material in the next chapter, which addresses advanced
SSH port forwarding.
In the following discussion on SSH clients and servers, a common architec-
ture will be used for each of the configuration examples. That common archi-
tecture is illustrated in Figure 6.11. The common architecture shows how to
configure port forwarding for both SSH clients and SSH servers on their
respective applications and systems.
Before proceeding to your exploration of the various configuration options,
examine the individual components of the common architecture. Table 6.1 lists
the different devices of the common architecture shown in Figure 6.11 and
describes what they do.
SSH Port Forwarding 201