solaris 8 system admin ii sa 288 phần 8 doc
Bạn đang xem bản rút gọn của tài liệu. Xem và tải ngay bản đầy đủ của tài liệu tại đây (256.12 KB, 57 trang )
11
Naming Services Overview 11-25
Copyright 2000 Sun Microsystems, Inc. All Rights Reserved. Enterprise Services September 2000, Revision A.1
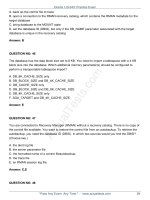
6. If you decide to use the NIS for name service resolution, what
template file would you use to create the name service switch file?
/etc/nsswitch.nis
7. What does it mean if the following entry exists in the name service
switch file?
hosts: nis [NOTFOUND=return] files
Assuming that the NIS name service is running, the syntax for this
entry means that only the NIS hosts table is searched. If a NIS server has
no map entry for a host lookup, the system would not reference the local
files. Remove the [NOTFOUND=return] entry if you want to search the
NIS hosts table and the local hosts file.
8. Is the following an appropriate entry to the /etc/nsswitch.conf
file? Why or why not?
groups: dns files nis
This entry does not make sense because dns only applies to the hosts
entry in the name service switch file.
11
11-26 Solaris™ 8 Operating Environment System Administration II
Copyright 2000 Sun Microsystems, Inc. All Rights Reserved. Enterprise Services September 2000, Revision A.1
Check Your Progress
Before continuing on to the next module, check that you are able to
accomplish or answer the following:
❑ Describe the concept of a naming service
❑ List the available naming services
❑ Compare the functionality of naming services
❑ Describe the name service switch process and determine which
configuration is appropriate for your network
12-1
Copyright 2000 Sun Microsystems, Inc. All RightsReserved. Enterprise Services September 2000, Revision A.1
NIS
12
Objectives
Upon completion of this module, you should be able to:
● Describe the NIS components, master server, slave server, and
client, and the NIS processes
● Configure an NIS master, slave, and client
● List the steps to add a new NIS map
● Use commands to update and propagate an NIS map
Additional Resources
Additional resources – The following references provide additional
details on the topics discussed in this module:
● Solaris Naming Administration Guide, Sun Part Number 806-1387-10
● Solaris Naming Setup and Configuration Guide, Sun Part
Number 806-1386-10
12
12-2 Solaris™ 8 Operating Environment System Administration II
Copyright 2000 Sun Microsystems, Inc. All Rights Reserved. Enterprise Services September 2000, Revision A.1
Introduction to NIS Concepts
NIS enables the creation of server systems that act as central
repositories for several of the administrative files found on UNIX
systems. The benefits of NIS include:
● Centralized administration of files
● Better scaling of file administration as networks grow
As Figure 12-1 illustrates, NIS is organized into named administrative
domains. Within each domain exists one NIS master server, zero or
more slave servers, and one or more clients.
Figure 12-1 NIS Domains
NIS Master Server
Within each domain, the NIS master server:
● Contains the original /etc ASCII files used to build the NIS maps
● Contains the NIS maps generated from the ASCII files
● Provides a single point of control for the entire NIS domain
● Is easy to set up
Maps
Master
server
Client
Slave
server
ClientClient Client
Push
Make
ASCII
Maps
12
NIS 12-3
Copyright 2000 Sun Microsystems, Inc. All Rights Reserved. Enterprise Services September 2000, Revision A.1
NIS Slave Servers
Within each domain, the NIS slave servers:
● Do not contain the original /etc ASCII files (which are used to
build the NIS maps)
● Contain copies of the NIS maps copied from the NIS master server
● Provide a backup repository for NIS map information
● Provide redundancy in case of server failures
● Provide load sharing on large networks
NIS Clients
Within each domain, the NIS clients:
● Do not contain the original /etc ASCII files (which are used to
build the NIS maps)
● Do not contain any NIS maps
● Bind to the master server or a slave server to obtain access to the
administrative file information contained in that server’s NIS
maps
● Dynamically rebind to another server in case of server failure
● Make all appropriate system calls aware of NIS
Note – All hosts in the NIS environment are clients, including the NIS
master and slaves.
12
12-4 Solaris™ 8 Operating Environment System Administration II
Copyright 2000 Sun Microsystems, Inc. All Rights Reserved. Enterprise Services September 2000, Revision A.1
NIS Processes
The two main processes involved in the running of an NIS domain are:
● ypserv – Runs on master and slave servers
● ypbind – Runs on master and slave servers, as well as client
systems
There are three daemons that used in an NIS domain on the master
server:
● rpc.yppasswdd
● ypxfrd
● rpc.ypupdated
Figure 12-2 illustrates a domain with these NIS processes and
daemons.
Figure 12-2 NIS Processes and Daemons
ypserv
ypbind
ypbind ypbind ypbind
ypserv
ypbind
rpc.yppasswdd
ypxfrd
rpc.ypupdated
ypbind
Maps
Master
server
Client
Slave
server
ClientClient Client
Push
Make
ASCII
Maps
12
NIS 12-5
Copyright 2000 Sun Microsystems, Inc. All Rights Reserved. Enterprise Services September 2000, Revision A.1
The ypserv Daemon
The ypserv daemon is a utility that:
● Runs on master and slave servers
● Answers ypbind requests from clients
● Responds to client information requests
The ypbind Daemon
The ypbind daemon is a process that:
● Runs on all NIS systems, servers as well as clients
● Makes initial client-to-server binding requests
● Stores binding information in the
/var/yp/binding/
domainname
directory
● Rebinds to another server if the connection is lost with the initial
server
● Requests NIS map information at the library-call level
The rpc.yppasswdd Daemon
The rpc.yppasswdd daemon is a process that:
● Allows users to change their passwords
● Updates the /etc/passwd and /etc/shadow files on the master
server
● Updates the NIS password map
● Provides or “pushes” the NIS password map to all slave servers
12
12-6 Solaris™ 8 Operating Environment System Administration II
Copyright 2000 Sun Microsystems, Inc. All Rights Reserved. Enterprise Services September 2000, Revision A.1
The ypxfrd Daemon
The ypxfrd daemon is a process that:
● Runs on the NIS master server only
● Responds to slave requests (using ypxfr) to pull the maps from
the master
● Transfers NIS maps at high speed
The rpc.ypupdated Daemon
The rpc.ypupdated daemon is a process that:
● Runs on the NIS master server only
● Updates the publickey map if secure RPC is enabled
12
NIS 12-7
Copyright 2000 Sun Microsystems, Inc. All Rights Reserved. Enterprise Services September 2000, Revision A.1
The Structure of NIS Maps
NIS maps are located in the /var/yp/
domainname
directory (where
domainname
is the name of the NIS domain). There are two files
(.pag and .dir file) for each map in this directory.
NIS Maps Filenames
The syntax for the NIS maps is:
map
.
key
.pag or
map
.
key
.dir
where:
●
map
– The base name of the map (hosts, passwd, and so on)
●
key
– The map’s sort key (byname, byaddr, and so on)
● pag – The map’s data
● dir – An index to the .pag file if the .pag file is large
The .dir file can be empty if the .pag file is small.
12
12-8 Solaris™ 8 Operating Environment System Administration II
Copyright 2000 Sun Microsystems, Inc. All Rights Reserved. Enterprise Services September 2000, Revision A.1
Map Contents and Sort Keys
The contents of each map is a key and value pair. The
key
represents
the data used to perform the lookup in the map while the
value
represents the data returned upon a successful lookup. Maps can be
duplicated in the /var/yp/
domainname
directory; they represent the
results of the sorting of the map’s data based on different keys.
For example, the map /var/yp/
domainname
/hosts.byaddr.pag
contains the data for the hosts map indexed by host IP addresses.
Similarly, the /var/yp/
domainname
/hosts.byname.pag map
contains the same host data using the host name as the lookup key. For
the domain name training, the following would be a list of the NIS
map files for the hosts map:
● /var/yp/training/hosts.byname.pag
● /var/yp/training/hosts.byname.dir
● /var/yp/training/hosts.byaddr.pag
● /var/yp/training/hosts.byaddr.dir
Commands to Read Maps
You can use two commands to read maps:
● ypcat [ -k ]
map
– This command is similar to the cat
file
command
● ypmatch [ -k ]
value map
– This command is similar to the
grep
value file
command
12
NIS 12-9
Copyright 2000 Sun Microsystems, Inc. All Rights Reserved. Enterprise Services September 2000, Revision A.1
Generating NIS Maps
To generate NLS maps, you need the source files, which are located in
either the /etc directory on the master server or copied to an
alternative directory. You should not keep the source files in /etc
because the contents of the maps are then the same as the contents of
the local files on the master server. This is a special problem for
passwd and shadow files, because all users would have access to the
master server maps and the root password would be passed to all YP
clients through the passwd map.
If you choose to locate the source files in another directory, you must
modify the /var/yp/Makefile by changing the DIR=/etc line and the
PWDIR=/etc line to DIR=/
your-choice
and
PWDIR=/
your-choice
, where
your-choice
is the name of the
directory you are using to store the source files. This enables you to
treat the local files on the server as if they were those of a client. (You
should first save a copy of the original Makefile.)
12
12-10 Solaris™ 8 Operating Environment System Administration II
Copyright 2000 Sun Microsystems, Inc. All Rights Reserved. Enterprise Services September 2000, Revision A.1
The following is an excerpt from the default Makefile showing the
variable DIR and PWDIR set to their default values:
#
# Copyright (c) 1998, by Sun Microsystems, Inc.
# All rights reserved.
#
#ident "@(#)Makefile 1.23 98/05/01 SMI"
#
#
# It is somewhat confusing to note that Solaris 2.x uses /etc/auto_master
# instead of the 4.x /etc/auto.master file name because of NIS+ treating
a
# "." in a special way.
#
# Set the following variable to "-b" to have NIS servers use the domain
name
# resolver for hosts not in the current domain.
#B=-b
B=
DIR =/etc
#
# If the passwd, shadow and/or adjunct files used by rpc.yppasswdd
# live in directory other than /etc then you'll need to change the
# following line.
# DO NOT indent the line, however, since /etc/init.d/yp attempts
# to find it with grep "^PWDIR"
#
PWDIR =/etc
DOM = `domainname`
NOPUSH = ""
ALIASES = /etc/mail/aliases
YPDIR=/usr/lib/netsvc/yp
12
NIS 12-11
Copyright 2000 Sun Microsystems, Inc. All Rights Reserved. Enterprise Services September 2000, Revision A.1
The ypinit Command and the NIS Makefile
The NIS maps are generated by the NIS configuration binary,
/usr/sbin/ypinit, and the make command. The ypinit command
reads the /var/yp/Makefile for source file locations and converts
ASCII source files into NIS maps.
Password File
For security reasons, and to prevent unauthorized root access, the files
used to build the NIS password maps should not contain an entry for
root.
To do this, copy the files to an alternative directory and modifying the
PWDIR entry in the Makefile.
Figure 12-3 on page 12-12 shows the important files on the NIS master.
12
12-12 Solaris™ 8 Operating Environment System Administration II
Copyright 2000 Sun Microsystems, Inc. All Rights Reserved. Enterprise Services September 2000, Revision A.1
Figure 12-3 Important Files on the NIS Master
12
NIS 12-13
Copyright 2000 Sun Microsystems, Inc. All Rights Reserved. Enterprise Services September 2000, Revision A.1
Configuring the NIS Master Server
To set up the NIS name service master server, perform the following
steps:
1. Determine which machines within your network domain will be
NIS servers; there will be one NIS master and as many NIS slaves
as needed. Typically, all systems within the domain will be NIS
clients.
Note – The NIS kit that was supplied with releases before the
Solaris 2.6 Operating Environment is no longer provided. NIS is now
part of the release rather than a separate file.
2. Copy the /etc/nsswitch.nis file to /etc/nsswitch.conf and
modify it, if necessary.
3. Choose an NIS domain name. This is usually less than 32
characters in length. (The maximum length is 256 characters.)
4. Execute the domainname command to set the local NIS domain.
5. Create an /etc/defaultdomain file with the domain name.
6. Make sure to maintain the format established by the original files,
and update the text files in the /etc directory (all of the files that
are used for NIS maps) on the master server with information
about the domain.
Note – You can also copy the network information files to some other
location on the system and modify them there rather than modifying
them in the /etc directory.
7. Use the touch command to create zero-length files with the
following names: /etc/ethers, /etc/bootparams, /etc/locale,
/etc/timezone, /etc/netgroup, and /etc/netmasks. These files
are necessary for the creation of the complete list of NIS maps as
directed in the Makefile. When you initialize NIS, you will
receive error messages for each of these files if they do not exist.
✓
12
12-14 Solaris™ 8 Operating Environment System Administration II
Copyright 2000 Sun Microsystems, Inc. All Rights Reserved. Enterprise Services September 2000, Revision A.1
8. Install an updated Makefile in /var/yp if you intend to use NIS
on the system that functions as your JumpStart™ server. This
provides entries that create a map for the /etc/locale file.
To create a Makefile that supports unassisted JumpStart
installation capability, make the following changes:
a. Add the following text after the existing *.time entries; all
beginning white space must be tabs:
locale.time: $(DIR)/locale
-@if [ -f $(DIR)/locale ]; then \
sed -e “/^#/d” -e s/#.*$$// $(DIR)/locale \
| awk ’{for (i = 2; i<=NF; i++) print $$i, $$0}’ \
| $(MAKEDBM) - $(YPDBDIR)/$(DOM)/locale.byname; \
touch locale.time; \
echo “updated locale”; \
if [ ! $(NOPUSH) ]; then \
$(YPPUSH) locale.byname; \
echo “pushed locale”; \
else \
: ; \
fi \
else \
echo “couldn’t find $(DIR)/locale”; \
fi
b. Append the word locale to the line beginning with the word
all.
c. Add the following line after the
auto.home: auto.home.time entry:
locale: locale.time
9. Create or populate the file /etc/locale and make an entry for
each domain on your network using the following format:
domainname locale
For example:
classroom.Central.Sun.COM en_US
12
NIS 12-15
Copyright 2000 Sun Microsystems, Inc. All Rights Reserved. Enterprise Services September 2000, Revision A.1
10. Edit the Makefile, and change every reference to the *.attr to
add the security subdirectory to the pathname, as follows:
$(DIR)/auth_attr
$(DIR)/exec_attr
$(DIR)/prof_attr
$(DIR)/audit_user
becomes:
$(DIR)/security/auth_attr
$(DIR)/security/exec_attr
$(DIR)/security/prof_attr
$(DIR)/security/audit_user
Note – Step 10 is necessary.
11. Initialize the master server using the local /etc files by executing
the ypinit -m command.
# ypinit -m
a. The program prompts you for a list of slave servers. When you
complete your list, press Control-D. You can make entries for
all slaves now or rerun the command after you determine that
you need more or fewer slave servers.
b. The program asks if you want to terminate on the first fatal
error. If you answer n, the procedure completes the creation of
the NIS database files. If you answer y, the process aborts with
the first error. You can fix it and restart the ypinit program.
12
12-16 Solaris™ 8 Operating Environment System Administration II
Copyright 2000 Sun Microsystems, Inc. All Rights Reserved. Enterprise Services September 2000, Revision A.1
The following dialog provides the text feedback displayed as the
program begins:
# ypinit -m
In order for NIS to operate successfully, we have to construct a list of
the NIS servers. Please continue to add the names for YP servers in order
of preference, one per line. When you are done with the list, type a
<control D> or a return on a line by itself.
next host to add: server1
next host to add: ^D
The current list of yp servers looks like this:
server1
Is this correct? [y/n: y] y
Installing the YP database will require that you answer a few questions.
Questions will all be asked at the beginning of the procedure.
Do you want this procedure to quit on non-fatal errors? [y/n: n] n
OK, please remember to go back and redo manually whatever fails. If you
don't, some part of the system (perhaps the yp itself) won't work.
Note – If you have to restart the ypinit program, you are prompted to
destroy the /var/yp/
domainname
directory.
Answer y.
12. Start the NIS daemons on the master server with the following
command:
# /usr/lib/netsvc/yp/ypstart
13. Once ypbind is running you need to complete the following steps
to build the mail.aliases map.
# cd /var/yp
# /usr/ccs/bin/make
If you want to stop the NIS service running on the NIS master,
issue the following command:
# /usr/lib/netsvc/yp/ypstop
!
Caution – Installations that select Core, End User, or Developer
software configuration clusters do not have all of the necessary files in
the /usr/lib/netsvc/yp to allow a host to function as an NIS server.
12
NIS 12-17
Copyright 2000 Sun Microsystems, Inc. All Rights Reserved. Enterprise Services September 2000, Revision A.1
Accessing and Testing the NIS Service
The initial way that users access NIS information is during login.
When the user types in a user name and password, the NIS database
verifies this information before it enables a login shell. If the user’s
home directory is on a remote system in the NIS domain, the NIS
auto_home map will reference the server information and
automatically mount the appropriate directory.
There are some informative commands that display information in the
NIS database. You can use these commands to test NIS service.
The most commonly used NIS commands are:
Note – You do not have to be the superuser to use these commands.
● ypcat – Prints values from the NIS database.
Example: Print the information from the hosts database
$ ypcat hosts
129.0.0.1 localhost
192.9.200.1 host1 loghost
192.9.200.2 host2
192.9.200.6 host6
192.9.200.8 host8
192.9.200.101 server1
192.9.200.102 server2
● ypmatch – Prints the value of one or more keys from the NIS
database.
Example: Match individual host entries
$ ypmatch host1 server1 hosts
192.9.200.1 host1
192.9.200.101 server1
Example: Match a specific user in the password database
$ ypmatch user1 passwd
user1:Q7icI6NRPEmak:11001:10:User1:export/home/user1:/bin/ksh
12
12-18 Solaris™ 8 Operating Environment System Administration II
Copyright 2000 Sun Microsystems, Inc. All Rights Reserved. Enterprise Services September 2000, Revision A.1
● ypwhich – Returns the name of the NIS server that supplies the
NIS map services to an NIS client.
Example: Return the name of the NIS master server
$ ypwhich
server1
When used with the -m option, the ypwhich command provides a
list of all databases and the name of the master server.
Example: List all databases on masterserver
$ ypwhich -m
auto.home server1
auto.master server1
timezone.byname server1
netmasks.byaddr server1
publickey.byname server1
<remaining output omitted>
12
NIS 12-19
Copyright 2000 Sun Microsystems, Inc. All Rights Reserved. Enterprise Services September 2000, Revision A.1
Configuring the NIS Client
Typically, you configure all systems within a NIS domain as clients:
1. Copy the /etc/nsswitch.nis file to /etc/nsswitch.conf and
modify it if necessary.
2. Edit the /etc/hosts file to ensure that the NIS master server and
all slave servers have been defined.
3. Execute the ‘domainname
domainname’
command to set the local
NIS domain. For example,
# domainname classroom.Central.Sun.COM
Note – You can use this command to set the name of a domain within
a classroom in the central region training center.
4. Create or populate the /etc/defaultdomain file with the domain
name.
5. Initialize the system as an NIS client with the following command:
# ypinit -c
6. When prompted for a list of NIS servers, enter the names of the
NIS master and all slave servers.
7. Start the NIS software with the following command:
# /usr/lib/netsvc/yp/ypstart
8. On the newly configured NIS client, test the NIS functionality by
entering the following command:
# ypwhich -m
The output should include the name of the NIS master server
along with the database maps it is serving.
12
12-20 Solaris™ 8 Operating Environment System Administration II
Copyright 2000 Sun Microsystems, Inc. All Rights Reserved. Enterprise Services September 2000, Revision A.1
Configuring the NIS Slave Server
You must have at least one NIS slave server provide backup should
the NIS master server become unavailable. You can do this by using
the following steps on the system that is designated to become the
slave server:
1. Copy the /etc/nsswitch.nis file to /etc/nsswitch.conf and
modify it if necessary.
2. Edit the /etc/hosts file to ensure that the NIS master and all NIS
slave servers have been defined.
3. Execute the domainname command to set the local NIS domain.
# domainname
domainname
For example,
# domainname classroom.Central.Sun.COM
4. Create or populate the /etc/defaultdomain file with the domain
name. Add a one-line entry to represent the selected domain name
(for example,
domainname
in step 3).
5. Initialize the system as an NIS client with the following command:
# ypinit -c
6. When prompted for a list of NIS servers, enter the NIS master host
followed by the name of the local host and all other NIS slave
servers on the local network.
7. On the NIS master, ensure that the ypserv process is running by
running this command:
# ps -ef | grep ypserv
If it is not running, refer to the previous section on how to start
NIS daemons on the master.
8. Return to the proposed NIS slave system and run ypstart.
# /usr/lib/netsvc/yp/ypstart
12
NIS 12-21
Copyright 2000 Sun Microsystems, Inc. All Rights Reserved. Enterprise Services September 2000, Revision A.1
9. Initialize the system as an NIS slave with the following command:
# ypinit -s
master
where
master
is the name of the NIS master.
Note – If you did not add the name of the NIS slave server when you
initially configured the NIS master server using the ypinit command,
run the ypinit -m command once more on the NIS master server. In
the process of updating the NIS master, the script prompts you for
confirmation when it is about to destroy the existing domain database.
Confirm by entering y.
10. Stop the NIS daemons on the slave server with the following
command:
# /usr/lib/netsvc/yp/ypstop
11. Restart the NIS daemons on the slave server with the following
command:
# /usr/lib/netsvc/yp/ypstart
12. On the newly configured NIS slave server, test the NIS
functionality with the following command:
# ypwhich -m
The output should include the name of the NIS master server
along with a list of database maps it is serving to the NIS domain.
12
12-22 Solaris™ 8 Operating Environment System Administration II
Copyright 2000 Sun Microsystems, Inc. All Rights Reserved. Enterprise Services September 2000, Revision A.1
Updating the NIS Map
Database files change as time goes on and your NIS maps must be
updated. To update the NIS maps (on the master server), perform the
following steps:
1. Update the text files in your source directory (typically /etc
unless it was changed in the Makefile) with the new or modified
information.
2. Change to the /var/yp directory.
# cd /var/yp
3. Refresh the NIS database maps by executing the make command.
# /usr/ccs/bin/make
Updating the Hosts Map and Propagating to Slave Servers
The following steps manually update the NIS hosts map on the
master server and propagate all maps to the slave servers:
1. Edit a map source file on the NIS master.
# vi /etc/hosts
2. Remake and push the NIS maps to the slave servers.
# cd /var/yp; make
The following commands manually “pull” only the host maps from
the master server.
# /usr/lib/netsvc/yp/ypxfr hosts.byaddr
# /usr/lib/netsvc/yp/ypxfr hosts.byname
You can also pull all of the maps from the master server at once using
the following command:
# ypinit -s
nis_master
12
NIS 12-23
Copyright 2000 Sun Microsystems, Inc. All Rights Reserved. Enterprise Services September 2000, Revision A.1
Updating the NIS Password Map
If the NIS master is running the rpc.yppasswdd daemon, you can
update any client system to the NIS password map by using the
yppasswd or passwd commands (Figure 12-4).
Figure 12-4 Updating the NIS Password Map
The following describes what you need to do to be successful at
updating of the password map:
● Running the rpc.yppasswdd daemon on the NIS master server
# /usr/lib/netsvc/yp/rpc.yppasswdd /etc/passwd -m passwd
The rpc.yppasswdd daemon updates the NIS master’s
/etc/passwd file and passwd map whenever users change their
NIS password (with the passwd or yppasswd commands). The
passwd map is then pushed to all slave servers.
yppasswd
passwd
Master server
running
rpc.yppasswdd
Maps
Master
server
Client
Slave
server
ClientClient Client
Push
Make
ASCII
Maps