javascript bible 4th edition jsb gold chapters phần 8 docx
Bạn đang xem bản rút gọn của tài liệu. Xem và tải ngay bản đầy đủ của tài liệu tại đây (872.11 KB, 232 trang )
CD-435
Appendix F ✦ Examples from Parts III and IV
images and image swapping (and thus pass the test for the presence of the
document.images array) can execute those statements. For a browser with an
image object, images are preloaded into the browser cache as the page loads so
that response to the user is instantaneous the first time the user calls upon new
versions of the images.
Listing 15-42: Using onMouseDown and onMouseUp Event
Handlers
<HTML>
<HEAD>
<TITLE>onMouseDown and onMouseUp Event Handlers</TITLE>
<SCRIPT LANGUAGE=”JavaScript”>
if (document.images) {
var RightNormImg = new Image(16,16)
var RightUpImg = new Image(16,16)
var RightDownImg = new Image(16,16)
var LeftNormImg = new Image(16,16)
var LeftUpImg = new Image(16,16)
var LeftDownImg = new Image(16,16)
RightNormImg.src = “RightNorm.gif”
RightUpImg.src = “RightUp.gif”
RightDownImg.src = “RightDown.gif”
LeftNormImg.src = “LeftNorm.gif”
LeftUpImg.src = “LeftUp.gif”
LeftDownImg.src = “LeftDown.gif”
}
function setImage(imgName, type) {
if (document.images) {
var imgFile = eval(imgName + type + “Img.src”)
document.images[imgName].src = imgFile
return false
}
}
</SCRIPT>
</HEAD>
<BODY>
<H1>onMouseDown and onMouseUp Event Handlers</H1>
<HR>
<P>Roll atop and click on the buttons to see how the link event handlers swap
images:</P>
<CENTER>
<A HREF=”javascript:void(0)”
onMouseOver=”return setImage(‘Left’,’Up’)”
onMouseDown=”return setImage(‘Left’,’Down’)”
Continued
elementObject.onMouseDown
CD-436
Part VI ✦ Appendixes
Listing 15-42 (continued)
onMouseUp=”return setImage(‘Left’,’Up’)”
onMouseOut=”return setImage(‘Left’,’Norm’)”
>
<IMG NAME=”Left” SRC=”LeftNorm.gif” HEIGHT=16 WIDTH=16 BORDER=0></A>
<A HREF=”javascript:void(0)”
onMouseOver=”return setImage(‘Right’,’Up’)”
onMouseDown=”return setImage(‘Right’,’Down’)”
onMouseUp=”return setImage(‘Right’,’Up’)”
onMouseOut=”return setImage(‘Right’,’Norm’)”
>
<IMG NAME=”Right” SRC=”RightNorm.gif” HEIGHT=16 WIDTH=16 BORDER=0></A>
</CENTER>
</BODY>
</HTML>
IE4+ and NN6+ simplify the implementation of this kind of three-state image button
by allowing you to assign the event handlers directly to IMG element objects.
Wrapping images inside links is a backward compatibility approach that allows older
browsers to respond to clicks on images for navigation or other scripting tasks.
onMouseEnter
onMouseLeave
NN2 NN3 NN4 NN6 IE3/J1 IE3/J2 IE4 IE5 IE5.5
Compatibility ✓
Example
You can modify Listing 15-43 with the IE5.5 syntax by substituting onMouseEnter
for onMouseOver and onMouseLeave for onMouseOut. The effect is the same.
onMouseMove
NN2 NN3 NN4 NN6 IE3/J1 IE3/J2 IE4 IE5 IE5.5
Compatibility (✓) ✓✓✓✓
elementObject.onMouseMove
CD-437
Appendix F ✦ Examples from Parts III and IV
Example
Listing 15-43 is a simplified example of dragging elements in IE4+. (See Chapter 31
for more dragging examples.) Three images are individually positioned on the page.
Most of the scripting code concerns itself with the geography of click locations, the
stacking order of the images, and the management of the
onMouseMove event han-
dler so that it is active only when an item is dragged.
Scripts assign the
onMouseDown and onMouseUp event handlers to the document
object, invoking the engage() and release() functions, respectively. When a user
mouses down anywhere in the document, the
engage() function starts by invoking
setSelectedObj(). This function examines the target of the mouseDown event. If it
is one of the map images, the
selectedObj global variable is set to the image
object and the element is brought to the front of the stacking order of images (any
previously stacked image is returned to its normal position in the stack).
MouseDown events on any other element simply make sure that the selectedObj
variable is null. The presence of a value assigned to selectedObj serves as a kind
of switch for other functions: When the variable contains a value, it means that the
user is doing something associated with dragging an element.
Back at the
engage() function — provided the user mouses down on one of the drag-
gable images — the
onMouseMove event handler is assigned to the document object,
setting it to invoke the
dragIt() function. For the sake of users, the offset of the
mouse down event from the top-left corner of the image is preserved in the
offsetX
and offsetY variables (minus any scrolling that the body is subject to at that instant).
These offset values are necessary to let the scripts set the location of the image during
dragging (the location is set for the top-left corner of the image) while keeping the cur-
sor in the same location within the image as when the user first presses the mouse.
As the user drags the image, the
onMouseDown event handler fires repeatedly, allow-
ing the
dragIt() function to continually update the location of the element relative
to the current cursor position (the
event.clientX and event.clientY properties).
The global offset variables are subtracted from the cursor position to preserve the
relation of the image’s top-left corner to the initial cursor position at mouse down.
Upon the user releasing the mouse button, the
release() function turns off the
onMouseMove event handler (setting it to null). This prevents the event from being
processed at all during normal usage of the page. The
selectedObj global variable
is also set to
null, turning off the “switch” that indicates dragging is in session.
Listing 15-43: Dragging Elements with onMouseMove
<HTML>
<HEAD><TITLE>onMouseMove Event Handler</TITLE>
Continued
elementObject.onMouseMove
CD-438
Part VI ✦ Appendixes
Listing 15-43 (continued)
<STYLE TYPE=”text/css”>
#camap {position:absolute; left:20; top:120}
#ormap {position:absolute; left:80; top:120}
#wamap {position:absolute; left:140; top:120}
</STYLE>
<SCRIPT LANGUAGE=”JavaScript”>
// global variables used while dragging
var offsetX = 0
var offsetY = 0
var selectedObj
var frontObj
// set document-level event handlers
document.onmousedown = engage
document.onmouseup = release
// positioning an object at a specific pixel coordinate
function shiftTo(obj, x, y) {
obj.style.pixelLeft = x
obj.style.pixelTop = y
}
// setting the z-order of an object
function bringToFront(obj) {
if (frontObj) {
frontObj.style.zIndex = 0
}
frontObj = obj
frontObj.style.zIndex = 1
}
// set global var to a reference to dragged element
function setSelectedObj() {
var imgObj = window.event.srcElement
if (imgObj.id.indexOf(“map”) == 2) {
selectedObj = imgObj
bringToFront(selectedObj)
return
}
selectedObj = null
return
}
// do the dragging (called repeatedly by onMouseMove)
function dragIt() {
if (selectedObj) {
elementObject.onMouseMove
CD-439
Appendix F ✦ Examples from Parts III and IV
shiftTo(selectedObj, (event.clientX - offsetX), (event.clientY -
offsetY))
return false
}
}
// set global vars and turn on mousemove trapping (called by onMouseDown)
function engage() {
setSelectedObj()
if (selectedObj) {
document.onmousemove = dragIt
offsetX = window.event.offsetX - document.body.scrollLeft
offsetY = window.event.offsetY - document.body.scrollTop
}
}
// restore everything as before (called by onMouseUp)
function release() {
if (selectedObj) {
document.onmousemove = null
selectedObj = null
}
}
</SCRIPT>
</HEAD>
<BODY>
<H1>onMouseMove Event Handler</H1>
<HR>
Click and drag the images:
<IMG ID=”camap” SRC=”camap.gif” WIDTH=”47” HEIGHT=”82” BORDER=”0”>
<IMG ID=”ormap” SRC=”ormap.gif” WIDTH=”57” HEIGHT=”45” BORDER=”0”>
<IMG ID=”wamap” SRC=”wamap.gif” WIDTH=”38” HEIGHT=”29” BORDER=”0”>
</SCRIPT>
</BODY>
</HTML>
onMouseOut
onMouseOver
NN2 NN3 NN4 NN6 IE3/J1 IE3/J2 IE4 IE5 IE5.5
Compatibility ✓✓✓ ✓ ✓ ✓✓✓✓
elementObject.onMouseOut
CD-440
Part VI ✦ Appendixes
Example
Listing 15-44 uses the U.S. Pledge of Allegiance with four links to demonstrate how
to use the
onMouseOver and onMouseOut event handlers. Notice that for each link,
the handler runs a general-purpose function that sets the window’s status message.
The function returns a
true value, which the event handler call evaluates to repli-
cate the required
return true statement needed for setting the status bar. In one
status message, I supply a URL in parentheses to let you evaluate how helpful you
think it is for users.
Listing 15-44: Using onMouseOver and onMouseOut Event
Handlers
<HTML>
<HEAD>
<TITLE>onMouseOver and onMouseOut Event Handlers</TITLE>
<SCRIPT LANGUAGE=”JavaScript”>
function setStatus(msg) {
status = msg
return true
}
// destination of all link HREFs
function emulate() {
alert(“Not going there in this demo.”)
}
</SCRIPT>
</HEAD>
<BODY>
<H1>onMouseOver and onMouseOut Event Handlers
</H1>
<HR>
<H1>Pledge of Allegiance</H1>
<HR>
I pledge <A HREF=”javascript:emulate()” onMouseOver=”return setStatus(‘View
dictionary definition’)” onMouseOut=”return setStatus(‘’)”>allegiance</A> to the
<A HREF=”javascript:emulate()” onMouseOver=”return setStatus(‘Learn about the
U.S. flag ()’)” onMouseOut=”return setStatus(‘’)”>flag</A>
of the <A HREF=”javascript:emulate()” onMouseOver=”return setStatus(‘View info
about the U.S. government’)” onMouseOut=”return setStatus(‘’)”>United States of
America</A>, and to the Republic for which it stands, one nation <A
HREF=”javascript:emulate()” onMouseOver=”return setStatus(‘Read about the
history of this phrase in the Pledge’)” onMouseOut=”return setStatus(‘’)”>under
God</A>, indivisible, with liberty and justice for all.
</BODY>
</HTML>
elementObject.onMouseOut
CD-441
Appendix F ✦ Examples from Parts III and IV
onPaste
NN2 NN3 NN4 NN6 IE3/J1 IE3/J2 IE4 IE5 IE5.5
Compatibility ✓✓
Example
Listing 15-45 demonstrates how to use the onBeforePaste and onPaste event han-
dlers (in conjunction with
onBeforeCopy and onCopy) to let scripts control the
data transfer process during a copy-and-paste user operation. A table contains
words to be copied (one column of nouns, one column of adjectives) and then
pasted into blanks in a paragraph. The
onBeforeCopy and onCopy event handlers
are assigned to the TABLE element because the events from the TD elements bub-
ble up to the TABLE container and there is less HTML code to contend with.
Inside the paragraph, two SPAN elements contain underscored blanks. To paste text
into the blanks, the user must first select at least one character of the blanks. (See
Listing 15-37, which gives a drag-and-drop version of this application.) The
onBeforePaste event handler in the paragraph (which gets the event as it bubbles
up from either SPAN ) sets the
event.returnValue property to false, thus allow-
ing the Paste item to appear in the context and Edit menus (not a normal occur-
rence in HTML body content).
At paste time, the
innerHTML property of the target SPAN is set to the text data
stored in the clipboard. The
event.returnValue property is set to false here, as
well, to prevent normal system pasting from interfering with the controlled version.
Listing 15-45: Using onBeforePaste and onPaste Event
Handlers
<HTML>
<HEAD>
<TITLE>onBeforePaste and onPaste Event Handlers</TITLE>
<STYLE TYPE=”text/css”>
TD {text-align:center}
TH {text-decoration:underline}
.blanks {text-decoration:underline}
</STYLE>
<SCRIPT LANGUAGE=”JavaScript”>
Continued
elementObject.onPaste
CD-442
Part VI ✦ Appendixes
Listing 15-45 (continued)
function selectWhole() {
var obj = window.event.srcElement
var range = document.body.createTextRange()
range.moveToElementText(obj)
range.select()
event.returnValue = false
}
function handleCopy() {
var rng = document.selection.createRange()
clipboardData.setData(“Text”,rng.text)
event.returnValue = false
}
function handlePaste() {
var elem = window.event.srcElement
if (elem.className == “blanks”) {
elem.innerHTML = clipboardData.getData(“Text”)
}
event.returnValue = false
}
function handleBeforePaste() {
var elem = window.event.srcElement
if (elem.className == “blanks”) {
event.returnValue = false
}
}
</SCRIPT>
</HEAD>
<BODY>
<H1>onBeforePaste and onPaste Event Handlers</H1>
<HR>
<P>Your goal is to copy and paste one noun and one
adjective from the following table into the blanks
of the sentence. Select a word from the table and
copy it to the clipboard. Select one or more spaces
of the blanks in the sentence and choose Paste to
replace the blank with the clipboard contents.</P>
<TABLE CELLPADDING=5 onBeforeCopy=”selectWhole()” onCopy=”handleCopy()” >
<TR><TH>Nouns</TH><TH>Adjectives</TH></TR>
<TR><TD>truck</TD><TD>round</TD></TR>
<TR><TD>doll</TD><TD>red</TD></TR>
<TR><TD>ball</TD><TD>pretty</TD></TR>
</TABLE>
<P ID=”myP” onBeforePaste=”handleBeforePaste()” onPaste=”handlePaste()”>
Pat said, “Oh my, the <SPAN ID=”blank1” CLASS=”blanks”>
</SPAN>
elementObject.onPaste
CD-443
Appendix F ✦ Examples from Parts III and IV
is so <SPAN ID=”blank2” CLASS=”blanks”>
</SPAN>!”</P>
<BUTTON onClick=”location.reload()”>Reset</BUTTON>
</BODY>
</HTML>
onPropertyChange
NN2 NN3 NN4 NN6 IE3/J1 IE3/J2 IE4 IE5 IE5.5
Compatibility ✓✓
Example
The page generated by Listing 15-46 contains four radio buttons that alter the
innerHTML and style.color properties of a paragraph. The paragraph’s
onPropertyChange event handler invokes the showChange() function, which
extracts information about the event and displays the data in the status bar of the
window. Notice how the property name includes
style. when you modify the style
sheet property.
Listing 15-46: Using the onPropertyChange Property
<HTML>
<HEAD>
<TITLE>onPropertyChange Event Handler</TITLE>
<SCRIPT LANGUAGE=”JavaScript”>
function normalText() {
myP.innerText = “This is a sample paragraph.”
}
function shortText() {
myP.innerText = “Short stuff.”
}
function normalColor() {
myP.style.color = “black”
}
function hotColor() {
myP.style.color = “red”
}
Continued
elementObject.onPropertyChange
CD-444
Part VI ✦ Appendixes
Listing 15-46 (continued)
function showChange() {
var objID = event.srcElement.id
var propName = event.propertyName
var newValue = eval(objID + “.” + propName)
status = “The “ + propName + “ property of the “ + objID
status += “ object has changed to \”” + newValue + “\”.”
}
</SCRIPT>
</HEAD>
<BODY>
<H1>onPropertyChange Event Handler</H1>
<HR>
<P ID=”myP” onPropertyChange = “showChange()”>This is a sample paragraph.</P>
<FORM>
Text: <INPUT TYPE=”radio” NAME=”btn1” CHECKED onClick=”normalText()”>Normal
<INPUT TYPE=”radio” NAME=”btn1” onClick=”shortText()”>Short
<BR>
Color: <INPUT TYPE=”radio” NAME=”btn2” CHECKED onClick=”normalColor()”>Black
<INPUT TYPE=”radio” NAME=”btn2” onClick=”hotColor()”>Red
</FORM>
</BODY>
</HTML>
onReadyStateChange
NN2 NN3 NN4 NN6 IE3/J1 IE3/J2 IE4 IE5 IE5.5
Compatibility ✓✓ ✓
Example
You can use the onReadyStateChange event handler to assist with a status display
while a long external file, such as a Java applet, loads. For example, you might have
a small image on a page that changes with the state change of an applet. The
<APPLET> tag assigns a function to the onReadyStateChange event handler:
<APPLET onReadyStateChange=”showState(this)”>
Then the function changes the image for each state type:
elementObject.onReadyStateChange
CD-445
Appendix F ✦ Examples from Parts III and IV
function showState(obj) {
var img = document.all.statusImage
switch (obj.readyState) {
case “uninitialized” :
img.src = uninit.src
break
case “loading” :
img.src = loading.src
break
case “complete” :
img.src = ready.src
}
}
The preceding function assumes that the state images are precached as the page
loads.
onResize
NN2 NN3 NN4 NN6 IE3/J1 IE3/J2 IE4 IE5 IE5.5
Compatibility ✓✓ ✓✓✓
Example
If you want to capture the user’s resizing of the browser window (or frame), you
can assign a function to the
onResize event handler either via script
window.onresize = handleResize
or by an HTML attribute of the BODY element:
<BODY onResize=”handleResize()”>
onSelectStart
NN2 NN3 NN4 NN6 IE3/J1 IE3/J2 IE4 IE5 IE5.5
Compatibility ✓✓ ✓
elementObject.onSelectStart
CD-446
Part VI ✦ Appendixes
Example
Use the page from Listing 15-47 to see how the onSelectStart event handler
works when a user selects across multiple elements on a page. As the user begins a
selection anywhere on the page, the ID of the object receiving the event appears in
the status bar. Notice that the event doesn’t fire until you actually make a selection.
When no other element is under the cursor, the BODY element fires the event.
Listing 15-47: Using the onSelectStart Event Handler
<HTML>
<HEAD>
<TITLE>onSelectStart Event Handler</TITLE>
<STYLE TYPE=”text/css”>
TD {text-align:center}
</STYLE>
<SCRIPT LANGUAGE=”JavaScript”>
function showObj() {
var objID = event.srcElement.id
status = “Selection started with object: “ + objID
}
</SCRIPT>
</HEAD>
<BODY ID=”myBody” onSelectStart=”showObj()”>
<H1 ID=”myH1”>onSelectStart Event Handler</H1>
<HR ID=”myHR”>
<P ID=”myP”>This is a sample paragraph.</P>
<TABLE BORDER=”1”>
<TR ID=”row1”>
<TH ID=”header1”>Column A</TH>
<TH ID=”header2”>Column B</TH>
<TH ID=”header3”>Column C</TH>
</TR>
<TR ID=”row2”>
<TD ID=”cellA2”>text</TD>
<TD ID=”cellB2”>text</TD>
<TD ID=”cellC2”>text</TD>
</TR>
<TR ID=”row3”>
<TD ID=”cellA3”>text</TD>
<TD ID=”cellB3”>text</TD>
<TD ID=”cellC3”>text</TD>
</TR>
</TABLE>
</BODY>
</HTML>
windowObject.onSelectStart
CD-447
Appendix F ✦ Examples from Parts III and IV
Chapter 16 Examples
The following sections contain examples from Chapter 16, “Window and Frame
Objects.”
Window Object
Properties
clipboardData
NN2 NN3 NN4 NN6 IE3/J1 IE3/J2 IE4 IE5 IE5.5
Compatibility ✓✓
Example
See Listings 15-30 and 15-39 to see how the clipboardData object is used with a
variety of edit-related event handlers.
closed
NN2 NN3 NN4 NN6 IE3/J1 IE3/J2 IE4 IE5 IE5.5
Compatibility ✓✓ ✓ ✓✓✓
Example
In Listing 16-4, I have created the ultimate cross-platform window opening and clos-
ing sample. It takes into account the lack of the
opener property in Navigator 2, the
missing
closed property in Navigator 2 and Internet Explorer 3, and it even pro-
vides an ugly but necessary workaround for the inability of Internet Explorer 3 to
gracefully see if a subwindow is still open.
The script begins by initializing a global variable,
newWind, which is used to hold
the object reference to the second window. This value needs to be global so that
other functions can reference the window for tasks, such as closing. Another global
windowObject.closed
CD-448
Part VI ✦ Appendixes
variable, isIE3, is a Boolean flag that lets the window closing routines know
whether the visitor is using Internet Explorer 3 (see details about the
navigator.appVersion property in Chapter 28).
For this example, the new window contains some HTML code written dynamically
to it, rather than loading an existing HTML file into it. Therefore, the URL parameter
of the
window.open() method is left as an empty string. It is vital, however, to
assign a name in the second parameter to accommodate the Internet Explorer 3
workaround for closing the window. After the new window is opened, an
opener
property is assigned to the object if one is not already assigned (this property is
needed only for Navigator 2). Next comes a brief delay to allow Internet Explorer
(especially versions 3 and 4) to catch up with opening the window so that content
can be written to it. The delay (using the
setTimeout() method described later in
this chapter) invokes the
finishNewWindow() function, which uses the global
newWind variable to reference the window for writing. The document.close()
method closes writing to the document — a different kind of close than a window
close.
A separate function,
closeWindow(), is responsible for closing the subwindow. To
accommodate Internet Explorer 3, the script appears to create another window
with the same characteristics as the one opened earlier in the script. This is the
trick: If the earlier window exists (with exactly the same parameters and a name
other than an empty string), Internet Explorer does not create a new window even
with the
window.open() method executing in plain sight. To the user, nothing
unusual appears on the screen. Only if the user has closed the subwindow do
things look weird for Internet Explorer 3 users. The
window.open() method
momentarily creates that subwindow. This subwindow is necessary because a “liv-
ing”
window object must be available for the upcoming test of window existence
( Internet Explorer 3 displays a script error if you try to address a missing window,
while NN2+ and IE4+ simply return friendly
null values).
As a final test, an
if condition looks at two conditions: 1) if the window object has
ever been initialized with a value other than
null (in case you click the window
closing button before ever having created the new window) and 2) if the window’s
closed property is null or false. If either condition is true, the close() method
is sent to the second window.
Listing 16-4: Checking Before Closing a Window
<HTML>
<HEAD>
<TITLE>window.closed Property</TITLE>
<SCRIPT LANGUAGE=”JavaScript”>
// initialize global var for new window object
// so it can be accessed by all functions on the page
windowObject.closed
CD-449
Appendix F ✦ Examples from Parts III and IV
var newWind
// set flag to help out with special handling for window closing
var isIE3 = (navigator.appVersion.indexOf(“MSIE 3”) != -1) ? true : false
// make the new window and put some stuff in it
function newWindow() {
newWind = window.open(“”,”subwindow”,”HEIGHT=200,WIDTH=200”)
// take care of Navigator 2
if (newWind.opener == null) {
newWind.opener = window
}
setTimeout(“finishNewWindow()”, 100)
}
function finishNewWindow() {
var output = “”
output += “<HTML><BODY><H1>A Sub-window</H1>”
output += “<FORM><INPUT TYPE=’button’ VALUE=’Close Main Window’”
output +=”onClick=’window.opener.close()’></FORM></BODY></HTML>”
newWind.document.write(output)
newWind.document.close()
}
// close subwindow, including ugly workaround for IE3
function closeWindow() {
if (isIE3) {
// if window is already open, nothing appears to happen
// but if not, the subwindow flashes momentarily (yech!)
newWind = window.open(“”,”subwindow”,”HEIGHT=200,WIDTH=200”)
}
if (newWind && !newWind.closed) {
newWind.close()
}
}
</SCRIPT>
</HEAD>
<BODY>
<FORM>
<INPUT TYPE=”button” VALUE=”Open Window” onClick=”newWindow()”><BR>
<INPUT TYPE=”button” VALUE=”Close it if Still Open” onClick=”closeWindow()”>
</FORM>
</BODY>
</HTML>
To complete the example of the window opening and closing, notice that the sub-
window is given a button whose
onClick event handler closes the main window. In
Navigator 2 and Internet Explorer 3, this occurs without complaint. But in NN3+ and
IE4+, the user is presented with an alert asking to confirm the closure of the main
browser window.
windowObject.closed
CD-450
Part VI ✦ Appendixes
defaultStatus
NN2 NN3 NN4 NN6 IE3/J1 IE3/J2 IE4 IE5 IE5.5
Compatibility ✓✓✓ ✓ ✓ ✓✓✓✓
Example
Unless you plan to change the default statusbar text while a user spends time at
your Web page, the best time to set the property is when the document loads. In
Listing 16-5, notice how I also read this property to reset the statusbar in an
onMouseOut event handler. Setting the status property to empty also resets the
statusbar to the
defaultStatus setting.
Listing 16-5: Setting the Default Status Message
<HTML>
<HEAD>
<TITLE>window.defaultStatus property</TITLE>
<SCRIPT LANGUAGE=”JavaScript”>
window.defaultStatus = “Welcome to my Web site.”
</SCRIPT>
</HEAD>
<BODY>
<A HREF=””
onMouseOver=”window.status = ‘Visit Microsoft\’s Home page.’;return true”
onMouseOut=”window.status = ‘’;return true”>Microsoft</A><P>
<A HREF=””
onMouseOver=”window.status = ‘Visit Netscape\’s Home page.’;return true”
onMouseOut=”window.status = window.defaultStatus;return true”>Netscape</A>
</BODY>
</HTML>
If you need to display single or double quotes in the statusbar (as in the second link
in Listing 16-5), use escape characters (
\’ and \”) as part of the strings being
assigned to these properties.
windowObject.defaultStatus
CD-451
Appendix F ✦ Examples from Parts III and IV
dialogArguments
NN2 NN3 NN4 NN6 IE3/J1 IE3/J2 IE4 IE5 IE5.5
Compatibility ✓✓ ✓
Example
See Listing 16-38 for the window.showModalDialog() method to see how arguments
can be passed to a dialog box and retrieved via the
dialogArguments property.
dialogHeight
dialogWidth
NN2 NN3 NN4 NN6 IE3/J1 IE3/J2 IE4 IE5 IE5.5
Compatibility ✓✓ ✓
Example
Dialog boxes sometimes provide a button or icon that reveals more details or more
complex settings for advanced users. You can create a function that handles the
toggle between two sizes. The following function assumes that the document in the
dialog box has a button whose label also toggles between “Show Details” and “Hide
Details.” The button’s
onClick event handler invokes the function as
toggleDetails(this).
function toggleDetails(btn) {
if (dialogHeight == “200px”) {
dialogHeight = “350px”
btn.value = “Hide Details”
} else {
dialogHeight = “200px”
btn.value = “Show Details”
}
}
In practice, you also have to toggle the display style sheet property of the extra
material between
none and block to make sure that the dialog box does not display
scrollbars in the smaller dialog box version.
windowObject.dialogHeight
CD-452
Part VI ✦ Appendixes
dialogLeft
dialogTop
NN2 NN3 NN4 NN6 IE3/J1 IE3/J2 IE4 IE5 IE5.5
Compatibility ✓✓ ✓
Example
Although usually not a good idea because of the potentially jarring effect on a user,
you can reposition a dialog box window that has been resized by script (or by the
user if you let the dialog box be resizable). The following statements in a dialog box
window document’s script recenters the dialog box window.
dialogLeft = (screen.availWidth/2) - (parseInt(dialogWidth)/2) + “px”
dialogHeight = (screen.availHeight/2) - (parseInt(dialogHeight)/2) + “px”
Note that the parseInt() functions are used to read the numeric portion of the
dialogWidth and dialogHeight properties so that the values can be used for
arithmetic.
directories
locationbar
menubar
personalbar
scrollbars
statusbar
toolbar
NN2 NN3 NN4 NN6 IE3/J1 IE3/J2 IE4 IE5 IE5.5
Compatibility ✓✓
Example
In Listing 16-6, you can experiment with the look of a browser window with any of
the chrome elements turned on and off. To run this script, you must either sign the
scripts or turn on codebase principals (see Chapter 46). Java must also be enabled
to use the signed script statements.
windowObject.directories
CD-453
Appendix F ✦ Examples from Parts III and IV
As the page loads, it stores the current state of each chrome element. One button
for each chrome element triggers the
toggleBar() function. This function inverts
the visible property for the chrome object passed as a parameter to the function.
Finally, the Restore button returns visibility to their original settings. Notice that
the
restore() function is also called by the onUnload event handler for the docu-
ment. Also, if you load this example into NN6, non-fatal script errors occur when
the scrollbars are turned on or off.
Listing 16-6: Controlling Window Chrome
<HTML>
<HEAD>
<TITLE>Bars Bars Bars</TITLE>
<SCRIPT LANGUAGE=”JavaScript”>
// store original outer dimensions as page loads
var originalLocationbar = window.locationbar.visible
var originalMenubar = window.menubar.visible
var originalPersonalbar = window.personalbar.visible
var originalScrollbars = window.scrollbars.visible
var originalStatusbar = window.statusbar.visible
var originalToolbar = window.toolbar.visible
// generic function to set inner dimensions
function toggleBar(bar) {
netscape.security.PrivilegeManager.enablePrivilege(“UniversalBrowserWrite”)
bar.visible = !bar.visible
netscape.security.PrivilegeManager.revertPrivilege(“UniversalBrowserWrite”)
}
// restore settings
function restore() {
netscape.security.PrivilegeManager.enablePrivilege(“UniversalBrowserWrite”)
window.locationbar.visible = originalLocationbar
window.menubar.visible = originalMenubar
window.personalbar.visible = originalPersonalbar
window.scrollbars.visible = originalScrollbars
window.statusbar.visible = originalStatusbar
window.toolbar.visible = originalToolbar
netscape.security.PrivilegeManager.revertPrivilege(“UniversalBrowserWrite”)
}
</SCRIPT>
</HEAD>
<BODY onUnload=”restore()”>
<FORM>
<B>Toggle Window Bars</B><BR>
<INPUT TYPE=”button” VALUE=”Location Bar”
onClick=”toggleBar(window.locationbar)”><BR>
<INPUT TYPE=”button” VALUE=”Menu Bar” onClick=”toggleBar(window.menubar)”><BR>
Continued
windowObject.directories
CD-454
Part VI ✦ Appendixes
Listing 16-6 (continued)
<INPUT TYPE=”button” VALUE=”Personal Bar”
onClick=”toggleBar(window.personalbar)”><BR>
<INPUT TYPE=”button” VALUE=”Scrollbars”
onClick=”toggleBar(window.scrollbars)”><BR>
<INPUT TYPE=”button” VALUE=”Status Bar”
onClick=”toggleBar(window.statusbar)”><BR>
<INPUT TYPE=”button” VALUE=”Tool Bar” onClick=”toggleBar(window.toolbar)”><BR>
<HR>
<INPUT TYPE=”button” VALUE=”Restore Original Settings” onClick=”restore()”><BR>
</FORM>
</BODY>
</HTML>
external
NN2 NN3 NN4 NN6 IE3/J1 IE3/J2 IE4 IE5 IE5.5
Compatibility ✓✓ ✓
Example
The first example asks the user if it is okay to add a Web site to the Active Desktop. If
Active Desktop is not enabled, the user is given the choice of enabling it at this point.
external.AddDesktopComponent(“”,”website”, 200, 100,
400, 400)
In the next example, the user is asked to approve the addition of a URL to the
Favorites list. The user can follow the normal procedure for filing the item in a
folder in the list.
external.AddFavorite(“ />“JSBible 4 Support Center”)
The final example assumes that a user makes a choice from a SELECT list of items.
The
onChange event handler of the SELECT list invokes the following function to
navigate to a fictitious page and locate listings for a chosen sports team on the page.
function locate(list) {
var choice = list.options[list.selectedIndex].value
windowObject.external
CD-455
Appendix F ✦ Examples from Parts III and IV
external.NavigateAndFind(“ choice,
“scores”)
}
frames
NN2 NN3 NN4 NN6 IE3/J1 IE3/J2 IE4 IE5 IE5.5
Compatibility ✓✓✓ ✓ ✓ ✓✓✓✓
Example
Listings 16-7 and 16-8 demonstrate how JavaScript treats values of frame references
from objects inside a frame. The same document is loaded into each frame. A script
in that document extracts info about the current frame and the entire frameset.
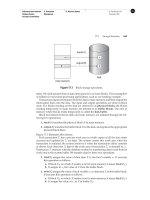
Figure 16-5 shows the results after loading the HTML document in Listing 16-7.
Listing 16-7: Framesetting Document for Listing 16-8
<HTML>
<HEAD>
<TITLE>window.frames property</TITLE>
</HEAD>
<FRAMESET COLS=”50%,50%”>
<FRAME NAME=”JustAKid1” SRC=”lst16-08.htm”>
<FRAME NAME=”JustAKid2” SRC=”lst16-08.htm”>
</FRAMESET>
</HTML>
A call to determine the number ( length) of frames returns 0 from the point of view
of the current frame referenced. That’s because each frame here is a window that
has no nested frames within it. But add the
parent property to the reference, and
the scope zooms out to take into account all frames generated by the parent win-
dow’s document.
Listing 16-8: Showing Various Window Properties
<HTML>
<HEAD>
<TITLE>Window Revealer II</TITLE>
Continued
windowObject.frames
CD-456
Part VI ✦ Appendixes
Listing 16-8 (continued)
<SCRIPT LANGUAGE=”JavaScript”>
function gatherWindowData() {
var msg = “”
msg += “<B>From the point of view of this frame:</B><BR>”
msg += “window.frames.length: “ + window.frames.length + “<BR>”
msg += “window.name: “ + window.name + “<P>”
msg += “<B>From the point of view of the framesetting document:</B><BR>”
msg += “parent.frames.length: “ + parent.frames.length + “<BR>”
msg += “parent.frames[0].name: “ + parent.frames[0].name
return msg
}
</SCRIPT>
</HEAD>
<BODY>
<SCRIPT LANGUAGE=”JavaScript”>
document.write(gatherWindowData())
</SCRIPT>
</BODY>
</HTML>
Figure 16-5: Property readouts from both frames loaded from Listing 16-7
windowObject.frames
CD-457
Appendix F ✦ Examples from Parts III and IV
The last statement in the example shows how to use the array syntax ( brackets) to
refer to a specific frame. All array indexes start with 0 for the first entry. Because
the document asks for the name of the first frame (
parent.frames[0]), the
response is
JustAKid1 for both frames.
innerHeight
innerWidth
outerHeight
outerWidth
NN2 NN3 NN4 NN6 IE3/J1 IE3/J2 IE4 IE5 IE5.5
Compatibility ✓✓
Example
In Listing 16-9, a number of buttons let you see the results of setting the
innerHeight, innerWidth, outerHeight, and outerWidth properties.
Listing 16-9: Setting Window Height and Width
<HTML>
<HEAD>
<TITLE>Window Sizer</TITLE>
<SCRIPT LANGUAGE=”JavaScript”>
// store original outer dimensions as page loads
var originalWidth = window.outerWidth
var originalHeight = window.outerHeight
// generic function to set inner dimensions
function setInner(width, height) {
window.innerWidth = width
window.innerHeight = height
}
// generic function to set outer dimensions
function setOuter(width, height) {
window.outerWidth = width
window.outerHeight = height
}
Continued
windowObject.innerHeight
CD-458
Part VI ✦ Appendixes
Listing 16-9 (continued)
// restore window to original dimensions
function restore() {
window.outerWidth = originalWidth
window.outerHeight = originalHeight
}
</SCRIPT>
</HEAD>
<BODY>
<FORM>
<B>Setting Inner Sizes</B><BR>
<INPUT TYPE=”button” VALUE=”600 Pixels Square” onClick=”setInner(600,600)”><BR>
<INPUT TYPE=”button” VALUE=”300 Pixels Square” onClick=”setInner(300,300)”><BR>
<INPUT TYPE=”button” VALUE=”Available Screen Space”
onClick=”setInner(screen.availWidth, screen.availHeight)”><BR>
<HR>
<B>Setting Outer Sizes</B><BR>
<INPUT TYPE=”button” VALUE=”600 Pixels Square” onClick=”setOuter(600,600)”><BR>
<INPUT TYPE=”button” VALUE=”300 Pixels Square” onClick=”setOuter(300,300)”><BR>
<INPUT TYPE=”button” VALUE=”Available Screen Space”
onClick=”setOuter(screen.availWidth, screen.availHeight)”><BR>
<HR>
<INPUT TYPE=”button” VALUE=”Cinch up for Win95” onClick=”setInner(273,304)”><BR>
<INPUT TYPE=”button” VALUE=”Cinch up for Mac” onClick=”setInner(273,304)”><BR>
<INPUT TYPE=”button” VALUE=”Restore Original” onClick=”restore()”><BR>
</FORM>
</BODY>
</HTML>
As the document loads, it saves the current outer dimensions in global variables.
One of the buttons restores the windows to these settings. Two parallel sets of but-
tons set the inner and outer dimensions to the same pixel values so that you can
see the effects on the overall window and document area when a script changes the
various properties.
Because Navigator 4 displays different-looking buttons in different platforms (as
well as other elements), the two buttons contain script instructions to size the win-
dow to best display the window contents. Unfortunately, no measure of the active
area of a document is available, so that the dimension values were determined by
trial and error before being hard-wired into the script.
windowObject.innerHeight
CD-459
Appendix F ✦ Examples from Parts III and IV
navigator
NN2 NN3 NN4 NN6 IE3/J1 IE3/J2 IE4 IE5 IE5.5
Compatibility ✓✓✓✓
Example
This book is littered with examples of using the navigator object, primarily for
performing browser detection. Examples of specific
navigator object properties
can be found in Chapter 28.
offscreenBuffering
NN2 NN3 NN4 NN6 IE3/J1 IE3/J2 IE4 IE5 IE5.5
Compatibility ✓✓ ✓
Example
If you want to turn off buffering for an entire page, include the following statement
at the beginning of your script statements:
window.offscreenBuffering = false
onerror
NN2 NN3 NN4 NN6 IE3/J1 IE3/J2 IE4 IE5 IE5.5
Compatibility ✓✓ ✓ ✓✓✓
Example
In Listing 16-10, one button triggers a script that contains an error. I’ve added an error
handling function to process the error so that it opens a separate window and fills in
a textarea form element (see Figure 16-6). If you load Listing 16-10 in NN6, some of
the reporting categories report “undefined” because the browser unfortunately does
not pass error properties to the
handleError() function. A Submit button is also
windowObject.onerror