Candlestick and Pivot Point Trading Triggers phần 8 pot
Bạn đang xem bản rút gọn của tài liệu. Xem và tải ngay bản đầy đủ của tài liệu tại đây (2.68 MB, 37 trang )
Setups and Triggers 245
FIGURE 8.28
RealTick graphics used with permission of Townsend Analytics, LTD.
FIGURE 8.29 Google rise
Used with permission of www.GenesisFT.com.
c08.qxd 9/25/06 8:38 AM Page 245
246 CANDLESTICK AND PIVOT POINT TRADING TRIGGERS
THE JACKHAMMER
In my experience, the one candle pattern that is associated or synonymous
more than any other with the word capitulation is the hammer as Figure
8.30 shows. In Chapter 7, we identified the frequency or the percentage of
times over a course of the year on a 15-minute time interval when the ham-
mer candle pattern formed at or near the low of a given day. The jackham-
mer, however, develops in the middle to the end of the trading session.
Usually immediately following the hammer is a bullish candle, or a mara-
buzo, a tall green positive (+) assigned candle.
What specifically describes the jackhammer? The jackhammer pattern
is a hammer candle, but it occurs in the middle to the end of a trading ses-
sion. I call it “the search and destroy” stop-loss order pattern. The general
market characteristics of this pattern starts off with the market establish-
ing a low, then consolidates or trades sideways for a bit, and then without
warning sells off abruptly. It is generally that particular sell-off that creates
a hammer pattern. Therefore, anyone who had intraday stops too close,
under what is considered the primary low for the day, got “bagged and
tagged.” In other words, stop-loss orders were elected, and longs were
jacked out of their positions and money—as in hit over the head with a billy
club and “jacked” (robbed).
Trading Rules Defined
The jackhammer formation is an extremely powerful intraday reversal for-
mation that requires immediate action to enter a long position. The se-
quence of events that occur for this pattern is:
FIGURE 8.30
c08.qxd 9/25/06 8:38 AM Page 246
• The hammer formed is a secondary low with the close at or near the
primary low’s low.
• It does not matter whether the real body is formed with a higher close
than open or positive assigned value; however, it is generally a more
solid signal when the close is above the open.
• This action generally completes a bullish convergence in the stochas-
tics or MACD oscillator.
• Buy on the close of the hammer or the next time periods’ open; initial
risk is a regular stop below the hammer’s low.
• Give additional importance if this pattern develops near pivot point
support targets, especially if there is a confluence of pivot support tar-
gets from different time frames.
• Stock traders should watch for an increase or a volume spike, which in-
dicates an exhaustion bottom is confirmed.
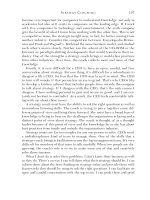
Figure 8.31 shows a 5-minute chart on the CBOT mini-Dow. Notice that
the “midsession” is defined by the middle of the day. The first intraday low
has been established, nearly three hours pass by, and the market makes a
nosedive as prices hit a new low for the trading session. In this example, the
hammer closes back within the primary low’s range. The trigger to go long
is on the hammer’s close or on the open once the hammer formation is con-
Setups and Triggers 247
FIGURE 8.31
Used with permission of esignal.com.
c08.qxd 9/25/06 8:38 AM Page 247
firmed. Generally, the jackhammer is followed by a blast-off secondary
candle as prices surge ahead. What we also have happen is that the market
crosses above both moving average values, thus signaling confirmation that
this is a valid buy signal. The trigger to buy was at 10393; as you can see, the
market ran straight to 10473 before giving an LCD trigger to exit at 10443
for a 50-point Dow move, or $250 per contract.
So far in this book, I have given you several patterns that work well for
great day trading vehicles, such as the stock index futures contracts. The
electronic markets offer retail traders a competitive advantage because
they can use a home computer with a DSL or a broadband connection to in-
tegrate charting software packages and equal access to markets. The stock
index futures contract, such as the mini-Dow contract, has what technical
and fundamental traders need: News-driven events and other technical
trading market participants both provide volatility and liquidity. Many of
the chart examples contained in these pages are a great representation of
an average day’s trading patterns. That’s not to say the other stock index
markets, such as the e-mini–S&P and the Russell, perform differently; they
interact extremely well with each other. In fact, at times I may have a trig-
ger in the mini-Dow and take the trade in the S&P, and vice versa. Most
times, when the Dow gives me a trigger, that is the market I will trade in.
Consider that the e-mini–S&P have an influence from the tech sector. Dow
at times may or may not have a similar dollar value move as the S&P. Both
markets are great day trading vehicles, as is the Russell. The Dow more
times than not has more distinct trading signals; for that reason, I have il-
lustrated these setups with using the Dow.
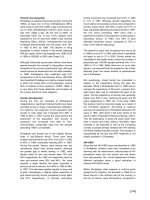
As another example of spotting a jackhammer pattern, look at Figure
8.32, which is another 5-minute chart in the Dow. Here you see the sec-
ondary low bounce right off a pivot point support; and as the white or pos-
itive assigned values show, the candles’ closes are above the opens and
what is indicated immediately after the hammer forms. Notice the immedi-
ate reaction of the market as the sequence of higher highs, higher lows, and
higher closing highs occurs. You can also see confirmation of the buy sig-
nal with the moving averages crossing over and with the second candle
after the hammer is formed—it closes above both moving average values.
This is the confirmation that should give you the confidence to maintain a
long position. The stop is initially placed below the hammer’s low. This
should not be a stop-close-only as this setup should see an immediate pos-
itive reaction. The trigger to go long here was at 10935; the first sign that
the bullish drive lost momentum was the lower closing low at 10965, which
resulted in a quick 30-point gain.
There are times when we see this pattern late in the trading session.
But keep in mind that the CBOT Dow contract trades continuously until 4
248
CANDLESTICK AND PIVOT POINT TRADING TRIGGERS
c08.qxd 9/25/06 8:38 AM Page 248
P
.
M
. (CT), whereas the e-mini–S&P closes at 3:15
P
.
M
. (CT) and reopens at
3:30
P
.
M
. (CT). This offers day traders more time to play those short
squeeze plays that tend to occur toward the end of the day. More important,
I covered why I do not look to sell at support levels. These short squeeze
plays occur as those who may have sold at higher levels look to cover and
take profits, as we see at certain times when the secondary low was re-
jected, which is what the hammer represents. Prices tend to move sharply
higher in a very short period of time, signifying a rejection of lower prices.
It is that price action that shows buyers attracted to the market, and bears
start buying back or covering their shorts.
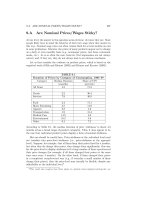
Therefore, when you are looking for a pattern such as the high close
doji or the jackhammer in this situation, it is a more fruitful venture. One
great example is in Figure 8.33, where the jackhammer forms near the end
of the session. The trigger to go long was at 10784, which we see as almost
an immediate reaction for prices to move sharply higher to nearly 10830.
This was another quick 40-point-plus gain, or $200 per contract. Again,
this does not sound like big money; but when you consider that the day
trading margin is $500 at most online brokerage firms, that is a healthly
percentage gain.
Setups and Triggers 249
FIGURE 8.32
RealTick graphics used with permission of Townsend Analytics, LTD.
c08.qxd 9/25/06 8:38 AM Page 249
Trading Tips
• If the stop level is too great a distance, lower or reduce your contract
size.
• Place hard stop below the low of the hammer candle.
• Scale out of positions when the market gives you a windfall profit, and
move stops on balance of position above your entry price.
Bullish Convergence Pattern
In Chapter 4, we went over how the market price makes lower lows, but not
by significant measures, and that when prices are at oversold extremes, we
should be cautious for market reversals. We went over the market condi-
tion of bullish convergence and how to use the stochastics and MACD in-
dicators to confirm buy signals when that market condition exists. The
jackhammer is a formation that seems to be present in such a situation.
Therefore, it is a great method for setting up a potential buy signal once the
pattern is confirmed. Look at Figure 8.34, which is a 5-minute chart on the
250
CANDLESTICK AND PIVOT POINT TRADING TRIGGERS
FIGURE 8.33
RealTick graphics used with permission of Townsend Analytics, LTD.
c08.qxd 9/25/06 8:38 AM Page 250
e-mini–S&P 500 futures. As you see, the midsession of the trading day at
12:30 shows on the charts that the market takes a secondary decline, form-
ing that spike bottom hammer pattern. Notice that the very next candle
after the hammer is a tall engulfing candle that forms a higher high. Prices
then continue on in the sequence of higher highs, higher lows, and higher
closing highs, while continuosly trading above the moving averages. If you
examine the stochastics at the bottom of the chart, notice that when the
price made a new lower low, the reading from the stochastics made a
higher low, identifying that bullish convergence existed. If you watched for
the stochastics to close back above the 20 percent line to confirm the price
reversal and the trigger to go long, you would have had a stress-free trade
that resulted in immediate returns.
In Figure 8.35, you see another example of the e-mini–S&P, this time
with the aid of the MACD study. The jackhammer occurs past the midses-
sion and actually closer to the close of business. Here we see both the mov-
ing average and the histogram components alerting us to the fact that the
price action was oversold and that a reversal was likely. The one-two com-
bination of the jackhammer and then the bullish engulfing pattern revealed
a forthcoming price reversal.
Setups and Triggers 251
FIGURE 8.34
Used with permission of esignal.com.
c08.qxd 9/25/06 8:38 AM Page 251
Stocks Get Jacked, Too
The psychological aspect of this formation occurs in stocks as well. Believe
me, they are not immune to the ravages of human emotion. The example in
Figure 8.36 is Comcast Corporation and is a great illustration of how the
stochastics indicator confirms that the jackhammer, or secondary low buy
signal, was triggered as confirmed with a bullish convergence signal. The
fast stochastics indicator shows the timing of both %K and %D closed back
above the 20 percent line, confirming a bottom was in place. The trigger to
go long here is on the close of the hammer at 26.63; and before the close at
4
P
.
M
. (ET), the market price is at 26.84.
The Jackhammer’s One-Two Punch
Figure 8.37 shows a 30-minute chart on United Technologies that illus-
trates, depending on the time period, that the jackhammer pattern can exist
from one day to the next, like a one-two knockout punch that attacks the
stops and immediately pops up. Since many traders look at the obvious low
point to place their stop-loss order, as this example shows, the jackhammer
took out the prior day’s low; and then once again, the one-two pattern de-
velops with the hammer and then the next candle being the tall white, or
252
CANDLESTICK AND PIVOT POINT TRADING TRIGGERS
FIGURE 8.35
Used with permission of esignal.com.
c08.qxd 9/25/06 8:38 AM Page 252
Setups and Triggers 253
FIGURE 8.36
RealTick graphics used with permission of Townsend Analytics, LTD.
FIGURE 8.37
RealTick graphics used with permission of Townsend Analytics, LTD.
c08.qxd 9/25/06 8:38 AM Page 253
bullish, engulfing candle. This starts the immediate price reversal, with the
sequence of higher highs, higher lows, and higher closing highs. See how
the market also closes above and continuously trades above both the mov-
ing average values.
If you know what to look for, trading for a living is a great opportunity;
but with opportunity comes responsibility. Prior to entering a trade, you
should have your “pregame” setup, complete with your market analysis and
rules for entering a trade. Certain rules should start with the techniques
covered in this book so far, which include:
• Identifying what the market condition is—overbought or oversold bull-
ish, bearish, or neutral.
• Identifying the levels that the pivot points lines are at, using the various
time frames—monthly, weekly, and daily periods.
• Setting up your charting software parameters with these specific pivot
points moving average values.
• Experimenting with variation settings on your own.
Then you need to watch and identify when and at what price points the
dojis, hammers, and shooting stars develop. Knowledge of these items will
arm you with critical information that can help provide protection from
overtrading as well as from adverse moves and such pitfalls as reacting on
emotions rather than on actual trading signals.
SUMMARY
The method of market analysis described in this book is designed so you
will be educated on the importance of developing your personal trading
system and so you can apply the techniques on a consistent basis, which
will allow you to make decisions in a mechanical and nonemotional way.
Common mistakes that traders make are not testing a strategy and not mak-
ing a logical determination of whether the strategy is viable for their trad-
ing style. Many traders adopt a new strategy, trade with it, and immediately
start tweaking different components of the strategy. The best approach
that I have found in trading is to establish trading rules and to test those
rules until an outcome is determined based on a reasonable number of
trades. Also, I have several different trading strategies for different markets
or conditions. The high close doji, the low close doji, and the jackhammer
patterns are just a few of my proprietary setups that I watch for meeting
these conditions.
If you are in a declining market, once an apparent bottom occurs near
254
CANDLESTICK AND PIVOT POINT TRADING TRIGGERS
c08.qxd 9/25/06 8:38 AM Page 254
a pivot point support target, watch for the high close doji or the jackham-
mer pattern to develop. In a rising trend, once the market trades at or near
a projected pivot point resistance, watch for a low close doji or a shooting
star pattern. These specific patterns can be added to your personal toolbox
of setups or used exclusively as a day trading plan. By understanding the
current market conditions (uptrend, downtrend, or sideways), you can
heighten your awareness of specific patterns that can be applied to that
trading environment. All that is left after entering a position is risk and
trade management, which is the focus of the next chapter.
Setups and Triggers 255
c08.qxd 9/25/06 8:38 AM Page 255
c08.qxd 9/25/06 8:38 AM Page 256
257
CHAPTER 9
Risk Management
Setting Stops
T
his chapter will walk you through the various types of stop orders
and when and where to place them. It will also provide a great deal of
important information on the reasons for stop orders, the type of
stops that should be placed at critical price levels, and identifying these spe-
cific price levels. If a trader is to maintain a degree of profitability over time,
managing risk and using a system that helps evaluate price changes are es-
sential. When you have finished this chapter, you will understand how to se-
lect stops to limit your potential losses and how to let profits ride.
The process in selecting stop placement as a risk management tool
starts with the price of where the trade was initiated. Here are some finer
points on the rationale for using a risk method, or having a stop-loss system
in place.
• Predetermined stops help conquer emotional interference.
• Stops should be part of a system or included in a set of trading rules.
• The risk/reward ratio should be weighed before entering trades, and a
stop objective should be set.
• When volatility is low, stops can be placed closer to an entry level.
• When volatility is high, stops should be placed further away from entry
level.
One of my favorite bits of advice that I give students and have taught at
seminars is that the first rule of trading starts with the premise that it is
okay to form an opinion on a gut, or instinctive, feeling—just act on a trade
c09.qxd 9/25/06 8:40 AM Page 257
signal that substantiates that opinion. Write your rules down and have
them posted on your trading screen on your computer. Before you enter
the trade, check your rule list; and make sure you know why, where, and
what type of stop to place. As you gain more experience in the business,
you will undoubtedly get caught in a news-driven, price-shock event, that is,
if you have not already experienced one. These are unavoidable and hard to
escape unscathed. It is considered a cost of doing business and should not
reflect on your abilities as a trader. Managing risk is your job, and captur-
ing as much profit as possible from winning trades should be your utmost
goal. The descriptions of the types of stops and the pros and cons of each
should help you make the right decision for the various circumstances or
market conditions.
PLACING STOP ORDERS
Stop orders are often referred to as a protection method against losses.
These orders can also be placed to enter positions. Specifically, a stop
order is an order that you place either through a broker or online. If the
market trades at a certain price, then the order is triggered and becomes a
market order to be filled at the next best available price. The general rules
of stop placement are:
• Buy stops are placed above the current market price.
• Sell stops are placed below the current market price.
GENERAL USES OF STOP ORDERS
This chapter will focus on protective stops used to offset a position and to
protect against losses and against accrued profits. You can also use a stop
to enter a position. There are a variety of stops that can be used depending
on your situation, the market you are trading, and what you are trying to ac-
complish. There are various types of available stops and several techniques
that can be used with these stops to help you manage your position and re-
duce your overall risk.
• Dollar Limits. Stops can be based on a dollar amount per position.
The dollar amount is categorized under money management for trading
systems. If you are risking $250 per futures contract in an e-mini–
Standard & Poor’s (S&P) contract, then your stop level would be
placed at a five-point distance from your entry price. This method is
258
CANDLESTICK AND PIVOT POINT TRADING TRIGGERS
c09.qxd 9/25/06 8:40 AM Page 258
used less frequently by professional traders because it has no relevancy
to a mechanical trading model, especially systems that are in the mar-
ket all the time, such as a moving average system. However, there are
benefits to this feature with setting a daily dollar amount on a loss limit
for active day traders. Some electronic order platforms allow you to set
a daily loss limit. Rather than per trade, it sets an overall loss limit on
your account.
• Percentage Figures. Most traders hear of using a stop of a certain per-
centage of the overall account size. Generally speaking, that number
can be 2 percent up to as much as 5 percent of the overall account. Un-
fortunately for most traders in futures or foreign exchange (forex) mar-
kets, the average size trading account is $10,000, which means the stop
is $200 to $500 dollars per trade. This leaves little room for error. Nor-
mally, you want to use at least a two-to-one risk/reward ratio on your
trades. So if you risk 5 percent on a $10,000 account, you should expect
to risk $500 and make $1,000 per trade.
• Time Factors. After a specific time period, if the price does not move
in the expected direction or if the velocity of such a move does not war-
rant holding onto the position, then exit the trade. If you see a low
close doji (LCD) or a high close doji (HCD) signal, it is my experience
that the market generally demonstrates an immediate reaction within
two or four time periods. After a long period of the market not re-
sponding to this type of signal, liquidate the position. The timing of the
trade did not correspond with the historical tendency and did not gen-
erate the desired results in a given period.
Another consideration in the art of placing stops using a time ele-
ment is the aid of a moving average. A moving average is simply a
trend line that is considered a time-driven price-directional tool. One
time factor that one can use as a stop placement method is the
crossover point of reference created when using two moving average
values. Once the shorter-term moving average crosses the longer-term
moving average, it reflects a value change in the market. In Figure 9.1,
once the market triggers a signal to go long with the high close doji,
combining a close below doji low and the crossover point (using both
the one-period pivot point and the three-period pivot point moving av-
erages) can act as a stop placement level. Once again, you would want
to look at the point of crossover of the two moving average values; and
if the market closes below the low of the doji’s low and the moving av-
erage (M/A) values, then a trigger to exit the position would be war-
ranted. As you can see, a bullish trend develops with the golden
sequence of events: higher highs, higher lows, and higher closing highs.
The stop-loss was placed at a critical point.
• Price Levels. Traders often use basic statistics to measure the degree
Risk Management 259
c09.qxd 9/25/06 8:40 AM Page 259
of price volatility that can occur on a daily basis in a given market.
These measures can then be used to place a stop order or a limit order
that takes into account these natural daily price movements. Statistics
that are often used are the mean, the standard deviation, and the co-
efficient of variation. The best trailing-stop approach has been ex-
plored by many technicians. The various methods include placing a
stop using a set price amount, which could be as much as 50 percent of
the average true range of a given time period, either above or below the
10- or 20-day moving average.
Why is this an important method? If you place a stop near a specific
chart point of interest, such as an old high or an old low, that level is
obvious to every chart watcher. Markets do “test” and penetrate from
time to time those levels. If you set your stop too close, such as setting
a sell stop below an old low point or a buy stop above an old price high,
chances are that your order may be executed if it is too close, such as
what the jackhammer or shooting star represents. So generally, a cer-
tain factor or distance should be calculated for your stop placement.
Since most traders believe a market has reached a peak, they will place
260
CANDLESTICK AND PIVOT POINT TRADING TRIGGERS
FIGURE 9.1
Used with permission of esignal.com.
c09.qxd 9/25/06 8:40 AM Page 260
a stop slightly above an old high or below an old low. Depending on
where you place your stop, the market may demonstrate a spike pat-
tern that will hit your order and then proceed to move in the desired di-
rection, without you, of course. Figure 9.2 shows an example of when
the market is at a major turning point, how a price spike occurs. You
may want to take the average daily range of the most recent 10 or more
periods and then use a factor between 20 percent and 50 percent of the
10-day average daily range. When entering a short position you would
use a protective buy stop based on a percentage above the 10-day av-
erage range. For example, if you take the average daily range for the 10
trading sessions from the low back on October 12 up to the first peak
on October 25, you have an average daily range for that 10-day period
of 174 PIPs (percentage in points), or points. The first spike top ex-
ceeded the prior high by 34 PIPs.
If you established a short position and wanted to place your stop
out of harm’s way, then using a stop of 20 percent of 174 PIPs above the
predetermined high would not have worked out, as that was 34 PIPs,
the exact amount by which the market exceeded the high. If you in-
Risk Management 261
FIGURE 9.2
Used with permission of esignal.com.
c09.qxd 9/25/06 8:40 AM Page 261
creased the stop amount by 50 percent of the 10-day average daily
range, then you would have an 87-point stop above the high; and this
would have kept you from getting stopped out. By using 120 percent of
the average of the last 10-day period range, this method would accom-
plish the goal of not getting stopped out. Realistically, that may be way
too much risk for an individual trader. But examine the risk/reward
ratio on that particular trade. A risk of 150 percent of the average daily
range from the most recent 10-day period would have been 261 PIPs.
The stop would be placed above the high on October 25 at 181.30. The
low was at 170.65, made nearly one month later on November 22.
Granted, depending on your risk tolerance, this may seem excessive;
but you can select and back-test any percentage variable of an average
daily range stop placement.
The key idea here is to keep your stops out of harm’s way. If a
trade is to become profitable, there should be signs, such as in the case
of selling short, that you see immediate results with lower highs, lower
lows, and lower closing lows. Even in the days where we see spike
highs or spike lows, notice where the market closes in relation to their
respective highs and lows. The price penetrates the highs but closes
back below the prior highs. The reverse is true at the spike lows. This
is a good clue that the market has exhausted a trend and is ready to re-
verse. Keeping a stop out of harm’s way will allow you to participate in
the move using a variation of an average daily range stop placement.
• Conditional Changes. A conditional change is defined as a higher
closing high in a downtrend or a lower closing low in an uptrend. Such
as the case with a spike top, the market does not close above an old
high. Therefore, one factor such as the stop-close-only order will be of
great use to a trader not looking to get bumped out of a position. There
is, as with any stop, the unknown risk that there is not a guaranteed
price at which your stop order will be filled. This order has a negative
connotation among traders because it spells too much risk. A buy stop
will be elected and will knock you out of a position if the market closes
above the stop price; and a sell stop will be elected and will knock you
out of your position if the close is below your selected price level. The
unknown is how far away the market will close from the selected stop
price. The key benefit in using a stop-close-only order is that it keeps
your risk defined to a conditional change and helps you from getting
knocked out of a position from intraperiod volatility. Stop-close-only
orders (SCOs) are for end-of-day trading and can be placed on most
trading platforms. The SCOs can be used for day trading; however, they
must be used manually, as most platforms do not accept intraday
SCOs. Some consider these mental stops, which are predefined risk
factors. However, many traders violate the rules once a signal calls for
262
CANDLESTICK AND PIVOT POINT TRADING TRIGGERS
c09.qxd 9/25/06 8:40 AM Page 262
an exit but they do not exit, thereby increasing their losses. A trader
needs to have a strict disciplinary approach.
The challenge in selecting the right stop is to reduce risk while not
being shaken out of the trade by market volatility. It is important to try
to maximize your trading results and to stay in profitable trades as long
as possible. Employing random stop-losses and profit targets can ruin
a trading strategy, making it perform significantly worse than it would
have otherwise. One successful method is to use trailing stops that
adapt to market volatility so that the stop is placed far enough away,
which combines enough sensitivity to price changes with flexibility to
fit your risk/reward parameters. Using this combination may provide
profitable consistency from a stop-placement aspect for the intermedi-
ate-term trader. The trailing stop is used as an attempt to lock in some
of the paper profits that could accrue should the market move in the di-
rection desired. Like an ordinary stop, the trailing stop is started at
some initial value but then is moved up (in a long trade) or down (in a
short trade) as the market moves in your favor.
Testing has demonstrated that a proper combination of even simple
exit methods, such as placing a stop below the low of the prior past two
trading sessions, can substantially improve the behavior of a trading
strategy, even turning a random, losing strategy into a profitable one!
Another less complicated method to use for a bullish trending mar-
ket condition is placing a stop below the lowest low from the most re-
cent 10-day period. Another method is a trailing stop method using the
lowest low from the last conditional change. I define the last condi-
tional change as a higher closing high. This is a much more important
event than a higher high. Buyers who stepped in on the open have a
strong conviction that price should expand to new higher territory
once the market established a new high ground. Therefore, if the lows
are violated, then the market is demonstrating weakness. In Figure 9.3,
we are looking at the daily chart on gold. Starting from the low on No-
vember 4 near 465, the market does not make a lower closing low. On
December 1, we see a close at a doji low but not below the low of the
doji. The trend then continues higher with a sequence of higher highs,
higher lows, and higher closing highs.
It is not until the shooting star develops that the intermediate top
is made. A stop placed beneath the low of the candle prior to the star
would be the last conditional change or the last higher closing high
that occurred. That would be where you would want to place a sell
stop. Using the two-period lowest-low method, you would have been
stopped out at 528. If you used a stop-close-only below that low, your
fill was the next time period’s close; and that was not as friendly or as
profitable, as the market closed at 514. However, using the lowest low
Risk Management 263
c09.qxd 9/25/06 8:40 AM Page 263
for the most recent 10 periods, your stop-out point was all the way
down at 497.
Let’s examine this method with a day trade using a chart example
on the spot forex British pound market from 2/6/2006 using a 15-minute
time frame. Figure 9.4 shows a low close doji trigger to sell short at
176.07. The initial stop per the LCD trigger states to use a stop-close-
only above the doji high. That would be 176.28. As you can see, the mar-
ket stalls in a traditional sideways channel, as forex markets are known
to do. But, sticking with your trading rules, as the market starts to de-
teriorate, you would change the stop from a stop-close-only to a regu-
lar stop one tick above the high of the second conditional lower closing
low candle. You now have the option to move stops above the highs
of the last reactionary high points; and if you follow the trail of the
market, you will notice the high from the last conditional lower closing
low. This failed reactionary high was the perfect spot to move your
stop down to just one PIP above that high point. At the end of the run,
you want to trail the stop to the point one PIP above the high of the
264
CANDLESTICK AND PIVOT POINT TRADING TRIGGERS
FIGURE 9.3
Used with permission of esignal.com.
c09.qxd 9/25/06 8:40 AM Page 264
second-to-last candle that made a conditional change, which would be
a lower closing low.
Let’s explore this method further for day traders in the stock index
futures. Figure 9.5 shows a 15-minute candle pattern showing another
low close doji trigger to sell short. The fill would be 1279.25, and the ini-
tial stop would be a mental stop-close-only above the doji high at
1283.5. As we want to see when short, immediate results materialize
with the sequence of events such as lower highs, lower lows, and, best
of all, lower closing lows. We now have the option to change and trail
a hard stop above the high of the second conditional change candle.
Here, a conditional change is a candle that makes a lower closing low.
Prices now decline to 1270.75; we have over an eight-point gain, or $400
per contract. We can do several things, such as taking profits on half of
our positions, because the market has reached a move equal to the av-
erage daily range from the most recent 10 trading days, or moving stops
down to lock in profits and letting our winners ride. We should now
place a trailing stop above the high of the last conditional change or an
SCO to exit the balance of positions.
Risk Management 265
FIGURE 9.4
Used with permission of esignal.com.
c09.qxd 9/25/06 8:40 AM Page 265
In this example, you would not have been able to sell the high or
buy the low using a set of trading rules. However, a solid chunk of mid-
dle of that trading session was captured with having little-to-no risk
pressure. The trailing stop method would allow you to stay with the
trade until the bearish conditions changed. The chart in Figure 9.5 is
also a great illustration of how a market moves from a trending condi-
tion to a consolidation phase. Once you have captured the profit, it is
time to wait for another trade setup.
There are many different variations to placing stops. The key is
watching for conditional changes; for example, in a declining market,
you should watch for the last reactionary high as the peak at which to
place a trailing stop once you are in a short position. You should use a
stop-close-only above a conditional change candle especially on a two-
period time count. These methods will help you limit losses, prevent
you from being prematurely knocked out of a trade, and reduce emo-
tional stress, while capitalizing on letting your winning trades ride.
266
CANDLESTICK AND PIVOT POINT TRADING TRIGGERS
FIGURE 9.5
Used with permission of esignal.com.
c09.qxd 9/25/06 8:40 AM Page 266
THE BOTTOM LINE
The bottom line is this: Stops are not for sissies. You just need to know
when changes in a market’s condition occur to help determine when to exit
a trade. If you are in a trending condition for too long, chances are that you
may be overextending your welcome; therefore, tightening stops is a good
way to protect profits. After all, it really counts most when you get out of
the trade. All traders struggle with stop placements. There is no one single
best method. The concept is to develop a consistent method that helps you
define cutting your losses and letting winners ride.
Risk Management 267
c09.qxd 9/25/06 8:40 AM Page 267
c09.qxd 9/25/06 8:40 AM Page 268
269
CHAPTER 10
Projecting Entry
and Exit Points
Learn to Scale Out
W
hat are some of the most important things that successful traders
do? They have:
• A system or a method that provides an accurate daily market forecast,
helping them define where the market might go each day.
• A set of rules for when to get in and out of the market and a bit of dis-
cipline to follow these rules.
• A set of timing indicators to help them pull the trigger at the key areas.
The legendary basketball coach Bob Knight often says, “Most people
have the will to win; few people have the will to prepare to win.” This is true
in many aspects of a person’s life, be it in athletics, academics, business, a
profession, or trading.
Trading is about making money, not about being correct in market
analysis or being a great prognosticator. Traders must be consistent in their
approach and strive to completely remove emotion from trading decisions.
This is often best achieved by having and sticking to a plan for every trade.
We trade in the future markets, not in the past markets. Hindsight is always
20/20. Keep in mind that you will never trade as well in real time with real
money as you will by looking at or trading in the past. Trading in the past is
an exercise in futility that will only harm your psyche going forward. You
should view every trade you make as the best trade you could make at the
time with the information available. That is why I like to scale out of my po-
sitions as a short-term trader at market points that signal when a trend has
c10.qxd 9/25/06 8:41 AM Page 269