Beginning DotNetNuke 4.0 Website Creation in C# 2005 with Visual Web Developer 2005 Express phần 2 pptx
Bạn đang xem bản rút gọn của tài liệu. Xem và tải ngay bản đầy đủ của tài liệu tại đây (1.27 MB, 39 trang )
CHAPTER 2 ■ THE EXPRESS AND DOTNETNUKE COMBINATION
27
The garbage collection thread walks the heap for any memory that seems to be unclaimed.
It also finds thread objects that have stopped and are no longer really connected to anything.
Once it finds some memory to be reclaimed, it marks it as such. Your object will then fire an
event that you can listen to. This event says “I don’t think this is being used anymore. Unless
you change a flag, I will delete it the next time I see it.” You get a chance to stop the garbage col-
lection by resetting a flag. This process is used just in case you haven’t lost connection with an
object and you really want it around.
If this flag is not reset, then the next time the thread runs and sees this object, it will
de-allocate the memory and delete the object. But that’s not all.
Consider a case in which you’ve instantiated objects 1, 2, 3, and 4. Now, let’s say you dis-
pose of objects 2 and 4. This leaves 1 and 3. This also leaves a hole between objects 1 and 3. If
threads. This does not even take into account thunking. (Thunking is a great word, don’t you think? Thunking
is what happens when a 32-bit program has to step down to a 16-bit program. It largely has to do with memory
management. Basically, your program is running along at light speed, and then it goes thunk!)
Figure 2-2. Task manager showing system idle time
28
CHAPTER 2
■ THE EXPRESS AND DOTNETNUKE COMBINATION
you now want to instantiate another object that is slightly larger than object 2, the system will
be unable to use the dead space between objects 1 and 3.
In this way, the garbage collector has another job, which is to create contiguous space
where there was none. In this case, it would move the contents of object 3’s memory to where
object 2 was. This will open a contiguous space that’s the size of objects 2 and 4. The garbage
collector is a neat freak.
You might be asking, why should I get rid of memory when the garbage collector does it for
me? Well, for small programs that do not run for long, you don’t really need to. Realize, how-
ever, that even these days memory is scarce. There is a threshold of memory usage that the
garbage collector will tolerate. Beyond this point, it starts running at a higher priority and for
longer. Since garbage collection takes time, your program could slow down, and could slow
down significantly. Besides, it is just good etiquette to clean up after yourself.
I will teach you about proper object disposal in Chapter 4, when we delve into some C#
programming. Don’t worry though—it is not terribly geeky or difficult to do. And remember, if
you forget, the garbage collector will clean up after you.
Safe Code
Safe code in .NET parlance is called managed code. This is code that is within the control of the
.NET memory manager and security apparatus.
As far as the memory manager goes, this means that if you instantiate an object using
.NET, then .NET will take care of the memory management of that object, including garbage
collection. If you use “unsafe” code, then all bets are off. .NET will not be able to manage this
code for you, and you are back to all the potential problems you had before.
The security apparatus I refer to does not mean keeping out the hackers. It means not let-
ting you do anything that will compromise the system. .NET has many rules concerning what
you can and can’t do. For instance, it will not let you accidentally write into memory that is not
yours. It will not let you stuff a 50-character string into a 30-character space. C will be more
than happy to let you do this.
Versioned Assemblies
You can still create DLLs in .NET. However, they are not your father’s DLLs.
Microsoft realized when designing .NET that memory was no longer the scarce resource it
once was. It is no longer necessary to have a single DLL for many executables. To this end, you
can now create a DLL for your program that resides in that program’s folder on the machine.
You can also have the same DLL for another .NET program that resides in that other program’s
folder on the machine. Start both programs up, and they will both use their own respective
DLL. Change one DLL and it will not affect the other program like it used to.
Each program is forced to use the DLL that is assigned to it. It is possible to have two
versions of the same DLL in memory at the same time. With one stroke, DLL hell is a thing of
the past.
So is the commonality of code lost? No. If you want, you can sign your DLL (for security
reasons) and put it into the GAC. But keep in mind that versioning is enforced here, and if you
change a DLL and put a new one in the GAC, then both versions will be in there even though
both DLLs have exactly the same name.
CHAPTER 2 ■ THE EXPRESS AND DOTNETNUKE COMBINATION
29
Your program will know, for example, that it wants version 2.0.3.4.5 of some DLL, and another
program will know it that it wants version 2.0.3.4.6. The point here is that DLLs can no longer be
overwritten, and again DLL hell is avoided. This feature is a major reason why I was so anxious for
.NET to come along.
By the way, there is a signing process that goes along with your program and the DLL that
it uses. This process uses encryption to make sure that the DLL it gets is the one it wants.
Microsoft has gone to great lengths to make sure that bad DLLs cannot be introduced onto
your system and spoof a DLL that you are trying to use.
Complete Classes
VB suffered from a severe lack of performance. It is a great language and development environ-
ment for writing Windows programs that do not require extensive use of system resources—
but some of its features are lacking indeed.
One such feature is the drawing capability of VB. To put it bluntly, it is pathetic. Any ren-
dering of complicated shapes becomes impossible in VB without resorting to the Windows API.
WHAT IS THE GAC?
The GAC is the global assembly cache. It is a common area to store DLLs that may be used by more than one
.NET program. All the .NET Framework is in the GAC.
You can find the GAC using Windows Explorer. In Windows XP, you will find it in C:\WINDOWS\assembly
(provided that the .NET Framework is installed on your machine). Open up Windows Explorer and look in there.
Figure 2-3 shows my GAC.
Figure 2-3. The GAC, showing multiple files with same name
Notice in this screenshot I have underlined two files in the same directory with the exact same name.
Try to give two files the same name in any other directory and you will get an error. These two files are distin-
guished by their version number and public key token. When you install the .NET Framework onto your
machine, it loads an add-in to Windows Explorer that enables it to see the GAC this way. If you were to go to
a DOS box and do a DIR command, you would not see anything like what you see in Figure 2-3.
There is one thing to note about putting assemblies in the GAC. .NET allows you to do an XCOPY deploy-
ment. It does not need to register anything. If you need to put something in the GAC, then you lose this
capability. This is something to remember when considering an install for your program.
30
CHAPTER 2
■ THE EXPRESS AND DOTNETNUKE COMBINATION
The Windows API is unsafe code. In fact, it is downright scary and really complicated.
However, if you want to create any kind of usable and professional program in VB, you will
need to resort to the Windows API.
I have a book on the Windows API that is a few thousand pages long. It is a few years old
and very worn. When I was working heavily in VB, I knew quite a few API commands by heart,
and how to use them.
VB is like an overbearing parent. It protects you from the big bad operating system and
does not allow you to do anything that might hurt you. However, VB does allow you to make
API calls, which become the back door out to the wild world. Using these API calls can crash
your system if you are not careful.
Like I said, though, if you wanted to write any kind of complicated system, you needed to
become familiar with the Windows API.
Then along comes .NET. I had heard that VB .NET and C# were on a par as far as what they
could do. This is true. VB .NET can now do some incredibly complicated drawing and other
neat things that it could never do before. .NET allows this because it has wrapped all the API
calls you would need in .NET classes and calls.
.NET allows you to dig deep into the Windows API using safe code. You will not get into
trouble like you could by using the raw API.
This was so cool to me that I decided to try some serious GDI work in .NET. (GDI is the
graphics device interface, and is probably the most common set of raw API calls).
Microsoft has come up with a set of classes called the GDI+. While I was trying this out, I
wrote my second book on .NET, called GDI+ Programming in C# and VB .NET. This book is all
about graphics in .NET and how to use the classes to do some amazing things. I think that I
used direct API calls only once or twice throughout all the examples in the book. I was very
hard-pressed to find something that the GDI+ classes could not do.
The important point is that .NET has a complete set of classes that allow you to do almost
anything you could want to do without needing to go to the API.
Common Data Types
In C, the size of an Integer data type is compiler dependent. Most times, however, it is 4 bytes.
In VB 6.0, an Integer is something different altogether. In C, a string is a starting memory posi-
tion and an end character. In VB, a string is totally different and has a size characteristic to it.
Likewise, if you wanted to write a program in C++, all your code for that program would
need to be in C++. There is no way to pass data directly from a part of a program written in VB
to one written in C++. You can pass data from VB to a C++ COM DLL using marshaling, but that
is very complicated. So you end up having to have your programming team write code using
the same language. You have no chance to leverage the talents of your best VB programmer.
.NET enforces a common data type set throughout the framework. It also compiles the
code you write to something called intermediate code. This intermediate code ends up being
the same regardless of whether you wrote it in C# or VB .NET or even COBOL .NET.
These two things allow you to write a program using assemblies from any of the .NET
languages. The VB programmer can write a complicated set of classes in VB, and the C# pro-
grammer can pass data back and forth and use the interfaces with no problems. All this is
native and requires no extra marshaling of data.
This allows you to use programmers with knowledge in several different languages on the
same project. Your VB programmer no longer needs to feel left out of the “real” projects.
CHAPTER 2 ■ THE EXPRESS AND DOTNETNUKE COMBINATION
31
.NET Remoting
Ah, remoting! Although Microsoft will deny it, this is where they got rid of DCOM (Distributed
COM). It is a way for a client program to talk to a server. It is not the browser/web server com-
bination, but an executable on one machine instantiating and talking to an executable on
another machine. These days, this type of client is called a fat client. Unlike the browser, this
client can make full use of the client machine’s operating system and is in fact operating sys-
tem dependent.
DCOM was, and is, a nightmare. It is difficult to set up and even more difficult to use prop-
erly. It can be slow and it is not firewall-friendly.
DCOM is also dependent upon GUIDs being in synch. Often, if you changed a server, you
would change its set of GUIDs. Then the client would no longer recognize the server and
couldn’t work with it. So, if you changed the server, you would need to recompile the client to
work with the new server. You would need to redistribute the new client whenever a new server
came along. This could be avoided in C++; but in VB 6.0, you were hosed.
.NET Remoting changed all that. There are two kinds of remoting available to your .NET
programs: HTTP remoting using SOAP, and binary remoting.
Binary remoting is the fastest, but it may not be able to pass through firewalls. HTTP
remoting is XML serialization, and passes through on port 80. HTTP remoting is much slower
than binary remoting. There is a third kind of remoting as well, which is a combination of the
two mentioned here. It is HTTP remoting using binary data.
.NET has made changing between remoting types very easy. There is no recompiling of
any program. It is just a value change in a configuration XML file.
Remoting is different from DCOM because it uses a leased lifetime for an object. DCOM
relies on pinging. If the objects cannot ping each other, then the remote object is destroyed.
Remoting has divorced the tight coupling between the client and the server, which makes
updating one part or the other much easier.
Reversion to Configuration Files
A far as .NET is concerned, the registry is a thing of the past. All configuration options and per-
sisted values are kept in XML configuration files.
These configuration files allow your .NET program to be installed on a computer just by
copying it to a folder. You then invoke the executable and you are running. Think of this com-
pared to installing something like Microsoft Word.
Back in the DOS days, this was how all programs were installed. Just copy them from one
machine to another. Along came Windows 95/98/ME/NT/2000/XP with its much heralded
registry. Now we are back to the original method. (I am not the only one who finds this
amusing.)
Discontinued Use of Pointers
Ah, pointers. No self-respecting C or C++ programmer would ever admit to not being an expert
in pointer arithmetic, right? Single indirection I could handle just fine, but sometimes I would
see double and triple indirection in code, and I would just throw up my hands. Some program-
mers took great joy in producing abstruse C code.
Well, Java came along and changed all that. Java is very object oriented and has no provi-
sion for pointers. This alone reduced the amount of bugs by an order of magnitude.
32
CHAPTER 2
■ THE EXPRESS AND DOTNETNUKE COMBINATION
In case you are wondering, here is a little explanation of pointers. A pointer is a reference
to a memory location. If you wanted a function to work on a very large string, the efficient
thing to do would be to pass a pointer to the string into the function instead of passing in the
string itself. The function would then reference the string and work on it. This had the added
advantage (or disadvantage) of permitting you to change a variable directly in the calling pro-
gram. If you were to pass in the whole string, the function would work on a copy of the string,
and nothing in the main program would change. While pointers may seem like a cool thing,
they are a major source of bugs. The memory referenced by pointers is not protected well. It is
very easy to inadvertently change something you should not have access to.
Everything in .NET is an object. .NET does not allow you to pass things by passing point-
ers. It certainly does not allow you to walk through memory one byte at a time like “C” does
with pointers.
.NET is very safe. There is a way, however, to pass a reference to an object into a function.
This allows you to use a function to change an object in a calling function. The .NET method of
passing a reference is explicit. You must explicitly say that the argument in a function call is a
byref argument. Type safety is still enforced in .NET even when passing a variable by reference.
The Evolution of DotNetNuke
Like anything new from Microsoft, .NET came with a whole host of help files and examples.
One of the first examples to come out was a starter kit for ASP.NET called IBuySpy. This was a
portal application that contained enough code to actually be useful. Microsoft released the
code to the world, and the license agreement was such that anyone could release any deriva-
tion of it with no fees.
This application caught the eye of an ASP.NET programmer in Canada by the name of
Shaun Walker. He took the program and altered it to fit an amateur sports web hosting envi-
ronment. Along the way, he more than doubled the code—from 11,000 to over 25,000 lines.
The program worked fine for him, so he tried to sell it to the world. When this was not suc-
cessful, he decided to release it to the open source community as a general purpose web
application framework. It took off.
Within three months he had 5,000 registered users, and the product was dubbed
DotNetNuke. It was named after an existing open source web portal product called PHP-Nuke.
DNN is free and its licensing scheme is similar to the BSD (Berkeley Software Distribution)
license. Basically, you can use it, enhance it—whatever you need. The BSD license gives the
most freedom of any licensing scheme.
Currently, DNN has over 40 core programmers and is over 200,000 lines of code. This is
truly amazing.
DotNetNuke Features
DNN has many features that allow you to create websites and manage them easily. While VWD
2005 Express does have starter kits for individual websites, DNN goes far beyond this.
CHAPTER 2 ■ THE EXPRESS AND DOTNETNUKE COMBINATION
33
Virtualized Websites
DNN allows you to have virtualized websites. Many companies have multiple websites. Think
of Microsoft. It has www.microsoft.com, , ,
, and a few others.
While www.microsoft.com provides a way to get to some of these other websites through
the main page, you can also get to these sites directly.
DNN allows you to set up multiple URLs that are accessible and manageable though a sin-
gle URL. Your company may have one URL for sales, one for the help desk, and another for
frequently asked questions. DNN allows you manage all these through a single portal.
Consistent Framework
Whether you are working on Microsoft Word, Excel, or PowerPoint, you can be assured that the
menu structure for all three programs will be the same. You can be assured that the look and
feel of the three programs is also the same. It is this consistency that makes these programs
usable.
The framework in DNN is very consistent when it comes to adding pages, managing con-
tent, and so on. You will find that the modules that can be plugged into DNN are also familiar
to you. This even extends to the folder structure and the files that are on your hard drive.
This consistent framework just may entice you to create your own module for public use
in DNN. Who knows?
Modular Architecture
The framework of DNN is such that a single page can have several sections on it. Each of these
sections can contain a module of your choice.
A module is a self-contained program that can run within this space. If you wanted a
search engine, a shopping cart, and some text on a single page, you would normally create a
single page and include the functionality of all these items on it. DNN allows you to separate
the functionality of each item while still displaying a single page to the user. You will find this
feature very powerful indeed.
Multilanguage Capabilities
ASP.NET uses the same type of resource files as a C# full-client program. The language
resource files are XML files called ResX files.
There are many language packs that you can download and install into your DNN project.
Every text string and word in DNN is inside one of these language resource files. All you need
to do is download one and log in again using the new language.
It is also a simple matter to show a drop-down list of languages in your application to allow
the user to choose his language as well.
34
CHAPTER 2
■ THE EXPRESS AND DOTNETNUKE COMBINATION
Skinning
Skinning is the process through which you define the look and feel of a web page or website in
an external file. The program looks to this file before the page renders, and applies this look and
feel to the page.
DNN allows you to write and provide skins for your website, and to change them when you
want. Also, the flexibility is such that you can even change the look and feel on a page-by-page
basis if you want.
Skinning is probably the most used and coolest feature of DNN as a whole.
Membership Management
DNN has several roles that you may apply to your website. It has the ability to create roles such
as guest, registered user, administrator, and so on.
When you create a page in DNN, you can specify whether that page is viewable by anyone
visiting the website or only by registered users. This is a very powerful feature that is very easy
to use. Managing role security without this feature takes quite a bit of work.
Tested Code
While there are many more DNN features not mentioned here, there is one that is perhaps
more important than all the rest: proven code.
DNN has been around for a while now, and it has been used by thousands of people in
thousands of websites.
DNN is thoroughly tested, and all the kinks have been worked out by testers and users like
you. You will be using a product that does what it says and works with no fuss. DNN is a proven
product.
Summary
This chapter has provided some information on why the combination of Microsoft .NET and
DNN is such a powerful one.
First of all, the complete software package is free. The VWD 2005 Express development
environment is free, and the DNN framework is free. This brings professional website develop-
ment to more non-programmers.
If you are a programmer or manage a programming department, the next advantage is
important to you. You can leverage the programming expertise of coders with different lan-
guage backgrounds. Your website can be written in VB .NET or, as is the case with this book, in
C#. Your website can be written in a combination of these languages if you like.
The advantages of DNN enable you to get up and running with a professional website with
almost no programming necessary. While this statement usually means “limited functional-
ity,” in this case it does not. You will be able to use DNN with VWD to create a website with as
little or as much functionality as you like. You can let the pluggable DNN modules do all the
work, or you can go into the code and tweak it to your specifications.
The combination is powerful indeed.
35
■ ■ ■
CHAPTER 3
Installation
I could have named this chapter “Fun with Dick and Jane.” It has enough pictures to satisfy the
most visual of programmers. I count myself among them.
When I perform a new task at work, I document what I do every step of the way. More often
than not, a coworker or I will need to perform this task again. A well-documented procedure
with lots of pictures always ensures that it gets done the same way again with no missing steps.
It may take more time initially, but in the end it saves time.
This chapter will show you how to install the various pieces of software necessary to work
with VWD and DNN. I document three different ways (with lots of pictures) to install what you
need to get running. Here is a list of what you will be doing:
The XP Home install: This is the simplest install of all. It does not require any upgrade to
XP Pro, and it does not require IIS to be installed. This install makes use of the File System
server that comes with VWD 2005 Express. There is a caveat to this that I will explain later.
The XP Pro install: This includes the Windows 2000 Server and Windows 2003 Server oper-
ating systems. Most people doing this at home will not have these operating systems. This
install makes use of the IIS web server, version 5.0 or 6.0, from Microsoft. This is the pre-
ferred install.
The “I forgot to install it” install: This is the clean-up install for those of us who forgot to
click a check box or two. Mainly, this will show you how to install SQL Server separately
from the Express installs.
■Note I strongly suggest that if you have Windows XP Home to upgrade to XP Pro so you can use IIS as a
web server. While the simple File System web server with VWD works, it has some drawbacks. First of all, it
can be a little flakey at times. This is from the DNN guys themselves. I have not experienced this flakiness
myself, but be forewarned. The other drawback is that the simple server only accepts internal requests. You
will not be able to test your website from outside your computer.
36
CHAPTER 3
■ INSTALLATION
I’ll show you how to install the following software:
• VWD 2005 Express Edition
• SQL Server 2005 Express Edition
• SQL Server Management Studio CTP
• DNN application framework
• IIS
• Visual C# 2005 Express Edition
Some of these programs will be installed by default when you install others. For instance,
you can elect to install SQL Server 2005 along with the MSDN help when you install either VWD
Express or Visual C# Express.
Before I get into the development environment install, I’ll spend some time on one of the
basics. If you have Windows XP Pro or Windows 2003, you should install IIS. If you have XP
Home and do not wish to upgrade to Pro, then skip the next section and go to the “Installing
Visual C# Express Edition” section. Otherwise, let’s get started.
Installing IIS
If you have Windows XP Pro or 2003 Server operating systems, you should install IIS before
starting the VWD and DNN installs. If you only want to use the File System web server that
comes with VWD Express, then you can skip this step.
Steps for Installation
IIS is the Microsoft version of a web server. IIS can be used from the smallest local intranet
sites all the way up to massive redundant server sites hosting thousands of hits a day.
First of all, you will need to see whether you already have IIS installed. Go to Start ➤
Settings ➤ Control Panel ➤ Add or Remove Programs. Click the Add/Remove Windows
Components button. Figure 3-1 shows how the screen should look.
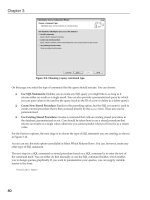
You can see here that I do not have IIS installed at all. I will need to remedy that fact. If you
do not have IIS installed, check the IIS box and click Next. A screen will come up and tell you
that you need to put in the original Windows XP disk. This is shown in Figure 3-2.
CHAPTER 3 ■ INSTALLATION
37
Figure 3-1. IIS configuration in Windows
Figure 3-2. Pop in the Windows XP disk.
38
CHAPTER 3
■ INSTALLATION
After the disk is inserted, click OK and you should be off and running. When you are done,
you should get the Finish screen, as shown in Figure 3-3.
Figure 3-3. IIS installation complete
Just to make sure that you have installed IIS, go back to the Add or Remove Programs
screen and click the Add/Remove Windows Components button again. Your screen should
look like mine, shown in Figure 3-4.
Figure 3-4. Verifying the completed installation
CHAPTER 3 ■ INSTALLATION
39
Installing Visual C# Express Edition
You will use C# as your language of choice when working with web pages. Installing the Express
Edition now is useful for projects later in the book, and is also useful as a learning tool. The help
and the projects included can really get you going in a hurry.
Since this is the first Express product you will install, it will notify you that you will need to
install the .NET Framework 2.0. This is essential. If you have the .NET Framework 1.1 or below,
do not worry. They play well together. If you have installed the .NET Framework 1.2 or any beta
versions of Express, then read the accompanying sidebar “Beta Version vs. Release Version.” It
is essential that you not have any beta versions of the 2005 Express Editions or the .NET 2.0
Framework beta installed on your machine.
Start by double-clicking the vcssetup.exe file. Once started, you should get the screen
shown in Figure 3-5.
Figure 3-5. The C# Express install screen
You can choose to send information to Microsoft. I choose not to myself. Once you accept
the license agreement, you will be asked if you want to load MSDN and SQL Server Express as
well. Check Yes and continue. This is shown in Figure 3-6.
You will need the SQL Server Express Edition when working with DNN. As I said, if this
install is the first of the Express installs, you will get a screen showing that the .NET 2.0 Frame-
work will also be installed. Figure 3-7 shows what will be installed here.
40
CHAPTER 3
■ INSTALLATION
Figure 3-6. Enabling installation of MSDN and SQL Server Express
Figure 3-7. The complete install list
This install will take a while. Once done, though, you will be halfway to having everything
you need to program.
While you are waiting for the install to run, just think about all that money you have saved.
All this software is free. If you didn’t have the money to spend, think of the opportunity you
now have. A world of programming is now open to you.
CHAPTER 3 ■ INSTALLATION
41
Once this is all installed, you will need to register the product. This requires a .NET Pass-
port. Follow the links on the registration page, and you will be led to a Microsoft site where you
will get the registration number. Open Visual C# and click Help ➤ Register Product. You will get
a page like the one shown in Figure 3-8.
Figure 3-8. Registering your product
BETA VERSION VS. RELEASE VERSION
I have installed and uninstalled all this software quite a few times while writing this chapter. Most of the time
things went smoothly. The one time it did not go so smoothly was when I tried to uninstall the .NET Framework
beta when I had a beta version of Visual Studio 2005 already installed.
The official rules state that you must uninstall all .NET beta products before you even think of installing
the release version. Even more importantly, you must uninstall these products before uninstalling the beta ver-
sion of the .NET 2.0 Framework. What I did wrong was uninstall things in the wrong order. I forgot exactly what
I had installed on my test machine and I uninstalled the beta .NET Framework before some aspects of the SQL
Server Express beta.
When I went to install the release version, I was able to install everything except SQL Server Express,
which always gave me an error. After much searching through my hard drive and the Add or Remove Programs
folder, I was still unable to install SQL Server. After a quick Google search, I found that I wasn’t the only one
with this problem, and that I should hunker down for a night of pain.
I essentially had two problems. One was that one of the uninstalls left some stuff in the registry, and the
other was that Windows said I had a previous instance of SQL Server running (even though I knew I did not).
In the end, I prevailed. I did have the help of quite a few blogs, many of which were from Microsoft devel-
opers themselves.
So the moral of the story is this: make sure that you uninstall everything .NET development–related
before you uninstall the .NET 2.0 beta Framework. Life will be so much easier.
42
CHAPTER 3
■ INSTALLATION
You will need to do this for VWD as well.
The next thing to do is check if SQL Server installed OK. Click Start ➤ Programs ➤
Microsoft SQL Server 2005 ➤ Configuration Tools ➤ SQL Server Configuration Manager.
Once it’s open, you should see some services. This is shown in Figure 3-9.
Figure 3-9. SQL Server services
Now you know all is well with SQL Server. You should have one service running and
another stopped. Now is a good time to install the Microsoft SQL Server Management Studio
Express CTP. CTP stands for Community Technical Preview. By the time this book comes out,
I am sure it will be a released product. This management tool will enable you to view, create,
and manage SQL Server databases. You will need to create a database for DNN. The file name
for this management tool install is SQLServer2005_SSMSEE.msi.
Installing Visual Web Developer
VWD is the backbone of this system. Without this, no web page will get created. The file for this
install is available for download from this book’s page at www.apress.com, or you can download
it from The name of the installation file is
CHAPTER 3 ■ INSTALLATION
43
vwdsetup.exe. Double-click this file and install it. Since you have already installed MSDN and
the .NET Framework, VWD is the only product to be downloaded and installed at this time.
This is shown in Figure 3-10.
Figure 3-10. Installing VWD by itself
Again, like the others, this will take a while. Note that what you are clicking on is a program
that gets and installs the proper software. It is not the software itself. This is kind of cool in that
you are always guaranteed to install the latest version. If I gave you the whole program to install,
who knows how old it would be before you got to install it. At that point, you would need to go
look for updates. A real potential mess has been avoided by doing it this way.
After installing, you will need to register this program just like you did with Visual C#
Express.
Installing DotNetNuke
DNN does not really have a classic install program like Microsoft Word or even VWD. This makes
things a little more involved. There are two ways to install DNN. The first way involves a ZIP file
that needs to be extracted to a particular directory. The name of this file (at the time of this writ-
ing) is DotNetNuke_4.0.1_Install.zip. Look for a newer version on www.dotnetnuke.com to get
the latest.
If you were to use the old install method for DNN version 3.x (do not do this), the directory
that you would unzip the file to is called c:\DotNetNuke. After unzipping DNN version 3.x, your
directory should look like this one shown in Figure 3-11.
44
CHAPTER 3
■ INSTALLATION
Figure 3-11. Directory structure after unzipping the DNN install ZIP file
Unzipping this file is the first of many (sometimes complicated) things to do before DNN
is finally installed. You will need to do quite a bit of groundwork before actually installing the
DNN product. There is a better way.
A Better Install
Microsoft added a great new feature with ASP.NET 2.0. This is the starter kit. It is basically a way
to create an install for an ASP.NET development environment. As you just saw, the versions of
DNN before 4.0 needed to be installed by unzipping a file to a directory. Although I have not
shown you, you would also need to set up a SQL Server database, set permissions, and so on.
While not especially difficult, these steps often lead to errors. The explanation of these steps
also always leaves something out. Something shows different on your machine than on mine,
and then where do we go?
Starting with DNN version 4.0.0, there is a starter kit for the install. It is on the download
page for this book at www.apress.com, as well as on the DNN website. You can even get it from
the Microsoft ASP.NET Developer Center. As you can guess, DNN is not the only starter kit out
there. Be aware, though, that starter kits are not supported by Microsoft and are technically
considered third-party software.
Anyway, back to the DNN install. The name of this install is
DotNetNuke_4.x.x_StarterKit.vsi. The xs represent the current minor version and build.
Once you have installed VWD 2005 Express, you can double-click this file and it will install.
Figure 3-12 shows the first screen.
CHAPTER 3 ■ INSTALLATION
45
Figure 3-12. Getting ready to install DNN
Click Next and the install will start. Before the actual install starts, however, you may see a
message like the one shown in Figure 3-13. The install has not been digitally signed yet, so you
will need to confirm the install here. By the time you get to use this install, it may be digitally
signed and you may not get this screen.
Figure 3-13. Confirm installation of DNN
46
CHAPTER 3
■ INSTALLATION
The install of the starter kit happens really fast. The end result of the install will look like
Figure 3-14.
Figure 3-14. DNN installation complete
Note what got installed here. You now have a DNN project, which is used to complete the
install later, and two modules necessary for the completed install. Note that you also have
a DNN skin. I may have mentioned before that skinning is one of the most powerful features of
DNN. Since it is a DNN project that will install DNN itself, the project needs a skin, like every
other DNN project.
This is kind of like a chicken-and-egg thing. You are using DNN to install DNN.
If you blew though this starter kit install, you probably thought “Is that all?” After all, it only
took about 30 seconds to complete. Well, there are some more lengthy steps to come.
Using VWD to Complete the DNN Install
The rest of the install gets done inside the VWD environment. This is where the XP Home install
and the XP Pro with IIS installs differ. Start by opening up VWD Express. If this is your first time
starting VWD, you may get a message like the one shown in Figure 3-15.
This message may stay up for a few minutes.
Once VWD is up and running, click File ➤ New Website. You should get the same screen
as shown in Figure 3-16.
This screen shows several things. First is that you have a DNN web application framework
template. This is what you select. Second is that the language is Visual Basic. Do not be
alarmed. DNN is written in VB. It is the only language you can create the project in. However,
as I said before, you can create code that runs in DNN in any of the .NET languages. For this
book, you will be using C#. You will see how this works later.
CHAPTER 3 ■ INSTALLATION
47
The third thing to notice here is the location. It is set for File System and has a directory
structure deep within the Documents and Settings folder.
Figure 3-15. VWD message for first time use
Figure 3-16. New DNN template
Local Web Server or IIS
For the location, you can choose File System, HTTP, or FTP. FTP is a file transfer protocol—this
option won’t be covered in this book.
HTTP is the IIS web server. Choosing this creates the DNN install so that it runs under IIS.
As you know, running under IIS requires that you have at least XP Pro installed, and IIS
installed as well.
Choosing File System creates the DNN install so that it runs under the debug personal web
server that comes with VWD Express. This can be run under XP Home and is free. No need to
upgrade here. I will cover both installs for you in the following sections.
Using the Local Web Server
Choose the File System location and change the directory to C:\DotNetNuke. This is easier than
digging several layers deep under C:\Document and Settings\.
Your choice should look like Figure 3-17.
48
CHAPTER 3
■ INSTALLATION
Figure 3-17. Choosing the local web server
Press OK and start the process. This process creates a DNN project, and will take a few
minutes, so be patient. When all is said and done, your DNN portal install will almost be
complete.
Using the IIS Install
If you are using the local web server, you can skip this step.
As shown in Figure 3-16, create a new DNN website. This time, however, you will be using
the HTTP location. This is shown in Figure 3-18.
Figure 3-18. DNN project built with IIS
CHAPTER 3 ■ INSTALLATION
49
Click the Location drop-down menu, and choose the HTTP file server. Instead of a direc-
tory for a location, you will be choosing http://localhost/DotNetNuke. The program will live in
the C:\Inetpub\wwwroot\DotNetNuke folder. The wwwroot folder is referred to as the virtual root
for IIS. This is where IIS stores all the websites it manages.
Once again click OK, and the install will start. When this process finishes, your DNN portal
install will almost be complete. Figure 3-19 shows the new directory where the DNN project
resides.
Figure 3-19. DNN created in virtual root directory of IIS
Once this step is complete, you will get the screen shown in Figure 3-20 that tells you your
DNN web application project is ready.
50
CHAPTER 3
■ INSTALLATION
Figure 3-20. The completed DotNetNuke IIS install
Read the document shown, and you will see that the install is not quite complete. There
are a couple more steps.
The first step (because it is the easiest) is to rename the release.config file that is created
with this project to web.config. Scroll down in Solution Explorer until you see the
release.config file, as shown in Figure 3-21.
Figure 3-21. Renaming release.config to web.config
CHAPTER 3 ■ INSTALLATION
51
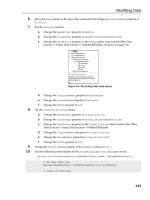
Right-click this file and rename it web.config. If you read the install web page, it says you
may need to modify the web.config connection string. I have found that this is not needed. In
fact, no editing of this file is needed at all.
The next thing to do is to create a database that will be used by your website. Do this under
the App_Data node in Solution Explorer. Right-click this node and choose Add New Item. This
node is shown in Figure 3-22.
Figure 3-22. Creating a SQL Server database under App_Data
Figure 3-23 shows the SQL Server database Database.mdf being chosen. Choose this and
click OK; after some grinding, a database will appear under the App_Data node.
Figure 3-23. Creating a new SQL Server database