Beginning DotNetNuke 4.0 Website Creation in C# 2005 with Visual Web Developer 2005 Express phần 3 doc
Bạn đang xem bản rút gọn của tài liệu. Xem và tải ngay bản đầy đủ của tài liệu tại đây (840.32 KB, 39 trang )
66
CHAPTER 4
■ BASIC C#
• Create a deployment package so you can install it somewhere when you are done
• Manage all your projects
• Interface with both local and online help in a context-sensitive manner
• Suggest code for you to insert into your program
I can think of more things, but I will leave it at that. For everything this C# IDE can do, the
other IDEs can do the same. In fact, as you know from the installation, the VWD IDE can also
act as a small web server.
The Look and Feel
Start up Visual C# and you should get a screen similar to that shown in Figure 4-1.
Figure 4-1. The C# IDE start screen
CHAPTER 4 ■ BASIC C#
67
You will see a standard menu on top with a toolbar below. Below this, you will see three
pinnable panes. The first is the toolbox, which is on the left-hand side and is currently mini-
mized. Run you mouse over it—you will see what looks like a pushpin in the top-right corner of
the pane. This is shown in Figure 4-2.
Figure 4-2. The toolbox pushpin, showing Auto Hide
Click this pushpin—it will rotate vertically and the toolbox will stay maximized. Note that
the Solution Explorer acts this way as well.
This pinnable menu and pane system is a really big help in developing code. Many times you
won’t need the toolbar or, in some cases, even the Solution Explorer. This feature allows you to
maximize the screen space you have for visual screen development or coding.
One last thing to note about the menu system is that it is completely configurable. If you
do not like the way it looks, you can move panes around, add new ones, or delete some choices
from other toolbars. It is up to you. I would suggest, however, that you use the system as it is for
now just to get used to it.
Creating a New Project
The project you will create in this chapter is a simple time sheet. This time sheet will allow you
to press a button to punch in and out of work. It will have the following features:
• A button to click that punches you into work at the beginning of your shift
• A button to click that punches you out at the end of the day
• A place that shows how many hours you’ve worked that day after you punch out
• A grid that shows how many hours you’ve worked in the current week
The intention of this project is to handle the design work and the business logic so you can
bring it over to the Web. In Chapter 7, you will be creating a DNN module that will do this work.
All the business logic you create in C# here will be used there.
68
CHAPTER 4
■ BASIC C#
Starting the Project
The name of this project will be “Punch.” Clever, eh?
Open the C# IDE and click the menu option File ➤ New Project. Choose a Windows Appli-
cation project and name it Punch. This is shown in Figure 4-3.
Figure 4-3. Creating a new project
Click OK and you will have a project with a single Windows form and a class that runs the
code for this form. Unfortunately, the name of the form is “form1” and the name of the code
class is “program.” This is way too generic, and you should change it.
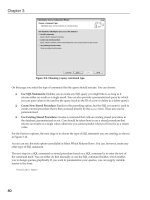
Inside the Solutions pane, right-click the form1.cs file and select the Properties window. It
will show as in Figure 4-4.
Change the file name from form1.cs to punch.cs. Press Enter and you will get the prompt
shown in Figure 4-5.
CHAPTER 4 ■ BASIC C#
69
Figure 4-4. The Properties window
Figure 4-5. Prompt to propagate changes
Click Yes here to continue. In previous versions of the C# IDE, the name change did not
propagate throughout the project. I used to have to open every file and change every reference
myself. This new functionality is a big help.
70
CHAPTER 4
■ BASIC C#
You now have a single form and a code file with which to write the program. The next thing
to do is populate the form with controls so that the user can interact with your program.
Click the form, and then click the Toolbox tab. The tab will expand. This is where you will
click the pushpin to force the toolbox to stay open while you are using it. You can see this in
Figure 4-6.
Figure 4-6. Opening the toolbox and making it stay open
Notice all the controls that Microsoft gives you for free here. You have common things
such as different types of buttons, labels, text fields, and so on. It is possible (and probable) that
when you create more Windows applications, you will need some more specialized controls
not shown here. There is a wealth of controls available for purchase online. If you feel really
comfortable with programming, you can even create new specialized controls out of the ones
shown here. If you feel so inclined, I wrote a book on how to write special data input controls,
called Data Entry and Validation with C# and VB .NET Windows Forms. This book is available
from Apress as well.
Project Setup
Before diving into the project, I want to take a break here to explain the setup of a C# solution.
The setup of a web solution will be similar. While I am on the topic, I will also show you some
aspects of C# and programming itself. This will not be anything too difficult, but it will be about
the most complex thing you will see in programming the projects in this book.
CHAPTER 4 ■ BASIC C#
71
The Solution Explorer
The Solution Explorer is the pane shown in the upper right of the screen. It is essentially a list
of all the files in your project. This project’s solution is shown in Figure 4-7.
Figure 4-7. The Solution Explorer window
My list here is expanded to show some other files. Let’s look at what some of these files are.
AssemblyInfo.cs: This file includes information about your project that can be accessed by
other programs. This information includes things such as version number and name.
Resources.resx: This file is an XML file that includes localized text you can use in your pro-
gram. You are not localizing this program, so your text is hard-coded in the class.
Settings.settings: This file has information about user preferences. You can store the last
known state of a program in here, and the next time a particular person logs in, the pro-
gram will return to the state that person left it.
References: The files included under this folder contain the core functionality of .NET. If
you write a DLL with some neat methods, you can include it here so you can reference the
methods in your program.
Program.cs: This is the most upper-level class that instantiates your Punch class. Basically
it starts the program running.
punch.cs: This is the visual form you see on the screen.
72
CHAPTER 4
■ BASIC C#
punch.Designer.cs: This is the code that Visual C# generates when you place and manipu-
late controls on your form.
punch.resx: This file contains localized text that relates to your Punch class. It will appear
once you add components to your form.
The blank form that you see in Figure 4-6 is the punch.cs file. The code that runs this form
is called punch.Designer.cs. This file contains all the code that places controls on the form. It
also contains all the code that handles the properties of the form. Double-click the
punch.Designer.cs file name in the Solution Explorer and you will see the code shown
in Listing 4-1.
Listing 4-1. Base code for a form
namespace Punch
{
partial class Punch
{
/// <summary>
/// Required designer variable.
/// </summary>
private System.ComponentModel.IContainer components = null;
/// <summary>
/// Clean up any resources being used.
/// </summary>
/// <param name="disposing">true if managed resources should be
/// disposed; otherwise, false.</param>
protected override void Dispose(bool disposing)
{
if (disposing && (components != null))
{
components.Dispose();
}
base.Dispose(disposing);
}
#region Windows Form Designer generated code
#endregion
private System.Windows.Forms.Button cmdPunch;
private System.Windows.Forms.Label label1;
private System.Windows.Forms.TextBox txtHoursToday;
private System.Windows.Forms.TableLayoutPanel tlp1;
private System.Windows.Forms.Label label2;
private System.Windows.Forms.TextBox txtMon;
CHAPTER 4 ■ BASIC C#
73
private System.Windows.Forms.ComboBox cmbWeek;
private System.Windows.Forms.TextBox txtSat;
private System.Windows.Forms.TextBox txtFri;
private System.Windows.Forms.Label label7;
private System.Windows.Forms.Label label5;
private System.Windows.Forms.TextBox txtSun;
private System.Windows.Forms.Label label6;
private System.Windows.Forms.TextBox txtThu;
private System.Windows.Forms.TextBox txtWed;
private System.Windows.Forms.TextBox txtTue;
private System.Windows.Forms.Label label4;
private System.Windows.Forms.Label label3;
private System.Windows.Forms.Label label8;
}
}
There are some things to note here. First is the fact that there is a namespace called Punch.
A namespace is a way to keep names of controls and methods from conflicting with some other
controls or methods that may be named the same. A namespace is like the town part of an
address. You may live on 5 Main Street, and I may live on 5 Main Street as well. The way we
keep these addresses unique is to define the towns we live in. A namespace allows you to avoid
naming conflicts and provide what is called a fully quallified name.
The next thing to note is that you have a class called Punch. It is actually a partial class, but I
will get to that later. Writing code in .NET—or any modern language nowadays—means writing
object-oriented code. A class is a way of encapsulating a set of funtionality. Functionality could
be the visual aspects and code that runs in the background. Everything that has anything to do
with this form is encapsulated in this class.
Next you will notice a region called Windows Form Designer generated code. You may click
the plus sign next to it to expand and edit this section if you want. I do not recommend this, and
neither does Microsoft. Suffice it to say that this section is reserved for the IDE, and this is
where it puts code that places the controls on the form.
■Caution You may look at the code in the Windows Forms Designer region, but do not change it. The
IDE relies on the code here to be exaclty what it put in here. If you change it, you may change the behavior of
your form.
Finally, you see a bunch of controls and their names. These are definitions of all the con-
trols you will be placing on this form. You will not have this code yet.
The next file I want you to look at is the file called punch.cs. There are a few ways to see
the code in this file. The first and most common way is to double-click the form. This adds what
is called an event handler for the form to the code, and the IDE shows the code. The other way
is to click the View Code button on the Solution Explorer. This is shown in Figure 4-8.
74
CHAPTER 4
■ BASIC C#
Figure 4-8. The View Code button
The code that you will see is shown in Listing 4-2.
Listing 4-2. Initial code for the Punch class
using System;
using System.Collections.Generic;
using System.ComponentModel;
using System.Data;
using System.Drawing;
using System.Text;
using System.Windows.Forms;
namespace Punch
{
public partial class Punch : Form
{
public Punch()
{
InitializeComponent();
}
private void Punch_Load(object sender, EventArgs e)
{
}
}
}
You will see here that you again have a partial class called Punch within the same Punch
namespace that you saw before. You can see from this code and the code in Listing 4-1 that the
Punch class is broken up between two files. Hence the word partial. You can define part of a
class in one file and another part in another file. The reason for doing this is to keep the IDE
forms designer–generated code away from the code that you will be writing. It is a way of
hiding what you really don’t need to see, and prevents some confusion.
CHAPTER 4 ■ BASIC C#
75
I got this code to show up by double-clicking the form. You will see from this piece of code
that there is a method called Punch_Load. This is the event handler method that is given to you
by the IDE. Since this code is in this file, you are free to edit it as you see fit.
You do not have to add anything to the Page_Load event handler. If you double-click the
form to get to the code page, the Page_Load event handler is what you get.
So this is the basic layout of a C# Windows program. As I said before, the layout of a web
solution, as far as the files go, is pretty much the same. Now on to the visual layout.
Designing the Form
Designing the form involves knowing what the user will need to see, and laying out the controls
correctly. The controls you will need for this form are as follows:
• A button to punch in and out
• A table to see a week’s time
• Several labels to view in and out punches
• A drop-down control to choose which week to view
• A label to see daily time
The list that follows instructs you on placing the control on the form. When you are done
with the form, it should look like the one shown in Figure 4-9.
1. From the toolbox, click the ComboBox control and place it on the form using your right
mouse button. In the Properties window, name it cmbWeek.
2. Choose a button from the toolbox and place it on the form as shown in Figure 4-9.
Name this button cmdPunch. Fill in the Text property as Punch In. Make the Font prop-
erty for this button 14-point bold. You’ll use just one button here to do double duty; it
punches the user in and out.
3. Choose a label from the toolbox and place it on the form as shown in Figure 4-9. No
need to name this label. Fill in the Text property as Hours Worked Today.
4. Below this label, add a text box called txtHoursToday. Change the BorderStyle property
to FixedSingle. Change the ReadOnly property to True.
5. Add seven labels to the form, representing the days Sunday through Saturday. There is
no need to name these labels. Change the Text property of each label to represent each
day of the week, as shown in Figure 4-9.
6. Add seven text boxes to the form below the day-of-week labels, as shown in Figure 4-9.
Name the text boxes txtSun, txtMon, txtTue, txtWed, txtThu, txtFri, and txtSat, respec-
tively. Change the BorderStyle of each to FixedSingle. Change the ReadOnly property of
each to True.
76
CHAPTER 4
■ BASIC C#
Figure 4-9. Final layout of controls on the form
Your final layout should look like that shown in Figure 4-9. You should now have a work-
able form with absolutely nothing behind it. It is time to add some code to this form.
Adding the Code
There are two events you need to handle in this form. The first is when a user clicks the drop-
down box. The second is when the user clicks the Punch button. There are two ways to add the
event handlers to this code. The first way is the way I prefer, which involves some hand-coding
and a good deal of knowledge about the way the IDE generates code. So, let’s get started . . . Just
kidding.
The easy way to add event handlers to the code is to double-click the control. So double-
click the drop-down box, and you will see a method appear in the punch.cs file. This is the code
you will see generated:
private void cmbWeek_SelectedIndexChanged(object sender, EventArgs e)
{
}
Now whenever someone clicks this control, the code you write inside this method will be
run. Next, double-click the Punch button. The code that appears is as follows:
private void cmdPunch_Click(object sender, EventArgs e)
{
}
CHAPTER 4 ■ BASIC C#
77
Whenever someone clicks the button, the code in this method will run. You can generate
event handling methods this way for any control. However, just as an aside, there are many
more events that you can handle for these and all other controls. These other events must be
wired up manually. You will not be handling any other events in this project.
You are now over the easy part.
A Class in Classes
There are three tenets to object-oriented programming. They are as follows:
• Polymorphism
• Inheritance
• Encapsulation
When it comes to software engineering, nothing is ever a single-syllable word. I think that
these three words are meant to confuse the uninitiated, and should be used as ammunition to
ask for a raise. Use these three words in a single sentence, and when your boss gives you a quiz-
zical look, ask for a raise.
When I first learned object-oriented programming (OOP) with C++, I spent a lot of time
trying to use these words with my colleagues. It soon became apparent that developers never
really talked this way. Here is what they actually mean:
Polymorphism: This feature allows you to have the same function for different objects.
While the function Circle.Draw() may render a circle, the function Square.Draw() does a
completely different thing, even though they both draw a shape.
Inheritance: This feature allows you to have a generic class—for example, one called House.
This class could have some basic properties, such as bedrooms, doors, a kitchen, and so on.
You could then derive a class—for example, RanchHouse—from House, and it would “inherit”
House’s properties. You could then add properties that are specific to a RanchHouse—for
example, that it has only one floor.
Encapsulation: This feature allows you to store data and functionality inside an object
while limiting access to them from outside. This is the OOP feature you will be using most
often in this project and other projects in this book. It’s often called “data hiding,” but one
can also “hide” functionality.
The following is a small side project to show you how you will use classes. I will use the
IntelliSense feature of the IDE to show how classes work. You can join in the fun . . . or not.
Start a project for a Windows Console Application. This is the simplest application, with
virtually no IDE-generated code to get in the way. Name the project “Encapsulation.” The
Program.cs file should look like Listing 4-3.
78
CHAPTER 4
■ BASIC C#
Listing 4-3. Start of the Encapsulation project
using System;
using System.Collections.Generic;
using System.Text;
namespace Encapsulation
{
class Program
{
static void Main(string[] args)
{
}
}
}
Not much here, is there? You have a single class called Program. Within this class, you will
add another class with some variables that are hidden from the outside, and some that are not.
I will show a way to get at these hidden variables later. Listing 4-4 shows the whole Program.cs
file with the new class.
Listing 4-4. The new class, with variables
using System;
using System.Collections.Generic;
using System.Text;
namespace Encapsulation
{
class Program
{
private class DataHiding
{
private int mPrivate_integer;
private string mPrivate_string;
public int mPublic_integer;
public string mPublic_string;
CHAPTER 4 ■ BASIC C#
79
//This is a constructor. It is used to initialize the object
// that is created from this class
public DataHiding()
{
mPrivate_integer = 1;
mPrivate_string = "one";
mPublic_integer = 2;
mPublic_string = "two";
}
//Property to get and set the private integer
public int Private_integer
{
get { return mPrivate_integer; }
set { mPrivate_integer = value; }
}
//Property to get and set the private string
public string Private_string
{
get { return mPrivate_string; }
set { mPrivate_string = value; }
}
}
// This is the method that gets run when the program is started
static void Main(string[] args)
{
}
}
}
The variables that are not allowed to be accessed by any code outside this class are
declared Private. The variables that can be accessed outside this class are declared Public.
Notice that the variables have an m in front of them. I use this convention to let myself know
that these variables are internal members of a class and not directly accessible.
80
CHAPTER 4
■ BASIC C#
Encapsulation
The properties called Private_Integer and Private_String are the ways to get and set the pri-
vate variables from outside the DataHiding class. These properties allow you to control what
values are allowed, and whether or not a variable can be just read, or both read and written.
The best way to see how this all works is to create an object and use the IntelliSense feature
of the IDE to tell you the level of accessibility of this class. This will be done inside the Main
method. Listing 4-5 shows the Main method with the appropriate code.
Listing 4-5. Accessing the new class
// This is the method that gets run when the program is started
static void Main(string[] args)
{
//Create the new object fom the class
DataHiding dh = new DataHiding();
//get the public values
Console.Write(dh.mPublic_integer);
Console.Write(dh.mPublic_string);
//get the private values via properties
Console.Write(dh.Private_integer);
Console.Write(dh.Private_string);
}
The first line of code instantiates (creates) a new object from the DataHiding class. Note that
this class was declared private. You can access it here, though, because the Main method is within
the Program class and can see all private members within the Program class, including nested
classes. The next two lines of code access the public variables of the dh object directly. The last
two lines of code access the private variables of the dh object via properties. Figure 4-10 shows
what happens when you type the letters “dh” (as in Console.Write(dh.).
Figure 4-10. IntelliSense showing what is available
CHAPTER 4 ■ BASIC C#
81
IntelliSense shows here that you can access the public variables directly, because it shows
mPublic_integer and mPublic_string, but not mPrivate_integer and mPrivate_String.
IntelliSense also shows that you can access the private variables though the properties
Private_integer and Private_string. This is encapsulation for you!
■Tip IntelliSense is fantastic in .NET. It tells you everything you need to know about a method or an object.
If you expect a variable to show and IntelliSense does not show it, you know you are doing something wrong.
Polymorphism
Let’s use IntelliSense once more to show polymorphism at work. I had you use the
Console.WriteLine method to output some variables to the screen. The WriteLine method of
the Console object is one of the most “overloaded” methods in .NET. When you were typing it
in and you typed the opening parenthesis after Console.Write, IntelliSense showed 18 ways to
use it. This is shown in Figure 4-11.
Figure 4-11. Method overloading shown via IntelliSense
See how IntelliSense shows 18 different ways to use this method? This is because you can
write out any of the types that .NET allows, with and without formatting. Outside the Console
class, it looks like there is only one Write method.
Now that I have explained some of what you will see as far as object-oriented program-
ming goes, let’s get to the code of this main project.
Back to the Project
Writing code in C# or VB entails some basic knowledge of object-oriented programming. I
already told you about classes, namespaces, variables, methods, and properties. There are a
few other concepts you need to be aware of before you go on, such as how to use them.
This project is about keeping time on a per-person basis for two weeks. The two weeks
in question are last week and this week. The module you will write for the DNN project will
encompass as many weeks and as many people as you want.
82
CHAPTER 4
■ BASIC C#
If you think about the data, you’ll find that you need to keep the times that a person
punched in and out on a daily basis. To further organize the data, it would be nice to keep this
data in a weekly format. So the data you need is as follows:
• Time punched in
• Time punched out
• Day of week
• Week
•Person
Basically, a person has a collection of weeks. Each week has a set of in and out times
for each day of that week. Using this design allows you to scale the collections between one
and . . . whatever.
This data will enable you to figure the hours worked for any day. There is no need to keep
the actual hours worked because there are rules (not included here) that adjust the hours
worked based on rounding rules. It is not necessarily true that the total hours worked in a day
are continuous from start to end.
The best way to keep and manage this data is with classes. You have seen the class that
encompasses the form and its controls. You will need to define your own class that encom-
passes a person and the time associated with punching in and out. Once you define the proper
class, you can scale the program to include as many weeks of data for as many people as you
need, with no extra code. I will show you how to do this.
The Private Class
You need a class to hold all the information necessary to run this form. The information you
need is the in and out times of each day of the week. Therefore, you will create a WeekPunches
class. Go into your punch.cs class file and add a new class. Listing 4-6 shows the complete code
for this class. Put this class within the Punch class, near the top.
Listing 4-6. The new WeekPunch class
private class WeekPunches
{
#region Class local variables
private DateTime mMondayStart;
private DateTime mMondayEnd;
private DateTime mTuesdayStart;
private DateTime mTuesdayEnd;
private DateTime mWednesdayStart;
private DateTime mWednesdayEnd;
private DateTime mThursdayStart;
private DateTime mThursdayEnd;
CHAPTER 4 ■ BASIC C#
83
private DateTime mFridayStart;
private DateTime mFridayEnd;
private DateTime mSaturdayStart;
private DateTime mSaturdayEnd;
private DateTime mSundayStart;
private DateTime mSundayEnd;
#endregion
#region Accessor Get / Set Methods
public DateTime MondayStart
{
get { return mMondayStart; }
set { mMondayStart = value; }
}
public DateTime MondayEnd
{
get { return mMondayEnd; }
set { mMondayEnd = value; }
}
public double MondayHours
{
get { return CalculateHours(mMondayStart, mMondayEnd); }
}
public DateTime TuesdayStart
{
get { return mTuesdayStart; }
set { mTuesdayStart = value; }
}
public DateTime TuesdayEnd
{
get { return mTuesdayEnd; }
set { mTuesdayEnd = value; }
}
public double TuesdayHours
{
get { return CalculateHours(mTuesdayStart, mTuesdayEnd); }
}
public DateTime WednesdayStart
{
get { return mWednesdayStart; }
set { mWednesdayStart = value; }
}
84
CHAPTER 4
■ BASIC C#
public DateTime WednesdayEnd
{
get { return mWednesdayEnd; }
set { mWednesdayEnd = value; }
}
public double WednesdayHours
{
get { return CalculateHours(mWednesdayStart, mWednesdayEnd); }
}
public DateTime ThursdayStart
{
get { return mThursdayStart; }
set { mThursdayStart = value; }
}
public DateTime ThursdayEnd
{
get { return mThursdayEnd; }
set { mThursdayEnd = value; }
}
public double ThursdayHours
{
get { return CalculateHours(mThursdayStart, mThursdayEnd); }
}
public DateTime FridayStart
{
get { return mFridayStart; }
set { mFridayStart = value; }
}
public DateTime FridayEnd
{
get { return mFridayEnd; }
set { mFridayEnd = value; }
}
public double FridayHours
{
get { return CalculateHours(mFridayStart, mFridayEnd); }
}
public DateTime SaturdayStart
{
get { return mSaturdayStart; }
set { mSaturdayStart = value; }
}
CHAPTER 4 ■ BASIC C#
85
public DateTime SaturdayEnd
{
get { return mSaturdayEnd; }
set { mSaturdayEnd = value; }
}
public double SaturdayHours
{
get { return CalculateHours(mSaturdayStart, mSaturdayEnd); }
}
public DateTime SundayStart
{
get { return mSundayStart; }
set { mSundayStart = value; }
}
public DateTime SundayEnd
{
get { return mSundayEnd; }
set { mSundayEnd = value; }
}
public double SundayHours
{
get { return CalculateHours(mSundayStart, mSundayEnd); }
}
#endregion
//This is where you would incorporate some rules such as
//lunch breaks
private double CalculateHours(DateTime Start, DateTime End)
{
//Check to see if end comes after start
if (DateTime.Compare(Start, End) < 0)
{
TimeSpan diff = End.Subtract(Start);
return (diff.TotalHours);
}
return 0.0;
}
}
I know this seems like a lot of complicated code. I will break it down for you, and you will
see the logic of it all.
The first thing to note is the list of private variables. When you are working in a class, there is
a need to have variables like this and a need to get to those variables. Standard object-oriented
programming states “Thou shalt not access variables directly.” Seriously.
86
CHAPTER 4
■ BASIC C#
When you access a variable in a class, you usually do it though a property. For instance, the
code snippet that follows shows a private variable and the property to read and write it.
private DateTime mThursdayStart;
public DateTime ThursdayStart
{
get { return mThursdayStart; }
set { mThursdayStart = value; }
}
There is a get accessor to read the variable and a set accessor to write the variable. This
not only “hides” the variable, but it also has the advantage of allowing you to validate the data
given to you before you write to the variable. This way you can make sure that only valid entries
are accepted.
So if you look at the code in Listing 4-6, you will see a pattern of private variables and pub-
lic properties. There really isn’t too much to this.
The last thing to talk about with this class is the “helper” method at the end, called
CalculateHours.
Not only can a class hide data, it can also hide functionality. This is also another tenet of
object-oriented programming. Only the class itself should be able to directly manipulate its
own data. Users of the class should be able to get whatever data out of it they need. In this case,
you are storing only punch times. Therefore, you need to calculate hours to present it via a
property.
If you look at the CalculateHours method, you will see that it first makes sure that the end
time is after the start time. The times that are stored also include date data. This means that, for
example, if you punch in at 11 p.m. and out at 3 a.m., this code will work. There is an internal
.NET class called TimeSpan that allows you to manipulate time in an easy manner.
■Note I must say that the .NET library is far more complete than the Java library. This CalculateHours
method in Java would be at least ten lines longer. You will find that if you want to do something to some data,
there is very often a method somewhere in the .NET library that will do it for you.
Other Variables
Now that you have this new self-contained class that can store and manipulate time, how do
you use it?
Before I answer this, you will need to add some other variables to the Punch class. These are
shown in Listing 4-7.
CHAPTER 4 ■ BASIC C#
87
Listing 4-7. Punch class variables and placement
namespace Punch
{
public partial class Punch : Form
{
#region Private variables
private static bool P_IN = false;
private static bool P_OUT = true;
private bool mPunchState = P_IN;
private DateTime mStartPunch;
private DateTime mEndPunch;
private ArrayList MyPunches = new ArrayList();
private class WeekPunches
{
Code here
}
}
#endregion
I have included not only the variables here, but the placement of them in the Punch class.
The variables are within the Private variables region. Note that the WeekPunches class is a pri-
vate class within the Punch class. This is perfectly valid and is often useful.
So you have a few Boolean variables, a couple of DateTime temporary variables, and an
ArrayList. Let’s talk about this for a second.
I had you define a WeekPunches class that contained its own data for a week of punches. It
also contained a method that manipulated that data to give a result of hours worked for a par-
ticular day.
The trick is to use this new class in a way that is reusable for many people for many weeks.
This is where the ArrayList comes in.
Collections
The ArrayList is considered a collection. As its name suggests, a collection is a group of objects
that can be added to and removed from. A collection also allows you to search it and get the
object you want. A collection even allows you to iterate though all the objects one by one with-
out explicitly knowing how many objects there are in it.
88
CHAPTER 4
■ BASIC C#
A collection can be any size and can be cleared of all data at once. In this case, your
ArrayList is a collection of WeekPunches objects.
There are many kinds of collections in .NET. I use the ArrayList because it is the most
generic and useful. There are some kinds of collections in .NET that only allow unique values
in them. This means that if an object is in a collection, you may not add another object that is
identical. This is really handy when you are given a list of names, for instance, and you know
there are duplicates. Just keep adding names to the collection and it will reject any duplicates.
At the end, you have a list of unique names.
As I said before, this project will hold a collection of only two weeks: last week and this week.
The Working Code
I had you double-click the Punch button and the drop-down box to get the event handlers for
these controls. Now it is time to add the code.
All programs need some kind of initial conditions set up. After all, how do you get the
drop-down box filled with choices? There are two ways.
The first way is to use the Properties pane, which is available to you when you click an
object. This is shown in Figure 4-12.
Figure 4-12. The Properties pane
Pretty much everything you need to fill in about the control is in here. This is fine for some
controls, but there are still some things that cannot be handled this way.
CHAPTER 4 ■ BASIC C#
89
The second way is to enter all the initial conditions via code. This is my preferred way of
doing it. It keeps all properties for all forms in the same place and also overrides the Properties
pane if anyone inadvertently messes with your control.
You will notice in your punch.cs code that the class is called Punch, and it has a member
also called Punch. This Punch member is referred to as a constructor. As soon as an object of the
class is instantiated (in this case by .NET), the .NET runtime tries to call its constructor. It is in
here that you initialize your page.
When I code a constructor, I prefer to call another method that initializes controls. I always
call this Init(). This is called just after the InitializeComponents() call. Listing 4-8 shows the
initialization code for this program.
Listing 4-8. The initialization code
private void Init()
{
FillData();
cmdPunch.Text = "Punch In";
cmbWeek.Items.Clear();
cmbWeek.Items.Add("Last Week");
cmbWeek.Items.Add("This Week");
cmbWeek.SelectedIndex = 0;
}
You can see from this code that I am filling in the text for the button, and I am also adding
the phrases “Last Week” and “This Week” to the drop-down combo box. By the way, this
combo box has a collection: the Items collection. Notice that I am clearing all data out of it first,
and then adding new objects (in this case, strings) to the collection.
Notice that the last thing I do in this method is set the selected index of the combo box to
zero, which is the first selection. Doing this in code is the same as clicking the combo box while
the form is running. As you know, clicking the combo box while the program is running causes
an event handler to be invoked.
The line cmbWeek.SelectedIndex = 0 will automatically call the method
cmbWeek_SelectedIndexChanged(object sender, EventArgs e). Oftentimes you will need to
invoke event handlers within your code, and this is one way to do it.
The Fake Database
This Init method calls another method: FillData. This FillData method fills the WeekPunches
objects with hard-coded data. Normally you would get this data from a database. I did not want to
do this here because it would be too much work for you without the ability to bring the code over to
the DNN module you will build later based on this project. Since you would have to rewrite the
database code, I decided to wait until you get to the DNN project before getting into that.
Listing 4-9 shows the FillData code.
90
CHAPTER 4
■ BASIC C#
Listing 4-9. Filling the collection
private void FillData()
{
//This takes the place of getting data from a database.
//We will hard-code last week's data and some of this week's.
//Create last week
DateTime LastSunday = DateTime.Now;
int Days2Subtract = 7 + (int)DateTime.Now.DayOfWeek;
LastSunday = LastSunday.Subtract(new TimeSpan(
Days2Subtract,
LastSunday.Hour,
LastSunday.Minute,
LastSunday.Second,
LastSunday.Millisecond));
WeekPunches LastWeek = new WeekPunches();
LastWeek.SundayStart = LastSunday;
LastWeek.SundayEnd = LastSunday;
LastWeek.MondayStart = LastSunday.Add(new TimeSpan(1,8,0,0,0));
LastWeek.MondayEnd = LastSunday.Add(new TimeSpan(1,15,0,0,0));
LastWeek.TuesdayStart = LastSunday.Add(new TimeSpan(2,8,0,0,0));
LastWeek.TuesdayEnd = LastSunday.Add(new TimeSpan(2,14,0,0,0));
LastWeek.WednesdayStart = LastSunday.Add(new TimeSpan(3,8,0,0,0));
LastWeek.WednesdayEnd = LastSunday.Add(new TimeSpan(3,13,0,0,0));
LastWeek.ThursdayStart = LastSunday.Add(new TimeSpan(4,8,0,0,0));
LastWeek.ThursdayEnd = LastSunday.Add(new TimeSpan(4,14,20,0,0));
LastWeek.FridayStart = LastSunday.Add(new TimeSpan(5,8,0,0,0));
LastWeek.FridayEnd = LastSunday.Add(new TimeSpan(5,15,30,0,0));
LastWeek.SaturdayStart = LastSunday.Add(new TimeSpan(6,0,0,0,0));
LastWeek.SaturdayEnd = LastSunday.Add(new TimeSpan(6,0,0,0,0));
MyPunches.Add(LastWeek);
//Create this week
DateTime ThisSunday = DateTime.Now;
Days2Subtract = (int)DateTime.Now.DayOfWeek;
ThisSunday = ThisSunday.Subtract(new TimeSpan(
Days2Subtract,
ThisSunday.Hour,
ThisSunday.Minute,
ThisSunday.Second,
ThisSunday.Millisecond));