Beginning DotNetNuke 4.0 Website Creation in C# 2005 with Visual Web Developer 2005 Express phần 8 docx
Bạn đang xem bản rút gọn của tài liệu. Xem và tải ngay bản đầy đủ của tài liệu tại đây (1.16 MB, 39 trang )
CHAPTER 9 ■ DNN PERMISSIONS AND PORTALS
263
Figure 9-14. The menu bar for test users
You can see that Cust_1 is logged in and can now see the registration page.
Log in as administrator and click Admin ➤ User Accounts. Once you’re in, edit the Emp_1
account. At the bottom of the Edit User Accounts page, there is a link called Manage Roles for
this User. Click this and you will be brought to the Manage Roles for User section, as shown in
Figure 9-15.
Figure 9-15. Screen to manage user roles
As shown in Figure 9-15, click the Security Role drop-down and choose the Employee role.
Once you do this, click the Add Role link, and this user will now become an employee. Do this
for Emp_2 as well.
Log out and back in as each of the test users in turn. You should see the Inventory and
Time pages for the employees, and the registration page for the customers.
This is pretty cool, if I do say so myself. You can see that managing roles is a good way to
enable access to parts of the website for different users.
There is a better way, though. You can combine security roles with portals to create a web-
site that truly separates the Internet from the intranet.
264
CHAPTER 9
■ DNN PERMISSIONS AND PORTALS
Managing Portals
This section deals with creating a child portal that further separates the functionality of the
website.
Let’s look at what you’ve done so far with this website.
• You installed DNN, which created a default portal. This portal appeared to you as a com-
plete website.
• You added pages to the site and existing modules to those pages.
• You created a new module for employees to punch in and out of work.
• You added a new page to hold this module and tested it under various conditions.
• You added a new security role to enable filtering of pages based on who was logged in.
• You changed permissions on a page-by-page basis to make the site appear properly to
casual browsers, registered users, and employees.
I guess I could end the book right here. You now have a working website that does every-
thing you set out to do. But wait . . . there’s more!
DNN is famous for being a portal-creation technology. While this is true, it is a bit of a mis-
conception. Until this chapter, I did not really mention the word portal very often. There was
no need to. DNN so far has been used as a framework to create a working website with some
customized content. Great. So what does the portal technology in DNN get you?
What Is a DNN Portal?
Notice that the title in this section is qualified with DNN. A portal means different things to
different people. I work with a company who made some software with portal technology
that’s actually the same as the module technology here. Portals, to this company, were mod-
ules to DNN. There is also a portal standard called WSRP, which is Web Services for Remote
Portlets. DNN does not conform to WSRP. WSRP allows remote portlets from different sites to
run inside a portal via SOAP (Simple Object Access Protocol) calls.
Generally, though, a portal is a website that allows you to create other websites managed
by the main one. There are two major kinds of portals. Here are their definitions, according to
Wikipedia ( />Enterprise portals: A framework for integrating information, applications, and processes
across organizational boundaries.
Web portal: A kind of Content Management System website, password protected to allow
site administrators to edit text, images, and other content as and when necessary. This
allows easy updating of the website content without the need to learn programming code.
So far in this book, I think we have come close to the second definition. You have used
DNN as a content management system. You have been able to create pages and manage users
with no programming involved (once you got the TimePunch module created, that is).
CHAPTER 9 ■ DNN PERMISSIONS AND PORTALS
265
Since you will be having both customers and employees using this website, however, I
think you need to come closer to the first definition. The best solution for this website is to cre-
ate a portal for Internet use and a portal for intranet use.
I work at a company that has a web presence to the outside world. In fact, my company
owns several other companies. Each of these other companies’ websites is actually a portal off
the main company’s website. We also have an intranet website that is available only to employ-
ees when they are connected to the internal network. This intranet is also a portal off the main
website.
So why a portal rather than another website that can be accessed through a link from the
main site? Table 9-1 outlines the reasons.
Table 9-1. Separate Sites vs. Portals
Child vs. Parent
There are two kinds of portals that you can create in DNN. The first kind is a parent portal. This
is what you have right now. A parent portal has a unique URL. For instance, my URL for the site
is http://localhost:1599/DotNetNuke/Default.aspx. If you are using the debug web server
that comes with VWD, then yours should be very similar.
When you create a new parent portal, you will be asked to give it a new URL.
■Caution Do not attempt to create another parent portal.
If you had your DNN website hosted at an ISP, you would have purchased a domain name
for your site. Creating a new parent portal requires that you purchase a new domain name and
have your host map the domain name to the IP address of your new account. If you create a
new parent portal without having all the DNS mappings in place, you may not be able to access
your new portal.
Separate Site Portal
You cannot manage a separate site from the
main one. You would need to have separate
superuser rights to manage a separate website.
A DNN portal allows you to manage all child
portals with the host user.
You generally cannot have a single login when
you link from one site to another. You must
log into the second site separately.
A portal allows you to have a single login for
the system as a whole. If you log into the main
portal, you can go to a child portal and still be
logged in.
A separate website shares no common
attributes with the main one. Different
websites cannot share modules.
A DNN child portal can inherit the same skins
and themes as the main portal. This means
that users get the same look and feel as they
navigate between what looks like one website
and another. In reality, they are two different
portals sharing the same skin.
266
CHAPTER 9
■ DNN PERMISSIONS AND PORTALS
What you want is a main portal that is the face of the company (this is what you have now)
and a child portal for every section you want to separate.
A child portal has the same URL, but has an extension of the sub-portal name. Here is an
fictitious example of a website with a main portal and some child portals:
Mysite.com: This is the main portal.
Mysite.com/finance: This is the finance child portal.
Mysite.com/marketing: This is the marketing child portal.
Mysite.com/employee: This is the employee child portal.
Hopefully, this makes it clear for you. What you want to do now is create the last example:
the employee child portal.
Creating the Portal
Log into your site using the host account. Click Host ➤ Portals. You should come up with a
screen like mine, as shown in Figure 9-16.
Figure 9-16. The portal settings screen
You can see that I have one portal, called My Restaurant, which is the main one. You also
see a section to export a template. This section is used to make a portal template for use in the
DNN wizard when creating a new site. You will not need to export a template.
Click the Add New Portal link. Fill in the page as shown in Figure 9-17.
CHAPTER 9 ■ DNN PERMISSIONS AND PORTALS
267
Figure 9-17. Creating a new portal
Make this a child portal and tack on “/Employee” at the end of the portal alias.
Make sure that you include the security settings. The username and password will be used
as the administrator account for this portal.
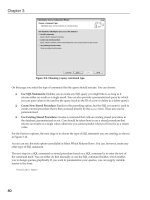
Click Create Portal and . . . it chokes, because it needs a template file. OK, choose the portal
template, retype your password, and try creating it again.
You may get a nasty looking error when DNN is done chugging. However, you can see the
new portal by choosing Host ➤ Portals again. This is shown in Figure 9-18.
Figure 9-18. A new employee portal is created.
Click the new employee portal and you will be taken to the new website you just created.
It will be a plain home page with nothing in the menu bar but Home, Admin, and Host. You can
see here that you are still logged in as the host for this portal as well as the main one. You can
now edit this portal. This is cool.
268
CHAPTER 9
■ DNN PERMISSIONS AND PORTALS
Editing the Portal
Your new portal has only a single page: the home page. You need to transfer the Inventory page
from the main portal to this sub-portal. You also need to transfer the Time page from the main
portal to this sub-portal.
The home page for this type of portal will usually be something like a newsletter to the
employees. It should be something informative but innocuous.
You will need to add an announcements module, called Employee Announcements, and a
text/HTML module, called NewsLetter, to the home page. This is shown in Figure 9-19.
Figure 9-19. The addition of the Employee Announcments and NewsLetter portals to the main page
I set the login reminder announcement to not expire. I set the summer picnic announce-
ment to expire on July 5.
CHAPTER 9 ■ DNN PERMISSIONS AND PORTALS
269
This page is seen by all users who navigate to this page. Since there is no link to this portal
on the main portal, the user must know the URL in order to get here.
Since this is a new portal, there will not be any Employee security role. This role is not car-
ried over from the main portal.
Log in to the Employee portal as administrator (or host) and add the Employee security
role as described earlier, in the “A New Role” section of this chapter.
Creating the Inventory Page
Unfortunately, you cannot copy a page from one portal to another. You can only copy a page
from within the same portal. You will have to copy the Inventory and Time pages from the
main portal in here by hand.
Create a new page, called Inventory, in the Employee portal. Make sure that its permis-
sions are set for viewing by employees only.
■Tip This is where Firefox and its tabbed windows come into play nicely. You can log into the main portal
in one tab and the Employee portal in another tab. This way you can copy back and forth easily.
Add a new user-defined table module to the content pane of the Employee portal’s Inven-
tory page. Add the same content to this module that you have in the Inventory module of the
main portal’s Inventory page.
Make sure that the settings are the same. If you want, you can make different rows—what-
ever works for you.
■Note A better way to display inventory would be to buy a data grid module (available from
www.snowcovered.com) and display the inventory data directly from the database. If you really want
to display data automatically, then I suggest you do this.
Creating the Time Page
Create a new page called Time in the Employee portal. Make sure that its permissions are set
for viewing by employees only.
Add the TimePunch module to the content pane of this page. Since the TimePunch
module is completely self-contained, there is no content to add. You are finished with the
new portal.
Testing the New Portal
The users from one portal are not available in the new portal. Log in as the admin user and add
an Employee user to the Employee portal. This is explained earlier in this chapter.
Log out of the portal, and you should see just the home page, as shown in Figure 9-20.
270
CHAPTER 9
■ DNN PERMISSIONS AND PORTALS
Figure 9-20. The Employee portal with no one logged in
Now log in as the newly created employee for this portal. You should be able to see the
Inventory page and the Time page, as shown in Figure 9-21.
Figure 9-21. The new portal, with the employee logged in
The Time page should let you punch in and out of the system just as you were able to do in
the main portal. If you looked at the database table, you would see that it has new rows, with
different module IDs than what you saw when you punched in and out on the main portal. In
fact, if you wanted, you could punch in and out in both portals, and the data would be kept sep-
arate. You need to do a little cleanup so that this isn’t possible. Punching should only be done
in the child portal.
CHAPTER 9 ■ DNN PERMISSIONS AND PORTALS
271
Cleaning Up the Main Portal
Now that you’ve created the child Employee portal, it’s time to get rid of any duplication in the
main module. This means that you need to delete the Inventory and Time pages from the main
module. You can do this by navigating to the page you want to delete, and clicking the Delete
icon on the Page Functions bar. This is shown in Figure 9-22.
Figure 9-22. Deleting the Inventory page
Delete the Inventory page and the Time page.
The Look and Feel
One of the aspects I mentioned for using a DNN portal is that you can differentiate the look and
feel of one portal from another. Right now, they both use the same skin. Not only do you want
to differentiate the employee pages from the customer ones by using a different portal, but it
would be nice to also have a different skin to differentiate between the portals.
Log into the Employee portal as administrator. In the Admin bar at the top of the page,
click Site. Change the site skins as I have them in Figure 9-23.
272
CHAPTER 9
■ DNN PERMISSIONS AND PORTALS
Figure 9-23. Site settings for the Employee portal
While this is not the skin I would choose, it does differentiate the main portal from the
Employee one. Click Update and you should get a disgusting green site with the navigation
links as a vertical section on the left side of the page. Figure 9-24 shows the two portals side
by side.
Figure 9-24. The main portal and the Employee portal, side by side
Summary
This was a fun chapter. You started out with a single portal that had all the pages exposed to
every casual browser.
This is not a good thing, so you learned how to create a new security role for the site and
adjust the page settings so that they would only show to certain users. This made the Inventory
and Time pages invisible to the casual browser and even to those who were registered users.
You learned that you must be logged in as administrator to give access to this new
employee role and manage the roles for users individually. You also learned that you can auto-
assign roles to registered users.
Once the roles were defined and page settings adjusted, you were able to log in as different
users and see different pages.
The final thing you learned was how to separate the website functionality even more by
creating a child portal. A child portal is one whose URL is the same as the parent’s, but with the
CHAPTER 9 ■ DNN PERMISSIONS AND PORTALS
273
name of the child portal tacked onto the end. This allows you to have a single domain name
that controls both internal and external websites.
The point of this whole book is to coach you along the way toward creating a web pres-
ence. So many companies have external and internal websites, and you now know how to
create your own.
While restricting IP access is out of the scope of this book, I will mention that most compa-
nies’ internal websites are restricted to a range of IP addresses specific to that company. This
way, web users cannot get at the internal website unless they are on the company’s intranet
and have a valid IP address. This is accomplished with IIS management.
The next chapter will cover DNN security and finding a host for your new website. You will
also load a new skin and container to change the look and feel of your website.
275
■ ■ ■
CHAPTER 10
DNN Hosting
Chapter 9 ended with you creating a new child portal that acted as your intranet. The child
portal was not intended to be seen from outside your own private network.
What happens, though, if you are not hosting your own DNN website? Large companies
with big IT budgets can host their own sites, but you probably will not be able to. Hosting your
own site isn’t so much difficult as it is time consuming and expensive, as far as equipment,
knowledge, and bandwidth goes.
Since you will be hosting your site through a third party, you will not really have an intra-
net. Not to worry, though—the child portal idea still applies. There is no direct way to get to this
child portal site without knowing it is there. Also, you will still need to log into the employee site
to gain access.
This chapter covers how to get your website off your computer and onto an ISP’s web
hosting server. It also covers some other things to consider when creating your site. For
instance, I have mentioned skinning plenty of times throughout this book. I will tell you how
to download and enable a new skin, as well as what goes into one—in case you want to create
your own skin.
Finally, I will cover security aspects of DNN.
Hosting
I have friends who host their own websites on their own computers at home. If you have the
knowledge, you can do it as well. All you need is an IP address, and away you go. You do not
even need a domain name.
276
CHAPTER 10
■ DNN HOSTING
Here is what I mean. A domain name is a friendly name like www.something.com. A domain
name is unique and can have many extensions. Here are some of the extensions available:
• .com
• .net
• .org
• .us
• .info
• .edu
• .name
• .co.uk
• .de
• .biz
• .tv
• .cc
• .bz
There are many more, mostly to do with different countries. In the preceding list, .de is a
domain name for all things German, and .co.uk is a domain name for websites in Great Britain.
I am sure you recognize some of the other domain name extensions.
So, which one does everyone want? Once upon a time, we all wanted a domain name with
the .com extension. The .net extension was a close second. This was because the general public
didn’t know many of the other domain extensions existed. Today, most people also know of
.org and .edu, among others.
Unfortunately, since all domain names must be unique, and most domain names actually
spell a word or phrase, a lot of the good ones are taken (for the well-known extensions).
A domain name is mapped to an IP address. IP addresses are also unique. However, no-one
really cares what IP address they get. Most people who have websites do not even know what IP
address they have.
The neat thing about browsers is that you can enter a domain name, if you know it, or an
IP address that maps to that domain name. If you do not have a domain name, then you can
just get an IP address, and away you go.
If you want to host your own site, you can get an IP address from your local cable or DSL
company, and set up IIS to host your site. There are two reasons you should not do it, though:
• The cable home ISPs hate this. You can take up a lot of bandwidth hosting a site at home.
All home Internet connections are bandwidth-limited on both the upload and download
side. Even if you did host your own site, it may not be fast enough for anyone to use.
• It is technically demanding and requires that you know a lot more than just how to
design a website.
CHAPTER 10 ■ DNN HOSTING
277
I suggest you get your site hosted by an outside source. Fortunately, there is quite a bit of
competition out there, and prices are very reasonable. Most of the time, you can get hosted
with a domain name for a lot less than two hundred dollars a year.
What You Get from a Host
A company that hosts your site will provide you with the following things:
• Guaranteed uptime: Most boast 99.99-percent uptime. You are pretty much guaranteed
that your site will never go down.
• Constant backup: This can be expensive to do yourself and can be even more expensive
if you don’t do it at all. Your host company will certainly back up all your stuff on a
daily basis.
• A mail server: Many hosting sites give you multiple mailboxes to use.
• Disk space: Depending on what plan you take, most sites give you a certain amount of
disk space storage, as well as a certain amount of e-mail storage.
• Statistics: Some plans give you statistics, such as hits and the like. Some plans make you
pay for it.
• Tech support: All hosting companies have a person who can answer any question you
may have about your website. Most get back to you almost immediately.
• Scalability: If you need to scale up to handle thousands of hits and downloads a day,
most hosting companies have the capacity and equipment to handle it.
As far as hosting a DNN site goes, you also get some other things, one of which is free
setup. I have seen hosting sites where you can sign up and request a person to install DNN 4.x
for you. This is really a great feature. You end up with a good starting point and you can create
your website right there on their server.
You may have noticed that, except for creating the TimePunch module, you did not use
the features of ASP.NET or the IDE at all. In fact, if you have IIS running, rather than the debug
web server that comes with VWD, you do not even have to load VWD to create your site.
Once the TimePunch module was created, you spent all your time within your site—using
the DNN administrator capabilities to create it.
There is no reason that you cannot create a website directly on the host machine. This is
really what DNN was created for.
Downloading Your Project
If you spent a lot of time creating your website on your machine at home, you do not necessar-
ily want to recreate it on the host machine. You want to upload what you have and be done with
it. Any good host will let you do this. In fact, any good host will tell you how to do this.
When you sign up for a hosting account, you will most likely be given access to some kind
of interface to manage the files in your web space. This web space is a virtual root directory on
their server. A virtual directory is an actual directory on some PC somewhere. IIS is told that
this actual directory is now the virtual root of your website.
278
CHAPTER 10
■ DNN HOSTING
It could be that the host has a machine with many directories, each of which is mapped to
another customer’s virtual root of their website. IIS can handle many websites at once. If your
site scales up to thousands of hits a day and needs tons of disk space, you may be assigned your
own server or group of servers.
Here is a basic list of things you will need to do to upload your DNN site from your com-
puter to a host computer and get it working. This list is general, but should give you a good idea
that you can do it yourself.
■Note If you used IIS as a web server for your site on your computer, your root would be
C:\Inetpub\wwwroot. If you used the local web server, your root should just be C:\.
1. Make sure that the host can handle ASP.NET 2.0.
2. Edit the Web.config file. You will need to put in the correct database settings. These
include the server name, database name, username, and password. Right now, you do
not have the server name. This is because your database is on your machine with the
ASP.NET system. On a hosting site, the database may be on a different machine. You get
this account information from the host provider.
3. Upload all your DNN files to your root folder. The host will give you a way to do this,
usually by FTP. In my case, the files would include everything in C:\DotNetNuke and all
its subfolders. If you are using IIS on your local machine, then your files would reside in
C:\Inetpub\wwwroot\DotNetNuke.
4. Open your browser and navigate to your domain name. When you get to your domain,
DNN will set up your database objects when it first loads. As you have seen on your own
machine, this can take several minutes.
5. Manage your site.
This list seems so simple and yet complicated at the same time. There are so few steps, but
you really need to get them right.
Finding a Host
Finding someone to host your site is easy. If you search for “DNN Hosting,” you’ll find pages
and pages of companies willing to host your site.
I suggest that you get a host who will install DNN for you and provide a level of support
that you can feel comfortable with. Most say that they will answer any support ticket questions
within an hour so. This is not too bad.
My own preference is to find a host who seems to specialize in hosting DNN sites. While
anyone who has a Windows server, and can handle ASP.NET 2.0 and SQL Server, can host a
DNN site, there is a lot more to it than just that. They should have a DNN expert on hand.
CHAPTER 10 ■ DNN HOSTING
279
Installing a Skin
The skin that comes with the basic DNN install is the blue and white one you are familiar with.
It is not very exciting.
As I have said before, there are a number of places where you can get new skins to give
your website a unique look that matches your site content. One of them is
www.snowcovered.com.
If you are courageous, you can create your own skin. I will show you how to do this in
Chapter 11. For now, this section will show you how to install a new skin and activate it in your
site.
You will test the skin in the My Restaurant registration page.
Uploading a New Skin
When you install your DNN site on another computer, you will have a folder called Install. If
you look on your own computer, you will see a folder called C:\DotNetNuke\Install. This is
shown in Figure 10-1.
Figure 10-1. The DNN install directories
You can see here that there are subfolders for installing containers, skins, languages, and
so on. If you were to buy a skin from somewhere like www.snowcovered.com, you would down-
load the skin to C:\DotNetNuke\Install\Skin. From there, you would use DNN to actually
install it.
I have provided a skin for you, called Flowers. This skin comes with a container as well. The
skin controls the look and feel of the pages within the website, while the container controls the
look and feel of the module itself.
280
CHAPTER 10
■ DNN HOSTING
I will show you how to install the Flowers skin here, and in the next chapter I will show you
how to make the skin and container yourself.
Copy the Flowers - Fixed Width.zip skin to the C:\DotNetNuke\Install\Skin folder. Next,
copy the Flowers.zip container to the C:\DotNetNuke\Install\Container folder.
The rest is incredibly simple. Make sure you are logged in as host. Navigate to Admin A
Skins. You should get a web page like the one shown in Figure 10-2.
Figure 10-2. The skin manager
This is the skin manager screen. You can see here that I have chosen the DNN-Blue set of
skins. This has four skins and four containers. The one I provided only has one skin and one
container.
Scroll down to the bottom of this page and click Upload Skin. You should get the screen
shown in Figure 10-3.
CHAPTER 10 ■ DNN HOSTING
281
Figure 10-3. Uploading a skin using the File Manager
Use the Browse button to choose the skin you put in the Install folder. Once you’ve
chosen it, click the Add link, and it will appear in the box, as shown in Figure 10-4.
Figure 10-4. A new skin, ready for upload
Click the Upload New File link, and the skin manager will churn a bit and install the skin
for you. You will get a log file showing what happened. This is shown in Figure 10-5.
282
CHAPTER 10
■ DNN HOSTING
Figure 10-5. A skin install log
It is interesting to note what the log file is telling you. First of all, you can see that it is
unzipping the skin file and finding all the files within. It then scans the Flowers - Fixed
Width.htm file for all the possible DNN tokens. Once it completes the scan, it replaces all the
tokens with DNN controls and generates a user control file out of the .htm file. This last part is
not evident in this log, but that is what happens. Chapter 11 will cover creating the skin and will
explain this process much more thoroughly.
Click Return, and you will be brought back to the skin manager. You can now choose the
Flowers skin in the Skins drop-down list. If you do, you will get a screen like Figure 10-6.
CHAPTER 10 ■ DNN HOSTING
283
Figure 10-6. A new skin, with picture
I have included a picture of the new skin in action so you can see what it looks like before
you choose it.
■Note This skin, unlike the DNN skins that come with the DNN install, only has two panes per page. If you
take a closer look at Figure 10-10, you will see that the only pane visible to you is the content pane. The other
pane is on the same line as the search bar. When testing this skin, make sure you test it on a page with only
one module. Make sure that module is in the content pane. Nothing bad will happen otherwise, it is just that
your other modules that were in the other panes will all be gathered in the single pane here.
284
CHAPTER 10
■ DNN HOSTING
Installing the Container
Since the Flowers container is separate from the skin, you will upload that next.
Click Upload Container, and follow the same process for the new container as you did for
the new skin. Remember that the new container is located in C:\DotNetNuke\Container.
When you have chosen the new Flowers container in the skin manager, your screen should
show a preview like Figure 10-7.
Figure 10-7. Preview of the Flowers container
While logged in as administrator or host, I want you to navigate to the registration page of
the restaurant website. This page is shown in Figure 10-8.
Figure 10-8. The registration page
CHAPTER 10 ■ DNN HOSTING
285
This page only has one module, and it is inside the Content pane. This layout fits your
new skin.
Click the Settings icon on the Page Functions icon bar at the top of the page. Scroll down
the settings page and choose the Flowers skin and container. This is shown in Figure 10-9.
Figure 10-9. Choosing the Flowers skin and container
Note that you will need to check the Site radio button in order to find the new skin and
container in the list.
Click the Update link at the bottom of the page, and your screen should change to the new
skin and container. This is shown in Figure 10-10.
Figure 10-10. The new skin, applied to a single page
286
CHAPTER 10
■ DNN HOSTING
Note that this new skin has the menu on the left-hand side and does not include the date.
Navigate to different pages in the site, and you will get the old DNN-Blue skin.
You can see that the new skin changes the look and feel of the page as a whole. The con-
tainer skin is applied to the Account Management text/HTML box in the center of the page.
This container includes a gradient image for the title, a white background for the text, and the
green line for the separator at the bottom.
DNN Security
Let’s talk about security in DNN. There are two types of security: one concerns securing data
from authorized users, and the other concerns preventing hacking.
The first type of security is addressed using the security roles provided by DNN. I already
went through this extensively in Chapter 9 when I talked about permissions. DNN does a good
and flexible job when it comes to this kind of security.
LOREM IPSUM TEXT
The quandary that you often have in putting together a demo screen is the text you use to fill up a page.
If you are creating a new page and wish to have some text boxes with some text in them, what do you
do? You could just start typing random sentences, but that actually gets hard and tedious after a while, espe-
cially if you want a large amount of text. It has been long known in the publishing industry that readers looking
at a layout will be distracted by the text in that layout if they can read it. Nonsense text is better than readable
text when you’re proving out layouts.
This problem is not new. Believe it or not, there was a need for typesetters to show dummy text to prove
out layouts back in the 1500s. Some enterprising typesetter created what is called Lorem Ipsum text. This text
has its roots in classical Latin literature, from a work by Cicero written in 45 BC. Here is a bit of classic Lorem
Ipsum text:
“Sed ut perspiciatis unde omnis iste natus error sit voluptatem accusantium doloremque laudantium,
totam rem aperiam, eaque ipsa quae ab illo inventore veritatis et quasi architecto beatae vitae dicta sunt expli-
cabo. Nemo enim ipsam voluptatem quia voluptas sit aspernatur aut odit aut fugit, sed quia consequuntur
magni dolores eos qui ratione voluptatem sequi nesciunt. Neque porro quisquam est, qui dolorem ipsum quia
dolor sit amet, consectetur, adipisci velit, sed quia non numquam eius modi tempora incidunt ut labore et
dolore magnam aliquam quaerat voluptatem. Ut enim ad minima veniam, quis nostrum exercitationem ullam
corporis suscipit laboriosam, nisi ut aliquid ex ea commodi consequatur? Quis autem vel eum iure reprehen-
derit qui in ea voluptate velit esse quam nihil molestiae consequatur, vel illum qui dolorem eum fugiat quo
voluptas nulla pariatur?”
(My spell-checker goes nuts on this text.) There are several websites that generate this text for you. Try
www.lipsum.com.
The next time you want to demo a page, you can include some of this text very quickly.
CHAPTER 10 ■ DNN HOSTING
287
Unauthorized Break-Ins
The criminal hacker that gets at sensitive data is what we all hear about on the news. Some
of these hacks are truly spectacular. Here is a short list of how hackers can compromise
your system:
• Social hacking
• Brute force username and password hacking
• Application profiling
• SQL injection
•Entry point attacks
• Cross-site scripting
• Identity theft
• Unmanaged code hacking
• View state hacking
These security threats are addressed in greater detail in the following sections. Keep
in mind, though, that this can never be an exhaustive list, as new hacks are being tried all
the time.
Social Hacking
Remember Kevin Mitnick? He is probably the most famous hacker of all. He was caught and, of
course, now make bunches of money as a security consultant.
Anyway, his favorite form of hacking is the easiest. He would call someone at a company
and pretend to be someone who worked there who needed some information. Many times he
was able to get people to give him usernames and passwords to sensitive data. This is called
social hacking.
DNN cannot do anything about one of your employees giving out usernames and pass-
words, but you can. By the same token, you can also prevent people from putting their
passwords on a Post-it note on their monitors. This is also a common way to get information.
Preventing social hacking is one major way to secure your system.
Brute Force Hacking
This is sometimes called dictionary hacking. What happens is that a hacker uses a program that
tries to get into a site using a known username. The password he tries comes from a dictionary
of passwords. In fact, an actual dictionary is often used. As long as there is no retries limit and
no restrictions on passwords, a hacker is quite likely to find a password that is a valid word
or phrase.
288
CHAPTER 10
■ DNN HOSTING
Unfortunately, DNN does not have password blacklists, forced password formats (such as
length and mixture of characters and numbers), or password expirations. You can, however,
buy modules that enable these things for you.
The best thing to do to defeat dictionary attacks is to have a policy in place that enforces a
complicated password.
This brings up another point. When you installed DNN, the opening page told you to
change the admin and host passwords. Make sure you do this. You should also change the
admin and host usernames as well. This is not so apparent in DNN. Here is how to do it:
1. Log in as host.
2. Add a new user who has an administrator role.
3. Log in as the new administrator user you just created.
4. Go to the user management screen and delete the admin user.
You can do the same for the host user, only you need to add a new superuser account.
Currently, there is no way to rename a user. There is a module that you can buy that lets you do
this, though.
Application Profiling
If I was to navigate to a site and I saw some telltale signs that I was on a DNN portal, I could
immediately try a few simple hacks. For instance, I could guess that the administrator user-
name is Admin, and I could guess that the person who owns the site is lazy and that the
administrator password is also Admin. I bet this would get me into a number of DNN sites.
Hackers often look for telltale signs of the software used to make a site. This is called appli-
cation profiling. DNN has quite a few of these telltale signs. Fortunately, you can turn these off
to prevent this kind of application profiling. The following list details some of the ways that you
can make DNN more secure in this regard:
• The title bar can be changed so that it does not betray the DNN version.
• The source code comments can be eliminated so that when someone views the source
in the browser they cannot tell it is DNN code. DNN has a liberal license that allows you
to eliminate these comments.
• The DNN copyright message in the page footer can be turned off.
It does not take much effort to protect DNN from application profiling.
SQL Injection
This is nefarious indeed. In a program in which SQL queries are used, a hacker can insert
or alter an existing database query. This is done by using quotes to break out of a select
statement.