Beginning XML with DOM and Ajax From Novice to Professional phần 4 ppt
Bạn đang xem bản rút gọn của tài liệu. Xem và tải ngay bản đầy đủ của tài liệu tại đây (1.72 MB, 45 trang )
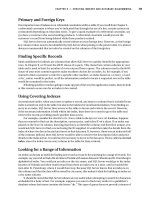
The aim of the project is to provide online content for students and teachers through
learning objects. A high proportion of the learning objects available use Flash and XML for
portability and platform independence. You can find examples of learning objects at http://
www.thelearningfederation.edu.au/tlf2/showMe.asp?nodeID=242#groups. Figure 4-10 shows
one learning object.
Figure 4-10. A Flash movie displaying XML content
Now that I’ve covered the range of client-side options available for working with XML
data, let’s examine when client-side processing is appropriate.
Choosing Between Client and Server
It’s important to decide whether an XML application should use client-side XML, server-side
XML, or some combination of the two types of processing. So far, you’ve seen several clients
that can work with XML content. In Chapters 5 to 10, you’ll look at client-side communication
in more detail. Chapters 11 to 13 will examine server-side applications.
In this section, I’ll cover different approaches for client-side and server-side interactions
in XML applications.
CHAPTER 4 ■ CLIENT-SIDE XML116
6765CH04.qxd 5/19/06 11:26 AM Page 116
Using Client-Side XML
At the beginning of this chapter, you saw that the main benefits of working with XML on the
client were a reduction of traffic between server and client, and a reduction in server-side
load. Let’s examine these concepts more closely with an example.
Suppose you need to display a list of properties that are for sale on a web site. Using
XHTML and server-side processing, you could
• Load a list of the property addresses and allow users to drill down to view the details of
each property on a separate page
• List all details of every property in a list on a single page
The second approach isn’t practical. If you need to display a large number of properties,
the page will be very long and will take a long time to download. You will also have a hard time
locating information.
In the first approach, viewing the details of a new property requests information from
the server, which reloads the interface to display those details. Even if you need only a small
amount of information, you’ll still need to refresh the page and load additional content from
the server each time. Separating the content from the interface saves server traffic and down-
load times each time you want to view another property.
One solution is to use XML on the client side. The server downloads the interface once,
when you first load the page. Each time you request further property details, you can down-
load the new content to the client, transform and style the XML into the desired format, and
insert the styled content into the cached interface.
The only problem with this approach is that the application can only run in a client that
has the appropriate level of XML support. If the content is served within a web browser, you
need to be careful, because the level of support differs greatly between the major players. For
example, Opera versions 8 and below don’t support XSLT.
Using Server-Side XML
One solution might be to process the XML on the server instead. Using server-side processing
can avoid any of the specific browser issues. However, as discussed, this means users place
more load on the server with more frequent trips to request information. Unless you’re dealing
with a particularly data-intensive application, this isn’t likely to overshadow the advantages of
the server-side approach. I’ll discuss this in more detail in Chapters 11 to 13, where you’ll see
some approaches to using server-side XML.
There are three broad approaches to using XML in web browser applications:
• Using XML on the server side only and sending XHTML to the web browser
• Transforming the XML into XHTML for delivery to the browser
• Serving XML to the web browser and manipulating it with client-side scripting
I’ll look at each of these approaches in the following sections. I’ll examine Flash as a
special case in Chapter 10.
CHAPTER 4 ■ CLIENT-SIDE XML 117
6765CH04.qxd 5/19/06 11:26 AM Page 117
Using XML Within a Dynamic Web Page
In this approach, the application processes XML using a server-side scripting language, such
as C#, VB .NET, PHP, or JavaServer Pages (JSP), and presents the end result to the browser as
XHTML. The browser can then style the content using server-side languages that provide
DOM or SAX support, allowing the application to process XML content easily.
Transforming XML into XHTML
The second approach is to generate XML and use XSLT to transform it into XHTML for presen-
tation on the browser. You can apply the XSLT stylesheet transformation on either the server
or client, depending on the browser capabilities. If the browser has XSLT support, the transfor-
mation occurs there; otherwise, it takes place on the server. Once generated, the application
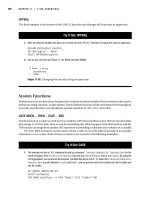
can style the XHTML in the browser using CSS. Figure 4-11 shows the workflow involved in
this approach.
Figure 4-11. The process of transforming XML into XHTML
This architecture involves the following steps:
1. Generate XML on the server.
2. Transform the XML content into XHTML on either the server or client.
3. Style the XHTML with CSS.
I’ll explain each step in a little more detail.
CHAPTER 4 ■ CLIENT-SIDE XML118
6765CH04.qxd 5/19/06 11:26 AM Page 118
Generating XML on the Server
The first step is much like building a dynamic web page, except that instead of generating
XHTML, the application generates XML. The structure of the XML depends on the data source
and the application.
Transforming the XML Content into XHTML
In the second stage, the application determines where the transformation should take place
and transforms the data. The result of the transformation is an XHTML document that con-
tains CSS references.
If the client has the capability to transform the data, it should apply the stylesheet at that
point to reduce the load on the server. However, this determination must be made on the
server, so that you can apply a server-side transformation if necessary.
If you’re using XSLT to access a small amount of content from a larger XML document, the
overhead of sending the XML to the browser may be more than the time saved in client-side
processing. It may make more sense to transform the content on the server and deliver
XHTML to the browser.
Another alternative is to combine both server-side and client-side transformations. The
server-side transform selects the content and delivers XML to the client. The client then per-
forms another transformation to generate the final XHTML.
Styling the XHTML with CSS
Once the browser receives the XHTML content, it is styled with CSS either through a linked
external stylesheet or through embedded or inline CSS declarations. The result is a styled
XHTML page.
Advantages and Disadvantages
Transforming XML into XHTML is a useful approach because it offers the following advan-
tages compared with traditional XHTML-based dynamic web pages:
• The application separates the data, layout, and styling of pages quite rigidly.
• Separating styling provides more manageability for web applications. This type of
architecture can be easily adapted to a server farm environment.
• The application can target different platforms with the same server-side code. For
example, the same content can be presented on web and mobile-phone browsers by
applying a different XSLT stylesheet for each device.
• The same application can be used for multiple purposes. For example, stylesheets
could transform application-specific XML into a format suitable for sharing with busi-
ness partners. They could then “browse” the transformed XML with a corporate system,
allowing both parties to interact without making major changes to either system.
Bear in mind that if you apply XSLT transformations on the server side, the server must
carry out additional processing. Through this process, you may lose gains arising from
reduced server traffic.
CHAPTER 4 ■ CLIENT-SIDE XML 119
6765CH04.qxd 5/19/06 11:26 AM Page 119
You can implement this type of architecture either by building your own framework or by
relying on existing tools. Some of the existing tools include
• Apache AxKit: />• Apache Cocoon Project: />• PolarLake Integration Suite: />integration/index.shtml
• Visual Net Server: />In addition, web servers such as Adobe (formerly Macromedia) ColdFusion (http://
www.macromedia.com/software/coldfusion/) and Microsoft Internet Information Services (IIS)
( offer good XML applica-
tion tools.
Serving XML to Client-Side Code
In this approach, the browser receives the XML content as data embedded within the client-
side code. You can use this approach to build dynamic pages that don’t have to make a
round-trip to the server for additional processing. The application makes XML data available
to client-side code by
• Loading XML into a DOM variable using the browser’s proprietary DOM load method.
• Using the XMLHTTP Request objects in IE, Mozilla, and Opera. This option is the core
technology behind an approach called Asynchronous JavaScript and XML (AJAX) that
you’ll learn about in Chapter 9.
• Using XML-aware client-side development tools such as Flash.
• Working with XML data islands.
Serving XML directly to the client reduces the number of round-trips to the server. With-
out XML, the application would have to make a call to the server each time to request new
content, which has the potential to slow down the user experience.
Summary
In this chapter, you’ve examined the XML support available in current versions of the major
browsers. You’ve seen the different ways that you can process XML in a web browser, including
some advanced functionality offered by IE. I’ve also shown you three different approaches to
using XML in web applications.
Chapters 5 to 10 examine how to implement the areas that you’ve examined in this chap-
ter. Chapter 5 looks at styling XML documents with CSS, and Chapters 6 and 7 cover XSLT in
detail. Chapter 8 looks more closely at scripting in the browser, while Chapter 9 examines one
browser scripting approach, called Ajax. In Chapter 10, I’ll introduce you to Flash as an alter-
native method for working with XML.
CHAPTER 4 ■ CLIENT-SIDE XML120
6765CH04.qxd 5/19/06 11:26 AM Page 120
Displaying XML Using CSS
You’re probably familiar with Cascading Style Sheets (CSS) and using CSS declarations to
style your XHTML pages. As you’ve already seen, stylesheets are very helpful for separating the
content of an XHTML page from its presentation. They also allow you to be more efficient in
managing web sites, because you can update styles across multiple pages by editing a single
stylesheet.
In this chapter, you’ll learn about CSS and see how you can use it to style XML docu-
ments. I’ll start with an introduction to CSS and show you how it styles XHTML documents.
This will help to clarify the terms and roles of CSS and show you what’s possible.
You’ll then work through examples that style XML documents with CSS. This process will
show you some of the limitations and the special considerations when styling with CSS. I’ll
discuss issues such as adding links, including images, adding content before or after elements,
and displaying attribute content. All of these areas require special CSS techniques.
CSS styling of XML provides some special challenges. With XHTML, a web browser under-
stands the meaning of each of the elements and can display them accordingly. For example, a
web browser understands how to render an <a> or <table> tag when it appears in an XHTML
page. If the same tag appears in an XML document, there is no intrinsic meaning, so a browser
cannot make any assumptions about how to render the element.
This chapter will
• Summarize how CSS works with XHTML
• Style XML documents with CSS
• Use CSS selectors with XML
• Discuss the CSS box model and the positioning schemes
• Lay out tabular XML data with CSS
• Link XML documents
• Add images to XML documents
• Add text to XML documents from the stylesheet
• Use attribute values from XML documents
Within the chapter, I’ll mention which browsers support each approach. I tested these
examples with Internet Explorer (IE) 6, Netscape 8, Firefox 1.5, Amaya 9.1, and Opera 8.51.
Therefore, when I mention that something isn’t supported in a web browser, I’m referring to
121
CHAPTER 5
6765CH05.qxd 5/19/06 11:31 AM Page 121
these versions. I’ve also included support for the Macintosh IE and Safari web browsers where
possible. As with the previous chapters, you can download the resources for this chapter from
the Source Code area of the Apress web site ().
Let’s start with a quick recap of CSS.
Introduction to CSS
Since the early days of printing, stylesheets have provided instructions about which font
family and size to use when printing a document. You can use CSS to provide styling informa-
tion for web documents. A CSS stylesheet is effectively a text document saved with the .css
extension.
Why CSS?
When you include presentation elements within an XHTML page, the content can easily get
lost within the style or presentation rules. The following benefits arise from separating the
content from the style and using a stylesheet to indicate how a document can be presented
visually:
• A single stylesheet can alter the appearance of multiple pages, meaning that you don’t
need to edit each individual page to make changes.
• Different stylesheets offer alternative views of the same content.
• The content is simpler to author and interpret because it doesn’t include presentation
information.
• Web pages load more quickly because a stylesheet is downloaded once and cached. You
can then reuse it throughout the site. The pages themselves are smaller because they no
longer contain styling information.
A CSS document contains style rules that apply to the elements of a target document,
indicating how the content of those elements should be rendered in a web browser.
CSS Rules
CSS is based on rules that govern how the content of an element or set of elements should be
displayed. You’ll see how to specify which elements to style a little later when I discuss the CSS
selectors.
Here’s an example of a CSS rule:
h1 {color:# 2B57A1;}
The rule is split into two parts: the selector (h1) and the declaration (color:# 2B57A1). The
selector shows which element or elements the declaration should apply to while the declara-
tion determines how the element(s) should be styled. In this example, all <h1> elements have
been specified, but selectors can be more sophisticated, as you’ll see later.
The declaration has two components: a property and a value, separated by a colon. The
property is the visual property that you want to change within the selected element(s). In this
CHAPTER 5 ■ DISPLAYING XML USING CSS122
6765CH05.qxd 5/19/06 11:31 AM Page 122
example, I’ve set the color property, which sets the foreground or text color of the heading.
The value of the property is #2B57A1, a blue color. The rule ends with a semicolon.
■Tip A CSS declaration can consist of several property-value pairs, and each property-value pair within a
rule must be separated with a semicolon. If you forget the semicolon, property-value pairs that appear after-
wards will be ignored. While you don’t have to add a semicolon at the end of a single declaration, it’s good
practice in case you want to add more declarations afterwards.
CSS supports a system of inheritance. Once you declare a rule for an element, it applies
to all child elements as well. If you set a rule specifying the color for the <body>, all child ele-
ments will inherit that color, including <p>, <h1>, <h2>, and <h3> elements. The exception here
is links, which a web browser often overrides. You may have to include a separate rule for the
<a> element.
This is one of the reasons for the name cascading stylesheets. The CSS declarations flow
down the element tree. Another reason for the name is that you can use rules from several
stylesheets by importing one into another or importing multiple stylesheets into the same
XHTML file. In addition, the rules apply in a cascading order. An inline declaration overrides a
declaration embedded in the <head> section of a page, which overrides an external stylesheet.
The following example shows a single rule containing multiple declarations. This means
that the rule applies to several elements at the same time:
h1, h2, h3 {color:# 2B57A1;
font-family:Verdana, Arial, sans-serif;
font-weight:bold;}
Commas separate the element names in the selector:
h1, h2, h3
Here, semicolons separate several properties for these elements, and all properties appear
between curly braces:
{color:# 2B57A1;
font-family:Verdana, Arial, sans-serif;
font-weight:bold;}
If you want the <h3> element to appear in italics as well, you can add an additional rule:
h3 {font-style:italic;}
By declaring the common properties together, you can avoid repeating all the other prop-
erty-value pairs when declaring the <h3> element individually. Rules declared individually have
a higher level of precedence in the cascade. For example, if you add a font-weight:normal dec-
laration in the rule for <h3>, it will override the bold declaration in the preceding rule.
You can find a list of CSS2 properties at />Many web sites explain how these properties are applied within stylesheets.
CHAPTER 5 ■ DISPLAYING XML USING CSS 123
6765CH05.qxd 5/19/06 11:31 AM Page 123
CSS VERSIONS
At the time of writing, there are two CSS recommendations: CSS1 and CSS2.The CSS2.1 specification is in
working-draft stage. The revision adds requested features and corrects errors in the CSS2 specification.
CSS3, also under development, provides a modularized approach to CSS; each of the modules are at various
stages of development.
The CSS1 features are mostly supported by IE 6, Netscape 6+, and Opera 6+ on Windows, and by
IE 5+, Netscape 6+, and Opera 5+ on Macintosh. Support for CSS2 is patchier, as you’ll see throughout this
chapter, despite being made a World Wide Web Consortium (W3C) recommendation in May 1998.
Styling XHTML Documents with CSS
As you saw in Chapter 3, XHTML is the reformulation of HTML using XML syntax. XHTML
version 1.1 is modular, meaning that web-enabled devices can choose to support modules
of XHTML, such as the tables or forms module. This makes it easier to create sites for new
devices, such as phones and Internet-enabled refrigerators.
I covered how to construct XHTML in Chapter 3. I’ll start this chapter by constructing a
CSS stylesheet. Figure 5-1 shows the page that you’ll create.
Figure 5-1. The XHTML page that you’ll create
CHAPTER 5 ■ DISPLAYING XML USING CSS124
6765CH05.qxd 5/19/06 11:31 AM Page 124
Without the stylesheet, Figure 5-2 shows that the document looks entirely different.
Figure 5-2. The XHTML page without CSS styling
As a precursor to constructing a CSS stylesheet for an XHTML document, you need to
remove all styling from that document. What remains should be only content and structural
tags. You’ll then use CSS to position the elements instead of relying on tables.
The style declarations are stored in an external stylesheet that links to the XHTML docu-
ment with the <link> element. You could also include the style rules inside the XHTML
document using a <style> element within the <head> element, or by adding a style attribute
to each element. However, storing the declarations in a single external document makes it
easier to maintain and apply the style rules.
The file styledXHTMLpage.htm, which appears below, contains the styled content:
<!DOCTYPE html PUBLIC "-//W3C//DTD XHTML 1.0 Transitional//EN"
"DTD/xhtml1-transitional.dtd">
<html xmlns=" /><head>
<title>XHTML Example</title>
<link rel="Stylesheet" href="styledXHTML.css" type="text/css" media="screen" />
</head>
<body>
<div class="header">Sample XHTML and CSS Layouts</div>
<div class="contents">
CHAPTER 5 ■ DISPLAYING XML USING CSS 125
6765CH05.qxd 5/19/06 11:31 AM Page 125
<div class="sideBarHead">Side bar</div>
<div class="item">Side 1</div>
<div class="item">Side 2</div>
<div class="item">Side 3</div>
<div class="item">Side 4</div>
<div class="item">Side 5</div>
<div class="item">Side 6</div>
</div>
<div class="navigation">
<div class="sideBarHead">Navigation</div>
<div class="item">Link 1</div>
<div class="item">Link 2</div>
<div class="item">Link 3</div>
<div class="item">Link 4</div>
<div class="item">Link 5</div>
<div class="item">Link 6</div>
</div>
<div class="page">
<div class="title">Sample Text</div>
<div class="credit">by Apress</div>
<table>
<tr>
<td rowspan="2">Cell spans<br />two rows</td>
<td>Cell 1</td>
<td>Cell 2</td>
<td>Cell 3</td>
</tr>
<tr>
<td>Cell 1</td>
<td>Cell 2</td>
<td>Cell 3</td>
</tr>
</table>
<div class="pullQuote">
This text is the remnants of a passage from Cicero's de
Finibus Bonorum et Malorum, written in 45 BC.
</div>
<p>Lorem ipsum dolor sit amet, consectetuer adipiscing elit, sed diam nonummy
nibh euismod tincidunt ut laoreet dolore magna aliquam erat volutpat. Ut wisi
enim ad minim veniam, quis nostrud exercitation ulliam corper suscipit
lobortis nisl ut aliquip ex ea commodo consequat. Duis autem veleum iriure
dolor in hendrerit in vulputate velit esse molestie consequat, vel willum
lunombro dolore eu feugiat nulla facilisis at vero eros et accumsan et iusto
odio dignissim qui blandit praesent luptatum zzril delenit augue duis dolore
te feugait nulla facilisi. </p>
</div>
</body>
</html>
CHAPTER 5 ■ DISPLAYING XML USING CSS126
6765CH05.qxd 5/19/06 11:31 AM Page 126
The document uses the stylesheet styledXHTML.css, which you can find with the down-
loaded resources. If you’re not familiar with some of the content in this example, don’t worry.
Ill cover it in depth in the “Layout of XML with CSS” section later in this chapter. I’ll also show
you how to choose which elements to style.
The styledXHTML.css stylesheet follows:
body, p, td {
color: #000000;
background-color: #FFFFFF;
font-family: Arial, Hevetica, sans-serif;
}
table, td {
padding: 10px;
border-style: solid;
border-width: 2px;
}
table {background-color: #CCCCCC;}
td {background-color: #FFFFFF;}
p {padding-bottom:20px;}
.header {
position: absolute;
top: 0px;
bottom: auto;
left: 0px;
z-index: 100;
width: 100%;
height: 60px;
padding-top: 10px;
padding-left: 20px;
font-size: 26px;
font-family: Arial, Hevetica, sans-serif;
color: #FFFFFF;
background-color: #2B57A1;
}
.contents, .navigation {
width: 100px;
height: 500px;
font-size:14px;
font-family: Arial, Helvetica, sans-serif;
color: #FFFFFF;
background-color: #7299D9;
padding: 10px;
}
.contents {
position: absolute;
left: 0px;
top:60px;
}
CHAPTER 5 ■ DISPLAYING XML USING CSS 127
6765CH05.qxd 5/19/06 11:31 AM Page 127
.navigation {
position: absolute;
right: 0px;
top: 60px;
padding-left: 10px;
}
.sideBarHead {
font-size: 12px;
font-weight: bold;
padding-top: 15px;
padding-bottom:10px;
}
.item {font-size: 12px;
padding-left: 10px;
}
.page {
width: auto;
background-color: #FFFFFF;
padding-top: 75px;
padding-left: 10px;
padding-right: 10px;
padding-bottom: 10px;
margin-left: 120px;
margin-right: 120px;
}
.title {font-size:22px;}
.credit {
font-size: 12px;
font-style: italic;
color: #999999;
padding-bottom: 15px;
}
.pullQuote {
float: right;
width: 20%;
background-color: #FFFFFF;
font-style: italic;
border: solid 2px #2B57A1;
padding: 10px;
margin:10px:
}
You can see from the range of declarations that it’s possible to style XHTML elements in
many different ways. The stylesheet governs the positioning of elements, padding, borders,
fonts, and colors.
There are a few things to note before moving on. The example uses CSS positioning
instead of tables for the header and sidebars. Separating the content of the document from
CHAPTER 5 ■ DISPLAYING XML USING CSS128
6765CH05.qxd 5/19/06 11:31 AM Page 128
the layout rules makes the page easier to edit. You should only use tables for presenting
tabular data.
The XHTML document includes structural elements, such as a rowspan attribute within a
table cell. It also separates each block within the document into separate <div> tags. A <div>
element is a handy container for content within a document.
The most important point from the exercise relates to the role played by the web browser.
While XHTML is HTML reformulated in XML syntax, there is a difference between XHTML
and other XML vocabularies. A web browser already understands XHTML elements and
knows how they should be rendered. For example, when a web browser comes across a
<table> element, it understands how to represent the <tr> and <td> tags. It knows that the
rowspan attribute indicates how many rows a table cell should span.
Other XML vocabularies don’t offer the same advantages. Unless you’re working with
a specialized viewer, a web browser or other processor can’t derive the display meaning
attached to each element. You must be a lot more careful when constructing stylesheets for
XML documents.
Styling XML Documents with CSS
You’ve looked at a styling example with XHTML, so now let’s see what happens when you dis-
play content from an XML vocabulary that is unfamiliar to the web browser. For instance,
you might want to display a custom XML document created from a database, or you could be
dealing with a vocabulary that is specific to one of your trading partners. The web browser
can’t display the content without help. One option is to control the display with CSS.
Because XML elements represent content without any attached presentation cues, you
must address the following questions:
• How can you control layout without the use of tables?
• How can you link the CSS stylesheet to the XML document?
• How can you present tabular data in XML?
• How do you include links to other documents?
• How can you display images in our XML documents?
As you style the document, some other issues will arise, including
• The extent to which you can reorder the elements so that they are presented in a
different sequence to their order in the original XML document
• Whether you can add content that isn’t in the original XML document, such as headers
and other fixed text elements
• The display of attribute content, since many XML files contain important data you may
wish to view
You can see that styling XML documents with CSS raises many issues. Let’s start by
attaching a CSS stylesheet to an XML document, so you can see how to render XML in a
web browser.
CHAPTER 5 ■ DISPLAYING XML USING CSS 129
6765CH05.qxd 5/19/06 11:31 AM Page 129
Attaching the Stylesheet
When working with XML vocabularies other than XHTML, you can’t include the styling rules
inside the document. Instead, you must use a standalone stylesheet.
XML documents can link a stylesheet using a processing instruction:
<?xml-stylesheet type="text/css" href="styles.css"?>
You can’t use the <link> element, because it’s specific to XHTML. Instead, you can only rely on
constructs common to all XML documents.
The processing instruction must include an href attribute that indicates the location of
the stylesheet. It must also include a type attribute indicating the Multipurpose Internet Mail
Extensions (MIME) type of the stylesheet. In the example, the value is text/css. If you’re dis-
playing the XML document in a user agent that doesn’t understand the stylesheet type—for
example, a non-CSS-aware mobile phone—it will not need to download the stylesheet.
The processing instruction can also take a number of optional attributes. The title
attribute specifies the name of the stylesheet. You can also specify the intended media for
viewing the document. Values include screen, as well as aural, braille, handheld, and tv.
Probably the most common value is screen, which targets color computer monitors.
The charset attribute indicates the character set used, and alternate indicates whether
the stylesheet is the preferred stylesheet. It can take the values yes or no; if a value isn’t sup-
plied, the default is no.
You can refer to multiple CSS stylesheets by adding a processing instruction for each
stylesheet. You can also add processing instructions to include an Extensible Stylesheet
Language Transformations (XSLT) stylesheet; I’ll discuss this topic in Chapters 6 and 7.
Let’s start by looking at the selectors.
Selectors
It’s important to understand the role of selectors in CSS. As you’ll recall, selectors indicate
where the rule should apply. From your work with CSS and XHTML, you may be familiar with
the selectors shown in Table 5-1.
Table 5-1. CSS Selector Types
Selector Type Example Description
Universal * A wildcard, which matches all element types
in the document.
Type body, myElement Matches all element types specified in the
comma-delimited list. In this case, it matches
all <body> and <myElement> elements.
Class .myClass Matches elements with a class attribute
whose value appears after the dot or period.
In this case, elements with the attribute
class="myClass" match. Note that this only
applies to XHTML, not XML.
CHAPTER 5 ■ DISPLAYING XML USING CSS130
6765CH05.qxd 5/19/06 11:31 AM Page 130
Selector Type Example Description
ID #myID Matches an element with an id attribute
whose value appears after the hash (#
) sign. In
this case, the selector matches elements with
the attribute id="myID". This selector type is of
limited use with XML.
Descendant body myElement Matches an element type that is a descendant
of another. In this case, it matches
<myElement> elements that are contained in
<body> elements. The <myElement> elements
don’t need to exist directly within the <body>
element. Rather, they can exist inside another
element, such as <p> or <table>.
Child body > myElement Matches an element type that is a direct child
of another. In this case, it matches
<myElement> elements that are direct children
of <body> elements.
Adjacent sibling myElement1 + myElement2 Matches an element type that is the next sib-
ling of another. Here, it matches <myElement2>
elements that have the same parent as a
<myElement1> element but appear immedi-
ately after the <myElement1> element.
You’ll also learn about a set of selectors called attribute selectors in the “Using Attributes
in Selectors” section.
The class selector only works in XHTML documents, because the browser already knows
the meaning of the class attribute for these vocabularies. Even if your XML document con-
tains a class attribute, the browser won’t associate it with the class selector.
Similarly, the ID selector only works with attributes of ID type. While the browser under-
stands this for XHTML elements, other XML vocabularies need to specify that an id attribute
is of type ID in a DTD or XML schema. Since a web browser isn’t forced to validate content, it
can’t reliably determine when an attribute is of type ID. Therefore, neither the class nor ID
selectors are suitable for use in styling XML documents.
Layout of XML with CSS
Even though tables aren’t recommended for XHTML document layout, a large number of sites
still use this technique. You can’t use this structure to present XML documents, because no
predefined <table> structure is available within a web browser. You need to control the layout
of all XML elements using CSS.
Before you can start styling XML documents, it’s important to understand that CSS oper-
ates on a box model when rendering a page.
CHAPTER 5 ■ DISPLAYING XML USING CSS 131
6765CH05.qxd 5/19/06 11:31 AM Page 131
Understanding the W3C Box Model
When displaying a document, CSS treats each element in the document as a rectangular box.
Each box is made up of four components: content surrounded by padding, a border, and mar-
gins, as shown in Figure 5-3.
Figure 5-3. The CSS box model
The margins around the box are transparent. You can apply styles to the borders around
the box to change the line style, thickness, and color. The area inside the border includes con-
tent surrounded by padding.
CSS specifies a default width of zero for the margin, border, and padding. You can specify
different values with the width and height properties, but when you do this, you’re actually
setting the width and height of the content area. The margin, border, and padding are addi-
tional and can be broken down into four areas: top, bottom, left, and right.
Each box can contain other boxes, which correspond to nested elements. CSS recognizes
two types of boxes: block and inline. In XHTML, you create block boxes with block-level ele-
ments such as <p>, <div>, h1>, and <table>, while you create inline boxes with tags such as
<em> and <span>. Block boxes automatically include space, while inline boxes don’t. This
means that inline boxes can flow together.
When styling XML with CSS, all elements are inline by default. You need to identify the
block-level elements by setting the display property value to block. You can also set the
display attribute to inline for the inline elements.
BROWSERS AND THE BOX MODEL
This section describes the W3C box model, but some browsers support a different box model. In the alterna-
tive box model, the width is the space between borders, including the margin, padding, and border. By
default, IE and Opera use the alternative box model, while Firefox follows the W3C standard.
You can change the box model to the W3C standard by including the strict DOCTYPE declaration. If you
do this, IE 6 and Opera 7+ will adopt the W3C box model described here.
CHAPTER 5 ■ DISPLAYING XML USING CSS132
6765CH05.qxd 5/19/06 11:31 AM Page 132
The following line indicates a paragraph in XHTML:
<p>Here is some text, <em>and a reference</em>,
then <strong>some emphasized text</strong>.</p>
The web browser knows that a paragraph should be displayed as a block, and the italicized
and emboldened text should be displayed inline, flowing within the text in the paragraph. You
can rewrite the content using the following XML:
<paragraph>Here is some text, <reference>and a reference,</reference>
then <important>some emphasized text</important>. </paragraph>
To make it display in the same way, set the display property for each element as follows:
paragraph {
display: block;
padding: 10px;
}
reference {
display: inline;
font-style: italic;
}
important {
display: inline;
font-weight: bold;
}
You can also set the display property to none to prevent a box from being created. This
tells the browser to behave as if neither the element nor any child elements exist. Even if a
child element declares the display value, the content will not appear.
Let’s look at an example where a block-level element, like the paragraph in the last exam-
ple, acts as a container for other boxes. You can find the XML document saved as boxes.xml
and the corresponding CSS file saved as boxes.css. Here’s the XML document:
<?xml version="1.0" encoding="UTF-8"?>
<?xml-stylesheet type="text/css" href="boxes.css"?>
<page>
<pageNumber>Page 1</pageNumber>
<paragraph>
Here is some text,
<reference>and a reference,</reference>
then
<important>some important text</important>.
</paragraph>
<paragraph>
Here is more text,
<reference>another reference,</reference>
CHAPTER 5 ■ DISPLAYING XML USING CSS 133
6765CH05.qxd 5/19/06 11:31 AM Page 133
and
<important>more important text</important>.
</paragraph>
</page>
The XML document uses the <page>, <pageNumber>, <paragraph>, <reference>, and
<important> tags to describe the content. The stylesheet follows:
paragraph {
display:block;
padding-top:10px;
border:solid 1px #A3A3A3;
padding: 10px;
margin: 20px;
}
reference {
display:inline;
font-style:italic;
color:#CC3333;
background-color: #E6E6E6;
}
important {
display:inline;
font-weight:bold;
color:#990000;
border:solid 1px #990000;
}
page {
display:block;
border:solid 2px #000000;
padding: 10px;
margin:10px;
}
pageNumber {
display:block;
padding:5px;
border:solid 2px #336699;
width: 60px;
margin-bottom: 20px;
}
Notice that the stylesheet includes borders, margins, and padding. I’ve used the short-
hand notation for describing borders.
When you view the XML document in a web browser, you’ll see something similar to the
image shown in Figure 5-4.
CHAPTER 5 ■ DISPLAYING XML USING CSS134
6765CH05.qxd 5/19/06 11:31 AM Page 134
Figure 5-4. The XML document styled with CSS
To simplify positioning in CSS, block boxes only contain all inline boxes or all block boxes.
If you include inline boxes with block boxes, the inline boxes will be treated as block boxes. An
anonymous block created around the inline box simplifies the positioning process. The net
result is that even if you set the display property on the <pageNumber> element to inline, it will
behave like a block because of the anonymous box created as a container.
It’s important to understand how boxes work so you can position them correctly.
Positioning in CSS
As I mentioned at the beginning of this section, you need to understand the W3C box model
before you start positioning content using CSS. If you know that each element is displayed as
a box, the process of layout becomes a case of deciding whether to use an inline or block box
and where to position it on the page.
CSS2 has three types of positioning: normal, floating, and absolute. It also contains some
subtypes, such as relative and fixed. Table 5-2 summarizes the different positioning options.
Table 5-2. Positioning Types in CSS
Type Explanation
Normal The default type. Block boxes flow from top to bottom, while inline boxes flow
from left to right.
Relative A subtype of normal positioning, where a box is offset to the left, right, top, or
bottom from its container.
Floating A box floats to the left or right, and other content flows around.
Absolute A box is positioned at a specified top and/or left position from its container.
Fixed A subtype of absolute positioning, where the container is always the browser
window.
CHAPTER 5 ■ DISPLAYING XML USING CSS 135
6765CH05.qxd 5/19/06 11:31 AM Page 135
I’ll discuss the difference between each of these types, as well as browser support for each
type. Be aware that the choice of positioning has a profound effect on the appearance of an
XML document.
Normal Flow
Normal flow is the default type of positioning. In this scheme, block boxes flow from the top
to the bottom of the page, starting at the top of their containing block, while inline boxes flow
horizontally from left to right. The containing block may be the browser window or another
block element.
To see how this works, I’ve reworked the previous example to include a <document>
element and a repeated <page> element. The files for this example are boxes2.xml and
boxes2.css.
Figure 5-5 shows how the new XML document appears in a web browser.
Figure 5-5. The revised XML with a <document> element
You can see that the document contains two pages, with the second appearing beneath
the first. The paragraphs flow from top to bottom within each page. The inline elements
<reference> and <important> flow with the normal text from left to right.
Inline boxes are wrapped as needed, moving down to a new line when the available width
is exceeded. Vertical margins of boxes collapse in the normal flow. Instead of adding the bot-
tom margin of a block box to the top margin of the following block box, only the larger of the
two values is used. Horizontal margins, however, never collapse.
CHAPTER 5 ■ DISPLAYING XML USING CSS136
6765CH05.qxd 5/19/06 11:31 AM Page 136
Relative Positioning
Relative positioning also falls under the “normal” category. This type of positioning renders
the page according to normal flow, but then offsets the box by a given amount. A nice way to
demonstrate this is by creating subscript or superscript text.
A position property with a value of relative indicates that a box should be relatively
positioned. You can use left, right, top, and bottom to specify the offset values. In this
example, you’ll add a footnote to the reference:
footnote {
position:relative;
top:3px;
font-size:10px;
display:inline;
font-weight:bold;
}
Note that you’ve specified a top offset to push the box downward. You can find the new
files saved as boxes3.xml and boxes3.css.
■Tip You should only specify one of either the left or right offset, or the top or bottom offset. If you specify
both the left and right, or top and bottom, you’ll need to make sure that one is the absolute negative of the
other (e.g., top:3px; bottom:-3px;); otherwise, the offset will be ignored.
Figure 5-6 shows the effect of adding a footnote element to the XML file.
Figure 5-6. The XML file with a relatively positioned <footnote> element
CHAPTER 5 ■ DISPLAYING XML USING CSS 137
6765CH05.qxd 5/19/06 11:31 AM Page 137
Relative Positioning and Overlapping Boxes
When using relative positioning, you need to be careful not to overlap boxes inadvertently.
Overlapping happens if you choose an offset that’s too large for the surrounding elements. The
effect is that one box appears on top of another.
■Note If you specify relative offset values that conflict with a width or height setting for a block-level
box, web browsers and other display devices will ignore them.
While an overlapping effect can be interesting, it also has some pitfalls. Unless you set
either a background-color or image for the box, it will be transparent by default. This means
that when text overlaps, you may end up with an unreadable mess.
The CSS specification doesn’t say which element should appear on top when relatively
positioned elements overlap. Hence, there may be rendering differences between browsers.
In the following example, the <important> element has a relative position 75 pixels from
the right-hand side of where it would have appeared under normal flow. The example also sets
background-color, so you can see the effect:
important {
position:relative;
background-color:#FFFFFF;
right:75px;
display:inline;
font-weight:bold;
color:#990000;
border:solid 1px #990000;
}
The files are saved as boxes4.xml and boxes4.css. Figure 5-7 shows the effect when the
XML document appears in a web browser.
The <important> element masks some of the content in the <reference> element.
CHAPTER 5 ■ DISPLAYING XML USING CSS138
6765CH05.qxd 5/19/06 11:31 AM Page 138
Figure 5-7. Unintended overlapping resulting from relative positioning
Floating
If you choose the positioning type float, you’ll create a floating box. Other content will flow
around the box. You can set the float property to either left or right. Floating boxes are
treated as block boxes, even if you define them specifically as inline elements.
Positioning with float doesn’t have the vertical margins collapsed above or below it,
unlike normal flow. Instead, the box is aligned with the top of the containing box. Horizontally,
it is shifted as far to the left or right of the containing box as is possible.
When you use this type of positioning, you should also set a width property indicating
how wide the element should be within the containing box. If you don’t do this, the floating
box will automatically take up 100 percent of the width of the containing box. Because it takes
up the maximum space, nothing can flow around it, and it will appear like a nonfloating
block-level element.
The next example includes a <pullQuote> element. This element floats to the right, taking
up 20 percent of the width of its container element. The XML follows:
<page>
<pullQuote>
The remnants of a passage from Cicero's de Finibus Bonorum et Malorum.
</pullQuote>
<paragraph>Lorem ipsum dolor sit amet, consectetuer adipiscing elit, sed diam
nonummy nibh euismod tincidunt ut laoreet dolore magna aliquam erat volutpat. Ut
wisi enim ad minim veniam, quis nostrud exercitation ulliam corper suscipit
lobortis nisl ut aliquip ex ea commodo consequat. Duis autem veleum iriure dolor
in hendrerit in vulputate velit esse molestie consequat, vel willum lunombro
dolore eu feugiat nulla facilisis at vero eros et accumsan et iusto odio
dignissim qui blandit praesent luptatum zzril delenit augue duis dolore te
feugait nulla facilisi.
</paragraph>
</page>
CHAPTER 5 ■ DISPLAYING XML USING CSS 139
6765CH05.qxd 5/19/06 11:31 AM Page 139
This document is saved as boxes5.xml, along with boxes5.css, the new stylesheet. The
stylesheet contains the following code:
paragraph {
display:block;
padding:10px;
border:solid 2px #A3A3A3;
}
pullQuote {
float:right;
width:20%;
font-style:italic;
border:solid 1px #CCCCCC;
padding:10px;
margin:10px:
}
Figure 5-8 shows how the floating element appears within a web browser.
Figure 5-8. A floating element
One interesting thing to point out here is that it doesn’t matter whether the <pullQuote>
element appears before or after the <paragraph> element—it will still display in the same
position within the browser. You can use this technique to present the contents of an XML
document in a different sequence from the one it follows within the XML source.
CHAPTER 5 ■ DISPLAYING XML USING CSS140
6765CH05.qxd 5/19/06 11:31 AM Page 140