Drupal 7 Module Development phần 9 docx
Bạn đang xem bản rút gọn của tài liệu. Xem và tải ngay bản đầy đủ của tài liệu tại đây (1.03 MB, 41 trang )
Chapter 10
[ 307 ]
The callback function hello_world_simple_form_callback() passes the
$form and $form_state variables after they have gone through hello_world_
simple_form_example()
. In this case we are returning the form element that is
being replaced.
Drupal knows this is a renderable array and renders it to the appropriate value.
Drupal sends the updated HTML back to the page where the Drupal AJAX
handlers retrieve the changes and replace the wrapper.
AJAX automatically applied
AJAX can be automatically applied to elements on a page. This is done by applying
the use-ajax class to an element on a page. A typical use would be to apply the
use-ajax class to a link within a page to trigger an AJAX action. Links are
commonly used because the page the link points to might be for the cases when
JavaScript is disabled as a fallback.
In the following example we are going to provide a link that, when clicked, will add
"Hello World" to a
div within the page. To start, we have two menu callbacks that
we add to hello_world_menu(). One item for the page we are generating and the
other is the callback URL used for AJAX or when JavaScript is disabled.
$items['hello_world/link'] = array(
'title' => 'Hello World: Link',
'page callback' => 'hello_world_link',
'access callback' => 'user_access',
'access arguments' => array('access content'),
);
$items['hello_world_link_callback'] = array(
'page callback' => 'hello_world_link_response',
'access callback' => 'user_access',
'access arguments' => array('access content'),
);
The rst menu item is to our page where the link is located and where the AJAX will
add content. The second menu item is the callback that will handle the AJAX request
or the page request, when JavaScript is unavailable.
function hello_world_link() {
drupal_add_js('misc/ajax.js');
$link = l(t('Say Hello'), 'hello_world_link_callback/nojs/',
array('attributes' => array('class' => array('use-ajax'))));
return '<div>' . $link . '</div><div id="saying-hello"></div>';
}
JavaScript in Drupal
[ 308 ]
The page callback where the link lives, starts by using drupal_add_js() to add
misc/ajax.js. This JavaScript does the work to automatically make the AJAX
work. This is followed by a link with a callback to
hello_world_link_callback/
nojs/
. The rst part of this link is the callback where the AJAX request is handled.
The
/nojs/ at the end is special. When JavaScript is not available it is passed to the
response function so it knows it was called to be a full page load. When JavaScript
is available it is replaced with
/ajax/. This is passed into the callback function so it
knows it was called via an AJAX request.
What makes this link become an AJAX link is the class being added with the name
use-ajax. The JavaScript le we added at the beginning, ajax.js, looks for links
with this class and converts them into AJAX.
function hello_world_link_response($type = 'ajax') {
if ($type == 'ajax') {
$output = t("Hello World!");
$commands = array();
$commands[] = ajax_command_append('#saying-hello', $output);
$page = array('#type' => 'ajax_commands', '#ajax_commands' =>
$commands);
ajax_deliver($page);
}
else {
return t("Hello World in a new page.");
}
}
When the callback to handle the request is called, the type of action is passed in.
When no JavaScript is available, nojs is passed in. When the request is AJAX, ajax
is passed in. This can be used in the callback functions logic to properly respond
to each case.
In this case we use an
if statement. When the request is AJAX, we respond in one
way and when JavaScript is not available we respond differently.
When the request is an AJAX callback we start by creating the response text of "Hello
World!". This is followed by creating an array to hold commands we want Drupal
to execute and adding a command to it.
A command is an action we want the JavaScript to perform when it receives the
AJAX response. The commands provide ways in which jQuery can manipulate the
content of the page with the responded data. In this case the command used is the
ajax_command_append(). This command accepts a jQuery selector and content.
The content is appended to the selector. This Drupal function utilizes the
jQuery.append() function.
Chapter 10
[ 309 ]
Once the response is set up it is inserted into a renderable array. The type is
ajax_commands, which will know how to render the AJAX command that was created
in the callback. To send the AJAX response properly
ajax_deliver() is used. This
function properly formats the response for the JavaScript on the receiving side.
Additionally, Drupal tracks the JavaScript and CSS les within a page. If a new
le is added within an AJAX request that is not already loaded in the page the new
le is sent as part of the response and added to the page along with the rest of
the response.
For cases when JavaScript is not available in the initial page view and the link is
followed, it is treated as a full page request and the user is sent to a new page. This
page lives at the same callback that built the AJAX response. The difference is
nojs is
passed into the callback so it knows the response is not in AJAX. In this case the else
is executed generating a different message for the new page.
AJAX commands
Drupal provides several AJAX commands that can add or alter content in a page
using jQuery methods. In the previous section we covered ajax_command_append().
Here are all the possible commands that can be used.
ajax_command_after
When ajax_command_after() is used, jQuery.after() is the method used to
add content to the page. The arguments are $selector, $content, and $settings.
$selector is the jQuery selector on the page and $content is the content to add
after the selector. $settings, the third argument, is a set of settings used by the
behaviors for this single command.
ajax_command_alert
The alert command is a core JavaScript command. ajax_command_alert($text) is
used to alert returned text. The text is presented in an alert box.
ajax_command_append
This command is similar to ajax_command_after. Instead of adding the content
after the selector it appends it to the end of the selector. The interface to the function
is the same as ajax_command_after() with the $selector, $content, and
$settings arguments. $selector is the jQuery selector on the page, $content is
the content to append to the selector, and $settings is used by behavior for just
this one command.
JavaScript in Drupal
[ 310 ]
ajax_command_before
To add content before an element use ajax_command_before(). It utilizes
jQuery.before() to add content before a selector. Again the $selector, $content,
and $settings arguments are used.
ajax_command_changed
To note that something within a page has changed ajax_command_
changed($selector,
$asterisk) can be used. Elements found on the page with the
given jQuery selector will have the ajax-changed class applied to them. $asterisk
is an optional CSS selector, that resides inside $selector. This is used to optionally
append an asterisk to that element.
ajax_command_css
ajax_command_css() uses the jQuery.css() command to update the CSS within
the page. This command takes in $selector and $argument arguments. For
example, changing a page's background color would look as follows:
$commands[] = ajax_command_css('body', array('background-color' =>
'#FFFFFF'));
ajax_command_data
jQuery provides a 'data' command to store data within a page outside of element
attributes. The ajax_command_data() function enables Drupal AJAX to add and
update data inside jQuerys data cache. The three arguments are:
$selector, the jQuery element selector
$name, the name of the data item being accessed
$value, the value for the item
ajax_command_html
ajax_command_html() utilizes jQuery.html() to update the html for a given selector.
The arguments are $selector (the jQuery selector), $html (the HTML to update the
selector to use), and $settings (optional settings for this command to use).
•
•
•
Chapter 10
[ 311 ]
ajax_command_prepend
To add content at the beginning of an element use the prepend command.
This utilizes jQuery.prepend() to add the content. The arguments for
ajax_command_prepend() are $selector, $content, and $settings.
ajax_command_remove
The remove command removes elements from a page. The single argument is the
selector to be removed. jQuery.remove() is utilized to remove the elements from
the page.
ajax_command_replace
The ajax_command_html replaces the html content within an element. For cases
where the entire element needs to be replaced ajax_command_replace() should be
used. It takes advantage of jQuery.replaceWith() to replace the entire element.
The three arguments are $selector, $html, and $settings. $html is the full html
the selector will be replaced with. For example, take the html:
<div class="container">
<div class="inner">Hello World!</div>
</div>
An ajax_command_replace() looks like the following:
$commands[] = ajax_command_replace('.inner', '<h2>Goodbye World!
</h2>';
This will update the html to look like the following:
<div class="container">
<h2>Goodbye World!</h2>
</div>
ajax_command_restripe
The restripe command tells Drupal to restripe a table. This is useful when content
inside the table has been altered. The only argument is the jQuery selector for
the table.
JavaScript in Drupal
[ 312 ]
ajax_command_settings
ajax_command_settings() is used to add settings to the response. The rst
argument is the settings to be sent with the response. If only the rst argument is
given, or the second argument is FALSE, then the setting will only be used for the
response. If the second argument, the
$merge argument, is set to TRUE the settings
will be merged into
Drupal.settings.
For more information on the jQuery APIs visit
.
Summary
We have covered the basic principles and commands of using JavaScript and jQuery
within the context of Drupal. We started by adding JavaScript to a page as a le,
inline, and as a setting. We continued by looking at adding complete libraries with
dependencies and altering JavaScript right before the page was rendered.
Drupal provides helper functions and libraries which are useful in creating Drupal
modules. We covered how these libraries and some of the more commonly used
elements work.
Working with Files
and Images
Drupal 7 introduced a new API for les and images, bringing the functionality of
popular contributed modules like Imagecache and Imagefield into core for the
rst time. In this chapter, we will build two modules that take advantage of this
new functionality. Some of the concepts we will cover are:
Understanding Drupal's
public and private lesystems
Associating les and images with content
Implementing a stream wrapper for custom le handling
Programmatically manipulating images using image styles and effects
Understanding Drupal's new Image Styles functionality
Implementing your own image effects for use with Image Styles
By the time you are done with this chapter, you should have a good understanding
of how to manipulate les and images using Drupal, including some methods for
retrieving remote les and images.
The Twitpic and watermark modules
In this chapter, we will be building the Twitpic module. This module will enable
you to interact with images stored on the Twitpic website (http://twitpic.
com
) and integrate them with Drupal in a variety of ways. It provides a stream
wrapper that allows developers to pull images from Twitpic by referring to them
with a custom URI, and offers a demo of how Drupal's Image API can be used to
manipulate these images.
•
•
•
•
•
•
Working with Files and Images
[ 314 ]
We will also be creating a second module, which allows users to add a simple
text watermark to images. Users will be able to congure the watermark so that
it displays custom text in a specied color. This effect will be available for use in
Image Styles, the Drupal 7 implementation of the
Imagecache module.
Files in Drupal
When you installed Drupal for the rst time, you probably got the following error
and wondered why you needed to create three directories for les:
Drupal denes three types of le storage, namely, public, private, and temporary.
Public les are available to the world at large for viewing or downloading. This is
where things such as image content, logos, and downloadable les are stored. Your
public le directory must exist somewhere under Drupal's root, and it must be
readable and writeable by whatever 'user' your web server is running under. Public
les have no access restrictions. Anyone, at anytime, can navigate directly to a public
le and view or download it.
Private les are not available to the world for general download. The private les'
directory should reside outside Drupal's root directory. However, it will still be
writeable by the web server user. Isolating private les this way allows developers
to control who can and can't access them as they wish. For instance, you could write
a module that only allows users who have a specic role, to access PDFs in the
private lesystem.
Chapter 11
[ 315 ]
It is very important that private les live outside of Drupal's web root,
despite the fact that by default they do not. In order for private les to
be useful, they must be readable to the user your web server runs as.
However, if these les are then under Drupal's web root, they will be
readable to anybody. Proper testing is extremely important for properly
securing private les. For more information on how to properly secure
your private le system, see the following site:
/>Temporary le storage is typically only used by Drupal for internal operations.
When les are rst saved by Drupal, they are rst written into the temporary le
area so they can be checked for security issues. After they have been deemed safe,
they are written to their nal location.
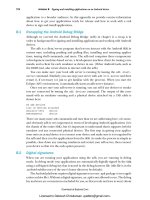
Each of the directories in the preceding error message reects the default location
for each type of le. You can change these default locations after your installation is
complete by logging in as administrator and visiting
admin/config/media/file-
system
as seen in the following image:
You can also indicate whether the default download method should be public or
private. (After installation it is public.)
Working with Files and Images
[ 316 ]
File API
In Drupal 6, most le handling functionality was provided through a rough core API
combined with contributed modules such as Filefield. Drupal 7 provides a more
robust and consistent API that allows developers to interact with les in a standard
set of functions that perform tasks like creating, opening, moving, and deleting les.
In order for les to be associated with nodes and other Drupal content, they must
have a record in Drupal's
file table. Each record identies a le with a unique ID
as well as associated metadata like le size and mime-type.
Many File API functions, such as
file_copy() and file_move(), take a le object
as one of their arguments. The le object is a PHP standard class containing the
metadata from the files table, and these API functions manage updating the
information in the files table when les are moved or deleted. This is one reason
it is so important to use these API functions for les associated with content—if you
don't, the files table will be inconsistent and your les may not show up properly.
If you need to work with les outside the context of Drupal content, there is
a separate set of functions in the File API with
unmanaged in their name. For
instance, where file_copy() will update the les table and copy your le,
file_unmanaged_copy() will just copy the le.
For a full list of the functions available in the File API,
refer to the API documentation at:
/>Here is a simple example of how this works. A common task while building a
Drupal site is importing data from another source and turning it into nodes. This
will not only include textual information like the title and body, but also images.
These images may live in a local directory, or they may live out on a website you're
importing from.
Let's look at how we can grab a le from an external site, save it to the default le
system, and attach it to a node we create. For this example, you will be working with
the eld
image in the article content type.
First we need to get a le and save it:
$image = file_get_contents(' />2.png');
$file = file_save_data($image, 'public://druplicon.png',FILE_EXISTS_
REPLACE);
Chapter 11
[ 317 ]
In order to open les from remote locations, PHP must have the allow_
url_fopen setting enabled in your php.ini. For more information see:
/>php#ini.allow-url-fopen
This is pretty straightforward. Using the PHP function file_get_contents(),
we grab an image of Drupal's mascot, the Druplicon, and save it into the variable
$image. We then save it locally using the Drupal API function file_save_data(),
which returns a le object file_save_data(), and takes three arguments. The rst
argument is the contents of the le, as a string. file_get_contents() returns a
string, so this works out well.
The second argument species the location where the le should be saved. This
destination should be represented as a URI, using one of the system's registered
stream wrappers. We will discuss stream wrappers in more detail later in the
chapter, but for now, just know that you can refer to any of Drupal's le system types
using a custom URI scheme, namely,
public://, private://, or temp://. This will
read or write the le into the appropriate le system without the developer needing
to know the details of where the les are physically located. Here we are saving our
le to the public le system.
The third argument species what
file_save_data() should do when a le already
exists with the same name as the le we're trying to save. There are three constants
dened to indicate the possible actions that Drupal can take:
FILE_EXISTS_REPLACE: The new le should overwrite the existing le.
FILE_EXISTS_RENAME: Rename the new le by appending an incrementing
number to the new le's name until no collision occurs. For example, if
druplicon.png and druplicon_1.png already existed, then the new le
would be druplicon_2.png.
FILE_EXISTS_ERROR: Don't do anything and just return FALSE.
The default option is
FILE_EXISTS_RENAME but we have specied that the le should
be replaced if it exists.
After the le is saved, a le object is returned. This object contains the
fid or le ID,
as well as associated metadata. Now that we have saved the image, we can create a
node and attach the image to it:
$node = new stdClass;
$node->type = 'article';
node_object_prepare($node);
•
•
•
Working with Files and Images
[ 318 ]
$node->title = 'The World of Crell';
$node->language = LANGUAGE_NONE;
$node->body[LANGUAGE_NONE]['0']['value'] = 'GAHHHH!';
$node->field_image[LANGUAGE_NONE]['0']['fid'] = $file->fid;
node_save($node);
As discussed in Chapter 6, Working with Content, a node is an object and elds
are properties of the object, indexed by language. In terms of this example, the
highlighted line is the most important one. All we need to do, is to associate our le
with the image eld, is add the
fid of our returned le object to a fid property of
the eld's instance. When the node is saved, Drupal will extract all the appropriate
information from the files table and add it to the image eld.
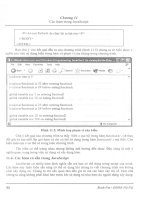
That's it! After running this code, you can visit your site's front page and you should
see something like the following:
This simple example shows how easy it is to manage les in Drupal, and should
provide a good jumping off point for further exploration.
As mentioned earlier in the chapter, Drupal 7's File API uses PHP stream wrappers.
It also introduces the ability for developers to create their own PHP stream wrappers
and integrate them with Drupal le handling. Let's take a look at what stream
wrappers are and how developers can use them.
Chapter 11
[ 319 ]
Stream wrappers
If you've been writing PHP for very long, you have most likely needed to work with
local or remote les at some point. The following PHP code is a common way to read
a le into a variable that you can do something with:
$contents = ";
$handle = fopen("/var/www/htdocs/images/xyzzy.jpg", "rb");
while (!feof($handle)) {
$contents .= fread($handle, 8192);
}
fclose($handle);
This is pretty straightforward. You get a handle to a local le using fopen() and
read 8 KB chunks of the le using fread() until feof() indicates that you've
reached the end of the le, at which point you fclose() the handle. The contents
of the le are now in the variable $contents. In addition to local les, you can also
access remote les through fopen() like this:
$handle = fopen("
"rb");
Data that you can access this way is streamable, meaning you can open it, close it,
or seek to an arbitrary place in it. Stream wrappers are an abstraction layer on top
of streams that tell PHP how to handle specic types of data. When using a stream
wrapper, you refer to the le just like a traditional URL—scheme://target. Often
the target will be the path and lename of a le either located locally or remotely, but
as we will see in our sample code, it can be any data that uniquely identies the data
you are trying to access.
The above examples use two of PHP's built in stream wrappers. The second uses
the
http:// wrapper for accessing websites using the http protocol, and the rst
uses the file:// wrapper for accessing les on local storage. file:// is the default
scheme when one is not specied, so in this case simply passing the le's path
works ne.
PHP also allows developers to dene their own wrappers for schemes that PHP does
not handle out of the box, and the Drupal File API has been built to take advantage
of this. For instance, Drupal denes the
private scheme to allow Drupal developers
to interact with les in Drupal's private le system. Let's look at how this works by
creating a scheme to retrieve images from a remote website.
Working with Files and Images
[ 320 ]
Creating a stream wrapper
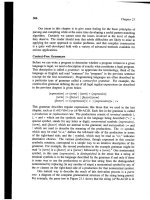
In this example we are going to create a stream wrapper to retrieve photos from
Twitpic, an image hosting service for Twitter users. Twitpic denes a REST API
to retrieve photos from the URL
/>id>
where size is either mini or thumb, and image-id is a unique identier you can
retrieve from a photo's URL, as seen in the following screenshot:
The full Twitpic API is dened at />So you can retrieve the thumbnail of this photo from the URL http://twitpic.
com/show/thumb/7nyr2
. This makes it very easy to refer to photos from Twitpic
in your code. However, if this URL format should change, then you could end up
with a lot of code to clean up. We can mitigate this by writing a stream wrapper
that encapsulates this logic in one place. This stream wrapper will use the format
twitpic://<image-id>/<size>.
There are two things that we need to do to create a custom stream wrapper in
Drupal. First, we need to create a custom class which implements our functionality,
then we need to register the class using
hook_stream_wrappers().
PHP denes a set of functions that stream wrappers can implement, as listed at
Drupal expanded
on that list and created an interface called
DrupalStreamWrapperInterface. Any
stream wrapper class used in Drupal must implement this interface or else it will
not register properly.
Chapter 11
[ 321 ]
In some cases you may not need some of this functionality provided by the interface.
For instance, in our example, we are only reading photos from Twitpic without
offering the ability to write data anywhere, so functions like
stream_write()
and
stream_mkdir() don't apply. In these cases we simply return FALSE.
For the full implementation details of
DrupalStreamWrapperInterface, refer to pal.
org/api/drupal/includes stream_wrappers.inc/7. You may
also want to refer to PHP's prototype stream wrapper class at http://
php.net/manual/en/streamwrapper.stream-open.php.
DrupalStreamWrapperInterface is quite extensive, with over 20 functions to be
dened by the implementing classes. Every stream wrapper should implement each
of PHP's le handling functions. As mentioned earlier, many of these simply return
FALSE. Others simply pass through to matching PHP functionality. (stream_eof()
simply calls and returns the results of feof($handle).)
Since the class is so large, you may want to put it into a separate le to improve
readability and maintainability of your code. You can do this by creating a new le
in your module's directory, and adding it to the
files[] array in your module.info
le as shown:
files[] = twitpicstreamwrapper.inc
In order to keep things simple, we will only discuss the most noteworthy parts of the
class shown in the following code. The full code listing can be downloaded from the
Packt website.
/**
* Twitpic Stream Wrapper
*
* This class provides a complete stream wrapper implementation.
*/
class TwitPicStreamWrapper implements DrupalStreamWrapperInterface {
/**
* Instance URI as scheme://target.
*/
protected $uri;
/**
* A generic resource handle.
*/
public $handle = NULL;
Working with Files and Images
[ 322 ]
/**
* Overrides getExternalUrl().
*
* Return the HTML URL of a Twitpic image.
*/
function getExternalUrl() {
// Get image_id and size from the URI into an array.
$target = file_uri_target($this->uri);
$options = array_combine(
array('image_id', 'size'),
explode('/', $target)
);
// If no size is specified, default to thumb.
if (empty($options['size'])) {
$options['size'] = 'thumb';
}
// Create the URL
$url = ' . $options['size'] . '/' .
$options['image_id'];
return $url;
}
/**
* Support for fopen(), file_get_contents(),etc.
*/
public function stream_open($uri, $mode, $options, &$opened_path) {
$allowed_modes = array('r', 'rb');
if (!in_array($mode, $allowed_modes)) {
return FALSE;
}
$this->uri = $uri;
$url = $this->getExternalUrl();
$this->handle = ($options & STREAM_REPORT_ERRORS) ? fopen($url,
$mode) : @fopen($url, $mode);
return (bool)$this->handle;
}
}
Chapter 11
[ 323 ]
A read-only stream wrapper like ours needs to perform two main functions. First, it
needs to translate a URI like
twitpic://y6vvv/thumb to a URL or path that can be
opened and read. Second, it needs to be able to open a le handle to this resource so
that developers can get the necessary data.
To manage the rst requirement, we have implemented
getExternalURL(). Any
class implementing
DrupalStreamWrapperInterface is required to override this
function with their own implementation. This code is pretty straightforward; we just
parse the object's URI, set some appropriate defaults, and return an appropriately
structured Twitpic API URL:
function getExternalUrl() {
// Get image_id and size from the URI into an array.
$target = file_uri_target($this->uri);
$options = array_combine(
array('image_id', 'size'),
explode('/', $target)
);
Note the use of file_uri_target() to retrieve the target information from the URI.
This is a helper function provided by the Drupal File API to make it easier to parse
stream wrapper URIs. You can also call file_uri_scheme() to retrieve the scheme
from a URI.
The
stream_open() function is similarly straightforward. This will get called
when a developer tries to open a resource handled by our stream wrapper using
PHP functions like fopen() or file_get_contents().This function takes four
arguments, and needs to return FALSE or a handle to our resource.
The rst argument is our wrapper's URI. The second argument,
$mode, indicates
whether the stream should be opened for reading and/or writing, as well as
other ags. Any mode can have b appended to it, to indicate that the le should be
opened in binary mode. (So where r indicates read-only, rb indicates read-only in
binary mode.)
$allowed_modes = array('r', 'rb');
if (!in_array($mode, $allowed_modes)) {
return FALSE;
}
We are implementing a read-only scheme, so if we get any mode other than r or rb
we return FALSE.
Working with Files and Images
[ 324 ]
The third argument is a bitmask of options dened by PHP. The one we're
dealing with here is
STREAM_REPORT_ERRORS, which indicates whether or not
PHP errors should be suppressed (for instance if a le is not found). The second is
STREAM_USE_PATH, which indicates whether PHP's include path should be checked
if a le is not found. This is not relevant to us, so we ignore it. If a le is found on
the include path, then the fourth argument
$opened_url should be set with the
le's real path.
Looking at the rest of the code for
stream_open(), we can see how this
comes together:
$this->uri = $uri;
$url = $this->getExternalUrl();
We save our URI into a protected property, and then call getExternalURL() to
translate it into an actual Twitpic URL that we can grab a photo from. We can then
fopen() this URL and set our internal handle.
if ($options && STREAM_REPORT_ERRORS) {
$this->handle = fopen($url, $mode);
}
else {
$this->handle = @fopen($url, $mode);
}
If STREAM_REPORT_ERRORS is not set, we suppress fopen() errors by prepending @,
which indicates to PHP that errors should not be reported. It is always good coding
practice to properly handle the options available to your stream functions if they are
applicable to your user case.
In addition to creating an implementation of
DrupalStreamWrapperInterface,
modules that dene their own stream wrappers must register them with Drupal's
stream wrapper registry by implementing hook_stream_wrappers(). This hook
returns an associative array dening some information about our stream wrapper,
as shown in the following code:
/**
* Implement hook_stream_wrappers().
*/
function twitpic_stream_wrappers() {{
return array(
'twitpic' => array(
'name' => 'Twitpic photos',
'class' => 'TwitpicStreamWrapper',
'description' => t('Photos from the Twitpic hosting service.')
Chapter 11
[ 325 ]
'type' => STREAM_WRAPPERS_READ_VISIBLE,
),
);
}
The array is keyed on our wrapper's scheme, in this case twitpic. Each scheme must
in turn dene another associative array with the following keys:
name: A short descriptive name for our wrapper.
class: The name of your PHP class that implements Drupal's stream
wrapper interface.
description: A sentence or two describing what this wrapper does.
type: A constant indicating what type of stream wrapper this is—readable
and/or writeable, local or remote, among other things. These are dened
in includes/stream_wrappers.inc and can be reviewed at: http://api.
drupal.org/api/drupal/includes stream_wrappers.inc/7
Note that in our example we have dened our wrapper as STREAM_WRAPPERS_
READ_VISIBLE
. This means it is read only, but visible in Drupal's UI. An example
of a wrapper that is not visible in the UI is Drupal's temp:// scheme, which is for
internal use only (it is set to STREAM_WRAPPER_HIDDEN).
This is all that is needed to implement your own custom stream wrapper. It may
seem like a lot, but once you understand what needs to be implemented, it is really
quite simple.
Now that your stream wrapper is nished, you will be able access photos from
Twitpic as easily as any other remote source using Drupal's File API. Now that we
can do this, let's look at some of the ways in which Drupal's Image API can be used
to modify and manage images.
In this example we have mostly focused on the Drupal-specic part
of writing stream wrappers. For more general documentation on
stream wrappers see />stream.php
•
•
•
•
Working with Files and Images
[ 326 ]
Images in Drupal
Just as the contributed Filefield module largely handled le handling in Drupal
6, two modules—Imagefield and Imagecache, largely handled image handling.
Imagefield was used for attaching images to nodes, and Imagecache was used
to create derivations of those images by resizing or cropping them. This was very
popular for things like creating square thumbnails in a grid for image galleries. The
functionality of both modules has been brought into core for Drupal 7, along with
an improved API for managing this functionality from code.
Image API
The Drupal 7 Image API provides a variety of functions to manipulate images. By
default, Drupal uses the GD image management library that is included with PHP.
However Drupal also offers the ability to switch to a different library if needed.
For instance, a contributed module could implement the ImageMagick library for
developers who needed support for additional image types such as TIFF, which GD
does not support.
Working with images is similar to working with les. You get an image object by
opening a local image using
image_load(), and then pass this object to one of the
image manipulation functions provided by Drupal. Once you've performed the
desired modications to your image, you save it using image_save().
Image API functions can only access les on your local le system.
You can still use stream wrapper schemes like public:// and
private:// to refer to les, but remote le systems will not
function properly.
The following Drupal functions are available for image manipulation:
image_crop(): Crop an image to specied dimensions.
image_desaturate(): Convert an image to grayscale.
image_resize(): Resize an image to specied dimensions. This can affect
the image's aspect ratio.
image_rotate(): Rotate an image to the specied number of degrees.
image_scale(): Resize an image to specied dimensions without affecting
the image's aspect ratio.
image_scale_and_crop(): Combine scale and crop in one operation.
•
•
•
•
•
•
Chapter 11
[ 327 ]
For full details of these and other functions available in the Image API
refer to />Let's take a look at how to we might integrate some of these functions with our
Twitpic module. First, let's make create a hook_menu() implementation that we
can use to trigger our code.
/**
* Implement hook_menu().
*/
function twitpic_menu() {
$items = array();
$items['twitpic/munge/%'] = array(
'title' => 'Munge a Twitpic image',
'description' => 'Displays a Twitpic image, munged in various ways
(cropped, rotated, etc).',
'page callback' => 'twitpic_image_munge',
'access arguments' => array('access_content'),
'type' => MENU_CALLBACK,
);
return $items;
}
When the URL twitpic/munge is requested, this hook will call the function
twitpic_image_munge(), which takes two arguments. The rst is the ID of
the Twitpic image we want to manipulate, and the second is an operation to be
performed. The allowed operations are rotate, scale, and desaturate. These
arguments will be automatically passed to twitpic_image_munge() when
appended to the URL, as discussed in Chapter 5, Building an Admin Interface.
Let's look at the callback function now:
/**
* Munge an image from Twitpic by applying a resize, crop or
* rotate to it.
*
* @param $id
* The image's ID, as extracted from its original URL.
* @param $operation
* An operation to perform on the image. Can be 'rotate',
* 'scale', or 'desaturate'.
Working with Files and Images
[ 328 ]
*/
function twitpic_image_munge($id, $operation = 'rotate') {
// If we get a disallowed operation, just return.
$operations = array('rotate', 'desaturate', 'scale');
if (!in_array($operation, $operations)) {
return;
}
$twitpic_uri = 'twitpic://' . $id . '/thumb';
$local_uri = 'public://' . $id . '.jpg';
$twitpic_image = file_get_contents($twitpic_uri);
$local_path = file_unmanaged_save_data($twitpic_image, $local_
uri, FILE_EXISTS_REPLACE);
$local_image = image_load($local_path);
switch ($operation) {
case 'scale':
image_scale($local_image, NULL, 50, FALSE);
break;
case 'desaturate':
image_desaturate($local_image);
break;
case 'rotate':
image_rotate($local_image, 45, 0x7D26CD);
break;
}
$local_uri = drupal_tempnam('public://', $id);
image_save($local_image, $local_uri);
return theme('image', array('path' => $local_uri));
}
The rst thing we do is to dene our allowed operations, and return if the
operation passed in doesn't match one of them. This allows us to fail gracefully in
that situation. Then we put together the Twitpic URI and grab a local copy of the
Twitpic image using file_get_contents() as we did earlier in the chapter. For the
purposes of this example, we just hardcode the size to thumb, but you could easily
add that as an additional argument, if you wish to do so.
Chapter 11
[ 329 ]
After this setup, we start getting into the meat of the function.
$local_path = file_unmanaged_save_data($twitpic_image, $local_uri,
FILE_EXISTS_REPLACE);
$local_image = image_load($local_path);
Since we are not associating this le with any other content within Drupal,
we have no need for it to be entered into the files table. Therefore, we use
file_unmanaged_save_data() as opposed to file_save_data(), in order
to prevent unnecessary records from being written.
Once the le is saved, we call
image_load() to get back $local_image, a Drupal
image object that we can pass on to the image manipulation functions. Like the le
object, an image object contains a variety of information about the image that has
been loaded, including its height and width, mime-type, and a handle to the image.
Now that we have an image object, we can mess with it using Drupal's API
functions. For the purposes of this experiment, we just hardcode some sample
manipulations in, to see the kind of things you can do.
switch ($operation) {
case 'desaturate':
image_desaturate($local_image);
break;
case 'scale':
image_scale($local_image, NULL, 50, FALSE);
break;
case 'rotate':
image_rotate($local_image, 45, 0x7D26CD);
break;
}
As you can see, we have three possible manipulations depending on the operation
passed in through the URL. All of these functions work directly on our image
object, $local_image which is passed by reference, so we don't need to worry
about return values.
The rst example,
image_desaturate(), is the simplest. It just converts the image
to grayscale, with no conguration arguments.
Working with Files and Images
[ 330 ]
The scale case uses image_scale(), which takes four arguments. The rst two are
the target height and width of the new image. Since
image_scale() preserves an
image's aspect ratio, you actually only need to provide one of these, and you can
leave the other one NULL, as we've done in the example. If you provide both values,
one of them may end up smaller than specied because of the calculations needed
to preserve the image's aspect ratio. The last argument species whether or not
image_scale() should upscale an image when you provide a height and/or width
that is larger than the original. This typically results in a lower quality pixilated
image, so we have specied FALSE.
Finally, the
rotate case uses image_rotate(), which takes two arguments. The rst
is the number of degrees the image should be rotated to, and the second species an
optional background color that should be used to ll in any space left behind by the
rotation. This color should be specied using the color's hex value. In this example,
we rotate 45 degrees and ll the background with purple.
Finally we need to save and display the resulting image:
$local_uri =drupal_tempnam('public://');
image_save($local_image, $local_uri);
return theme('image', array('path' => $local_uri));
}
We create a local lename using drupal_tempnam(), which just generates a random
lename we can use when given a path. It may seem tempting to use information like
the le's Twitpic ID or the operation to be performed in the le's name. However, in
this example, these items are passed in through the URL, and this cannot be trusted. It
is possible to create a security problem if you are not very careful using user-submitted
data in lenames, and thus it is best to avoid that, if at all possible.
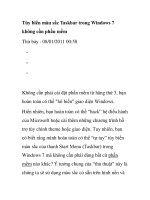
We can now pass this path, along with our modied image object, to
image_save(),
to save our image to the public lesystem. Once saved, it is a simple matter to call
the theme function for images, to generate the necessary HTML for our image to
be displayed. The following is an example of what you would see when requesting
twitpic/munge/7nyr2/rotate:
Chapter 11
[ 331 ]
This is all very cool, but sometimes it might be nice to pre-create some manipulations
for repeated use, or even a set of manipulations to be executed in order. This is what
Image Styles are for, and we'll look at that now.
Image Styles
Image Styles is the Drupal 7 core replacement for the popular Imagecache module,
which has been around since Drupal 5. Image Styles is a collection of manipulations
which can be saved as a group to be applied to images. Once saved, these styles can
be easily used as formatters for Image elds, or they can be used in code by calling
a theme function as we did above with our hand-crafted images.