250 html and web design secrets phần 6 ppt
Bạn đang xem bản rút gọn của tài liệu. Xem và tải ngay bản đầy đủ của tài liệu tại đây (2.55 MB, 44 trang )
P1: GIG
WY021-08 WY021-Holzshlag-v2 May 25, 2004 17:17
ࡗ
200 Part II: HTML, XHTML, CSS, and Accessibility
ࡗ ࡗࡗ
Listing 8-8: (continued)
padding: 10px;
}
</style>
</head>
<body>
<ul id="links">
<li><a href=" is the
publisher of this book.</span></a></li>
<li><a href=" is the
author of this book.</span></a></li>
<li><a href=" is the
technical editor of this book.</span></a></li>
</ul>
</body>
</html>
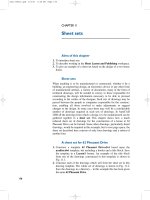
Figure 8-20 shows the results.
Figure 8-20: Text mouseovers using CSS work well in today’s modern Web
browsers.
tip
Add additional features to your links styles to enhance the look. Or, create an
awesome list-based navigation, as described earlier in this book, to create
horizontal as well as vertical navigation options with this technique.
P1: GIG
WY021-08 WY021-Holzshlag-v2 May 25, 2004 17:17
ࡗ
ࡗࡗࡗ
Chapter 8: Style Tips for Type and Design 201
ࡗࡗࡗ
Secret #143: Text and Image Mouseovers
You can use the same swapping technique using images. In this case, you’ll be
placing an image element directly into the anchor element and, instead of using
the display element to hide and then reveal the image, you’ll set the image to have
no height and width until the hover state, in which you’ll include width and height
(see Listing 8-9).
Listing 8-9: CSS mouseovers using images
<!DOCTYPE html PUBLIC "-//W3C//DTD XHTML 1.0 Transitional//EN"
" /><html xmlns=" /><head>
<title>Text Mouseovers</title>
<meta http-equiv="Content-Type" content="text/html; charset=iso-
8859-1" />
<style type="text/css">
#links {
position: absolute;
top: 100px;
left: 25px;
width: 150px;
height: 300px;
font: 14px Arial, sans-serif;
}
#links a {
display: block;
font-weight: bold;
text-decoration: none;
text-align: center;
padding: 10px;
color: #c00;
border: 1px solid black;
}
#links a:hover {
color: #c00;
background-color: #FFF;
}
#links a span {
display: none;
}
(continued)
P1: GIG
WY021-08 WY021-Holzshlag-v2 May 25, 2004 17:17
ࡗ
202 Part II: HTML, XHTML, CSS, and Accessibility
ࡗ ࡗࡗ
Listing 8-9: (continued)
#links a img {
height: 0;
width: 0;
border-width: 0;
}
#links a:hover img {
position: absolute;
top: 75px;
left: 255px;
height: 50px;
width: 190px;
}
li {
list-style-type: none;
padding: 10px;
}
</style>
</head>
<body>
<ul id="links">
<li><a href=" src="wiley.gif"
/></a></li>
<li><a href=" src="molly.gif"
/></a></li>
<li><a href=" />src="sideshow.jpg" /></a></li>
</ul>
</body>
</html>
Figure 8-21 shows the results.
ࡗࡗࡗ
Secret #144: Dynamic CSS Menus
This technique is an extension of the ideas in the CSS mouseover techniques, but
it applies the :hover pseudo class to other elements—this is actually a perfectly
acceptable use of :hover, but, unfortunately, IE doesn’t support it. As a result,
you’ll only have access to the primary links.
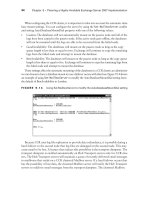
So, while you can use this effect to create great menus (see Figure 8-22) without
JavaScript, you can’t do it in IE (see Figure 8-23). However, because you’re simply
styling lists, they will tend to degrade to nested lists in most browsers without CSS
support (as shown in Figure 8-24).
P1: GIG
WY021-08 WY021-Holzshlag-v2 May 25, 2004 17:17
ࡗ
ࡗࡗࡗ
Chapter 8: Style Tips for Type and Design 203
Figure 8-21: CSS-based mouseovers with images.
Figure 8-22: A CSS-based dynamic menu in action.
note
For more information about the mouseover and menu techniques discussed
here, visit Eric Meyer’s CSS Edge, at www.meyerweb.com/eric/css/
edge/. A good explanation for hierarchical dynamic menus can be found at
www.pixy.cz/blogg/clanky/csshiermenu/.
P1: GIG
WY021-08 WY021-Holzshlag-v2 May 25, 2004 17:17
ࡗ
204 Part II: HTML, XHTML, CSS, and Accessibility
ࡗ ࡗࡗ
Figure 8-23: IE will only display the top links of the menu.
Figure 8-24: The same menu with styles completely disabled.
P1: GIG
WY021-08 WY021-Holzshlag-v2 May 25, 2004 17:17
ࡗ
ࡗࡗࡗ
Chapter 8: Style Tips for Type and Design 205
ࡗࡗࡗ
Secret #145: Rounded Tabs
Still another interesting effect offered up by Eric Meyer is a technique whereby
you can use images to create a rounded tab effect in horizontal list navigation.
Rounded tabs are a mainstay of navigation, providing a softer look than square
tabs tend to offer.
The beauty of this technique is that it is supported in all contemporary browsers
(see Figure 8-25).
Figure 8-25: Rounded tab technique from complex spiral consulting.
note
This technique is described in a white paper on Eric’s consulting Web site, at
www.complexspiral.com/publications/rounding
-
tabs/.
ࡗࡗࡗ
Secret #146: Sliding Doors
Another awesome effect for tabbed navigation is the “Sliding Doors’’ technique
created by CSS designer Douglas Bowman.
In this technique, you use two separate images, one small and one large, to create a
sliding effect. This allows you to create dynamic navigation that is far more friendly
to the resizing of fonts while maintaining the navigation design. Figure 8-26 shows
the concept at work.
P1: GIG
WY021-08 WY021-Holzshlag-v2 May 25, 2004 17:17
ࡗ
206 Part II: HTML, XHTML, CSS, and Accessibility
ࡗ ࡗࡗ
Figure 8-26: The Sliding Doors effect.
Figure 8-27: Horizontal rule fade effects.
note
To learn the Sliding Doors technique as well as some variants, see
www.alistapart.com/articles/slidingdoors/.
P1: GIG
WY021-08 WY021-Holzshlag-v2 May 25, 2004 17:17
ࡗ
ࡗࡗࡗ
Chapter 8: Style Tips for Type and Design 207
ࡗࡗࡗ
Secret #147: Cool Rules
I stumbled upon this technique while writing this chapter. Ethan Marcotte (this
book’s technical editor) and designer Dunstan Orchard worked together to find a
means to style horizontal rules using background graphics.
Through a bit of trial and error, Ethan and Dunstan came up with a means to create
cross-browser horizontal rule effects including subtle fades. Figure 8-27 shows the
results.
note
To read more about styling horizontal rules, see www.sidesh0w.com/
weblog/2004/03/17/sexily
-
styling
-
horizontal
-
rules.html.
Summary
Obviously, there are still concerns about the role CSS plays for certain audiences,
but CSS has truly emerged as more than just a band-aid solution for font and color
control. You can now enhance your pages in so many ways, and I really believe
we have only just begun to understand where CSS will take us in terms of visual
design.
If you’re excited about CSS after this chapter—and I hope you are—you’llbe happy
to know you get to spend another chapter with CSS, examining how CSS works
for layout, how to manage workarounds, deal with hacks, and write CSS for other
media types.
P1: GIG
WY021-08 WY021-Holzshlag-v2 May 25, 2004 17:17
208
P1: JYX
WY021-09 WY021-Holzshlag-v2 May 25, 2004 17:21
Chapter
9
Laying Out
Pages with CSS
ࡗࡗࡗࡗࡗࡗࡗࡗࡗࡗࡗࡗࡗࡗࡗࡗࡗࡗࡗࡗࡗࡗࡗࡗࡗࡗࡗ
Secrets in This Chapter
#148: Two-Column Layout, Positioned Left Navigation 211
#149: Float-Based Layout 212
#150: Nested Float 214
#151: Three-Column Layout 218
#152: Vertical Centering in CSS 220
#153: Ordering DIVs for Backward Compatibility 226
#154: @import for Graceful Degradation 227
#155: CSS Hacking Strategies 228
#156: The Box Model Hack 230
#157: The High Pass Filter 231
#158: The Mid Pass Filter 232
#159: IE 5.0 Windows Band Pass Filter 232
#160: IE 5.5 Windows Band Pass Filter 233
#161: Opera Hacks 233
#162: Understanding CSS Media Types 234
#163: Alternate Style Sheet for Print 235
#164: Alternate Style Sheet for Small-screen Media 236
#165: Alternate Style Sheet for Projection 237
#166: CSS Best Practices 237
ࡗࡗࡗࡗࡗࡗࡗࡗࡗࡗࡗࡗࡗࡗࡗࡗࡗࡗࡗࡗࡗࡗࡗࡗࡗࡗࡗ
P1: JYX
WY021-09 WY021-Holzshlag-v2 May 25, 2004 17:21
ࡗ
210 Part II: HTML, XHTML, CSS, and Accessibility
ࡗ ࡗࡗ
A
n intriguing development over the past several years has been the move
away from table-based design to transitional designs using lighter tables
and CSS, or out-and-out pure CSS layouts.
CSS ultimately frees the designer by providing much richer and more diverse
means of presenting and delivering designs to various media including, but not
limited to, the following:
ࡗ
Screen
ࡗ
ࡗ
Projection
ࡗ
Audio
ࡗ
Braille
ࡗ
Television
But page layout with CSS is in relatively early days yet, so designers need a lot of
additional information to work with their layouts effectively.
In this chapter, you’ll learn about some of the most practical means of laying out
pages. The examples are made simple so you can both begin using them quickly
and gain insight into the concepts being employed. Also included in this chapter
are numerous hacks to assist you in making sure your CSS layouts are as backward
compatible as possible.
CSS Layout Basics
Several terms and concepts are referred to throughout this chapter, so it’s good to
let you know them up front:
ࡗ
Box Model. Any HTML or XHTML element creates a box, and you can
use CSS to access and style aspects of that box, including margins,
padding, and borders. There are problems in Box Model
implementations—which is one of the reasons that CSS layouts require
so much attention to detail and often require hacks to ensure proper
cross-browser display.
ࡗ
Graceful degradation. This is the concept that when styles are removed
from a design, the actual text content is still available and easily
accessed, even if all the visual layout and design elements are gone.
ࡗ
Hack. A hack is any use of code outside its original, intended purpose.
ࡗ
Workaround. A workaround is typically an exploitation of a bug within a
browser allowing you to bypass support problems. Hacks and
workarounds are very similar, and there’s always dissent as to whether a
hack is a hack, a workaround, or a technique.
ࡗ
Positioning. In CSS, you can position element boxes either absolutely,
via specific coordinates, or relatively, in relation to other elements. You
can create complete layouts with absolute positioning, as is sometimes
called for.
note
The layouts in this chapter use positioning in conjunction with other methods
for maximum flexibility. Many visual editors, such as Dreamweaver, use the
term “layers” to refer to absolutely positioned CSS boxes.
P1: JYX
WY021-09 WY021-Holzshlag-v2 May 25, 2004 17:21
ࡗ
ࡗࡗࡗ
Chapter 9: Laying Out Pages with CSS 211
ࡗ
Floats. Floats in CSS are a means of floating something to the right or
left. Intended mostly to float images, floating has become one form of
laying out documents.
ࡗ
Filters. Filters in this context are a means of bypassing specific browsers
while targeting others. Filters are really hacks, but the terminology is
used to define specific hacks that are filtering specific browsers.
note
See Appendix C for helpful resources to assist you in your CSS education.
ࡗࡗࡗ
Secret #148: Two-Column Layout,
Positioned Left Navigation
Using absolute positioning, you can create a two-column layout with a left column
menu and right content area.
Listing 9-1 shows the CSS and markup used to create the layout.
Listing 9-1: Working with positioning in layout
<!DOCTYPE html PUBLIC "-//W3C//DTD XHTML 1.0 Strict//EN"
" /><html xmlns=" /><head>
<title>Layout Content Right, Navigation Left</title>
<style type="text/css">
#content {
margin:0px 50px 50px 175px;
padding:10px;
}
#nav {
position:absolute;
top:50px;
left:20px;
width:200px;
padding:10px;
line-height:17px;
}
</style>
</head>
<body>
<div id="content">
(continued)
P1: JYX
WY021-09 WY021-Holzshlag-v2 May 25, 2004 17:21
ࡗ
212 Part II: HTML, XHTML, CSS, and Accessibility
ࡗ ࡗࡗ
Listing 9-1: (continued)
<p>Lorem ipsum dolor sit amet, consectetuer adipiscing elit. In
vestibulum vestibulum elit. Ut porta. Duis vulputate bibendum
tellus. Vivamus dictum egestas mi. Cras justo. Vestibulum nisl
mauris, convallis a, vestibulum et, accumsan vel, lacus. Morbi
mattis viverra turpis. Pellentesque blandit quam in sapien. Proin
pellentesque, purus sit amet mollis sollicitudin, lacus leo
rhoncus enim, nec vestibulum urna tellus at magna. Ut
adipiscing.</p>
<p>Morbi ut sem non diam fringilla tincidunt. Maecenas nunc
tellus, adipiscing eget, tincidunt ut, venenatis ut, enim. Sed
posuere turpis at nisl. Sed at sem. Nullam sagittis tincidunt
magna. Duis tempus. Proin dui turpis, consequat quis, porttitor
ut, molestie vel, libero. Phasellus sodales venenatis urna.</p>
<p>Maecenas ipsum risus, fringilla rutrum, porta id, congue id,
leo. Fusce augue nulla, vestibulum at, euismod ut, ultrices in,
felis. Cras vitae pede ac mi lobortis fermentum. Phasellus
viverra. Ut ultrices, neque ac congue varius, justo quam elementum
mi, at nonummy urna elit quis augue. Praesent feugiat pede a
turpis. Duis libero diam, volutpat id, dictum vitae, aliquet sed,
lorem. </p>
</div>
<div id="nav">
<ul>
<li><a href="home.html">Home</a></li>
<li><a href="books.html">Books</a></li>
<li><a href="articles.html">Articles</a></li>
<li><a href="events.html">Events</a></li>
<li><a href="courses.html">Courses</a></li>
<li><a href="consultation.html">Consultation</a></li>
<li><a href="about.html">About Molly</a></li>
<li><a href="fun.html">Fun Stuff</a></li>
</ul>
</div>
</body>
</html>
Figure 9-1 shows the results.
ࡗࡗࡗ
Secret #149: Float-Based Layout
While not primarily intended for laying out documents, the use of the float prop-
erty in CSS does allow you to create a number of convenient layouts with minimum
fuss.
Floating layouts are common because they are functional, flexible, and easy to
work with. Floating layouts use the float property and a value of left or right
to determine which element gets floated.
P1: JYX
WY021-09 WY021-Holzshlag-v2 May 25, 2004 17:21
ࡗ
ࡗࡗࡗ
Chapter 9: Laying Out Pages with CSS 213
Figure 9-1: A CSS layout using positioning.
Listing 9-2 shows how.
Listing 9-2: Float-based layout, floating left content
<!DOCTYPE html PUBLIC "-//W3C//DTD XHTML 1.0 Strict//EN"
" /><html xmlns=" /><head>
<title>Layout Float Left</title>
<style type="text/css">
#content {
float:left;
width:70%;
background-color:#fff;
padding: 15px;
}
#nav {
margin-top: 15px;
}
</style>
</head>
(continued)
P1: JYX
WY021-09 WY021-Holzshlag-v2 May 25, 2004 17:21
ࡗ
214 Part II: HTML, XHTML, CSS, and Accessibility
ࡗ ࡗࡗ
Listing 9-2: (continued)
<body>
<div id="content">
<p>Lorem ipsum dolor sit amet, consectetuer adipiscing elit. In
vestibulum vestibulum elit. Ut porta. Duis vulputate bibendum
tellus. Vivamus dictum egestas mi. Cras justo. Vestibulum nisl
mauris, convallis a, vestibulum et, accumsan vel, lacus. Morbi
mattis viverra turpis. Pellentesque blandit quam in sapien. Proin
pellentesque, purus sit amet mollis sollicitudin, lacus leo
rhoncus enim, nec vestibulum urna tellus at magna. Ut
adipiscing.</p>
<p>Morbi ut sem non diam fringilla tincidunt. Maecenas nunc
tellus, adipiscing eget, tincidunt ut, venenatis ut, enim. Sed
posuere turpis at nisl. Sed at sem. Nullam sagittis tincidunt
magna. Duis tempus. Proin dui turpis, consequat quis, porttitor
ut, molestie vel, libero. Phasellus sodales venenatis urna.</p>
<p>Maecenas ipsum risus, fringilla rutrum, porta id, congue id,
leo. Fusce augue nulla, vestibulum at, euismod ut, ultrices in,
felis. Cras vitae pede ac mi lobortis fermentum. Phasellus
viverra. Ut ultrices, neque ac congue varius, justo quam elementum
mi, at nonummy urna elit quis augue. Praesent feugiat pede a
turpis. Duis libero diam, volutpat id, dictum vitae, aliquet sed,
lorem. </p>
</div>
<div id="nav">
<ul>
<li><a href="home.html">Home</a></li>
<li><a href="books.html">Books</a></li>
<li><a href="articles.html">Articles</a></li>
<li><a href="events.html">Events</a></li>
<li><a href="courses.html">Courses</a></li>
<li><a href="consultation.html">Consultation</a></li>
<li><a href="about.html">About Molly</a></li>
<li><a href="fun.html">Fun Stuff</a></li>
</ul>
</div>
</body>
</html>
Figure 9-2 shows the results.
ࡗࡗࡗ
Secret #150: Nested Float
The nested float layout in Listing 9-3 shows how you can nest div elements to get
more interesting layouts. Nesting div elements can be an important part of
P1: JYX
WY021-09 WY021-Holzshlag-v2 May 25, 2004 17:21
ࡗ
ࡗࡗࡗ
Chapter 9: Laying Out Pages with CSS 215
Figure 9-2: A CSS layout using float.
complex layout designs. This simple example will help give you a taste of how it
works.
Listing 9-3: Nested Float
<!DOCTYPE html PUBLIC "-//W3C//DTD XHTML 1.0 Strict//EN"
" /><html xmlns=" /><head>
<title>Nested DIV Example</title>
<style type="text/css">
#content {
border: 1px solid #000;
}
#content #nav {
border-left: 1px solid #000;
border-bottom: 1px solid #000;
float: right;
width: 250px;
background: #ccc;
margin: 0px 0px 10px 10px;
}
(continued)
P1: JYX
WY021-09 WY021-Holzshlag-v2 May 25, 2004 17:21
ࡗ
216 Part II: HTML, XHTML, CSS, and Accessibility
ࡗ ࡗࡗ
Listing 9-3: (continued)
</style>
</head>
<body>
<div id="content">
<div id="nav">
<ul>
<li><a href="home.html">Home</a></li>
<li><a href="books.html">Books</a></li>
<li><a href="articles.html">Articles</a></li>
<li><a href="events.html">Events</a></li>
<li><a href="courses.html">Courses</a></li>
<li><a href="consultation.html">Consultation</a></li>
<li><a href="about.html">About Molly</a></li>
<li><a href="fun.html">Fun Stuff</a></li>
</ul>
</div>
<p>Lorem ipsum dolor sit amet, consectetuer adipiscing elit. In
vestibulum vestibulum elit. Ut porta. Duis vulputate bibendum
tellus. Vivamus dictum egestas mi. Cras justo. Vestibulum nisl
mauris, convallis a, vestibulum et, accumsan vel, lacus. Morbi
mattis viverra turpis. Pellentesque blandit quam in sapien. Proin
pellentesque, purus sit amet mollis sollicitudin, lacus leo
rhoncus enim, nec vestibulum urna tellus at magna. Ut
adipiscing.</p>
<p>Morbi ut sem non diam fringilla tincidunt. Maecenas nunc
tellus, adipiscing eget, tincidunt ut, venenatis ut, enim. Sed
posuere turpis at nisl. Sed at sem. Nullam sagittis tincidunt
magna. Duis tempus. Proin dui turpis, consequat quis, porttitor
ut, molestie vel, libero. Phasellus sodales venenatis urna.</p>
<p>Maecenas ipsum risus, fringilla rutrum, porta id, congue id,
leo. Fusce augue nulla, vestibulum at, euismod ut, ultrices in,
felis. Cras vitae pede ac mi lobortis fermentum. Phasellus
viverra. Ut ultrices, neque ac congue varius, justo quam elementum
mi, at nonummy urna elit quis augue. Praesent feugiat pede a
turpis. Duis libero diam, volutpat id, dictum vitae, aliquet sed,
lorem.</p>
</div>
</body>
</html>
You can see the results in Figure 9-3. Figure 9-4 shows a styled version of this
design scheme in use.
Reversing the layout is simple, too. All you need to do is modify the float from right
to left and change the borders, as follows:
P1: JYX
WY021-09 WY021-Holzshlag-v2 May 25, 2004 17:21
ࡗ
ࡗࡗࡗ
Chapter 9: Laying Out Pages with CSS 217
Figure 9-3: The basic layout styles for a nested float.
Figure 9-4: A styled example of a nested float from Owen Brigg’s CSS panic guide.
P1: JYX
WY021-09 WY021-Holzshlag-v2 May 25, 2004 17:21
ࡗ
218 Part II: HTML, XHTML, CSS, and Accessibility
ࡗ ࡗࡗ
#content #nav {
border-right: 1px solid #000;
border-bottom: 1px solid #000;
float: left;
width: 250px;
background: #ccc;
margin: 0px 0px 10px 0px;
}
Figure 9-5 shows the reverse.
Figure 9-5: Reversing the float.
Add a little style to the page and you’ve got an easy, useful float-based layout.
ࡗࡗࡗ
Secret #151: Three-Column Layout
This is a very popular layout, used frequently to emulate the three-column layouts
to which we’re accustomed in table-based designs. In this case, each of the flanking
columns is a fixed width, and the center content column will adjust dynamically
(see Listing 9-4).
Listing 9-4: Dynamic three-column layout
<!DOCTYPE html PUBLIC "-//W3C//DTD XHTML 1.0 Strict//EN"
" />P1: JYX
WY021-09 WY021-Holzshlag-v2 May 25, 2004 17:21
ࡗ
ࡗࡗࡗ
Chapter 9: Laying Out Pages with CSS 219
<html xmlns=" /><head>
<title>Three-column Layout</title>
<style type="text/css">
#content {
padding: 10px;
width: auto;
position: relative;
margin: 0px 210px 20px 170px;
}
#nav {
padding: 10px;
width: 200px;
position: absolute;
left: 10px;
top: 75px;
}
#right {
padding: 10px;
text-align: right;
width: 150px;
position: absolute;
right: 20px;
top: 50px;
}
</style>
</head>
<body>
<div id="content">
<p>Lorem ipsum dolor sit amet, consectetuer adipiscing elit. In
vestibulum vestibulum elit. Ut porta. Duis vulputate bibendum
tellus. Vivamus dictum egestas mi. Cras justo. Vestibulum nisl
mauris, convallis a, vestibulum et, accumsan vel, lacus. Morbi
mattis viverra turpis. Pellentesque blandit quam in sapien. Proin
pellentesque, purus sit amet mollis sollicitudin, lacus leo
rhoncus enim, nec vestibulum urna tellus at magna. Ut
adipiscing.</p>
<p>Morbi ut sem non diam fringilla tincidunt. Maecenas nunc
tellus, adipiscing eget, tincidunt ut, venenatis ut, enim. Sed
posuere turpis at nisl. Sed at sem. Nullam sagittis tincidunt
magna. Duis tempus. Proin dui turpis, consequat quis, porttitor
ut, molestie vel, libero. Phasellus sodales venenatis urna.</p>
(continued)
P1: JYX
WY021-09 WY021-Holzshlag-v2 May 25, 2004 17:21
ࡗ
220 Part II: HTML, XHTML, CSS, and Accessibility
ࡗ ࡗࡗ
Listing 9-4: (continued)
<p>Maecenas ipsum risus, fringilla rutrum, porta id, congue id,
leo. Fusce augue nulla, vestibulum at, euismod ut, ultrices in,
felis. Cras vitae pede ac mi lobortis fermentum. Phasellus
viverra. Ut ultrices, neque ac congue varius, justo quam elementum
mi, at nonummy urna elit quis augue. Praesent feugiat pede a
turpis. Duis libero diam, volutpat id, dictum vitae, aliquet sed,
lorem.</p>
</div>
<div id="right">
<p><em>Maecenas ipsum risus, fringilla rutrum, porta id, congue
id, leo. Fusce augue nulla, vestibulum at, euismod ut, ultrices
in, felis.</em></p>
</div>
<div id="nav">
<ul>
<li><a href="home.html">Home</a></li>
<li><a href="books.html">Books</a></li>
<li><a href="articles.html">Articles</a></li>
<li><a href="events.html">Events</a></li>
<li><a href="courses.html">Courses</a></li>
<li><a href="consultation.html">Consultation</a></li>
<li><a href="about.html">About Molly</a></li>
<li><a href="fun.html">Fun Stuff</a></li>
</ul>
</div>
</body>
</html>
Figure 9-6 shows the results.
Add a little CSS pizzazz, and you end up with a fully styled site, such as that shown
in Figure 9-7.
ࡗࡗࡗ
Secret #152: Vertical Centering in CSS
Recently, designers have got back to fixing their CSS designs. In other words,
instead of having the design flow dynamically to the browser size, the design is
fixed to a certain pixel width (see Figure 9-8).
note
While some designers prefer fixed designs, other camps strongly advocate
“fluid” or “liquid” designs—those designs that flow to fill the browser window.
Advantages of liquid design include that no browser space is wasted, and no
matter how you size your browser, the design will flow to fit it. Liquid design
means less control of aspects of the overall design, and managing text line
P1: JYX
WY021-09 WY021-Holzshlag-v2 May 25, 2004 17:21
ࡗ
ࡗࡗࡗ
Chapter 9: Laying Out Pages with CSS 221
Figure 9-6: The basic three-column layout.
Figure 9-7: Molly.Com uses this three-column layout.
P1: JYX
WY021-09 WY021-Holzshlag-v2 May 25, 2004 17:21
ࡗ
222 Part II: HTML, XHTML, CSS, and Accessibility
ࡗ ࡗࡗ
lengths in a fluid design is difficult, if not impossible, without sacrificing some
other aspect of the design. These issues most likely are responsible for the
move back from liquid design to controlled, centered designs, as we are
beginning to see with sites such as A List Apart, www.alistapart.com/,
and many of the CSS Zen Garden designs, www.csszengarden.com/.
Figure 9-8: Centered designs in CSS are making a comeback.
While CSS offers a logical means to center designs, a problem exists with browser
implementation. It’s more than a bit frustrating, because with table-based layouts
this was very easy, but the same difficulties with accessibility and limited design
options exist when using tables. You’d simply use the align="center" attribute
to center the containing table, and the entire layout would then be centered.
So how do you achieve the same effect in CSS? You have to employ a workaround
to support multiple browsers.
The correct way to horizontally center a box is to set the left and right margins
of a given box to a width of auto. This is going to be true of any box within your
design, not just the containing box you’re using to center the design itself.
#mainbox {
margin-left: auto;
margin-right: auto;
}
By doing this, any box will center neatly, and in complying browsers, it does (see
Figure 9-9).
However, because some browsers don’t implement the correct CSS to manage
your containing boxes, you have to look at workarounds or hacks.
The most common hack in use is to apply the text-align property to the
containing box, setting the alignment to a value of center. This technique will
P1: JYX
WY021-09 WY021-Holzshlag-v2 May 25, 2004 17:21
ࡗ
ࡗࡗࡗ
Chapter 9: Laying Out Pages with CSS 223
Figure 9-9: Centering a box using the correct method works in complying browsers
such as Mozilla.
work in a wider range of browsers. The workaround is controversial for a couple of
reasons:
ࡗ
Yo u’re applying a property meant for text, not for positioning, so you’re
not using the language correctly, which is why this is considered a hack.
ࡗ
You have to write extra CSS to override the text-align: center
property and value, because you’re going to use the text-align:
center property on the body element. So, any text within the body is
now going to be aligned to the center, unless you override the
text-align property elsewhere.
Listing 9-5 shows the CSS and markup for the centering hack.
Listing 9-5: Centering hack
<!DOCTYPE html PUBLIC "-//W3C//DTD XHTML 1.0 Strict//EN"
" /><html xmlns=" /><head>
<title>Centering Hack</title>
<style type="text/css">
body {
(continued)
P1: JYX
WY021-09 WY021-Holzshlag-v2 May 25, 2004 17:21
ࡗ
224 Part II: HTML, XHTML, CSS, and Accessibility
ࡗ ࡗࡗ
Listing 9-5: (continued)
text-align: center;
}
#content {
width: 400px;
height: 400px;
text-align: left;
}
</style>
</head>
<body>
<div id="content">
<p>Lorem ipsum dolor sit amet, consectetuer adipiscing elit. In
vestibulum vestibulum elit. Ut porta. Duis vulputate bibendum
tellus. Vivamus dictum egestas mi. Cras justo. Vestibulum nisl
mauris, convallis a, vestibulum et, accumsan vel, lacus. Morbi
mattis viverra turpis. Pellentesque blandit quam in sapien. Proin
pellentesque, purus sit amet mollis sollicitudin, lacus leo
rhoncus enim, nec vestibulum urna tellus at magna. Ut
adipiscing.</p>
<p>Morbi ut sem non diam fringilla tincidunt. Maecenas nunc
tellus, adipiscing eget, tincidunt ut, venenatis ut, enim. Sed
posuere turpis at nisl. Sed at sem. Nullam sagittis tincidunt
magna. Duis tempus. Proin dui turpis, consequat quis, porttitor
ut, molestie vel, libero. Phasellus sodales venenatis urna.</p>
<p>Maecenas ipsum risus, fringilla rutrum, porta id, congue id,
leo. Fusce augue nulla, vestibulum at, euismod ut, ultrices in,
felis. Cras vitae pede ac mi lobortis fermentum. Phasellus
viverra. Ut ultrices, neque ac congue varius, justo quam elementum
mi, at nonummy urna elit quis augue. Praesent feugiat pede a
turpis. Duis libero diam, volutpat id, dictum vitae, aliquet sed,
lorem.</p>
</div>
</body>
</html>
Your box is now centered. Or is it? In Internet Explorer (IE) 6 and Netscape 4.x it
is (even though the height and border styles aren’t supported). But in Mozilla and
Opera, the box isn’t centered (see Figure 9-10).
note
The fact that the box does not center properly using this method in Mozilla and
Opera is not a fault of those browsers. They’re actually rendering the CSS prop-
erly. You’re using a hack, which more sophisticated browsers tend not to like.