beginning drupal 7 phần 8 potx
Bạn đang xem bản rút gọn của tài liệu. Xem và tải ngay bản đầy đủ của tài liệu tại đây (993.97 KB, 33 trang )
CHAPTER 13 ■ THEMING
213
The next step is to update the definition for the block title. I will add a background color to the title
and change the font color for the title. In the blocks.css file, search for the line that defines the CSS for
.sidebar .block h2 and add the attributes shown here:
.sidebar .block h2 {
background-color: #9CD88C;
padding-left: 10px;
padding-top: 5px;
padding-bottom: 5px;
color: #287314;
}
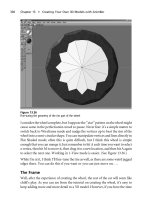
After making the changes, save the blocks.css file and refresh your browser. The changes made to
the CSS should result in the themed blocks looking like Figure 13-10—significantly better than the plain
look of the default definition for blocks.
Figure 13-10. Themed block
Changing Sitename and Logo
Most Drupal themes adhere to a standard approach for incorporating the logo and the name of the site.
To change the logo of the site from the default Genesis logo, click on the Appearance link in the top
menu. On the Appearance page, click on the Settings link for your Genesis subtheme. On the Settings
page, uncheck the use default logo checkbox. As soon as you uncheck the box, Drupal displays a text
field where you can enter the path to the image you wish to use for your logo or have the option to
upload a file. Either approach results in a new logo being displayed in place of the default Genesis logo.
Be mindful of the dimensions of the logo based on the dimensions of your banner area.
You can also change the site’s name by clicking on the Configuration link on the top menu and on
the Configuration page clicking on the Site information link. On the Site information page you can
change the value in the Site name text field.
A Tool for Helping You Theme Your Site
There is a tool that I use on a daily basis that is indispensible when it comes to theming: Firefox’s Firebug
plug-in (which is now available for Google Chrome). Firebug provides all of the information you need to
identify the right CSS elements to create or modify in order to achieve the look of any item on any page.
Firebug provides a simple-to-use mechanism for identifying the CSS ID or class that is assigned to a
CHAPTER 13 ■ THEMING
214
specific element by simply right-clicking on that element and choosing the inspect element item from
the menu. For example, I right-clicked on the site title in the header area and selected the inspect
element option. As shown in Figure 13-11, Firebug displayed the HTML used by the theme to render the
title and the CSS used by the browser to render that element. Firebug even goes so far as to display the
name of the CSS file and the line number within that file where the attributes are defined. It doesn’t get
much easier than that!
Figure 13-11. Using Firebug to identify a CSS ID
Summary
You’re now ready to begin creating your own custom themes by either modifying an existing theme,
creating a derivative theme from a starter theme like Genesis, or creating a new theme from scratch.
There are a number of resources on Drupal.org to help guide you through other more advanced theming
topics. A good place to start is Drupal.org/theme-guide and the forums (Drupal.org/forum).
You now have your site themed and ready for its public unveiling, but before you unleash the hordes
of people chomping at the bit to see your site, let’s make sure you’re ready to administer it.
C H A P T E R 14
■ ■ ■
215
Administering Your Drupal Site
If you have followed along in the previous chapters, you now have enough knowledge to build a Drupal
7-based website. Building your website and releasing it to the world is an exciting experience, and one
that often brings with it great pride a joy. Whether your site has two or three pages or hundreds,
deploying a website and seeing traffic on it is a rewarding and enriching experience. Deploying your
website is just a step along the journey; it is by no means the end. As the proud owner of a website, you
must monitor it, nurture it, expand it, and support it, all of which are involved in administering your
website.
Administering a Drupal website can be a relatively simple task, depending on the size of your site,
the number of users, the number of users who have the ability to author content, and the number of
modules that you’ve installed. Over the past several years, I’ve created a number of personal “pet”
project websites that are up and running, and I rarely do anything other than go out and glimpse at the
site logs. There are other sites that I have built that require more attention, and the amount of attention
really depends on the criteria I just mentioned.
Typical site administration tasks that you will want to consider performing on a periodic basis
include:
• Backing up the site so you can restore it should anything disastrous happen.
• Checking the logs to see if there are any errors that you need to address.
• Checking to see if there are any security patches to modules you have installed.
• Checking to see if there are any module upgrades that make sense to deploy on
your site.
• Checking to see if there were any Drupal core updates that you need to deploy.
• Approving requests for new user accounts.
In this chapter, I’ll describe in detail each of these administrative tasks.
Backing Up Your Site
If you don’t do anything else on this list of administrative tasks, at least make sure that your data is safe
and recoverable in the case of an unexpected disaster. It’s easy to put off backing up your site, as it’s
likely that you’ll rarely need to go back and restore your site from a backup. But speaking from
experience, the first time you need to restore your site and you don’t have a backup is the last time you
CHAPTER 14 ■ ADMINISTERING YOUR DRUPAL SITE
216
won’t have backups in place from the start. Take it from the voice of experience: the few minutes it takes
to set up backups are well spent.
There are two paths to take to address backups on your new site: you can use utilities that your
hosting provider gives to you to backup your database and directories, or you can use a Drupal module
called “Backup and Migrate” to automatically back up your site on a defined schedule, and, just as
important, to easily restore your site from a previous backup. Both approaches work equally as well, and
the “Backup and Migrate” module is a perfect solution for those who are less inclined to use operating-
system-level commands to schedule backups and to create the scripts necessary to back up your Drupal
site.
You will need to install the module, because it is not part of Drupal core. You can find details for this
module at www.drupal.org/project/backup_migrate. To install the module, follow the steps covered in
Chapter 8.
To access the “Backup and Migrate” configuration page, go to
http://localhost/admin/content/backup_migrate (note: replace “localhost” with the appropriate
domain name if your site is not running on your local PC). After clicking Enter, you will see the
configuration panel for the “Backup and Migrate” module.
The first step in configuring the “Backup and Migrate” module is to define where backup files will be
stored on the server. Click on the Destinations tab at the top of the page, revealing the page shown in
Figure 14-1. There are two settings for where files will be stored: one for manual backups, where the site
administrator clicks on a “Backup now” link to perform the backup, and the automatic backup. I’ll
explain how to set up automatic backups in a minute. You can also set the database that you want
backed up. By default, the module automatically detects the database that your site is running on and
sets the parameter. You may choose to override the default directories and database that are set during
the process of installing the module, or you may, as I do, leave the defaults.
Figure 14-1. Setting the destination directories for backups
The next step is to set the schedule for automatic backups. To do so, click on the Schedules tab at
the top of the page, revealing the configuration options shown in Figure 14-2. If you haven’t set a
schedule previously, the page will simply display an “Add schedule” link. Click on that link to view the
CHAPTER 14 ■ ADMINISTERING YOUR DRUPAL SITE
217
parameters that you can set for scheduling backups. First, enter a name for the Schedule. We are going
to set the backups to be performed on a daily basis, so enter “Daily backups” as the name. Next, set the
“Backup every” field to 1 Day(s). Finally, set the “Number of backup files to keep” to 14, meaning Drupal
will retain 14 days’ of backups before deleting the oldest backup file and storing the newest file. This
helps protect you from consuming massive amounts of disk space for old backup files. Set this value
carefully. You may have legal requirements in your industry that require that you keep backup files for a
certain number of days, weeks, months, or years. Finally, click the “Save schedule” button.
Figure 14-2. Setting up the automatic backup schedule
Drupal will now automatically back up the site on a daily basis. The last step is to perform a manual
backup of your site. To do so, click on the Backup tab (see Figure 14-3). On the resulting page, select the
Default Database as the database to back up, set the “to” option to the Manual Backups Directory (you
can also select Download, which will download the backup to your local computer), and set the “using”
option to Default Settings. Finally, click the “Backup now” button.
Figure 14-3. Manually backing up your site
CHAPTER 14 ■ ADMINISTERING YOUR DRUPAL SITE
218
When the backup is completed, Drupal will redisplay the screen with information including the
name of the backup file that was generated, the directory where it was stored, and how long the backup
took to execute.
Restoring a Backup
If, for some reason, you needed to restore your system to a previously backed up state, you can return to
the “Backup and Migrate” administration page (http://localhost/admin/content/backup_migrate) and
select the backup file to restore. Click on the Destinations tab, revealing the list of destination directories
where backups are stored. See Figure 14-4.
Figure 14-4. Listing the backup directories where backup files are stored
Because we backed up our system using the manual backup process, click on the “List files” link for
“Manual Backups Directory,” revealing the page shown in Figure 14-5.
Figure 14-5. The manual backups directory and the file to restore
In this example, we could restore our system to the state it was in at the time we did the manual
backup by simply clicking on the Restore link for that backup file. If you have scheduled backups
enabled and have not manually backed up your system, the process described would be identical, with
the exception of selecting the “List files” link for the scheduled backups directory. Clicking that link
would reveal a list of backup files that were automatically created based on the schedule that you set in
the previous steps.
Backing Up the File System
The “Backup and Migrate” module only backs up the contents of your Drupal database. The Drupal
installation itself, meaning Drupal core, all of the contributed modules you have installed, all of the
CHAPTER 14 ■ ADMINISTERING YOUR DRUPAL SITE
219
themes you have installed, any customizations you have made to modules, and any files that users have
uploaded will not be saved by the “Backup and Migrate” module.
There are several options for backing up the file system, starting with simply copying the entire
Drupal directory to another destination (for example, downloading the site to your local PC if you are
running on a hosted server), copying the Drupal directory to a USB/CD/DVD if you are running on your
local desktop/laptop, or, in the case of a hosted environment, working with your provider to ensure that
your Drupal directory is being backed up often enough to ensure minimal disruption in the case of a
disaster. Whichever scenario you choose, you should back up the file system on a frequent basis if users
are uploading and attaching files to content (even daily, just as you do with your “Backup and Migrate”
schedule), and in a case where you do not allow file attachments and uploads, it is still a good idea to
back up your file system on at least a weekly basis (due to module updates).
Checking the Log Files
With backups in place, the next administrative task is to periodically check the log files to see if there are
errors in the system that need to be corrected (for example, “page not found” errors). To view the log
files, click on the Reports link in the top menu, revealing a list of reports that are available to help you
administer your new Drupal site. See Figure 14-6.
Figure 14-6. List of standard reports
CHAPTER 14 ■ ADMINISTERING YOUR DRUPAL SITE
220
There are three reports that I will focus on in this chapter (you can easily view the other reports by
simply clicking on the links). I will focus on the Recent log entries, Top ‘page not found’ errors, and the
Status report (I’ll cover available updates later in this chapter).
Recent Log Entries
Drupal provides a rich framework for recording events in the system that may be of interest to someone
who is administering a Drupal site. Module developers and Drupal core maintainers leverage this
capability to log any events that they feel are important enough to warrant an entry in the log file. If you
click on the “Recent log entries” link, you will see a report that looks similar to Figure 14-7.
Figure 14-7. Recent log entries
Your entries will be different from those shown in Figure 14-7, because the actions you have
performed will have been different. This list of entries includes both errors and successful events (for
example, a user logging in to the system results in a log entry that shows the date and time of when they
logged in). Simply click on the message to see whatever details the module or Drupal core developer
deemed appropriate to share with a site administrator. In Figure 14-7, we see that there are a number of
“page not found” errors in for the “Backup and Migrate” module. To address these errors, you may have
to download a newer version of the “Backup and Migrate” module, or you may need to visit that
module’s homepage on Drupal.org to see if there is a workaround. Discussing all of the errors and how
to resolve them is beyond the scope of this chapter, because of the breadth of errors that can occur on a
Drupal site. The best resource for resolving errors that you may see are the Drupal.org website and the
specific module’s issue queue that is generating the errors. If you do not find answers on the module’s
homepage, the next step is to consult the forums on the Drupal.org website. It is highly unlikely that
CHAPTER 14 ■ ADMINISTERING YOUR DRUPAL SITE
221
you’re the first one to encounter the error, and if you are, posting a request for help in the forum will
typically result in a rapid response from someone who knows how to solve the issue.
“Page Not Found” Errors
Returning to the Reports main page and clicking on the “Top page not found” errors reveals a list of
“404” errors, or “page not found,” errors. See Figure 14-8.
Figure 14-8. “Page not found” report
It is important to check this report periodically to see if site visitors are clicking on links that are
“broken.” In Figure 14-8 you can see that the “Backup and Migrate” module is looking for two files that
do not exist in the proper directories, and in the case of the third item, someone attempted to navigate to
admin/backup_migrate, which is a destination that does not exist on the site. Resolving the errors listed
on this page may take some investigation and analysis on your part. You’ll want to focus on errors that
have a high count, as they are likely impacting site visitors (in this case, there is a bug in the “Backup and
CHAPTER 14 ■ ADMINISTERING YOUR DRUPAL SITE
222
Migrate” module, which isn’t a feature that is visible to site visitors, so resolving that issue may be a
lower priority).
Status Report
A general “health” report for your site can be accessed on the list of Reports page by clicking on the
Status report link. Clicking this link reveals a page that highlights key areas of your Drupal installation
that are of relatively high importance. Items that are checked when you run this report include whether
critical configuration files are protected from unauthorized changes and whether the database is up to
date. In Drupal 7, with the revised approach for installing modules, it’s unlikely that the database will
become out of date. If it is reported as out of date, run the http://localhost/update.php script to
synchronize the database with the current state of your modules.
You are most likely to see issues regarding the status of Drupal core, contributed modules, and
themes. If there is an updated version of Drupal or a contributed module or theme has been updated on
Drupal.org, these items will appear as yellow. See Figure 13-9.
Figure 14-9. Status report
CHAPTER 14 ■ ADMINISTERING YOUR DRUPAL SITE
223
Checking for Updates
If the status report shows that there are module or theme updates, you’ll want to check to see which
types of updates are available. There are three general categories of updates that you will want to pay
attention to as you develop your new site and once the site is in production:
• Security updates
• Module updates
• Drupal core updates
In most cases you will want to address security updates as soon as possible, while module updates
and Drupal core updates may be something that you address on a monthly, quarterly, or even less
frequent basis. Updates typically address bugs that were found in modules and/or new features that
were added to the module or Drupal core. As the site administrator, you will need to determine, by
looking at the release notes for the each update, whether the update is something you should do
immediately (for example, fixing a bug that you have struggled with on your site) or can delay.
To check to see if there are any security patches or updates, click on the “Out of date” link on the
status report next to the modules and themes item. The “Out of date” report lists all modules and themes
that you have installed on your site that have available updates on Drupal.org. It’s a good idea to visit
each module’s page on Drupal.org to see if there are any critical bugs reported for the new version of the
module before you decided to download and install it. I have experienced cases where a new version of a
contributed module that I have installed on one of my sites introduced new bugs that I didn’t have on
the site prior to the upgrade. It’s a good idea to check before upgrading.
To install the updates for a theme or module, simply check the box for that module or theme and
then click on “Download the updates.” Drupal will automatically download, install, and enable the
updates. See Figure 14-10.
Figure 14-10. Available module and theme updates
In a case where Drupal core is updated, the process is slightly more complex. To update Drupal
core:
1. Make sure you backup your database!
2. Make sure you backup your entire Drupal directory!
3. Click on the download link for the version that you wish to use, which results
in the Drupal .tar file for that version being downloaded to your local PC.
CHAPTER 14 ■ ADMINISTERING YOUR DRUPAL SITE
224
4. Unpackage/expand the Drupal distribution (for Windows users, you may need
to download 7zip, a free utility that unpackages tar files on Windows
computers).
5. Open the folder that is created when you expand the Drupal distribution (see
Figure 4-11).
Figure 14-11. Drupal 7 files and folders
6. If you have Drupal installed on your local computer, delete all of the files
except the sites directory. It’s critical that you keep the sites directory, as it
contains all of the files that you’ve uploaded, all of the backups of your site,
and the configuration information for connecting to the database. Next, copy
all of the files and directories to your htdocs directory (see Appendix A for a
refresher on where you will find this directory for your specific operating
system).
7. If you have Drupal installed on a hosted server, use the same mechanism
described in Appendix A for transferring the files to that server in the root
directory of your hosting account (assuming you installed Drupal in that root
directory) after deleting all the files in your root directory except the sites
directory.
8. Once all of the files have been loaded, enter http://localhost/update.php
(note: replace “localhost” with the appropriate domain name if you are hosting
this site and not running Drupal on your local PC).
9. Test your site.
CHAPTER 14 ■ ADMINISTERING YOUR DRUPAL SITE
225
Approving Requests for User Accounts
Drupal lets you, the site administrator, determine how user accounts are created on your website. You
can:
• Allow site visitors to create their own accounts without approval by a site
administrator.
• Allow site visitors to request an account, but require that a site administrator
approve it before allowing the visitor to use the account.
• Restrict account creation to only the site administrator.
The approach you use is completely dependent on whether you allow visitors to have their own
accounts. There is no reason to provide this feature if you don’t provide interactive features on your site.
If you provide limited capabilities for authenticated users (for example, if you don’t enable permissions
for any administrative features to the generic “authenticated users” category) and you don’t want to be
bothered with enabling user accounts, then allowing visitors to create accounts without approval is
appropriate. If you want control over who has an account, then you will want to configure you site so
visitors can request an account, but you must approve their requests before their accounts become
active.
To set how your site handles user accounts, click on the Configuration link in the top menu,
revealing the main configuration page for your site. On this page, you will see a category of options for
“People and Permissions.” Within this category you will see a link for Account Settings.
Click on the link to reveal the account settings configuration form, shown in Figure 4-11.
Figure 14-12. Account settings page
On this page, you will find a section titled Registration and Cancellation. In Figure 14-11, the option
is set where visitors can request a user account, but administrator approval is required is set.
CHAPTER 14 ■ ADMINISTERING YOUR DRUPAL SITE
226
To see how this feature works, click the “Log out” link at the top right-hand corner of the page,
which will return you to your site’s homepage as an anonymous user (not logged into the site).
In the left column, you can see that, under the login form, there is a link for “Create new account.”
Click on that link to see the form where a new user can request a new account.
The visitor needs to provide a username and a valid e-mail address to create a new account. Once
these values have been entered and the visitor has clicked “Create new account,” Drupal redisplays your
site’s homepage with a message that their account is pending approval by the site administrator.
You, as the site administrator, must now enable their account. To do so, click on the People link at
the top of the page to see the list of users on your site. See Figure 14-13.
Figure 14-13. New user listed as blocked
In Figure 14-12, you can see that a user account was just created for toddtomlinson, and that the
user’s status is set to “blocked,” meaning they are blocked from logging onto the site.
If your site has several user accounts you may wish to filter the list to find only those user accounts
that are blocked and hence need to be activated. To filter the list, select the last of the three drop-down
menus in the “Show only users where” section, and select “blocked” from the list of options.
Next, click on the Filter button to limit the list of users shown on the page to only those that need to
be activated. Click the check box next to each of the users that you wish to activate and make sure that
the Update Options select list is set to “Unblock the selected users.” When all users have been checked
and the appropriate option selected, click on the Update button.
Once the updates have completed, click the Reset button in the “Show only users where” section to
redisplay all users. Which shows that our new user, toddtomlinson, is now active. See Figure 14-14.
CHAPTER 14 ■ ADMINISTERING YOUR DRUPAL SITE
227
Figure 14-14. All users now set to active
One of the options that you can set on the Account settings page is whether users receive e-mail
notifications when their accounts are created. If you have that option enabled, when you enable an
account the user is automatically notified via e-mail that their account is now ready for them to log in to
the website.
Summary
In this chapter, I covered the basics of administering a Drupal website. I explained the key
administrative tasks associated with running your new site.
Depending on the complexity of your site and the features you have deployed, there may be other
administrative tasks that are specific to those additional features. This list will get you started down the
path to ensuring that your site is backed up, error free, and up to date. For additional Drupal
administrative topics, visit the Drupal.org website.
Wow, we’ve covered a lot of information up to this point. You now have the knowledge necessary to
build simple to complex websites on Drupal, and you now know how to administer your new site. That a
lot of information to digest, and you may be wondering where to start when setting up a new site. That’s
the focus on the next and last chapter of the book, helping you navigate through the process of creating a
successful Drupal website.
C H A P T E R 15
■ ■ ■
229
Putting It All Together
Reading this book has given you the foundation of knowledge on which to continue to build your Drupal
skills. If you are new to the concept of a web content management system, you may not be able to jump
in and build a highly complex site as your first endeavor with Drupal. But like all things in life, you have
to start somewhere, and you now have the tools and knowledge to begin your journey. For those of you
who had content management experience, hopefully the book helped to cast a light on how Drupal
works so you can correlate what you know from other CMS platforms with what Drupal provides.
Now What?
Learning anything new takes practice, and with practice comes comfort, and with comfort comes the
ability to do new and exciting things. Learning Drupal takes time, study, practice, and patience. One of
the best ways to learn Drupal is to find a real-world opportunity to build a web site and do it in Drupal.
Whether the site is for your child’s sports team, your church, a community group, a non-profit
organization, or anything else under the sun, having a project to focus on that you know will benefit a
person or organization gives you incentive to learn, which helps in the learning process. How else can
you keep up-to-date with your Drupal knowledge?
Look At Other Drupal-Based Sites for Ideas
Although it’s hard to look at a site and immediately detect that it is a Drupal site, there is an excellent
resource that will help you find sites that were built on Drupal. Dries Buytaert, the creator of Drupal,
maintains a fairly up-to-date list of very high-profile web sites that are built on Drupal. You can find that
list on his personal web site at Dries does an excellent job of
capturing a broad spectrum of sites from various industries and sites from all around the world. The list
is updated constantly, so it is a good idea to bookmark that page and to visit it frequently.
By scanning through the list of sites that Dries has compiled (currently well over 100), you can
quickly get a sense for the types of sites that people have successfully built on Drupal. By looking at other
sites, you can get inspiration for design (the visual look of the site), layout (how the pages are
structured), organization (how content is displayed), and the features and functions that have been
deployed. Looking at other sites is a common starting point for many people who are embarking on a
new Drupal project.
CHAPTER 15 ■ PUTTING IT ALL TOGETHER
230
Keep Tabs on Drupal and Contributed Modules
One of the benefits of using Drupal is that it is a constantly evolving platform. As new concepts are
defined on the Web, Drupal is often one of the first content management systems to employ those
capabilities. Keeping up with the changes is relatively simple: just check
and look at the latest modules and updates posted to the site. (See
Figure15-1.)
Figure15-1. List of modules on Drupal.org
When visiting the page, you’ll notice a list of sort-by options in the right column. One of those
options is “Last release.” Clicking on this option sorts the list of modules in date-descending order, with
the last modules posted to the site listed first. Depending on how frequently you visit the site, you may
only have to spend a minute or two looking through the list of new modules to see what is available.
There is also an RSS feed for module updates that you may want to subscribe to. If you see something of
interest, you can click on the title for that module to visit the modules homepage on Drupal.org.
Get Involved in Your Local Drupal Users Group
There are hundreds of Drupal User Groups all around the globe, including regional user groups as well
as groups that are focused on specific topics or industries (such as Drupal in Education, Drupal in
Libraries, Drupal in Government). Your local Drupal Users Group is a great place to meet others in your
community who are also new to Drupal, and to learn, as most groups provide training as part of their
periodic meetings. To locate a group near you or a group that is focused on an area that you are
interested in, visit .
CHAPTER 15 ■ PUTTING IT ALL TOGETHER
231
A Methodology for Building Your Site on Drupal
While there isn’t a formal “Drupal Methodology” for building sites on Drupal, there are several industry
best practices and processes that you may wish to follow as you embark on the journey of creating a new
Drupal web site. The process described in Table15-1 may seem overwhelming and more complex and
involved than what you think you need to build your new site, but from experience it’s good to at least
think about the steps listed and apply and perform the tasks that you think are appropriate, based on the
scope and complexity of the site that you are building.
Table15-1. A Methodoloy for Building Your Drupal Site
Phase Task Activity
I
Starting Your Project
The tasks listed below are focused on helping you think about and define what
your site is going to be. Drupal is a lot like a stack of lumber: you could build
virtually any type and style of house with an appropriately sized stack of
lumber. You typically wouldn’t start picking up boards and nailing them
together without first knowing the details of the house that you are going to
build. Think of this phase of the project as defining the blueprint of your new
site. In this phase, you’re documenting key aspects of your site on paper, and
not in Drupal. Once you have an understanding of what it is you’re going to
build, you can embark on the construction activities.
A What is your new web site all about?
Write down, in narrative form, what the purpose of your new site is and, in
general, describe the audience that you intend to target with your site. Think of
this document as your “elevator pitch,” meaning if you met someone in an
elevator and they asked you what your web site was about, you could recite this
document verbatim before the two of you left the elevator. This activity forces
you to define in concise terms what it is you are building and who is going to
view the site.
B Identify who is going to visit and use your web site
List the various types of visitors who you intend to target with your new web
site. Examples of visitor types for a library site might be children, teens, young
adults, adults, jobseekers, and senior citizens. A favorite technique is to use a
blank piece of paper and on this paper draw a “box” representing a browser
window with your web site in that browser window. Draw a number of stick
figures around the box and label each one with the type of visitor that “person”
represents.
Continued
CHAPTER 15 ■ PUTTING IT ALL TOGETHER
232
Phase Task Activity
C Identify the content that you are going to deliver to your visitors
A common mistake in the web site construction process is the “field of dreams”
mentality: “if I build it they will come.” Well if “they” come to your site, what
content are you going to present to “them” so they stay on your site, look
around, and bookmark your site for future visits? You may wish to use a blank
piece of paper for each visitor type, drawing a stick figure on the left and listing
the content that this person would be interested in seeing on your site. There
will likely be duplication between various visitor types, and that is okay, but it is
important to step into the “shoes” of each visitor type to think about what
content you are going to provide each visitor that will make them pay attention
and return to your site in the future. Examples of content types might be, for a
library website, book reviews, movie reviews, music reviews, recommended
reading lists, and a list of upcoming programs at the library.
D Identify the functionality that you are going to deliver to your visitors
Content is typically only one aspect of what constitutes a web site; there may be
interactive features that you want to deliver, such as blogs, surveys, videos,
audio, discussion forums, online forms, e-commerce, RSS feeds, or other
interactive features. In this task list all of the interactive features that you wish
to provide to your visitors.
E Define the sites structure
Examine the types of content and functionality documented in the previous
steps; you will start to see logical groupings or categories. You may see logical
groupings based on a topic or subject, or you may see groupings based on
specific visitor types. Using a library site as an example, you might see that there
is a logical grouping of content across all visitor types that is focused on book
reviews. You might also see a logical grouping of content that is focused on
senior citizens and their use of community resources. Each of these logical
groupings may, and probably should become a major page on your web site.
F Define custom content types and taxonomy structure
There may be types of content that do not fit the generic Drupal page content
type with just a title and body. An example might be that you identified
“Events” as a type of content. An Event has a title, a start date, a start time, an
end date, an end time, and a location. It might be advantageous to create a
custom content type for events that enforces the entry of those additional
details rather than relying on the author to remember to enter those values in
the body of a generic page. In this step, you should create a list of custom
content types and the attributes (such as start date, start time) associated with
each content type.
While defining content types, it’s also time to think about taxonomy and how
you are going to categorize content on your site.
CHAPTER 15 ■ PUTTING IT ALL TOGETHER
233
Phase Task Activity
G Define the navigational structure of your web site
With an understanding of the visitor types, the content that they will want to see
on your site, and the logical groupings or major pages that will make up your
site, you can now define the navigation (menus) for your site. If you know that a
specific visitor type is a primary visitor of your web site, you should make it easy
for that visitor to find the information that they are seeking. The typical
mechanism for doing that is to provide some form of menu or menus. In this
task you would identify all of the links that you wish to provide to your site
visitors and how those links should be organized (as menus). Using the library
example, you may decide that you want a primary menu at the top of the page
that provides links to About the Library, Locations and Hours, and How to
Contact the Library. You may decide that you want a secondary menu that links
visitors to pages for Books, Movies, Music, and Events. You may decide that you
want another menu that helps to direct specific visitor types to pages that are
focused on their specific interest areas, such as links for youth, teens, adults,
senior citizens, and business owners. You can take the concept to another level
of detail by defining drop-down menu items for certain menu links; for
example, under the Books menu you may want to provide a link to
Recommended Books, What’s New, and What’s on Order.
II
Setting Up Your Drupal Environment
Now that you have an understanding of what you’re going to build, the next
step is to set up your Drupal environment to begin the construction process.
A Decide where you are going to host your new web site
You can easily build your new web site on your desktop or laptop and then
deploy that site on a hosted environment, or you can choose to build the site in
the environment where you are going to host the production version of your
web site. Either approach works well. However, at some point in the near future
you are going to want to deploy your site with a commercially viable hosting
provider or your organization’s own hosting platforms. To find a list of
commercial hosting providers that support Drupal, visit
B Install and configure Drupal
Following the step-by-step instructions outlined in Appendix A, install Drupal
on either your local desktop/laptop or on your hosting providers environment.
Continued
CHAPTER 15 ■ PUTTING IT ALL TOGETHER
234
Phase Task Activity
III Visual Design
Picking or designing your Drupal theme is one of those activities that you can
choose to do early in the process, mid-way through the development process,
or near the end of your efforts. For most people, having a sense of what the site
is going to look like helps to visualize the layout as it will look in its final state.
There may be mitigating circumstances where you can’t pick or design the
theme up front, such as the case where the organization you are building the
site for doesn’t have their branding completed (including logo, colors,
iconography, fonts, and so on). In that case it is still possible to continue with
the construction activities using a generic theme.
A Look for an existing theme that matches what you are trying to accomplish
There are hundreds of themes that are available on Drupal.org and there is
likely one that comes close to the layout and design that you would like to use
on your site. To see the list of themes visit www.drupal.org/project/themes. If
you can’t find a theme that matches your requirements, you can use one of the
various “starter” themes listed on the Drupal site (such as Zen) as a place to
start. Revisit Chapter 6 for detailed instructions on how to download and install
a Drupal theme.
B Implement your sites specific design elements
If you pick an off-the-shelf theme from Drupal.org (versus creating one from
scratch), you will likely want to change the themes logo, colors, and so on. The
topic of theme development is beyond the scope of this book; however, you can
read up on the concepts behind Drupal themes and which files you will want to
look in to make changes to customize the them at />guide.
IV Downloading and Installing Contributed Modules
In step D, Phase you documented the functionality that you want to deliver to
your site visitors beyond just content (such as blogs, RSS feeds, video, polls,
forums, and e-commerce). In this Phase you will search for, install, and enable
the modules that you need to address the desired functionality.
CHAPTER 15 ■ PUTTING IT ALL TOGETHER
235
Phase Task Activity
A Identify the modules required to address the desired functionality
Some of the functionality may be address by Drupal 7 core modules (such as
blogs, the book module, forums, and the like) while other functionality may
require searching for an appropriate module. To look for modules visit
In the left column you will see several
categories of modules. You can start by browsing through the appropriate
categories listed in the right column on
If you’re struggling to find the right module, a good resource to use is the
Drupal.org forums. The community is extremely helpful, and posting a quick
question asking for advice on which module to use for a specific feature or
function may cut down on your research time as well as picking the wrong
module for the job.
B Download and install required modules
Once you’ve identified the right modules to address the required functionality
on your site, follow the instructions listed in Chapter 8 for installing, enabling,
configuring, and setting permissions for each of the modules.
V
Creating Custom Content Types
If you identified custom content types in Phase I, E, now is a good time to create
those content types. Using the list of content types and the list of attributes for
each type, follow the instructions in Chapter 10 for creating new content types.
VI
Creating Views
There may be pages on which you want to provide a list or table view of content.
Now is a good time to construct those views to support creation of pages in the
next step. The process for creating views can be found in Chapter 11.
VII
Creating the Physical Pages
Use the techniques described in this book to create the actual pages (for
example, use the Panels module to create complex page layouts). Visit chapter
12 for a description of how to use panels, and Chapter 7 for a description of
using blocks. Create the various pages that you defined in Phase I, task E
Continued
CHAPTER 15 ■ PUTTING IT ALL TOGETHER
236
Phase Task Activity
VIII
Finishing-Up the Menus on Your Site
With the pages in place, you’re now ready to finalize the menus on your site.
Revisit the navigational structure you defined in Phase I, task F to ensure that
you’ve addressed all of the navigational requirements for your new site. For a
description of how to create menus visit Chapter 5.
IX
Finalizing the Configuration
At this point, the site should be configured and ready to go. In this phase, make
sure that you have created all of the user roles, have assigned the appropriate
permissions to those roles, and you have configured how users accounts will be
created. Visit Chapter 3 for a description of how to define roles and assign
permissions.
X
Creating Content
Now that we have the site configured, content types created, views defined,
panels created, and user roles and permissions defined its the time to create
content on your site.
X
Testing Your Site
With your site nearly ready for production, now is the time to test to make sure
that everything works as you expect it to work. Make sure you test the site, as an
anonymous user (not logged into the site). It is also a good idea to create test
accounts for each of the user roles that you have defined and to visit the site
while logged in to each account to ensure that the roles and permissions are
working as you had envisioned.
XI
Deploying to Production
It’s now time to deploy your site to your production-hosting environment.
A. If you created your site on your desktop or laptop you’ll need to copy the entire
Drupal directory to your production web server, and you’ll need to backup your
database and restore the database on your hosting environment. For additional
details on this process please see Chapter 13.
CHAPTER 15 ■ PUTTING IT ALL TOGETHER
237
Phase Task Activity
B. If you created your site on a hosting providers platform you are already there
and don’t need to move your site.
XII
Administering Your Site
As described in Chapter 13, monitor and manage your new Drupal web site.
Summary
In this chapter I covered the methodology for creating a new Drupal site, linking the methodology back
to the steps that I covered throughout the rest of the book. Although every web site is different, the steps
outlined in the methodology work for virtually any type of web site. It’s important to think through
everything described in the methodology, and in fact I would suggest that you find a quiet corner and
walk through the methodology before starting to build your new site. The methodology forces you to
think about what you are trying to accomplish before you build it, minimizing the risk of creating your
web site and then finding out that you missed the boat completely.
Your Drupal journey has just begun. Congratulations on taking the first step by completing this
book. Drupal is an amazing platform and one that takes time to fully digest. I would suggest continuing
the learning process by picking up Pro Drupal 7 Development, third edition, by Dave Reid and John van
Dyk (Apress, 2010). Although you may not want to be a developer, the book covers several topics that are
relevant to site administrators. For a list of other Drupal books please visit www.apress.com.
If you have a desire to learn more about programming in PHP or CSS, I suggest picking up PHP for
Absolute Beginners by Jason Lengstorf (Apress (2009) and Beginning CSS Web Development by Simon
Collison (Apress, 2006). Both books are fantastic resources and are written for those who are starting to
learn development for the web.
I look forward to seeing your new Drupal sites up on the web. Best wishes on your journey, I hope we
cross paths at an upcoming DrupalCon!