BUILDING REMOTE ACCESS NETWORKS phần 5 pps
Bạn đang xem bản rút gọn của tài liệu. Xem và tải ngay bản đầy đủ của tài liệu tại đây (277.58 KB, 60 trang )
Enabling Dial-on-Demand Routing (DDR) • Chapter 6 217
bandwidth 64
dialer in-band
dialer pool 2
dialer remote-name Router3
dialer string 8358661 class backup
dialer load-threshold 127 either
dialer-group 1
ppp multilink
!
map-class dialer backup
dialer fast-idle 30
dialer hold-queue 20
dialer idle-timeout 180
The first two bold commands in Figure 6.4 configure the BRI0 interface
to be a member of dialer pools 1 and 2. The optional priority parameter
can be used to specify that one pool receive priority over another. The pri-
ority range is from 0 (lowest) to 255 (highest) with a default value of 0.
The next two bold commands configure interfaces dialer1 and dialer2 to
be members of dialer pools 1 and 2, respectively. Finally, the map class
backup has been configured. You can see that under the dialer string com-
mands in dialer pools 1 and 2, the class backup parameter has been used.
The class parameter associates the map class backup with that interface
when that string is dialed.
Virtual Profiles
The virtual profile feature of DDR is a method of customizing each dial-up
connection with its own virtual interface. When using virtual profiles, as
each user dials in to the network, he is assigned his own unique interface.
This feature allows for a more scaleable dial-up network. Some of the vir-
tual profiles work if you are using DDR dialer profiles or legacy DDR, or
even if DDR is not configured. One use of a virtual profile is for a specific
user to get a specific IP address and/or routing entries.
NOTE
In the event you are using a dialer profile for a specific user, the virtual
profile will override the configuration.
www.syngress.com
93_sbcran_06 10/16/00 1:28 PM Page 217
218 Chapter 6 • Enabling Dial-on-Demand Routing (DDR)
There are two components of a virtual profile: the generic component,
which is information common to all dial-up users, including some router
configuration; and the user-specific component with information about
each user obtained from an authentication, authorization, and accounting
(AAA) server. (See Chapter 8 for an overview of AAA.) When creating a vir-
tual profile, you can use either the generic component (Case 1), the user-
specific component (Case 2), or both (Case 3). Each of these cases is
explained in the following section.
Case 1: Create a Virtual Profile Using the
Virtual Template
In this first example, the virtual profile is created by applying the virtual
template and a subset of the configuration obtained from the AAA server;
the router will apply the configuration commands in the virtual interface to
the physical interface. If the physical interface has been configured for
legacy DDR or a dialer profile with no specific user, the virtual interface
configuration will override the existing configuration. If, however, the inter-
face has been configured with user information and a dialer profile, it will
override the virtual profile. When the virtual interface is used, the router
applies the configuration commands to the physical interface the user
dialed into, whether it is an ISDN line, a serial line, or an asynchronous
serial line.
Once the virtual interface commands have been applied, the router
checks for user-specific information on the AAA server. If the AAA server
contains interface-specific information for that user, it is ignored. Only
non–interface-specific information is applied, such as access lists, routes,
address pools, and route filters.
If you are using ISDN with virtual interfaces, the virtual interface is
applied to the B-channel as opposed to the D-channel. This allows sepa-
rate configurations on each B-channel for different users.
Configure a Virtual Profile Using Virtual
Templates
To configure a virtual profile using a virtual template you need to perform
the following steps:
1. Configure a virtual template interface
2. Group the virtual template interface with the virtual profile
www.syngress.com
93_sbcran_06 10/16/00 1:28 PM Page 218
Enabling Dial-on-Demand Routing (DDR) • Chapter 6 219
Configure a Virtual Template Interface
The virtual template is a serial interface, which means you can con-
figure the same commands on it as on any other serial interface, except
shutdown and dialer commands. Figure 6.5 shows an example of a virtual
template interface.
Figure 6.5 Configuration for virtual template interface.
Interface virtual-template 1
ip unnumbered ethernet 0
encapsulation ppp
ppp authentication chap
As you can see, the configuration for the virtual template is very simple; in
addition to the commands above, you can configure many additional com-
mands.
Group the Virtual Template Interface with the Virtual Profile
Grouping the virtual template with the virtual profile is done by issuing the
virtual-profile virtual-template number command. The virtual templates
can range from 1 to 30. With this method of creating a virtual profile, all
interface-specific AAA commands are ignored and all other AAA commands
such as routes and access lists are not. With this method of creating a vir-
tual profile, there is no requirement for using AAA. If AAA is not used, all
users that need access to the router must be specifically created in the
router configuration.
Case 2: Create a Virtual Profile Using the
AAA Server
In this case, the virtual profile is created solely from the configuration
obtained from the AAA server. When a user establishes a Point-to-Point
Protocol (PPP) session, the router contacts the AAA server and obtains
user-specific information, which is then applied to the virtual profile for
that user. The information is interpreted as IOS commands—as if the AAA
server were directly connected to the router making configuration changes.
Both interface and non-interface commands can be included in the infor-
mation from the AAA server.
Once the router gets the commands from the AAA server, it applies
them to the interface, overriding any previous configurations for that inter-
face. When the PPP session is terminated, the virtual profile is deleted and
the interface is restored to default configuration.
www.syngress.com
93_sbcran_06 10/16/00 1:28 PM Page 219
220 Chapter 6 • Enabling Dial-on-Demand Routing (DDR)
Configure a Virtual Profile Using the AAA Server
To configure a virtual profile using an AAA server, you need to perform the
following steps:
1. Configure AAA on the router
2. Specify AAA as the virtual profile source
3. Configure the per-user configurations on the AAA server
Configure AAA on the Router
For details on configuring AAA on the router, refer to Chapter 8, “Securing
Your Remote Access Network.”
Specify AAA as the Virtual Profile Source
To specify AAA as the virtual profile source you need to use the virtual-
profile aaa command from the global configuration mode.
Configure the Per-user Configurations on the AAA Server
The following example contains an excerpt from both the AAA server and
the router running per-user configurations. Figure 6.6 contains a per-user
configuration for users Mike and Dan. For more details on per-user config-
urations on the AAA server, refer to Cisco’s Web site at www.cisco.com. In
this example, two users are configured for authentication on the AAA
server, and the router is configured to use AAA authentication.
Figure 6.6 AAA server configuration for virtual profile using AAA server.
AAA Configuration for Mike and Dan
mike Password = "ekimpass"
User-Service-Type = Framed-User,
Framed-Protocol = PPP,
cisco-avpair = "interface_config=ip address 172.16.1.100
255.255.255.0,"
dan Password = "danssecret"
User-Service-Type = Framed-User,
Framed-Protocol = PPP,
cisco-avpair = "interface_config=ip address 172.16.2.100
255.255.255.0"
www.syngress.com
93_sbcran_06 10/16/00 1:28 PM Page 220
Enabling Dial-on-Demand Routing (DDR) • Chapter 6 221
The router in Figure 6.7 is configured to reference the AAA server for its
virtual profile information. In this example, Mike would get IP address
172.16.1.100 when he dials in, and Dan would get IP address
172.16.2.100.
Figure 6.7 Router configuration for virtual profile using AAA server.
Router Configuration
aaa new-model
aaa authentication ppp default radius
aaa authorization network radius
virtual-profile aaa
!
interface dialer 0
ip address 10.0.1.1 255.255.255.0
encapsulation ppp
dialer map ip 10.0.1.2 name mike 8348661
dialer map ip 10.0.1.3 name dan 8348662
dialer-group 1
ppp authentication chap
Case 3: Create a Virtual Profile Using Both the
Virtual Template and AAA Server
The configuration from the AAA server and the virtual interface template
together make up Case 3. When using both AAA and virtual templates, the
router processes a new PPP session in the following order:
1. The virtual profile is dynamically created from the information con-
tained in the virtual template
2. The AAA server information is obtained and applied to the virtual
profile
Just as in Case 2, if there is conflicting information in either the AAA
server or the virtual template with the router, the router configuration is
overwritten. This case offers the most customizable configuration possible.
Specific user information as well as generic information can be combined
to create user-unique profiles.
www.syngress.com
93_sbcran_06 10/16/00 1:28 PM Page 221
222 Chapter 6 • Enabling Dial-on-Demand Routing (DDR)
Configure a Virtual Profile Using Both the Virtual
Template and AAA Server
To configure a virtual profile using both a virtual template and an AAA
server, you need to perform the following steps:
1. Configure a virtual interface template
2. Configure AAA on the router
3. Configure the per-user configurations on the AAA server
4. Specify the virtual profile by both virtual templates and AAA
Steps 1, 2, and 3 are similar to the steps in the previous two cases.
Step 4 is a combination of Cases 1 and 2. Figures 6.8 and 6.9 show all
four steps on both the AAA server and the router.
Figure 6.8 AAA server configuration for virtual profile using both virtual
template and AAA server.
AAA Configuration for Mike and Dan
mike Password = "ekimpass"
User-Service-Type = Framed-User,
Framed-Protocol = PPP,
cisco-avpair = "interface_config=ip address 172.16.1.100
255.255.255.0,"
dan Password = "danssecret"
User-Service-Type = Framed-User,
Framed-Protocol = PPP,
cisco-avpair = "interface_config=ip address 172.16.2.100
255.255.255.0"
Figure 6.8 is an excerpt from the AAA server and is the same as the
AAA server configuration used in the example on configuring a virtual pro-
file using AAA.
Figure 6.9 Router configuration for virtual profile using both virtual
template and AAA server.
aaa new-model
aaa authentication ppp default radius
aaa authorization network radius
virtual-profile virtual-template 1
www.syngress.com
Continued
93_sbcran_06 10/16/00 1:28 PM Page 222
Enabling Dial-on-Demand Routing (DDR) • Chapter 6 223
virtual-profile aaa
!
interface Virtual-Template 1
ip unnumbered ethernet 0
encapsulation ppp
ppp authentication chap
!
interface dialer 0
ip address 10.0.1.1 255.255.255.0
encapsulation ppp
dialer map ip 10.0.1.2 name mike 8348661
dialer map ip 10.0.1.3 name dan 8348662
dialer-group 1
ppp authentication chap
Figure 6.9 is an excerpt from the router configuration for creating the
virtual profile by both AAA and virtual templates. The two commands in
bold group the virtual profile to both AAA and the virtual template.
Creating the virtual template and configuring AAA are the same as in the
previous examples.
Fine Tuning Connections
DDR has several options available for fine-tuning its connections. The
biggest expense in DDR is the cost of the link, so most of the options avail-
able directly address timers used in maintaining and terminating DDR ses-
sions. Another way of keeping costs down is by limiting when and how
often the line gets established. This is done through dialer lists. By now
you should have a good understanding of what the dialer list is and how to
configure one. The next section reiterates this and gives more examples of
dialer lists with additional information on setting specific dialing and dis-
connecting timers.
Dialer Lists
Interesting traffic is defined as traffic that the router deems important. The
way to define this is by configuring an access list. All traffic destined for a
DDR interface must pass through the dialer list before being marked
“interesting.” When interesting traffic comes into the router destined for a
remote network, the router establishes a call to the remote network and
www.syngress.com
93_sbcran_06 10/16/00 1:28 PM Page 223
224 Chapter 6 • Enabling Dial-on-Demand Routing (DDR)
sends the data. Once the circuit is connected, all traffic (including uninter-
esting traffic) can flow through the circuit. Once your defined interesting
traffic stops (for a specified/configurable amount of time) the call will be
disconnected.
NOTE
When the circuit has been connected, traffic that is marked interesting
will reset the idle timer.
The idle timer is what causes the link to be terminated. Because the
dialer list is tied to how long the line is kept open, it is important to con-
figure the dialer list carefully. The limit on the number of dialer lists in a
router is 10, but each list can have multiple entries. Figures 6.10 and 6.11
are examples of dialer lists; they are followed by a brief explanation of what
traffic will be permitted or denied.
Figure 6.10 Dialer list example 1.
dialer-list 1 protocol ip list 101
!
access-list 101 permit tcp any any eq smtp
access-list 101 permit tcp any any eq www
access-list 101 permit tcp any any eq pop3
access-list 101 permit tcp any any eq telnet
access-list 101 permit icmp any any
access-list 101 deny any any
The dialer list in Figure 6.10 permits only IP traffic that passes access
list 101. Access list 101 allows only e-mail, WWW, Telnet and ICMP traffic.
Figure 6.11 Dialer list example 2.
dialer-list 1 protocol ip permit
dialer-list 1 protocol appletalk permit
dialer-list 1 protocol ipx permit
dialer-list 1 protocol decnet permit
www.syngress.com
93_sbcran_06 10/16/00 1:28 PM Page 224
Enabling Dial-on-Demand Routing (DDR) • Chapter 6 225
The example in Figure 6.11 allows IP, AppleTalk, IPX, and DECNET
traffic to initiate a connection. This type of dialer list would be costly if the
line being used was measured by how long it was connected.
Dialer Timers
In addition to dialer lists, dialer timers are another way of keeping DDR
costs down. There are several different timers associated with DDR. The
timers are:
■
Enable-timeout
■
Fast-idle
■
Hold-queue
■
Idle-timeout
■
Wait-for-carrier-time
The enable-timeout timer sets the amount of time that an interface
stays down before it is capable of dialing. The command syntax is dialer
enable-timeout seconds, where seconds is a value between 1 and
2147483. The default is 15 seconds.
The fast-idle timer is a timer that overrides the idle-timeout timer. If an
interface is connected to location A and traffic destined for location B
enters the router and the interface cannot dial, the fast-idle timer starts
counting down to 0. Once the fast-idle timer reaches 0, the interface is
reset, allowing the traffic destined for location B to be sent. The syntax for
the fast-idle timer is dialer fast-idle seconds, where seconds is a value
between 1 and 2147483. The default value for the dialer fast-idle time is
20 seconds.
The hold-queue is a queue that the interface maintains. If the interface
is not connected and interesting traffic comes in, the hold-queue holds a
specified amount of packets while the interface is brought up. Once the
interface is connected, the hold-queue is emptied and any future traffic can
flow directly through the interface. The syntax for the hold-queue is dialer
hold-queue packets [timeout seconds], where packets is the number of
packets to be held from 0 to 100 and the optional timeout parameter is
how long the packets will be kept while the interface is being connected.
By default, the hold queue is 0, which means that during a call establish-
ment all incoming packets will be dropped.
As mentioned earlier, the idle-timeout is the amount of time the router
waits between seeing interesting traffic and disconnecting the line. Once
an interface is connected, the idle-timeout timer is started. Once the timer
reaches 0, the interface is disconnected. If interesting traffic enters the
www.syngress.com
93_sbcran_06 10/16/00 1:28 PM Page 225
226 Chapter 6 • Enabling Dial-on-Demand Routing (DDR)
router during the call, the idle-timeout timer is reset. The syntax for the
command is dialer idle-timeout seconds [either] where seconds is the
amount of time before disconnecting the line (between 1 and 2147483 sec-
onds) and either informs the router to count both inbound and outbound
traffic for the idle-timeout. The default idle-timeout is 120 seconds.
The wait-for-carrier-time timer is how long the router will wait for a
carrier to come up before dialing. The syntax for this command is dialer
wait-for-carrier-time seconds, where seconds is a value between 1 and
2147483. The default wait-for-carrier-time is 30 seconds.
Walkthrough
The following walkthrough shows how to configure a router to make mul-
tiple connections over the same physical interface. In this example, a 3640
router is used with PRI, FastEthernet, and Digital modem modules. The
3640 is configured to accept analog and ISDN dial-up connections as well
as a connection to a remote 3620 router, all through the PRI interface.
Figure 6.12 shows the network diagram. Figure 6.13 is the router configu-
ration for the 3640.
www.syngress.com
Figure 6.12 PRI with ISDN dialup, ISDN dialout, and analog dialup.
3620
E0
Telco
3640
PRI0
FE0/0
10.0.2.2 -
10.0.2.20
10.0.0.1
10.0.4.1
10.0.3.2
ISDN Dialup
BRI0
Workstation
10.0.3.1
Dialer 3
Dialer 2
Async Group 1
10.0.2.1
192.168.100.1
Workstation
Analog Dialup
192.168.100.2 -
192.168.100.20
835-8662
93_sbcran_06 10/16/00 1:28 PM Page 226
Enabling Dial-on-Demand Routing (DDR) • Chapter 6 227
Figure 6.13 3640 router configuration.
(Section 1)
hostname Cisco3640
!
username alicia password alicia
username andy password andy
username brad password brad
username chad password chad
username jeff password jeff
username john password john
username Cisco3620 password chappass
!
isdn switch-type primary-dms100
!
(Section 2)
controller T1 0/0
framing esf
linecode b8zs
pri-group timeslots 1-24
!
interface FastEthernet 0/0
ip address 10.0.0.1 255.255.255.0
!
(Section 3)
interface Serial 0/0:23
description PRI D-channel
no ip address
encapsulation ppp
dialer pool-member 2
dialer pool-member 3
!
www.syngress.com
Continued
93_sbcran_06 10/16/00 1:28 PM Page 227
228 Chapter 6 • Enabling Dial-on-Demand Routing (DDR)
(Section 4)
interface Group-Async 1
description connected to Dial-inPCs(modem)
ip address 192.168.100.1 255.255.255.0
encapsulation ppp
dialer in-band
dialer idle-timeout 180
async mode dedicated
group-range 33 64
ppp authentication chap pap callin
peer default ip address pool analogdialup
!
(Section 5)
interface Dialer 2
description connected to Dial-inPCs(ISDN)
ip address 10.0.2.1 255.255.255.224
encapsulation ppp
dialer in-band
dialer idle-timeout 180
dialer pool 2
ppp authentication chap pap callin
ppp multilink
peer default ip address pool isdndialup
!
(Section 6)
interface Dialer 3
description connected to Cisco3620
ip address 10.0.3.1 255.255.255.252
encapsulation ppp
dialer idle-timeout 120
dialer remote-name Cisco3620
dialer-group 1
dialer string 8358665
www.syngress.com
Continued
93_sbcran_06 10/16/00 1:28 PM Page 228
Enabling Dial-on-Demand Routing (DDR) • Chapter 6 229
dialer hold-queue 20
dialer idle-timeout 60
dialer fast-idle 4
dialer pool 3
ppp authentication chap
snapshot server 15 dialer
!
(Section 7)
dialer-list 1 protocol ip list 101
ip local pool isdndialup 10.0.2.2 10.0.2.20
ip local pool analogdialup 192.168.100.2 192.168.100.20
!
(Section 8)
access-list 101 permit tcp any any eq smtp
access-list 101 permit tcp any any eq www
access-list 101 permit tcp any any eq telnet
access-list 101 permit tcp any any eq pop3
access-list 101 permit icmp any any
access-list 101 deny any any
!
router rip
version 2
network 10.0.0.0
network 192.168.100.0
!
(Section 9)
line 33 64
exec
autoselect ppp
autoselect during-login
login local
modem InOut
transport input all
www.syngress.com
93_sbcran_06 10/16/00 1:28 PM Page 229
230 Chapter 6 • Enabling Dial-on-Demand Routing (DDR)
Figure 6.13 shows the router configuration for the 3640. The following
is an explanation of the numbered sections in Figure 6.13:
Section 1 sets up the dial-up user names and passwords. It also config-
ures the router name for the connection to the 3620 and its Challenge
Handshake Authentication Protocol (CHAP) password.
Section 2 is the configuration for the PRI controller. The framing has been
configured as Extended Superframe (esf), the linecode is set to binary eight
zero signaling (b8zs), and all 24 time slots are being made available to the
controller.
Section 3 is the configuration for the D-channel of the PRI interface. The
last channel of a T1 circuit is typically the D-channel. The encapsulation is
being set to ppp and the two dialer pools (2 and 3) are being identified.
Once the dialer pools have been identified, the router will know what phys-
ical interface to use to establish calls for that dialer.
Section 4 is the configuration for analog dial-up users. In this interface,
the IP address, encapsulation, PPP authentication, and dialer options are
configured. Of the dialer options, the idle-timeout is set to 180 seconds,
which will disconnect any dial-up users after 180 seconds of no activity.
The group-range 33 64 command identifies what lines to use for this
interface. The lines for the modems will vary depending on the physical
configuration of the router. The IP address pool for this interface is also
identified as the analogdialup pool. Section 7 contains the configuration of
the pool.
Section 5 is the configuration for the dial-up ISDN connections. This
interface (Dialer 2) shares many of the same commands as the Group-
Async 1 interface. The differences are the IP address pool (ISDN dialup
versus analog dialup), PPP multilink, the group range 33 64 command,
and the reference to the dialer pool (dialer pool 2).
Section 6 is the configuration for the DDR connection to the 3620 remote
router. This interface also shares many commands with the previous two
interfaces. The additional commands configure snapshot routing (snapshot
server 15 dialer) and set the fast-idle time to 4 seconds (dialer fast-idle 4).
The fast-idle setting will allow the router to quickly hang up the line to
make it available for a dial-up user.
Section 7 contains the dialer list for identifying interesting traffic and the
IP address pools for the two dial-up configurations. The interesting traffic
has been identified as IP traffic which passes IP access list 101. (Section 8
describes the access list.) The two IP address pools identify IP addresses
that will be assigned to dial-up clients when they establish a connection.
This access list allows all SMTP, POP, WWW, Telnet, and ICMP traffic to
establish a connection to the 3620 remote router.
www.syngress.com
93_sbcran_06 10/16/00 1:28 PM Page 230
Enabling Dial-on-Demand Routing (DDR) • Chapter 6 231
Section 9 is the configuration for the digital modems for analog dial-up
users. This configuration allows users either to connect directly to the
router (exec) or to establish a PPP session (autoselect ppp) and connect to
the Internet.
This example shows how one physical interface can be configured to
perform multiple tasks based on some of the advanced DDR commands
covered in this chapter.
Summary
This chapter covered rotary groups, dialer profiles, virtual profiles, and
fine-tuning DDR connections.
The rotary group is used when there are multiple physical interfaces
through which to place a call. In the event that one interface is busy, the
rotary group will use the next available interface to make a call. A dialer
rotary group does not need to be configured for both BRI and PRI B-chan-
nels; the multiple B-channels in either interface are automatically placed
into a dialer rotary group.
Dialer profiles are based on separate logical interface configurations
bound to physical interfaces. They involve configuring a profile, which is
kept separate from the physical interface. Once the profile has been config-
ured, it is bound to the physical interface. Multiple profiles can then be
linked to one interface, allowing multiple sites to be called from the same
interface. Additionally, one profile can be linked to multiple interfaces,
allowing greater bandwidth per call.
Virtual profiles are used in dial-up networks to configure unique inter-
faces for each individual user. You can use a virtual interface, AAA server,
or both to create a virtual profile. The virtual interface contains informa-
tion that will be applied to all users, such as encapsulation type and dial
timers, and the AAA server contains user-specific information such as
access lists and routes.
DDR has several different methods of keeping connection times short
and deciding how often the line is brought up. Dialer lists and dialer
timers are two methods. Dialer lists are used to determine what kind of
traffic is interesting, which tells the router to make a DDR connection.
Dialer timers can be used to make the connection hang up more quickly
and queue packets while the connection is being made.
www.syngress.com
93_sbcran_06 10/16/00 1:28 PM Page 231
232 Chapter 6 • Enabling Dial-on-Demand Routing (DDR)
FAQs
Q: I have a hub-and-spoke Frame Relay network and need to set up a
backup solution. I have decided to use ISDN to accomplish this. Do I
need to use dialer profiles or can I use legacy DDR?
A: The answer depends mainly on how many sites you need to back up. If
you are backing up one site, you can use legacy DDR. If you are
backing up more than one site and do not want to pay for two ISDN
lines for each office, you can use dialer profiles. If you are backing up
enough sites, you may want to use a PRI line at the hub site. If you are
using a PRI line, you can configure either legacy DDR or dialer profiles,
depending on how complex your network is. The most important thing
to keep in mind is that dialer profiles allow you to configure one inter-
face to dial out with multiple different configurations; if your hub is
going to be receiving calls, a dialer profile will not be necessary.
Q: I need to set up virtual profiles, but do not have an AAA server. How
hard is it to configure an AAA server?
A: If you want to use virtual profiles you do not have to use AAA.
Remember you can use a virtual interface template for virtual profiles.
But to answer your question, Cisco has an AAA server called the Access
Control Server. More information can be obtained from Cisco’s Web site
at www.cisco.com.
Q: Can I configure both a rotary group and a dialer profile on the same
router?
A: Yes and no. You can configure both a rotary group and a dialer profile
on the same router; the same physical interfaces cannot be used for
both. If you have BRI0 as a member for rotary group 1, it cannot be a
member of a dialer profile.
www.syngress.com
93_sbcran_06 10/16/00 1:28 PM Page 232
Configuring and
Backing Up
Permanent
Connections
Solutions in this chapter:
■
Configuring point-to-point connections
■
Understanding and configuring X.25
connections
■
Configuring Frame Relay connections
■
Configuring and troubleshooting ATM
connections
■
Backing up permanent connections
Chapter 7
233
93_sbcran_07 10/16/00 3:58 PM Page 233
234 Chapter 7 • Configuring and Backing Up Permanent Connections
Introduction
When analyzing the traffic requirements between remote offices and your
central site, you may find it is not cost-effective to use an on-demand con-
nection. Under these circumstances, you need to implement a permanent
connection.
This chapter will explore several ways of providing permanent connec-
tions: point-to-point links (leased lines), X.25, Frame Relay, and Asyn-
chronous Transfer Mode (ATM). Although X.25 is perhaps not the perfect
choice for implementing a new network, there are times when you may
need to extend or connect to an existing X.25 network, so this chapter will
look at X.25 technology. Frame Relay is currently the most common
method used to connect a wide area network (WAN); ATM is also commonly
used for WAN connections. We will look at these technologies and see how
they can be used to connect remote sites to a central site.
As organizations become more reliant on their network infrastructure,
network engineers are required to provide a higher level of service. The
final section of this chapter will look at ways of back up these connections
to provide different levels of resilience.
Configuring Point-to-Point Connections
In today’s WAN arena, point-to-point networks are a very common method
for connecting a remote site to another site. When implementing point-to-
point connections there are many options to choose from. A point-to-point
link can be a simple dial-up connection, a dedicated serial link, or an
Integrated Services Digital Network (ISDN) connection. Regardless of the
type of link, you’ll need a protocol to allow communication over that link.
Let’s look at two protocols that can be implemented over point-to-point
links: Point-to-Point Protocol (PPP) and High-Level Data Link Control
(HDLC).
PPP is designed for links that transport packets between two peers. PPP
can operate across asynchronous, synchronous, ISDN, and dial-up point-
to-point implementations. PPP links provide a simultaneous, full-duplex,
bi-directional operation, and are assumed to deliver packets in order. PPP
encapsulates higher-layer protocol packets—such as Internet Protocol (IP),
Internetwork Packet Exchange (IPX), and AppleTalk—into PPP packets for
transmission across the link on a first-come, first-served basis. PPP is a
standard international protocol, and can be used in multi-vendor environ-
ments.
HDLC is a widely-used protocol for encapsulation techniques on point-
to-point dedicated links. HDLC is derived from IBM’s Synchronous Data
www.syngress.com
93_sbcran_07 10/16/00 3:58 PM Page 234
www.syngress.com
Link Control (SDLC) protocol suite. HDLC specifies the encapsulation
method in point-to-point synchronous links, and it is the default encapsu-
lation for Cisco serial interfaces.
The following diagram and configurations provide details on how to
configure a simple point-to-point network.
Figure 7.2 Point-to-Point Configurations.
Central#
!
version 11.3
!
hostname Central
!
interface Ethernet0
ip address 10.1.1.1 255.255.255.0
!
interface Serial0
ip address 192.168.3.1 255.255.255.0
no shutdown
!
router rip
network 192.168.3.0
network 10.0.0.0
!
Configuring and Backing Up Permanent Connections • Chapter 7 235
Figure 7.1 A simple point-to point-network.
E0 E0
S0
S0
Central Branch
192.168.3.1/24
10.1.1.1/24
192.168.3.2/24
192.168.1.1/24
Dedicated
T1
Continued
93_sbcran_07 10/16/00 3:58 PM Page 235
236 Chapter 7 • Configuring and Backing Up Permanent Connections
Figure 7.2 Continued.
end
Branch
!
version 11.3
!
hostname Branch
!
interface Ethernet0
ip address 192.168.1.1 255.255.255.0
no shutdown
!
interface Serial0
ip address 192.168.3.2 255.255.255.0
no shutdown
!
!
router rip
network 192.168.3.0
network 10.0.0.0
Notice that Figure 7.2 did not specify an encapsulation on any of the
serial interfaces. This means that the encapsulation would be HDLC, the
default encapsulation on serial interfaces in Cisco routers.
If you wanted to use PPP instead of HDLC, you would enter the fol-
lowing command in interface configuration mode for each of the connected
serial interfaces:
Central(config-if)# encapsulation ppp
Keep in mind that the encapsulation must be the same on both sides of
the link, or no communication will be possible over that link.
www.syngress.com
93_sbcran_07 10/16/00 3:58 PM Page 236
Configuring and Backing Up Permanent Connections • Chapter 7 237
X.25 Connections
X.25 technology was developed in the early days of computer networking,
and was designed for unreliable and slow-speed networks. During the
days in which X.25 was commonly used, people didn’t have the option of
running multimedia, voice, or any other high-bandwidth application over a
data network. This accounts for the differences between X.25 and some of
the newer technologies that are currently available like ATM, Frame Relay,
or ISDN. The following sections review some of the advantages and disad-
vantages of using X.25. At the same time, it uses X.25 to introduce some
of the more common solutions currently in place.
X.25 Overview
X.25 was developed when some of the newer technologies were yet to be
discovered. It’s a protocol that runs up to Layer 3 in the Open System
Interconnection (OSI) stack, which means it can be routed. Today we’re
seeing that X.25 is being replaced with faster technologies such as ATM,
Frame Relay, or ISDN. One of the primary benefits of X.25 was its ability to
provide error checking, which was needed when most data networks were
running over slow, error-prone public networks. This benefit, however, has
also been looked upon as a disadvantage, due to the delay added as errors
are being checked. X.25 defines the first three layers in an ISO network
model:
■
Layer 1 (the physical layer) is concerned with electrical or sig-
naling functions. It includes several standards such as X.21 and
other serial cable standards like V.35 and RS232.
■
Layer 2 (the data-link layer) Link Access Procedure Balanced
(LAPB) is a data-link layer protocol that provides an error-free link
between two connected devices. LAPB is derived from the HDLC
standard of ISO.
■
Layer 3 (the network layer) is referred to as the X.25 Packet
Layer Protocol (PLP) and is primarily concerned with network
routing functions and the multiplexes permanent virtual circuits
(PVCs), switched virtual circuits (SVCs) type of logical connections
over a single physical connection.
www.syngress.com
93_sbcran_07 10/16/00 3:58 PM Page 237
238 Chapter 7 • Configuring and Backing Up Permanent Connections
Data Terminal Equipment (DTE) and Data
Circuit-Terminating Equipment (DCE)
X.25 utilizes a connection-oriented service, which ensures that packets are
transmitted in order. The end-user connection is called DTE and the con-
nection on the network (carrier) side is called DCE (see Figure 7.3). The
user (DTE) can communicate with multiple users simultaneously on a
single physical line, with multiple logical channels. On one physical line
there can be as many as 4096 logical channels.
Packet Assembler/De-assembler (PAD)
In the early 80s, a majority of data processing was done utilizing asynchro-
nous terminals, which are character-oriented. These asynchronous termi-
nals are then connected to a device called a Packet Assembler/De-assembler
(PAD), which collects characters and sends them as a packet through the
X.25 network. In Figure 7.3, in place of a client DTE device, a PAD that
connects to asynchronous terminals would be used.
Frames in X.25
Frames in X.25 are defined into three categories, Information Frames (IF),
Supervisory Frames (SF), and Unnumbered Frames (UF). IFs carry the user
data and sequence numbers to tell the other end what is received and
what is expected. SFs handle flow and error control; they also indicate the
final packet (no data to send). UFs control Mode setting commands and
responses. They are carried over LAPB frame format (see Table 7.1). LAPB
frames include the following fields:
www.syngress.com
Figure 7.3 X.25 DTE and DCE connectivity.
X.25
cloud
CLIENT- DTE
DCE -
Network Device
DCE - Network Device
DCE - Network Device
93_sbcran_07 10/16/00 3:58 PM Page 238
Configuring and Backing Up Permanent Connections • Chapter 7 239
A header flag of 01111110 delimiting the beginning of the frame.
The address field (1 byte or 2 bytes), really used for link commands and
responses—the real addressing is done at the packet layer. (The packet
layer address is called Data Network Identification Code (DNIC)). The
address field simply indicates whether the frame is a command frame or a
response frame.
A control byte, which specifies whether the frame is an Information frame
(IF), Supervisory frame (SF), or an Unnumbered frame (UF).
The information field follows the control field. The information field con-
tains the upper layer data (encapsulated in a PLP packet).
The FCS field (frame check sequence) provides error checking and guar-
antees the integrity of the transmitted data.
The trailer flag (also 011111110) delimits the end of the frame.
Table 7.1 X.25 Packet Format
Flag Address Control Information FCS Flag
01111110 8 bits 8 or Variable no. 16-bit 01111110
16 bits of bytes check sum
The X.25 protocol is defined in three parts, corresponding to the lower
three layers of the OSI model.
X.21 defines physical layer characteristics and maps to the physical layer
in the OSI model.
LAP-B mode maps to the data-link layer in the OSI model.
Packet Layer Protocol provides connection-oriented transport over virtual
circuits and maps to the network layer in the OSI model.
The other protocols related to X.25 are: X.3, X.29, X.75, and X.121.
These are also called International Telecommunication Union
Telecommunication Standardization Sector (ITU-T) standards for the X.25
series.
X.3 Specifies the parameters for PAD terminal handling. X.3 controls such
elements as the baud rate, flow control, local echo, and cursor style.
X.29 Specifies the multiplexing and de-multiplexing of characters into an
X.25 packet. It sends these packets to an asynchronous terminal, via
asynchronous lines, connected to the PAD.
www.syngress.com
93_sbcran_07 10/16/00 3:58 PM Page 239
240 Chapter 7 • Configuring and Backing Up Permanent Connections
X.75 Specifies the interoperability between two or more public switching
X.25 networks.
X.121 Specifies the X.25 addressing standard. It is also called the DNIC
(Data Network Identification Code) address.
X.25 Virtual Circuits
A virtual circuit is simply a logical circuit that provides reliable connec-
tivity between two DTE devices. Physically, the connection may pass
through many different intermediate nodes along the way, but logically it
appears to be a single link between the two communicating devices.
X.25 supports two types of virtual circuits, switched virtual circuits
(SVCs), and permanent virtual circuits (PVCs).
SVCs provide a temporary link to transmit data; they are established
and terminated on an as-needed basis. During a data transfer, the DTE
devices are required to establish, maintain, and terminate the session.
This has to happen each time the two devices need to communicate. An
SVC would be useful in a situation that requires sporadic data transfers.
PVCs, on the other hand, are permanently in place and always ready to
transfer data. The session is always active. A PVC is useful in a situation
that requires frequent and consistent data transfers.
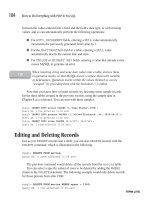
X.25 Call Setup and Disconnection
In the network layer, the packet is defined with a general format ID, logical
channel group number, Logical Channel Number (LCN), and packet type.
The establishment and termination of a virtual circuit (PVCs and SVCs)
occurs at the packet level. Sliding windows, flow control per virtual circuits
(VC), and recovery functions also occur at the packet level.
Table 7.2 and Figure 7.4 illustrate the call setup and disconnection
process.
Table 7.2 Call Setup and Disconnection
Call Request Æ Incoming Call
Call Connected Å Call Accepted
Data Æ Data
Data Å Data
Clear Request Æ Clear Indication
Clear Confirmation Å Clear Confirmation
……
www.syngress.com
93_sbcran_07 10/16/00 3:58 PM Page 240
Configuring and Backing Up Permanent Connections • Chapter 7 241
Configuring X.25
This section describes how to configure an X.25 network. First, you need
to understand a little bit about how X.25 addressing works. X.25 networks
use the X.121 addressing format. X.121 addresses are used by X.25 to
establish virtual circuits. Table 7.3 illustrates the X.121 address format.
Table 7.3 X.121 Address Format
International Data Number (IDN)
DNIC 4 digits NTN up to 10 digits
Country PSN
3 digits 1 digit
An X.121 address consists of the International Data Number (IDN),
which in turn consists of two sub-fields: the DNIC, and the National
Terminal Number (NTN).
The four-digit DNIC portion of the X.121 address consists of two sub-
fields: the country code (three digits), which identifies the country in which
the destination network resides (the code for the United States is 311), and
the Packet Switched Network (PSN), a single digit that basically identifies
the X.25 provider (AT&T or Tymnet, for example).
www.syngress.com
Figure 7.4 X.25 Call Setup.
P1
Ready
P3
DCE waiting
P2
DTE waiting
P5
Call collision
P4
Data transfer
13
56
24
7
1. DTE - CALL REQUEST
2. DCE - CALL CONNECT
3. DCE - INCOMING CALL
4. DTE - CALL ACCEPTED
5. DCE - INCOMING CALL
6. DTE - CALL REQUEST
7. DCE - CALL CONNECTED
State Diagram of Call Setup
93_sbcran_07 10/16/00 3:58 PM Page 241