professional android application development phần 5 doc
Bạn đang xem bản rút gọn của tài liệu. Xem và tải ngay bản đầy đủ của tài liệu tại đây (447.83 KB, 43 trang )
150
Chapter 5: Intents, Broadcast Receivers, Adapters, and the Internet
ArrayAdapter<Quake> aa;
ArrayList<Quake> earthquakes = new ArrayList<Quake>();
@Override
public void onCreate(Bundle icicle) {
super.onCreate(icicle);
setContentView(R.layout.main);
earthquakeListView =
(ListView)this.findViewById(R.id.earthquakeListView);
int layoutID = android.R.layout.simple_list_item_1;
aa = new ArrayAdapter<Quake>(this, layoutID , earthquakes);
earthquakeListView.setAdapter(aa);
}
}
4. Next, you should start processing the earthquake feed. For this example, the feed used is the
1-day USGS feed for earthquakes with a magnitude greater than 2.5.
Add the location of your feed as an external string resource. This lets you potentially specify a different
feed based on a user’s location.
<?xml version=”1.0” encoding=”utf-8”?>
<resources>
<string name=”app_name”>Earthquake</string>
<string name=”quake_feed”>
/> </string>
</resources>
5. Before your application can access the Internet, it needs to be granted permission for Internet
access. Add the
uses-permission to the manifest.
<uses-permission xmlns:android=”
android:name=”android.permission.INTERNET”>
</uses-permission>
6. Returning to the Earthquake Activity, create a new refreshEarthquakes method that con-
nects to, and parses, the earthquake feed. Extract each earthquake, and parse the details to
obtain the date, magnitude, link, and location. As you fi nish parsing each earthquake, pass it in
to a new
addNewQuake method.
The XML parsing is presented here without further comment.
private void refreshEarthquakes() {
// Get the XML
URL url;
try {
String quakeFeed = getString(R.string.quake_feed);
url = new URL(quakeFeed);
URLConnection connection;
44712c05.indd 15044712c05.indd 150 10/20/08 4:11:35 PM10/20/08 4:11:35 PM
151
Chapter 5: Intents, Broadcast Receivers, Adapters, and the Internet
connection = url.openConnection();
HttpURLConnection httpConnection = (HttpURLConnection)connection;
int responseCode = httpConnection.getResponseCode();
if (responseCode == HttpURLConnection.HTTP_OK) {
InputStream in = httpConnection.getInputStream();
DocumentBuilderFactory dbf;
dbf = DocumentBuilderFactory.newInstance();
DocumentBuilder db = dbf.newDocumentBuilder();
// Parse the earthquake feed.
Document dom = db.parse(in);
Element docEle = dom.getDocumentElement();
// Clear the old earthquakes
earthquakes.clear();
// Get a list of each earthquake entry.
NodeList nl = docEle.getElementsByTagName(“entry”);
if (nl != null && nl.getLength() > 0) {
for (int i = 0 ; i < nl.getLength(); i++) {
Element entry = (Element)nl.item(i);
Element title =
(Element)entry.getElementsByTagName(“title”).item(0);
Element g =
(Element)entry.getElementsByTagName(“georss:point”).item(0);
Element when =
(Element)entry.getElementsByTagName(“updated”).item(0);
Element link =
(Element)entry.getElementsByTagName(“link”).item(0);
String details = title.getFirstChild().getNodeValue();
String hostname = “”;
String linkString = hostname + link.getAttribute(“href”);
String point = g.getFirstChild().getNodeValue();
String dt = when.getFirstChild().getNodeValue();
SimpleDateFormat sdf;
sdf = new SimpleDateFormat(“yyyy-MM-dd’T’hh:mm:ss’Z’”);
Date qdate = new GregorianCalendar(0,0,0).getTime();
try {
qdate = sdf.parse(dt);
} catch (ParseException e) {
e.printStackTrace();
}
String[] location = point.split(“ “);
Location l = new Location(“dummyGPS”);
l.setLatitude(Double.parseDouble(location[0]));
l.setLongitude(Double.parseDouble(location[1]));
String magnitudeString = details.split(“ “)[1];
44712c05.indd 15144712c05.indd 151 10/20/08 4:11:35 PM10/20/08 4:11:35 PM
152
Chapter 5: Intents, Broadcast Receivers, Adapters, and the Internet
int end = magnitudeString.length()-1;
double magnitude;
magnitude = Double.parseDouble(magnitudeString.substring(0,
end));
details = details.split(“,”)[1].trim();
Quake quake = new Quake(qdate, details, l,
magnitude, linkString);
// Process a newly found earthquake
addNewQuake(quake);
}
}
}
} catch (MalformedURLException e) {
e.printStackTrace();
} catch (IOException e) {
e.printStackTrace();
} catch (ParserConfigurationException e) {
e.printStackTrace();
} catch (SAXException e) {
e.printStackTrace();
}
finally {
}
}
private void addNewQuake(Quake _quake) {
// TODO: Add the earthquakes to the array list.
}
7. Update the addNewQuake method so that it takes each newly processed quake and adds it to the
Earthquake
ArrayList. It should also notify the Array Adapter that the underlying data have
changed.
private void addNewQuake(Quake _quake) {
// Add the new quake to our list of earthquakes.
earthquakes.add(_quake);
// Notify the array adapter of a change.
aa.notifyDataSetChanged();
}
8. Modify your onCreate method to call refreshEarthquakes on start-up.
@Override
public void onCreate(Bundle icicle) {
super.onCreate(icicle);
setContentView(R.layout.main);
earthquakeListView =
44712c05.indd 15244712c05.indd 152 10/20/08 4:11:35 PM10/20/08 4:11:35 PM
153
Chapter 5: Intents, Broadcast Receivers, Adapters, and the Internet
(ListView)this.findViewById(R.id.earthquakeListView);
int layoutID = android.R.layout.simple_list_item_1;
aa = new ArrayAdapter<Quake>(this, layoutID , earthquakes);
earthquakeListView.setAdapter(aa);
refreshEarthquakes();
}
The Internet lookup is currently happening on the main UI thread. This is bad form as the application
will become unresponsive if the lookup takes longer than a few seconds. In Chapter 8, you’ll learn how
to move expensive or time-consuming operations like this onto the background thread.
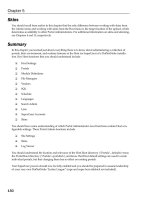
9. If you run your project, you should see a List View that features the earthquakes from the last
24 hours with a magnitude greater than 2.5, as shown in the screenshot in Figure 5-6.
Figure 5-6
10. There are only two more steps to make this a more useful application. First, create a new menu
item to let users refresh the earthquake feed on demand.
10.1. Start by adding a new external string for the menu option.
<string name=”menu_update”>Refresh Earthquakes</string>
10.2 Then override the Activity’s onCreateOptionsMenu and onOptionsItemSelected
methods to display and handle the refresh earthquakes menu item.
static final private int MENU_UPDATE = Menu.FIRST;
@Override
44712c05.indd 15344712c05.indd 153 10/20/08 4:11:35 PM10/20/08 4:11:35 PM
154
Chapter 5: Intents, Broadcast Receivers, Adapters, and the Internet
public boolean onCreateOptionsMenu(Menu menu) {
super.onCreateOptionsMenu(menu);
menu.add(0, MENU_UPDATE, Menu.NONE, R.string.menu_update);
return true;
}
@Override
public boolean onOptionsItemSelected(MenuItem item) {
super.onOptionsItemSelected(item);
switch (item.getItemId()) {
case (MENU_UPDATE): {
refreshEarthquakes();
return true;
}
}
return false;
}
11. Now add some interaction. Let users fi nd more details by opening a Dialog box when they
select an earthquake from the list.
11.1. Creating a new quake_details.xml layout resource for the Dialog box you’ll display on
an item click.
<?xml version=”1.0” encoding=”utf-8”?>
<LinearLayout
xmlns:android=” /> android:orientation=”vertical”
android:layout_width=”fill_parent”
android:layout_height=”fill_parent”
android:padding=”10sp”>
<TextView
android:id=”@+id/quakeDetailsTextView”
android:layout_width=”fill_parent”
android:layout_height=”fill_parent”
android:textSize=”14sp”
/>
</LinearLayout>
11.2. Then modify your onCreate method to add an ItemClickListener to the List View
that displays a Dialog box whenever an earthquake item is selected.
static final private int QUAKE_DIALOG = 1;
Quake selectedQuake;
@Override
public void onCreate(Bundle icicle) {
super.onCreate(icicle);
setContentView(R.layout.main);
earthquakeListView =
44712c05.indd 15444712c05.indd 154 10/20/08 4:11:35 PM10/20/08 4:11:35 PM
155
Chapter 5: Intents, Broadcast Receivers, Adapters, and the Internet
(ListView)this.findViewById(R.id.earthquakeListView);
earthquakeListView.setOnItemClickListener(new OnItemClickListener() {
public void onItemClick(AdapterView _av, View _v, int _index,
long arg3) {
selectedQuake = earthquakes.get(_index);
showDialog(QUAKE_DIALOG);
}
});
int layoutID = android.R.layout.simple_list_item_1;
aa = new ArrayAdapter<Quake>(this, layoutID , earthquakes);
earthquakeListView.setAdapter(aa);
refreshEarthquakes();
}
11.3. Now override the onCreateDialog and onPrepareDialog methods to create and
populate the Earthquake Details dialog.
@Override
public Dialog onCreateDialog(int id) {
switch(id) {
case (QUAKE_DIALOG) :
LayoutInflater li = LayoutInflater.from(this);
View quakeDetailsView = li.inflate(R.layout.quake_details, null);
AlertDialog.Builder quakeDialog = new AlertDialog.Builder(this);
quakeDialog.setTitle(“Quake Time”);
quakeDialog.setView(quakeDetailsView);
return quakeDialog.create();
}
return null;
}
@Override
public void onPrepareDialog(int id, Dialog dialog) {
switch(id) {
case (QUAKE_DIALOG) :
SimpleDateFormat sdf;
sdf = new SimpleDateFormat(“dd/MM/yyyy HH:mm:ss”);
String dateString = sdf.format(selectedQuake.getDate());
String quakeText = “Mangitude “ + selectedQuake.getMagnitude() +
“\n” + selectedQuake.getDetails() + “\n” +
selectedQuake.getLink();
AlertDialog quakeDialog = (AlertDialog)dialog;
quakeDialog.setTitle(dateString);
TextView tv =
(TextView)quakeDialog.findViewById(R.id.quakeDetailsTextView);
tv.setText(quakeText);
break;
}
}
44712c05.indd 15544712c05.indd 155 10/20/08 4:11:35 PM10/20/08 4:11:35 PM
156
Chapter 5: Intents, Broadcast Receivers, Adapters, and the Internet
11.4. The fi nal step is to linkify the Dialog to make the link to the USGS a hyperlink. Adjust
the Dialog box’s XML layout resource defi nition to include an
autolink attribute.
<?xml version=”1.0” encoding=”utf-8”?>
<LinearLayout
xmlns:android=” /> android:orientation=”vertical”
android:layout_width=”fill_parent”
android:layout_height=”fill_parent”
android:padding=”10sp”>
<TextView
android:id=”@+id/quakeDetailsTextView”
android:layout_width=”fill_parent”
android:layout_height=”fill_parent”
android:textSize=”14sp”
android:autoLink=”all”
/>
</LinearLayout>
Launch your activity again. When you click on a particular earthquake, a Dialog box will appear, par-
tially obscuring the list, as shown in Figure 5-7.
Figure 5-7
44712c05.indd 15644712c05.indd 156 10/20/08 4:11:36 PM10/20/08 4:11:36 PM
157
Chapter 5: Intents, Broadcast Receivers, Adapters, and the Internet
Summary
The focus of this chapter has been on binding your application components.
Intents provide a versatile messaging system that lets you pass intentions between your application
and others, to perform actions and signal events. You learned how to use implicit and explicit Intents to
start new Activities, and how to populate an Activity menu dynamically through runtime resolution of
Activity Intent Filters.
You were introduced to Broadcast Intents and saw how they can be used to send messages throughout the
device, particularly to support an event-driven model based on system- and application-specifi c events.
You learned how to use sub-Activities to pass data between Activities and how to use Dialogs to dis-
play information and facilitate user input.
Adapters were introduced and used to bind underlying data to visual components. In particular, you
saw how to use an Array Adapter and Simple Cursor Adapter to bind a List View to Array Lists and
Cursors.
Finally, you learned the basics behind connecting to the Internet and using remote feeds as data sources
for your native client applications.
You also learned:
To use Linkify to add implicit View Intents to TextViews at run time. ❑
Which native Android actions are available for you to extend, replace, or embrace. ❑
How to use Intent Filters to let your own Activities become handlers for completing action ❑
requests from your own or other applications.
How to listen for Broadcast Intents using Broadcast Receivers. ❑
How to use an Activity as a Dialog box. ❑
In the next chapter, you will learn how to persist information within your applications. Android pro-
vides several mechanisms for saving application data, including fi les, simple preferences, and fully fea-
tured relational databases (using the SQLite database library).
44712c05.indd 15744712c05.indd 157 10/20/08 4:11:36 PM10/20/08 4:11:36 PM
44712c05.indd 15844712c05.indd 158 10/20/08 4:11:36 PM10/20/08 4:11:36 PM
Data Storage, Retrieval,
and Sharing
In this chapter, you’ll be introduced to three of the most versatile data persistence techniques
in Android — preferences, local fi les, and SQLite databases — before looking at Content
Providers.
Saving and loading data is an essential requirement for most applications. At a minimum,
Activities should save their User Interface (UI) state each time they move out of the foreground.
This ensures that the same UI state is presented when it’s next seen, even if the process has been
killed and restarted before that happens.
It’s also likely that you’ll need to save preferences, to let users customize the application, and per-
sist data entered or recorded. Just as important is the ability to load data from fi les, databases, and
Content Providers — your own, and those shared by native and third-party applications.
Android’s nondeterministic Activity and Application lifetimes make persisting UI state and
application data between sessions particularly important. Android offers several alternatives for
saving application data, each optimized to fulfi ll a particular need.
Preferences are a simple, lightweight key/value pair mechanism for saving primitive application
data, most commonly a user’s application preferences. Android also provides access to the local
fi lesystem, both through specialized methods and the normal
Java.IO classes.
For a more robust persistence layer, Android provides the SQLite database library. The SQLite
database offers a powerful native SQL database over which you have total control.
44712c06.indd 15944712c06.indd 159 10/20/08 4:11:20 PM10/20/08 4:11:20 PM
160
Chapter 6: Data Storage, Retrieval, and Sharing
Content Providers offer a generic interface to any data source. They effectively decouple the underlying
data storage technique from the application layer.
By default, access to all fi les, databases, and preferences is restricted to the application that created
them. Content Providers offer a managed way for your applications to share private data with other
applications. As a result, your applications can use the Content Providers offered by others, including
native providers.
Android Techniques for Saving Data
The data persistence techniques in Android provide options for balancing speed, effi ciency, and
robustness:
Shared Preferences ❑ When storing the UI state, user preferences, or application settings, you
want a lightweight mechanism to store a known set of values. Shared Preferences let you save
groups of key/value pairs of primitive data as named preferences.
Files ❑ It’s not pretty, but sometimes writing to, and reading from, fi les directly is the only way
to go. Android lets you create and load fi les on the device’s internal or external media.
SQLite Databases ❑ When managed, structured data is the best approach, Android offers the
SQLite relational database library. Every application can create its own databases over which it
has total control.
Content Providers ❑ Rather than a storage mechanism in their own right, Content Providers let
you expose a well-defi ned interface for using and sharing private data. You can control access
to Content Providers using the standard permission system.
Saving Simple Application Data
There are two lightweight techniques for saving simple application data for Android applications —
Shared Preferences and a pair of event handlers used for saving Activity instance details. Both mecha-
nisms use a name/value pair (NVP) mechanism to store simple primitive values.
Using
SharedPreferences, you can create named maps of key/value pairs within your application
that can be shared between application components running in the same Context.
Shared Preferences support the primitive types Boolean, string, fl oat, long, and integer, making them
an ideal way to quickly store default values, class instance variables, the current UI state, and user
preferences. They are most commonly used to persist data across user sessions and to share settings
between application components.
Alternatively, Activities offer the
onSaveInstanceState handler. It’s designed specifi cally to persist
the UI state when the Activity becomes eligible for termination by a resource-hungry run time.
The handler works like the Shared Preference mechanism. It offers a
Bundle parameter that represents
a key/value map of primitive types that can be used to save the Activity’s instance values. This Bundle
44712c06.indd 16044712c06.indd 160 10/20/08 4:11:20 PM10/20/08 4:11:20 PM
161
Chapter 6: Data Storage, Retrieval, and Sharing
is then made available as a parameter passed in to the onCreate and onRestoreInstanceState
method handlers.
This UI state Bundle is used to record the values needed for an Activity to provide an identical UI fol-
lowing unexpected restarts.
Creating and Saving Preferences
To create or modify a Shared Preference, call getSharedPreferences on the application Context, pass-
ing in the name of the Shared Preferences to change. Shared Preferences are shared across an applica-
tion’s components but aren’t available to other applications.
To modify a Shared Preference, use the
SharedPreferences.Editor class. Get the Editor object by
calling
edit on the SharedPreferences object you want to change. To save edits, call commit on the
Editor, as shown in the code snippet below.
public static final String MYPREFS = “mySharedPreferences”;
protected void savePreferences(){
// Create or retrieve the shared preference object.
int mode = Activity.MODE_PRIVATE;
SharedPreferences mySharedPreferences = getSharedPreferences(MYPREFS,
mode);
// Retrieve an editor to modify the shared preferences.
SharedPreferences.Editor editor = mySharedPreferences.edit();
// Store new primitive types in the shared preferences object.
editor.putBoolean(“isTrue”, true);
editor.putFloat(“lastFloat”, 1f);
editor.putInt(“wholeNumber”, 2);
editor.putLong(“aNumber”, 3l);
editor.putString(“textEntryValue”, “Not Empty”);
// Commit the changes.
editor.commit();
}
Retrieving Shared Preferences
Accessing saved Shared Preferences is also done with the getSharedPreferences method. Pass in the
name of the Shared Preference you want to access, and use the type-safe
get<type> methods to extract
saved values.
Each getter takes a key and a default value (used when no value is available for that key), as shown in
the skeleton code below:
public void loadPreferences() {
// Get the stored preferences
int mode = Activity.MODE_PRIVATE;
44712c06.indd 16144712c06.indd 161 10/20/08 4:11:20 PM10/20/08 4:11:20 PM
162
Chapter 6: Data Storage, Retrieval, and Sharing
SharedPreferences mySharedPreferences = getSharedPreferences(MYPREFS,
mode);
// Retrieve the saved values.
boolean isTrue = mySharedPreferences.getBoolean(“isTrue”, false);
float lastFloat = mySharedPreferences.getFloat(“lastFloat”, 0f);
int wholeNumber = mySharedPreferences.getInt(“wholeNumber”, 1);
long aNumber = mySharedPreferences.getLong(“aNumber”, 0);
String stringPreference;
stringPreference = mySharedPreferences.getString(“textEntryValue”,
“”);
}
Saving the Activity State
If you want to save Activity information that doesn’t need to be shared with other components (e.g.,
class instance variables), you can call
Activity.getPreferences() without specifying a preferences
name. Access to the Shared Preferences map returned is restricted to the calling Activity; each Activity
supports a single unnamed SharedPreferences object.
The following skeleton code shows how to use the Activity’s private Shared Preferences:
protected void saveActivityPreferences(){
// Create or retrieve the activity preferences object.
SharedPreferences activityPreferences =
getPreferences(Activity.MODE_PRIVATE);
// Retrieve an editor to modify the shared preferences.
SharedPreferences.Editor editor = activityPreferences.edit();
// Retrieve the View
TextView myTextView = (TextView)findViewById(R.id.myTextView);
// Store new primitive types in the shared preferences object.
editor.putString(“currentTextValue”,
myTextView.getText().toString());
// Commit changes.
editor.commit();
}
Saving and Restoring Instance State
To save Activity instance variables, Android offers a specialized alternative to Shared Preferences.
By overriding an Activity’s
onSaveInstanceState event handler, you can use its Bundle parameter
to save instance values. Store values using the same
get and put methods as shown for Shared Pref-
erences, before passing the modifi ed
Bundle into the superclass’s handler, as shown in the following
code snippet:
private static final String TEXTVIEW_STATE_KEY = “TEXTVIEW_STATE_KEY”;
44712c06.indd 16244712c06.indd 162 10/20/08 4:11:20 PM10/20/08 4:11:20 PM
163
Chapter 6: Data Storage, Retrieval, and Sharing
@Override
public void onSaveInstanceState(Bundle outState) {
// Retrieve the View
TextView myTextView = (TextView)findViewById(R.id.myTextView);
// Save its state
outState.putString(TEXTVIEW_STATE_KEY,
myTextView.getText().toString());
super.onSaveInstanceState(outState);
}
This handler will be triggered whenever an Activity completes its Active life cycle, but only when it’s
not being explicitly fi nished. As a result, it’s used to ensure a consistent Activity state between active
life cycles of a single user session.
The saved
Bundle is passed in to the onRestoreInstanceState and onCreate methods if the applica-
tion is forced to restart during a session. The following snippet shows how to extract values from the
Bundle and use them to update the Activity instance state:
@Override
public void onCreate(Bundle icicle) {
super.onCreate(icicle);
setContentView(R.layout.main);
TextView myTextView = (TextView)findViewById(R.id.myTextView);
String text = “”;
if (icicle != null && icicle.containsKey(TEXTVIEW_STATE_KEY))
text = icicle.getString(TEXTVIEW_STATE_KEY);
myTextView.setText(text);
}
It’s important to remember that onSaveInstanceState is called only when an Activity becomes
inactive, but not when it is being closed by a call to fi nish or by the user pressing the Back button.
Saving the To-Do List Activity State
Currently, each time the To-Do List example application is restarted, all the to-do items are lost and any
text entered into the text entry box is cleared. In this example, you’ll start to save the application state of
the To-Do list application across sessions.
The instance state in the
ToDoList Activity consists of three variables:
Is a new item being added? ❑
What text exists in the new item entry textbox? ❑
What is the currently selected item? ❑
Using the Activity’s default Shared Preference, you can store each of these values and update the UI
when the Activity is restarted.
44712c06.indd 16344712c06.indd 163 10/20/08 4:11:20 PM10/20/08 4:11:20 PM
164
Chapter 6: Data Storage, Retrieval, and Sharing
Later in this chapter, you’ll learn how to use the SQLite database to persist the to-do items as well. This
example is a fi rst step that shows how to ensure a seamless experience by saving Activity instance details.
1. Start by adding static String variables to use as preference keys.
private static final String TEXT_ENTRY_KEY = “TEXT_ENTRY_KEY”;
private static final String ADDING_ITEM_KEY = “ADDING_ITEM_KEY”;
private static final String SELECTED_INDEX_KEY = “SELECTED_INDEX_KEY”;
2. Next, override the onPause method. Get the Activity’s private Shared Preference object, and get
its Editor object.
Using the keys you created in Step 1, store the instance values based on whether a new item is
being added and any text in the “new item” Edit Box.
@Override
protected void onPause(){
super.onPause();
// Get the activity preferences object.
SharedPreferences uiState = getPreferences(0);
// Get the preferences editor.
SharedPreferences.Editor editor = uiState.edit();
// Add the UI state preference values.
editor.putString(TEXT_ENTRY_KEY, myEditText.getText().toString());
editor.putBoolean(ADDING_ITEM_KEY, addingNew);
// Commit the preferences.
editor.commit();
}
3. Write a restoreUIState method that applies the instance values you recorded in Step 2 when
the application restarts.
Modify the
onCreate method to add a call to the restoreUIState method at the very end.
@Override
public void onCreate(Bundle icicle) {
[ existing onCreate logic ]
restoreUIState();
}
private void restoreUIState() {
// Get the activity preferences object.
SharedPreferences settings = getPreferences(Activity.MODE_PRIVATE);
// Read the UI state values, specifying default values.
String text = settings.getString(TEXT_ENTRY_KEY, “”);
Boolean adding = settings.getBoolean(ADDING_ITEM_KEY, false);
// Restore the UI to the previous state.
if (adding) {
addNewItem();
myEditText.setText(text);
}
}
44712c06.indd 16444712c06.indd 164 10/20/08 4:11:20 PM10/20/08 4:11:20 PM
165
Chapter 6: Data Storage, Retrieval, and Sharing
4. Record the index of the selected item using the onSaveInstanceState / onRestore
InstanceState
mechanism. It’s then only saved and applied if the application is killed without
the user’s explicit instruction.
@Override
public void onSaveInstanceState(Bundle outState) {
outState.putInt(SELECTED_INDEX_KEY,
myListView.getSelectedItemPosition());
super.onSaveInstanceState(outState);
}
@Override
public void onRestoreInstanceState(Bundle savedInstanceState) {
int pos = -1;
if (savedInstanceState != null)
if (savedInstanceState.containsKey(SELECTED_INDEX_KEY))
pos = savedInstanceState.getInt(SELECTED_INDEX_KEY, -1);
myListView.setSelection(pos);
}
When you run the To-Do List application, you should now see the UI state persisted across sessions.
That said, it still won’t persist the to-do list items — you’ll add this essential piece of functionality later
in the chapter.
Creating a Preferences Page for the Earthquake Viewer
In Chapter 5, you created an earthquake monitor that showed a list of recent earthquakes based on an
Internet feed.
In the following example, you’ll create a Preferences page for this earthquake viewer that lets users
confi gure application settings for a more personalized experience. You’ll provide the option to toggle
automatic updates, control the frequency of updates, and fi lter the minimum earthquake magnitude
displayed.
Later in this chapter, you’ll extend this example further by creating a Content Provider to save and
share earthquake data with other applications.
1. Open the Earthquake project you created in Chapter 5.
Add new String resources for the labels displayed in the “Preferences” screen. Also, add a String
for the new Menu Item that will let users access the Preferences screen.
<?xml version=”1.0” encoding=”utf-8”?>
<resources>
<string name=”app_name”>Earthquake</string>
<string name=”quake_feed”>
/> </string>
<string name=”menu_update”>Refresh Earthquakes</string>
44712c06.indd 16544712c06.indd 165 10/20/08 4:11:20 PM10/20/08 4:11:20 PM
166
Chapter 6: Data Storage, Retrieval, and Sharing
<string name=”auto_update_prompt”>Auto Update?</string>
<string name=”update_freq_prompt”>Update Frequency</string>
<string name=”min_quake_mag_prompt”>Minimum Quake Magnitude</string>
<string name=”menu_preferences”>Preferences</string>
</resources>
2. Create a new preferences.xml layout resource that lays out the UI for the Preferences Activ-
ity. Include a checkbox for indicating the “automatic update” toggle, and spinners to select the
update rate and magnitude fi lter.
<LinearLayout
xmlns:android=” /> android:orientation=”vertical”
android:layout_width=”fill_parent”
android:layout_height=”fill_parent”>
<TextView
android:layout_width=”fill_parent”
android:layout_height=”wrap_content”
android:text=”@string/auto_update_prompt”
/>
<CheckBox android:id=”@+id/checkbox_auto_update”
android:layout_width=”fill_parent”
android:layout_height=”wrap_content”
/>
<TextView
android:layout_width=”fill_parent”
android:layout_height=”wrap_content”
android:text=”@string/update_freq_prompt”
/>
<Spinner
android:id=”@+id/spinner_update_freq”
android:layout_width=”fill_parent”
android:layout_height=”wrap_content”
android:drawSelectorOnTop=”true”
/>
<TextView
android:layout_width=”fill_parent”
android:layout_height=”wrap_content”
android:text=”@string/min_quake_mag_prompt”
/>
<Spinner
android:id=”@+id/spinner_quake_mag”
android:layout_width=”fill_parent”
android:layout_height=”wrap_content”
android:drawSelectorOnTop=”true”
/>
<LinearLayout
android:orientation=”horizontal”
android:layout_width=”fill_parent”
android:layout_height=”wrap_content”>
<Button
44712c06.indd 16644712c06.indd 166 10/20/08 4:11:20 PM10/20/08 4:11:20 PM
167
Chapter 6: Data Storage, Retrieval, and Sharing
android:id=”@+id/okButton”
android:layout_width=”wrap_content”
android:layout_height=”wrap_content”
android:text=”@android:string/ok”
/>
<Button
android:id=”@+id/cancelButton”
android:layout_width=”wrap_content”
android:layout_height=”wrap_content”
android:text=”@android:string/cancel”
/>
</LinearLayout>
</LinearLayout>
3. Create four new array resources in a new res/values/arrays.xml fi le. They will provide the
values to use for the update frequency and minimum magnitude fi lter.
<?xml version=”1.0” encoding=”utf-8”?>
<resources>
<string-array name=”update_freq_options”>
<item>Every Minute</item>
<item>5 minutes</item>
<item>10 minutes</item>
<item>15 minutes</item>
<item>Every Hour</item>
</string-array>
<array name=”magnitude”>
<item>3</item>
<item>5</item>
<item>6</item>
<item>7</item>
<item>8</item>
</array>
<string-array name=”magnitude_options”>
<item>3</item>
<item>5</item>
<item>6</item>
<item>7</item>
<item>8</item>
</string-array>
<array name=”update_freq_values”>
<item>1</item>
<item>5</item>
<item>10</item>
<item>15</item>
<item>60</item>
</array>
</resources>
44712c06.indd 16744712c06.indd 167 10/20/08 4:11:20 PM10/20/08 4:11:20 PM
168
Chapter 6: Data Storage, Retrieval, and Sharing
4. Create the Preferences Activity. It will be used to display the application preferences.
Override
onCreate to infl ate the layout you created in Step 2, and get references to the
Checkbox and both Spinner controls. Then make a call to the
populateSpinners stub.
package com.paad.earthquake;
import android.app.Activity;
import android.content.SharedPreferences;
import android.content.SharedPreferences.Editor;
import android.os.Bundle;
import android.view.View;
import android.widget.ArrayAdapter;
import android.widget.Button;
import android.widget.CheckBox;
import android.widget.Spinner;
public class Preferences extends Activity {
CheckBox autoUpdate;
Spinner updateFreqSpinner;
Spinner magnitudeSpinner;
@Override
public void onCreate(Bundle icicle) {
super.onCreate(icicle);
setContentView(R.layout.preferences);
updateFreqSpinner =
(Spinner)findViewById(R.id.spinner_update_freq);
magnitudeSpinner = (Spinner)findViewById(R.id.spinner_quake_mag);
autoUpdate = (CheckBox)findViewById(R.id.checkbox_auto_update);
populateSpinners();
}
private void populateSpinners() {
}
}
5. Fill in the populateSpinners method, using Array Adapters to bind each Spinner to its corre-
sponding array.
private void populateSpinners() {
// Populate the update frequency spinner
ArrayAdapter<CharSequence> fAdapter;
fAdapter = ArrayAdapter.createFromResource(this,
R.array.update_freq_options,
android.R.layout.simple_spinner_item);
fAdapter.setDropDownViewResource(
android.R.layout.simple_spinner_dropdown_item);
44712c06.indd 16844712c06.indd 168 10/20/08 4:11:20 PM10/20/08 4:11:20 PM
169
Chapter 6: Data Storage, Retrieval, and Sharing
updateFreqSpinner.setAdapter(fAdapter);
// Populate the minimum magnitude spinner
ArrayAdapter<CharSequence> mAdapter;
mAdapter = ArrayAdapter.createFromResource(this,
R.array.magnitude_options,
android.R.layout.simple_spinner_item);
mAdapter.setDropDownViewResource(
android.R.layout.simple_spinner_dropdown_item);
magnitudeSpinner.setAdapter(mAdapter);
}
6. Add public static String values to use to identify the named Shared Preference you’re going to cre-
ate, and the keys it will use to store each preference value. Update the
onCreate method to retrieve
the named preference and call
updateUIFromPreferences. The updateUIFrom Preferences
method uses the
get<type> methods on the Shared Preference object to retrieve each preference
value and apply it to the current UI.
public static final String USER_PREFERENCE = “USER_PREFERENCES”;
public static final String PREF_AUTO_UPDATE = “PREF_AUTO_UPDATE”;
public static final String PREF_MIN_MAG = “PREF_MIN_MAG”;
public static final String PREF_UPDATE_FREQ = “PREF_UPDATE_FREQ”;
SharedPreferences prefs;
@Override
public void onCreate(Bundle icicle) {
super.onCreate(icicle);
setContentView(R.layout.preferences);
updateFreqSpinner = (Spinner)findViewById(R.id.spinner_update_freq);
magnitudeSpinner = (Spinner)findViewById(R.id.spinner_quake_mag);
autoUpdate = (CheckBox)findViewById(R.id.checkbox_auto_update);
populateSpinners();
prefs = getSharedPreferences(USER_PREFERENCE, Activity.MODE_PRIVATE);
updateUIFromPreferences();
}
private void updateUIFromPreferences() {
boolean autoUpChecked = prefs.getBoolean(PREF_AUTO_UPDATE, false);
int updateFreqIndex = prefs.getInt(PREF_UPDATE_FREQ, 2);
int minMagIndex = prefs.getInt(PREF_MIN_MAG, 0);
updateFreqSpinner.setSelection(updateFreqIndex);
magnitudeSpinner.setSelection(minMagIndex);
autoUpdate.setChecked(autoUpChecked);
}
44712c06.indd 16944712c06.indd 169 10/20/08 4:11:20 PM10/20/08 4:11:20 PM
170
Chapter 6: Data Storage, Retrieval, and Sharing
7. Still in the onCreate method, add event handlers for the OK and Cancel buttons. Cancel should
close the Activity, while OK should call
savePreferences fi rst.
@Override
public void onCreate(Bundle icicle) {
super.onCreate(icicle);
setContentView(R.layout.preferences);
updateFreqSpinner = (Spinner)findViewById(R.id.spinner_update_freq);
magnitudeSpinner = (Spinner)findViewById(R.id.spinner_quake_mag);
autoUpdate = (CheckBox)findViewById(R.id.checkbox_auto_update);
populateSpinners();
prefs = getSharedPreferences(USER_PREFERENCE, Activity.MODE_PRIVATE);
updateUIFromPreferences();
Button okButton = (Button) findViewById(R.id.okButton);
okButton.setOnClickListener(new View.OnClickListener() {
public void onClick(View view) {
savePreferences();
Preferences.this.setResult(RESULT_OK);
finish();
}
});
Button cancelButton = (Button) findViewById(R.id.cancelButton);
cancelButton.setOnClickListener(new View.OnClickListener() {
public void onClick(View view) {
Preferences.this.setResult(RESULT_CANCELED);
finish();
}
});
}
private void savePreferences() {
}
8. Fill in the savePreferences method to record the current preferences, based on the UI selec-
tions, to the Shared Preference object.
private void savePreferences() {
int updateIndex = updateFreqSpinner.getSelectedItemPosition();
int minMagIndex = magnitudeSpinner.getSelectedItemPosition();
boolean autoUpdateChecked = autoUpdate.isChecked();
Editor editor = prefs.edit();
editor.putBoolean(PREF_AUTO_UPDATE, autoUpdateChecked);
editor.putInt(PREF_UPDATE_FREQ, updateIndex);
editor.putInt(PREF_MIN_MAG, minMagIndex);
editor.commit();
}
44712c06.indd 17044712c06.indd 170 10/20/08 4:11:20 PM10/20/08 4:11:20 PM
171
Chapter 6: Data Storage, Retrieval, and Sharing
9. That completes the Preferences Activity. Make it accessible in the application by adding it to
the application manifest.
<activity android:name=”.Preferences”
android:label=”Earthquake Preferences”>
</activity>
10. Now return to the Earthquake Activity, and add support for the new Shared Preferences fi le
and a Menu Item to display the Preferences Activity.
Start by adding the new Menu Item. Extend the
onCreateOptionsMenu method to include a
new item that opens the Preferences Activity.
static final private int MENU_PREFERENCES = Menu.FIRST+1;
@Override
public boolean onCreateOptionsMenu(Menu menu) {
super.onCreateOptionsMenu(menu);
menu.add(0, MENU_UPDATE, Menu.NONE, R.string.menu_update);
menu.add(0, MENU_PREFERENCES, Menu.NONE, R.string.menu_preferences);
return true;
}
11. Modify the onOptionsItemSelected method to display the Preferences Activity when the new
Menu Item is selected. Create an explicit Intent, and pass it in to the
startActivityForResult
method. This will launch the Preferences screen and alert the
Earthquake class when the prefer-
ences are saved through the
onActivityResult handler.
private static final int SHOW_PREFERENCES = 1;
public boolean onOptionsItemSelected(MenuItem item) {
super.onOptionsItemSelected(item);
switch (item.getItemId()) {
case (MENU_UPDATE): {
refreshEarthquakes();
return true;
}
case (MENU_PREFERENCES): {
Intent i = new Intent(this, Preferences.class);
startActivityForResult(i, SHOW_PREFERENCES);
return true;
}
}
return false;
}
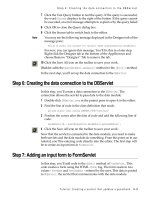
12. Launch your application, and select Preferences from the Activity menu. The Preferences Activ-
ity should be displayed as shown in Figure 6-1.
44712c06.indd 17144712c06.indd 171 10/20/08 4:11:20 PM10/20/08 4:11:20 PM
172
Chapter 6: Data Storage, Retrieval, and Sharing
Figure 6-1
13. All that’s left is to apply the preferences to the Earthquake functionality.
Implementing the automatic updates will be left until Chapter 8, when you’ll learn how to use
Services and background threads. For now, you can put the framework in place and apply the
magnitude fi lter.
14. Start by creating a new updateFromPreferences method that reads the Shared Preference val-
ues and creates instance variables for each of them.
int minimumMagnitude = 0;
boolean autoUpdate = false;
int updateFreq = 0;
private void updateFromPreferences() {
SharedPreferences prefs =
getSharedPreferences(Preferences.USER_PREFERENCE,
Activity.MODE_PRIVATE);
int minMagIndex = prefs.getInt(Preferences.PREF_MIN_MAG, 0);
if (minMagIndex < 0)
minMagIndex = 0;
int freqIndex = prefs.getInt(Preferences.PREF_UPDATE_FREQ, 0);
if (freqIndex < 0)
freqIndex = 0;
autoUpdate = prefs.getBoolean(Preferences.PREF_AUTO_UPDATE, false);
Resources r = getResources();
44712c06.indd 17244712c06.indd 172 10/20/08 4:11:20 PM10/20/08 4:11:20 PM
173
Chapter 6: Data Storage, Retrieval, and Sharing
// Get the option values from the arrays.
int[] minMagValues = r.getIntArray(R.array.magnitude);
int[] freqValues = r.getIntArray(R.array.update_freq_values);
// Convert the values to ints.
minimumMagnitude = minMagValues[minMagIndex];
updateFreq = freqValues[freqIndex];
}
15. Apply the magnitude fi lter by updating the addNewQuake method to check a new earthquake’s
magnitude before adding it to the list.
private void addNewQuake(Quake _quake) {
if (_quake.getMagnitude() > minimumMagnitude) {
// Add the new quake to our list of earthquakes.
earthquakes.add(_quake);
// Notify the array adapter of a change.
aa.notifyDataSetChanged();
}
}
16. Override the onActivityResult handler to call updateFromPreferences and refresh the
earthquakes whenever the Preferences Activity saves changes.
@Override
public void onActivityResult(int requestCode, int resultCode,
Intent data) {
super.onActivityResult(requestCode, resultCode, data);
if (requestCode == SHOW_PREFERENCES)
if (resultCode == Activity.RESULT_OK) {
updateFromPreferences();
refreshEarthquakes();
}
}
17. Finally, call updateFromPreferences in onCreate (before the call to refreshEarthquakes)
to ensure that the preferences are applied when the Activity fi rst starts.
@Override
public void onCreate(Bundle icicle) {
super.onCreate(icicle);
setContentView(R.layout.main);
earthquakeListView =
(ListView)this.findViewById(R.id.earthquakeListView);
earthquakeListView.setOnItemClickListener(new OnItemClickListener() {
public void onItemClick(AdapterView _av, View _v,
int _index, long arg3) {
selectedQuake = earthquakes.get(_index);
showDialog(QUAKE_DIALOG);
44712c06.indd 17344712c06.indd 173 10/20/08 4:11:20 PM10/20/08 4:11:20 PM
174
Chapter 6: Data Storage, Retrieval, and Sharing
}
});
int layoutID = android.R.layout.simple_list_item_1;
aa = new ArrayAdapter<Quake>(this, layoutID, earthquakes);
earthquakeListView.setAdapter(aa);
updateFromPreferences();
refreshEarthquakes();
}
Saving and Loading Files
It’s good practice to use Shared Preferences or a database to store your application data, but there are
still times when you’ll want to use fi les directly rather than rely on Android’s managed mechanisms.
As well as the standard Java I/O classes and methods, Android offers
openFileInput and
openFileOuput to simplify reading and writing streams from and to local fi les, as shown in the
code snippet below:
String FILE_NAME = “tempfile.tmp”;
// Create a new output file stream that’s private to this application.
FileOutputStream fos = openFileOutput(FILE_NAME, Context.MODE_PRIVATE);
// Create a new file input stream.
FileInputStream fis = openFileInput(FILE_NAME);
These methods only support fi les in the current application folder; specifying path separators will
cause an exception to be thrown.
If the fi lename you specify when creating a
FileOutputStream does not exist, Android will create it
for you. The default behavior for existing fi les is to overwrite them; to append an existing fi le, specify
the mode as
Context.MODE_APPEND.
By default, fi les created using the
openFileOutput method are private to the calling application —
a different application that tries to access these fi les will be denied access. The standard way to
share a fi le between applications is to use a Content Provider. Alternatively, you can specify either
Context.MODE_WORLD_READABLE or Context.MODE_WORLD_WRITEABLE when creating the output
fi le to make them available in other applications, as shown in the following snippet:
String OUTPUT_FILE = “publicCopy.txt”;
FileOutputStream fos = openFileOutput(OUTPUT_FILE, Context.MODE_WORLD_WRITEABLE);
Including Static Files as Resources
If your application requires external fi le resources, you can include them in your distribution package
by placing them in the
res/raw folder of your project hierarchy.
44712c06.indd 17444712c06.indd 174 10/20/08 4:11:20 PM10/20/08 4:11:20 PM