check point ng vpn 1 firewall 1 advanced configuration and troubleshooting phần 8 ppsx
Bạn đang xem bản rút gọn của tài liệu. Xem và tải ngay bản đầy đủ của tài liệu tại đây (1.04 MB, 64 trang )
SecureClient Packaging Tool • Chapter 10 417
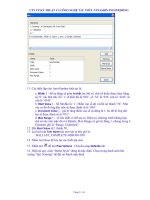
1. Highlight the profile’s name in the Main window (see Figure 10.14).
2. Open the Copy [profile name] to dialog box (see Figure 10.15) by doing
one of the following:
• Select Profile | Copy from the menu.
• Right-click and then select Copy from the menu.
• Press Ctrl + C.
• Select the Copy icon from the toolbar.
3. Enter the new profile name and comment. In this example (see Figure 10.15),
we’re creating a profile for software developers who work from other locations.
4. Click OK to copy the profile and close the dialog box.
5. You can now double-click the new profile name and edit its options.
Deleting a Profile
Deleting a profile is easy. Complete the following steps:
1. Highlight the profile’s name in Main window (refer back to Figure 10.14).
2. Delete the profile by doing one of the following:
www.syngress.com
Figure 10.14 Selecting an Existing Profile
Figure 10.15 The “Copy [profile name] to” Dialog Box
259_ChkPt_VPN_10.qxd 4/2/03 4:26 PM Page 417
418 Chapter 10 • SecureClient Packaging Tool
■
Select Profile | Delete from the menu.
■
Right-click and then select Delete from the menu.
■
Press Del.
■
Select the Delete icon from the toolbar.
Editing a Profile
To edit an existing profile, follow these steps:
1. Highlight the profile’s name in Main window (refer back to Figure 10.14).
2. Edit the profile by doing one of the following:
■
Select Profile | Edit from the menu.
■
Right-click and then select Copy from the menu.
■
Press Ctrl + E.
■
Select the Edit icon from the toolbar.
Creating SecureClient
Installation Packages
To create SecureClient Installation packages, launch the SecureClient Packaging tool
(if it’s not already open) and view the existing profiles (refer back to Figure 10.14).
Highlight the profile you want to build a package for and then start the SecureClient
Packaging Tool Package Generator wizard by doing one of the following:
■
Select Profile | Generate from the menu.
■
Right-click and then select Generate from the menu.
■
Press Ctrl + G.
■
Select the Generate icon from the toolbar.
Let’s walk through the process window by window.
The Welcome Window
The first window you will see is the Welcome window (see Figure 10.16). Seeing this
window is your confirmation that you’ve successfully launched the wizard. Be sure
to heed the warning in the third paragraph in this window. For this wizard to execute,
it needs to have access to the special SecuRemote/SecureClient directory so that
it can copy all the files it needs. Be sure to have it copied over in advance. Click Next to
continue.
www.syngress.com
259_ChkPt_VPN_10.qxd 4/2/03 4:26 PM Page 418
SecureClient Packaging Tool • Chapter 10 419
The Package Generation Window
The second window (see Figure 10.17) is the Package Generation window.You
shouldn’t have a reason to change the offered defaults unless you have an unusual
configuration. Keeping it standardized is a way to reduce complexity and errors. Click
Next to continue.
As you can see from Figure 10.18, we’ve successfully created the installation
package. Distribute it to your remote users and you’re ready to go!
www.syngress.com
Figure 10.16 The Welcome Window
Figure 10.17 The Package Generation Window
Figure 10.18 Success!
259_ChkPt_VPN_10.qxd 4/2/03 4:26 PM Page 419
420 Chapter 10 • SecureClient Packaging Tool
Deploying SecuRemote Packages
The SecureClient Packaging tool is a fairly simple, self-contained utility program. It
creates profiles and then creates installation packages containing the profiles.There’s
really nothing complicated at all about “deploying” them; you just post them on your
Web site or send them out on CD-ROMs. In fact, that’s the whole point of this utility;
once the installation packages are created, the user simply runs them and reboots and
they’re done.
More sophisticated administrators might want to add some complexity to the
deployment process. Even though there’s little security risk in a user receiving a spoofed
installation package (after all, the software is publicly available and the user still needs to
authenticate to the server), you might want to digitally sign the packages (in a ZIP file,
say) before distributing them.
A typical installation package is 7MB or 8MB, so it’s probably too large to be
conveniently e-mailed. Posting on a Web site for downloading could be ideal.
www.syngress.com
259_ChkPt_VPN_10.qxd 4/2/03 4:26 PM Page 420
SecureClient Packaging Tool • Chapter 10 421
Summary
The SecureClient Packaging tool can significantly reduce complexity in a VPN rollout
by enabling you to generate customized installation packages comprising a single
executable file to be distributed to users. Within this package, you can set default
options, configure for silent installation if desired. and set additional options manually.
The user only has to launch the executable, approve the end-user license agreement,
and the rest of the installation is automated, presenting to the user only the choices
determined by the administrator.
The SecureClient Packaging Tool provides a wizard to assist you, the administrator,
in creating user profiles and an easy interface for managing these profiles.The
SecureClient Packaging Tool Profile Generator wizard combines the completed profile
with the necessary SecuRemote/SecureClient installation files to create a single
executable file for distribution to users.
All that’s left for the administrator is to distribute the packages to end users.The
packages are designed for easy self-installation by users without advanced skills. For
more sophisticated enterprises, the administrator might want to implement version
control or digital signing of the packages.
Solutions Fast Track
Creating a Profile
; Close the SmartView Dashboard before trying to launch the SecureClient
Packaging tool, because they cannot simultaneously be open with read/write
privileges.
; Use the SecureClient Packaging Tool wizard to create profile for your users.
; Follow the screen in the wizard to configure all the settings for the automated
installation.
; By configuring the profile to obscure (encrypt) topology information in the
userc.C file and to include only partial topology information, you can make
the installation package safer for public distribution.
Managing SecureClient Profiles
; Copy an existing profile and save it under a new name to create new,
similar profiles.
www.syngress.com
259_ChkPt_VPN_10.qxd 4/2/03 4:26 PM Page 421
422 Chapter 10 • SecureClient Packaging Tool
; Edit existing profiles when you need to make changes.
; Experiment with different versions of your profiles until you get them
working properly, and then delete the unneeded copies.
Creating SecureClient Installation Packages
; Run the SecureClient Packaging Tool Profile Generator wizard to combine a
completed profile with the necessary installation files to create an installation
package. Be sure to specify the target location for your completed installation
packages.
; Complete the two-screen wizard and you’re done!
Deploying SecuRemote Packages
; Copy the necessary files to the management server before trying to generate a
package from a profile.
; Use the SecureClient Packaging Tool Package Generator wizard to generate
ready-to-go installation packages.
; Be sure to do thorough testing with a small sample before launching a large-
scale rollout.
; Distribute the installation package to your remote users.
www.syngress.com
259_ChkPt_VPN_10.qxd 4/2/03 4:26 PM Page 422
SecureClient Packaging Tool • Chapter 10 423
Q: For one-time installations and testing, isn’t it faster and easier to copy the
SecuRemote/SecureClient directory over to the remote machine and run the
installation program from there?
A: Even for single installations, using the packaging tool may prove beneficial, because
creating a profile and then generating a package goes very quickly, and it gives the
added benefit of a repeatable installation process.
Q: Where can I find the special directory of files that the package generator needs to
build the package?
A: Download the SecuRemote/SecureClient self-extracting installation package from
the Check Point Web site. Run the package and the directory will be created for
you.The default destination location is C:\SecureClient Files.
Q: I want to be able to post our installation packages on our public Web site so that
our users can download them and run them from anywhere, without having to
authenticate first. Is this safe?
A: The SecureClient Packaging tool and the SecuRemote/SecureClient software are
distributed with every copy of VPN-1/FireWall-1 NG, so you won’t be able to
prevent anyone from getting access to them. But since remote users need to
authenticate as part of initializing a VPN, there’s no risk that unauthorized persons
could connect to your encryption domain. As for information that might be
contained in your particular userc.C file, this is more of a concern because topology
information might be included in this file. Be sure to check Obscure topology
on disk in the Topology window in order to encrypt topology information in the
userc.C file.Also, enable Partial Topology in the same window in order to reduce
the amount of topology information included in the userc.C file.
Q: If the SecureClient Packaging tool is one of the SMART clients, why can’t I launch
it directly from the SmartView Dashboard?
www.syngress.com
Frequently Asked Questions
The following Frequently Asked Questions, answered by the authors of this book, are
designed to both measure your understanding of the concepts presented in this chapter
and to assist you with real-life implementation of these concepts. To have your questions
about this chapter answered by the author, browse to www.syngress.com/solutions and
click on the “Ask the Author” form.
259_ChkPt_VPN_10.qxd 4/2/03 4:26 PM Page 423
424 Chapter 10 • SecureClient Packaging Tool
A: You can’t have the SmartView Dashboard and SecureClient Packaging tool both
open at the same time in read/write mode.This prevents your creating a package
based on a configuration that’s being edited.Therefore, the option to launch the
SecureClient Packaging tool directly from the SmartView Dashboard isn’t available,
and if you try to launch it from the operating system, you’ll get a warning dialog
box reminding you that you can’t have them open simultaneously for read/write
access.
Q: Is the SecureClient Packaging tool just for preparing installation packages for
SecureClient, or can I also prepare a package for SecuRemote?
A: The SecureClient Packaging tool can prepare installation packages for
either product.
www.syngress.com
259_ChkPt_VPN_10.qxd 4/2/03 4:26 PM Page 424
SmartDefense
Solutions in this chapter:
■
Understanding and Configuring
SmartDefense
Chapter 11
425
; Summary
; Solutions Fast Track
; Frequently Asked Questions
259_ChkPt_VPN_11.qxd 4/3/03 8:42 AM Page 425
426 Chapter 11 • SmartDefense
Introduction
SmartDefense is a new product that was first available for FireWall-1 NG FP2 and was
designed to be part of Check Point’s new line of Active Defense security solutions.The
new active solutions are designed to take immediate action to prevent an attack, instead
of only notifying the administrators that an attack has taken place.This can be viewed
as an extension to the packet inspection that already takes place on your firewall.
FireWall-1 previously had the capability to understand a small number of application
layer protocols, such as FTP, to allow the firewall make the correct decision on the
validity of a connection. FireWall-1 now understands additional protocols and has some
idea of what should be considered a valid data stream based on user-defined parameters.
SmartDefense takes a different approach than a standard Intrusion Detection System
(IDS) because it does not attempt to counter each new attack that is discovered, but
instead it protects your network against entire classes of attacks. SmartDefense performs
strict sanity checks on packet headers and protocol data to prevent any malformed
information into your network. For example, instead of watching for an extensive list of
attacks that can be used against DNS servers, SmartDefense will check DNS packets for
compliance with the RFC standard for DNS packets.This behavior can protect against
a large number of current and future exploits without the need for continual signature
updates.This, of course, will not protect against every available attack because many
attacks are difficult to distinguish from valid traffic flows. Some of these checks may
also be too strict and will subsequently drop valid traffic that is required for your appli-
cations to function properly, which is why you have the ability to change the sensitivity
levels or even turn off the protection entirely.
Not everything that you will see in SmartDefense is a new feature, because Check
Point has combined some longstanding features with new attack defenses and placed it
all into a single user interface.This user interface is available for use without any extra
licensing, but if want to be able to update the attack definitions you will need to pur-
chase the subscription service, which gives you the ability to receive all of the latest
updates directly from Check Point with the click of a button.
This chapter covers the SmartDefense features available in FireWall-1 NG FP3.
SmartDefense is constantly being updated via the subscription service, and the user
interface will likely be modified in future updates, so it is likely that you will see fea-
tures that were not available during the writing of this book. Fortunately, many of the
major attack classes already exist in SmartDefense and the information in this chapter
should still be valid in future versions.
The help files that are currently included with the FP3 SmartClients are lacking in
both information and accuracy.You may see discrepancies between what is printed in this
chapter and what is contained in the help files. Most of the features in SmartDefense
www.syngress.com
259_ChkPt_VPN_11.qxd 4/3/03 8:42 AM Page 426
www.syngress.com
were tested in a lab environment so that the most accurate information about the
behavior of SmartDefense could be presented to the readers.
Understanding and
Configuring SmartDefense
The SmartDefense configuration window is the new home for some firewall features
that have been available for years. Since not all of these options can be turned off,
SmartDefense cannot be disabled as a whole, but you have the ability to pick and
choose which features you would like to activate. Before enabling any features in a pro-
duction environment for the first time, it would be prudent to do extensive testing to
verify that valid traffic is not affected by false positives. In addition, some of the options
can be configured for sensitivity, and the thresholds should also be thoroughly tested
before being applied to production firewalls. As part of the testing process, you should
read through the release notes for SmartDefense, because a few of the features still have
problems that can have adverse affects on your network. Knowing the kinds of applica-
tions that are used on your network and how they communicate can also help you
identify any possible problems before modifying the SmartDefense policy.
The options for SmartDefense can be accessed from the SmartDashboard, either via
the SmartDefense toolbar button or through the menus by selecting Policy |
SmartDefense.The SmartDefense configuration window is made up of three different
components. On the left half of the screen, you will see the configuration tree, which
contains all of the available attack signatures categorized by attack type.You can enable
and disable attacks in the configuration tree by clicking on the check box next to each
option. In the top right portion of SmartDefense is an informational window.This
window will display a brief description of the selected attack and usually some basic
information about how the attack is countered. Below the information window is
where the configurable options are placed, if any are available for a particular attack.
The following sections describe the attacks that SmartDefense is able to recognize
and the configurable options available to the firewall administrator.
General
The General section of the SmartDefense configuration tree, shown in Figure 11.1,
contains some general information and some links to quickly perform other tasks
related to SmartDefense.The information window contains a section called “News
flashes,” which contains some announcements about SmartDefense features. Below the
information window is a button labeled Update SmartDefense.This button causes
the management server to connect to Check Point’s site and download any attack sig-
nature updates that are available.
SmartDefense • Chapter 11 427
259_ChkPt_VPN_11.qxd 4/3/03 8:42 AM Page 427
428 Chapter 11 • SmartDefense
The second button, labeled Open SmartView Tracker, is a way to quickly jump
to SmartView Tracker if you want to see any log entries that SmartDefense may have
added to the logs.The final link, Check Point Security Updates, opens your Web
browser and takes you to the Check Point Security Updates page, which contains advi-
sories about new vulnerabilities and instructions on how to configure your enforce-
ment points to protect against the attacks.
Updating SmartDefense to use the latest attack signatures is an extremely simple
process, assuming you have purchased the subscription service. If you do not have access
to the subscription service, you will not have access to the update button.To update
your current signatures, just click the Update SmartDefense button. If updates are
available, a pop-up window appears describing what has been updated, as shown in
Figure 11.2. Just like it says in the pop-up window, these updates will not take effect
until you install the policy.This also assumes that you use the OK button to exit the
SmartDefense configuration. If you press Cancel to close the window, the updates will
not be saved. If you are already using the latest attack signatures, you will get a pop-up
message saying so, as shown in Figure 11.3.
Only two outbound services are used for updating SmartDefense: DNS (UDP only)
and HTTPS. When you click on the Update SmartDefense button, the GUI Client
(not the management server or enforcement point) will perform a DNS query for sup-
port.checkpoint.com and then initiate an HTTPS session to support.checkpoint.com to
download any updates. If the GUI Client is unable to resolve support.checkpoint.com or
is unable to initiate the HTTPS session, the update will fail.
www.syngress.com
Figure 11.1 SmartDefense General Configuration
259_ChkPt_VPN_11.qxd 4/3/03 8:42 AM Page 428
SmartDefense • Chapter 11 429
Anti-Spoofing Configuration Status
When an attacker is said to be spoofing packets, he is usually bypassing the standard
TCP/IP stack of the OS and building packets with a source address that is not the real
address assigned to the originating workstation. When the source address of a packet is
changed, or spoofed, to another address, the response packets will not be returned to
the attacking machine because the packets will be routed to the real owner of the
spoofed source address. Often, the return packets aren’t needed when performing an
attack, such as a SYN attack, which is discussed later in the chapter in the “SYN
Attack” section. When performing a SYN attack, the source address is spoofed to hide
the real source of the attack and to make the attack much more difficult to block
because the target server will see connections from thousands of different IP addresses.
Other times, the source address will be spoofed to try and fool a gateway device into
thinking that the packet is originating from a machine in the internal network.
FireWall-1 has long had an anti-spoofing feature that prevents packets with spoofed
internal addresses from passing through the firewall from the external interface. More
specifically, if a packet is not sourced from the network that is defined behind an inter-
face, it will not be allowed through the firewall.
The anti-spoofing portion of SmartDefense doesn’t block an attack itself, but it is
meant to be an easy way to verify that you have anti-spoofing configured on all the
gateways in your network. Any enforcement points that are not correctly configured for
anti-spoofing will be displayed in a list on this page. From the page, you can select the
gateway that you would like to configure and go straight to the topology page for the
selected gateway. SmartDefense will not consider a gateway to be correctly configured
for anti-spoofing, unless the IP addresses behind all interfaces are defined and the
Perform Anti-Spoofing based on Interface Topology box is checked.
You can quickly see if you have any gateways that are not performing anti-spoofing
by looking at the icon next to Anti Spoofing Configuration Status in the
SmartDefense settings tree.The icon for the menu item will either be a red triangle with
www.syngress.com
Figure 11.2 Successful Update of SmartDefense
Figure 11.3 SmartDefense Already Up to Date
259_ChkPt_VPN_11.qxd 4/3/03 8:42 AM Page 429
430 Chapter 11 • SmartDefense
an exclamation point inside (see Figure 11.4) or a green check mark with a circle around
it (see Figure 11.5). If you see the red warning symbol, you have gateways that are not
configured to perform anti-spoofing, and they will be listed in the bottom-right corner
of the SmartDefense window. If you select the gateway and click the Edit button, you
will be taken directly to the topology page for that gateway. Once you have configured all
gateways for anti-spoofing, the gateway list will be removed and you will see a message
that “Anti-spoofing configuration is set on all gateways.”
www.syngress.com
Figure 11.4 Anti Spoofing Not Configured on All Gateways
Figure 11.5 Anti Spoofing Configured Correctly
259_ChkPt_VPN_11.qxd 4/3/03 8:42 AM Page 430
SmartDefense • Chapter 11 431
If you are not using this feature on your firewall, an attacker may be able to get a
packet through your firewall by setting the source address of a packet to an IP that
belongs to your internal network. When you are not using anti-spoofing, the firewall
will not keep track of which interface a source address should be originating from and
will allow any packets through that match an “accept” rule in the policy. Someone with
experience writing code in C or some other programming language can write his own
programs to forge these kinds of packets. Instead, someone could use one of the many
tools available on the Internet, such as RafaleX, which can be found at http://www.
packx.net. Packets builders such as these can be used by a firewall administrator to test
the security policy and verify that such attacks will be dropped by the firewall before an
attacker attempts to access your systems.
Denial of Service
This section of SmartDefense deals with some common Denial of Service (DoS)
attacks that are used to crash the target machine.These particular attacks are able to
crash systems by sending illegal packets (packets that do not conform to the RFC stan-
dard for the specific protocol) that the receiving system is unable to process correctly.
There is very little to configure in this section (see Figure 11.6); your only decision
is which attacks you want SmartDefense to watch for.You can disable checking for any
individual attack by removing the check mark next to the attack name. For the attacks
that you do want to defend against, you have the option of selecting what action should
be taken when an offending packet is detected.
www.syngress.com
Figure 11.6 Denial of Service Category Settings
259_ChkPt_VPN_11.qxd 4/3/03 8:42 AM Page 431
432 Chapter 11 • SmartDefense
If, in your environment, you are constantly under a range of attacks and you do not
want to be alerted every time the attack happens, you can use the Accumulate succes-
sive events feature available on the main Denial of Service category menu, which is
also shown in Figure 11.6. If you select the Accumulate successive events option,
you will need to select the alert you would like to receive when a certain threshold of
events has been reached.There is also an Advanced button where you select how many
events will trigger the selected action.The settings here are exactly the same as the ones
available for the other attacks under the Successive Events category in the configuration
tree, and these advanced settings are covered in the “Successive Events” section.
www.syngress.com
Review of Alerts
All of the actions available for use in SmartDefense (some are shown in Figure
11.6) are user configurable. If you want to change the parameters for a spe-
cific alert, you do so in the global properties of your security policy under Logs
and Alerts | Alert Commands.
You need to configure most of the alerts before you can do anything useful
with them. FireWall-1 contains an internal_sendmail command that you can use
to generate SMTP mail messages and send them through a designated SMTP
server, and an internal_snmp_trap command that generates and sends an SNMP
trap message to the configured destination (by default, local host). These scripts
are only accessible from within FireWall-1, and cannot be accessed from the
command line of the management server or enforcement point.
You can configure the internal_sendmail command with additional
parameters to allow the mail to be properly formatted for transit through your
network. Many mail servers are configured to reject messages with a blank
sender field, or they will only permit mail from specific e-mail addresses. These
options are configured by adding additional tags to the internal_sendmail
command. The format of this command is as follows:
Internal_sendmail -t mail_server [-f sender_address] [-s "subject"]
recipient_address
Here is a description of each option in this command string:
■
mail_server The IP address or hostname of your SMTP gateway
that will be forwarding the generated e-mail message to the
proper destination. This option is required, because internal_
Tools & Traps…
Continued
259_ChkPt_VPN_11.qxd 4/3/03 8:42 AM Page 432
SmartDefense • Chapter 11 433
Teardrop
In the case that an IP datagram is larger than the maximum allowed packet size in a net-
work, the packet can be fragmented into smaller pieces so it can pass through that net-
work. Within the IP protocol header is a flag that specifies that more fragments are
coming, and a field that contains an offset value.The offset value informs the receiving
device at what position in the data stream to place the data in packet.The Teardrop attack
exploits this feature of the IP protocol by sending packet fragments that overlap with each
other.This is done by setting the offset value to something closer to the beginning of the
packet than where the previous packet ended, meaning the server thinks there are two
different sets of data that belong in the same exact place in the data stream.This condition
should not occur under normal circumstances, and many operating systems were unable
to handle the overlapping fragments, which caused the machine to crash.
Enabling this option does not provide any extra protection against this attack
because FireWall-1 already does strict sanity checking of fragmented packets (which is
covered in the next section). Illegal packets will automatically be dropped, and a frag-
mentation error log entry will be created. Even though you are already protected from
this attack, it was added to SmartDefense so that you can specify a different action for
the Teardrop attack than for other fragmentation errors. For example, you may want to
www.syngress.com
sendmail does not perform the DNS lookups to deliver the SMTP
message itself.
■
sender_address The e-mail address that will be listed as the
sender of the e-mail message. This option is not required, but you
can use it if your SMTP gateway requires a valid e-mail address
before relaying SMTP messages, or if you want firewall messages
sent from a certain e-mail address.
■
subject The subject message that you want in the generated
e-mail message. The subject cannot contain any spaces, unless you
enclose the entire subject in quotation marks, such as “Firewall
Alert Message”.
■
recipient_address The e-mail address that the e-mail message
will be sent to. You must define at least one recipient (otherwise,
what is the point of sending an e-mail?), and you can separate
multiple e-mail address with spaces.
The body of the e-mail message is determined by FireWall-1 depending
on what alert triggered the action. This cannot be changed, as the only con-
figurable options available are used to facilitate proper delivery of the e-mail
alert messages.
259_ChkPt_VPN_11.qxd 4/3/03 8:42 AM Page 433
434 Chapter 11 • SmartDefense
receive e-mail alerts when someone has launched this attack against you, but do not
want to receive an e-mail for every fragmentation error that is encountered.
Ping of Death
The Ping of Death is another Denial of Service attack that functions by breaking the
rules defined for an IP packet.This particular attack consists of a machine sending an
ICMP echo request that is larger than the maximum IP datagram size.This can be
accomplished by sending IP fragments to the destination machine that, when com-
bined, add up to more that 65,535 bytes. As the fragments are being reassembled into
memory, packet buffer will overflow, which can cause unpredictable results ranging
from no effect to a system crash.
As with the Teardrop DoS attack, this attack will be prevented regardless of how
you configure this option, but you have the ability to specify a different action for this
specific attack than when other packet sanity checks fail.
LAND
The LAND Denial of Service attack confuses the target machine by sending a spoofed
TCP packet with the SYN flag set, and the source and destination address and port num-
bers are exactly the same.The target machine will interpret this packet as a TCP session
that is being initiated from itself. At the time that this vulnerability was discovered, most
operating systems did not know how to handle this condition and would crash or reboot.
Although this attack will normally be countered by the anti-spoofing configuration
on your gateways, you can still defend against this DoS attack even if you have decided
not to perform anti-spoofing at your enforcement points.
IP and ICMP
This section of SmartDefense deals with IP- and ICMP-based attacks and requires even
less configuration than the Denial of Service category.This is because most of these
options cannot be disabled.You will notice that the check boxes next to the Fragment
Sanity Check and the Packet Sanity check are grayed out and locked in the “checked”
position.There is one available option under Packet Sanity called Enable relaxed
UDP length verification, which is shown in Figure 11.7.This option will prevent the
enforcement point from imposing such strict checks on the length field in the UDP
packet header.This option may be needed because not all applications calculate the UDP
length field in the same manner, and the firewall will drop some of these packets because
it thinks the length is incorrect. Removing the check mark from this option will offer a
little more protection, but if you use applications that don’t calculate the length field cor-
rectly (from FireWall-1’s perspective), you will need to leave this option enabled.
www.syngress.com
259_ChkPt_VPN_11.qxd 4/3/03 8:42 AM Page 434
SmartDefense • Chapter 11 435
The other configurable option in the IP and ICMP Configuration Tree is Max
Ping Size.To configure this option, select Max Ping Size in the configuration tree,
and modify the Ping Size field to specify the maximum number of bytes that will be
allowed in a ping.
Fragment Sanity Check
This feature of SmartDefense cannot be disabled, but is listed here to let you decide
how you want the firewall to respond to problems detected by the strict fragment
sanity check that is performed. Some firewalls and IDS systems will not detect an attack
if it is fragmented into smaller pieces.This happens because each packet is inspected
individually as it passes through the device, and a fragment of the attacker’s data won’t
be recognized as an attack.To avoid this problem, FireWall-1 collects all fragments and
checks the reassembled packet before passing the information to the destination.
Packet Sanity
Again, this is an option that cannot be disabled, and it’s only in SmartDefense so that
you can choose what action should be taken when a packet fails this check.This is a
sanity check on all information in the packet at layer 3 and layer 4.This sanity check
looks for a wide range of problems in the packet structure, such as the following:
■
Invalid packet length
■
Invalid header length
■
Improper TCP flags
■
Use of IP options
www.syngress.com
Figure 11.7 IP and ICMP Options
259_ChkPt_VPN_11.qxd 4/3/03 8:42 AM Page 435
436 Chapter 11 • SmartDefense
If any information in the packet is inconsistent with the state of the communica-
tion or the data within the packet, the firewall will drop the packet.This check also
prevents the Options section of the IP header from being used. IP options can be con-
figured to do such things as supply routing information telling intermediate routing
devices how the packet should be routed, or to record route information as the packet
traverses the network.These options can be useful tools for troubleshooting, but they
also give an attacker the ability to bypass security measures, so they are not allowed
through the enforcement points.
Max Ping Size
This feature of SmartDefense is designed to drop echo requests if they are larger than
the specified amount in this section.You can set the maximum byte size that you want
to allow from an ICMP echo request. If an echo request is larger than the byte count
configured in this section, the packet will be dropped and the specified action will be
taken. When choosing what action you want performed, keep in mind that the action
will be taken for each ICMP packet that is dropped.This check is performed before the
packet is checked against the rule base, so you will receive alerts for pings that are too
big, even if no ICMP is allowed through the gateway.
This feature was not designed to combat the Ping of Death attack, which creates an
illegal size packet, but instead limits the amount of data that can be sent in a correctly
sized echo request. Large echo requests are not usually needed for troubleshooting and
can easily cause congestion on links that are already near capacity. For this reason, you
may want to keep your allowed echo request size low.
W
ARNING
The default setting for Max Ping Size is 64 bytes. If your security policy allows
pings into your network, keep in mind that this option, at its default setting,
will prevent certain devices from being able to ping. For example, Cisco routers
use a default ping size of 100 bytes, so while a Microsoft Windows worksta-
tion will be able to ping through your enforcement point, the Cisco router
would not.
Keep in mind when you are choosing your max ping size and action method that
every ping larger than your threshold will be considered an attack. For example, if you
configure SmartDefense to send you an e-mail if someone exceeds the max ping size,
you will receive an e-mail for each individual oversized ping that is received; if you
receive 1,000 oversized pings, you will receive 1,000 e-mails.
www.syngress.com
259_ChkPt_VPN_11.qxd 4/3/03 8:42 AM Page 436
SmartDefense • Chapter 11 437
TCP
This section of SmartDefense contains categories of attacks that attempt to exploit the
TCP protocol, such as out of sequence packets, invalid session requests and excessively
small fragment sizes. No options are available for the TCP category itself; all configura-
tion is on the individual object within the TCP tree.
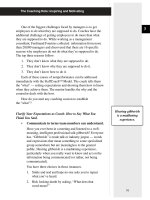
SYN Attack
A SYN attack is a Denial of Service attack that abuses the flags that are used to initiate
a TCP session.This attack can cause the destination server to stop accepting new con-
nections from valid hosts because it is busy waiting for responses from the attacker’s
false sessions.
www.syngress.com
TCP 3-Way Handshake
When a client wants to transfer data with another server, it will request a new
session by sending an empty (no data) TCP packet with the “synchronize”
(SYN) flag set. The SYN flag tells the destination host that the client is
requesting a TCP session be opened. If the server decides to accept this new
connection, an empty TCP packet will be sent in response with both the SYN
and acknowledge (ACK) flags set. The SYN/ACK tells the client that the server
has acknowledged its request for a new session and is accepting the request
by trying to establish the connection in the opposite direction. As the final
step of the three-way handshake, the client will send a response packet
with only the ACK flag set. This completes the TCP handshake, as both sides
have sent a SYN request and an ACK response that is required for two-way
communication.
A session can be rejected by sending the reset (RST) flag to the other
host. This is different from the graceful closing of a session that uses the finish
(FIN) flag in a similar way as the initial handshake. The RST flag is used when
either host detects an error and decides to reset the communication channel,
or if it does not want to accept the communication at all. If a client initiates a
TCP connection by sending a SYN packet to a port that is not currently being
used, the server will respond with a RST/ACK, telling the client that it has
acknowledged the request but is refusing to allow the communication. Along
those same lines, if a client receives a SYN/ACK packet for a session that it has
not sent the initial SYN for, the client will respond to the server with a RST flag,
telling the server it does not wish to complete the handshake.
Notes from the Underground…
259_ChkPt_VPN_11.qxd 4/3/03 8:42 AM Page 437
438 Chapter 11 • SmartDefense
When a server receives a SYN request, it puts the partially established connection
information into a separate table from where established connections are tracked, which
Check Point refers to as the backlog queue. If the server does not receive a response to
the SYN/ACK packet that is sent to the client, the uncompleted connection will stay
in the backlog queue until the server times out the connection and removes it from the
table. If the backlog queue is full of incomplete connections, the server will stop
accepting new requests until space is made available in the queue.This process is illus-
trated in Figure 11.8.The attacker will take advantage of this limit by sending a con-
stant stream of SYN requests, but will not respond to the SYN/ACK packets that are
sent back to the source.This will keep the backlog queue full of invalid connections,
and valid users will not be able to connect to the server.
To prevent the target from blocking all incoming packets from the IP address of the
attacker, the source address of the packets will usually be spoofed, which makes it difficult
to identify the attacker and filter out the invalid packets. During the attack, the attacker
needs to make sure that the spoofed source addresses are not used by valid machines. If a
real host receives a SYN/ACK for a connection it didn’t initiate, that host will send a
RST back to the server. Once the server receives the RST packet, it will remove the
connection from the backlog queue, which frees space for another new connection. If the
www.syngress.com
Figure 11.8 TCP Three-Way Handshake
Connection Stored in
Backlog (half-open)
Connection Table
Connection Stored in Active
Connection Table
SYN
Server
Client
SYN/ACK
Server
Client
ACK
Server
Client
1)
2)
3)
259_ChkPt_VPN_11.qxd 4/3/03 8:42 AM Page 438
SmartDefense • Chapter 11 439
majority of the attacker’s packets are spoofed with IP addresses of active hosts, the backlog
queue will never fill up, because the connections will be reset in milliseconds.
A feature designed to combat SYN attacks, called SYNDefender, was added to pre-
vious versions of FireWall-1.Three different defense methods were available in
SYNDefender, and each had its strengths and weaknesses:
■
SYN Gateway When the server sends the SYN/ACK back to the client, the
firewall will immediately send the ACK packet to the server.This will move
the connection out of the backlog queue and into the active connection table.
This is done because servers can handle a much large number of established
connections than partially established connections. If the ACK is not received
from the client within the timeout period, the firewall will send a RST to the
server, closing that particular session. Figure 11.9 illustrates the steps taken
when using SYN Gateway.
www.syngress.com
Figure 11.9 SYN Gateway
OR
1)
2)
3)
4)
4)
SYN
Server
Client
Firewall
SYN
SYN/ACK
SYN/ACK
Server
Client
Firewall
ACK
Server
Client
Firewall
ACK
Server
Client
Firewall
RST
Server
Client
Firewall
259_ChkPt_VPN_11.qxd 4/3/03 8:42 AM Page 439
440 Chapter 11 • SmartDefense
■
Passive SYN Gateway This is the least intrusive method, because it allows
the connection request to proceed as normal, in the backlog queue. If the
ACK isn’t received within the timeout period, the firewall will generate a
RST packet to remove the session from the server’s backlog queue.The
timeout period on the firewall is much less than the default timeout from the
server.This will not entirely prevent an attack, but it makes sure that entries in
the backlog queue do not linger.The challenge is finding an appropriate
timeout value that makes an attack very difficult, but will not reset sessions
coming over slower links. Figure 11.10 illustrates Passive SYN Gateway.
■
SYN Relay When this method is used, the Firewall will respond to all SYN
packets on behalf of the server by sending the SYN/ACK to the client. Once
the ACK is received from the client, the firewall will pass the connection to
the server. With this method, the server will never receive invalid connection
attempts, because the firewall will not pass on the original SYN packet until it
has received the corresponding ACK from the client.This method offers the
best protection for the target server, but also has the most overhead because
the firewall is required to respond to all connection requests passing through.
This option was not available in FireWall-1 4.x, but was added to NG as a
www.syngress.com
Figure 11.10 Passive SYN Gateway
OR
1)
2)
3)
3)
SYN
Server
Client
Firewall
SYN
SYN/ACKSYN/ACK
Server
Client
Firewall
ACK
Server
Client
Firewall
ACK
RST
Server
Client
Firewall
259_ChkPt_VPN_11.qxd 4/3/03 8:42 AM Page 440
SmartDefense • Chapter 11 441
kernel-level process to keep delay to a minimum, although it will still add
some amount of overhead.
With the introduction of SmartDefense to FireWall-1 NG FP2, the SYNDefender
functionality was moved into the SmartDefense configuration. A new method to combat
SYN attacks, called SYN Attack protection, was also added to SmartDefense, although
Check Point left an option to use the older SYNDefender if you are so inclined.
The new SYN Attack protection automatically switches between two different
modes of operation: passive mode and active mode. Under normal condition, SYN
Attack protection runs in passive mode and only switches to active mode when it
detects a SYN attack in progress. Once the attack has passed, the enforcement point
will switch back to passive protection. Configurable options allow you to set
SmartDefense’s sensitivity to SYN attacks.
When SmartDefense SYN Attack protection is operating in passive mode, it is
using the Passive SYN Gateway feature described earlier in this section.This keeps the
overhead to a minimum while still ensuring that uncompleted handshakes do not stay
in the backlog queue too long. If the threshold of attack attempts is exceeded, the
Enforcement Point (EP) will switch to active protection until the number of offending
SYN packets drops below the threshold level. When using active protection mode, the
EP is operating as a SYN Relay.The combination of these two methods ensures that
your gateways operate as quickly as possible, but will also completely protect your
servers from SYN attacks when one is detected.
By default, SYN protection is disabled, because the SYNDefender configuration has
been overridden on all modules, but the new SYN Attack protection hasn’t yet been
enabled.The default settings for the SYN Attack configuration are shown in Figure
11.11.To enable SYN flooding protection on your gateways, you need to use either
active SYN Attack protection or use the SYNDefender configuration if you have mod-
ules that need to use the older protection.
As was mentioned in the anti-spoofing section, there are many tools that can be
used by an attacker to try to disable your servers. RafaleX, allowing you to set any vari-
able in the layer 3 and 4 packet headers, can be used to generate a SYN flood condi-
tion. Another tool, nmap (www.insecure.org), is a port scanning tool that identifies
open ports by sending a SYN packet and seeing how the server responds.This tool can
be configured to use spoofed “decoy” addresses and could possibly trigger a SYN flood
condition if the probing was configured too aggressively. Both of these tools can be
used by an attacker to exploit your firewall, but they are much more useful to the fire-
wall administrator for testing the security policy and verifying that you are protecting
against these types of attacks. Port scanners like nmap can also tell you which ports are
being filtered and which are not.This can tip you off to a problem in your rule base
before an attacker finds and exploits the problem.
www.syngress.com
259_ChkPt_VPN_11.qxd 4/3/03 8:42 AM Page 441