teach yourself visually adobe flash cs3 professional a
Bạn đang xem bản rút gọn của tài liệu. Xem và tải ngay bản đầy đủ của tài liệu tại đây (41.19 MB, 180 trang )
Flash
®
CS3 Professional
by Sherry Kinkoph Gunter
01_171233 ffirs.qxp 8/20/07 3:16 PM Page i
01_171233 ffirs.qxp 8/20/07 3:16 PM Page iv
Flash
®
CS3 Professional
by Sherry Kinkoph Gunter
01_171233 ffirs.qxp 8/20/07 3:16 PM Page i
Teach Yourself VISUALLY™ Flash
®
CS3
Professional
Published by
Wiley Publishing, Inc.
111 River Street
Hoboken, NJ 07030-5774
Published simultaneously in Canada
Copyright © 2007 by Wiley Publishing, Inc., Indianapolis,
Indiana
No part of this publication may be reproduced, stored in a
retrieval system or transmitted in any form or by any means,
electronic, mechanical, photocopying, recording, scanning or
otherwise, except as permitted under Sections 107 or 108 of the
1976 United States Copyright Act, without either the prior
written permission of the Publisher, or authorization through
payment of the appropriate per-copy fee to the Copyright
Clearance Center, 222 Rosewood Drive, Danvers, MA 01923,
(978) 750-8400, fax (978) 646-8600. Requests to the Publisher
for permission should be addressed to the Legal Department,
Wiley Publishing, Inc., 10475 Crosspoint Blvd., Indianapolis,
IN 46256, (317) 572-3447, fax (317) 572-4355, Online:
www.wiley.com/go/permissions.
Library of Congress Control Number: 2007934452
ISBN: 978-0-470-17123-3
Manufactured in the United States of America
10 9 8 7 6 5 4 3 2 1
Trademark Acknowledgments
Wiley, the Wiley Publishing logo, Visual, the Visual logo, Teach
Yourself VISUALLY, Read Less - Learn More and related trade
dress are trademarks or registered trademarks of John Wiley &
Sons, Inc. and/or its affiliates. Flash is a registered trademark of
Adobe Systems Incorporated. All other trademarks are the
property of their respective owners. Wiley Publishing, Inc. is not
associated with any product or vendor mentioned in this book.
LIMIT OF LIABILITY/DISCLAIMER OF WARRANTY: THE
PUBLISHER AND THE AUTHOR MAKE NO
REPRESENTATIONS OR WARRANTIES WITH RESPECT TO
THE ACCURACY OR COMPLETENESS OF THE CONTENTS OF
THIS WORK AND SPECIFICALLY DISCLAIM ALL
WARRANTIES, INCLUDING WITHOUT LIMITATION
WARRANTIES OF FITNESS FOR A PARTICULAR PURPOSE. NO
WARRANTY MAY BE CREATED OR EXTENDED BY SALES OR
PROMOTIONAL MATERIALS. THE ADVICE AND STRATEGIES
CONTAINED HEREIN MAY NOT BE SUITABLE FOR EVERY
SITUATION. THIS WORK IS SOLD WITH THE
UNDERSTANDING THAT THE PUBLISHER IS NOT ENGAGED
IN RENDERING LEGAL, ACCOUNTING, OR OTHER
PROFESSIONAL SERVICES. IF PROFESSIONAL ASSISTANCE IS
REQUIRED, THE SERVICES OF A COMPETENT
PROFESSIONAL PERSON SHOULD BE SOUGHT. NEITHER
THE PUBLISHER NOR THE AUTHOR SHALL BE LIABLE FOR
DAMAGES ARISING HEREFROM. THE FACT THAT AN
ORGANIZATION OR WEBSITE IS REFERRED TO IN THIS
WORK AS A CITATION AND/OR A POTENTIAL SOURCE OF
FURTHER INFORMATION DOES NOT MEAN THAT THE
AUTHOR OR THE PUBLISHER ENDORSES THE
INFORMATION THE ORGANIZATION OR WEBSITE MAY
PROVIDE OR RECOMMENDATIONS IT MAY MAKE. FURTHER,
READERS SHOULD BE AWARE THAT INTERNET WEBSITES
LISTED IN THIS WORK MAY HAVE CHANGED OR
DISAPPEARED BETWEEN WHEN THIS WORK WAS WRITTEN
AND WHEN IT IS READ.
FOR PURPOSES OF ILLUSTRATING THE CONCEPTS
AND TECHNIQUES DESCRIBED IN THIS BOOK, THE
AUTHOR HAS CREATED VARIOUS NAMES, COMPANY
NAMES, MAILING, E-MAIL AND INTERNET
ADDRESSES, PHONE AND FAX NUMBERS AND
SIMILAR INFORMATION, ALL OF WHICH ARE
FICTITIOUS. ANY RESEMBLANCE OF THESE
FICTITIOUS NAMES, ADDRESSES, PHONE AND FAX
NUMBERS AND SIMILAR INFORMATION TO ANY
ACTUAL PERSON, COMPANY AND/OR
ORGANIZATION IS UNINTENTIONAL AND PURELY
COINCIDENTAL.
Contact Us
For general information on our other products and services
please contact our Customer Care Department within the U.S.
at 800-762-2974, outside the U.S. at 317-572-3993 or fax
317-572-4002.
For technical support please visit www.wiley.com/techsupport.
Sales
Contact Wiley
at (800) 762-2974 or
fax (317) 572-4002.
01_171233 ffirs.qxp 8/20/07 3:16 PM Page ii
“Like a lot of other people, I understand things best when
I see them visually. Your books really make learning easy
and life more fun.”
John T. Frey (Cadillac, MI)
“I have quite a few of your Visual books and have been
very pleased with all of them. I love the way the lessons
are presented!”
Mary Jane Newman (Yorba Linda, CA)
“I just purchased my third Visual book (my first two are
dog-eared now!), and, once again, your product has
surpassed my expectations.
Tracey Moore (Memphis, TN)
“I am an avid fan of your Visual books. If I need to learn
anything, I just buy one of your books and learn the topic
in no time. Wonders! I have even trained my friends to
give me Visual books as gifts.”
Illona Bergstrom (Aventura, FL)
“Thank you for making it so clear. I appreciate it. I will
buy many more Visual books.”
J.P. Sangdong (North York, Ontario, Canada)
“I have several books from the Visual series and have
always found them to be valuable resources.”
Stephen P. Miller (Ballston Spa, NY)
“Thank you for the wonderful books you produce. It
wasn’t until I was an adult that I discovered how I learn
— visually. Nothing compares to Visual books. I love the
simple layout. I can just grab a book and use it at my
computer, lesson by lesson. And I understand the
material! You really know the way I think and learn.
Thanks so much!”
Stacey Han (Avondale, AZ)
“I absolutely admire your company’s work. Your books
are terrific. The format is perfect, especially for visual
learners like me. Keep them coming!”
Frederick A. Taylor, Jr. (New Port Richey, FL)
“I have several of your Visual books and they are the
best I have ever used.”
Stanley Clark (Crawfordville, FL)
“I bought my first Teach Yourself VISUALLY book last
month. Wow. Now I want to learn everything in this easy
format!”
Tom Vial (New York, NY)
“Thank you, thank you, thank you for making it so easy
for me to break into this high-tech world. I now own four
of your books. I recommend them to anyone who is a
beginner like myself.”
Gay O’Donnell (Calgary, Alberta, Canada)
“I write to extend my thanks and appreciation for your
books. They are clear, easy to follow, and straight to the
point. Keep up the good work! I bought several of your
books and they are just right! No regrets! I will always
buy your books because they are the best.”
Seward Kollie (Dakar, Senegal)
“Compliments to the chef!! Your books are extraordinary!
Or, simply put, extra-ordinary, meaning way above the
rest! THANK YOU THANK YOU THANK YOU! I buy them
for friends, family, and colleagues.”
Christine J. Manfrin (Castle Rock, CO)
“What fantastic teaching books you have produced!
Congratulations to you and your staff. You deserve the
Nobel Prize in Education in the Software category.
Thanks for helping me understand computers.”
Bruno Tonon (Melbourne, Australia)
“Over time, I have bought a number of your ‘Read Less -
Learn More’ books. For me, they are THE way to learn
anything easily. I learn easiest using your method of
teaching.”
José A. Mazón (Cuba, NY)
“I am an avid purchaser and reader of the Visual series,
and they are the greatest computer books I’ve seen. The
Visual books are perfect for people like myself who enjoy
the computer, but want to know how to use it more
efficiently. Your books have definitely given me a greater
understanding of my computer, and have taught me to
use it more effectively. Thank you very much for the hard
work, effort, and dedication that you put into this series.”
Alex Diaz (Las Vegas, NV)
Praise for Visual Books
July 05
01_171233 ffirs.qxp 8/20/07 3:16 PM Page iii
Credits
Project Editor
Timothy J. Borek
Acquisitions Editor
Jody LeFevere
Copy Editor
Kim Heusel
Technical Editor
Jon McFarland
Editorial Manager
Robyn Siesky
Business Manager
Amy Knies
Sr. Marketing Manager
Sandy Smith
Manufacturing
Allan Conley
Linda Cook
Paul Gilchrist
Jennifer Guynn
Book Design
Kathie Rickard
Production Coordinator
Adrienne Martinez
Layout
Carrie A. Foster
Jennifer Mayberry
Screen Artist
Jill Proll
Illustrators
Ronda David-Burroughs
Cheryl Grubbs
Shane Johnson
Jake Mansfield
Proofreader
Nancy L. Reinhardt
Quality Control
Dwight Ramsey
Indexer
Broccoli Information
Managament
Special Help
Jody LeFevere
Alissa Birkel
Vice President and Executive
Group Publisher
Richard Swadley
Vice President and Publisher
Barry Pruett
Composition Director
Debbie Stailey
Wiley Bicentennial Logo
Richard J. Pacifico
01_171233 ffirs.qxp 8/20/07 3:16 PM Page iv
About the Author
Sherry Kinkoph Gunter has written and edited oodles of books over
the past 11 years covering a variety of computer topics, including
Internet subjects, Microsoft Office programs, digital photography,
and more. Her recent titles include
Teach Yourself VISUALLY
Microsoft Office 2007
, Master VISUALLY Dreamweaver CS3 and
Flash CS3
, Teach Yourself VISUALLY HTML, and Office 2007
Simplified
. Sherry’s ongoing quest is to help users of all levels master
ever-changing computer technologies. No matter how many times
software manufacturers and hardware conglomerates throw out a new
version or upgrade, Sherry vows to be there to make sense of it all and
help computer users get the most out of their machines.
Author’s Acknowledgments
Special thanks go out to publisher Barry Pruett and to acquisitions
editor Jody LeFevere for allowing me the opportunity to tackle this
project; to project editor Tim Borek for his impeccable dedication and
patience in guiding this project from start to finish; to copy editor Kim
Heusel for ensuring that all the
i’s were dotted and t’s were crossed;
to technical editor Jon McFarland for skillfully checking each step
and offering valuable input along the way; and finally to the
production team at Wiley for their able efforts in creating yet another
visual masterpiece. Extra special thanks go to my favorite fireman,
Matty Gunter, my hero in every way.
01_171233 ffirs.qxp 8/20/07 3:16 PM Page v
Table of Contents
Flash Fundamentals
Animations
Web page components
Games
Applications
Mobile phone content
Creating Objects
Introduction to Flash. . . . . . . . . . . . . . . . . . . . . . . . . . . . . . . . . . . . . . . . . . . . . . . . . . . . . . . . . . . . . 4
Navigate the Flash Window . . . . . . . . . . . . . . . . . . . . . . . . . . . . . . . . . . . . . . . . . . . . . . . . . . . . . . . 6
Understanding the Flash Timeline. . . . . . . . . . . . . . . . . . . . . . . . . . . . . . . . . . . . . . . . . . . . . . . . . . 7
Open a Flash File . . . . . . . . . . . . . . . . . . . . . . . . . . . . . . . . . . . . . . . . . . . . . . . . . . . . . . . . . . . . . . . 8
Save and Close a Flash File . . . . . . . . . . . . . . . . . . . . . . . . . . . . . . . . . . . . . . . . . . . . . . . . . . . . . . 10
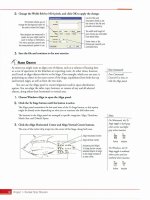
Change the Document Size . . . . . . . . . . . . . . . . . . . . . . . . . . . . . . . . . . . . . . . . . . . . . . . . . . . . . . 12
Using the Property Inspector . . . . . . . . . . . . . . . . . . . . . . . . . . . . . . . . . . . . . . . . . . . . . . . . . . . . . 14
Work with Panels. . . . . . . . . . . . . . . . . . . . . . . . . . . . . . . . . . . . . . . . . . . . . . . . . . . . . . . . . . . . . . . 16
Zoom Out or In . . . . . . . . . . . . . . . . . . . . . . . . . . . . . . . . . . . . . . . . . . . . . . . . . . . . . . . . . . . . . . . . 18
Using Rulers and Grids. . . . . . . . . . . . . . . . . . . . . . . . . . . . . . . . . . . . . . . . . . . . . . . . . . . . . . . . . . 20
Find Help with Flash. . . . . . . . . . . . . . . . . . . . . . . . . . . . . . . . . . . . . . . . . . . . . . . . . . . . . . . . . . . . 22
Open a Flash Template . . . . . . . . . . . . . . . . . . . . . . . . . . . . . . . . . . . . . . . . . . . . . . . . . . . . . . . . . 24
Introducing Flash Objects. . . . . . . . . . . . . . . . . . . . . . . . . . . . . . . . . . . . . . . . . . . . . . . . . . . . . . . . 28
Using the Flash Tools . . . . . . . . . . . . . . . . . . . . . . . . . . . . . . . . . . . . . . . . . . . . . . . . . . . . . . . . . . . 30
Draw Line Segments. . . . . . . . . . . . . . . . . . . . . . . . . . . . . . . . . . . . . . . . . . . . . . . . . . . . . . . . . . . . 32
Draw Lines with the Pen Tool . . . . . . . . . . . . . . . . . . . . . . . . . . . . . . . . . . . . . . . . . . . . . . . . . . . . 34
Draw Shapes . . . . . . . . . . . . . . . . . . . . . . . . . . . . . . . . . . . . . . . . . . . . . . . . . . . . . . . . . . . . . . . . . . 36
Draw Objects with the Brush Tool. . . . . . . . . . . . . . . . . . . . . . . . . . . . . . . . . . . . . . . . . . . . . . . . . 38
Fill Objects with the Paint Bucket Tool . . . . . . . . . . . . . . . . . . . . . . . . . . . . . . . . . . . . . . . . . . . . . 40
chapter
1
chapter
2
02_171233 ftoc.qxp 8/20/07 3:16 PM Page vi
Select Objects . . . . . . . . . . . . . . . . . . . . . . . . . . . . . . . . . . . . . . . . . . . . . . . . . . . . . . . . . . . . . . . . . 44
Format Line Segments . . . . . . . . . . . . . . . . . . . . . . . . . . . . . . . . . . . . . . . . . . . . . . . . . . . . . . . . . . 48
Smooth or Straighten Line Segments . . . . . . . . . . . . . . . . . . . . . . . . . . . . . . . . . . . . . . . . . . . . . . 50
Edit Fills . . . . . . . . . . . . . . . . . . . . . . . . . . . . . . . . . . . . . . . . . . . . . . . . . . . . . . . . . . . . . . . . . . . . . . 52
Modify Objects with the Free Transform Tool. . . . . . . . . . . . . . . . . . . . . . . . . . . . . . . . . . . . . . . . 54
Rotate and Flip Objects . . . . . . . . . . . . . . . . . . . . . . . . . . . . . . . . . . . . . . . . . . . . . . . . . . . . . . . . . 58
Using the Eraser Tool . . . . . . . . . . . . . . . . . . . . . . . . . . . . . . . . . . . . . . . . . . . . . . . . . . . . . . . . . . . 60
Create a Gradient Effect . . . . . . . . . . . . . . . . . . . . . . . . . . . . . . . . . . . . . . . . . . . . . . . . . . . . . . . . . 62
Transform a Gradient Fill . . . . . . . . . . . . . . . . . . . . . . . . . . . . . . . . . . . . . . . . . . . . . . . . . . . . . . . . 64
Edit a Color Set . . . . . . . . . . . . . . . . . . . . . . . . . . . . . . . . . . . . . . . . . . . . . . . . . . . . . . . . . . . . . . . . 66
Copy Attributes . . . . . . . . . . . . . . . . . . . . . . . . . . . . . . . . . . . . . . . . . . . . . . . . . . . . . . . . . . . . . . . . 68
Group Objects . . . . . . . . . . . . . . . . . . . . . . . . . . . . . . . . . . . . . . . . . . . . . . . . . . . . . . . . . . . . . . . . . 70
Stack Objects . . . . . . . . . . . . . . . . . . . . . . . . . . . . . . . . . . . . . . . . . . . . . . . . . . . . . . . . . . . . . . . . . . 72
Align Objects . . . . . . . . . . . . . . . . . . . . . . . . . . . . . . . . . . . . . . . . . . . . . . . . . . . . . . . . . . . . . . . . . . 74
Enhancing and Editing Objects
Working with Imported Graphics
chapter
3
Import Graphics . . . . . . . . . . . . . . . . . . . . . . . . . . . . . . . . . . . . . . . . . . . . . . . . . . . . . . . . . . . . . . . 78
Convert Bitmaps into Vector Graphics . . . . . . . . . . . . . . . . . . . . . . . . . . . . . . . . . . . . . . . . . . . . . 80
Break Apart a Bitmap . . . . . . . . . . . . . . . . . . . . . . . . . . . . . . . . . . . . . . . . . . . . . . . . . . . . . . . . . . . 82
Turn Bitmaps into Fills . . . . . . . . . . . . . . . . . . . . . . . . . . . . . . . . . . . . . . . . . . . . . . . . . . . . . . . . . . 84
chapter
4
02_171233 ftoc.qxp 8/20/07 3:16 PM Page vii
Table of Contents
Add Text with the Text Tool . . . . . . . . . . . . . . . . . . . . . . . . . . . . . . . . . . . . . . . . . . . . . . . . . . . . . . 88
Format Text . . . . . . . . . . . . . . . . . . . . . . . . . . . . . . . . . . . . . . . . . . . . . . . . . . . . . . . . . . . . . . . . . . . 90
Align and Kern Text. . . . . . . . . . . . . . . . . . . . . . . . . . . . . . . . . . . . . . . . . . . . . . . . . . . . . . . . . . . . . 92
Set Text Box Margins and Indents . . . . . . . . . . . . . . . . . . . . . . . . . . . . . . . . . . . . . . . . . . . . . . . . . 94
Move and Resize Text Boxes . . . . . . . . . . . . . . . . . . . . . . . . . . . . . . . . . . . . . . . . . . . . . . . . . . . . . 96
Break Apart Text . . . . . . . . . . . . . . . . . . . . . . . . . . . . . . . . . . . . . . . . . . . . . . . . . . . . . . . . . . . . . . . 98
Distort Text. . . . . . . . . . . . . . . . . . . . . . . . . . . . . . . . . . . . . . . . . . . . . . . . . . . . . . . . . . . . . . . . . . . . 99
Working with Text
chapter
5
Add and Delete Layers . . . . . . . . . . . . . . . . . . . . . . . . . . . . . . . . . . . . . . . . . . . . . . . . . . . . . . . . . 102
Set Layer Properties . . . . . . . . . . . . . . . . . . . . . . . . . . . . . . . . . . . . . . . . . . . . . . . . . . . . . . . . . . . 104
Work with Layers in the Timeline . . . . . . . . . . . . . . . . . . . . . . . . . . . . . . . . . . . . . . . . . . . . . . . . 106
Stack Layers. . . . . . . . . . . . . . . . . . . . . . . . . . . . . . . . . . . . . . . . . . . . . . . . . . . . . . . . . . . . . . . . . . 108
Organize Layers into Folders . . . . . . . . . . . . . . . . . . . . . . . . . . . . . . . . . . . . . . . . . . . . . . . . . . . . 110
Add Guide Layers . . . . . . . . . . . . . . . . . . . . . . . . . . . . . . . . . . . . . . . . . . . . . . . . . . . . . . . . . . . . . 112
Create Mask Layers. . . . . . . . . . . . . . . . . . . . . . . . . . . . . . . . . . . . . . . . . . . . . . . . . . . . . . . . . . . . 114
Customize the Timeline . . . . . . . . . . . . . . . . . . . . . . . . . . . . . . . . . . . . . . . . . . . . . . . . . . . . . . . . 116
Working with Layers
chapter
6
Layers
LayersLayersLayers
Laye 1
Layer 2
Layer 5
Understanding Symbols and Instances . . . . . . . . . . . . . . . . . . . . . . . . . . . . . . . . . . . . . . . . . . . . 120
Using the Flash Library. . . . . . . . . . . . . . . . . . . . . . . . . . . . . . . . . . . . . . . . . . . . . . . . . . . . . . . . . 122
Create a Symbol . . . . . . . . . . . . . . . . . . . . . . . . . . . . . . . . . . . . . . . . . . . . . . . . . . . . . . . . . . . . . . 126
Insert an Instance . . . . . . . . . . . . . . . . . . . . . . . . . . . . . . . . . . . . . . . . . . . . . . . . . . . . . . . . . . . . . 128
Modify an Instance . . . . . . . . . . . . . . . . . . . . . . . . . . . . . . . . . . . . . . . . . . . . . . . . . . . . . . . . . . . . 130
Edit Symbols . . . . . . . . . . . . . . . . . . . . . . . . . . . . . . . . . . . . . . . . . . . . . . . . . . . . . . . . . . . . . . . . . 132
Swap Symbols . . . . . . . . . . . . . . . . . . . . . . . . . . . . . . . . . . . . . . . . . . . . . . . . . . . . . . . . . . . . . . . . 134
Working with Flash Symbols and Instances
chapter
7
02_171233 ftoc.qxp 8/20/07 3:16 PM Page viii
Introduction to Animation . . . . . . . . . . . . . . . . . . . . . . . . . . . . . . . . . . . . . . . . . . . . . . . . . . . . . . 138
Introduction to Frames . . . . . . . . . . . . . . . . . . . . . . . . . . . . . . . . . . . . . . . . . . . . . . . . . . . . . . . . . 140
Set Movie Dimensions and Frame Rate . . . . . . . . . . . . . . . . . . . . . . . . . . . . . . . . . . . . . . . . . . . 142
Add Frames . . . . . . . . . . . . . . . . . . . . . . . . . . . . . . . . . . . . . . . . . . . . . . . . . . . . . . . . . . . . . . . . . . 144
Select Frames. . . . . . . . . . . . . . . . . . . . . . . . . . . . . . . . . . . . . . . . . . . . . . . . . . . . . . . . . . . . . . . . . 148
Modify Frame Properties . . . . . . . . . . . . . . . . . . . . . . . . . . . . . . . . . . . . . . . . . . . . . . . . . . . . . . . 149
Delete or Change the Status of Frames. . . . . . . . . . . . . . . . . . . . . . . . . . . . . . . . . . . . . . . . . . . . 150
Create Frame-by-Frame Animation . . . . . . . . . . . . . . . . . . . . . . . . . . . . . . . . . . . . . . . . . . . . . . . 152
Onion-Skinning an Animation . . . . . . . . . . . . . . . . . . . . . . . . . . . . . . . . . . . . . . . . . . . . . . . . . . . 156
Preview a Flash Animation. . . . . . . . . . . . . . . . . . . . . . . . . . . . . . . . . . . . . . . . . . . . . . . . . . . . . . 160
Adjust the Animation Speed with Frames . . . . . . . . . . . . . . . . . . . . . . . . . . . . . . . . . . . . . . . . . . 161
Move and Copy Frames . . . . . . . . . . . . . . . . . . . . . . . . . . . . . . . . . . . . . . . . . . . . . . . . . . . . . . . . 162
Create Scenes . . . . . . . . . . . . . . . . . . . . . . . . . . . . . . . . . . . . . . . . . . . . . . . . . . . . . . . . . . . . . . . . 164
Save an Animation as a Movie Clip. . . . . . . . . . . . . . . . . . . . . . . . . . . . . . . . . . . . . . . . . . . . . . . 166
Using Movie Explorer . . . . . . . . . . . . . . . . . . . . . . . . . . . . . . . . . . . . . . . . . . . . . . . . . . . . . . . . . . 168
Creating Basic Animation in Flash
chapter
8
Create a Motion Tween. . . . . . . . . . . . . . . . . . . . . . . . . . . . . . . . . . . . . . . . . . . . . . . . . . . . . . . . . 172
Create a Spinning Tween . . . . . . . . . . . . . . . . . . . . . . . . . . . . . . . . . . . . . . . . . . . . . . . . . . . . . . . 176
Create a Growing or Shrinking Tween . . . . . . . . . . . . . . . . . . . . . . . . . . . . . . . . . . . . . . . . . . . . 180
Animate Symbols Along a Path . . . . . . . . . . . . . . . . . . . . . . . . . . . . . . . . . . . . . . . . . . . . . . . . . . 184
Set Tween Speed. . . . . . . . . . . . . . . . . . . . . . . . . . . . . . . . . . . . . . . . . . . . . . . . . . . . . . . . . . . . . . 188
Adjust Symbol Opacity . . . . . . . . . . . . . . . . . . . . . . . . . . . . . . . . . . . . . . . . . . . . . . . . . . . . . . . . . 189
Create a Shape Tween . . . . . . . . . . . . . . . . . . . . . . . . . . . . . . . . . . . . . . . . . . . . . . . . . . . . . . . . . 190
Using Shape Hints. . . . . . . . . . . . . . . . . . . . . . . . . . . . . . . . . . . . . . . . . . . . . . . . . . . . . . . . . . . . . 194
Using Reverse Frames. . . . . . . . . . . . . . . . . . . . . . . . . . . . . . . . . . . . . . . . . . . . . . . . . . . . . . . . . . 198
Animate a Mask . . . . . . . . . . . . . . . . . . . . . . . . . . . . . . . . . . . . . . . . . . . . . . . . . . . . . . . . . . . . . . 200
Distribute Objects to Layers. . . . . . . . . . . . . . . . . . . . . . . . . . . . . . . . . . . . . . . . . . . . . . . . . . . . . 202
Creating Animation by Tweening
chapter
9
02_171233 ftoc.qxp 8/20/07 3:16 PM Page ix
Table of Contents
Introduction to Flash Buttons . . . . . . . . . . . . . . . . . . . . . . . . . . . . . . . . . . . . . . . . . . . . . . . . . . . . 218
Create a Button Symbol . . . . . . . . . . . . . . . . . . . . . . . . . . . . . . . . . . . . . . . . . . . . . . . . . . . . . . . . 220
Create Shape-Changing Buttons . . . . . . . . . . . . . . . . . . . . . . . . . . . . . . . . . . . . . . . . . . . . . . . . . 224
Add Animation to a Button . . . . . . . . . . . . . . . . . . . . . . . . . . . . . . . . . . . . . . . . . . . . . . . . . . . . . 228
Assign Button Behaviors. . . . . . . . . . . . . . . . . . . . . . . . . . . . . . . . . . . . . . . . . . . . . . . . . . . . . . . . 232
Creating Buttons
chapter
11
89
Introduction to Flash Actions . . . . . . . . . . . . . . . . . . . . . . . . . . . . . . . . . . . . . . . . . . . . . . . . . . . . 238
Using the Actions Panel . . . . . . . . . . . . . . . . . . . . . . . . . . . . . . . . . . . . . . . . . . . . . . . . . . . . . . . . 240
Assign Frame Actions . . . . . . . . . . . . . . . . . . . . . . . . . . . . . . . . . . . . . . . . . . . . . . . . . . . . . . . . . 242
Add Actions to Movie Clips . . . . . . . . . . . . . . . . . . . . . . . . . . . . . . . . . . . . . . . . . . . . . . . . . . . . . 244
Jump to a Specific Frame or Scene . . . . . . . . . . . . . . . . . . . . . . . . . . . . . . . . . . . . . . . . . . . . . . . 246
Assign Stop and Play Actions. . . . . . . . . . . . . . . . . . . . . . . . . . . . . . . . . . . . . . . . . . . . . . . . . . . . 248
Load a New Movie into the Current Movie . . . . . . . . . . . . . . . . . . . . . . . . . . . . . . . . . . . . . . . . 252
Control Instances with Behaviors . . . . . . . . . . . . . . . . . . . . . . . . . . . . . . . . . . . . . . . . . . . . . . . . 254
Link a Button to a Web Page . . . . . . . . . . . . . . . . . . . . . . . . . . . . . . . . . . . . . . . . . . . . . . . . . . . . 258
Customize the Actions Panel . . . . . . . . . . . . . . . . . . . . . . . . . . . . . . . . . . . . . . . . . . . . . . . . . . . . 260
Add a Component . . . . . . . . . . . . . . . . . . . . . . . . . . . . . . . . . . . . . . . . . . . . . . . . . . . . . . . . . . . . 262
Adding Interactivity
chapter
12
ACTION SCRIPT
Adding Interactivity
to Your Flash Movies
Flash Actions
Act 1, scene 1
Apply a Filter. . . . . . . . . . . . . . . . . . . . . . . . . . . . . . . . . . . . . . . . . . . . . . . . . . . . . . . . . . . . . . . . . 206
Apply a Blend Mode. . . . . . . . . . . . . . . . . . . . . . . . . . . . . . . . . . . . . . . . . . . . . . . . . . . . . . . . . . . 208
Assign Timeline Effects . . . . . . . . . . . . . . . . . . . . . . . . . . . . . . . . . . . . . . . . . . . . . . . . . . . . . . . . . 210
Create a Transform Effect . . . . . . . . . . . . . . . . . . . . . . . . . . . . . . . . . . . . . . . . . . . . . . . . . . . . . . . 212
Apply a Transition Effect . . . . . . . . . . . . . . . . . . . . . . . . . . . . . . . . . . . . . . . . . . . . . . . . . . . . . . . . 214
Adding Special Effects
chapter
10
02_171233 ftoc.qxp 8/20/07 3:16 PM Page x
Using Progressive Download to Play a Video. . . . . . . . . . . . . . . . . . . . . . . . . . . . . . . . . . . . . . . 288
Embed a Video Clip . . . . . . . . . . . . . . . . . . . . . . . . . . . . . . . . . . . . . . . . . . . . . . . . . . . . . . . . . . . 292
Assign an Embedded Video Stop Behavior. . . . . . . . . . . . . . . . . . . . . . . . . . . . . . . . . . . . . . . . . 296
Working with Video
chapter
14
Introduction to Distribution Methods . . . . . . . . . . . . . . . . . . . . . . . . . . . . . . . . . . . . . . . . . . . . . 300
Publish a Movie as a Flash Movie File . . . . . . . . . . . . . . . . . . . . . . . . . . . . . . . . . . . . . . . . . . . . 302
Publish a Movie as a Web Page. . . . . . . . . . . . . . . . . . . . . . . . . . . . . . . . . . . . . . . . . . . . . . . . . . 304
Publish a Movie as a Projector File . . . . . . . . . . . . . . . . . . . . . . . . . . . . . . . . . . . . . . . . . . . . . . . 308
Export to Another File Format . . . . . . . . . . . . . . . . . . . . . . . . . . . . . . . . . . . . . . . . . . . . . . . . . . . 310
Play a Flash Movie in Flash. . . . . . . . . . . . . . . . . . . . . . . . . . . . . . . . . . . . . . . . . . . . . . . . . . . . . . 312
Play a Flash Movie in a Browser . . . . . . . . . . . . . . . . . . . . . . . . . . . . . . . . . . . . . . . . . . . . . . . . . 314
Test Movie Bandwidth. . . . . . . . . . . . . . . . . . . . . . . . . . . . . . . . . . . . . . . . . . . . . . . . . . . . . . . . . . 316
Print Movie Frames. . . . . . . . . . . . . . . . . . . . . . . . . . . . . . . . . . . . . . . . . . . . . . . . . . . . . . . . . . . . 320
Distributing Flash Movies
chapter
15
Import a Sound Clip . . . . . . . . . . . . . . . . . . . . . . . . . . . . . . . . . . . . . . . . . . . . . . . . . . . . . . . . . . . 266
Assign a Sound to a Frame . . . . . . . . . . . . . . . . . . . . . . . . . . . . . . . . . . . . . . . . . . . . . . . . . . . . . 268
Assign a Sound to a Button . . . . . . . . . . . . . . . . . . . . . . . . . . . . . . . . . . . . . . . . . . . . . . . . . . . . . 270
Set Synchronization Properties . . . . . . . . . . . . . . . . . . . . . . . . . . . . . . . . . . . . . . . . . . . . . . . . . . 272
Add Sound Effects. . . . . . . . . . . . . . . . . . . . . . . . . . . . . . . . . . . . . . . . . . . . . . . . . . . . . . . . . . . . . 274
Load a Sound Using a Behavior . . . . . . . . . . . . . . . . . . . . . . . . . . . . . . . . . . . . . . . . . . . . . . . . . 276
Assign Start and Stop Sounds . . . . . . . . . . . . . . . . . . . . . . . . . . . . . . . . . . . . . . . . . . . . . . . . . . . 280
Edit Sounds . . . . . . . . . . . . . . . . . . . . . . . . . . . . . . . . . . . . . . . . . . . . . . . . . . . . . . . . . . . . . . . . . . 282
Set Audio Output for Export. . . . . . . . . . . . . . . . . . . . . . . . . . . . . . . . . . . . . . . . . . . . . . . . . . . . . 284
Adding Sound
chapter
13
02_171233 ftoc.qxp 8/20/07 3:16 PM Page xi
How to Use this Teach Yourself VISUALLY Book
Do you look at the pictures in a book or newspaper
before anything else on a page? Would you rather see
an image instead of read about how to do something?
Search no further. This book is for you. Opening
Teach
Yourself VISUALLY Flash CS3 Professional
allows you to
read less and learn more about the Flash CS3 program.
Who Needs This Book
This book is for a reader who has never used this
particular technology or software application. It is also for
more computer-literate individuals who want to expand
their knowledge of the different features that Flash CS3
Professional has to offer. We assume that you already
know the basics of your computer’s operating system as
well as how to use your mouse and other input devices.
Book Organization
Teach Yourself VISUALLY Flash CS3 Professional has 15
chapters.
Chapter 1, “Flash Fundamentals,” covers the basic
elements of using the program, including opening and
saving files, setting the Stage size, working with the
Flash panels, and other fundamental tasks.
Chapters 2 and 3, “Creating Objects” and “Enhancing
and Editing Objects,” explain how to use the Flash
drawing tools to create original artwork for your Flash
projects and how to manipulate the artwork to change
its appearance.
Chapter 4, “Working with Imported Graphics,” shows
you how to bring in artwork from other sources to use
in your Flash movies.
Chapter 5, “Working with Text,” teaches you how to add
and edit text for use in your Flash projects.
Chapter 6, “Working with Layers,” explains how to use
layers in your movies to organize elements, create
dimension, and create masks.
Chapter 7, “Working with Flash Symbols and Instances,”
instructs you in how to reuse artwork in your movies
and keep movie elements organized in the Flash Library.
Chapters 8 and 9, “Creating Basic Animation in Flash,”
and “Creating Animation by Tweening,” show you how
to build animations in Flash and work with frames.
Chapter 10, “Adding Special Effects,” explain how to
add filters, transitions, and blends to add special effects
to your projects.
Chapter 11, “Creating Buttons,” demonstrates how to
add buttons to your project and assign button behaviors.
Chapter 12, “Adding Interactivity,” introduces you to
basic Flash actions and behaviors you can assign to add
interactivity, such as stop and play actions.
Chapter 13, “Adding Sound,” shows you how to add
sound to enhance your Flash movies.
Chapter 14, “Working with Video,” explains how to utilize
Flash video features to control embedded video clips.
Chapter 15, “Distributing Flash Movies,” instructs you on
the various ways you can publish your Flash projects so
others can see them.
Chapter Organization
This book consists of sections, all listed in the book’s
table of contents. A
section is a set of steps that show
you how to complete a specific computer task.
Each section, usually contained on two facing pages, has
an introduction to the task at hand, a set of full-color
Windows screen shots and steps that walk you through
the task, and a set of tips. This format allows you to
quickly look at a topic of interest and learn it instantly.
Chapters group together three or more sections with a
common theme. A chapter may also contain pages that
give you the background information needed to
understand the sections in a chapter.
What You Need to Use This Book
To perform the steps in this book, you need a personal
computer with Adobe Flash CS3 installed.
Windows requirements:
l
Intel Pentium 4, Intel Centrino, Intel Xeon, or Intel
Core Duo (or compatible) processor
l
Windows XP with Service Pack 2 or Windows Vista
l
512MB of RAM
l
2.5GB of available hard-disk space
l
16-bit video card
l
DVD-ROM drive
l
Internet connection (for product activation and
online help access)
Mac requirements:
l
1GHz PowerPC G4 or G5 or multicore Intel
processor
How to use this book
03_171233 flast.qxp 8/20/07 3:24 PM Page xii
l
Mac OS X v. 10.4.8
l
512MB of RAM
l
2.5GB of available hard disk space
l
16-bit video card
l
DVD-ROM drive
l
Internet connection (for product activation and
online help access)
Using the Mouse
This book uses the following conventions to describe
the actions you perform when using the mouse:
Click
Press your left mouse button once. You generally click
your mouse on something to select something on the
screen.
Double-click
Press your left mouse button twice. Double-clicking
something on the computer screen generally opens
whatever item you have double-clicked.
Right-click
Press your right mouse button. When you right-click
anything on the computer screen, the program displays
a shortcut menu containing commands specific to the
selected item.
Click and Drag, and Release the Mouse
Move your mouse pointer and hover it over an item on
the screen. Press and hold down the left mouse button.
Now, move the mouse to where you want to place the
item and then release the button. You use this method
to move an item from one area of the computer screen
to another.
The Conventions in This Book
A number of typographic and layout styles have been
used throughout
Teach Yourself VISUALLY Flash CS3
Professional
to distinguish different types of information.
Bold
Bold type represents the names of commands and
options that you interact with. Bold type also indicates
text and numbers that you must type into a dialog box
or window.
Italics
Italic words introduce a new term and are followed by
a definition.
Numbered Steps
You must perform the instructions in numbered steps in
order to successfully complete a section and achieve
the final results.
Bulleted Steps
These steps point out various optional features. You do
not have to perform these steps; they simply give
additional information about a feature.
Indented Text
Indented text tells you what the program does in
response to your following a numbered step. For
example, if you click a certain menu command, a dialog
box may appear, or a window may open. Indented text
may also tell you what the final result is when you
follow a set of numbered steps.
Notes
Notes give additional information. They may describe
special conditions that may occur during an operation.
They may warn you of a situation that you want to
avoid, for example the loss of data. A note may also
cross-reference a related area of the book. A cross-
reference may guide you to another chapter, or another
section within the current chapter.
Icons and Buttons
Icons and buttons are graphical representations within
the text. They show you exactly what you need to click
to perform a step.
You can easily identify the tips in any section
by looking for the TIPS icon. Tips offer
additional information, including tips, hints,
and tricks. You can use the TIPS information
to go beyond what you have learned in the steps.
Operating System Difference
You can follow along with the steps in this book
regardless of whether your computer is running the
Mac OS or Windows operating system. Where steps are
provided for both operating systems, the Windows
instructions precede the Mac OS instructions. For
example, “Press ( ).”
03_171233 flast.qxp 8/20/07 3:24 PM Page 1
1
chapter
Flash
Fundamentals
The Flash authoring
program is the perfect tool
for both new and
experienced Web page
designers who want to
create expressive, dynamic
Web page elements. In this
chapter, you learn all the
basics for starting Flash
files and finding your way
around the program
window.
Animations
Web page components
Games
Applications
Mobile phone content
04_171233 ch01.qxp 8/20/07 3:26 PM Page 2
Introduction to Flash 4
Navigate the Flash Window 6
Understanding the Flash Timeline 7
Open a Flash File 8
Save and Close a Flash File 10
Change the Document Size 12
Using the Property Inspector Panel 14
Work with Panels 16
Zoom Out or In 18
Using Rulers and Grids 20
Find Help with Flash 22
Open a Flash Template 24
04_171233 ch01.qxp 8/20/07 3:26 PM Page 3
Adobe Flash is the program of
choice for multimedia authoring
projects. You can use Flash to
create animations, Web page
components, games, applications,
and mobile phone content. Using
the Flash Player plug-in, just
about every Web browser available
today supports Flash-based
content. In the strictest sense,
Flash is an integrated development
environment, while the Flash
Player is a virtual machine for
running Flash files.
Animations
Web page components
Games
Applications
Mobile phone content
Introduction
to Flash
4
Create Animation Content
Flash includes a variety of tools you can use to draw
your own graphic objects to use in your projects.
Flash-created vector graphics are much smaller in
file size than raster graphics, such as JPEGs and
GIFs. Vector graphics display much faster on a
downloading Web page and are a more efficient
method of delivering images over the Internet. To
learn more about creating objects, see Chapters 2
and 3. To learn how to import artwork, see Chapter
4. See Chapter 5 to learn about adding text.
Flash
JPEG
Work with Symbols
After creating new objects or importing artwork from
other sources, you can turn objects into symbols to
reuse in your Flash movie. Every time you use a
symbol, you use an instance of the original object. If
you make changes to the original, the instance
changes as well. Flash keeps track of your symbols in
the file’s Library. To learn more about using symbols
and instances, see Chapter 7.
04_171233 ch01.qxp 8/20/07 3:26 PM Page 4
5
Build Animation Sequences
You can use the Flash animation tools to create all
kinds of animation effects, from making an object
move across the screen to complex animations that
follow paths and action commands. You can create
animations using frames. A frame stores content, and
the total number of frames determines the length of
your movie. For more on creating animations, see
Chapters 8 and 9. To learn how to add sound to your
animations, see Chapter 13.
“Air Fighters”
Act 2
Scene 7
12-07-07
Take 1
Organize with Layers
You can use layers in your Flash movies to organize
content and add depth to your animations. Each layer
acts like a transparent sheet, allowing you to view
underlying layers. You can manage layers in the Flash
Timeline window. To learn more about working with
layers and the Flash Timeline, see Chapter 6
Background
B
ack
g
roun
d
Layer 1
Layer 2
L
a
y
er
2
Layer 3La
y
er
3
Add Interactive Elements
You can also use the Flash tools to create interactive
elements in your movie and assign actions. For
example, you can add a button that, when clicked,
activates another movie. A programming language
called
ActionScript controls interactivity in Flash. You
do not need to know how to write ActionScript to
add interactivity; Flash includes numerous prewritten
scripts that you can apply. To learn more about adding
buttons, see Chapter 11. To learn about adding
actions, see Chapter 12.
Click here to see the fighter plane in action!
START
Publish Your Movies
There are a variety of ways you can share your
animations with others. Flash includes options for
publishing movies to Web pages, as Flash movie files,
or as self-extracting animations. The program also
includes features to help you preview a movie before
publishing, test download performance, and more. To
learn more about publishing your Flash projects, see
Chapter 15.
Click here to see the fighter plane in action!
Flash Fundamentals
chapter
1
04_171233 ch01.qxp 8/20/07 3:26 PM Page 5
The Flash program window has several components for working with graphics
and movies. Take time to familiarize yourself with the on-screen elements.
If you use Flash on a Macintosh computer, the program elements may look
a bit different than those displayed in the following Windows example.
TITLE BAR
Displays the name of the open file.
MENU BAR
Displays Flash menus which, when
clicked, reveal commands.
FILE TAB
The tab at the top of the work
area represents the current file. If
two or more files are open, you
can switch from file to file by
clicking a tab.
TIMELINE
Contains all the frames, layers,
and scenes that make up a movie.
TOOLS PANEL
Contains the basic tools needed to
create and work with vector graphics.
CURRENT SCENE
Displays the name of the scene on
which you are currently working.
STAGE OR MOVIE AREA
The area where a movie or
graphic displays, where you can
view a frame’s contents and draw
graphic objects. This area is also
called the Flash Editor.
WORK AREA
The area surrounding the Stage.
Anything placed on the work area
does not appear in the movie.
PROPERTY INSPECTOR
Use this panel to view and edit
properties of the current object.
PANELS
Allow quick access to options for
controlling and editing Flash
movies.
6
Navigate the
Flash Window
04_171233 ch01.qxp 8/20/07 3:26 PM Page 6
7
The Flash Timeline contains the frames, layers, and scenes that make up a movie.
You can use the Timeline to organize and control your movies. By default, the
Timeline appears docked near the top of the program window. If you are new to
Flash, take a moment and familiarize yourself with the Timeline elements.
See Chapters 8, 9, and 10 for more on working with the Flash Timeline.
LAYERS
Use layers to organize artwork,
animation, sound, and interactive
elements. Layers enable you to
keep pieces of artwork separate and
combine them to form a cohesive
image, such as a company logo that
includes a layer of text and another
layer with a graphic shape.
FRAMES
Lengths of time in a Flash movie
are divided into frames. They
enable you to control what
appears in animation sequences
and which sounds play.
FRAME NUMBERS
Frames appear in chronological
order in the Timeline, and each
frame has a number.
PLAYHEAD
Also called the Current Frame
Indicator, the playhead marks the
current frame displayed on the
Stage.
PANEL MENU
Displays a drop-down menu of
customizing options for controlling
how frames are displayed in the
Timeline.
TIMELINE BUTTONS
Scattered around the Timeline are
buttons for controlling frames,
layers, and movies.
LAYER BUTTONS
Click to add and delete layers.
LAYER CONTROLS
Display the status of a layer, such
as hidden, locked, or outlined.
Understanding the
Flash Timeline
Flash Fundamentals
chapter
1
04_171233 ch01.qxp 8/20/07 3:26 PM Page 7
Flash files are called documents
or movies. When you save a file,
you can open it and work on it
again. You can make Flash files
as simple as a drawing you create
using the Flash drawing tools, or
as complex as an animation
sequence consisting of scenes
and interactive elements.
OPEN A FLASH FILE
1 Click File.
2 Click Open.
If the Main toolbar is displayed, you can click the
Open button ( ) to display the Open dialog box.
You can also press + ( + ) to open the
Open dialog box.
l
You can open a recent file by clicking here and
clicking the file name.
Note: When you first open Flash, you can use the Welcome screen to
open existing files or create new files. Click
Open to display the Open
dialog box.
The Open dialog box appears.
3 Click to navigate to the folder or drive
containing the file you want to open.
4 Click the file name.
l
You can change the file types listed by clicking
here and choosing a file type.
5 Click Open.
The file opens in the Flash window.
11
33
44
22
55
Air Fighters
You can also start a new Flash file at any time,
even if you are currently working on another file.
Every new file you start uses a default Stage size.
If the file windows are maximized, each open file
appears as a tab at the top of the Timeline.
Open a Flash File
Open a
Flash File
8
04_171233 ch01.qxp 8/20/07 3:26 PM Page 8
Why does Flash not show a Main toolbar by
default?
The Main toolbar includes access to common
commands, such as Open and
Save. For example, to open a
file, click the
Open button
( ). By default, Flash
does not display the Main
toolbar, but you can turn it
on if you want. Click
Windows, Toolbars, and
then
Main.
Toolbar
ON
OFF
Is there a limit to how many
Flash files I can have open?
No. However, the more files you
open, the slower your computer
runs. Graphics files, such as those
that you author in Flash, can take
up more processing power than
other programs. Unless you are
sharing data between the files, it
is a good idea to close Flash files
you are no longer using.
OPEN A NEW FLASH FILE
1 Click File.
2 Click New.
If the Main toolbar is displayed, you can
click the New button ( ) to display the
New Document dialog box.
You can also press + ( + ) to
open the New Document dialog box.
Note: When you first open Flash, you can use the Welcome
screen to open existing files or create new files. From the
Create New column, click the type of file you want to create.
11
33
44
22
9
The New Document dialog box appears.
3 Click the type of document you want to
create.
l
A description of each type appears here.
4 Click OK.
A blank document appears in the Flash
window.
You can have several Flash files open and
switch between them using the tabs at the
top of the Timeline.
Note: You can also use the Window menu to switch between
open files.
Flash Fundamentals
chapter
1
04_171233 ch01.qxp 8/20/07 3:26 PM Page 9
As you create movies in Flash, you
need to save them to work on them
again. By default, Flash saves all files
in the FLA format. Because Flash
does not offer an automatic save
feature, it is a good practice to save
your work frequently.
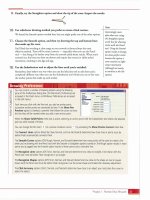
SAVE A FILE
1 Click File.
2 Click Save.
If the Main toolbar is displayed, you
can click the Save button ( ) to
display the Save As dialog box.
You can also press + ( + )
to open the Save As dialog box.
11
22
33 44
Recipes
Air Fighters
A
You can close Flash files no longer in use to free
up computer memory. Be sure to save your
changes before closing a file.
Saving graphics to the Flash Library works a bit
differently than saving a file. See Chapter 7 for
more information about saving symbols.
Save and Close a Flash File
Save and Close
a Flash File
10
The Save As dialog box appears.
Note: If you have previously saved a file, Flash saves
the changes without displaying the Save As dialog box.
3 Type a unique name for the file.
l
To save to another folder or drive, click
and select another location.
l
To save the file as another file type,
click and click a file type.
4 Click Save.
Flash saves your file.
04_171233 ch01.qxp 8/20/07 3:26 PM Page 10