the holiday activity books
Bạn đang xem bản rút gọn của tài liệu. Xem và tải ngay bản đầy đủ của tài liệu tại đây (20.94 MB, 52 trang )
Discover more at
ww w.dk.com
WAYSTOHAVEHOLIDAYFUNFROMSTARTTOFINISH
*ANE"ULL
²+BOF#VMMµT%,CPPLTQSPWJEFGVOBOEGBOUBTUJDMPPLJOH
BDUJWJUJFTUIBULJETDBOµUIFMQCVUSFTQPOEUPXJUIFOUIVTJBTN³
##$1"3&/5*/(
4HE(OLIDA
Y
!
CTIVIT
Y
"
OO
K
!CTIVITY"OOK
4HE
LI
D
*ANE
"ULL
I S B N 978-1-40531-88 1-5
9 7 8 1 4 0 5 3 1 8 8 1 5
!CTIVITY"OOK
(OLIDAY
8JUIPOUIFNPWFGPPEJEFBTOPOTMJQCPBSEHBNFTBOEMPUT
NPSFGBNJMZBDUJWJUJFT5IF)PMJEBZ"DUJWJUZ#PPLNBLFTUIF
KPVSOFZBTNVDIGVOBTUIFIPMJEBZJUTFMG
.BLFZPVSPXOQPSUBCMFHBNFCPYQSJOUZPVSPXO
UTIJSUTBOEDSFBUFTPNFOBUVSFBSU
8IFUIFSZPVBSFJOUIFDJUZPOUIFCFBDIPSVQBNPVOUBJO
ZPVXPOµUCFTBZJOH²"SFXFUIFSFZFU ³PS²*µNCPSFE³
POIPMJEBZFWFSBHBJO
4HE
Discover more at
ww w.dk.com
(
Y
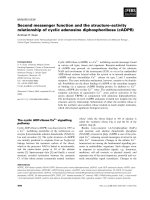
The
Holiday
Activity Book
Jane Bull
A Dorling Kindersley Book
LONDON, NEW YORK, MUNICH,
MELBOURNE, and DELHI
Design • Jane Bull
e
ditor • Penelope Arlon
P
hotography • Andy Crawford
D
esign assistant • Gemma Fletcher
p
ublishing Manager • Sue Leonard
P
roduction • Georgina Hayworth
DTP D
esigner • Ben Hung
J
acket editor • Mariza O’Keeffe
For Charlotte, Billy, and James
First published in Great Britain in 2007 by
Dorling Kindersley Limited
80 Strand, London WC2R 0RL
A Penguin Company
2 4 6 8 10 9 7 5 3 1
Copyright © 2007 Dorling Kindersley Limited
Copyright © 2007 Jane Bull
All rights reserved. No part of this publication
may be reproduced, stored in a retrieval system,
or transmitted in any form or by any means,
electronic, mechanical, photocopying, recording,
or otherwise, without the prior written
permission of the copyright owner.
A CIP catalogue record for this book
is available from the British Library
ISBN 978-1-40531-881-5
Colour reproduction by
GRB Editrice S.r.l., Verona, Italy
Printed and bound by Toppan, China
Discover more at
www.dk.com
all packed up. . .
. . .
and ready to go!
A
book packed full
of
holiday fun
Your holiday activity kit 4-5
Fold-away game mats 6-7
Sticky play tin 8-9
Sticky furry felts 10-11
Food on the move 12-13
Travel tubs 14-15
Crunchy holiday postcards 16-17
Keeping cool 18-19
Stencil your style 20-21
Design your stencil 22-23
Teds on tour 24-25
Wish you were here! 26-27
My holiday book 28-29
How to shape a book 30-31
Nature walk 32-33
Nature activities 34-35
Beach art 36-37
Pebble heads 38-39
Your souvenir shop 40-41
How to make souvenirs 42-43
Things to do 44-45
Are we there yet? 46-47
Index 48
Wish
you
were
here!
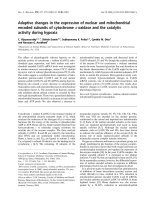
4
Your holiday
activity kit
Pack up your pens!
Be prepared
for some creative fun on your
holiday – make your own kit.
Make a kit box
YOU WILL NEED:
A box (a shoe box is ideal),
coloured paper, thin card, and cord.
What’s in the kit?
Here are a few essentials you could pack for lots of creative fun.
Shoe box
with lid
Add handles
Tie knots on
all four ends,
making sure
the knots are
big enough.
The larger pads of paper
will fit on the top.
Pack up your
materials in
the sections.
E
raser
Pencil
sharpener
Scissors
Sticky tape
Strong glue
Glue stick
Wax
crayons
Pads of
paper
E
nvelopes
Coloured
paper
and card
Stickers
Pencil
Coloured pencils
Felt-tip
pens
Ruler
Paints
Blank
postcards
Make four holes.
Thread
the cord
through
the holes.
Mini paints and pencils can save space.
Add some dividers
Pack and go!
Wrap your box in paper –
wrapping paper works
well.
Use coloured paper
to make some
patterns.
Use thin card
to make dividers.
Slot the
card strips
together.
Slide the dividers
into position.
Design a pattern for
the lid, draw it on
paper, and glue
it in place.
Cut two slots
from the base
edge to the middle.
Cut one slot
up each width
as shown.
Cover up
Decorate
You could stick on pictures
from magazines or paint
the box instead.
If you can’t find
cord, use some
shoe laces.
Have a
good
trip!
Stick on some
shaky eyes.
Cut a strip the
same length as the box.
Cut two strips the
same width as the box.
F
o
l
d
-
a
w
a
y
A
n
y
w
h
e
r
e
a
n
d
e
v
e
r
y
w
h
e
r
e
–
m
a
k
e
a
g
a
m
e
m
a
t
t
h
a
t
f
o
l
d
s
u
p
n
e
a
t
l
y
i
n
y
o
u
r
b
o
x
.
g
a
m
e
m
a
t
s
Your mat will
need to fold up small
enough to fit in your box.
You can use
anything as
counters, even
your snacks!
A
n
y
w
h
e
r
e
a
n
d
e
v
e
r
y
w
h
e
r
e
–
m
a
k
e
a
g
a
m
e
m
a
t
g
a
m
e
m
a
t
s
Fold-up game board
Find a piece of white material to make a
fold-away board. White cotton is good
as it will fold up nice and small.
Cut out a
piece of
white cotton,
30 cm by
30 cm (12 in
by 12 in).
Draw in the
lines, making
sure you
have 8 boxes
by 8 boxes in
the centre of
the cotton.
Colour in
every other
square. No
coloured
square should
be next to
another
coloured
square.
Snakes and ladders
Your board can be adapted to snakes and
ladders, draughts, chess, or any other
board game. Just cut out felt shapes to
suit your game.
Ready to play?
Make sure you learn the rules of the game
you choose to play, then unfold the mat and
play away!
Your mat will
need to fold up small
enough to fit in your box.
With a ruler
mark out
every 2.5 cm
(1 in) across
and down.
Sticky play tin
Another portable game box
– this time full of sticky
games that will stay in place when you’re on the move.
Pack up your tin, get sticky, and get playing!
Why use a tin container?
Magnets will stick to the lid of a metal tin,
such as an old biscuit tin. You can make
pictures and write messages and
they won’t slide around.
Foam or card shapes
with magnets glued
to the back.
Fridge magnet
letters and
numbers
Metal tin
What’s in
the tin?
Keep your bits and bobs together
by finding small boxes that will fit
neatly into your tin. They’ll keep
your tin neat and tidy.
Letter and number magnets
Write a message, play a word game,
do some sums, or
make funny
faces.
Lap top
Open your tin when
you’re on the move
or on the beach!
Fold-away game mat
Here’s the perfect place to
store your game mat.
Felt shapes
Furry felt shapes are great
for making pictures. Turn
over the page for some
shape ideas.
It’s full
of
bits in boxes
Glue a piece of felt to the inside
of the tin lid. You can then
make pictures out of
felt pieces.
Inside the tin lid
10
Cut out a tangram
Draw the lines
of the template
onto a square
of thin card.
Felt squares
Sticky furry felts
Felt sticks really well to felt
so you can
make felt pictures without them sliding
away – perfect for moving vehicles.
Cut circles, squares,
flowers, leaves, and
any other shapes
you can think of.
1 Inside the tin lid
Cut a piece of felt to fit inside
your tin lid and glue in place.
2 Glue it flat
Now you have a non-slip surface
to place your shapes on.
3 Cut out shapes
Now all you need to do is cut
out lots and lots of felt shapes.
Now make a picture
Keep the shapes
in a box and store
it in your tin.
Your felt shapes
will stick to this
surface.
Dab glue
in each
corner.
Use the template opposite to cut
out your tangram shapes.
Cut along all
of the lines.
Now put each
shape on a
square of felt
and draw
around it.
Cut the
shape out.
Repeat
with all
the shapes.
Tangrams
What is a Tangram?
It’s a Chinese puzzle
made by cutting a square into five triangles, one
square, and one rhomboid. These shapes can all be
rearranged to make hundreds of different pictures.
Your tangram template
For help with your tangram template, turn to
page 48 where you will find instructions on
how to transfer a template onto card.
Keep your
shapes in a box
Triangle
Rhomboid
Square
Triangle
Triangle
Triangle
Triangle
Food on the
move
Pack-up some fast food
for a long journey.
Bite-sized snacks like grapes, nuts, and
vegetable sticks all boxed up in airtight tubs
are just right when you’re peckish.
C
r
u
m
b
s
!
W
e
’
r
e
o
n
o
u
r
w
a
y
!
!
Foody travel tips
• Don’t take too much sugary or salty food.
• Fresh vegetables and fruit are more refreshing.
• Feeling travel sick? Try ginger – it’s good for
your digestion and may settle your stomach.
13
Bite-sized
Small pieces of food are
sometimes all you need to
keep you going on a long
journey. After all, if you’re
cooped-up in a car you won’t
need lots of
extra energy.
ROUGH
TRACK
OAT BARS
CHERRY
TOMATOES
and
RADISHES
NUTS AND
SEEDS
GINGERSNAP
COOKIES
JUICY
G
RAPES
PRETZELS
and CORN
SNACKS
PEAS
and
BEANS FOR
DIPPING
CARROT
and
CUCUMBER
STICKS
FRESH,
CRISP
APPLE
SAVOURY
CHEESE
D
IPS
Into a bowl goes:
100 g (4 oz) self-raising flour
40 g (1
3
/
4
oz) granulated sugar
1 tsp ground ginger
1 tsp bicarbonate of soda
50 g (2 oz) butter
Travel tubs
Air-tight
containers will keep
your food fresh throughout a
journey and will stop anything
from spilling out.
Put all the
ingredients into
a mixing bowl.
Gingersnaps
2 tablespoons
golden syrup
Use your hands
to squeeze the
mixture into a ball.
Rub it together using
your fingertips.
1 Rub it together then add the syrup
2 Make a big ball
Set the oven to
190˚C, 375˚F,
Gas mark 5
Makes 16 biscuits
Rough track oat bars
Makes 24 bars
Into a saucepan goes:
50 g (2 oz) soft brown sugar
2 tablespoons golden syrup
75 g (3 oz) butter
1 Melt it down
2 Add the oats
Set the oven to
190˚C, 375˚F,
Gas mark 5
200 g (8 oz)
rolled oats
Put the
sugar, syrup,
and butter into
a saucepan.
Turn
off The heaT!
Keep stirring
until the oats
are mixed in.
Heat the pan and
mix together as
the butter melts.
Add the oats.
Ask an adult
to help with
the hot pan.
14
15
Ask an adult
to help with
the oven.
Divide the
ball into
16 pieces.
Roll each piece
into a ball.
Place the balls on the
baking sheet and press
them down with a fork.
Non-stick baking
sheet.
3 Make into small balls
4 Squash them
5 Bake them
Bake for 10–15 minutes
You may need to cook them in
two batches. When they are done
let them cool down on a rack.
3 Tip into a pan
4 Press it down
5 Bake and cut
Ask an adult
to help with
the oven.
Pour into a non-stick
baking tin – about
20 x 30 cm (8 x 12 in).
Press the mixture
down and out to
the edges.
Use the back
of the spoon.
Bake for 20 minutes.
Cut into
bars while
still slightly
warm.
When they
have cooled,
remove the
oat bars.
L
o
a
d
u
p
t
h
e
b
e
a
n
s
,
w
e
’
r
e
o
f
f
!
16
Crunchy
holiday
postcards
Cookie postcard
Bake some yummy shortbread
cookies, have fun painting
your holiday scenes on them,
and give them to a friend.
Ink you
can eat!
Use food
colouring just
like ink to
paint your
pictures onto
your cookies.
Red
yellow
green
blue.
Ask an adult
to help with the oven.
Sprinkle flour onto the
surface to stop it sticking.
Making the cookies
Makes 8–10 cookies
Wish you
were here!
1 Rub it together
Put all the ingredients in the bowl
and rub them together with your
fingers until the mixture is crumbly.
2 Roll it out
Squeeze the mixture into a ball.
Sprinkle flour on the table and roll
out the dough to 5 mm (
1
/
4
in) thick.
150 g
(6 oz)
plain
flour
100 g
(4 oz)
butter
50 g
(2 oz)
caster
sugar
Set the oven
to 170˚C,
325˚F,
Gas mark 3
4 Place on the tray
Grease a baking sheet then carefully
transfer the dough onto it. The cookies
are now ready for the oven.
5 Bake then cool down
Bake in the oven for 10–15 minutes.
3 Cut into rectangles
Use a knife to cut the dough into
rectangles. Collect up the leftovers
and roll them out again.
Paint your cookies
When the cookies have cooled down they are ready
for painting. Remember to keep your brush clean.
Let the
cookies cool
on a wire rack.
Pour drops
of food colouring
into a palette.
Paint directly
onto the cookie.
Wash the brush
with water each time
you change colour.
18
Put the fruit
and a spoon in
a plastic cup and
fill with lemonade.
Frozen fizzy
fruit cups
Use fresh fruit and
lemonade for these
fizzy fruit ices.
Plastic
spoon
Plastic
cup
Fresh
fruit
Carefully
put it in to
the freezer
overnight
until it’s
solid.
Cut some
thin card to
fit the top of
the cup.
Push the
spoon
through a
hole in
the card.
Lemonade
Keeping cool
“Phew! It’s a hot day,
I could do
with something delicious to cool me
down.” Look no further, these icy creations
are perfect for a hot day or a long journey.
Redcurrants
Strawberries
Black and
green
grapes
Blueberries
Push the
lolly stick to
the bottom
of the pot.
Drink on a stick
Squeeze and freeze! Buy some fruit juice or squeeze
your own, then freeze it into refreshing lollies.
Take the cardboard off
and pull it out of the
pot – a delicious lolly.
Reuse
small
dessert
pots.
Pour some
fruit juice
into an
empty
pot.
The card
will keep
the stick
upright.
Push
a lolly stick
through a
piece of card.
Pop the pot
into the
freezer.
Be patient, it will take at
least six hours to freeze. If
you can, leave it overnight.
Try making
lots of
different
flavours.
REMEMBER Keep
the card on the pot
until you are ready
to eat the ice.
19
Cool for
long
journeys
Put a bottle of
water or juice
in the freezer
overnight. Take
it out just before
your journey and
it will keep cool for
most of the day.
Make
mini fruit cups
using small dessert
pots and tiny
spoons.
Keep
the cup so
when the lolly
melts you can eat
the fruit with the
spoon.
Buy an
atomiser from a
chemist and fill
it with fresh
water.
Refresh
your face.
Frozen
fruit
drinks
Y
R
(_
7
)
3
n
6
2
4
x
^
v
f
v
z
f
r
p
20
Stencil
your style
Personalize your stuff.
Choose a motif, cut out a
stencil, and print, print,
print – it’s as easy as that!
z
r
21
Keep it simple
The trick to stencilling is to
keep the designs very simple.
Create your own logo – it could
be a holiday theme or your
favourite activity.
Print matching sets
Stencil everything!
Once you have decided on
your design, you can stencil
lots and lots of things from
notebooks and boxes
to bags and caps.
Backpack
Notebook
Hat
Holiday kit box
Use a smaller
version of
your design.
Make
large
and small
stencils.
22
Prepare
your shirt
Design your stencil
A clean, white shirt will
work best because the paint
shows up well, but a pale
colour will work too.
Paint your design
Dab on the paint
Keep the image simple
Use the piece of stencil card to draw on your
design. Bold simple shapes work best – they
are easier to cut out and paint through.
Stencils look better if you have more
than one cutout in the design.
This way you can use
more colours too.
REMEMBER –
whatever you cut
away will be where
the ink goes
through.
Fabric paints are the best to use – they work like
ordinary paints but will not wash out when you clean
your clothes. Follow the makers’ instructions on the pots.
Tape your stencil
in place at the
top and bottom.
Don’t put
too much
paint on
the brush.
The material needs to
be completely flat to
get the best print. Put
a piece of thick card
inside the shirt to stop
it ruffling up.
Use a stiff piece
of card that will fit
inside your shirt.
Insert the card right
up to the neckline.
Paintbrush with hard bristles
Use the paints
straight from
the pots.
Use thin card
for the stencil;
cereal packet
card works well.
If you can’t get fabric
paints, you could use
acrylic paints instead.
23
Ask an adult
to help you
cut out the
design.
Fold the shirt
around the card
and tape in place.
Cut out another piece of
stiff card and use it as a
template to mark out
the background of the
design. Put tape around
the edges of the card,
then remove it.
Paint
a colour
within
the tape.
Make a background Add the colour
Peel back the stencil
Ready to go!
Paint all the
colours before
you remove
the stencil.
Remove the stencil
and allow the paint to dry.
Iron over the pattern to
fix the paint – follow the
instructions on the paint pot.
Ask an adult
to help with ironing.
Leave it
to dry.
Little and large
Make smaller stencils for
caps or notebooks.