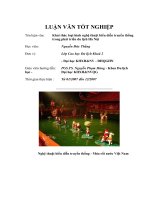
Mô hình đấu trường La Mã Colosseum.
Bạn đang xem bản rút gọn của tài liệu. Xem và tải ngay bản đầy đủ của tài liệu tại đây (652.78 KB, 2 trang )
Colosseum, Italy: Assembly Instructions
Canon ® is a registered trademark of Canon Inc. © Canon Inc. © Y.Watanabe
Before starting assembly:Writing the number of each section on its
back side before cutting out the sections is highly recommended.
(* This way, you can be sure which section is which even after cutting out
the sections.)
/>
Indicates where sections
should be glued together.
2
4
1
When gluing parts 1 and 2 together,
align the triangles on the ends of part 1 to
the seams on part 2.
1
11
View of completed model
2
*This model was designed for Papercraft and may differ from the original in some respects.
Assembly Instructions:Two A4 sheets(No.1 to No.2)
12
3
*Build the model by carefully reading the Assembly Instructions, in the parts sheet page order.
Fold outward
*Hint: Trace along the folds with a ruler
and an exhausted pen (no ink) to get a sharper, easier fold.
Top
Assembly Instructions
Mountain fold(dotted line)
Make a mountain fold.
Valley fold(dashed and dotted line)
Make a valley fold.
Scissors line(solid line)
Cut along the line.
Cut in line(solid line)
Assembly tip
Caution
Fold inward
Bottom
8
Glue
The illustration below is a close-up of
parts 2, 3, 5, 6, 8, and 9.Be sure to
fold the top and bottom parts correctly.
The glue spot(colored dot)
shows where to apply the glue.
9
Glue spot(Red dot)
Glue parts with the same number together.
11, 12
Glue spot(Green dot)
7
10
Glue within the same part.
Glue spot(Blue dot)
8, 9
Glue to the rear of the other part.
7
5
Scissors, set square, glue(We recommend stick glue), pencil, used
ballpoint pen, toothpicks, tweezers, (useful for handling small parts)
5, 6
6
Before gluing, crease the paper along mountain fold and valley
fold lines and make sure rounded sections are nice and stiff.
2, 3
Cut along the line.
Tools and materials
10
4
1
Glue, scissors and other tools may be dangerous to young children
so be sure to keep them out of the reach of young children.
1
1+2+3+4
Colosseum, Italy: Assembly Instructions
Canon ® is a registered trademark of Canon Inc. © Canon Inc. © Y.Watanabe
19
21
23
15
13, 14
20
14
13
24
22
15, 16
Glue parts 19 and 20 along the top
of parts 21 - 22.
16
Glue the 16 glue tabs on parts 19 - 24
to the oval on the stand.
When gluing parts 19 - 24 to the stand,
be sure the seams of all parts line up as
shown in the illustration.
Parts 19 - 24
Parts 1 - 12
17
18
Parts 17 + 18
Stand
Finished!
2