Setup VPN (Virtual Private Network) using Windows 2003 Server
Bạn đang xem bản rút gọn của tài liệu. Xem và tải ngay bản đầy đủ của tài liệu tại đây (1.32 MB, 28 trang )
Higher Education Commission
08/10/08
Setup VPN (Virtual Private Network) using
Windows 2003 Server
Author:
Abdul Razak
Version Status:
Issue 1.0
Date:
October 08, 2008
HEC Ref:
ICT-Univ-08-001
Document Revision History
Date
08/10/08
Version Number
1.0
Author/Editor
Abdul Razak
Summary of main changes
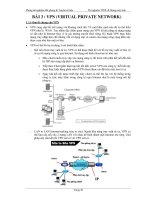
Pre-Requisites
1. Two network interface cards.
2. One static/NATed public IP on the outside NIC.
3. One static private IP on the private NIC.
Configuration
1.
Open Routing and Remote Access from Administrative Tools.
Note: you should disable Windows Firewall and Internet Connection sharing if you
installed SP1. 3. Click
2.
Right-click the server and then click Configure and Enable Routing and Remote Access
3.
Next on Welcome screen. Select Virtual Private Network [VPN] access and NAT in the
Configuration of
4.
In VPN Connection screen, select outside NIC which is connecting to the Internet
(Public/NATed)
*The other NIC will be used for internal interface to the network.
5.
IP Address Assignment option enables you to control the IP leased to the VPN clients.
Recommended option is to specify a chunk of reserved IPs. To add a IP range click NEW
6.
Specify the IP Range and click OK then Next
7.
Select the default option which is “Routing and Remoter Access authentication”
If you plan to have multiple remote Access servers on your network or already have
RADIUS server installed you can select the RADIUS option
8.
On the next confirmation page summarized configuration of VPN severs is displayed.
Review and click Finish to complete the setup.
If everything goes right the configuration wizard will conclude successfully.
9.
For VPN policies configuration open Routing and Remote Access from Administrative
Tools. Expand the RAS Server and right click Remote Access Policies and Click New
9.
Specify the self descriptive policy name on the next wizard screen and click Next
10.
In the access methods option select VPN and click Next
11.
Select the way you want to grant VPN access either user based or group based.
Recommended method is using active directory ser groups. Select Group and then click Add
12.
Select the group name created for the VPN user from the active directory
This in this tutorial is “VPN” and click Next.
13.
On the the authentication method accept the choice MS-CHAPv2 and click Next
14.
On the Ploicy Encryption Level Page accept all the three levels
15.
On the page review the policy summery and click finish to end the configuration.
Finally the Remote Access Server is ready to be tested.
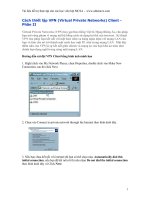
How to Configure VPN Connection
1. Click Start -->All ProgramsÆAccessoriesÆCommunicationsÆNew Connection Wizard
2. Click Next
3. Select Connect to the network at my place
4. Select Virtual Private Network Connection
5. Specify the desired name for VPN connection
121.52.X.X
6. Use Name OR type the IP Address of the VPN Server (121.52.X.X)
7. Select the appropriate choice whether every one can use the connection or not
8. Check Add a shortcut to the connection to my desktop
The connection configuration is completed.