XỬ lý GIAO DIỆN NGƯỜI DÙNG
Bạn đang xem bản rút gọn của tài liệu. Xem và tải ngay bản đầy đủ của tài liệu tại đây (5.13 MB, 55 trang )
6/27/2013
1. XML layout – XML container
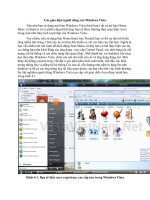
1.1 Android Layouts
Each element in the XML Layout is either a View
or ViewGroup object
Displaying the Application‘s View
paints the screen by walking the View tree by
asking each component to draw itself in a preorder traversal way.
Each component draws itself and then asks
each of its children to do the same.
2. Types of event programming
3. Toast & Alert Dialog
4. Common controls
5. Advanced controls
6. Custom layout
7. Webkit
8. Intent & Intent filters
9. Touch & Multi touch
10. Multi language in Android
1
1. XML layout – XML container
3
1.2 View class
The View class represents the basic building block
for user interface components.
a rectangular area on the screen
responsible for drawing and event handling.
is the base class for widgets
The ViewGroup subclass is the base class for
layouts
invisible containers that hold other Views
and define inside views layout properties.
1.1 Android Layouts
1.2 View class
1.3 Sample UI components
1.4 XML layout and attaching
1.5 UI Hierarchy
1.6 Common layouts
2
4
6/27/2013
1.3 Sample UI components
1.4 XML layout and attaching
Attaching Layouts to java code
You must “connect” the XML elements with equivalent
objects in your Java activity. This allows you to manipulate
the UI with code.
setContentView(R.layout.main);
Demo:
Button is content view
5
1.4 XML layout and attaching
7
1.4 XML layout and attaching
What is an XML layout?
Demo
An
XML-based layout is a specification of the various UI
components (widgets) and the relationships to each other
–and to their containers –all written I
Android considers XML-based layouts to be resources,
and as such layout files are stored in the res/layout
directory inside your Android project XML format.
You could create Layout XML files using UI tools such
as:
Eclipse
ADT UI Designer (getting better but still…)
(to be phased out soon???)
Asset Studio (probably the best option, not available yet)
DroidDraw
6
8
6/27/2013
1.5 UI Hierarchy
1.6 Common layouts
In
SDK folder / Tools/ monitor.bat
displays the UI structure of the current
screen shown on the emulator or device.
HierarchyViewer
FrameLayout:
<?xml version="1.0" encoding="utf-8"?>
android:orientation="vertical"
xmlns:android=" />
android:src="@drawable/blue"/>
android:src="@drawable/red"/>
</FrameLayout>
9
1.6 Common layouts
There
1.6 Common layouts
LinearLayout:
are five basic types of Layouts:
Frame,
11
Linear, Relative, Table, and Absolute.
FrameLayout:
simplest type of layout object: a blank space on your
screen that you can later fill with a single object
All child elements of the FrameLayout are pinned to the
top left corner of the screen; you cannot specify a
different location for a child view.
Subsequent child views will simply be drawn over
previous ones, partially or totally obscuring them (unless
the newer object is transparent).
is a box model –widgets or child containers are lined
up in a column or row, one after the next. To configure
a LinearLayout, you have five main areas of control
besides the container's contents:
orientation,
fill model,
weight,
gravity,
padding ,
margin
10
12
6/27/2013
1.6 Common layouts
1.6 Common layouts
LinearLayout:
LinearLayout:
aligns all children in a single direction —vertically or
horizontally depending on the android:orientation
attribute.
All children are stacked one after the other, (vertical
list will only have one child per row, a horizontal list will
only be one row high - the height of the tallest child,
plus padding).
A LinearLayout respects margins between children
and the gravity (right, center, or left alignment) of
each child.
You may attribute a weight to children of a
LinearLayout (wrap_content)
Linear Layout: Orientation indicates whether the
LinearLayoutr epresents a row(HORIZONTAL) or a
v
column (VERTICAL).
e
r
t
i
c
a
l
Horizontal
13
1.6 Common layouts
15
1.6 Common layouts
LinearLayout:
LinearLayout Orientation indicates whether the
LinearLayout represents a row or a column.
Add the android:orientation property to your
LinearLayout element in your XML layout, setting the
value to be horizontal for a row or vertical for a column.
The orientation can be modified at runtime by
invoking setOrientation()
14
LinearLayout: Fill Model
Widgets have a "natural"
size based on their
accompanying text.
When their combined
sizes does not exactly
match the width of the
Android device's screen,
we may have the issue of
what to do with the
remaining space.
16
6/27/2013
1.6 Common layouts
LinearLayout: Fill Model
All widgets inside a LinearLayout must supply dimensional
attributes android:layout_width and android:layout_height to
help address the issue of empty space. Values used in
defining height and width are:
1.Specific a particular dimension, such as 125dip (device
independent pixels)
2.Provide wrap_content, which means the widget should
fill up its natural space, unless that is too big, in which
case Android can use word-wrap as needed to make it fit.
3.Provide fill_parent, which means the widget should fill
up all available space in its enclosing container, after all
other widgets are taken care of.
1.6 Common layouts
LinearLayout: Weight
It is used to proportionally assign
space to widgets in a view.
You set android:layout_weight to
a value (1, 2, 3, …) to indicates
what proportion of the free space
should go to that widget.
Example Both the TextView and
the Button widgets have been set
as in the previous example. Both
have the additional property
android:layout_weight="1"
whereas the EditTextcontrol has
android:layout_weight="2"
Default value is 0
17
1.6 Common layouts
LinearLayout: Fill Model
19
1.6 Common layouts
LinearLayout: Gravity
It is used to indicate how a
control will align on the screen.
By default, widgets are left-and
top-aligned.
You may use the XML property
android:layout_gravity=“…” to
set other possible
arrangements: left, center, right,
top, bottom, etc.
18
20
6/27/2013
1.6 Common layouts
LinearLayout: Gravity
1.6 Common layouts
CAUTION: gravity vs layout_gravity
The difference between:
android:gravity specifies how to place the content of
an object, both on the x-and y-axis, within the object
itself.
LinearLayout: Padding vs Margin
android:layout_gravity positions the view with respect
to its parent (i.e. what the view is contained in).
21
1.6 Common layouts
LinearLayout: Padding
The padding specifies how much space there is between
the boundaries of the widget's "cell" and the actual widget
contents.
If you want to increase the internal whitespace between
the edges of the and its contents, you will want to use the:
android:padding property
or by calling setPadding() at runtime on the widget's
Java object.
Note: Padding is analogous to the margins on a word
processing document.
22
23
1.6 Common layouts
LinearLayout: Internal Margins Using Padding
Example:
The
EditTextbox has been changed to display 30dip of padding
all around
24
6/27/2013
1.6 Common layouts
1.6 Common layouts
LinearLayout: (External) Marging
By default, widgets are tightly packed next to each other.
To increase space between them use the
android:layout_margin attribute
TableLayout:
25
27
1.6 Common layouts
1.6 Common layouts
TableLayout:
TableLayout:
1.TableLayout positions its children into rows and
columns.
2.TableLayout containers do not display border lines.
3.The table will have as many columns as the row with
the most cells.
4.A cell could be empty, but can not span columns, as
they can in HTML.
5.A TableRow object defines a single row in the table.
6.A row has zero or more cells, each cell is defined by
any kind of other View.
7.A cell may also be a ViewGroup object.
26
1.Android's TableLayout allows you to position your
widgets in a grid made of identifiable rows and columns.
2.Columns might shrink or stretch to accommodate their
contents.
3.TableLayout works in conjunction with TableRow.
4.TableLayout controls the overall behavior of the
container, with the widgets themselves positioned into one
or more TableRow containers, one per row in the grid.
28
6/27/2013
1.6 Common layouts
1.6 Common layouts
TableLayout:
TableLayout:
Rows are declared by you by putting widgets as children
of a TableRow inside the overall TableLayout.
The number of columns is determined by Android ( you
control the number of columns in an indirect way).
So if you have three rows, one with two widgets, one with
three widgets, and one with four widgets, there will be at
least four columns.
Ordinarily, widgets are put into the first available column of
each row.
In the example below, the label (“URL”) would go in the
first column (column 0, as columns are counted starting
from 0), and the TextField would go into a spanned set of
three columns (columns 1 through 3).
29
31
1.6 Common layouts
1.6 Common layouts
TableLayout:
TableLayout:
However, a single widget can take up more than one
column by including the android:layout_span property,
indicating the number of columns the widget spans (this is
similar to the colspan attribute one finds in table cells in
HTML)
30
32
6/27/2013
1.6 Common layouts
1.6 Common layouts
TableLayout:
RelativeLayout:
By default, each column will be sized according to the
"natural" size of the widest widget in that column.
If your content is narrower than the available space,
you can use the TableLayout property:
android:stretchColumns= " … "
Its value should be a single column number (0-based)
or a comma-delimited list of column numbers. Those
columns will be stretched to take up any available
space yet on the row.
1.RelativeLayout lets child views specify their position
relative to the parent view or to each other(specified by ID).
2.You can align two elements by right border, or make one
below another, centered in the screen, centered left, ...
3.Elements are rendered in the order given, so if the first
element is centered in the screen, other elements aligning
themselves to that element will be aligned relative to screen
center.
4.Also, because of this ordering, if using XML to specify this
layout, the element that you will reference (in order to
position other view objects) must be listed in the XML file
before you refer to it from the other views via its reference ID.
33
35
1.6 Common layouts
1.6 Common layouts
RelativeLayout:
TableLayout:
In our running example we stretch columns 2, 3, and
4 to fill the rest of the row
The defined RelativeLayout parameters are
(android:layout_...) :
width, height,
below, above
alignTop, alignParentTop,
alignBottom, alignParentBottom
toLeftOf, toRightOf
padding [Bottom|Left|Right|Top], and
margin [Bottom|Left|Right|Top].
android:layout_toLeftOf=
34
"@+id/my_button"
36
6/27/2013
1.6 Common layouts
1.6 Common layouts
RelativeLayout: ‐Referring to the container
Some positioning XML (boolean) properties mapping a
widget according to its location respect to the parent’s place
are:
RelativeLayout:
37
1.6 Common layouts
39
1.6 Common layouts
RelativeLayout: –Referring to other widgets
RelativeLayout:
RelativeLayout places widgets based on their relationship
to other widgets in the container and the parent container.
38
The following properties manage positioning of a widget
respect to other widgets:
40
6/27/2013
1.6 Common layouts
1.6 Common layouts
RelativeLayout: –Referring to other widgets
RelativeLayout: Example
41
1.6 Common layouts
43
1.6 Common layouts
RelativeLayout: –Referring to other widgets
RelativeLayout: Example
In order to use Relative Notation in Properties you need to
consistently:
1.Put identifiers (android:id attributes) on all elementst hat
you will need to address.
2.Syntax is: @+id/...(for instance an EditText box could be
XML called: android:id="@+id/ediUserName")
3.Reference other widgets using the same identifier value
(@+id/...) already given to a widget. For instance a control
below the EditText box could say:
android:layout_below="@+id/ediUserName"
42
Use the Eclipse ADT Layout Editor for laying out RelativeLayouts
44
6/27/2013
1.6 Common layouts
2. Types of event programming
AbsoluteLayout:
A layout that lets you specify exact locations (x/y
coordinates) of its children. Absolute layouts are less flexible
and harder to maintain than other types of layouts without
absolute positioning.
2.1 Onclick in XML
2.2 Inline anonymous listener
2.3 Activity is listener
2.4 Listener in variable
2.5 Explicit Listener Class
2.6 View subclassing
47
45
1.6 Common layouts
2.1 Onclick in XML
Designing Complex Uis
LinearLayout is the most common modeling tool.
Generally, complex UI designs result from the
combination of simpler nested boxes that show their
inner pieces using a horizontal or vertical orientation.
Using onClick view property of view (android:onClick) in xml
Summary of Commonly-used Android containers
1.LinearLayout (the box model),
2.RelativeLayout (a rule-based model), and
3.TableLayout (the grid model), along with
4.ScrollView, a container designed to assist with
implementing scrolling containers.
5.Other (ListView, GridView, WebView, MapView,…)
discussed later
46
48
6/27/2013
2.2 Inline anonymous listener
2.4 Listener in variable
•create an anonymous listener
•define and pass it the setOnClickListener functions in
the same step
•similar to Implements
•don’t add the
implementation to class
•hold a reference to the
Listener in a variable
49
2.3 Activity is listener
51
2.5 Explicit Listener Class
•adding an interface to your base class.
–adding “implements Interfacename” to the class declaration
An explicit class for the listener, but an
anonymous (inlined) listener object
50
52
6/27/2013
2.6 View subclassing
Demo
•Simple math calculator
–Inline anonymous class
–Activity as listener
–Variable as listener
•Note
–final keyword
•What does it mean?
55
53
3. Toast & Alert Dialog
Comparision
3.1 Toast notification
3.2 Alert Dialog
54
56
6/27/2013
3.1 Toast notification
3.2 Alert Dialog
A message that pops up on the surface of the window.
It only fills the amount of space required for the message.
The notification automatically fades in and out, and does
not accept interaction events.
can be created and displayed from an Activity or Service.
show critical messages to the user
information about our application
Confirm
Yes/No message dialog
Yes/No Long Message Dialog
Pick One from a List Dialog
Pick a number of items from a larger set
Progress Dialog
Single choice from a set of choices dialog
A prompt dialog
Custom dialog
57
3.1 Toast notification
59
3.2 Alert Dialog
Toast toast=Toast.makeText(StylesActivity.this, "text",
Toast.LENGTH_SHORT);
toast.setGravity(Gravity.CENTER, 0, 0);
toast.show();
Short form
Toast.makeText(context, text, duration).show();
Use Application Context or Activity context
2 values for duration: Toast.LENGTH_SHORT to display for
a short duration (2 seconds) or Toast.LENGTH_LONG for
longer duration (3.5 seconds)
create an instance of AlertDialog.Builder.
activity context
setTitle → Sets the title of the pop-up. Just a String
setMessage → We can add a message. A String
setIcon: passing a Drawable object
R.drawable.icon
setCancelable (true/flase)
Read more:
/>58
60
6/27/2013
3.2 Alert Dialog
4. Common controls
setNegativeButton → add a simple button (cancel button)
setPositiveButton → add a simple button. (OK button)
setNeutralButton → button to perform another functionality
other than ok or cancel
no restrictions on the use of the three buttons, cause the
Alert dialog to dismiss
they can perform the same functionality the difference is
just in logical meaning.
setOnCancelListener
4.1 View
4.2 TextView
4.3 EditText
4.4 Button
4.5 Checkbox
4.6 RadioButton
4.7 Image
4.8 ScrollView control
61
3.2 Alert Dialog
63
4.1 View
All of the views in a window are arranged in a single tree.
common operations :
To get color hex code:
1.Set properties
or‐hex.com/
android:textStyle= "bold"
2.Set focus:
To force focus to a specific view, call requestFocus().
3.Set up listeners:
4.Set visibility:
You can hide or show views using setVisibility(int).
A Detailed List of Widgets:
/>package-summary.html
/>62
64
6/27/2013
4.2 TextView
4.3 EditText
A label is called in android a TextView, typically used to
display a caption, not editable
/>TextView.html
Some properties
TextAutoCorrect: input “teh” ”the”
TextCapword: Upper case word
65
4.3 EditText
67
4.4 Button
The EditText (or textBox) widget is an extension of TextView
that allows updates.
The control configures itself to be editable.
Important Java methods are:
EditText txtbox=(EditText) findViewById(R.id.txtUser);
txtBox.setText(“someValue”) and txtBox.getText().toString()
Button is a subclass of TextView->formatting a Button’s face
is similar to the setting of a TextView.
/>66
68
6/27/2013
4.5 Checkbox
4.6 RadioButton
checkbox is a specific type of two-states button that can
be either checked or unchecked.
A example usage of a checkbox inside your activity would
be the following:
69
4.6 RadioButton
A radio button is a two-states button that can be either
checked or unchecked.
When the radio button is unchecked, the user can press or
click it to check it.
Radio buttons are normally used together in a RadioGroup.
When several radio buttons live inside a radio group,
checking one radio button unchecks all the others.
RadioButton inherits from … TextView. Hence, all the
standard TextView properties for font face, style, color, etc.
are available for controlling the look of radio buttons.
Similarly, you can call isChecked() on a RadioButton to see
if it is selected, toggle() to select it, and so on, like you can
with a CheckBox.
70
71
4.6 RadioButton
72
6/27/2013
4.7 Image
4.8 ScrollView control
and ImageButton are two Android widgets
that allow embedding of images in your applications.
Both are image-based widgets analogue to TextView
and Button, respectively.
Each widget takes an android:src or
android:background attribute (in an XML layout) to
specify what picture to use.
Pictures are usually reference a drawable resource.
ImageButton, is a subclass of ImageView. It adds the
standard Button behavior for responding to click events.
ImageView
When we have more data than what can be shown on a
single screen you may use the ScrollView control.
It provides a sliding or scrolling access to the data. This
way the user can only see part of your layout at one time,
but the rest is available via scrolling.
This is similar to browsing a large web page that forces
the user to scroll up the page to see the bottom part of the
form.
73
4.7 Image
75
4.8 ScrollView control
74
76
6/27/2013
5. Advanced controls
5.1 Listview
5.1 Listview
5.2 Spinner
5.3 SlidingDrawer
5.4 AutocompleteTextView
5.5 Gridview
5.6 Time Selection
5.7 Picture Gallery
5.8 Tab selector
5.9 Menu
77
5.1 Listview
79
5.1 Listview
Using string‐array resource
78
Click add button to do…
80
6/27/2013
5.1 Listview
Using ArrayList
5.1 Listview
Using ListActivity
81
5.1 Listview
Using ArrayList
83
5.1 Listview
Using ListActivity
NOTE: The ListActivity class is implicitly bound to an object
identified by @android:id/list
82
84
6/27/2013
5.1 Listview
Using ListActivity
5.2 Spinner
In Android, the Spinner is the equivalent of the drop-down
selector.
Spinners have the same functionality of a ListView but
take less space.
As with ListView, you provide the adapter for linking data
to child views using setAdapter()
Add a listener object to capture selections made from the
list with setOnItemSelectedListener().
Use the setDropDownViewResource()method to supply
the resource ID of the multi-line selection list view to use.
85
5.1 Listview
Using ListActivity
87
5.2 Spinner
3. Selected value
1. Click here
2. Selected this option
86
88
6/27/2013
5.2 Spinner
5.2 Spinner
You can use: android.R.layout.simple_spinner_dropdown_item for
setDropdownViewResource
91
89
5.2 Spinner
5.2 Spinner
View Arg1: the view that represents the selected item
int Arg2: the position of the selected item.
long Arg3: the id of the selected item.
90
92
6/27/2013
5.3 SlidingDrawer
This class was deprecated in API level 17.
5.3 SlidingDrawer
93
5.3 SlidingDrawer
This class was deprecated in API level 17.
This class was deprecated in API level 17.
95
5.3 SlidingDrawer
This class was deprecated in API level 17.
•Hides content out of the screen and allows the user to drag
a handle to bring the content on screen.
•SlidingDrawercan be used vertically or horizontally.
•SlidingDrawer should be used as an overlay inside layouts.
This means SlidingDrawer should only be used inside of a
FrameLayoutor a RelativeLayout for instance.
•The size of the SlidingDrawer defines how much space the
content will occupy once slid out so SlidingDrawer should
usually use fill_parent for both its dimensions.
94
96
6/27/2013
5.3 SlidingDrawer
This class was deprecated in API level 17.
5.4 AutocompleteTextView
Select this
We can use Sliding Menu in />97
5.4 AutocompleteTextView
99
5.4 AutocompleteTextView
With auto-completion, as the user types, the text is treated
as a prefix filter, comparing the entered text as a prefix
against a list of candidates.
Matches are shown in a selection list that, like with
Spinner, folds down from the field.
The user can either type out a new entry (e.g., something
not in the list) or choose an entry from the list to be the
value of the field.
AutoCompleteTextView subclasses EditText, so you can
configure all the standard look-and-feel aspects, such as
font face and color.
AutoCompleteTextView has a
android:completionThreshold property, to indicate the
minimum number of characters a user must enter before the
list filtering begins.
98
Min 1 char to work
100