Teaching presentation skill using Video as Role Model
Bạn đang xem bản rút gọn của tài liệu. Xem và tải ngay bản đầy đủ của tài liệu tại đây (223.55 KB, 7 trang )
Teaching Presentation Skills Using Video as Role Model
Proceedings of the MOE Conference on “Developing the Basics of Holistic General Education.”「提昇全人基本素養的通識教育」pp. 41-50.
Ming Hsin University of Science and Technology, June 2004.
Johanna E. Katchen (柯安娜)
National Tsing Hua University (國立清華大學外語系)
/>Abstract
Videotaping has been used in areas such as acting and sports to help performers analyze their abilities and perfect their skills. This technique can also be useful for practicing
presentation skills in a foreign language. In addition to this primary use, teachers can also archive best performances and use them as models for teaching future students. After presenting
advice on the specifics of classroom videotaping for teachers unfamiliar with the process, this
paper looks at some of the advantages of using video as role model and the kinds of presentation
activities that can be modeled. It concludes by offering advice on video archiving.
Key Words: videotaping, public speaking, presentation skills, digital video
Introduction
When I was twelve years old, my father started a church choir. Soon thereafter he
bought a reel-to-reel tape recorder; his intention was to record their performances, listen in
order to discover and analyze their errors, and then rehearse to correct those errors. However,
during the church services, my father was busy waving his arms cajoling the motley group of
nonprofessionals to approximate the intentions of the composers, so I was assigned to be his
“recording engineer.” Since that time, I’ve always felt comfortable using technological devices and I learned a lesson that later became exceeding useful in my language teaching career—the value of recording a performance in order to critique and improve it.
Later, when I was a graduate student in the USA, I worked with a woman who used
both audiotape and videotape to record the speech and teaching demonstrations of international
teaching assistants with an eye to having them become aware of their difficulties and subsequently overcome them. In my own dissertation research, data included videotapes of university mathematics classes taught by international teaching assistants. A few years after I
came to Taiwan, I decided to try videotaping in my public speaking class. The department
video camera was not of high quality by today’s standards, but I managed to record some
process demonstration speeches. The following year, when I taught the unit again and gave the
assignment, I showed two of these speeches; one was of a girl showing us how to fry an egg, a
topic that seems rather boring in hindsight. The following week, I entered a very busy classroom. In the back of the room someone was preparing to boil water for making Chinese tea in
the traditional way; others had bags spilling over with mysterious content. On a table at the
front of the room were a watermelon, a banana, a kiwi, a container of mayonnaise, a spoon, and
a knife—and in the first speech the student showed us how her mother made a colorful salad to
tempt a little girl to eat fruit. And so it continued—easy corn soup one can make in the dormitory, personalized greeting cards, and so on. I was amazed that my students could do such a
wonderful job. That was October 1990 and the start of my using previous student speeches as
examples, as role models, when assigning students to give speeches.
1
Figure 1. Process Demonstration Speech 1990
Making Fruit Salad
Teaching Situation
At National Tsing Hua University, public speaking was a two-semester course required
of all English majors up through 2004. From fall semester 2004 it became an elective course,
although English majors are still required to take a certain number of courses that focus on
speaking skills. The level of the students’ English is upper intermediate to advanced. When I
taught the course, I based the syllabus on rhetorical modes, with informative speeches (including process demonstration and comparison/contrast) in the first semester and persuasive
speeches (including cause/ effect, problem/ solution) in the second. I also required two or three
extemporaneous speeches each semester.
I have also given one or two audio assignments per semester. These save class time, as
when I assign self-introductions to be done outside of class because the students already know
each other. Moreover, the more reticent students may feel less stress when they do not have to
face a live audience for their first speech. Audio also gives the teacher an opportunity to
analyze pronunciation and intonation more carefully, as when I assign students to read a portion of the famous Martin Luther King, Jr. speech “I Have a Dream” for voice expression in the
second semester. Recently, at the request of some of the students, I have abandoned the use of
audiotapes and now ask students to submit files by e-mail attachment in MP3 instead. This
format is even more personal and immediate and I can still give each student oral feedback, not
on the audiotape after each speech as before, but as a new MP3 file I record on my own
computer and send to each individual also by e-mail attachment.
Like audio before it, video is a way for us to review various behaviors with an eye to
changing or perfecting those behaviors. Coaches and actors use it, why not teachers?
Using the Video Camera
Video cameras, sometimes also called camcorders, are useful devices when we are
looking at how to improve performance in all kinds of fields. In the language classroom we can
record student language use in pair work and group activities, whether they are performing
self-introductions or role plays or just singing songs together in English to enjoy the camaraderie. Video recording can help in preparation for more serious events: practicing business or
conference presentations, performing micro-teaching in teacher training. Some teachers also
require students to plan and film their own projects, having them do the storyboarding, write
the scripts, narrate, film, edit, and finally show the finished product to the whole class.
Recording students provides several advantages. Students can critique themselves, see
“hard” copies of their performances and be proud of them. Teachers can grade later and more
2
thoroughly. The best of the recordings make good examples for future teaching and can also be
utilized in making teaching materials—traditional and multimedia, class websites, and even
distance learning. Recordings can be utilized in teacher research—ethnographic or linguistic
research, and particularly in conducting classroom action research. We can study how teachers
teach and how learners learn, and learn more about our own teaching style by recording our
classes.
When videotaping in the classroom, there are a few points to keep in mind. First you
have to prepare the equipment (most of these helpful hints come from personal experience and
appeared previously in Katchen, 1992 and modified in Katchen, 2001). If you are using a
school camera, make sure it will be available at the time you plan to use it. Practice using the
camera functions, such as panning (moving side to side, practice also up and down), framing
the image, zooming in and out, and other special features the camera may have. Make sure
especially to adjust the lighting for inside, and add backlight if your subject is using another
projection source (as when showing Power Point slides).
For a steady image and to free your arms, you will want to use a tripod. Make certain
you have a sturdy one and the proper interface to secure your camera to it. The interface should
be packed with the tripod. Since you are recording inside, it is more sensible to use electricity
rather than batteries. Finally, you need to check what sort of recording tape the camera uses,
secure the proper kind, and make sure you have two: always take a spare. Consider, too, how
much recording time you will need and make sure you have enough time on the tapes.
It is also wise to plan your classroom logistics ahead of time. Where will you place the
camera? Normally if students are performing or speaking in the front of the room, place the
camera near the back, but out of the way of student traffic to minimize the possibility of accidents. Don’t place speakers in front of a window in daytime or in front of a white board as the
bright background will make students’ faces appear too dark. A duller and darker background,
such as an ordinary blackboard, is much better. There should be enough light on the students’
faces. Check where the room sockets are and take an extension cord if necessary. In an ordinary classroom, the camera’s built-in microphone should be sufficient, but you may consider
using a clip-on remote microphone if your classroom is in a noisy place or you have some
special purpose. And have an alternative plan just in case the electricity fails (note that even if
you have batteries, there may not be enough light to go on with the presentations or recording).
And what will you do if workmen start mowing the lawn or making other loud noises during
recording?
Prepare the students before the day of videotaping by laying out your rules for behavior,
such as whether they can enter or leave the room during taping, not crossing in front of the
camera, respect for equipment, position of chairs, and any other considerations. On the day of
your first taping, try to get to class early to set up; get students to help you move chairs if
necessary. For example, I prefer an aisle in the middle of the classroom so that I do not record
the tops of students’ heads. Before taping, record the classroom for a few seconds and play it
back just to make sure everything is working.
After taping, adjust the Write Protect square so that you do not accidently record over
your precious tape. In 2004 it is still easiest to make videotape (VHS) copies, so you can make
an easy-to-use copy for yourself and another for the students if you have a self-access lab for
them to view on their own time. It is easy to connect the video camera output (line out) to the
VCR input (line in), then set the VCR on AV In or Video Input (a TV station should not be
playing). After rewinding your camera’s videotape, set it on play. You should see and hear it
on your TV. If you do not, check all your controls again. Put a blank VHS tape in your VCR
and hit the Record button (while the camera is playing the tape on your TV). Record about 30
seconds. Stop playing on the camera and stop recording on the VCR. Rewind the videotape
and play it to see if it recorded. If the recording was successful, then rewind both tapes and hit
3
PLAY on the camera’s video and RECORD on the VCR. If the recording didn’t work, try
again.
Students will want to see the video, so when will you show it to them? If you show it in
class, the rest of the class may be bored if the tape is long (this may be okay for short role plays
when everyone can laugh and enjoy them together) and individuals may lose face. If you view
it with them individually or in small groups, make sure you tell them something positive about
their performances. Help them build up their confidence. If you ask students to view on their
own outside of class, students also need guidance. All students think they look terrible at first
and need encouragement. Show students how videotaping is a tool for future improvement.
Students can see a number of things when they view their performances: their fluency or
hesitations, how well they prepared, their gestures and other nonverbal behavior, their use of
audiovisual aids, and their interaction with their audience. Students often criticize themselves
more harshly than their teachers do. Have them look for one good point and one point they
would like to improve next time. They can track their improvements, see their good performances and be proud of them.
Why Use Previous Student Speeches?
I videotape almost all speaking activities of students. While my primary purpose is to
have students see their performances and self-critique, both my secondary purposes make
teaching easier for me: (1) I do not have to grade in class; I can grade more thoroughly later at
my convenience. (2) I use the best examples as teaching materials. After teaching a new unit
(process, comparison and contrast, cause and effect, etc.), I show two or three examples of the
best previous student speeches of that genre. Students say that by seeing the example speeches,
they have a good idea what I want them to do.
Why would I want to use student speeches as examples, as role models? These
speeches are not perfect. However, most native speakers cannot speak as well as the best native speaker examples. Why should we expect more of our students? It is not necessary for our
students to be perfect speakers, but it is possible for them to be reasonably effective speakers.
Seeing peers, older students they may know, students who have been where they are now—is
motivating. Students get ideas from seeing what previous students have done, and they are
motivated to do even better. They say to themselves, “I can do that.” “I can do better than
that!”
Figure 2. Process Speech 2001
Arranging Flowers
Figure 3. Process Speech 2002
Taiwanese Opera
I have promised students I will never use a bad speech, never show an example of
something done poorly. The examples are not perfect, but each of them does something well.
This emphasizes the process over product, that everything can be improved or changed for a
4
different effect. In addition to modeling types of speeches—process (show and tell), also
comparisons, descriptions, argumentation, we can show good examples of introductions and
conclusions, for example, working with audio and visual materials, using Power Point.
Saving and Archiving
As mentioned previously, the easiest way (in 2004) to save classroom videotapes for
students is on videotape, especially if students can view and review in a self-access lab.
Videotapes are cheap and copies are easy to make from the camera. They are also relatively
easy to view in the classroom as many classrooms in Taiwan are either equipped with a
videotape player or one can be wheeled in on a cart. VHS is dependable and it always works.
However, VHS is getting old, it is becoming harder to buy videotape players, and the tapes are
deteriorating and can easily break with age. Students now also think of them as old technology—some students want VCDs or DVDs to watch in their own computers. (Some of the
material in this section also appeared in Katchen, 2004.)
Most of our camcorders now are already digital, using Mini DV tapes. The newest
brands record directly on to DVD, but the format may not play on every DVD player. With a
video capture card and a fire wire IE1394 (some cameras the USB port), one can play the recording into the computer and edit. You will also need movie making software. Windows
Movie Maker comes installed with Windows on new computers and is relatively easy to use;
another affordable option is U-Lead Video Studio made in Taiwan. Some camera manufacturers say you can edit within the camera, but the computer gives you more options. To copy to
VCD or DVD, you will also need a DVD writer, which comes with the needed software.
Granted digital quality is better than analog; nevertheless, with student recordings VHS copies
are good enough. Digital, however, gives us more editing and archiving options.
With editing you can make a more professional-looking product. You cut out those few
seconds before starting and after ending, add titles such as the students’ names and title of
performance, perhaps add music, put in scene-change breaks, and so on. However, when you
work with video on the computer, you need a lot of temporary storage space on your hard drive.
One way to get more space is to purchase an external hard drive (they can be 40 giga and even
larger) and set that drive as your temporary storage drive for that program.
If you have collected previous speech samples on analog videotape in the past, now is
the time to convert those deteriorating videotapes to a more permanent medium. Some video
capture cards permit analog input; the other option is a small device that works as a bridge,
converting analog to digital or digital to analog, with input and output for VCR jacks, S-video,
and fire wires. Once you play the video into your computer (from a VCR connected to your
video card via a bridge if necessary), you follow the same process as editing from a digital
video camera. Of course, the final result will not be digital quality, but you have more flexibility in editing out unwanted portions, adding titles, even inserting questions in text, audio, or
even video format between segments.
What can you do with your finished movies? You can record back to tape or burn a
DVD (but as mentioned before, the finished product will probably play on your computer but
not on your DVD player at home or the one in the classroom). While it is possible to upload
video to the Internet, it still takes a lot of space even with compression (about 10 MB per
minute for reasonable clarity), but this will get better in the near future. AVI (Audio Video
Interleave, for PC, details at format yields
better quality; however, MPEG (Moving Picture Experts Group, for both PC and MAC, details
at provides more compression possibilities for
Internet use.
5
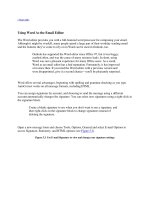
Figure 4. Adding Titles at the
Beginning of the Video
Figure 5. Adding Titles on the Video
An important issue with video editing and DVDs you make yourself is that they may
not play on DVD players. Most often the problem has to do with whether the hardware plays
DVD-R, DVD-RW, DVD+R, DVD+RW (see sometimes also with the format you save in. Think first of how the finished product will be used, on
which hardware you will most likely play it. Although your movie is more likely to play on a
computer, you still need to check the individual computer as the computer may not have the
proper software installed to play a DVD or your kind of DVD or it may not have the proper
codecs (decoders to interpret and play from the format your movie is compressed in).
While saving in VHS is convenient, especially in the short term for teacher and student
review, analog technology is nearly obsolete in Taiwan. We can save the digital Mini-DV
tapes, but they only play back in our cameras. Disc is a more permanent solution, but right now
there are still difficulties. The software is not that easy to master but, more importantly, there
are so many formats to save in right now, they do not play back on every piece of equipment,
and it is all very confusing. This should straighten out as even recently I have seen DVD
players being sold that play DVD-R, DVD-RW, DVD+R, DVD+RW and some other formats.
For now, however, the classroom teacher may not want to invite headaches trying to master
digital video editing.
Final Comments
In our department, the required two-semester public speaking course is no longer required from autumn 2004; instead, four speaking courses selected from a number of options are
required. I am proposing a new one-semester course—Speaking Skills for Future Teachers.
Role modeling will be critical—using the blackboard, technologies, presenting a lesson, and so
on. We use role modeling for all sorts of learning. Technology makes the development and
illustration of role models easier. A moving picture—from video—may be worth more than
ten thousand words.
References
Katchen, J. E. (1992). Using the video camera to improve speaking and performance skills. In
M. C. Yang (Ed.), Papers from the eighth conference on English language teaching and
learning in the Republic of China (pp. 531-540). Taipei: Crane Publishing Co., Ltd.
Katchen, J. E. (2001). New technologies applied to teaching presentation skills. Paper presented at the Second Regional conference on College English Teaching, The Chinese
University of Hong Kong.
6
Katchen, J. E. (2004). Analog to Digital: Technology Shift with Classroom Implications.
Paper presented at the Inaugural CELC Symposium for English Language Teachers,
“Paradigm Shifts in Language Teaching and Learning: Teacher Roles and Learner
Responsibilities,” Singapore. (To appear in Proceedings.)
McGowan, J. F. (1996-2002). [On-line]. AVI overview. Accessed on May 20, 2004. Available at />MPEG Pointers and Resources. (2000). [On-line]. Accessed on May 20, 2004. Available at
/>Taylor, J. (1996-2004). DVD Demystified. [On-line]. Accessed on May 20, 2004. Available
at />
7