Ebook Textbook of histology and a practical guide (2/E): Part 1
Bạn đang xem bản rút gọn của tài liệu. Xem và tải ngay bản đầy đủ của tài liệu tại đây (19.81 MB, 207 trang )
Textbook of Histology
and
A Practical Guide
Prelims.indd i
4/21/2010 12:15:09 PM
“This page intentionally left blank"
Textbook of Histology
and
A Practical Guide
JP Gunasegaran
Professor, Department of Anatomy
Rajah Muthiah Medical College & Hospital
Annamalai University
Annamalai Nagar–608 002
Chidambaram, Tamil Nadu, India
ELSEVIER
A division of
Reed Elsevier India Private Limited
Gurgaon (Haryana)
Prelims.indd iii
4/21/2010 12:15:10 PM
Textbook of Histology and a Practical Guide, 2/e
Gunasegaran
ELSEVIER
A division of
Reed Elsevier India Private Limited
Mosby, Saunders, Churchill Livingstone, Butterworth Heinemann and
Hanley & Belfus are the Health Science imprints of Elsevier.
© 2010 Elsevier
First Edition 2007
Second Edition 2010
All rights reserved. No part of this publication may be reproduced or transmitted in any form or by any means,
electronic or mechanical including photocopying, recording, or any information storage and retrieval system without
the prior written permission from the publisher and the copyright holder.
ISBN: 978-81-312-2490-8
Medical knowledge is constantly changing. As new information becomes available, changes in treatment, procedures,
equipment and the use of drugs become necessary. The authors, editors, contributors and the publisher have, as far as
it is possible, taken care to ensure that the information given in this text is accurate and up-to-date. However, readers
are strongly advised to confirm that the information, especially with regard to drug dose/usage, complies with current
legislation and standards of practice. Please consult full prescribing information before issuing prescriptions for any
product mentioned in the publication.
Published by Elsevier, a division of Reed Elsevier India Private Limited.
Registered Office: Gate No. 3, Building No. A-1, 2 Industrial Area, Kalkaji, New Delhi–110 019.
Corporate Office: 14th Floor, Building No. 10B, DLF Cyber City, Phase II, Gurgaon–122 002, Haryana, India.
Head, Medical Education: Jalees Farhan
Managing Editor (Development): Binny Mathur
Copy Editor: Goldy Bhatnagar
Manager-Production: N.C. Pant
Laser typeset by Chitra Computers, New Delhi.
Printed and bound at Sanat Printers, Kundli, Haryana.
Prelims.indd iv
4/21/2010 12:15:11 PM
PREFACE TO THE
SECOND EDITION
I am extremely thankful to my colleagues and students for their valuable suggestions and also drawing my attention towards
minor errors and omissions in the first edition of my book, “Textbook of Histology and a Practical Guide” released in 2007.
I am very happy to state that I have tried to incorporate almost all of them as detailed below, without changing the simple,
concise and friendly format of the book.
1. Minor errors and omissions have appropriately been amended where ever applicable throughout the book.
2. A brief account on principles of various types of microscopes has been included in the first chapter dealing with
histological techniques.
3. Salient features of biological phenomena of the cell is added in the second chapter devoted to epithelial tissue.
4. Characteristics of oral mucosa have been included under Oral Cavity in Chapter 12, detailing digestive system.
5. All photomicrographs have been enlarged for better visualization of labelling inside them besides replacing around 50
old ones with new higher resolution digital pictures. In addition, legends and all illustrations have been aligned side by
side for easy and ready comprehension by the students. Similarly the H&E diagrams have also been enlarged.
I sincerely hope to receive the same kind of support for this revised edition, which is being released within a short span of
three years.
At this juncture I wish to thank the staff of Reed Elsevier India Pvt. Ltd., especially Dr. Binny Mathur (Managing Editor)
for shouldering the responsibility of editing the book for the second time and for taking a keen interest in making the book
‘the best’.
JP GUNASEGARAN
Prelims.indd v
4/21/2010 12:15:11 PM
“This page intentionally left blank"
PREFACE TO THE
FIRST EDITION
This book presents microscopic structure of tissues and organs in a sequential manner using simple and precise language to
make it easily understandable, while sustaining the interest of the reader. The charts and tables given in the book are intended
to help the reader to revise the topic quickly.
The advantage of the book is its concise nature. Detailed descriptions have been deliberately avoided keeping in mind the
heavy workload on the beginners and the fact that they need to know only the basic facts.
The self-assessment exercises incorporating all the important information are provided after the text. The exercises enable
the students to test their ability to recapitulate what has been studied. The section on Practicals at the end of each chapter is
designed to suit the revised curriculum and time schedule. Each of the 23 Practicals follows a class lecture on the topic. Though
all slides in Histology are found in the Practical section, the rare ones like cardio-oesophageal, pyloroduodenal, rectoanal,
sclerocorneal junctions are meant for postgraduates and these may, if so desired, be shown as demonstration to undergraduate
students.
The unique features of the book are its photomicrographs from slides collected over a period of time and colour diagrams in
boxes drawn by the author himself with haematoxylin and eosin colour pencils.
The photomicrographs and the legends in the form of practical instructions will help the students to identify the tissue/
organ and understand the details of the slide given by the institution without much help from the teacher.
The colour diagrams will guide the students to learn the art of drawing so that they can draw a better labelled diagram
of their own in the record notebook. The intention is to make the students develop their own artistic skill rather than
copying from the book or from other record notebooks. The salient features for identification of the section are given in
boxes by the side of the diagrams to help the students in practical examination.
The vast experience gained by the author in India and abroad in premier institutions like CMC, JIPMER, RMMC and Al-Fateh
University of Medical Sciences and the constant encouragement given by his colleagues and well wishers induced him to come
out with the book.
It is hoped that the book will meet the requirements of undergraduate students in the fields of medicine, dentistry, veterinary
science, mammalian biology and other allied fields.
Though care is taken at every stage to fulfill the requirements of the students based on curriculum prescribed by MCI, it
may still be possible to improve the quality of the book. I would very much appreciate and welcome suggestions/comments
for improvement from teachers and students, and this may be conveyed to me through e-mail () or
by post.
JP GUNASEGARAN
Prelims.indd vii
4/21/2010 12:15:11 PM
“This page intentionally left blank"
ACKNOWLEDGEMENTS
With profound joy and happiness, I express my heartfelt thanks and gratitude to all those who helped me to fulfill my dream
project ‘Textbook of Histology and a Practical Guide”.
First and foremost I place on record the yeomen contribution made by two senior academics, Professor S Vembar and
Professor Samir C Mitra in educating me throughout the period of writing and in shaping this book as it appears today. I am
deeply indebted to Professor S Vembar, Adviser to Vice Chancellor, Annamalai University and former Principal, Rajah Muthiah
Medical College for sparing his valuable time and meticulously going through the manuscript word by word to improve the
quality of presentation. I sincerely thank Professor Samir C Mitra, Professor Emeritus, JIPMER for his valuable guidance and
suggestions to maintain the accuracy of the contents throughout the course of writing.
I am grateful to my senior colleague, Professor A Krishnamurthy, for his constant encouragement and for providing some
line diagrams. I am also thankful to my other colleagues who shared my teaching burden when I was busy with the ‘project’.
My special thanks are due to Dr. M Nirmal, Reader in Oral Pathology, Mr. K Beekar, Mrs A Gnanmpal, Technicians of my
department and Mr. Kamal Hassan Kader, Technician, now in UAE, for their support in photomicrography. I express my
thanks to Mr. N Sundar for helping me in computer-related work and to Mr. Gnanavel for drawing line diagrams.
I am indebted to my family especially my wife Vanmathi and children Divya, Niranj and Jeff for their patience during the
period of writing when I kept busy and would not devote enough time to them. I fondly remember the technical support
rendered by my daughter Divya throughout the exercise. I am very happy to dedicate this book to my family.
I thank the University authorities for permitting me to utilize the infrastructure available.
With pleasure I express my deep gratitude to the staff of Elsevier India Pvt. Ltd. and in particular, Mr. Rajiv Banerji
(Publishing Manager), Mr. Tanweer Ahmad (Commissioning Editor), and Dr. Binny Mathur (Managing Editor) for their
efforts and keen interest in bringing out the book to the best of my satisfaction. I hope this book, which has been a labour of
love for me, will be well received by academics and student community.
It is because of His grace that I have been able to accomplish the task of writing the book and may all glory and honour be
His!
JP GUNASEGARAN
Prelims.indd ix
4/21/2010 12:15:11 PM
“This page intentionally left blank"
CONTENTS
Preface to the Second Edition
Preface to the First Edition
Acknowledgements
1. HISTOLOGICAL TECHNIQUES AND MICROSCOPY
Introduction
General Architecture of the Body
Units of Measurement Used in Histology
Interpretation of a Section
Processing of Tissues for Light Microscopy (Paraffin Wax Embedding)
Staining Procedure
Microscopy
Self-assessment Exercise
Practical No. 1 Light Microscope and Histological Technique
2. EPITHELIAL TISSUE
Classification of Epithelial Tissue
Surface (or) Lining Epithelium
General Features
Intercellular Junctions (Junctional Complexes)
Surface Modifications of Epithelial Cells
Classification of Lining Epithelium
Some Biological Phenomena of the Cell
Self-assessment Exercise
Practical No. 2 Epithelial Tissue
I: Simple Epithelium
II: Stratified Epithelium
3. GLANDS
General Features
Development
Classification of Glands
General Architecture of a Compound Gland
Exercise
Self-assessment Exercise
Practical No. 3 Glandular Epithelium: The Salivary Glands
4. CONNECTIVE TISSUE
General Features
Classification of Connective Tissue (Based on Structure and Function)
Ordinary Connective Tissue
Self-assessment Exercise
Practical No. 4 Connective Tissue I: Ordinary
Prelims.indd xi
v
vii
ix
1
1
1
1
2
2
4
5
8
9
13
13
13
13
14
15
16
23
27
29
29
34
37
37
37
37
42
49
43
45
51
51
51
56
65
67
4/21/2010 12:15:11 PM
xii
Contents
5. CARTILAGE
General Features
Components
Types
Functions
Self-assessment Exercise
Practical No. 5 Connective Tissue II: Cartilage
6. BONE
General Features
Types of Bone
Bone Membranes
Bone Composition
Structure of Compact Bone
Structure of Spongy or Cancellous Bone
Bone Formation/Ossification
Self-assessment Exercise
Practical No. 6 Connective Tissue III: Bone
7. LYMPHOID TISSUE
Introduction
Immunoglobulins
Thymus
General Features
Components/Structure
Characteristic Features
Functions
Lymph Node
General Features
Components/Structure
Functions
Spleen
General Features
Components/Structure
Theories of Splenic Circulation
Functions
Palatine Tonsil
Self-assessment Exercise
Practical No. 7 Lymphoid and Haemopoietic Tissue
8. MUSCULAR TISSUE
Introduction
Types
Skeletal Muscle
General Features
General Architecture
Structure of a Skeletal Muscle Fibre
Contraction Mechanism
Types of Skeletal Muscle Fibres
Motor End-plates
Muscle Spindles
Smooth Muscle
Cardiac Muscle
Prelims.indd xii
73
73
74
74
76
77
79
83
83
83
84
84
85
88
88
94
96
103
103
103
106
106
106
109
109
109
109
109
111
112
112
112
114
116
116
119
122
131
131
131
131
131
131
133
134
135
136
136
137
137
4/21/2010 12:15:11 PM
Contents
Self-assessment Exercise
Practical No. 8 Muscular Tissue
Demonstration of Special Slides
9. NERVOUS TISSUE
Introduction
Anatomical Classification of Nervous System
Classification of Neurons
Structure of a Neuron (Multipolar)
Ganglia
Neuroglia (in CNS)
Cerebral Cortex
General Features
Structure
Cerebellar Cortex
General Features
Structure
Self-assessment Exercise
Practical No. 9 Nervous Tissue
10. BLOOD VESSELS
Introduction
Types of Blood Vessels
Structure
Arteries
General Features
Structure
Arteriole
General Features
Structure
Capillaries
General Features
Structure
Functions of Capillary Endothelium
Venule
General Features
Structure
Veins
General Features
Structure
Self-assessment Exercise
Practical No. 10 Blood Vessels
11. INTEGUMENTARY SYSTEM
Introduction
Functions of Skin
Types of Skin
Structure
Epidermis
Glands of Skin
Appendages of Skin
Skin Receptors
Self-assessment Exercise
Practical No. 11 Skin
Prelims.indd xiii
xiii
141
143
146
147
147
147
147
148
153
155
155
155
156
158
158
158
161
163
173
173
173
173
173
174
174
178
178
178
178
178
178
179
180
180
180
180
180
180
183
185
189
189
189
189
190
190
196
198
200
202
204
4/21/2010 12:15:11 PM
xiv
Contents
12. DIGESTIVE SYSTEM
Introduction
Oral Cavity
General Features
Structure of Oral Mucosa
Lips
Gingiva
Teeth
Histological Structure of a Tooth
Tongue
Taste Buds
Gastrointestinal Tract (GIT)
General Plan of Gastrointestinal Tract
Oesophagus
General Features
Structure
Stomach
General Features
Structure
Salient Features of Each Region of Stomach
Small Intestine
General Features
Structure
Salient Microscopic Features of Each Region of Small Intestine
Large Intestine
General Features
Structure
Salient Features of Each Region of Large Intestine
Glands Associated with Digestive System
Salivary Glands
General Features
Structure
Liver
General Features
Structure
Regeneration of Liver
Pancreas
General Features
Structure
Gall Bladder
General Features
Structure
Self-assessment Exercise
Practical No. 12 Digestive System
I: Oral Cavity
II: Oesophagus and Stomach
III: Intestine
IV: Glands
211
211
211
211
211
212
212
213
213
216
218
221
221
222
222
222
223
223
223
226
227
227
228
229
230
230
230
232
233
234
234
234
237
237
237
241
241
241
241
244
244
244
245
248
248
252
258
265
13. URINARY SYSTEM
271
Introduction
Kidney
General Features
Macroscopic Features
271
271
271
271
Prelims.indd xiv
4/21/2010 12:15:11 PM
Contents
Microscopic Structure
Juxtaglomerular Apparatus (JGA)
Ureter
General Features
Structure
Urinary Bladder
General Features
Structure
Urethra
Female Urethra
Self-assessment Exercise
Practical No. 13 Urinary System
14. MALE REPRODUCTIVE SYSTEM
xv
272
278
279
279
279
279
279
280
282
282
283
285
291
Introduction
Testis
General Architecture of Testis
Seminiferous Tubules
Spermatogenic Cells
Interstitial Tissue and Leydig Cells
Genital Ducts
Epididymis
Vas Deferens (Ductus Deferens)
Ejaculatory Duct
Accessory Sex Glands
Seminal Vesicle
Prostate
Bulbourethral Gland
Penis
Gross Features
Microscopic Structure
Self-assessment Exercise
Practical No. 14 Male Reproductive System
291
291
291
293
293
295
296
296
297
297
298
298
299
300
300
300
302
303
306
15. FEMALE REPRODUCTIVE SYSTEM
313
Introduction
Ovary
General Features
Structure
Development of Ovarian Follicle
Uterine Tube (Fallopian Tube)
General Features
Structure
Uterus
General Features
Structure
Cyclic Changes in the Endometrium
Cervix of Uterus
Vagina
General Features
Structure
Mammary Gland (Breast)
General Features
Gross Structure
Histological Structure
Prelims.indd xv
313
313
313
313
314
320
320
320
321
321
321
321
323
324
324
324
325
325
325
325
4/21/2010 12:15:11 PM
xvi
Contents
Placenta
General Features
Structure
Umbilical Cord
General Features
Structure
Self-assessment Exercise
Practical No. 15 Female Reproductive System I and II
16. RESPIRATORY SYSTEM
Introduction
General Structure of the Conducting Portion of the Respiratory Tract
Structural Changes in the Conducting Portion of the Respiratory Tract (from Larynx to Bronchiole)
Nasal Cavity
General Features
Structure
Pharynx
General Features
Structure
Larynx
General Features
Structure
Trachea
General Features
Structure
Principal Bronchus
Lungs: Intrapulmonary Bronchus and Its Subdivisions and Lung Parenchyma
General Features
Structure
Self-assessment Exercise
Practical No. 16 Respiratory System
17. ENDOCRINE GLANDS
Introduction
Pituitary (Hypophysis Cerebri)
General Features
Development
Thyroid
General Features
Development
Structure
Synthesis and Secretion of Thyroid Hormones
Effect of Thyroid Hormones
Parathyroid
General Features
Development
Structure
Adrenal (Suprarenal)
General Features
Development
Structure
Pineal Body (Epiphysis)
General Features
Structure
Functions
Prelims.indd xvi
328
328
329
330
330
330
331
334
343
343
344
344
344
344
345
346
346
346
347
347
347
348
348
348
350
350
350
350
356
358
361
361
361
361
362
367
367
367
367
369
369
370
370
370
370
372
372
372
372
375
375
375
375
4/21/2010 12:15:11 PM
Contents
Self-assessment Exercise
Practical No. 17 Endocrine Glands
18. SPECIAL SENSES
Introduction
Eye
General Features
Structure
Ear
General Features
Structure
Self-assessment Exercise
Practical No. 18 Special Senses
xvii
377
379
385
385
385
385
385
396
396
396
404
406
Appendix: Some Important Cells: Their Location, Features and Functions
413
Index
429
Prelims.indd xvii
4/21/2010 12:15:11 PM
“This page intentionally left blank"
1
HISTOLOGICAL
TECHNIQUES AND
MICROSCOPY
INTRODUCTION
Before we study the various histological techniques, let us quickly familiarise ourselves with the basics of histology.
The term Histology is derived from the Greek words, histos, meaning “web” (tissue) and logos meaning “the study of”. Today the
term histology is used not only for the study of tissue alone but also for the study of cells and fine structure of organs and can
collectively be called microscopic anatomy. The study of histology provides a structural basis for functional correlation of an
organ or tissue and is a necessary prerequisite to the study of the abnormal tissue (pathology).
GENERAL ARCHITECTURE OF THE BODY
Cells are the functional and building units of all living organisms and are held together by intercellular junctions and matrix.
In multicellular organisms, tissues are collections of specialised cells with associated intercellular matrix for performing
specific functions.
There are four basic types of tissues in the body and each one performs a specific function:
1. Epithelial tissue – protection
2. Connective tissue – support
3. Muscular tissue – contraction
4. Nervous tissue – conduction
Thus the tissues form building blocks of the organs (e.g. kidney, liver, ovary) and they constitute the various functional
systems (Flowchart 1.1) of the body (e.g. digestive system, urinary system, reproductive system, etc.).
Cells
Tissues
Organs
Systems
Body
Flowchart 1.1 Architecture of the body.
UNITS OF MEASUREMENT USED IN HISTOLOGY
For Light Microscopy
The term micrometer (μm) is being used nowadays instead of micron (μ).
1 micrometer or micron = 0.001 mm or 10–6 m.
1
2
Textbook of Histology and a Practical Guide
For Electron Microscopy
The term nanometer (nm) is being used nowadays instead of angstrom (A°).
1 nanometer = 0.001 (μm or 10–9 m.
1 angstrom = 0.1 nm or 10–10 m.
INTERPRETATION OF A SECTION
When a thin section is examined under microscope only two-dimensional image is seen. It is actually a slice cut through
parts of three-dimensional objects like cells, fibres and tubes (blood vessels and ducts) which are oriented randomly.
It is often difficult to interpret the orientation of these structures in sectional view, because the plane of section may not
pass through exactly, either transversely or longitudinally. This results in variation in the appearance of the cells, fibres and
tubes depending on the plane of section.
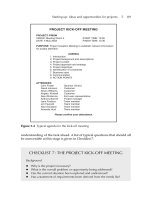
In order to comprehend the three-dimensional architecture of a structure from a two-dimensional section, it is necessary
to study sections cut in different planes (Fig. 1.1). Serial sectioning of the tissue is prepared and studied in a sequential
order to get information about the three-dimensional architecture of the structures.
PROCESSING OF TISSUES FOR LIGHT MICROSCOPY (PARAFFIN WAX EMBEDDING)
Tissues are processed by the following procedure to obtain thin translucent sections so that they can be examined under
microscope by transillumination.
Fixation and Fixatives
Chemical substances like formalin, mercuric chloride, acetic acid, picric acid and glutaraldehyde are used as fixatives to
preserve tissues.
All fixatives have both desirable and undesirable effects.
A combination of these fixatives is often prepared to get the maximum desirable effect. Such combinations commonly
used are:
1. Bouin’s fluid (formalin, acetic acid and picric acid)
2. Formal sublimate (formalin and mercuric chloride)
3. Helly’s fluid (formalin, mercuric chloride and potassium dichromate)
4. Zenker’s fluid (acetic acid, mercuric chloride and potassium dichromate)
Small pieces of fresh tissues are placed in common fixatives like 10% neutral formal saline for 24 hours.
The purpose of fixation is
– to preserve the morphology and chemical composition of the tissue,
– to prevent autolysis and putrefaction,
– to harden the tissue for easy manipulation,
– to solidify colloidal material, and
– to influence staining.
After fixation, some hard tissues like bone and tooth, which contain large amount of calcium salts, require an additional step
called decalcification before they are subjected for dehydration. Decalcification makes the hard tissues soft, enabling them to
be cut with microtome. For decalcification, several decalcifying agents are used, namely 10% nitric acid, 5% trichloroacetic
acid and ethylene diamine tetra acetic acid (EDTA).
Dehydration
Water from the tissues is removed in a gradual manner by immersing the tissues in ascending grades of alcohol, viz. 50%,
70%, 90% and absolute alcohol, in order to embed it in paraffin wax which is not miscible in water. Tissue remains in
each of these grades for 30–60 minutes.
Histological Techniques and Microscopy
Planes section of a oval structure
d
e
Chapter 1
3
Appearance of sections
f
b
a
d
f
e
c
a
b
c
a, b, c — Transverse; d, e — Longitudinal; f — Longitudinal (Tangential
A
B
A
B
E
A — Transverse
B — Tangential
C — Transverse
D — Longitudinal
E — Oblique
C
D
C
D
E
Planes of section of a tubular structure
Appearance of sections
Fig. 1.1 Appearance of sections of oval and tubular structures in various planes.
Clearing
After dehydration the tissue is treated with a paraffin solvent (clearing agent) like xylene or toluene for
2-3 hours. These agents penetrate and replace the alcohol from the tissue and make it translucent (clear).
Embedding
In order to obtain thin sections with microtome, tissue is infiltrated with embedding medium which gives a rigid consistency to the tissue.
The various embedding media are paraffin wax, celloidin, gelatin, plastic resins (for EM), etc. Paraffin is the routinely used
embedding medium for light microscopy.
Embedding involves two steps, namely, impregnation and casting or block making.
A. Impregnation
After clearing, the tissue is impregnated with molten paraffin wax (at 58°–60 °C) in a hot air oven for 2 hours with three
changes. The melting point of paraffin wax is 56 °C.
4
Textbook of Histology and a Practical Guide
B. Casting or block making
After impregnation, the tissue is placed in ‘L’ moulds containing molten paraffin. The molten wax
cube with the tissue is allowed to cool and the paraffin block is then removed from the mould.
Section Cutting (Microtomy)
5–7 μm-thick sections are cut with a rotary microtome.
The cut paraffin sections are affixed to albuminised glass microslides after flattening the sections over warm water.
The microslides with sections are either air dried or dried in an incubator overnight at 37 °C and stored for staining at
room temperature.
STAINING PROCEDURE
Staining is done routinely by using a basic and an acidic dye that stain tissue components selectively.
Tissue components that stain more readily with basic dyes are termed basophilic and are blue in colour and those with an
affinity for acid dyes are termed acidophilic and are pink/orange in colour.
The basic dyes are haematoxylin, toluidine blue and methylene blue. The acidic dyes are eosin, orange G and acid fuchsin.
Of these dyes, the combination of haematoxylin and eosin (H&E) is most commonly used in histological staining procedure. However, special stains like periodic acid Schiff reagent (PAS), osmic acid, Mallory and Masson’s, trichrome stains
are being used to selectively identify certain tissue components.
Haematoxylin usually stains the acid component (nucleus) of the cell, blue or black, whereas eosin stains the basic components present in the cytoplasm, pink.
Deparaffinization
To remove the paraffin from the section, the slides are treated with xylol. Three changes are necessary, each for 3–5
minutes.
Hydration
The slides are passed through the following series to hydrate the sections:
– Absolute alcohol
–
5 min (with 2 changes)
– 90% alcohol
–
3 min
– 70% alcohol
–
3 min
– 50% alcohol
–
3 min
[Wash in] Distilled water –
3 min
Staining
For differential staining (the commonly used technique), following steps are involved: A staining with
haematoxylin for 5–7 minutes.
– Washing well in running tap water until the section becomes blue.
– Differentiation with 1% acid alcohol for 5 seconds.
– Washing in running tap water again, until the section becomes blue.
– Staining with 1% eosin for 1 minute.
Dehydration
The stained sections are dehydrated in the following series:
– 50% alcohol
–
10 sec
– 70% alcohol
–
10 sec
– 90% alcohol
–
30 sec
– Absolute alcohol –
5 min (with 2 changes)
Histological Techniques and Microscopy
Chapter 1
5
Clearing and Mounting
The sections are cleared in xylene and mounted in DPX.
MICROSCOPY
Once the paraffin sections are stained with haematoxylin and eosin (H&E) or with some special stains, it can be viewed
through a light microscope. Its various parts and their functions are enumerated in Practical No. 1. Moreover, it is important
that the student should have the basic knowledge of the principles of some special microscopes that are being used under
certain condition.
Basic Principles of Some Special Microscopes
Dark Ground (Dark Field) Microscope
Dark-ground microscope is a modified light microscope where the objects are examined by dark ground illumination. Dark
ground illumination is obtained simply by inserting a small circle of black paper in the centre of the filter carrier of the
condenser. The central rays which would normally pass through the object and into the objective are cut off and the peripheral
rays from the condenser pass through the object, but do not enter the objective; the only light entering the objective will be
that scattered (refracted) by the object, which makes the object bright and self-luminous against a dark background with a
high degree contrast.
This microscope is used to examine extremely minute particles (colloid suspension) or large transparent objects (e.g. living
protozoa, crystals, etc.) which are otherwise invisible with ordinary light microscope. This phenomenon is similar to the
appearance of dust particles floating in a beam of sunlight in a dark room.
Phase-contrast Microscope
This microscope has been developed based on the fact that light passing through any transparent object mounted in a medium
of a different refractive index slows down and changes its direction. Within the cell, different organelles exhibit different
refractive indices and consequently alter the phase of the light that passes through them to different extents. These phase
differences are transformed into differences of light intensity (by means of a special optical system) so that structures within
the cells become visible in high contrast and with good resolution. So this microscope is being used to view any transparent
living biological specimens. (There is no need to stain the specimen.)
Polarizing Microscope
Polarizing microscope is a modified light microscope with two Polaroid filters. The first filter is placed below the condenser
and is called polarizer and the second filter is placed between the objective and the eyepiece and is called analyser. When both
polarizer and analysers are kept with their main axes at right angle to one another, no light passes, resulting in a darkfield
effect. However, when structures oriented in a linear (e.g. bones, muscle, collagen, nerve fibres) or radial fashion (e.g. lipid
droplets, starch granules) are examined, they appear as bright structures against a dark background because they are able to
rotate the direction of the vibration of polarized light. The capacity to rotate the direction of the vibration of the polarized
light is called birefringency and is present in crystalline substances or biological materials containing oriented molecules.
Electron Microscopes
The basic principle behind the electron microscope is that it uses shorter wavelengths of electrons instead of light rays to
achieve a very high resolution, as low as 3Å. This enables one to view fine structural details of cells and organelles. The
electrons are deflected/scattered by a series of electromagnetic lens in a manner similar to light deflection by glass lens of
optical microscope.
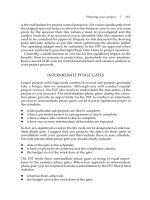
Electrons are produced by heating a metal filament (cathode) at high temperature (60–100 kv) in vacuum and are accelerated
between the cathode and the anode forming a beam of electrons that passes through an aperture in the anode. This beam
of electrons (primary or incidental electrons) is made to pass through the specimen (ultrathin section mounted on a copper
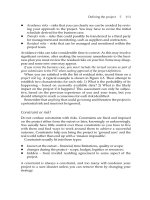
mesh grid) by a condenser coil or lens. As it impinges upon the specimen, different types of electrons and electromagnetic waves
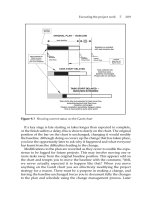
are emitted/scattered as a result of various types of atoms present in the specimen (Fig. 1.2).
6
Textbook of Histology and a Practical Guide
Primary (incident) electron beam
Secondary electrons
Reflected (back scattered) electrons
x-Ray/cathode luminescence
SPECIMEN
Absorbed electrons
Transmitted electrons
Fig. 1.2 Specimen – Electron interactions.
Cathode shield
Tungsten filament
Anode
Condenser lens
Specimen
Specimen holder
Obiective lens
Projector lens
Image
Fluorescent screen
Camera
Fig. 1.3 Components and optical path of a transmission electron microscope.