chap24 pps Automotive technology at University of Cambridge
Bạn đang xem bản rút gọn của tài liệu. Xem và tải ngay bản đầy đủ của tài liệu tại đây (3.17 MB, 73 trang )
start
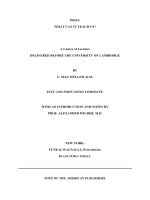
Automotive Technology: Principles, Diagnosis, and Service, 3rd Edition
By James D. Halderman
1
©©2008
2009Pearson
PearsonEducation,
Education,Inc.
Inc.
Pearson
PearsonPrentice
PrenticeHall
Hall- -Upper
UpperSaddle
SaddleRiver,
River,NJ
NJ07458
07458
OBJECTIVES:
After studying Chapter 24, the reader should
be able to:
•
•
•
Prepare for ASE Engine Performance (A8)
certification test content area “A” (General
Engine Diagnosis).
List the visual checks to determine engine
condition.
Discuss engine noise and its relation to
engine condition.
2
Continued
Automotive Technology: Principles, Diagnosis, and Service, 3rd Edition
By James D. Halderman
©©2008
2009Pearson
PearsonEducation,
Education,Inc.
Inc.
Pearson
PearsonPrentice
PrenticeHall
Hall- -Upper
UpperSaddle
SaddleRiver,
River,NJ
NJ07458
07458
OBJECTIVES:
After studying Chapter 24, the reader should
be able to:
•
•
•
•
Describe how to perform a dry and a wet
compression test.
Explain how to perform a cylinder leakage
test.
Discuss how to measure the amount of timing
chain slack.
Describe how an oil sample analysis can be
used to determine engine condition.
Automotive Technology: Principles, Diagnosis, and Service, 3rd Edition
By James D. Halderman
3
©©2008
2009Pearson
PearsonEducation,
Education,Inc.
Inc.
Pearson
PearsonPrentice
PrenticeHall
Hall- -Upper
UpperSaddle
SaddleRiver,
River,NJ
NJ07458
07458
KEY TERMS:
back pressure
compression test • cranking vacuum test • cylinder
leakage test
dynamic compression test
idle vacuum test • inches of mercury (in. Hg)
paper test • power balance test
restricted exhaust • running compression test
vacuum test • wet compression test
Automotive Technology: Principles, Diagnosis, and Service, 3rd Edition
By James D. Halderman
4
©©2008
2009Pearson
PearsonEducation,
Education,Inc.
Inc.
Pearson
PearsonPrentice
PrenticeHall
Hall- -Upper
UpperSaddle
SaddleRiver,
River,NJ
NJ07458
07458
If there is an engine operation problem, the cause could
be any one of many items, including the engine itself.
The condition of the engine should be tested anytime
the operation of the engine is not satisfactory.
Automotive Technology: Principles, Diagnosis, and Service, 3rd Edition
By James D. Halderman
5
©©2008
2009Pearson
PearsonEducation,
Education,Inc.
Inc.
Pearson
PearsonPrentice
PrenticeHall
Hall- -Upper
UpperSaddle
SaddleRiver,
River,NJ
NJ07458
07458
TYPICAL ENGINE-RELATED COMPLAINTS
Many driveability problems are not caused by engine mechanical
problems. A thorough inspection and testing of ignition and fuel
systems should be performed before testing for engine problems.
Typical engine mechanicalrelated complaints include:
Excessive oil consumption
Engine misfiring
Loss of power
Smoke from the engine or exhaust
Engine noise
Automotive Technology: Principles, Diagnosis, and Service, 3rd Edition
By James D. Halderman
6
©©2008
2009Pearson
PearsonEducation,
Education,Inc.
Inc.
Pearson
PearsonPrentice
PrenticeHall
Hall- -Upper
UpperSaddle
SaddleRiver,
River,NJ
NJ07458
07458
ENGINE SMOKE DIAGNOSIS
The color of exhaust smoke can indicate what problem might exist.
See this chart
on Page 202
of your textbook.
Continued
Automotive Technology: Principles, Diagnosis, and Service, 3rd Edition
By James D. Halderman
7
©©2008
2009Pearson
PearsonEducation,
Education,Inc.
Inc.
Pearson
PearsonPrentice
PrenticeHall
Hall- -Upper
UpperSaddle
SaddleRiver,
River,NJ
NJ07458
07458
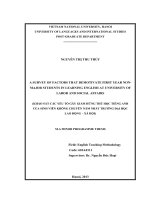
Figure 24–1 Blowby gases coming
out of the crankcase vent hose.
Excessive amounts of combustion
gases flow past the piston rings and
into the crankcase.
Figure 24–2 White steam is usually an
indication of a blown (defective) cylinder
head gasket that allows engine coolant to
flow into the combustion chamber where
it is turned to steam.
Automotive Technology: Principles, Diagnosis, and Service, 3rd Edition
By James D. Halderman
8
©©2008
2009Pearson
PearsonEducation,
Education,Inc.
Inc.
Pearson
PearsonPrentice
PrenticeHall
Hall- -Upper
UpperSaddle
SaddleRiver,
River,NJ
NJ07458
07458
THE DRIVER IS YOUR BEST RESOURCE
The driver of the vehicle knows a lot about the vehicle and how it is
driven. Before diagnosis is started, always ask the following:
When did the problem first occur?
Under what conditions does it occur?
1. Cold or hot?
2. Acceleration, cruise, or deceleration?
3. How far was it driven?
After the nature and scope of the problem are determined, the
complaint should be verified before further tests are performed.
Automotive Technology: Principles, Diagnosis, and Service, 3rd Edition
By James D. Halderman
9
©©2008
2009Pearson
PearsonEducation,
Education,Inc.
Inc.
Pearson
PearsonPrentice
PrenticeHall
Hall- -Upper
UpperSaddle
SaddleRiver,
River,NJ
NJ07458
07458
VISUAL CHECKS
The first and most important “test” is a careful visual inspection.
Oil Level and Condition The first area for visual inspection is oil
level and condition.
1. Oil level—oil should be to the proper level
2. Oil condition
a. Using a match or lighter, try to light the oil on the dipstick;
if the oil flames up, gasoline is present in the engine oil.
b. Drip some engine oil from the dipstick on the hot exhaust
manifold. If the oil bubbles or boils, there is coolant (water)
in the oil.
c. Check for grittiness by rubbing the oil between your fingers.
10
Continued
Automotive Technology: Principles, Diagnosis, and Service, 3rd Edition
By James D. Halderman
©©2008
2009Pearson
PearsonEducation,
Education,Inc.
Inc.
Pearson
PearsonPrentice
PrenticeHall
Hall- -Upper
UpperSaddle
SaddleRiver,
River,NJ
NJ07458
07458
Coolant Level and Condition Most mechanical engine problems
are caused by overheating. The proper operation of the cooling
system is critical to the life of any engine.
NOTE: Check the coolant level in the radiator only if the radiator is cool.
If the radiator is hot and the radiator cap is removed, the drop in pressure
above the coolant will cause the coolant to boil immediately and can cause
severe burns when the coolant explosively expands upward and outward
from the radiator opening.
1. The coolant level in the coolant recovery container should be
within the limits indicated on the overflow bottle. If this level
is too low or the coolant recovery container is empty, then
check the level of coolant in the radiator (only when cool) and
also check the operation of the pressure cap.
11
Continued
Automotive Technology: Principles, Diagnosis, and Service, 3rd Edition
By James D. Halderman
©©2008
2009Pearson
PearsonEducation,
Education,Inc.
Inc.
Pearson
PearsonPrentice
PrenticeHall
Hall- -Upper
UpperSaddle
SaddleRiver,
River,NJ
NJ07458
07458
2. Coolant should be checked with a hydrometer for boiling and
freezing temperature. This test indicates if the concentration of
the antifreeze is sufficient for proper protection.
3. Pressure test the cooling system and look for leakage. Coolant
leakage can often be seen around hoses or cooling system
components because it will often cause:
a. A grayish white stain
b. A rusty color stain
c. Dye stains from antifreeze (greenish or yellowish depending
on the type of coolant)
d. Check for cool areas of the radiator indicating clogged
sections.
e. Check operation and condition of the fan clutch, fan, and
coolant pump drive belt.
12
Continued
Automotive Technology: Principles, Diagnosis, and Service, 3rd Edition
By James D. Halderman
©©2008
2009Pearson
PearsonEducation,
Education,Inc.
Inc.
Pearson
PearsonPrentice
PrenticeHall
Hall- -Upper
UpperSaddle
SaddleRiver,
River,NJ
NJ07458
07458
What’s Leaking?
The color of the leaks observed under a vehicle can help the technician
determine and correct the cause. Some leaks, such as condensate (water)
from the air-conditioning system, are normal, whereas a brake fluid leak is
very dangerous. The following are colors of common leaks:
Sooty black
Yellow, green,
blue, or orange
Red
Murky
Clear
Engine oil
Antifreeze (coolant)
Automatic transmission fluid
Brake or power steering fluid or very
neglected antifreeze (coolant)
Air-conditioning condensate (water)
(normal)
Automotive Technology: Principles, Diagnosis, and Service, 3rd Edition
By James D. Halderman
13
©©2008
2009Pearson
PearsonEducation,
Education,Inc.
Inc.
Pearson
PearsonPrentice
PrenticeHall
Hall- -Upper
UpperSaddle
SaddleRiver,
River,NJ
NJ07458
07458
Oil Leaks Can lead to severe engine damage if the resulting low
oil level is not corrected. Besides an oily mess where the vehicle is
parked, the leak can cause blue smoke to occur under the hood as
leaking oil drips on the exhaust system.
NOTE: Most oil leaks appear at the bottom of the engine due to gravity.
Look for the highest, most forward location for the source of the leak.
To help find the source of oil leaks follow these steps:
Step #1 Clean the engine or area around the suspected leak. Use a
highpowered hotwater spray. While the engine is running, spray
the entire engine and the engine compartment. Avoid letting water
come into direct contact with air inlet, ignition distributor or coil(s).
14
Continued
Automotive Technology: Principles, Diagnosis, and Service, 3rd Edition
By James D. Halderman
©©2008
2009Pearson
PearsonEducation,
Education,Inc.
Inc.
Pearson
PearsonPrentice
PrenticeHall
Hall- -Upper
UpperSaddle
SaddleRiver,
River,NJ
NJ07458
07458
An alternative method is to spray a degreaser on the engine, then
start and run the engine until warm. Engine heat helps the degreaser
penetrate the grease and dirt.
Use a water hose to rinse off the engine and engine compartment.
NOTE: If the engine starts to run rough or stalls when the engine gets
wet, then the secondary ignition wires (spark plug wires) or distributor cap
may be defective or have weak insulation. Be certain to wipe all wires and
the distributor cap dry with a soft, dry cloth if the engine stalls.
15
Continued
Automotive Technology: Principles, Diagnosis, and Service, 3rd Edition
By James D. Halderman
©©2008
2009Pearson
PearsonEducation,
Education,Inc.
Inc.
Pearson
PearsonPrentice
PrenticeHall
Hall- -Upper
UpperSaddle
SaddleRiver,
River,NJ
NJ07458
07458
Step #2 If the leak is not visible or oil seems to be coming from
“everywhere,” use a white talcum powder. Leaking oil will show as a
dark area on the white powder.
The Foot Powder Spray Trick
The source of an oil or other fluid leak is often difficult to determine. A
quick and easy method that works is the following. First, clean the entire
area. This can best be done by using a commercially available degreaser
to spray the entire area.
Let it soak to loosen all accumulated oil and greasy dirt. Clean off the
degreaser with a water hose. Let the area dry. Start the engine, and using
spray foot powder or other aerosol powder product, spray the entire area.
The leak will turn the white powder dark. The exact location of any leak
can be quickly located.
16
Continued
Automotive Technology: Principles, Diagnosis, and Service, 3rd Edition
By James D. Halderman
©©2008
2009Pearson
PearsonEducation,
Education,Inc.
Inc.
Pearson
PearsonPrentice
PrenticeHall
Hall- -Upper
UpperSaddle
SaddleRiver,
River,NJ
NJ07458
07458
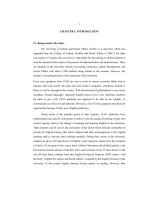
Figure 24–3 What looks like an oil pan gasket leak
can be a rocker cover gasket leak. Always look up
and look for the highest place you see oil leaking;
that should be repaired first.
Finding the location of the
oil leak can be difficult.
Continued
Automotive Technology: Principles, Diagnosis, and Service, 3rd Edition
By James D. Halderman
Figure 24–4 The transmission and flexplate
(flywheel) were removed to check the exact
location of this oil leak. The rear main seal
and/or the oil pan gasket could be the
cause of this leak.
17
©©2008
2009Pearson
PearsonEducation,
Education,Inc.
Inc.
Pearson
PearsonPrentice
PrenticeHall
Hall- -Upper
UpperSaddle
SaddleRiver,
River,NJ
NJ07458
07458
Step #3 Fluorescent dye can be added to the engine oil. Add about
1/2 oz (15 cc) of dye per 5 quarts of engine oil. Start the engine and
allow to run about 10 minutes to thoroughly mix the dye throughout
the engine.
A black light will
easily show oil leak
locations.
The dye will
show as a bright
yellow/ green
area.
Figure 24–5 Using a black light
to spot leaks after adding dye to
the oil.
NOTE: Fluorescent dye works best with clean oil.
Automotive Technology: Principles, Diagnosis, and Service, 3rd Edition
By James D. Halderman
18
©©2008
2009Pearson
PearsonEducation,
Education,Inc.
Inc.
Pearson
PearsonPrentice
PrenticeHall
Hall- -Upper
UpperSaddle
SaddleRiver,
River,NJ
NJ07458
07458
ENGINE NOISE DIAGNOSIS
An engine knocking noise is often difficult to diagnose. Several
items that can cause a deep engine knock include:
Valves clicking Can happen because of lack of oil to lifters.
Most noticeable at idle when oil pressure is lowest.
Torque converter Bolts or nuts may be loose on the flex plate.
Most noticeable at idle or when there is no load on the engine.
Cracked flex plate Often mistaken for rodor mainbearing.
Timing chain noise An excessively loose timing chain can
cause a severe knocking noise when it hits the timing chain
cover. This noise can often sound like a rodbearing knock.
Mainbearing knock A mainbearing knock often cannot be
isolated to a particular cylinder. The sound can vary in intensity
and may disappear at times depending on engine load.
Continued
19
Automotive Technology: Principles, Diagnosis, and Service, 3rd Edition
By James D. Halderman
©©2008
2009Pearson
PearsonEducation,
Education,Inc.
Inc.
Pearson
PearsonPrentice
PrenticeHall
Hall- -Upper
UpperSaddle
SaddleRiver,
River,NJ
NJ07458
07458
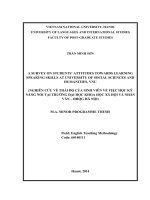
Loose or defective drive belts or tensioners If an accessory
drive belt is loose or defective, the flopping noise often sounds
similar to a bearing knock.
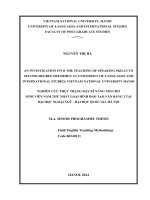
Figure 24–6 An accessory belt tensioner. Most tensioners have a mark indicating normal operating
location. If the belt has stretched, this indicator mark will be outside of the normal range. Anything
wrong with the belt or tensioner can cause noise.
Continued
Automotive Technology: Principles, Diagnosis, and Service, 3rd Edition
By James D. Halderman
20
©©2008
2009Pearson
PearsonEducation,
Education,Inc.
Inc.
Pearson
PearsonPrentice
PrenticeHall
Hall- -Upper
UpperSaddle
SaddleRiver,
River,NJ
NJ07458
07458
Piston pin knock Usually not affected by load on the cylinder.
If clearance is too great, a double knock is heard when at idle.
If all cylinders are grounded out one at a time and the noise
does not change, a defective piston pin could be the cause.
Piston slap Usually caused by an undersized or improperly
shaped piston or oversized cylinder bore. Most noticeable when
the engine is cold and tends to decrease or stop making noise as
the piston expands during engine operation.
Rodbearing noise Load sensitive (usually) and changes in
intensity as the load on the engine increases and decreases. A
rodbearing failure can often be detected by grounding out the
plugs one cylinder at a time. If the knocking noise decreases or is
eliminated when a particular cylinder is grounded (disabled),
then the grounded cylinder is where the noise is originating.
21
Continued
Automotive Technology: Principles, Diagnosis, and Service, 3rd Edition
By James D. Halderman
©©2008
2009Pearson
PearsonEducation,
Education,Inc.
Inc.
Pearson
PearsonPrentice
PrenticeHall
Hall- -Upper
UpperSaddle
SaddleRiver,
River,NJ
NJ07458
07458
See the chart on Page 204 of your textbook.
22
Continued
Automotive Technology: Principles, Diagnosis, and Service, 3rd Edition
By James D. Halderman
©©2008
2009Pearson
PearsonEducation,
Education,Inc.
Inc.
Pearson
PearsonPrentice
PrenticeHall
Hall- -Upper
UpperSaddle
SaddleRiver,
River,NJ
NJ07458
07458
Clicking noise—like the clicking of a ballpoint pen…
Figure 24–7 A cracked exhaust manifold on a Ford V-8.
Automotive Technology: Principles, Diagnosis, and Service, 3rd Edition
By James D. Halderman
23
©©2008
2009Pearson
PearsonEducation,
Education,Inc.
Inc.
Pearson
PearsonPrentice
PrenticeHall
Hall- -Upper
UpperSaddle
SaddleRiver,
River,NJ
NJ07458
07458
Engine Noise and Cost
A light ticking noise often heard at one-half engine speed and associated
with valve train noise is a less serious problem than many deep-sounding
knocking noises. Generally, the deeper the sound of the engine noise, the
more the owner will have to pay for repairs. A light “tick tick tick,” though
often not cheap, is usually far less expensive than a deep “knock knock
knock” from the engine.
Regardless of the type of noise, after external causes of knocking
noise have been eliminated, the engine should be disassembled and
carefully inspected to determine the exact cause.
Automotive Technology: Principles, Diagnosis, and Service, 3rd Edition
By James D. Halderman
24
©©2008
2009Pearson
PearsonEducation,
Education,Inc.
Inc.
Pearson
PearsonPrentice
PrenticeHall
Hall- -Upper
UpperSaddle
SaddleRiver,
River,NJ
NJ07458
07458
OIL PRESSURE TESTING
Proper oil pressure is very important for operation of any engine.
Low oil pressure can cause engine wear,
and engine wear can cause low oil pressure.
If main thrust or rod bearings are worn, oil pressure is reduced
because of leakage around the bearings. Oil pressure testing is
usually performed with the following steps:
Step #1 Run the engine until operating temperature is achieved.
Step #2 With the engine off, remove the oil pressure sending unit
or sender, usually located near the oil filter. Thread an oil pressure
gauge into the threaded hole.
25
Continued
Automotive Technology: Principles, Diagnosis, and Service, 3rd Edition
By James D. Halderman
©©2008
2009Pearson
PearsonEducation,
Education,Inc.
Inc.
Pearson
PearsonPrentice
PrenticeHall
Hall- -Upper
UpperSaddle
SaddleRiver,
River,NJ
NJ07458
07458