chap72 pps Automotive technology at University of Cambridge
Bạn đang xem bản rút gọn của tài liệu. Xem và tải ngay bản đầy đủ của tài liệu tại đây (1.17 MB, 55 trang )
start
Automotive Technology: Principles, Diagnosis, and Service, 3rd Edition
By James D. Halderman
©©2008
2009Pearson
PearsonEducation,
Education,Inc.
Inc.
Pearson
PearsonPrentice
PrenticeHall
Hall- -Upper
UpperSaddle
SaddleRiver,
River,NJ
NJ07458
07458
OBJECTIVES:
After studying Chapter 72, the reader should
be able to:
•
•
•
Prepare for ASE Brakes (A5) certification test
content area “A” (Hydraulic System
Diagnosis and Repair).
Explain how to bench bleed a master cylinder.
Describe the proper brake bleeding sequence.
Continued
Automotive Technology: Principles, Diagnosis, and Service, 3rd Edition
By James D. Halderman
©©2008
2009Pearson
PearsonEducation,
Education,Inc.
Inc.
Pearson
PearsonPrentice
PrenticeHall
Hall- -Upper
UpperSaddle
SaddleRiver,
River,NJ
NJ07458
07458
OBJECTIVES:
After studying Chapter 72, the reader should
be able to:
•
•
•
Describe the single stroke manual brake
bleeding procedure.
Discuss how to gravity bleed the hydraulic
brake system.
List the steps needed to perform a pressure
bleed procedure.
Automotive Technology: Principles, Diagnosis, and Service, 3rd Edition
By James D. Halderman
©©2008
2009Pearson
PearsonEducation,
Education,Inc.
Inc.
Pearson
PearsonPrentice
PrenticeHall
Hall- -Upper
UpperSaddle
SaddleRiver,
River,NJ
NJ07458
07458
KEY TERMS:
bleeder valve • brake bleeding
gravity bleeding
power bleeding • pressure bleeding
reverse fluid injection
single stroke bleeding method • surge bleeding
vacuum bleeding
Automotive Technology: Principles, Diagnosis, and Service, 3rd Edition
By James D. Halderman
©©2008
2009Pearson
PearsonEducation,
Education,Inc.
Inc.
Pearson
PearsonPrentice
PrenticeHall
Hall- -Upper
UpperSaddle
SaddleRiver,
River,NJ
NJ07458
07458
BRAKE BLEEDING
Brake bleeding is removing any trapped air from the hydraulic
system. Air can get into the hydraulic system whenever any
hydraulic brake line or unit is opened. A common source of air in
the brake system of this type can occur through very small holes in
rubber flexible brake lines.
Another source is absorption of moisture by brake fluid. When
moisture is absorbed, boiling point of the brake fluid is reduced.
During severe braking, the heat generated can cause the brake
fluid to boil and create air bubbles in the hydraulic brake system.
Air eventually travels to the highest part of the brake system, if not
restricted by pressure control valves. Air in the system results in a
spongy brake pedal.
Continued
Automotive Technology: Principles, Diagnosis, and Service, 3rd Edition
By James D. Halderman
©©2008
2009Pearson
PearsonEducation,
Education,Inc.
Inc.
Pearson
PearsonPrentice
PrenticeHall
Hall- -Upper
UpperSaddle
SaddleRiver,
River,NJ
NJ07458
07458
BLEEDING THE MASTER CYLINDER
Whenever the master cylinder is replaced or the hydraulicsystem
has been left opened for several hours, the air may have to be bled
from the master cylinder. Bleed the master cylinder “on the
bench” before installing it on the vehicle.
Figure 72–1 Always clamp a master
cylinder in a vise by the mounting
flange to prevent distortion of the
cylinder bore.
Continued
Automotive Technology: Principles, Diagnosis, and Service, 3rd Edition
By James D. Halderman
©©2008
2009Pearson
PearsonEducation,
Education,Inc.
Inc.
Pearson
PearsonPrentice
PrenticeHall
Hall- -Upper
UpperSaddle
SaddleRiver,
River,NJ
NJ07458
07458
If bleeding the master cylinder after working on the hydraulic
system, follow these steps:
Step #1 Fill the master cylinder with clean brake fluid from a
sealed container up to the recommended “full” level.
Step #2 Have an assistant slowly depress the brake pedal as you
“crack open” the master cylinder bleed screw starting with the
section closest to the bulkhead. It is very important that the
primary section of the master cylinder be bled before attempting
to bleed the air out of the secondary section of the master cylinder.
Before the brake pedal reaches the floor, close the bleeder valve.
Step #3 Repeat several times until a solid flow of brake fluid is
observed leaving the bleeder valve. If the master cylinder has no
bleeder valves, outlet tube nuts can be loosened instead.
Continued
Automotive Technology: Principles, Diagnosis, and Service, 3rd Edition
By James D. Halderman
©©2008
2009Pearson
PearsonEducation,
Education,Inc.
Inc.
Pearson
PearsonPrentice
PrenticeHall
Hall- -Upper
UpperSaddle
SaddleRiver,
River,NJ
NJ07458
07458
NOTE: A proper manual bleeding of the hydraulic system requires that
accurate communications occur between the person depressing the brake
pedal and the person opening and closing the bleeder valve(s). The
bleeder valve (also called a bleed valve) should be open only when the
brake pedal is being depressed. The valve must be closed when the brake
pedal is released to prevent air from being drawn into the system.
Automotive Technology: Principles, Diagnosis, and Service, 3rd Edition
By James D. Halderman
©©2008
2009Pearson
PearsonEducation,
Education,Inc.
Inc.
Pearson
PearsonPrentice
PrenticeHall
Hall- -Upper
UpperSaddle
SaddleRiver,
River,NJ
NJ07458
07458
BRAKE BLEEDER VALVE LOOSENING
METHODS
Attempting to loosen a bleeder valve often results in breaking
(shearing off) the bleeder valve. Several procedures can be tried
that help prevent the possibility of breaking a bleeder valve.
Bleeder valves are tapered and become wedged in the caliper on
the wheel cylinder housing.
Figure 72–2 Typical bleeder valve from a
disc brake caliper. The arrows point to
the taper section that does the actual
sealing. It is this taper that requires a
shock to loosen. If the bleeder is simply
turned with a wrench, the bleeder usually
breaks off because the tapered part at the
bottom remains adhered to the caliper or
wheel cylinder. Once loosened, brake
fluid flows around the taper and out
through the hole in the side of the bleeder
valve.
Continued
Automotive Technology: Principles, Diagnosis, and Service, 3rd Edition
By James D. Halderman
©©2008
2009Pearson
PearsonEducation,
Education,Inc.
Inc.
Pearson
PearsonPrentice
PrenticeHall
Hall- -Upper
UpperSaddle
SaddleRiver,
River,NJ
NJ07458
07458
Figure 72–3 Typical bleeder locations. Note that the combination valve and master cylinder
shown do not have bleeder valves; therefore, bleeding is accomplished by loosening the brake
line at the outlet parts. (Courtesy of Allied Signal Automotive Aftermarket)
Continued
Automotive Technology: Principles, Diagnosis, and Service, 3rd Edition
By James D. Halderman
©©2008
2009Pearson
PearsonEducation,
Education,Inc.
Inc.
Pearson
PearsonPrentice
PrenticeHall
Hall- -Upper
UpperSaddle
SaddleRiver,
River,NJ
NJ07458
07458
Air Impact Method Use a 6point socket for the bleeder valve and
necessary adapters to fit an air impact wrench to the socket.
Apply some penetrating oil to the bleeder valve and allow it to flow
around the threads.
Turn the pressure down on the impact wrench to limit the force.
The hammering effect of the impact wrench loosens the bleeder valve
without breaking it off.
Continued
Automotive Technology: Principles, Diagnosis, and Service, 3rd Edition
By James D. Halderman
©©2008
2009Pearson
PearsonEducation,
Education,Inc.
Inc.
Pearson
PearsonPrentice
PrenticeHall
Hall- -Upper
UpperSaddle
SaddleRiver,
River,NJ
NJ07458
07458
Hit and Tap Method
Step #1 Tap on the end of the bleeder valve with a steel hammer.
This shock often “breaks the taper” at the base of the bleeder
valve. Shock also breaks loose rust or corrosion on the threads.
Step #2 Using a 6point wrench or socket, tap the bleeder valve
in the clockwise direction (tighten).
Step #3 Using the same 6point socket or wrench, tap the bleeder
valve counterclockwise to loosen and remove the bleeder valve.
Step #4 If valve is still stuck (frozen), repeat Step 1 thru Step 3.
NOTE: The shock of the tap on the wrench breaks loose the valve.
Simply pulling on the wrench often results in breaking off the bleeder.
Continued
Automotive Technology: Principles, Diagnosis, and Service, 3rd Edition
By James D. Halderman
©©2008
2009Pearson
PearsonEducation,
Education,Inc.
Inc.
Pearson
PearsonPrentice
PrenticeHall
Hall- -Upper
UpperSaddle
SaddleRiver,
River,NJ
NJ07458
07458
Air Punch Method Use an air punch near the bleeder valve while
attempting to loosen the bleeder valve at the same time.
The punch creates a shock motion that often loosens the taper and
threads of the bleeder valve from the caliper or wheel cylinder.
It is often helpful to first attempt to turn the bleeder valve in the
clockwise (tightening), then turn in the counterclockwise direction
to loosen and remove the bleeder valve.
Figure 72–4 Using an air punch next to the
bleeder valve to help “break the taper” on
the bleeder valve.
Continued
Automotive Technology: Principles, Diagnosis, and Service, 3rd Edition
By James D. Halderman
©©2008
2009Pearson
PearsonEducation,
Education,Inc.
Inc.
Pearson
PearsonPrentice
PrenticeHall
Hall- -Upper
UpperSaddle
SaddleRiver,
River,NJ
NJ07458
07458
Heat and Tap Method Heat the area around the bleeder valve with
a torch. The heat expands the size of the hole and usually allows the
bleeder to be loosened and removed.
CAUTION: The heat from a torch will damage the rubber seals inside
the caliper or wheel cylinder. Using heat to free a stuck bleeder valve will
require that all internal rubber parts be replaced.
Continued
Automotive Technology: Principles, Diagnosis, and Service, 3rd Edition
By James D. Halderman
©©2008
2009Pearson
PearsonEducation,
Education,Inc.
Inc.
Pearson
PearsonPrentice
PrenticeHall
Hall- -Upper
UpperSaddle
SaddleRiver,
River,NJ
NJ07458
07458
Wax Method
Step #1 Heat the bleeder valve itself with a torch. The heat causes
the valve itself to expand.
Step #2 Remove heat from the bleeder valve. As the valve is
cooling, touch paraffin wax or candle wax to the hot valve. The wax
will melt and run down around the threads of the valve.
Step #3 Allow the bleeder valve to cool until it can be safely
touched with your hand. This assures that the temperature is low
enough for the wax to return to a solid and provide the lubricating
properties necessary for the easy removal of the bleeder valve.
Again, turn the bleeder valve clockwise before turning the valve
counterclockwise to remove.
Continued
Automotive Technology: Principles, Diagnosis, and Service, 3rd Edition
By James D. Halderman
©©2008
2009Pearson
PearsonEducation,
Education,Inc.
Inc.
Pearson
PearsonPrentice
PrenticeHall
Hall- -Upper
UpperSaddle
SaddleRiver,
River,NJ
NJ07458
07458
Do It Right—Replace the Brake Fluid
Often, used brake fluid looks like black coffee or coffee with cream. Both
conditions indicate contaminated or moisture-laden brake fluid that should
be replaced. The following steps will assure a complete brake fluid change:
Step #1 Remove the old brake fluid from the master cylinder using
a suction bulb. (Dispose of this old brake fluid properly.)
Step #2 Fill the master cylinder with new clean brake fluid from a
sealed container.
Step #3 Bleed each wheel brake until the brake fluid is clean.
This fluid replacement will fully restore the brake hydraulic system to asnew condition and protect the system from rust and corrosion. Replacing
only friction pads and/or linings is not a complete, thorough brake system
service. Customers should be aware of the importance of this procedure.
CAUTION: Do not allow the master cylinder to run out of brake fluid.
Recheck and refill as necessary during the bleeding process.
Automotive Technology: Principles, Diagnosis, and Service, 3rd Edition
By James D. Halderman
©©2008
2009Pearson
PearsonEducation,
Education,Inc.
Inc.
Pearson
PearsonPrentice
PrenticeHall
Hall- -Upper
UpperSaddle
SaddleRiver,
River,NJ
NJ07458
07458
BLEEDING SEQUENCE
After bleeding the master cylinder, the combination valve should
be bled if equipped.
Follow the same procedure as when bleeding the master cylinder,
being careful not to allow the master cylinder to run dry.
NOTE: The master cylinder is located in the highest section of the
hydraulic braking system. Some master cylinders are equipped with
bleeder valves. All master cylinders can be bled using the same procedure
as that used for bleeding calipers and wheel cylinders. If the master
cylinder is not equipped with bleeder valves, it can be bled by loosening
the brake line fittings at the master cylinder.
Continued
Automotive Technology: Principles, Diagnosis, and Service, 3rd Edition
By James D. Halderman
©©2008
2009Pearson
PearsonEducation,
Education,Inc.
Inc.
Pearson
PearsonPrentice
PrenticeHall
Hall- -Upper
UpperSaddle
SaddleRiver,
River,NJ
NJ07458
07458
Check the level in the master cylinder frequently and keep it filled
with clean brake fluid throughout the brake bleeding procedure.
For most rearwheeldrive vehicles equipped with a front/rear split
system, start the bleeding with the wheel farthest from the master
cylinder and work toward the closest.
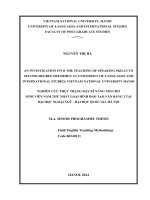
Figure 72–5 Most vehicle manufacturers
recommend starting the brake bleeding
process at the rear wheel farthest from
the master cylinder.
For most vehicles, this
sequence is:
1.
2.
3.
4.
Right rear
Left rear
Right front
Left front
Automotive Technology: Principles, Diagnosis, and Service, 3rd Edition
By James D. Halderman
Continued
©©2008
2009Pearson
PearsonEducation,
Education,Inc.
Inc.
Pearson
PearsonPrentice
PrenticeHall
Hall- -Upper
UpperSaddle
SaddleRiver,
River,NJ
NJ07458
07458
NOTE: If the vehicle has two wheel cylinders on one brake, bleed the
upper cylinder first.
For vehicles equipped with a diagonal split section or equipped with
ABS, follow the brake bleeding procedure recommended in the
service information for the vehicle.
Automotive Technology: Principles, Diagnosis, and Service, 3rd Edition
By James D. Halderman
©©2008
2009Pearson
PearsonEducation,
Education,Inc.
Inc.
Pearson
PearsonPrentice
PrenticeHall
Hall- -Upper
UpperSaddle
SaddleRiver,
River,NJ
NJ07458
07458
MANUAL BLEEDING
Manual bleeding uses hydraulic pressure created by the master
cylinder to pump fresh fluid through the brake system. This
method is called the single stroke bleeding method.
It is extremely important when manually bleeding a brake system
that the pedal be applied and released slowly and gently. Rapid
pedal pumping can churn up the fluid and reduce the size of
trapped air bubbles, making them more difficult to bleed.
Manual bleeding requires an assistant to apply and release the
brake pedal, a bleeder screw wrench, approximately two feet of
clear, plastic hose with an inside diameter small enough to fit
snugly over the bleeder screws, and a clear jar partially filled
with clean brake fluid.
Continued
Automotive Technology: Principles, Diagnosis, and Service, 3rd Edition
By James D. Halderman
©©2008
2009Pearson
PearsonEducation,
Education,Inc.
Inc.
Pearson
PearsonPrentice
PrenticeHall
Hall- -Upper
UpperSaddle
SaddleRiver,
River,NJ
NJ07458
07458
To manually bleed the brake system, follow these steps:
1. Discharge the vacuum or hydraulic power booster (if
equipped) by pumping the brake pedal with the ignition OFF
until the pedal feels hard.
2. Fill the master cylinder reservoir with new brake fluid and
make sure it remains at least half full throughout the bleeding
procedure.
3. Attach the plastic hose over the bleeder screw of the first
wheel cylinder or caliper in the bleeding sequence, and
submerge the end of the tube in the jar of brake fluid.
See Figure 72–6.
Continued
Automotive Technology: Principles, Diagnosis, and Service, 3rd Edition
By James D. Halderman
©©2008
2009Pearson
PearsonEducation,
Education,Inc.
Inc.
Pearson
PearsonPrentice
PrenticeHall
Hall- -Upper
UpperSaddle
SaddleRiver,
River,NJ
NJ07458
07458
Figure 72–6 Bleeding brakes using clear
plastic tubing makes it easy to see air
bubbles. Submerging the hose in a container
of clean brake fluid helps ensure that all of
the air will be purged by the system.
4. Loosen the bleeder screw
approximately onehalf turn,
and have an assistant slowly
depress the brake pedal. Air
bubbles leaving the bleeder
screw will be visible in the
hose.
5. Tighten the bleeder screw
and have your assistant
slowly release the brake
pedal.
Continued
Automotive Technology: Principles, Diagnosis, and Service, 3rd Edition
By James D. Halderman
©©2008
2009Pearson
PearsonEducation,
Education,Inc.
Inc.
Pearson
PearsonPrentice
PrenticeHall
Hall- -Upper
UpperSaddle
SaddleRiver,
River,NJ
NJ07458
07458
6.
Wait at least 15 seconds to allow time for any small bubbles
to form into larger bubbles.
7.
Repeat steps 4 and 5 until no more air bubbles emerge from
the bleeder.
8.
Transfer the plastic hose to the bleeder screw of the next
wheel cylinder or caliper in the bleeding sequence, and
repeat steps 4 through 7. Continue until all brakes are bled.
NOTE: Make certain all brake components such as calipers and wheel
cylinders are correctly installed with bleeder valve located on the highest
section of the part. Some wheel cylinders and calipers (such as many Ford
calipers) can be installed upside down! This usually occurs whenever both
front calipers are off the vehicle and they accidentally get reversed left to
right. If this occurs, the air will never be completely bled from the caliper.
Automotive Technology: Principles, Diagnosis, and Service, 3rd Edition
By James D. Halderman
©©2008
2009Pearson
PearsonEducation,
Education,Inc.
Inc.
Pearson
PearsonPrentice
PrenticeHall
Hall- -Upper
UpperSaddle
SaddleRiver,
River,NJ
NJ07458
07458
VACUUM BLEEDING
Vacuum bleeding uses a special suction pump that attaches to
the bleeder screw. The pump creates a lowpressure area at the
bleeder screw, which allows atmospheric pressure to force brake
fluid through the system when the bleeder screw is opened.
Vacuum bleeding requires only one technician. To vacuum bleed a
brake system follow these steps:
1. Fill the master cylinder reservoir with new brake fluid and
make sure it remains at least half full throughout the bleeding
procedure.
2. Attach the plastic tube from the vacuum bleeder to the
bleeder screw of the first wheel cylinder or caliper in the
bleeding sequence.
Continued
Automotive Technology: Principles, Diagnosis, and Service, 3rd Edition
By James D. Halderman
©©2008
2009Pearson
PearsonEducation,
Education,Inc.
Inc.
Pearson
PearsonPrentice
PrenticeHall
Hall- -Upper
UpperSaddle
SaddleRiver,
River,NJ
NJ07458
07458
Figure 72–7 Vacuum bleeding uses
atmospheric pressure to force brake
fluid through the hydraulic system.
If necessary, use one of the
adapters provided with the
vacuum in the catch bottle.
Continued
Automotive Technology: Principles, Diagnosis, and Service, 3rd Edition
By James D. Halderman
©©2008
2009Pearson
PearsonEducation,
Education,Inc.
Inc.
Pearson
PearsonPrentice
PrenticeHall
Hall- -Upper
UpperSaddle
SaddleRiver,
River,NJ
NJ07458
07458