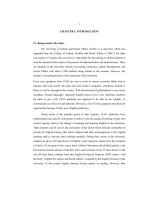
chap97 pps Automotive technology at University of Cambridge
Bạn đang xem bản rút gọn của tài liệu. Xem và tải ngay bản đầy đủ của tài liệu tại đây (1.93 MB, 50 trang )
start
Automotive Technology: Principles, Diagnosis, and Service, 3rd Edition
By James D. Halderman
©©2008
2009Pearson
PearsonEducation,
Education,Inc.
Inc.
Pearson
PearsonPrentice
PrenticeHall
Hall- -Upper
UpperSaddle
SaddleRiver,
River,NJ
NJ07458
07458
OBJECTIVES:
After studying Chapter 97, the reader should
be able to:
•
•
•
•
Prepare for ASE Suspension and Steering (A4) certification
test content area “C” (Related Suspension and Steering
Service).
Explain how to perform a U-joint inspection.
List the steps necessary to replace a U-joint.
Explain how to perform a measurement of the working
angles of a U-joint.
Continued
Automotive Technology: Principles, Diagnosis, and Service, 3rd Edition
By James D. Halderman
©©2008
2009Pearson
PearsonEducation,
Education,Inc.
Inc.
Pearson
PearsonPrentice
PrenticeHall
Hall- -Upper
UpperSaddle
SaddleRiver,
River,NJ
NJ07458
07458
OBJECTIVES:
After studying Chapter 97, the reader should
be able to:
•
•
Describe the service procedures for replacing CV joints and
boots.
Describe the routine maintenance service procedures
required for drive axle shafts and universal CV joints.
Automotive Technology: Principles, Diagnosis, and Service, 3rd Edition
By James D. Halderman
©©2008
2009Pearson
PearsonEducation,
Education,Inc.
Inc.
Pearson
PearsonPrentice
PrenticeHall
Hall- -Upper
UpperSaddle
SaddleRiver,
River,NJ
NJ07458
07458
KEY TERMS:
Inclinometer
pin bushings • pinch bolt
spline bind • synthetic retainers
torque prevailing nut
U-joints
Automotive Technology: Principles, Diagnosis, and Service, 3rd Edition
By James D. Halderman
©©2008
2009Pearson
PearsonEducation,
Education,Inc.
Inc.
Pearson
PearsonPrentice
PrenticeHall
Hall- -Upper
UpperSaddle
SaddleRiver,
River,NJ
NJ07458
07458
The driveshaft of a typical rear-wheel-drive (RWD) vehicle
rotates about three times faster than the wheels.
This is due to the gear reduction that occurs in the
differential.
The driveshaft rotates at the same speed as the engine if the
transmission ratio is 1 to 1 (1:1).
The engine speed, in revolutions per minute (RPM), is
transmitted through the transmission at the same speed.
Automotive Technology: Principles, Diagnosis, and Service, 3rd Edition
By James D. Halderman
©©2008
2009Pearson
PearsonEducation,
Education,Inc.
Inc.
Pearson
PearsonPrentice
PrenticeHall
Hall- -Upper
UpperSaddle
SaddleRiver,
River,NJ
NJ07458
07458
The Squeaking Pickup Truck - Part 1
The owner of a pickup truck complained that a squeaking noise occurred while driving in reverse. The “eeeee-eeeee-eeee” sound increased in frequency as the truck increased in speed, yet the noise
did not occur when driving forward.
Because there was no apparent looseness in the U-joints, the service technician at first thought that the problem was inside either the transmission or the rear end. When the driveshaft was removed
to further investigate the problem, it became obvious where the noise was coming from.
The U-joint needle bearing had worn the cross-shaft bearing surface of the U-joint. The noise occurred only in reverse because the wear had occurred in the forward direction, and therefore only
when the torque was applied in the opposite direction did the needle bearing become bound up and start to make noise. A replacement U-joint solved the squeaking noise in reverse.
Automotive Technology: Principles, Diagnosis, and Service, 3rd Edition
By James D. Halderman
©©2008
2009Pearson
PearsonEducation,
Education,Inc.
Inc.
Pearson
PearsonPrentice
PrenticeHall
Hall- -Upper
UpperSaddle
SaddleRiver,
River,NJ
NJ07458
07458
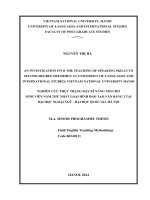
The Squeaking Pickup Truck - Part 2
Figure 97–1 Notice how the needle
bearings have worn grooves into
the bearing surface of the U-joint.
Automotive Technology: Principles, Diagnosis, and Service, 3rd Edition
By James D. Halderman
©©2008
2009Pearson
PearsonEducation,
Education,Inc.
Inc.
Pearson
PearsonPrentice
PrenticeHall
Hall- -Upper
UpperSaddle
SaddleRiver,
River,NJ
NJ07458
07458
DRIVESHAFT AND U-JOINT INSPECTION
The driveshaft should be inspected for the following:
1. Any dents or creases caused by incorrect hoisting of the
vehicle or by road debris.
2. Undercoating, grease, or dirt buildup on the driveshaft
can cause a vibration.
3. Undercoating should be removed using a suitable solvent
and a rag. Always dispose of used rags properly.
CAUTION: A dented or creased driveshaft can collapse, especially
when the vehicle is under load. This collapse of the driveshaft can cause
severe damage to the vehicle and may cause an accident.
Continued
Automotive Technology: Principles, Diagnosis, and Service, 3rd Edition
By James D. Halderman
©©2008
2009Pearson
PearsonEducation,
Education,Inc.
Inc.
Pearson
PearsonPrentice
PrenticeHall
Hall- -Upper
UpperSaddle
SaddleRiver,
River,NJ
NJ07458
07458
The U-joints should be inspected every time the vehicle chassis is
lubricated, or four times a year. Original equipment (OE) U-joints
are permanently lubricated and have no provision for greasing. If
there is a grease fitting, the U-joint should be lubricated by applying
grease with a grease gun. See Figure 97–3.
Figure 97–2 All U-joints and spline collars equipped with a grease fitting should be greased
four times a year as part of a regular lubrication service.
Continued
Automotive Technology: Principles, Diagnosis, and Service, 3rd Edition
By James D. Halderman
©©2008
2009Pearson
PearsonEducation,
Education,Inc.
Inc.
Pearson
PearsonPrentice
PrenticeHall
Hall- -Upper
UpperSaddle
SaddleRiver,
River,NJ
NJ07458
07458
Figure 97–3 Many U-joints require a special grease gun tool to reach the grease fittings.
Continued
Automotive Technology: Principles, Diagnosis, and Service, 3rd Edition
By James D. Halderman
Continued
©©2008
2009Pearson
PearsonEducation,
Education,Inc.
Inc.
Pearson
PearsonPrentice
PrenticeHall
Hall- -Upper
UpperSaddle
SaddleRiver,
River,NJ
NJ07458
07458
U-joints can be defective and not show noticeable free movement.
A proper U-joint inspection can be performed
only by removing the driveshaft from the vehicle.
NOTE: U-joints are not serviceable items and cannot be repaired. If worn
or defective, they must be replaced.
In addition to periodic lubrication, the driveshaft should be grabbed
and moved to see if there is any movement of the U-joints.
If any movement is noticed when the driveshaft is moved, the
U-joint is worn and must be replaced.
Continued
Automotive Technology: Principles, Diagnosis, and Service, 3rd Edition
By James D. Halderman
©©2008
2009Pearson
PearsonEducation,
Education,Inc.
Inc.
Pearson
PearsonPrentice
PrenticeHall
Hall- -Upper
UpperSaddle
SaddleRiver,
River,NJ
NJ07458
07458
Before removing the driveshaft, always mark the position of all
mating parts to ensure proper reassembly. White correction fluid,
also known as “White Out” or “Liquid Paper,” is an easy and fastdrying marking material.
Figure 97–4 Always mark
the original location of Ujoints before disassembly.
Continued
Automotive Technology: Principles, Diagnosis, and Service, 3rd Edition
By James D. Halderman
©©2008
2009Pearson
PearsonEducation,
Education,Inc.
Inc.
Pearson
PearsonPrentice
PrenticeHall
Hall- -Upper
UpperSaddle
SaddleRiver,
River,NJ
NJ07458
07458
To remove the driveshaft from a rear-wheel-drive vehicle, -remove the
four fasteners at the rear U-joint at the differential.
Figure 97–5 Two
types of retaining
methods that are
commonly used
at the rear U-joint
at the differential.
Push the driveshaft forward toward the transmission and then
down and toward the rear of the vehicle. The driveshaft should
slip out of the transmission spline and can be removed from
underneath the vehicle.
Continued
Automotive Technology: Principles, Diagnosis, and Service, 3rd Edition
By James D. Halderman
©©2008
2009Pearson
PearsonEducation,
Education,Inc.
Inc.
Pearson
PearsonPrentice
PrenticeHall
Hall- -Upper
UpperSaddle
SaddleRiver,
River,NJ
NJ07458
07458
To inspect U-joints, move
each joint through its full
travel, making sure it can
move (articulate) freely
and equally in all
directions.
Figure 97–6 The best way to check any
U-joint is to remove the driveshaft from
the vehicle and move each joint in all
directions. A good U-joint should be
free to move without binding.
NOTE: With the driveshaft removed, transmission lubricant can leak out
of the rear extension housing. To prevent a mess, use an old spline the
same size as the one being removed or place a plastic bag over the
extension housing to hold any escaping lubricant. A rubber band can be
used to hold the bag onto the extension housing.
Automotive Technology: Principles, Diagnosis, and Service, 3rd Edition
By James D. Halderman
©©2008
2009Pearson
PearsonEducation,
Education,Inc.
Inc.
Pearson
PearsonPrentice
PrenticeHall
Hall- -Upper
UpperSaddle
SaddleRiver,
River,NJ
NJ07458
07458
U-JOINT REPLACEMENT
All movement in a U-joint should occur between the trunnions and the needle bearings in the end caps. The
end caps are press-fit to the yokes, which are welded to the driveshaft.
Three types of retainers are used to keep bearing caps on U-joints:
The outside snap ring. See Figure 97–7
The inside retaining ring. See Figure 97–8
Injected synthetic (usually nylon)
After removing the retainer, use a press or a vise to separate the U-joint from the yoke. See Figure 97–9.
Continued
Automotive Technology: Principles, Diagnosis, and Service, 3rd Edition
By James D. Halderman
©©2008
2009Pearson
PearsonEducation,
Education,Inc.
Inc.
Pearson
PearsonPrentice
PrenticeHall
Hall- -Upper
UpperSaddle
SaddleRiver,
River,NJ
NJ07458
07458
Figure 97–7 Typical U-joint that uses an
outside snap ring. This style of joint bolts
directly to the companion flange that is
attached to the pinion gear in the
differential.
Figure 97–8 Removing an inside retaining ring
(snap ring).
Continued
Automotive Technology: Principles, Diagnosis, and Service, 3rd Edition
By James D. Halderman
©©2008
2009Pearson
PearsonEducation,
Education,Inc.
Inc.
Pearson
PearsonPrentice
PrenticeHall
Hall- -Upper
UpperSaddle
SaddleRiver,
River,NJ
NJ07458
07458
Figure 97–9 Use a vise and two sockets to replace a U-joint. One socket fits over the bearing
cup and one fits on the bearing to press fit the cups from the crosspiece.
Continued
Automotive Technology: Principles, Diagnosis, and Service, 3rd Edition
By James D. Halderman
©©2008
2009Pearson
PearsonEducation,
Education,Inc.
Inc.
Pearson
PearsonPrentice
PrenticeHall
Hall- -Upper
UpperSaddle
SaddleRiver,
River,NJ
NJ07458
07458
Use Tape to be Safe
When removing a driveshaft, use tape
to prevent the rear U-joint caps from
falling off.
Figure 97–10 Taping the U-joint to
prevent
thefall
caps
comingalloff.
If
the caps
off from
the U-joint,
of
the needle bearings will fall out and
scatter over the floor.
Automotive Technology: Principles, Diagnosis, and Service, 3rd Edition
By James D. Halderman
©©2008
2009Pearson
PearsonEducation,
Education,Inc.
Inc.
Pearson
PearsonPrentice
PrenticeHall
Hall- -Upper
UpperSaddle
SaddleRiver,
River,NJ
NJ07458
07458
Figure 97–11 A special tool being used to
press apart a U-joint that is retained by
injected plastic. Heat from a propane torch
may be necessary to soften the plastic to avoid
exerting too much force on the U-joint.
U-joints that use synthetic
retainers must be separated
using a press and a special tool
to press onto both sides of the
joint in order to shear the
plastic retainer, as shown here.
Continued
Automotive Technology: Principles, Diagnosis, and Service, 3rd Edition
By James D. Halderman
©©2008
2009Pearson
PearsonEducation,
Education,Inc.
Inc.
Pearson
PearsonPrentice
PrenticeHall
Hall- -Upper
UpperSaddle
SaddleRiver,
River,NJ
NJ07458
07458
Replacement U-joints use spring clips instead of injected plastic.
Remove the old joint from the yoke, and replace with a new one.
Replacement U-joints should be forged (never cast) and use up
to 32 needle bearings (also called pin bushings) instead of just
24 needle bearings, as used in lower--quality U-joints.
Replacement U-joints usually have a grease fitting so that the
new replacement U-joint can be properly lubricated.
See Figures 97–12 and 97–13.
NOTE: If a U-joint is slightly stiff after being installed, strike the Ujoint using a brass punch and a light hammer. This often frees a stiff joint
and is often called “relieving the joint.” The shock aligns the needle
bearings in the end caps.
Continued
Automotive Technology: Principles, Diagnosis, and Service, 3rd Edition
By James D. Halderman
©©2008
2009Pearson
PearsonEducation,
Education,Inc.
Inc.
Pearson
PearsonPrentice
PrenticeHall
Hall- -Upper
UpperSaddle
SaddleRiver,
River,NJ
NJ07458
07458
Figure 97–12 Removing the worn cross from the yoke.
Figure 97–13 When installing a new U-joint, position
the grease fitting on the inboard side (toward the
driveshaft tube) and in alignment with the grease
fitting of the U-joint at the other end.
After removing any dirt or burrs from the yoke, press in a new Ujoint. Rotate the new joint after installation to make sure it moves
freely, without binding or stiffness. If a U-joint is stiff, it can cause
a vibration.
Continued
Automotive Technology: Principles, Diagnosis, and Service, 3rd Edition
By James D. Halderman
©©2008
2009Pearson
PearsonEducation,
Education,Inc.
Inc.
Pearson
PearsonPrentice
PrenticeHall
Hall- -Upper
UpperSaddle
SaddleRiver,
River,NJ
NJ07458
07458
U-JOINT WORKING ANGLES
Unequal or incorrect U-joint working angles can cause severe
vibrations. driveshaft and U-joint angles may change from the
original factory setting due to one or more of the following:
1. Defective or collapsed engine or transmission mounts
2. Defective or sagging springs, especially the rear springs
due to overloading or other causes
3. Accident damage or other changes to the chassis of the
vehicle
4. Vehicle modification that raises or lowers the ride height
Continued
Automotive Technology: Principles, Diagnosis, and Service, 3rd Edition
By James D. Halderman
©©2008
2009Pearson
PearsonEducation,
Education,Inc.
Inc.
Pearson
PearsonPrentice
PrenticeHall
Hall- -Upper
UpperSaddle
SaddleRiver,
River,NJ
NJ07458
07458
Replace any engine or transmission mount that is cracked or collapsed. When a mount
collapses, the engine drops from its original location. Now the driveshaft angles are changed
and a vibration may be felt.
Rear springs often sag after many years of service or after being overloaded. This is especially
true of pickup trucks. Many people carry as much as the cargo bed can hold, often exceeding
the factory-recommended carry capacity or gross vehicle weight (GVW) of the vehicle.
To measure U-joint and driveshaft angles, the vehicle must be hoisted using an axle contact or
drive-on-type lift so as to maintain the same driveshaft angles as the vehicle has while
being driven.
Continued
Automotive Technology: Principles, Diagnosis, and Service, 3rd Edition
By James D. Halderman
©©2008
2009Pearson
PearsonEducation,
Education,Inc.
Inc.
Pearson
PearsonPrentice
PrenticeHall
Hall- -Upper
UpperSaddle
SaddleRiver,
River,NJ
NJ07458
07458
The working angles of the two U-joints on a driveshaft should be
within 1/2 degree of each other in order to cancel out speed changes.
Figure 97–14 The working angle of most U-joints should be at least 1/2 degree (to permit the
needle bearing to rotate in the U-joints) and should not exceed 3 degrees or a vibration can
occur in the driveshaft, especially at higher speeds. The difference between the front and rear
working angles should be within 1/2 degree of each other.
Continued
Automotive Technology: Principles, Diagnosis, and Service, 3rd Edition
By James D. Halderman
©©2008
2009Pearson
PearsonEducation,
Education,Inc.
Inc.
Pearson
PearsonPrentice
PrenticeHall
Hall- -Upper
UpperSaddle
SaddleRiver,
River,NJ
NJ07458
07458
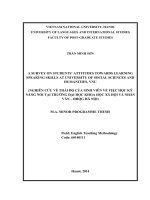
To measure the working angle:
Figure 97–15 Inclinometer reads 19
1/2 degrees at this rear U-joint.
Step #1 Place an inclinometer (a
tool used to measure angles) on the
rear U-joint bearing cap. Level the
bubble and read the angle. At right,
the pictured reading is 19.5 degrees.
Step #2 Rotate the driveshaft 90
degrees and read the angle of the rear
yoke. This reading is 17 degrees.
Step #3 Subtract the smaller reading
from the larger reading to obtain the
working angle of the joint. Here, it is
2.5 degrees (19.5 - 17 = 2.5 degrees).
Continued
Automotive Technology: Principles, Diagnosis, and Service, 3rd Edition
By James D. Halderman
©©2008
2009Pearson
PearsonEducation,
Education,Inc.
Inc.
Pearson
PearsonPrentice
PrenticeHall
Hall- -Upper
UpperSaddle
SaddleRiver,
River,NJ
NJ07458
07458